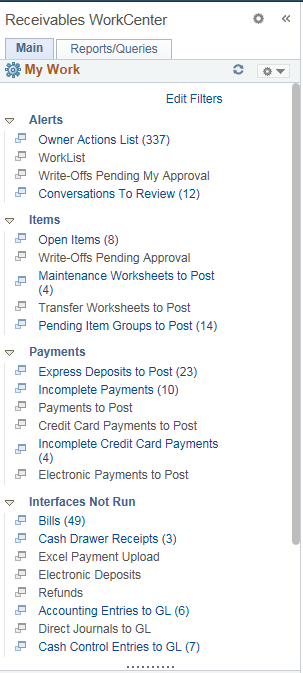
Using the PeopleSoft Classic Receivables WorkCenter - My Work
The My Work pagelet provides links that consolidate a user’s actionable tasks, using the user ID as the Assigned User ID to show only items in their own queue.
Note: This feature is no longer supported. However, a fluid version of the Receivables WorkCenter functionality is supported on the Credit to Cash Operations Home Page. See Using the PeopleSoft Fluid Receivables WorkCenter.
The My Work pagelet includes these functional groupings for links:
Alerts
Items
Payments
Interfaces Not Run
Exceptions
This example illustrates the fields and controls on the PeopleSoft Classic Receivables WorkCenter - My Work pagelet.
Field or Control |
Description |
|---|---|
Edit Filters |
Click this link to modify filters on many links registered in the My Work pagelet as an end-user. On the Edit Filters page, click the Edit Filter icon of the filter you want to modify. Select filter values on the Configure Filter Values page. To configure filter definitions and values as a System Administrator, see the product documentation for the Configure Filter Values Page. |
Alerts are defined in Enterprise Component’s Events & Notifications framework.
The Alerts group level includes these links to transaction areas:
Owner Actions List
Worklist
Write-Offs Pending My Approval
Conversations to Review
|
Page Name |
Definition |
Alternate Navigation |
Usage |
|---|---|---|---|
|
Owner Actions List |
AR_WC_ALERTS_SEL |
Click the Alerts: Owner Actions List link. Or |
Review and act upon action list items assigned to the user. |
|
Worklist |
WORKLIST |
Click the Alerts: Worklist link. Or |
Review and act upon workflow worklist tasks assigned to the user. |
|
Write-Offs Pending My Approval |
AR_WC_ITEMS_SEL |
Click the Items: Write-Offs Pending My Approval link. Or |
Includes write-offs submitted for approval by a requestor and write-offs pushed back from a higher level approver. Allows the approver to approve, deny, or push back one or more worksheets. |
|
Conversations to Review |
AR_WC_ALERTS_SEL |
Click the Alerts: Conversations to Review link. Or Click the Add Conversation link on the Conversations tab or in the header region of the Collections Workbench. |
Review conversations assigned to the user and access the Conversations page. |
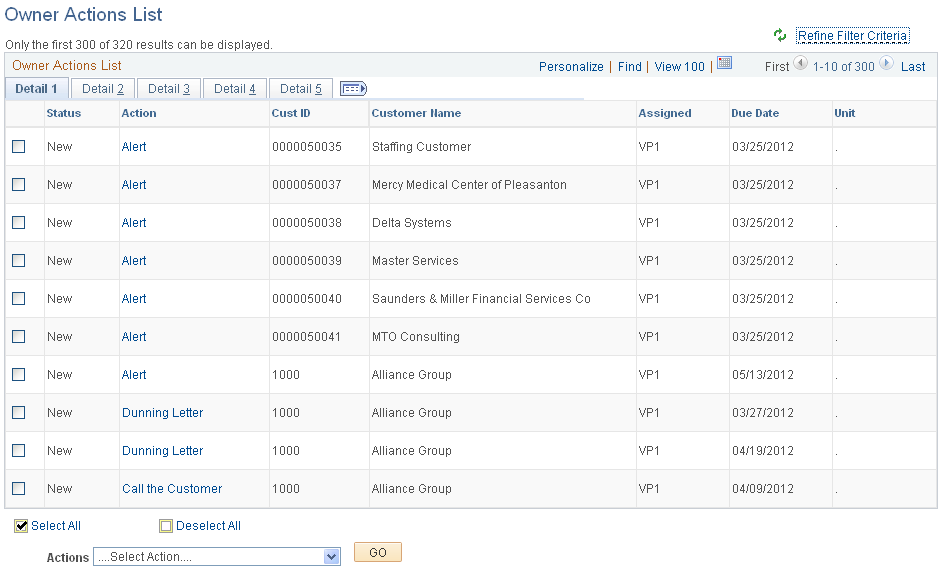
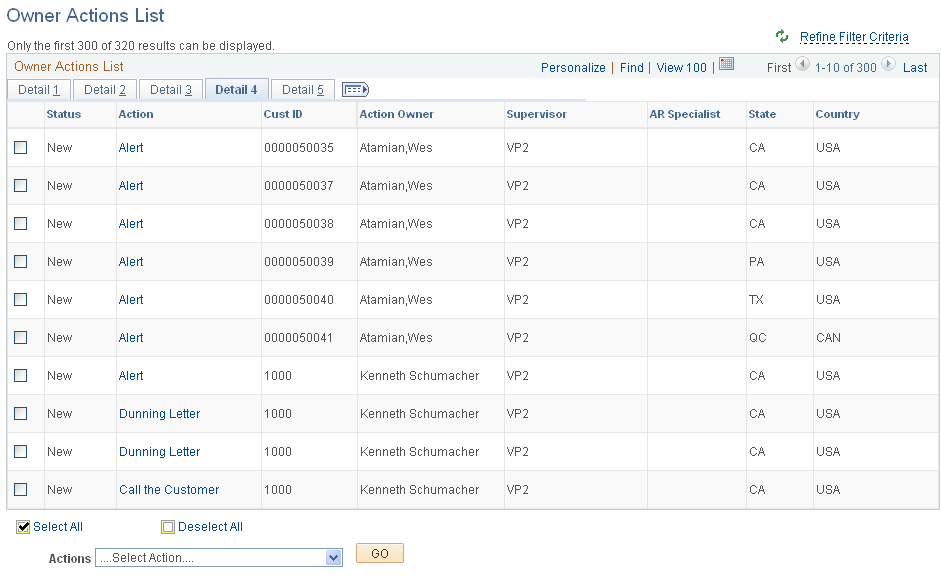
Use the Owner Actions Lists page (AR_WC_ALERTS_SEL) to review and act upon the action list items assigned to you.
Navigation:
Click the Alerts: Owner Actions List link.
This example illustrates the fields and controls on the Owner Actions List Page - Detail 1 Tab.
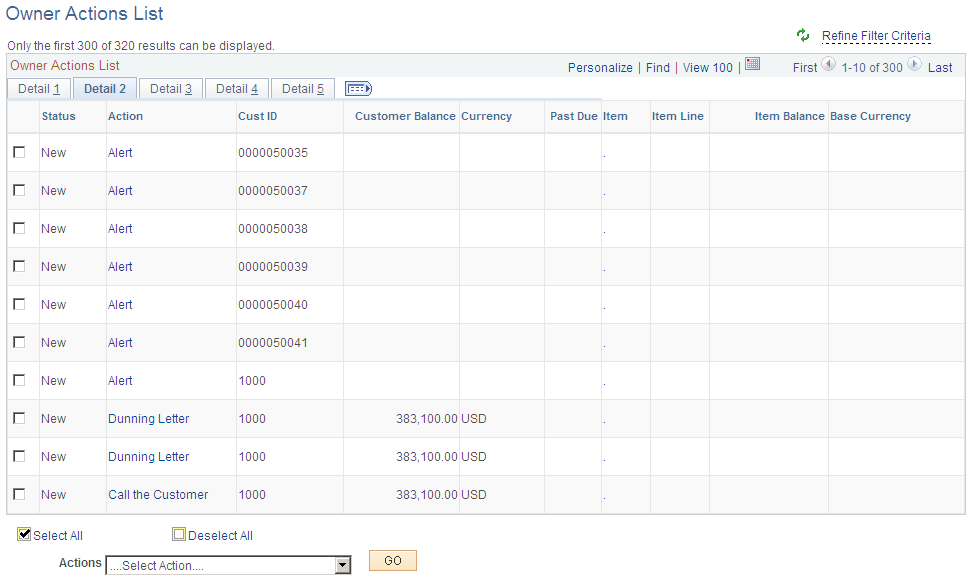
This example illustrates the fields and controls on the Owner Actions List Page - Detail 2 Tab.
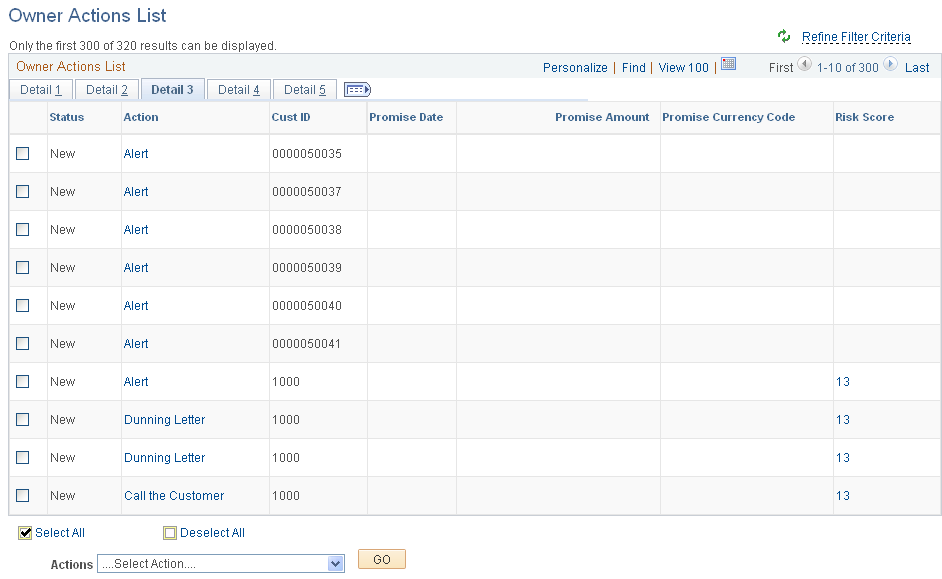
This example illustrates the fields and controls on the Owner Actions List Page - Detail 3 Tab.
This example illustrates the fields and controls on the Owner Actions List Page - Detail 4 Tab.
This example illustrates the fields and controls on the Owner Actions List Page - Detail 5 Tab.
Field or Control |
Description |
|---|---|
Action |
Click the action link associated with an item to show action details on the Action page, where you can perform, cancel, or reassign the action, and add a conversation. Each action in the Action column must be performed individually by drilling into the action from this list. See the documentation for the Action Detail Page. See also Working with Actions. |
Item |
Click the item ID link to access item details in the View/Update Item Details component (ITEM_MAINTAIN), where you can view and update item details and view item activity and accounting entries (Accounts Receivable, Customer Accounts, Item Information, View/Update Item Details). |
Risk Score |
Click the risk score link to open the Risk Score Details page, where you can view the risk score that is calculated based on setting up risk scoring rules and running the Request Risk Scoring process (AR_RISK). You can also access this information on the Risk Score Details page by clicking the Risk Score value link on the Credit Profile tab on the Collections Workbench. |
Actions |
Perform an action on one or more items that you select in the Owner Actions List grid, and click the GO button. Choose from these actions:
When you choose the Reassign action, the system displays the Reassignment group box, where you can assign the selected item action to a different owner. You can also access the Owner Action List page through the Customer Interactions component (Accounts Receivable, Customer Interactions, Actions, Owner Action List, Owner Action List). See Working with Actions. |
Use the Worklist page (WORKLIST) to review and act upon workflow worklist tasks assigned to you.
When work is routed to a you, it is put in your worklist. To work on an item, you select it from the Worklist and the system presents the appropriate page to begin work.
Navigation:
Click the Alerts: Worklist link.
Or
This example illustrates the fields and controls on the Worklist Page.
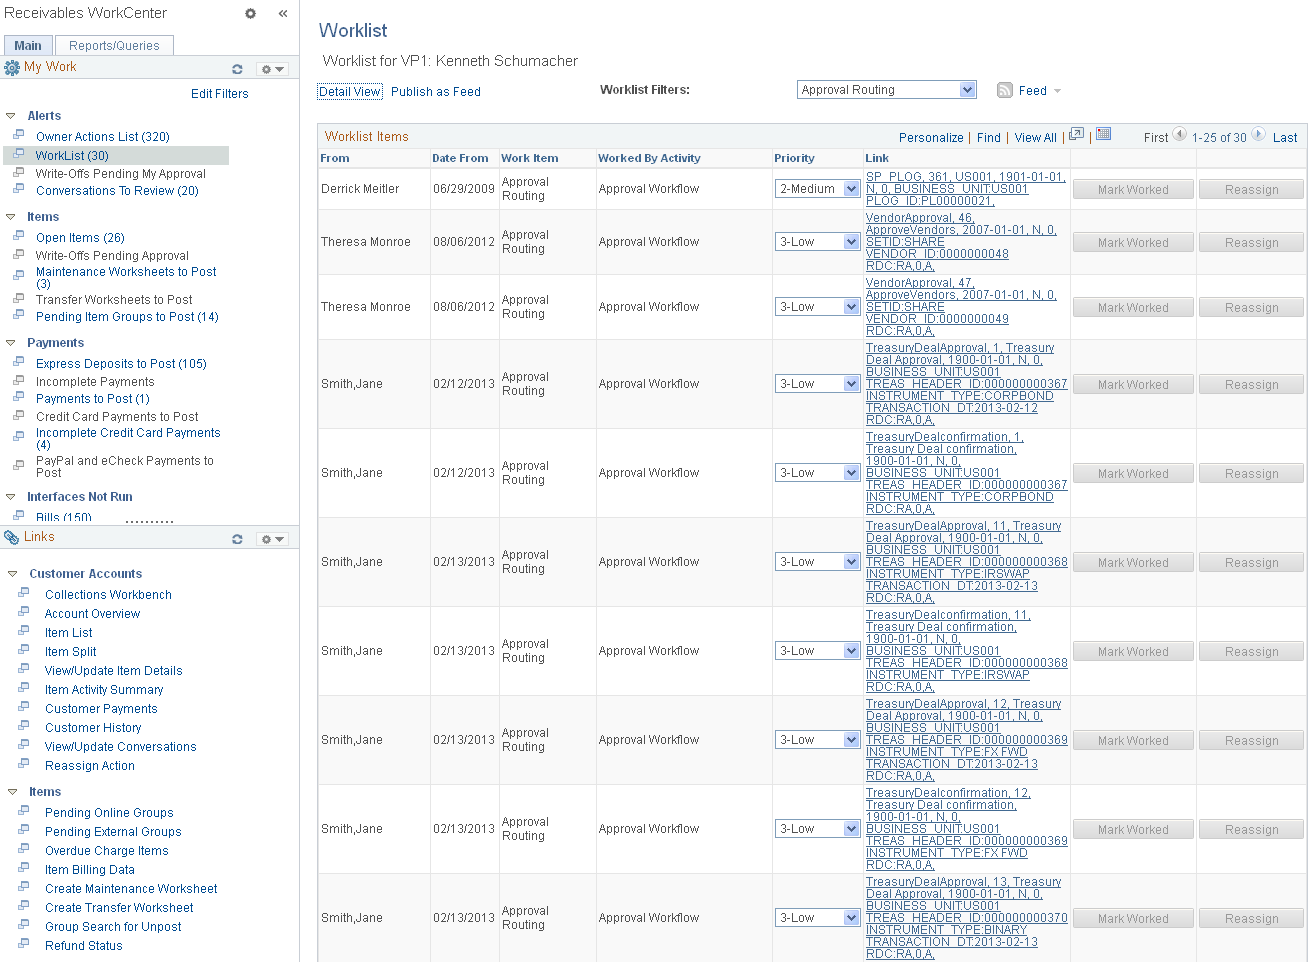
The Worklist shows these items in the grid:
New Write Off Requiring My Approval
New Action List item Created
New Debit/Credit Created
New Payment Predictor On-Account Created
See also Using the PeopleSoft Worklist to View Notification Messages and Working with Actions
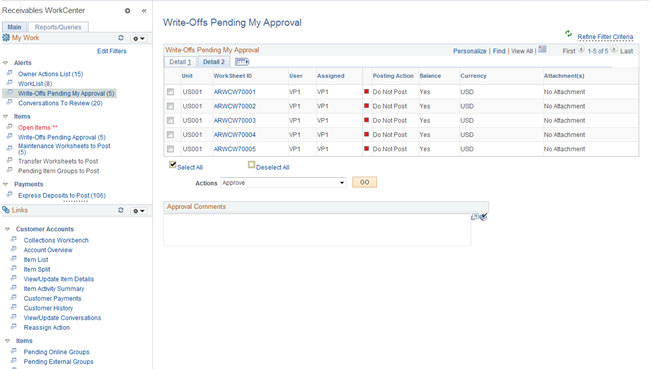
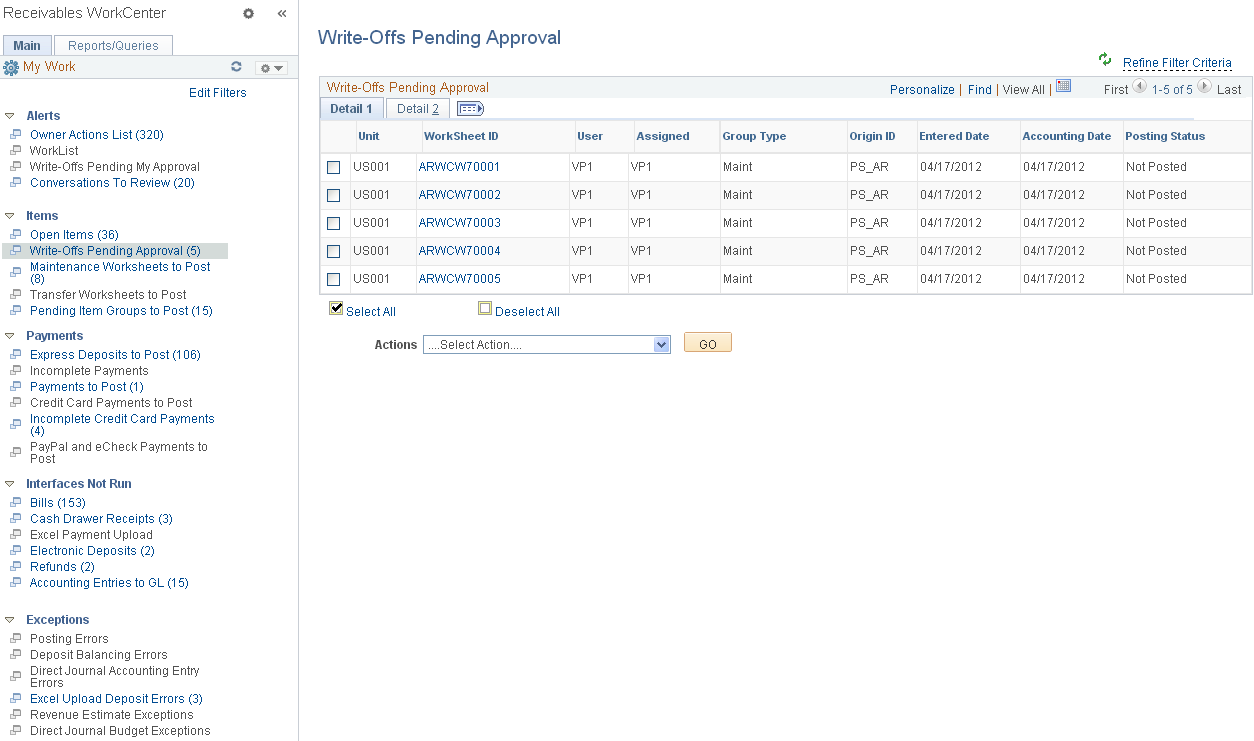
Use the Write-Offs Pending My Approval page (AR_WC_ITEMS_SEL) to review write-offs submitted for approval by a requestor and write-offs pushed back from a higher level approver. You can approve, deny, or pushback one or more worksheets.
Navigation:
Click the Items: Write-Offs Pending My Approval link.
This example illustrates the fields and controls on the Write-Offs Pending My Approval Page - Detail 1 Tab.

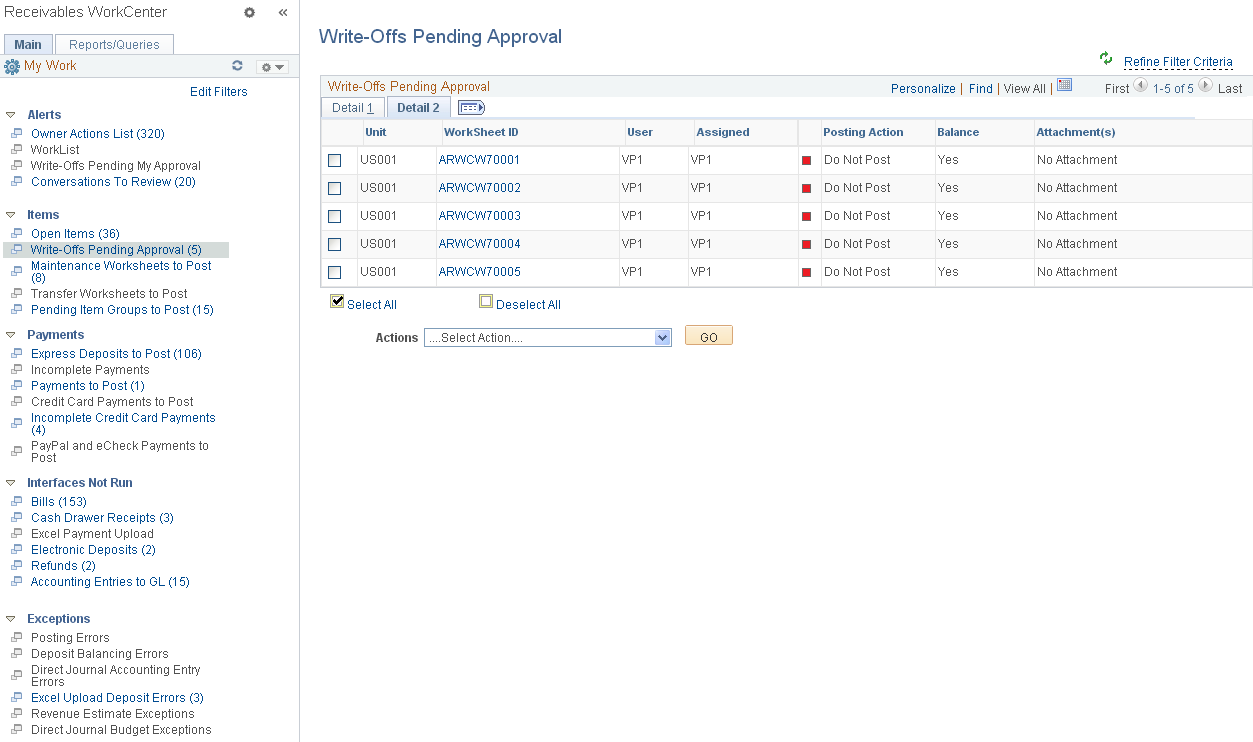
This example illustrates the fields and controls on the Write-Offs Pending My Approval Page - Detail 2 Tab.
Field or Control |
Description |
|---|---|
Worksheet ID |
Click the link associated with a worksheet ID to show worksheet details on the Worksheet Application page (Accounts Receivable, Receivables Maintenance, Maintenance Worksheet, Update Maintenance Worksheet, Worksheet Application). |
Actions |
Perform an action on one or more worksheets that you select in the Write-Offs Pending My Approval grid, and click the GO button. Choose from these actions:
When you select the Approve action, the system displays the Comments field, where you can enter free-form comments. The approver can also review the write-off and choose to approve, deny, or pushback using the Worksheet Application page for Payment, Draft, or Maintenance worksheets. The bottom of the Worksheet Application pages display buttons to approve or deny the write-off amount and contains a section to enter comments. |
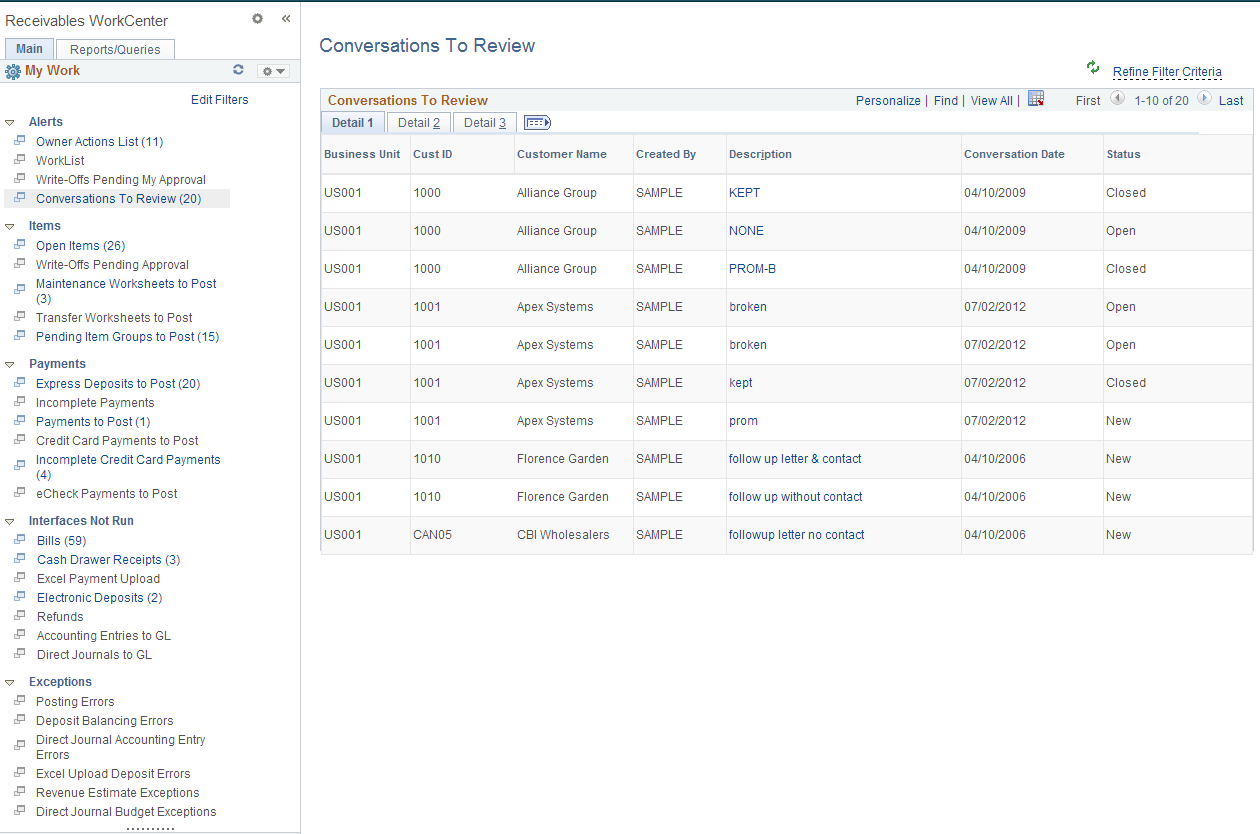
Use the Conversations to Review page (AR_WC_ALERTS_SEL) to review conversations assigned to you and to access the Conversations page.
Navigation:
Click the Alerts: Conversations to Review link.
Or
Click the Add Conversation link on the Conversations tab or in the header region of the Collections Workbench.
This example illustrates the fields and controls on the Conversations to Review Page - Detail 1 Tab.
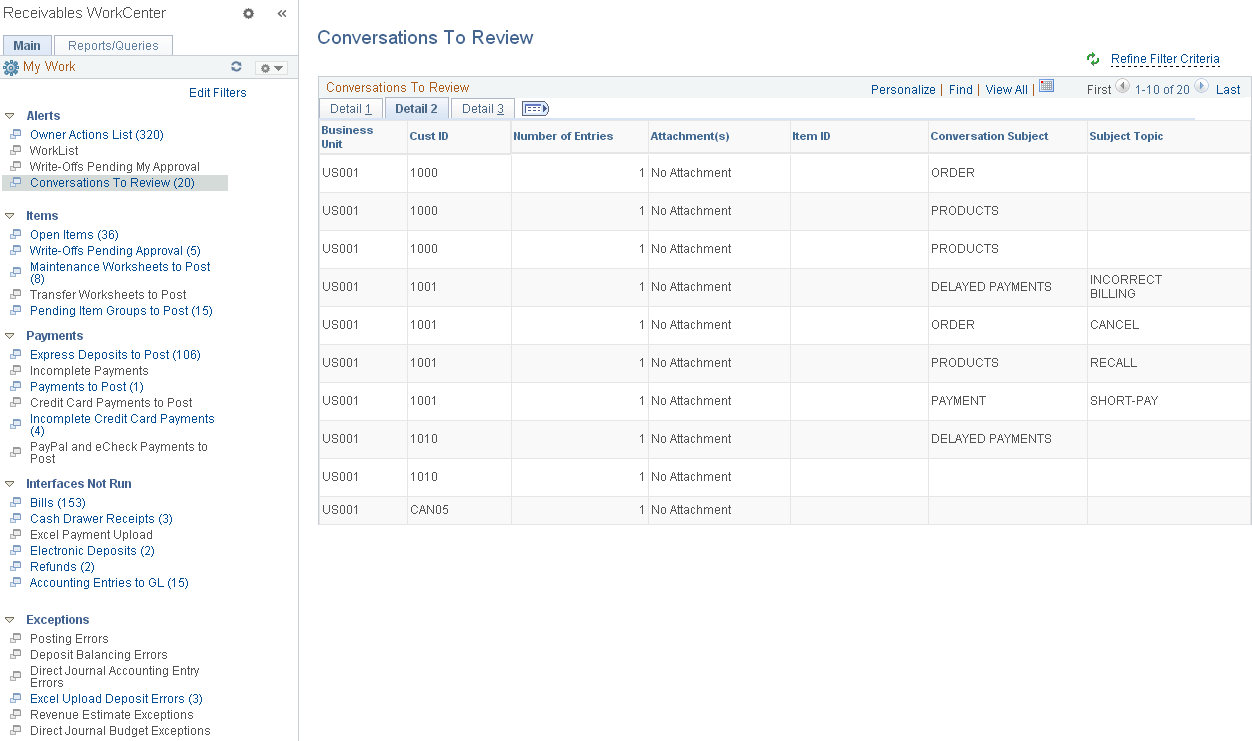
This example illustrates the fields and controls on the Conversations to Review Page - Detail 2 Tab.
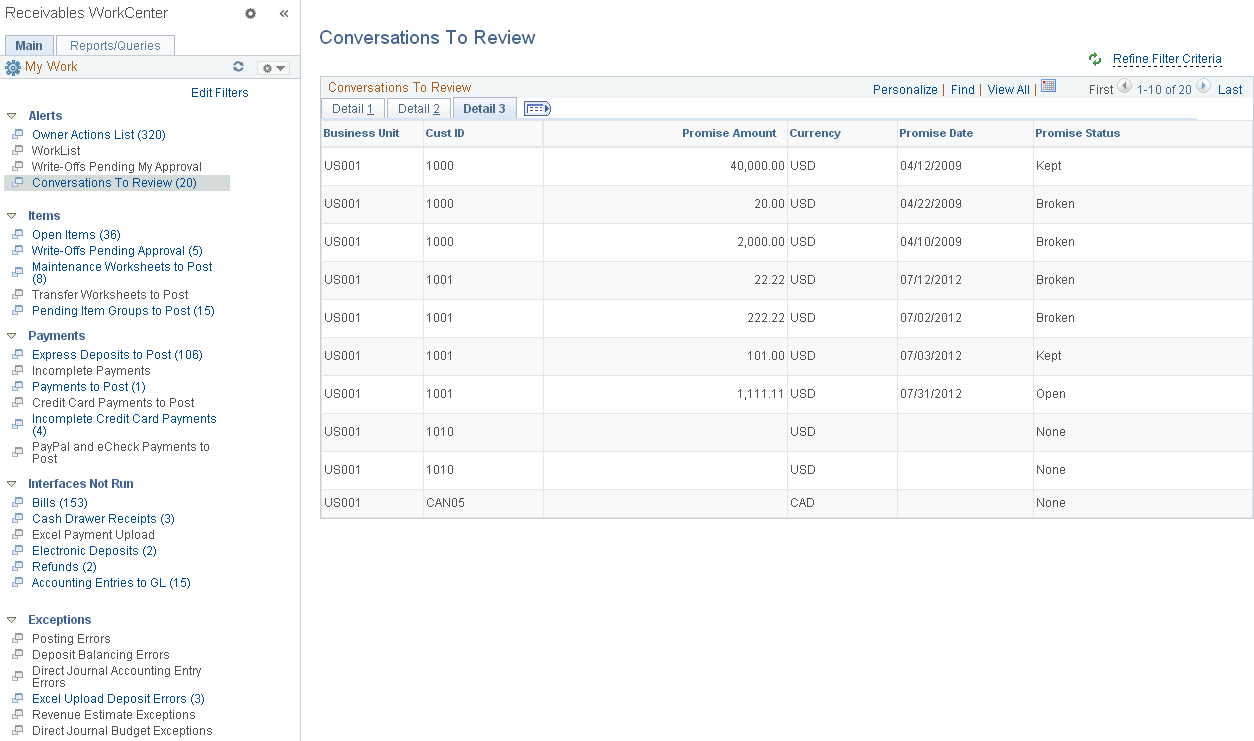
This example illustrates the fields and controls on the Conversations to Review Page - Detail 3 Tab.
The Conversations to Review grid shows items for active customers with any of these statuses:
Review Required
Follow-Up Required
Supervisor Review Required
Promise Date Review
Broken Promise Review
The grid also shows existing conversations for inactive customers; in this case, the conversation details are read-only.
Field or Control |
Description |
|---|---|
Description |
Click the link associated with a conversation description to access the Conversations page. You can also access the Conversations page through the Receivables Customer Interactions menu (Accounts Receivable, Customer Interactions, Conversations, View/Update Conversations, Conversations), the Collections Workbench (click the Add Conversation link on the Conversations tab or in the header region of the Collections Workbench), or the Customers component (Customers, Conversations, Update Conversations, Conversations). See Reviewing Conversations and Promises. See also Entering and Reviewing Conversations |
Attachments (n) |
Indicates whether attachments exist, and if so, a link appears that accesses the attachments. The number of attachments appears in parenthesis (n). Displays No Attachment in the column if none exists. |
The Items group level includes these links to transaction areas:
Open Items
Write-Offs Pending Approval
Maintenance Worksheets to Post
Transfer Worksheets to Post
Pending Item Groups to Post
Note: Pages that do not include an alternate navigation are accessible only through the Receivables WorkCenter.
|
Page Name |
Definition |
Alternate Navigation |
Usage |
|---|---|---|---|
|
Open Items |
AR_WC_ITEM_LIST |
Click the Items: Open Items link.
|
Build and view a list of open items that require follow-up based on their status. Use links to view details for a specific item. |
|
Write-Offs Pending Approval |
AR_WC_ITEMS_SEL |
Click the Items: Write-Offs Pending Approval link. |
Review Payment, Maintenance and Draft worksheets containing write-offs pending approval. |
|
Maintenance Worksheets to Post |
AR_WC_ITEMS_SEL |
Click the Items: Maintenance Worksheets to Post link. |
Review and manage one or more maintenance worksheets in the grid. |
|
Transfer Worksheets to Post |
AR_WC_ITEMS_SEL |
Click the Items: Transfer Worksheets to Post link. |
Review transfer worksheets available to post. |
|
Pending Item Groups to Post |
AR_WC_PNDITM_SEL |
Click the Items: Pending Item Groups to Post link. |
Review and select one or more pending item groups to delete or post. |
Use the Open Items page (AR_WC_ITEM_LIST) to build and view a list of open items that require follow-up based on their status. Use links to view details for a specific item. The total count displayed with the link is all open items in the system.
Navigation:
Click the Items: Open Items link.
This example illustrates the fields and controls on the Open Items page.
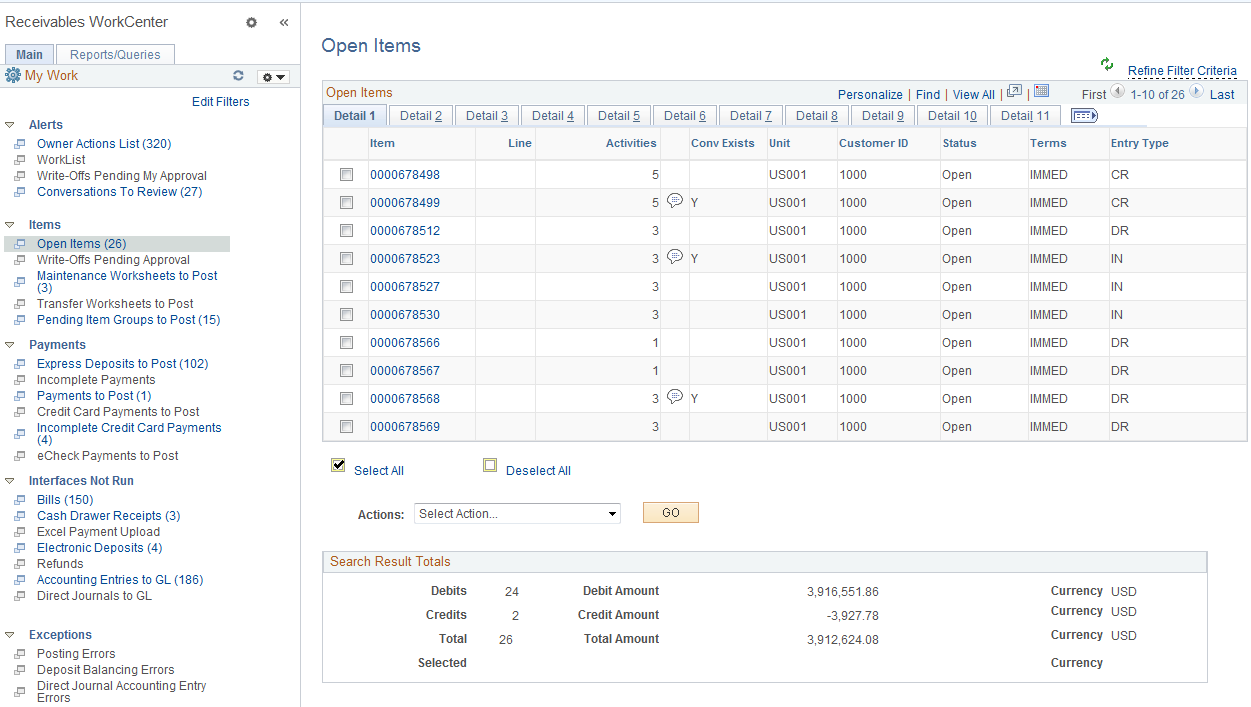
Depending on the filters selected for your Open Items page, the grid will show these items:
Disputed
Deduction
Doubtful
Collection
Past Due
By Entry Type (for example, On-Accounts, Prepayments)
Use the Item List component (ITEM_LIST) to search for items for a specified customer or business unit. You can also generate a list of items spanning multiple customers based on the search parameters that you entered (including but not limited to such as Disputed, Collection, Deduction, and Past Due). Use the Advanced Search function to enter and save search criteria based on field values in the Item table (PS_ITEM).
Field or Control |
Description |
|---|---|
Item |
Click the item ID link to access item details in the View/Update Item Details component (ITEM_MAINTAIN), where you can view and update item details and view item activity and accounting entries (Accounts Receivable, Customer Accounts, Item Information, View/Update Item Details). See Changing and Reviewing Item Information and Reviewing Item Information |
|
Click the Conversation Exists icon to drill into item conversation details. If one conversation exists for the item, clicking the icon opens the Conversations page, where you can review the conversation details. If multiple conversations exist for an item, clicking the icon opens the Conversations for Item page (AR_CONVER_LIST_SEC), where you can view the details for a specific conversation in the list. |
|
Click the View Invoice Image icon to view the invoice for the selected item. |
|
Click the Email icon to open the Send Invoice page, where you can send a copy of the invoice image for an item by email. |
Actions |
Select an action from the following:
|
 and
and  (View Invoice Image icon)
 (Email icon)
Use the Write-Offs Pending Approval page (AR_WC_ITEMS_SEL) to review Payment, Maintenance and Draft worksheets containing write-offs pending approval.
Navigation:
Click the Items: Write-Offs Pending Approval link.
This example illustrates the fields and controls on the Write-Offs Pending Approval Page - Detail 1 Tab.
This example illustrates the fields and controls on the Write-Offs Pending Approval page - Detail 2 tab.
Field or Control |
Description |
|---|---|
WorkSheet ID |
Click the link associated with a worksheet ID to show worksheet details on the Worksheet Application page (Accounts Receivable, Receivables Maintenance, Maintenance Worksheet, Update Maintenance Worksheet, Worksheet Application). You can drill down into a worksheet to see approval history—including prior approvals, denials, and pushbacks—that exists for the selected worksheet. |
Use the Maintenance Worksheets to Post page (AR_WC_ITEMS_SEL) to review and manage one or more maintenance worksheets in the grid.
Navigation:
Click the Items: Maintenance Worksheets to Post link.
This example illustrates the fields and controls on the Maintenance Worksheets to Post Page - Detail 1 Tab.

This example illustrates the fields and controls on the Maintenance Worksheets to Post Page - Detail 2 Tab.
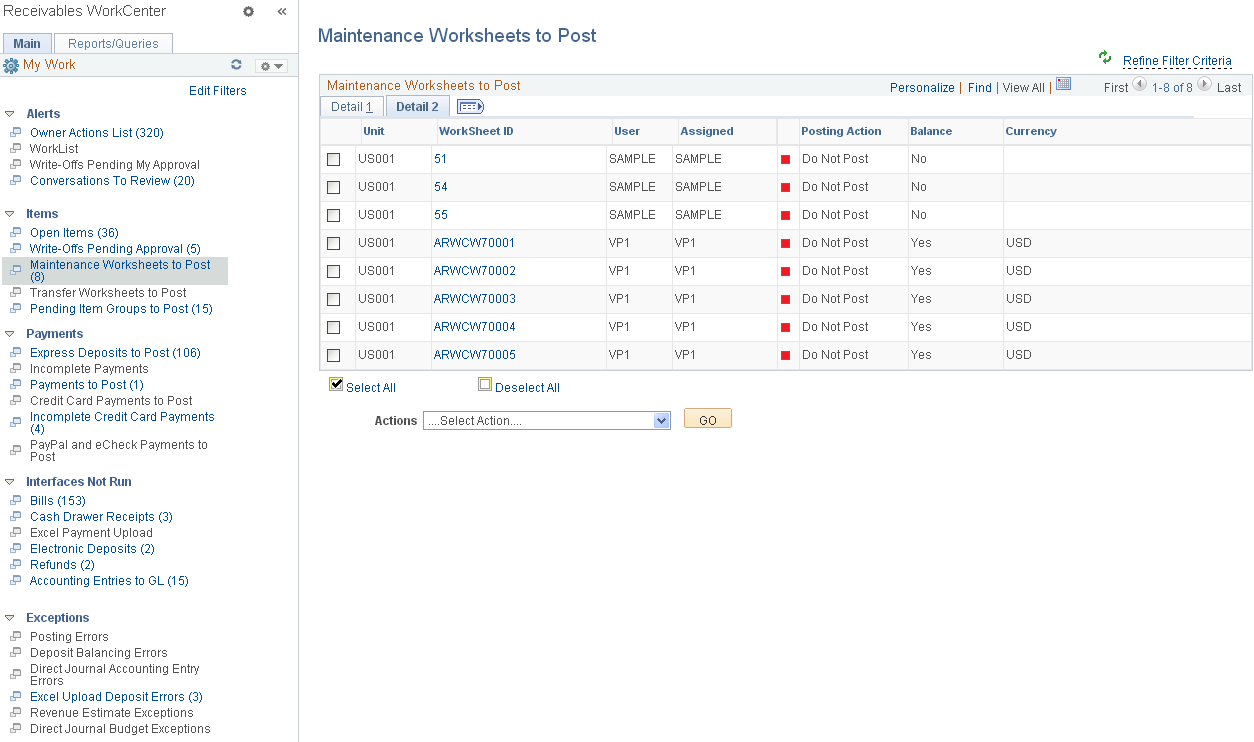
Note: Default filter values in this example show groups with a Posting Status = Not Posted and Posting Action = No Action. You must define these user filter values to achieve the same result.
Field or Control |
Description |
|---|---|
WorkSheet ID |
Click the link associated with a worksheet ID to show the maintenance worksheet details on the Worksheet Application page (Accounts Receivable, Receivables Maintenance, Maintenance Worksheet, Update Maintenance Worksheet, Worksheet Application). |
Actions |
Perform an action on one or more maintenance worksheets that you select in the Maintenance Worksheets to Post grid, and click the GO button. Choose from these actions:
To perform actions on individual worksheets, use the Worksheet Action page (Accounts Receivable, Receivables Maintenance, Maintenance Worksheet, Finalize Worksheet, Worksheet Action). |
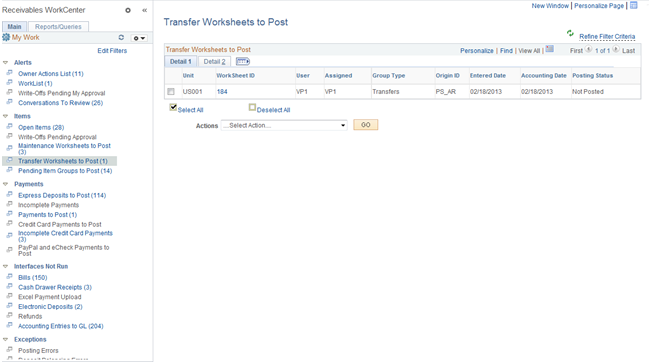
Use the Transfer Worksheets to Post page (AR_WC_ITEMS_SEL) to review transfer worksheets available to post.
Navigation:
Click the Items: Transfer Worksheets to Post link.
This example illustrates the fields and controls on the Transfer Worksheets to Post Page - Detail 1 Tab.
This example illustrates the fields and controls on the Transfer Worksheets to Post Page - Detail 2 Tab.
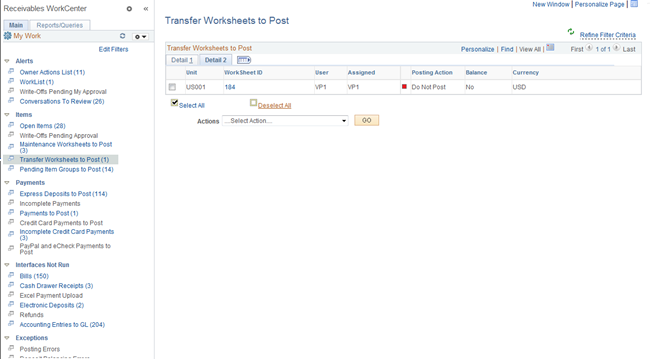
Note: Default filter values in this example show groups with a Posting Status = Not Posted and Posting Action = No Action. You must define these user filter values to achieve the same result
Field or Control |
Description |
|---|---|
WorkSheet ID |
Click the link associated with a worksheet ID to show transfer worksheet details in the Transfer Worksheet component (Accounts Receivable, Receivables Maintenance, Transfer Worksheet, Update Worksheet), where you can transfer items to another customer or business unit, transfer doubtful receivables, and review and update accounting entries. See Transferring Items to Another Customer or Business Unit. |
Actions |
Perform an action on one or more transfer worksheets that you select in the Transfer Worksheets to Post grid, and click the GO button. Choose from these actions:
See Transferring Items to Another Customer or Business Unit. |
Use the Pending Item Groups to Post page (AR_WC_PNDITM_SEL) to review and select one or more pending item groups to delete or post.
The Pending Item Groups to Post page displays pending items—including Online, External, and Overdue Charges items—to be processed in the Receivables system.
Navigation:
Click the Items: Pending Item Groups to Post link.
This example illustrates the fields and controls on the Pending Item Groups to Post Page - Detail 1 Tab.
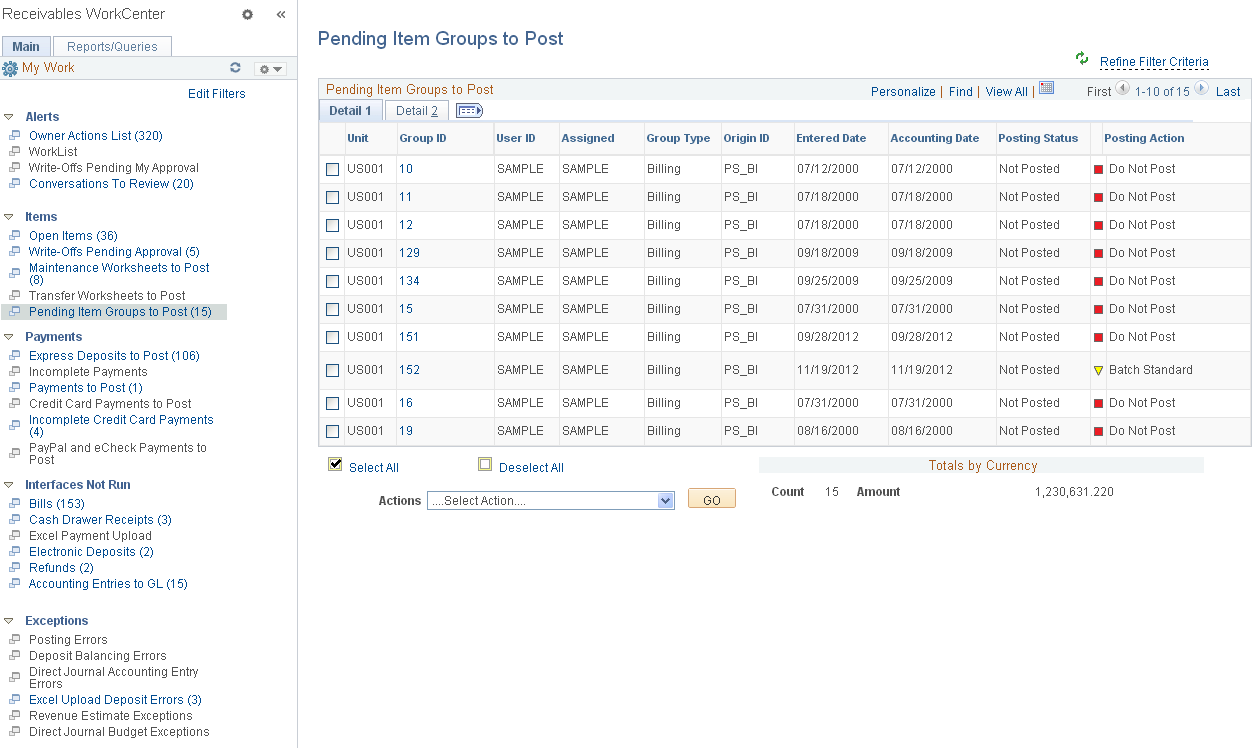
This example illustrates the fields and controls on the Pending Item Groups to Post Page - Detail 2 Tab.
Note: Default filter values in this example show groups with a Posting Status = Not Posted and Posting Action = No Action. You must define these user filter values to achieve the same result.
Field or Control |
Description |
|---|---|
Group ID |
Click a Group ID link to open the pending item details for the group. If a pending item group was loaded using a billing interface (Origin ID = PS_BI), the External Pending Item Entry pages open (Accounts Receivable, Pending Items, External Items). For pending items that were entered online (Origin ID = OBILL), the Online Pending Item Entry pages open (Accounts Receivable, Pending Items, Online Items). For Overdue Charges pending groups with a single customer/item, the Finance Single Entry Format component opens upon clicking the Group ID link. If multiple customers/items are associated with the Overdue Changes group, first a detail page displays all the transactions associated with the group. Click the Item ID link on the detail page to view the respective Finance Single Entry Format component pages. |
Actions |
Perform an action on one or more groups that you select in the Pending Item Groups to Post grid, and click the GO button. Choose from these actions:
All actions except for Post Now and Post Now to GL are allowed for Overdue Charges and External items. To perform actions on groups one at a time, you can also use the Group Action page (Accounts Receivable, Pending Items, External Items, Group Entry, Group Action or Accounts Receivable, Pending Items, Online Items, Group Entry, Group Action). |
Totals by Currency |
Displays the sum of Control Amounts of the items in the Control Currency. If the Control Currency is not specified at the transaction level, then the system will not display a currency code for the amount. |
The Payments group level includes these links to transaction areas:
Express Deposits to Post
Incomplete Payments
Payments to Post
Credit Card Payments to Post
Incomplete Credit Card Payments
Note: Pages that do not include an alternate navigation are accessible only through the Receivables WorkCenter.
|
Page Name |
Definition |
Alternate Navigation |
Usage |
|---|---|---|---|
|
Express Deposits to Post |
AR_WC_PYMNT_SEL |
Click the Payments: Express Deposits to Post link. |
Review and select one or more express deposits to post. |
|
Incomplete Payments |
AR_WC_PYMNT_SEL |
Click the Payments: Incomplete Payments link. |
Review a list of incomplete payments. |
|
Payments to Post |
AR_WC_PYMNT_SEL |
Click the Payments: Payments to Post link. Or |
Review and select one or more payment worksheets to post the next time you run Receivables Update processing. |
|
Credit Card Payments to Post |
AR_WC_PYMNT_SEL |
Click the Payments: Credit Card Payments to Post link. |
Review and select one or more credit card payment worksheets to post the next time you run Receivables Update processing. |
|
Incomplete Credit Card Payments |
AR_WC_PYMNT_SEL |
Click the Payments: Incomplete Credit Card Payments link. |
Review credit card payments that have not been authorized or settled. Select and correct, resubmit, or delete one or more incomplete credit card payments. |
|
Electronic Payments to Post |
AR_WC_PYMNT_SELe |
Click the Payments: Electronic Payments to Post link. |
Review and post electronic check and PayPal payments. |
Use the Express Deposits to Post page (AR_WC_PYMNT_SEL) to review and select one or more express deposits to post.
Navigation:
Click the Payments: Express Deposits to Post link.
This example illustrates the fields and controls on the Express Deposits to Post Page - Detail 1 Tab.
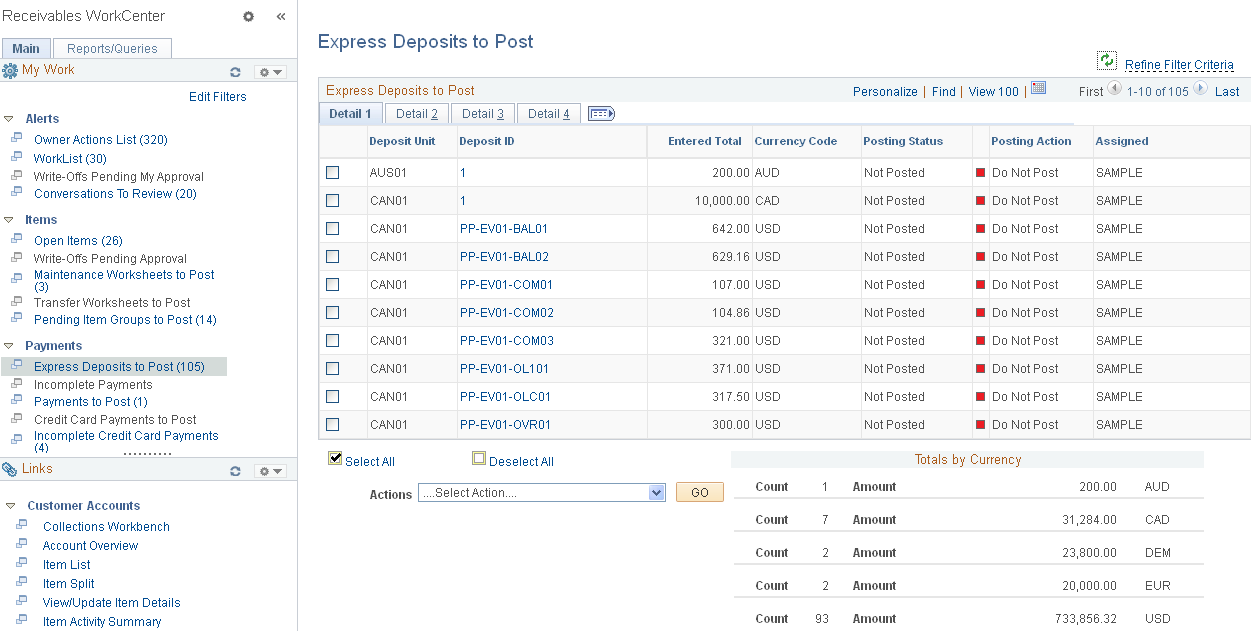
This example illustrates the fields and controls on the Express Deposits to Post Page - Detail 2 Tab.
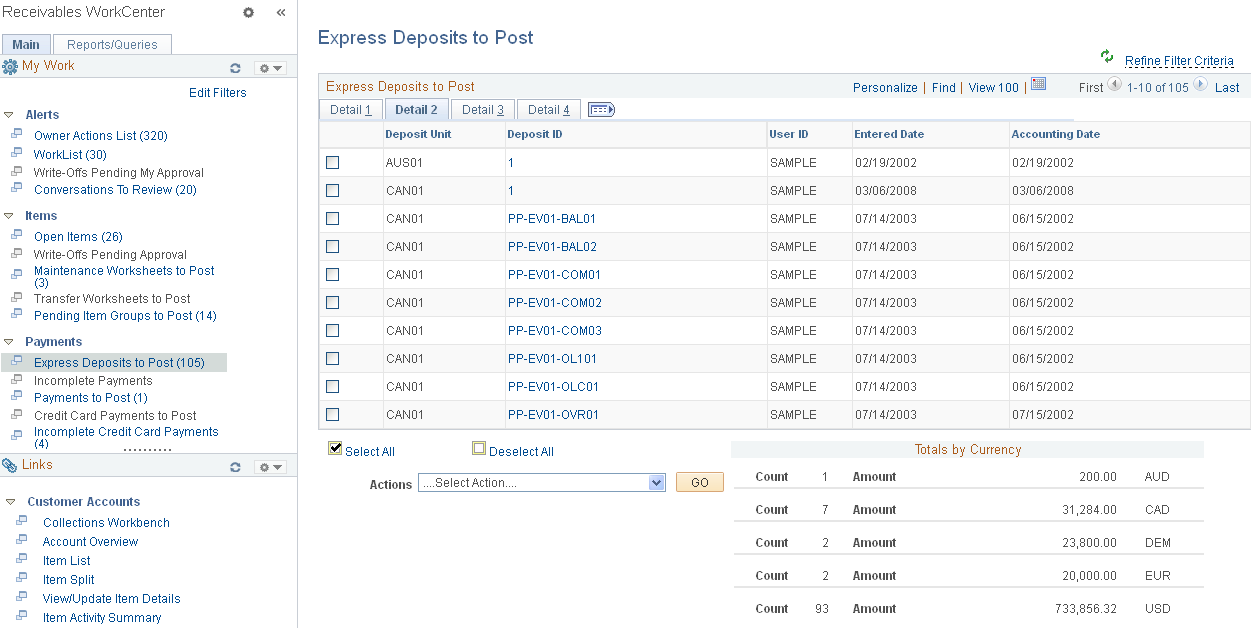
This example illustrates the fields and controls on the Express Deposits to Post Page - Detail 3 Tab.
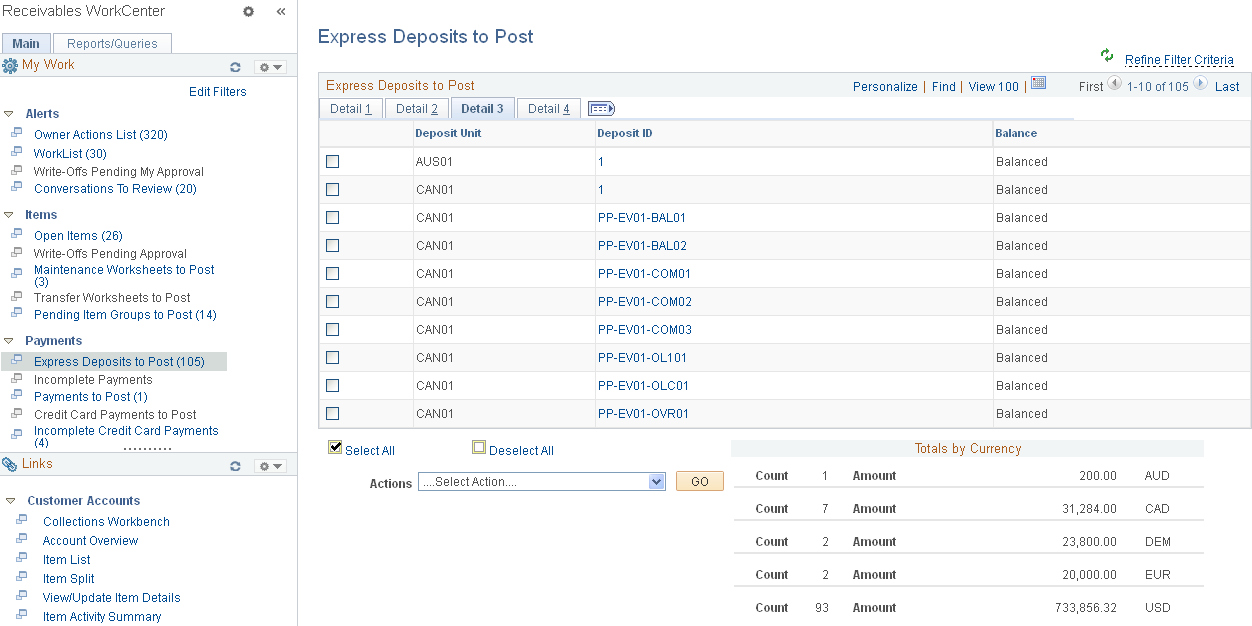
This example illustrates the fields and controls on the Express Deposits to Post Page - Detail 4 Tab.

Field or Control |
Description |
|---|---|
Deposit ID |
Click the Deposit ID link to open the Express Deposit (PAYMENT_EXPRESS) component (Accounts Receivable, Payments, Online Payments, Express Deposit), where you can enter express deposit totals, enter and apply payments with express deposit, and select an express deposit action. |
Actions |
Perform an action on one or more payment groups that you select in the Express Deposits to Post grid, and click the GO button. Choose from these actions:
To perform actions on express deposits one at a time, you can also use the Express Deposit - Action page (Accounts Receivable, Payments, Online Payments, Express Deposit, Action). |
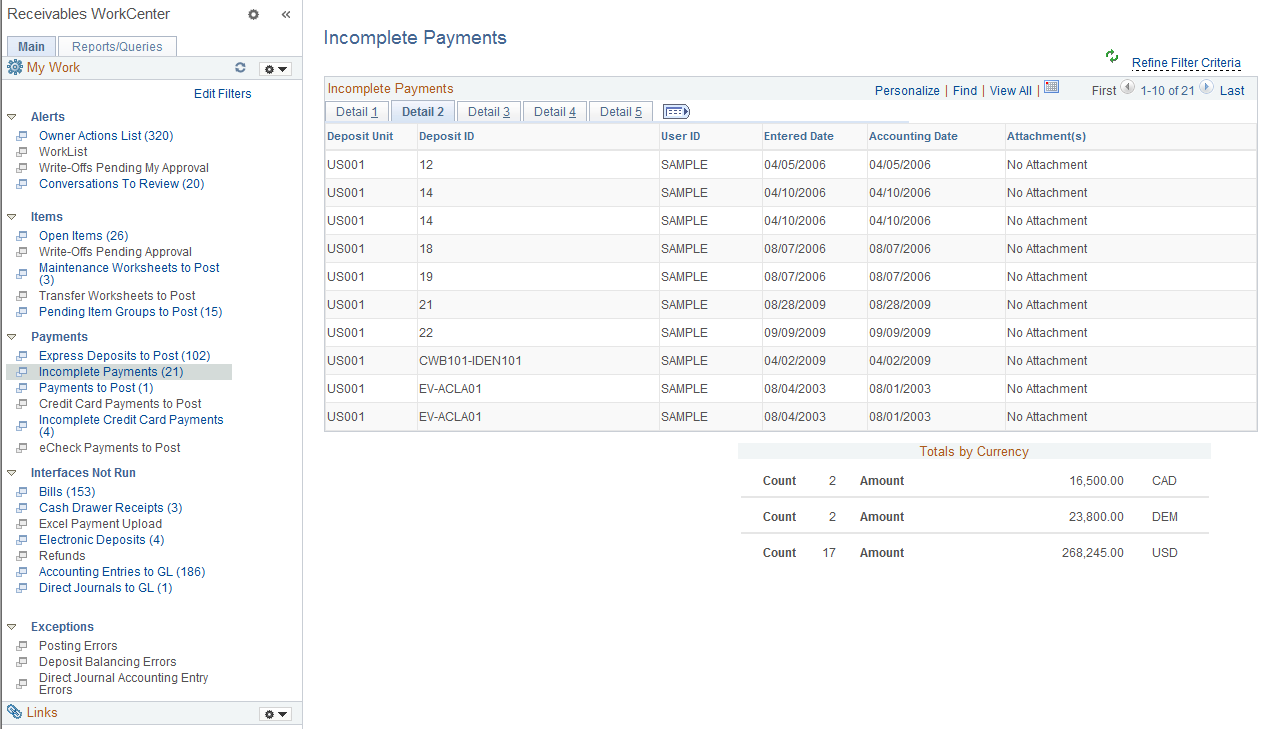
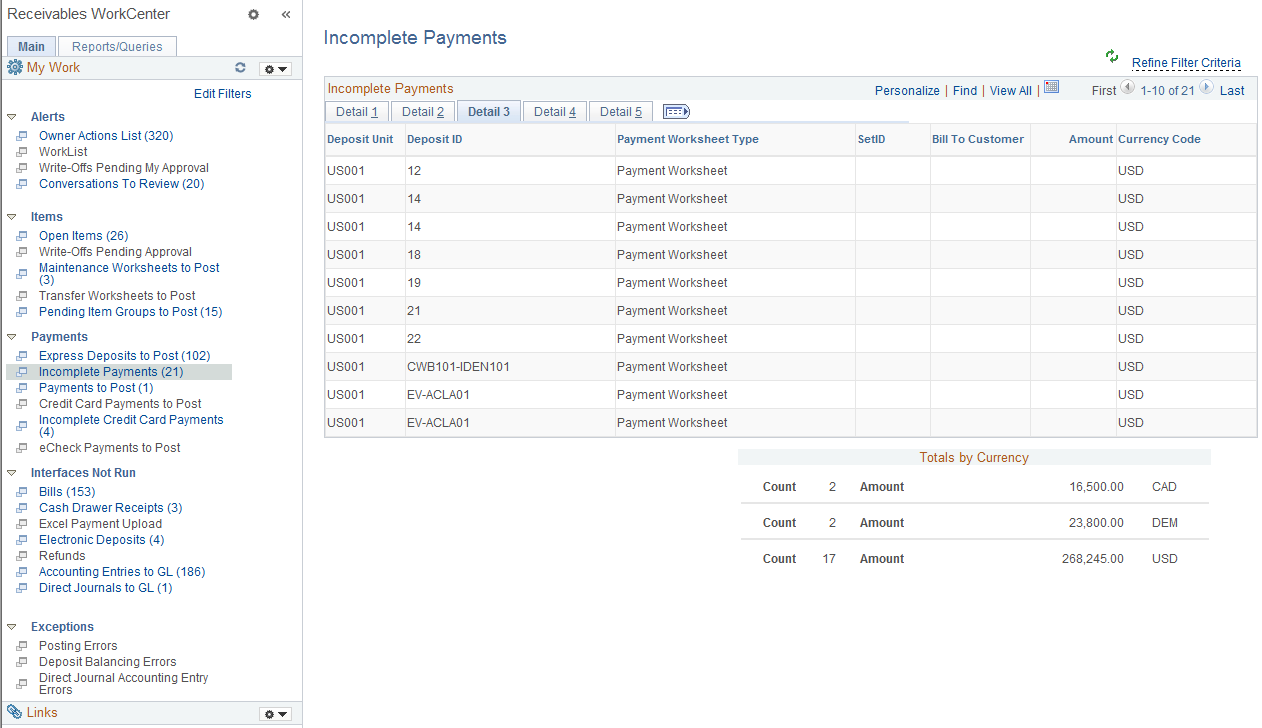
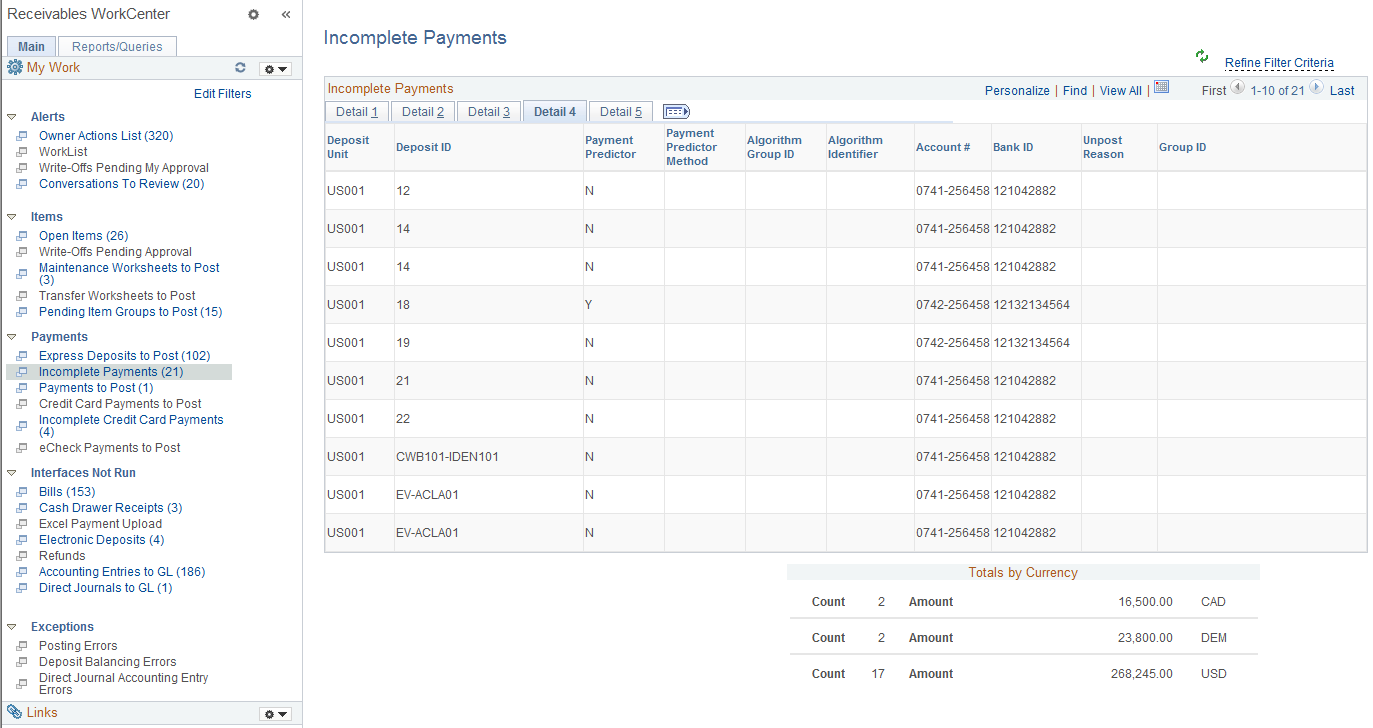
Use the Incomplete Payments page (AR_WC_PYMNT_SEL) to review a list of incomplete payments.
Navigation:
Click the Payments: Incomplete Payments link.
This example illustrates the fields and controls on the Incomplete Payments Page - Detail 1 Tab.

This example illustrates the fields and controls on the Incomplete Payments Page - Detail 2 Tab.
This example illustrates the fields and controls on the Incomplete Payments Page - Detail 3 Tab.
This example illustrates the fields and controls on the Incomplete Payments Page - Detail 4 Tab.
This example illustrates the fields and controls on the Incomplete Payments Page - Detail 5 Tab.
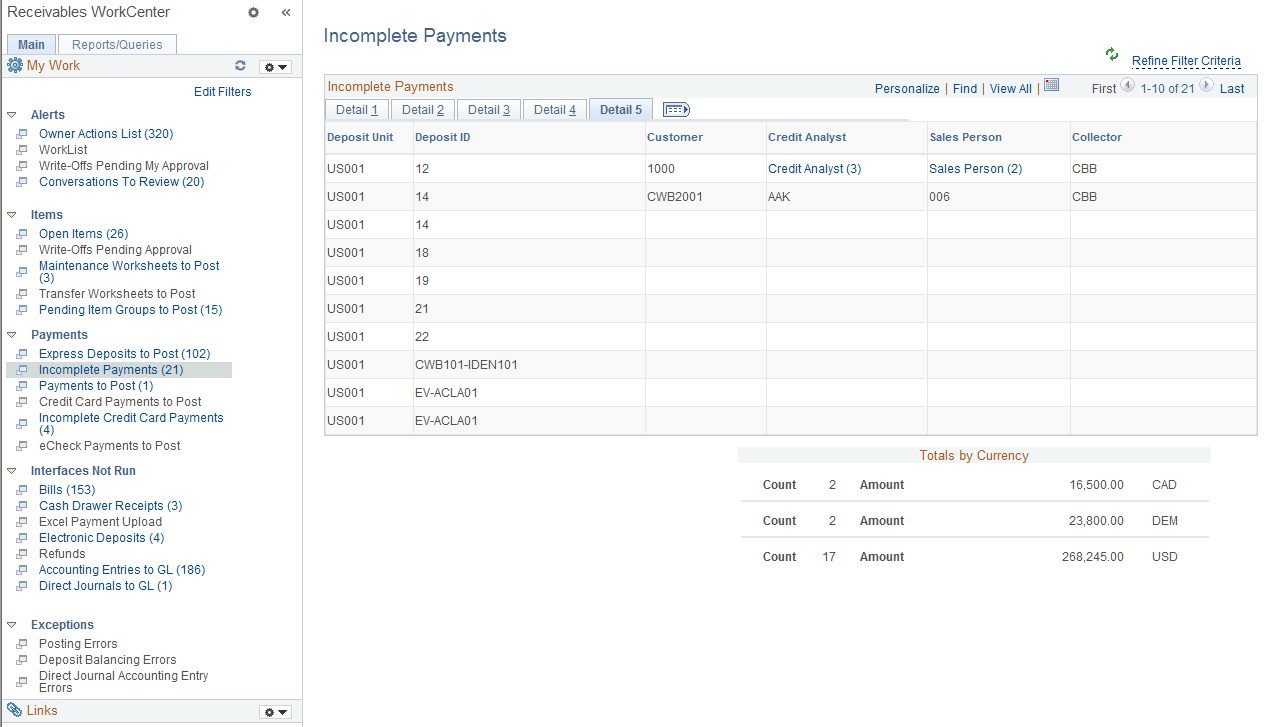
The Incomplete Payments grid shows items with these statuses:
Unidentified Status
Identified Status
Worksheet Status
Field or Control |
Description |
|---|---|
Payment ID |
Click the link associated with a payment ID to access the All Payments page (Accounts Receivable, Payments, Review Payments, All Payments, All Payments or Accounts Receivable, Payments, Review Payments, Payment Status, All Payments), where you can review payment status details. |
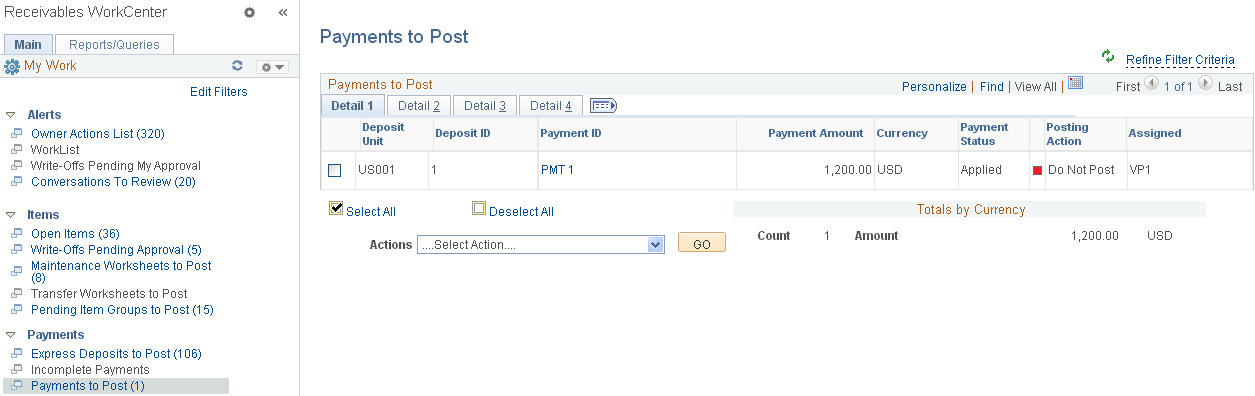
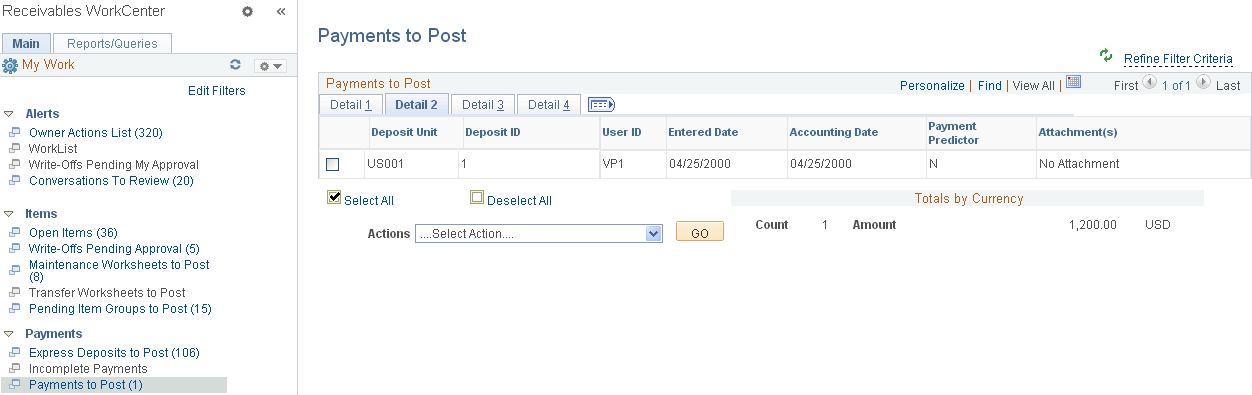
Use the Payments to Post page (AR_WC_PYMNT_SEL) to review and select one or more payment worksheets to post the next time you run Receivables Update processing.
Navigation:
Click the Payments: Payments to Post link.
Or .
This example illustrates the fields and controls on the Payments to Post Page - Detail 1 Tab.
This example illustrates the fields and controls on the Payments to Post Page - Detail 2 Tab.
This example illustrates the fields and controls on the Payments to Post Page - Detail 3 Tab.
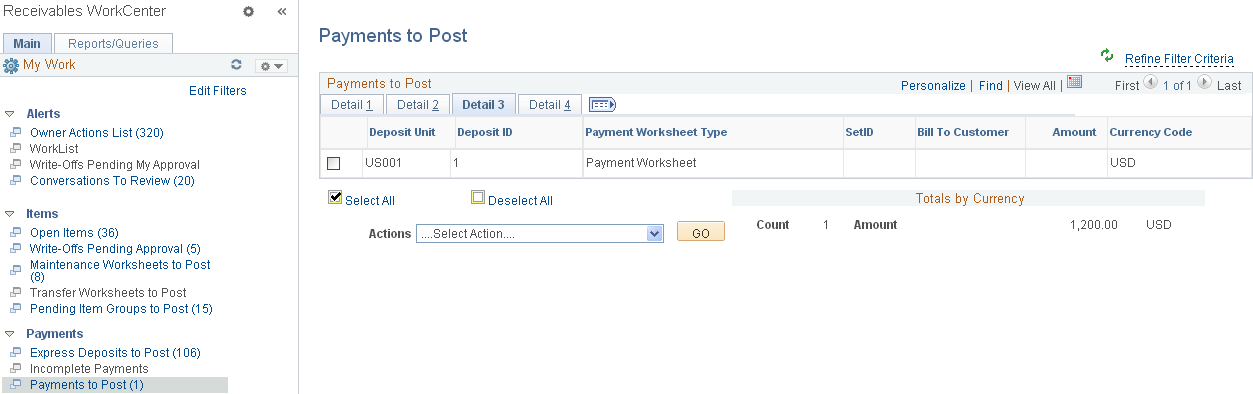
This example illustrates the fields and controls on the Payments to Post Page - Detail 4 Tab.

Field or Control |
Description |
|---|---|
Payment ID |
Click the link associated with a payment ID to access the All Payments page (Accounts Receivable, Payments, Review Payments, All Payments, All Payments or Accounts Receivable, Payments, Review Payments, Payment Status, All Payments), where you can review payment status details. |
Actions |
Perform an action on one ore more payment groups that you select in the Payments to Post grid and click the GO button. Choose from these actions:
To perform actions on payment groups one at a time, you can also use the Groups Set To Post page (Accounts Receivable, Pending Items, Review Items, Groups Set To Post, Groups Set To Post). |
Use the Credit Card Payments to Post page (AR_WC_PYMNT_SEL) to review and select one or more credit card payment worksheets to post the next time you run Receivables Update processing.
Navigation:
Click the Payments: Credit Card Payments to Post link.
This example illustrates the fields and controls on the Credit Card Payments to Post Page - Detail 1 Tab.
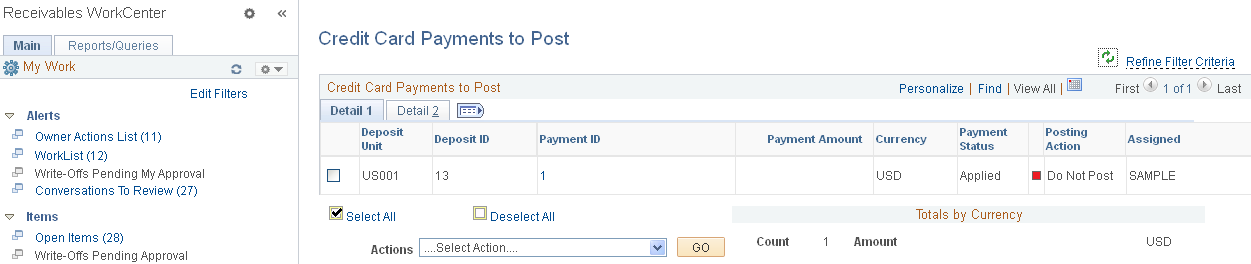
This example illustrates the fields and controls on the Credit Card Payments to Post Page - Detail 2 Tab.
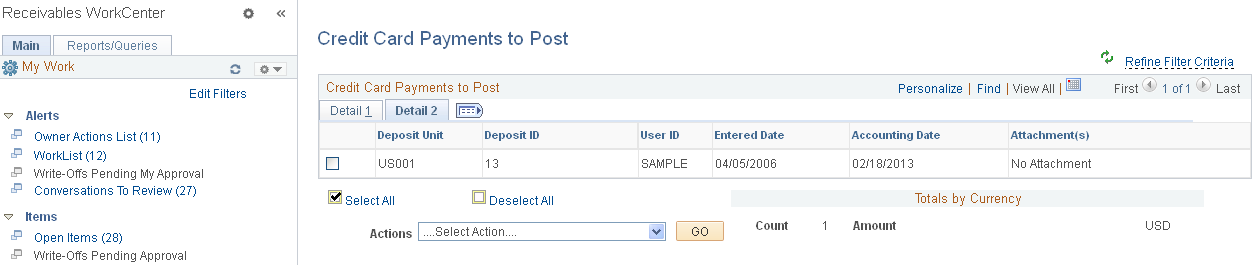
Field or Control |
Description |
|---|---|
Payment ID |
Click the link associated with a payment ID to access the All Payments page (Accounts Receivable, Payments, Review Payments, All Payments, All Payments or Accounts Receivable, Payments, Review Payments, Payment Status, All Payments), where you can review payment status details. |
|
Click the Credit Card Details icon to open the Credit Card Details page (Accounts Receivable, Credit Card, Credit Card Workbench, and click the Credit Card Details button, or click the Pay Balance by Credit Card link on the Account Overview - Balances page), where you can view or modify the customer's credit card details and settle a credit card transaction. |
Actions |
Perform an action on one or more payment groups that you select in the Credit Card Payments to Post grid, and click the GO button. Choose from these actions:
To perform actions on credit card payment groups one at a time, you can use the Credit Card Worksheet Application page (Accounts Receivable, Credit Cards, Update Worksheet, Worksheet Application). See Creating Credit Card Payments Using the Credit Card Worksheet. |

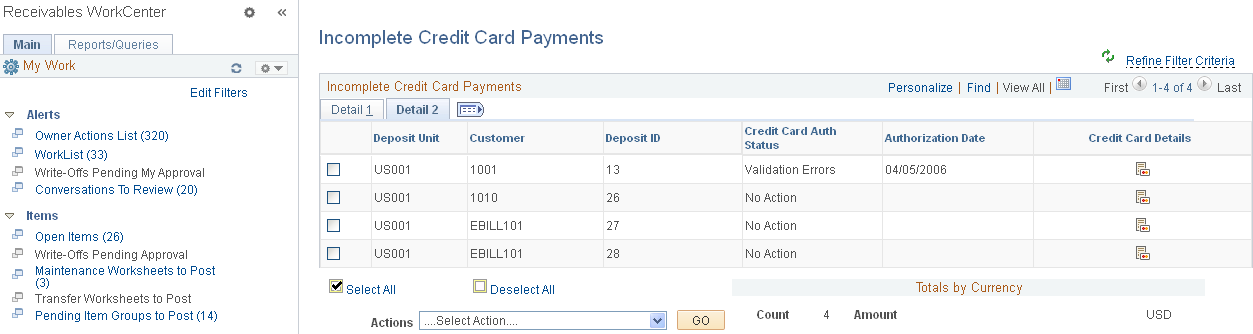
Use the Incomplete Credit Card Payments page (AR_WC_PYMNT_SEL) to review credit card payments that have not been authorized or settled. Select and correct, resubmit, or delete one or more incomplete credit card payments.
Navigation:
Click the Payments: Incomplete Credit Card Payments link.
This example illustrates the fields and controls on the Incomplete Credit Card Payments Page - Detail 1 Tab.
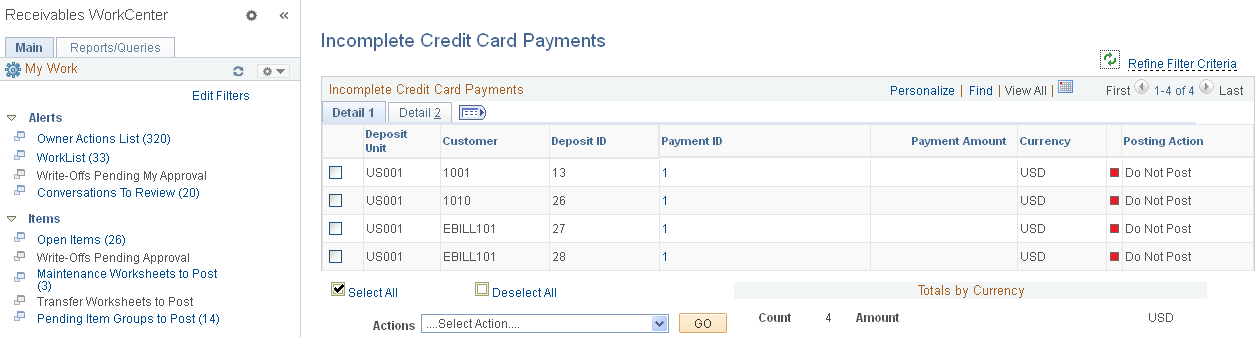
This example illustrates the fields and controls on the Incomplete Credit Card Payments Page - Detail 1 Tab.
Field or Control |
Description |
|---|---|
Payment ID |
Click the link associated with a payment ID to access the Credit Card Worksheet page (Accounts Receivable, Credit Cards, Credit Card WorkBench, Update Worksheet), where you can review credit card payments. See Creating Credit Card Payments Using the Credit Card Worksheet. |
|
Click the Credit Card Details icon to open the Credit Card Details page (Accounts Receivable, Credit Card, Credit Card Workbench, and click the Credit Card Details button, or click the Pay Balance by Credit Card link on the Account Overview - Balances page), where you can view or modify the customer's credit card details and settle a credit card transaction. |
Actions |
Perform an action on one or more incomplete credit card payments that you select in the Incomplete Credit Card Payments grid, and click the GO button. Choose from these actions:
You can also perform actions on incomplete credit card payments on the Credit Card WorkBench (Accounts Receivable, Credit Cards, Credit Card WorkBench). |
Use the Electronic Payments to Post page (AR_WC_PYMNT_SEL) to review and post electronic check and PayPal payments.
Navigation:
Click the Payments: Electronic Payments to Post link.
This example illustrates the fields and controls on the Electronic Payments to Post Page - Detail 1 Tab.
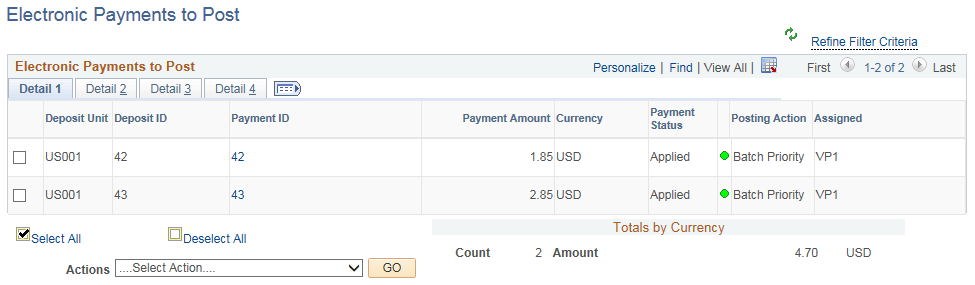
This example illustrates the fields and controls on the Electronic Payments to Post Page - Detail 2 Tab.

This example illustrates the fields and controls on the Electronic Payments to Post Page - Detail 3 Tab.

This example illustrates the fields and controls on the Electronic Payments to Post Page - Detail 4 Tab.

Field or Control |
Description |
|---|---|
Payment ID |
Click the link associated with a payment ID to access the All Payments page (Accounts Receivable, Payments, Review Payments, All Payments, All Payments or Accounts Receivable, Payments, Review Payments, Payment Status, All Payments), where you can review payment status details. |
Actions |
Perform an action on one or more payment groups that you select in the Electronic Payments to Post grid, and click the GO button. Choose from these actions:
|
Payment Worksheet Type |
Displays ePayment Worksheet. For more information, see Processing ePayments in Receivables. |
The Interfaces Not Run group level includes these links to transaction areas:
Bills
Cash Drawer Receipts
Excel Payment Upload
Electronic Deposits
Refunds
Accounting Entries to GL
Direct Journals to GL
Note: Pages that do not include an alternate navigation are accessible only through the Receivables WorkCenter.
|
Page Name |
Definition |
Alternate Navigation |
Usage |
|---|---|---|---|
|
Bills |
AR_WC_INTFC_SEL |
Click the Interfaces Not Run: Bills link. |
Displays bills from BI_HDR available to be sent from Billing to AR. |
|
Cash Drawer Receipts |
AR_WC_INTFC_SEL |
Click the Cash Drawer Receipts link. |
Displays CDR_RECEIPT rows that have not been loaded into the payment staging tables and for which the Process Cash Drawer Receipts (CDR_LOADPMT) process still needs to be run. |
|
Excel Payment Upload |
AR_WC_PYMNT_SEL |
Click the Excel Payment Upload link listed under Interfaces Not Run. |
Displays DEPOSIT_EXCEL rows that have not been loaded into the payment staging tables. The Excel Edit process (AR_EXCL_EDIT) needs to be run. |
|
Electronic Deposits |
AR_WC_INTFC_SEL |
Click the Electronic Deposits link. |
Review and select one or more pending item groups to delete, post, or unpost. |
|
Refunds |
AR_WC_INTFC_SEL |
Click the Refunds link. |
Displays ITEM_ACTIVITY refund transactions that have not been distributed to AP. |
|
Accounting Entries to GL |
AR_WC_INTFC_SEL |
Click the Accounting Entries to GL link. |
Displays ITEM_ACTIVITY ready to be sent to GL via Journal Generator. |
|
Direct Journals to GL |
AR_WC_PYMNT_SEL |
Click the Direct Journals to GL link. |
Displays completed direct journal payments ready to be sent to the GL system. |
|
Cash Control Entries to GL |
AR_WC_PYMNT_SEL |
Click the Cash Control Entries to GL link. |
Displays completed cash control entries ready to be sent to GLsystem. |
Use the Bills page (AR_WC_INTFC_SEL) to display bills from BI_HDR available to be sent from Billing to AR.
Navigation:
Click the Interfaces Not Run: Bills link.
This example illustrates the fields and controls on the Bills Page - Detail 1 Tab.

This example illustrates the fields and controls on the Bills Page - Detail 2 Tab.
Field or Control |
Description |
|---|---|
Actions |
Perform this action on one or more bills that you select in the Bills grid, and click the GO button: Load Invoices to AR Use this action to initiate the Load AR Pending Items Application Engine process (BILDAR01), which loads the item or items you have selected into PeopleSoft Receivables. If you use a third-party billing system, you must develop an interface to populate the pending item tables. See Running the Load AR Pending Items Process (BILDAR01). See Understanding Pending Item Entry. The run control ID for this process is generated using auto-numbering with this prefix: ARWC_LDAR. |
Use the Cash Drawer Receipts page (AR_WC_INTFC_SEL) to display CDR_RECEIPT rows that have not been loaded into the payment staging tables and for which the Process Cash Drawer Receipts (CDR_LOADPMT) process still needs to be run.
Navigation:
Click the Cash Drawer Receipts link.
This example illustrates the fields and controls on the Cash Drawer Receipts Page - Detail 1 Tab.
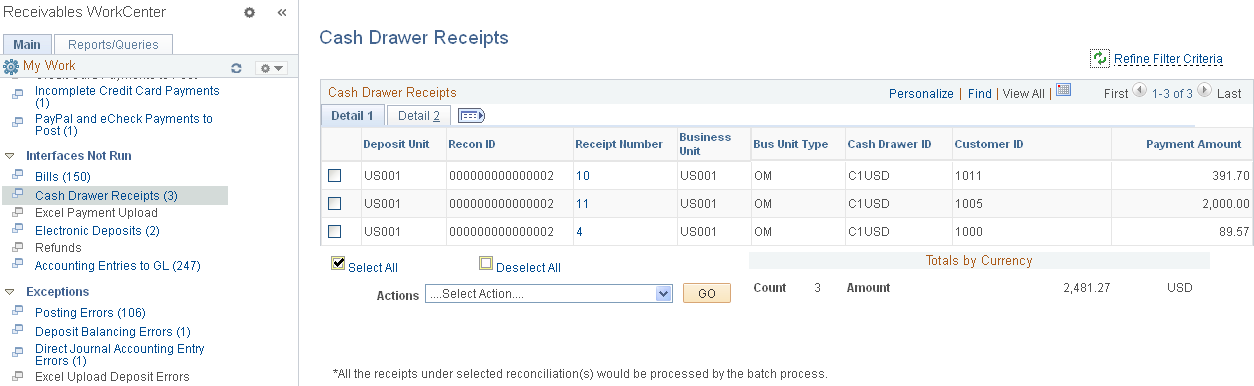
This example illustrates the fields and controls on the Cash Drawer Receipts Page - Detail 2 Tab.
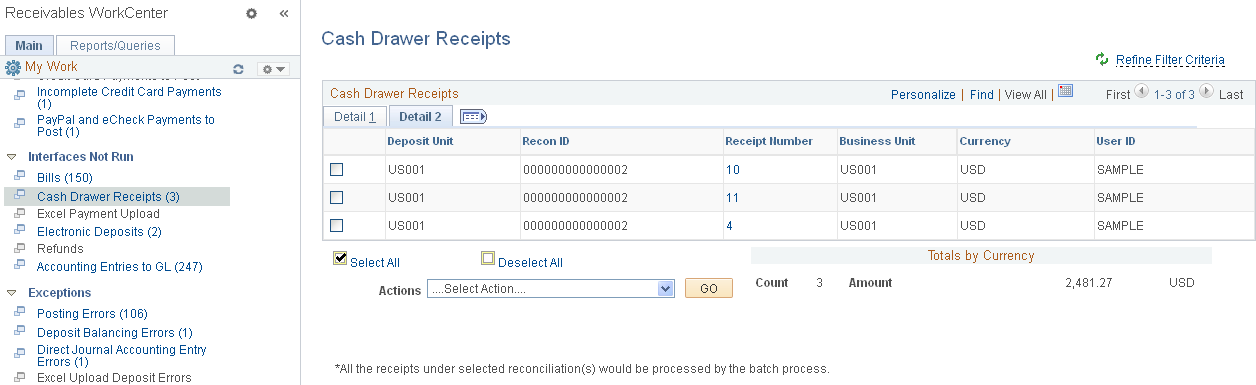
Field or Control |
Description |
|---|---|
Actions |
Select this action from the list to apply to all receipts shown in the grid and click the GO button. Process Receipts This grid does not allow individual rows to be selected for processing. When you select the Process Receipts action, the system opens the Process Cash Drawer Receipts page, where you can select the receipts to process, and initiate Cash Drawer Receipts processing (CDR_LOADPMT) to send payments to Accounts Receivable. See Receiving Cash Drawer Payments. The run control ID for this process is generated using auto-numbering with this prefix: ARWC_CDR. |
Use the Excel Payment Upload page (AR_WC_PYMNT_SEL) to display DEPOSIT_EXCEL rows that have not been loaded into the payment staging tables. The Excel Edit process (AR_EXCL_EDIT) needs to be run.
Navigation:
Click the Excel Payment Upload link listed under Interfaces Not Run.
This example illustrates the fields and controls on the Excel Payment Upload Page - Detail 1 Tab.
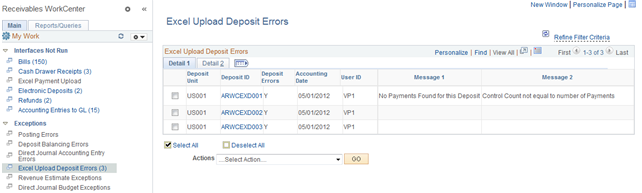
This example illustrates the fields and controls on the Excel Payment Upload Page - Detail 2 Tab.
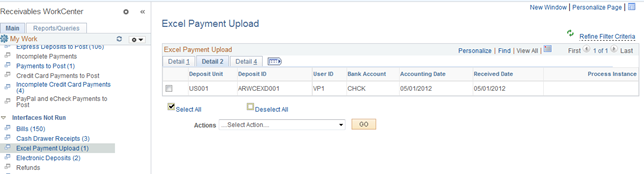
Field or Control |
Description |
|---|---|
Deposit ID |
Click the Deposit ID link to open the Express Deposit (PAYMENT_EXPRESS) component (Accounts Receivable, Payments, Online Payments, Express Deposit) for the selected deposit, where you can enter express deposit totals, enter and apply payments with express deposit, and select an express deposit action. |
Actions |
Select the following action from the list to apply to all deposits shown in the grid, and click the GO button: Excel Payment Upload This grid does not allow individual rows to be selected for processing. When you select the Excel Payment Upload action, the system sends rows in the grid to the Excel Payment Upload Process page, where you can select the payments to process, and initiate the Excel Edit process (AR_EXCL_EDIT). See Receiving and Editing Spreadsheet Payments. The run control ID for this process is generated using auto-numbering with this prefix: ARWC_EXL. |
Use the Electronic Deposits page (AR_WC_INTFC_SEL) to review and select one or more pending item groups to delete, post, or unpost.
Navigation:
Click the Electronic Deposits link.
This example illustrates the fields and controls on the Electronic Deposits Page - Detail 1 Tab.
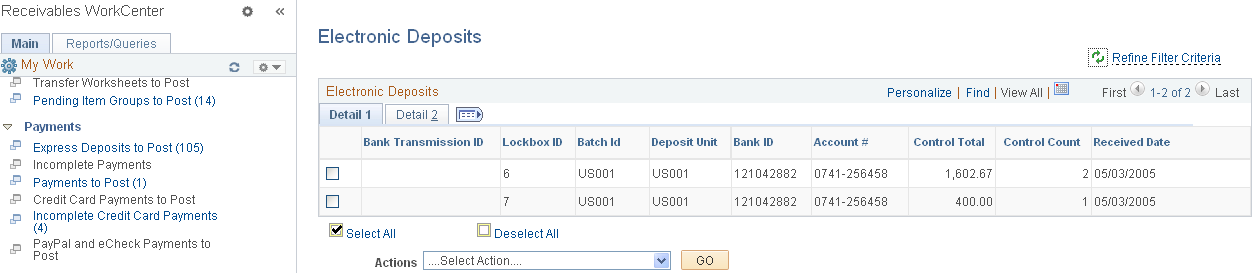
This example illustrates the fields and controls on the Electronic Deposits Page - Detail 2 Tab.
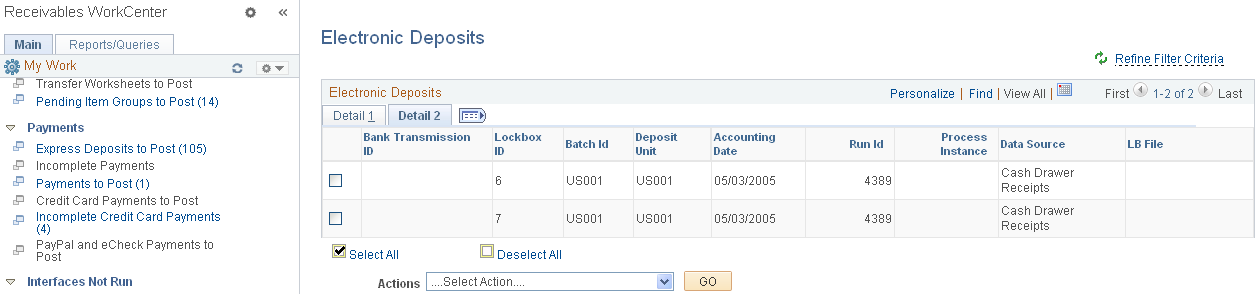
The Electronic Deposits grid shows these items:
EDI 820
EDI CREEXT
Lockboxes
Electronic Bank Statements
EFT payment files
Cash Drawer Receipts
Spreadsheet Payments
Field or Control |
Description |
|---|---|
Actions |
Select the following action from the list to apply to all electronic deposits shown in the grid, and click the GO button: Process Payment Interface This grid does not allow individual payments to be selected for processing. When you select the Process Payment Interface action, the system opens the Payment Interface page, where you can select the data sources to run, and initiate the Payment Loader Application Engine process. See Using EDI and Split Stream Processing. The run control ID for this process is generated using auto-numbering with this prefix: ARWC_PYLD. |
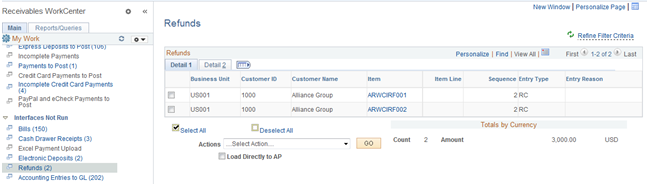
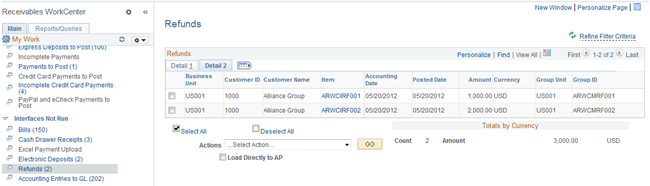
Use the Refunds page (AR_WC_INTFC_SEL) to display ITEM_ACTIVITY refund transactions that have not been distributed to AP.
Navigation:
Click the Refunds link.
This example illustrates the fields and controls on the Refunds Page - Detail 1 Tab.
This example illustrates the fields and controls on the Refunds Page - Detail 2 Tab.
Field or Control |
Description |
|---|---|
Actions |
Select the following action from the list to apply to all refunds shown in the grid, and click the GO button: Load Refunds to AP This grid does not allow individual refunds to be selected for processing. When you select the Load Refunds to AP action, the system opens the Refunds page (Accounts Receivable, Receivables Maintenance, Refunds, Request Refund Item, Refunds), where you can select the refunds and initiate processing refund processing (RUN_AR36001). The system loads the processed refunds into the PeopleSoft Payables voucher staging tables. See Processing Refunds. The run control ID is generated using auto-numbering with this prefix: ARWC_RFND. |
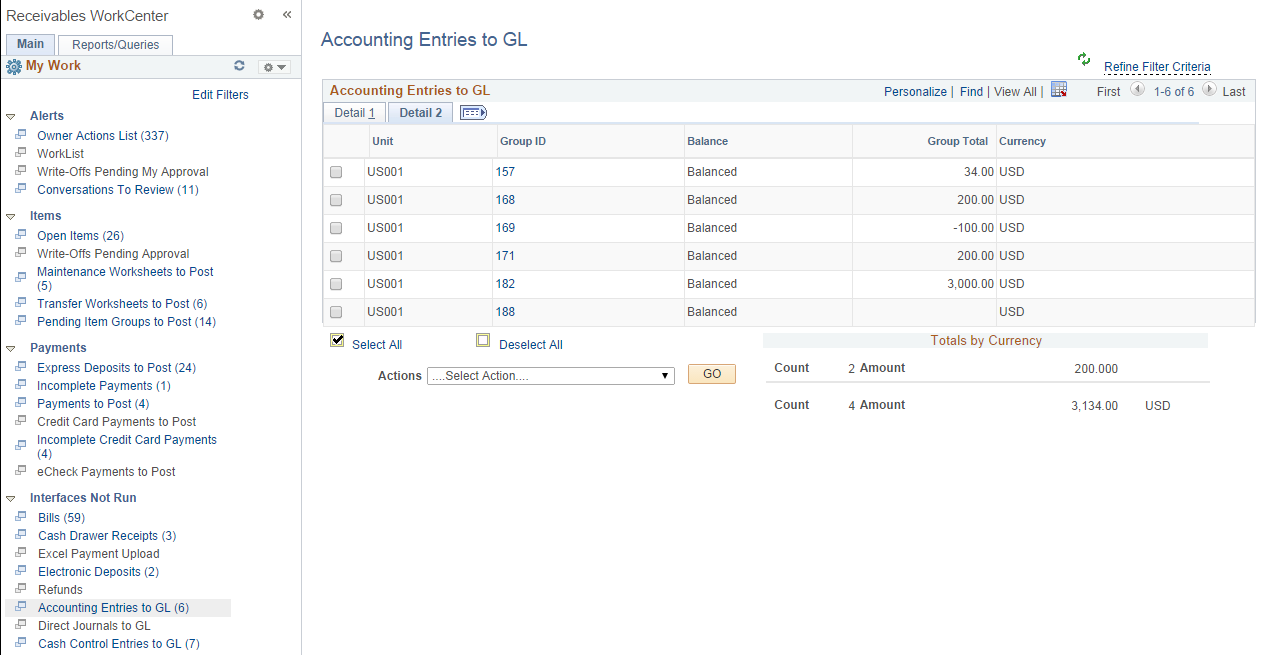
Use the Accounting Entries to GL page (AR_WC_INTFC_SEL) to display ITEM_ACTIVITY ready to be sent to GL via Journal Generator.
Navigation:
Click the Accounting Entries to GL link.
This example illustrates the fields and controls on the Accounting Entries to GL page - Detail 1 tab.
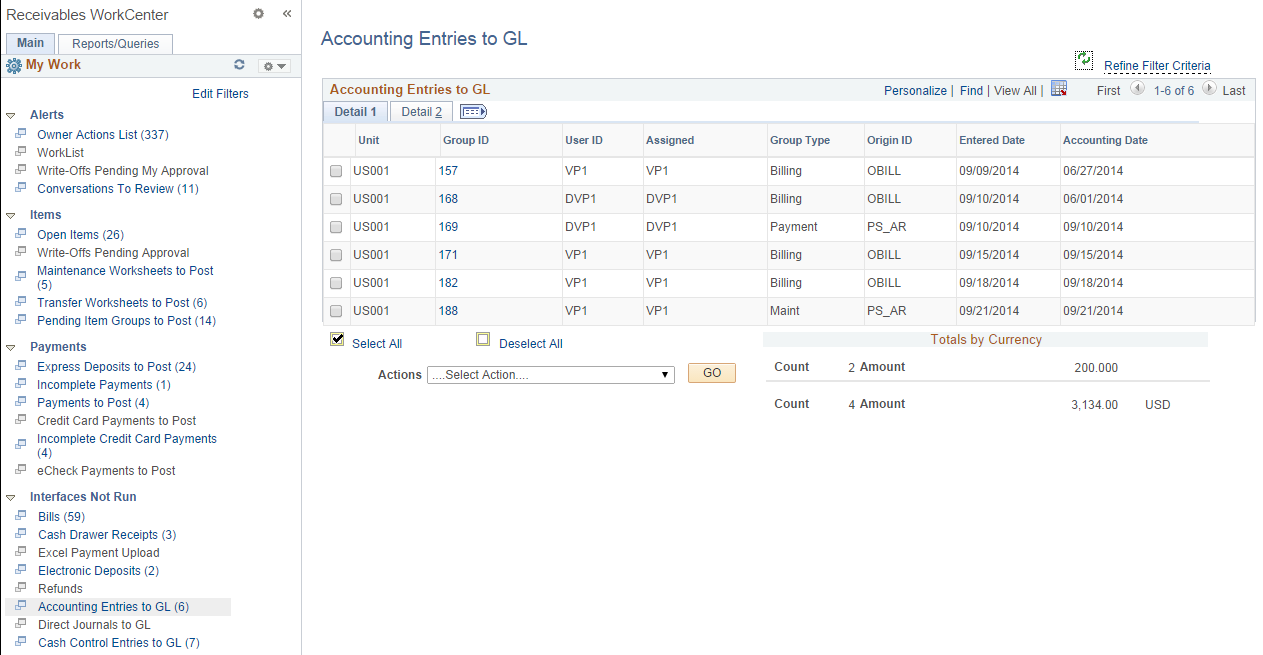
This example illustrates the fields and controls on the Accounting Entries to GL page - Detail 2 tab.
Field or Control |
Description |
|---|---|
Actions |
Select the Generate Journals action from the list and click the GO button. You can select a single or multiple transactions and run the Journal Generator process for the selected transactions. See Journaling Payments Directly to the General Ledger. See Generating Journal Entries. See Understanding the Load GL Accounting Entries Process (BILDGL01). The run control ID is generated using auto-numbering with this prefix: ARWC_JRNL. |
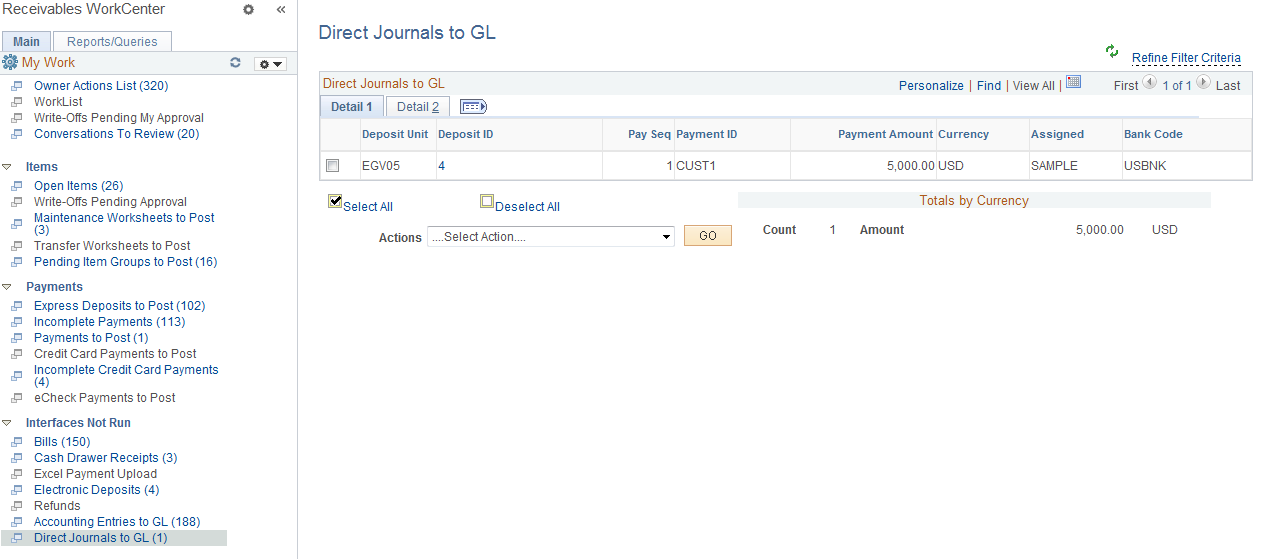
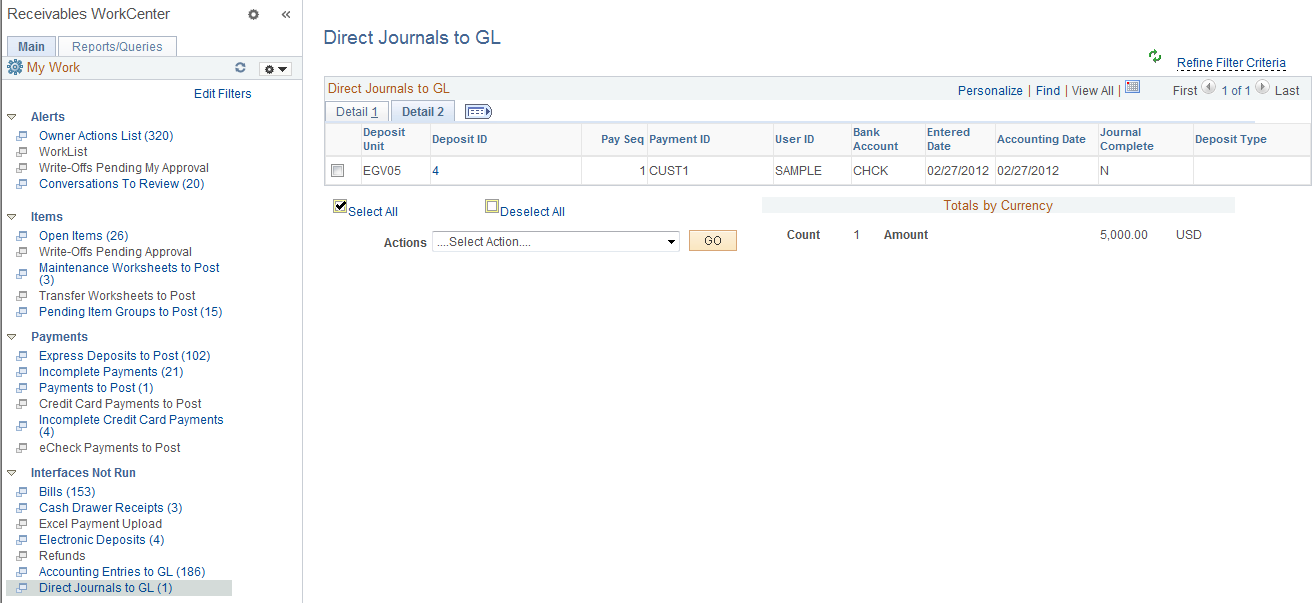
Use the Direct Journals to GL page (AR_WC_PYMNT_SEL) to display completed direct journal payments ready to be sent to the General Ledger system.
Navigation:
Click the Direct Journals to GL link.
This example illustrates the fields and controls on the Direct Journals to GL page - Detail 1 tab.
This example illustrates the fields and controls on the Direct Journals to GL page - Detail 2 tab.
Field or Control |
Description |
|---|---|
Deposit ID |
Click this link to access the Direct Journal Review page for the deposit. |
Actions |
Select the Generate Journals action from the list and click the GO button. |
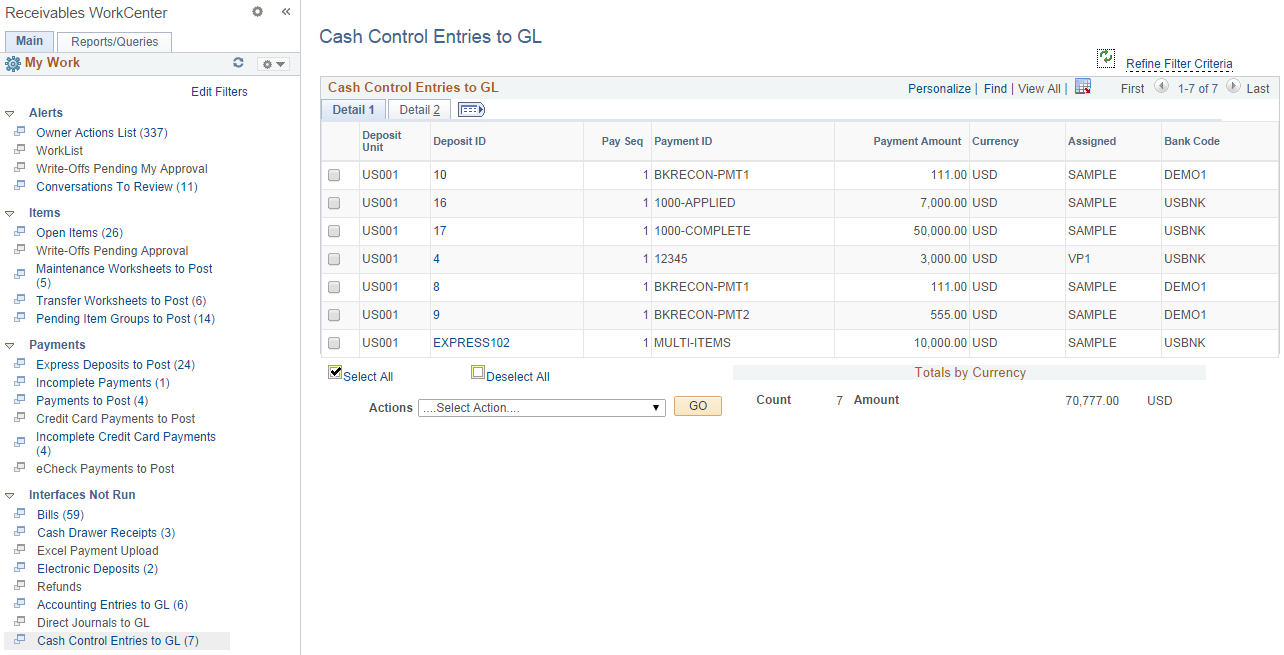
Use the Cash Control Entries to GL page (AR_WC_PYMNT_SEL) to display completed cash control entries ready to be sent to GLsystem.
Navigation:
Click the Cash Control Entries to GL link.
This example illustrates the fields and controls on the Cash Control Entries to GL page - Detail 1 tab.
This example illustrates the fields and controls on the Cash Control Entries to GL page - Detail 2 tab.
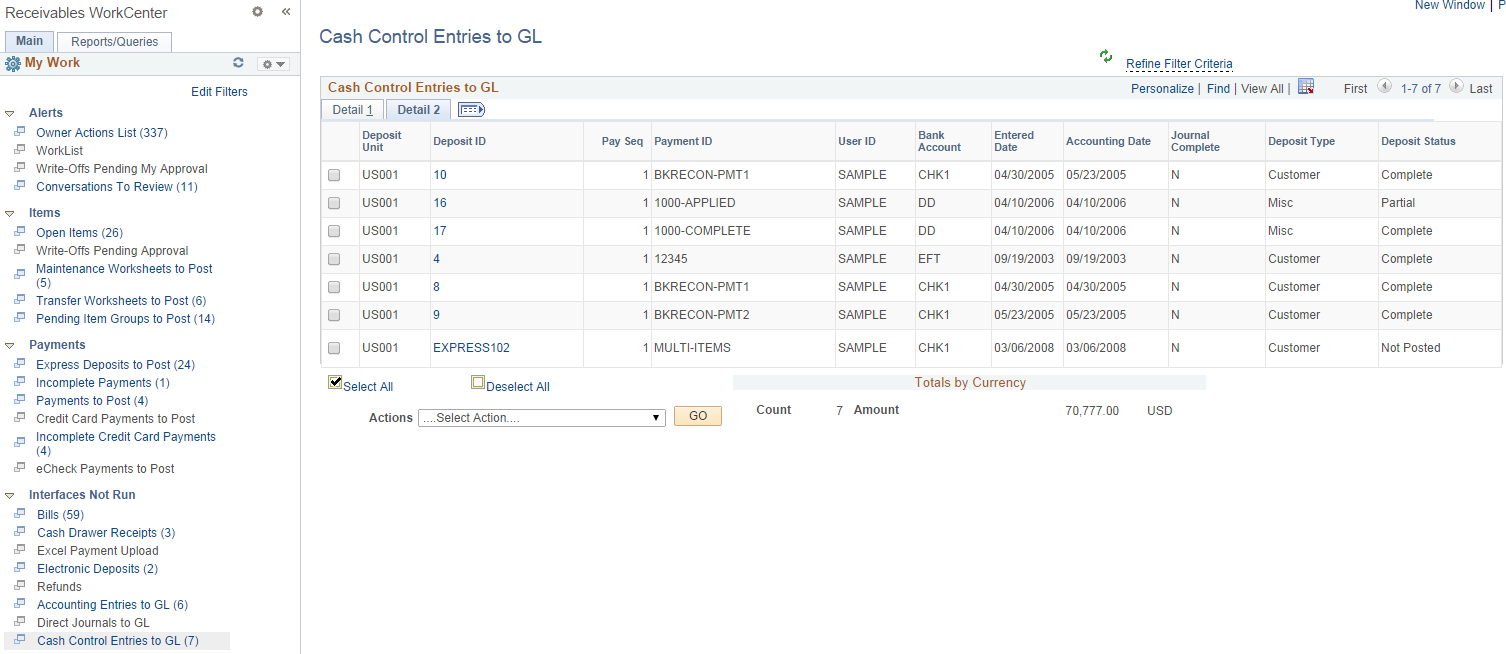
Field or Control |
Description |
|---|---|
Deposit ID |
Click this link to access the Cash Control Review page for the deposit. See the Cash Control Payments Page for more information. |
Actions |
Select the Generate Journals action from the list and click the GO button. You can select a single or multiple entries and run the Journal Generator process for the selected entries. |
The Exceptions group level includes links to transactional areas as summarized in the following table:
Note: Pages that do not include an alternate navigation are accessible only through the Receivables WorkCenter.
|
Page Name |
Definition |
Alternate Navigation |
Usage |
|---|---|---|---|
|
Posting Errors |
AR_WC_PNDITM_SEL |
Click the Exceptions: Posting Errors link. |
Displays pending item groups containing errors, with access to Online Error Correction pages. |
|
Deposit Balancing Errors |
AR_WC_PYMNT_SEL |
Click the Exceptions: Deposit Balancing Errors link. |
Displays deposits where control totals do not equal the sum of the payments entered, including regular and express deposits. |
|
Direct Journal Accounting Entry Errors |
AR_WC_PYMNT_SEL |
Click the Exceptions: Direct Journal Accounting Entry Errors link. |
Correct Direct Journal accounting entry edit errors. |
|
Revenue Estimate Exceptions |
AR_WC_INTFC_SEL |
Click the Exceptions: Revenue Estimate Exceptions link. |
Review Revenue Estimate budget checking errors. |
|
Excel Upload Deposit Errors |
AR_WC_EXCEL_ERR |
Click the Exceptions: Excel Upload Deposit Errors link. |
Correct Excel upload deposit errors. |
|
Direct Journal Budget Exceptions |
AR_WC_PYMNT_SEL |
Click the Exceptions: Excel Upload Deposit Errors link. |
Review Direct Journal budget checking errors. |
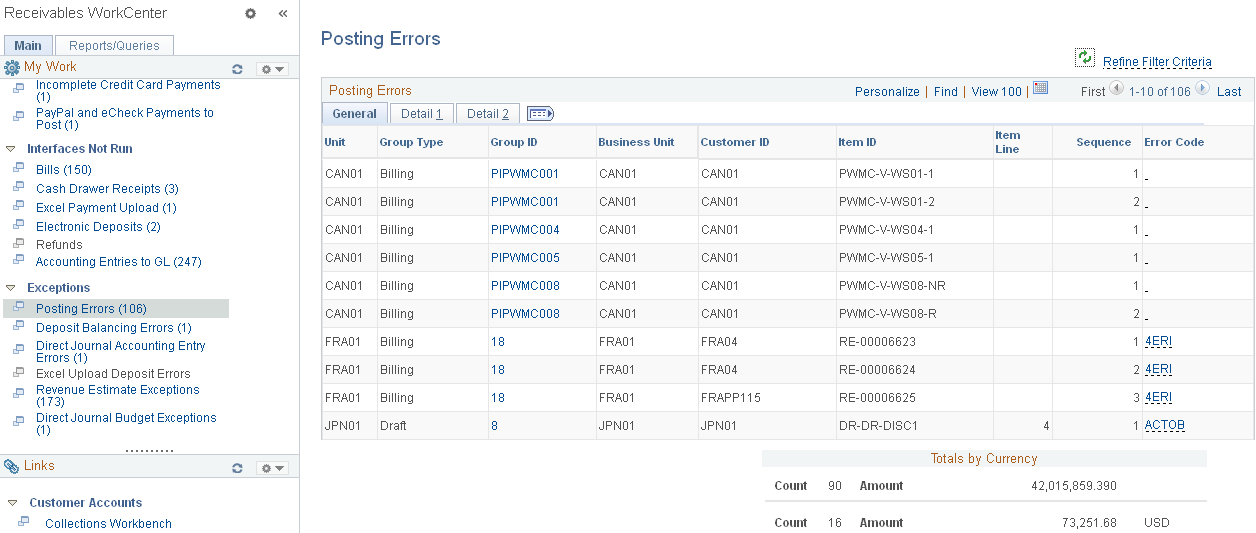
Use the Posting Errors page (AR_WC_PNDITM_SEL) to display pending item groups containing errors with access to Online Error Correction pages.
Navigation:
Click the Exceptions: Posting Errors link.
This example illustrates the fields and controls on the Posting Errors Page - General Tab.
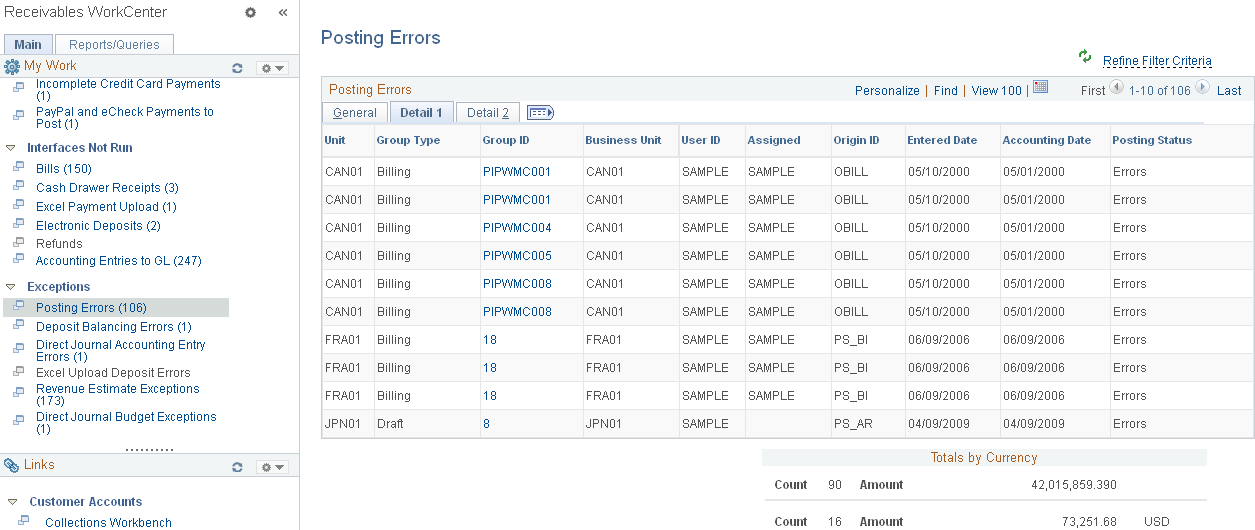
This example illustrates the fields and controls on the Posting Errors Page - Detail 1 Tab.
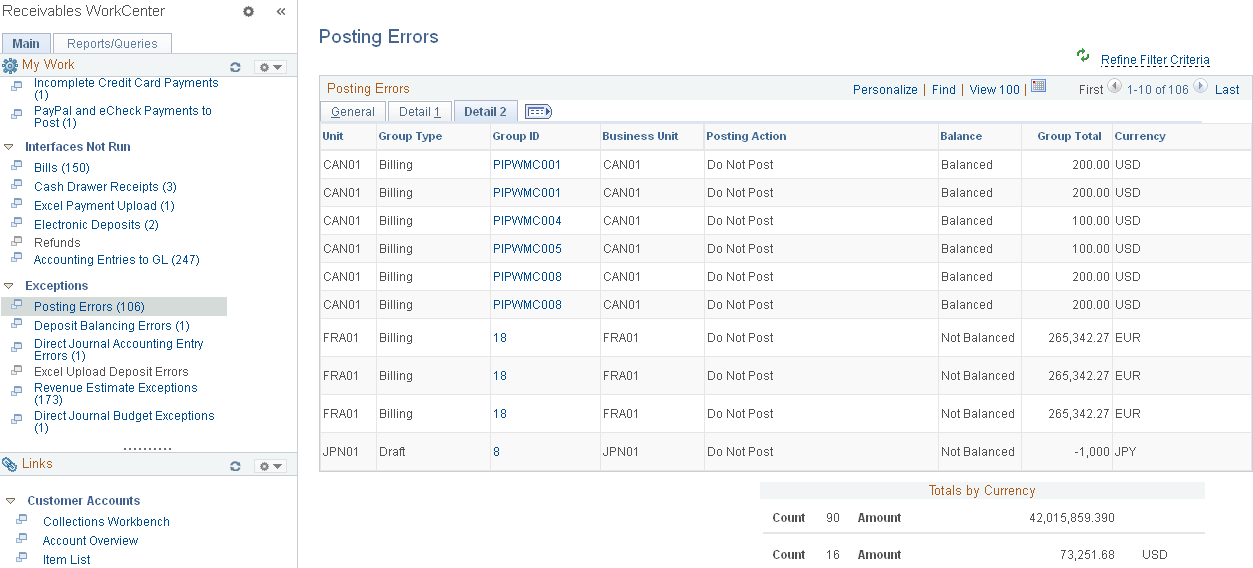
This example illustrates the fields and controls on the Posting Errors Page - Detail 2 Tab.
The Posting Errors grid shows results for these items and groups:
External Pending Items
Online Pending Items
Overdue Charge Pending Items
Maintenance Groups
Transfer Groups
Unpost Groups
Direct Debit Groups
Draft Groups
Payment Groups
Field or Control |
Description |
|---|---|
Group ID |
Click the link associated with a group ID to access error correction pages for Receivables Update (Accounts Receivable, Receivables Update, Correct Posting Errors). |
Use the Deposit Balancing Errors page (AR_WC_PYMNT_SEL) to display deposits where control totals do not equal the sum of the payments entered, including regular and express deposits.
Navigation:
Click the Exceptions: Deposit Balancing Errors link.
This example illustrates the fields and controls on the Deposit Balancing Errors Page - Detail 1 Tab.

This example illustrates the fields and controls on the Deposit Balancing Errors Page - Detail 2 Tab.
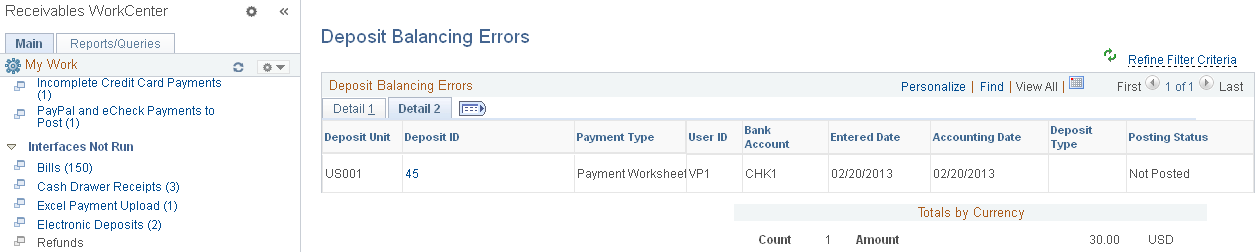
Field or Control |
Description |
|---|---|
Deposit ID |
Click the Deposit ID link to open the Express Deposit (PAYMENT_EXPRESS) component (Accounts Receivable, Payments, Online Payments, Express Deposit) for the selected deposit, where you can correct the deposit with balancing errors. |
Use the Direct Journal Accounting Entry Errors page (AR_WC_PYMNT_SEL) to correct Direct Journal accounting entry edit errors.
Navigation:
Click the Exceptions: Direct Journal Accounting Entry Errors link.
This example illustrates the fields and controls on the Direct Journal Accounting Entry Errors Page - Detail 1 Tab.

This example illustrates the fields and controls on the Direct Journal Accounting Entry Errors Page - Detail 2 Tab.
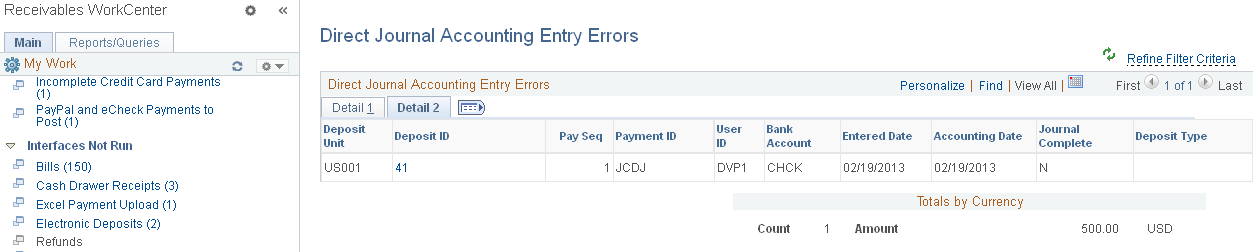
Field or Control |
Description |
|---|---|
Deposit ID |
Click the Deposit ID link to open the Accounting Entries page, where you can Review and correct errors for accounting entries in a maintenance group. You can also access the Accounting Entries page using these navigation paths: Accounts Receivable, Receivables Update, Correct Posting Errors, Worksheet, Accounting Entries or Accounts Receivable, Receivables Maintenance, Maintenance Worksheet, Update Accounting Entries, Accounting Entries . |
Use the Revenue Estimate Exceptions page (AR_WC_INTFC_SEL) to review Revenue Estimate budget checking errors.
Navigation:
Click the Exceptions: Revenue Estimate Exceptions link.
This example illustrates the fields and controls on the Revenue Estimate Exceptions Page.
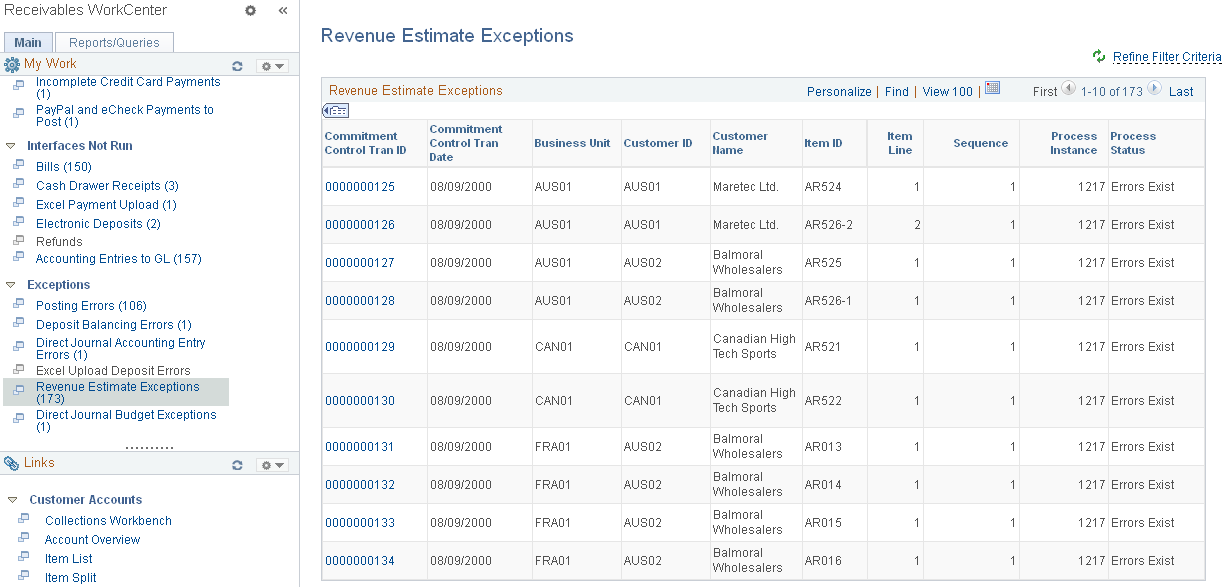
Field or Control |
Description |
|---|---|
Commitment Control Tran ID (commitment control transaction ID) |
Click the link associated with a commitment control transaction ID to open the Revenue Estimate (KK_XCP_AR1) component (Commitment Control, Review Budget Check Exceptions, Revenues, Review Revenue Estimate), where you can review the budget exceptions and, if you have authority, to override specific budgets for a failed transaction as well as all budgets for a failed transaction. |
Use the Excel Upload Deposit Errors page (AR_WC_EXCEL_ERR) to correct Excel upload deposit errors.
Navigation:
Click the Exceptions: Excel Upload Deposit Errors link.
This example illustrates the fields and controls on the Excel Upload Deposit Errors Page - Detail 1 Tab.
This example illustrates the fields and controls on the Excel Upload Deposit Errors Page - Detail 2 Tab.
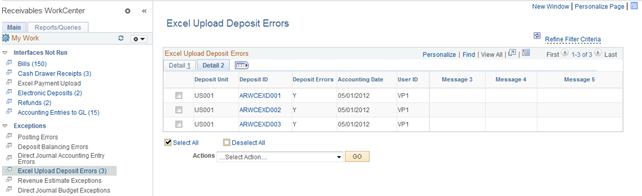
Field or Control |
Description |
|---|---|
Actions |
Select an action from the list and click the GO button: Delete Deposits Use this grid to review and select deposit records created by the Excel Payment Upload process. You can also correct Excel deposit upload errors on the Excel Upload Deposit Errors page (Accounts Receivable, Payments, Electronic Payments, Excel Error Correction, Excel Upload Deposit Errors). See Receiving and Editing Spreadsheet Payments. The run control ID is generated using auto-numbering with this prefix: ARWC_RBT. |
Use the Direct Journal Budget Exceptions page (AR_WC_PYMNT_SEL) to review Direct Journal budget checking errors.
Navigation:
Click the Exceptions: Direct Journal Budget Exceptions link.
This example illustrates the fields and controls on the Direct Journal Budget Exceptions Page - Detail 1 Tab.

Use this grid to review direct journal budget checking errors.