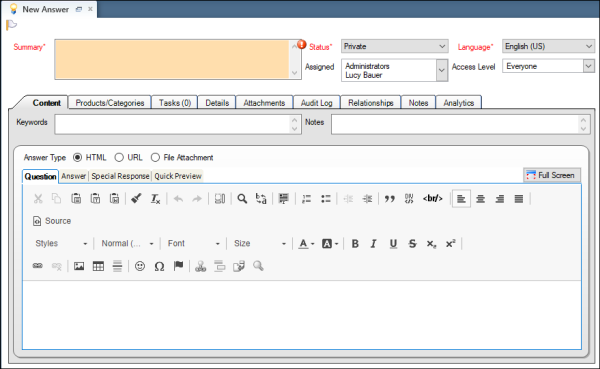
Key answer fields are used to specify the answer summary, status, language, access
level, and the staff member assigned to the answer.
Key answer fields are found at the top of the content pane. Field marked with a red
label and an asterisk are required and must be completed before you can save the
answer. The key answer fields that display on the content pane vary depending on the permissions set in your profile.
You can create different answer types when
adding answers to the knowledge base. Answer types give you more flexibility in
providing information to your customers. You can add the following types of
answers:
-
HTML—Answers that appear to customers as standard HTML on the customer portal. When you
create an HTML answer, you can use the HTML editor to view answers as
customers will see them. See HTML Editor for Answers.
-
URL—Answers that consist of a link to an external URL. The URL address
and the content of the web page display. See Add a URL Answer.
-
File attachment—Answers that appear as file attachments. File attachment answers
link to information contained in another document and appear to customers on
the customer portal as file attachments. See Add a File Attachment Answer.
-
Do one of the following:
-
From an open answer report, click New.
-
If your navigation set is configured to add answers from the file menu, click
File and select
Answer. See Configure the File Menu.
The New Answer editor displays with the Content tab active.
-
Enter field information.
Answer Fields
| Field |
Description |
| *Summary |
Enter the subject of the answer in this field. |
| *Status |
Click this drop-down list to select an answer
status. |
| *Language |
Click this drop-down list to select a language. |
| Assigned |
Click this drop-down list to select a staff member to
assign to the answer. Only staff members who have permission
in their profile to create answers are listed. By default,
the staff member who created the answer is selected. Tip: Use the Find feature at the bottom of the
Assigned drop-down list to find staff members quickly.
Wildcards are supported when searching staff members and
groups. You can search strings that include a space by
entering %+Space+character, which is
helpful when searching last names. For example,
entering %+Space+b returns all last
names starting with the letter b. There is also an
implied wildcard when searching, so entering
b in the Find field returns all
items containing the letter b. |
| Access Level |
Click this drop-down list to control answer visibility by
selecting one or more access levels. See Associate an Answer with Multiple Access Levels. |
-
To add a flag to the answer, click the area
next to the white flag above the answer fields.
-
Select the answer type on the Content tab.
Options include HTML, URL, and File Attachment. See
HTML Editor for Answers,
Add a URL Answer, or
Add a File Attachment Answer.
Caution: When you change the answer type in an existing answer, all answer
relationships and certain answer fields are removed. For example, when you
change an HTML answer type to a URL answer type, the Question, Answer, Special Response, and Attachments
tabs are removed and you lose any content that was created on those
tabs.
-
To add keywords to associate with the answer, enter the words in the
Keywords field on the Content tab. Separate keywords
by commas and separate any compound words by spaces. For example,
phone,call plan,nationwide.
Keywords are used by the search feature. In addition, associated products
and categories and their descriptions are automatically used as keywords for
answers.
Tip: Use keywords sparingly. Too many keywords can
negatively impact the accuracy of search results. Instead, consider using
the aliases.txt wordlist file to customize the words used during
keyword indexing and text searching. See
Wordlist Files.
-
To add notes specific to your answer content, enter your notes in the
Notes field on the Content tab.
Keep in mind that this field can be viewed by customers. Use the Notes tab for
private notes.
-
To associate products and categories with the answer, click the
Products/Categories tab.
-
To add tasks to the answer, click the Tasks tab.
-
To add information you want to associate with the answer, including setting
Publish On and Review On fields, click the Details
tab.
-
To attach files to the answer, click the Attachments
tab. Attachments are available only for HTML answer types.
You can attach as many files as needed to associate with an answer.
Attachments appear as clickable links when a customer views an answer. They can
also be indexed as searchable text. Therefore, you can choose whether each
document is indexed when managing your file attachments.
-
Click Add Files on the Attachments tab
toolbar.
-
To attach files that will be shared with sibling answers, click
Add Files under the Attachments for This
Answer and All Sibling Answers section.
The Attachments for This Answer and All Sibling Answers section
displays only if the Siblings Visible property for the File Attachments
relationship item on the answer workspace is set to True. See
Sibling Answers and
Options Properties.
-
To view the answer audit log, click the Audit Log
tab.
-
To manage answer relationships, including sibling answers, manually related
answers, and learned links, click the Relationships
tab.
-
To enter private notes about the answer, click the Notes
tab.
These notes are not be visible to customers on the customer portal.
-
Click the Notes tab.
-
Click Add.
-
Enter the notes in the Answer Note field.
-
Click Save.
Your answer is added to the knowledge base.
Results:
If you set the answer status to Public, the End-User Visibility
window opens and displays all interfaces associated with the answer, along with the
answer product and category visibilities. A check mark signifies that a product or
category is visible on a particular interface, whereas a X signifies that it is not.
-
To perform a visibility check when the answer status is changed to Public,
select Only When Status is Changed to Public
Type.
-
To perform a visibility check every time the answer is saved, select
On Every Save.