Attribute lookups
Oracle Unity allows you to look up values for non-system attributes with the string or text data type. When Viewing data object records in the Data viewer, this allows you to select attribute values from a list instead of manually entering them. Oracle Unity comes with ready-to-use lookups for many attributes.
Attribute lookups are also available when Creating segments. Learn more about Segmentation attribute lookups.
Important: Data that is imported with the Near real-time API can't be used for configuring lookup values. To ensure that data is used for lookup values, use the Streaming API or an ingest job to import the data.
Benefits of using attribute lookups
Enabling lookup for attributes can benefit your organization in the following ways:
-
Optimizes the process of using the Data viewer to view data object records by eliminating the need to manually enter attribute values when setting up filter conditions.
-
By selecting attribute values rather than manually entering them, this eliminates the possibility of a user incorrectly entering an attribute value (entering F instead of Female).
-
Gives you visibility into all available values for an attribute, up to a maximum of 200.
Example: You can use lookup values for the State attribute. You want to view records for residents of Arizona, California, and Florida. When you add the State attribute as a filter, you'll select Matches and use the drop-down list for the attribute's input field to select the three states. This eliminates the need for you to know the exact values (state abbreviations) to successfully retrieve the appropriate records.
Enabling attribute lookups
Review the following for enabling attribute lookups.
-
The attribute must have the string or text data type. Learn more about Data types.
-
You should only enable lookup for attributes with a limited number of unique values, such as Country or State. This is not recommended for attributes with a high number of unique values, such as First name. Enabling lookup for attributes with a high number of unique values can negatively affect the performance of system jobs (data warehouse and identity resolution) and the time needed for them to run and complete.
-
To enable lookup for an attribute, follow the steps for Managing attributes and select Enable Lookup. To view this option, you need the Data master or Data engineer User role.
-
If you are enabling or disabling lookup for an attribute for a master entity, please see Enabling lookup for master entity attributes.
-
After enabling or disabling lookup, you will need to do the following to view the change:
-
When the publish job successfully completes, run the Data warehouse job from the Data feeds page.
-
If you enabling/disabling lookup for an attribute from a Master entity, you will also need to run the Identity resolution job from the Data feeds page after the Data warehouse job successfully completes. You may also need to complete additional tasks depending on the attribute you are enabling lookup for. Please see Enabling lookup for master entity attributes.
-
When using the Data viewer, lookups are available for the Matches , Does not match, Contains, and Does not contain operators. Learn more about Viewing data object records.
-
The attribute must have a Data density greater than 0%.
After enabling lookup for an attribute:
-
Lookup values for attributes from Master entities will be calculated when the Identity resolution job runs. Lookup values for attributes from all other data objects will be calculated when the Data warehouse job runs.
-
To ensure quick response time, lookup values are cached for seven days. After seven days, the cache expires.
-
New lookup values will be accessible immediately after the Data warehouse job
Enabling lookup for master entity attributes
If you are enabling lookup to master entity attributes for the first time, you will need to do the following:
-
Follow the steps for Managing attributes and select Enable Lookup.
-
When the publish job successfully completes, run the Data warehouse job from the Data feeds page.
-
When the data warehouse job successfully completes, run the Identity resolution job from the Data feeds.
If you have previously enabled lookup for an attribute in a master entity and want to enable lookup for a newly created attribute for the same master entity, you will need to complete additional tasks.
Example: You previously enabled lookup for the City attribute in MasterCustomer. You now want to create the Province attribute for MasterCustomer and enable lookup for this new attribute. You will need to complete the additional steps below.
To enable lookup for a new master entity attribute after previously enabling lookup for a different attribute in the same master entity, you will need to do the following:
Note: To complete these steps, you need the Instance admin user role.
-
First follow the steps for Creating attributes for master entities.
-
Follow the steps for Managing attributes and select Enable Lookup.
-
Update the state of the existing cube for the master entity to Deleted. See the steps for deleting an existing cube.
-
Follow the steps for Publishing changes.
-
When the publish job successfully completes, update the state of the existing cube for the master entity to Active. See the steps for updating a deleted cube to active.
-
Follow the steps for Publishing changes.
-
When the publish job successfully completes, run the Data warehouse job from the Data feeds page.
-
When the data warehouse job successfully completes, run the Identity resolution job from the Data feeds page.
See the specific steps below for updating the status of the existing cube.
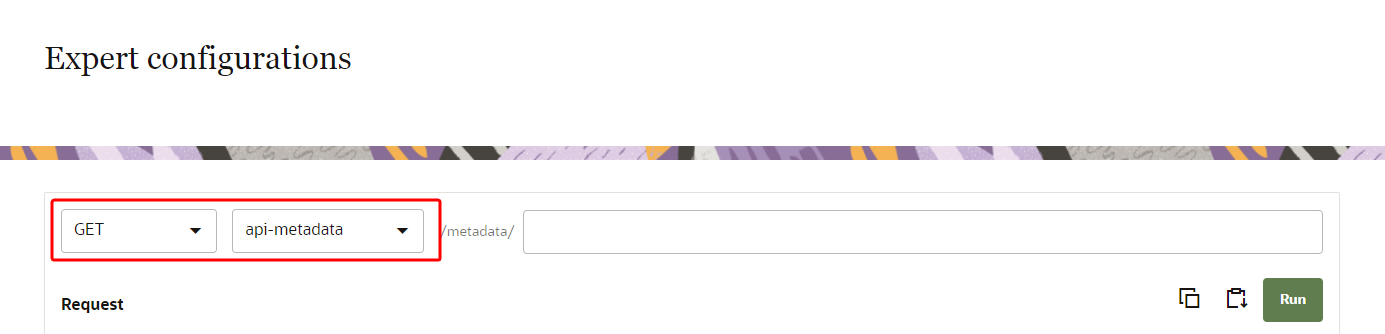
- Navigate to the expert config page of Oracle Unity by going to the following URL: https://[your cxunity hostname]/data/?root=expertConfig.
- Select GET and api-metadata.
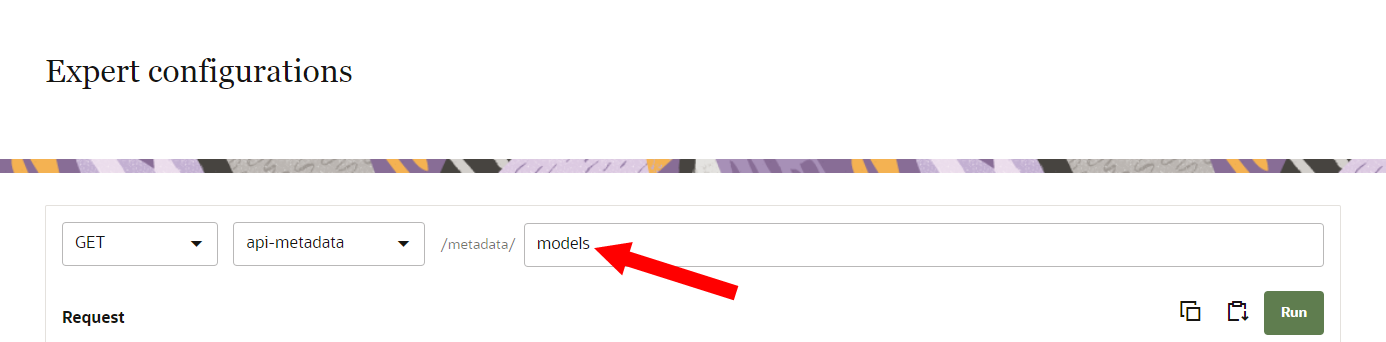
- In the input field, enter models and click Run.
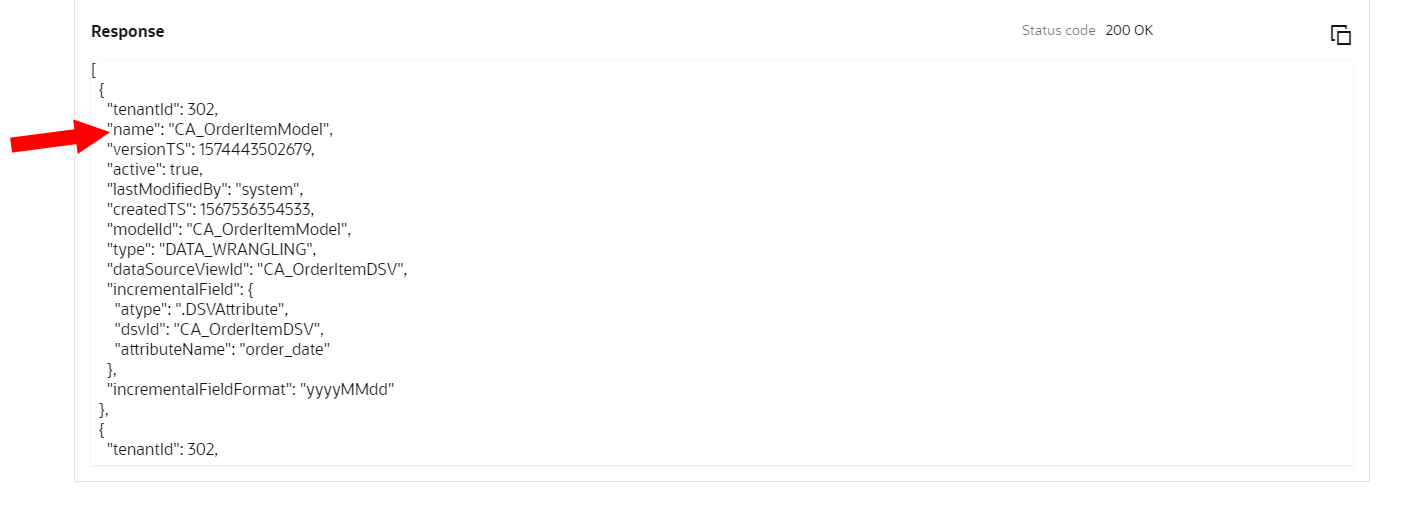
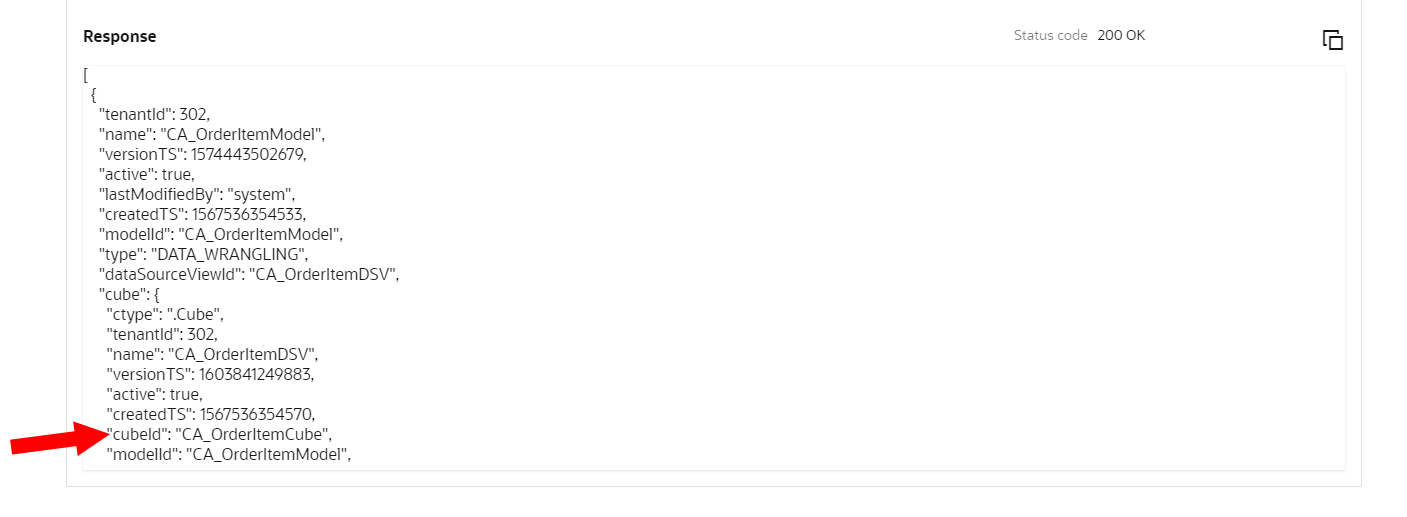
- In the Response section, note the model "name" you want to update. You will use this model ID name in the next step. The naming convention for models is: CR_[master entity]_Model. For example, the model ID name for MasterCustomer is CR_MasterCustomer_Model.
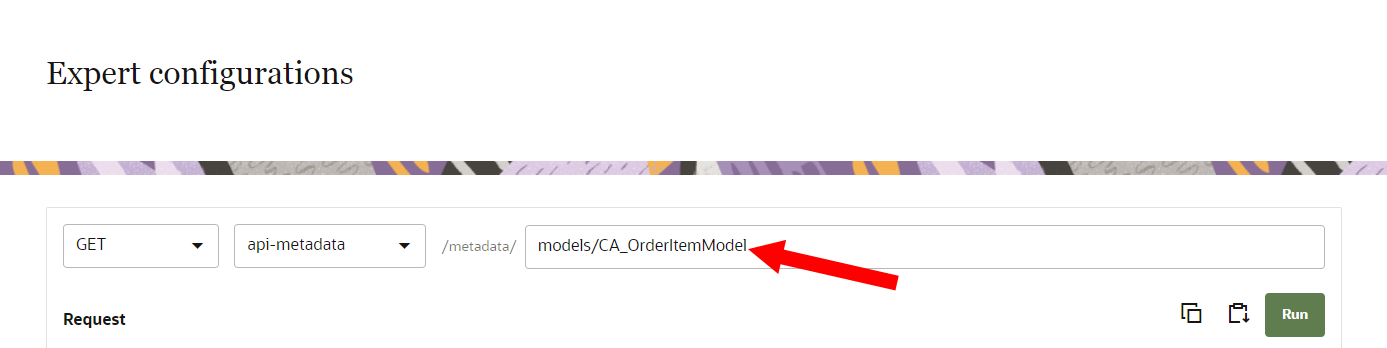
- In the input field, enter models/[modelID name] and click Run.
- Note the "cubeId" for the model. You will use this cube ID name in the next step. The naming convention for cubes is: CR_[master entity]_Cube. For example, the cube for MasterCustomer is CR_MasterCustomer_Cube.
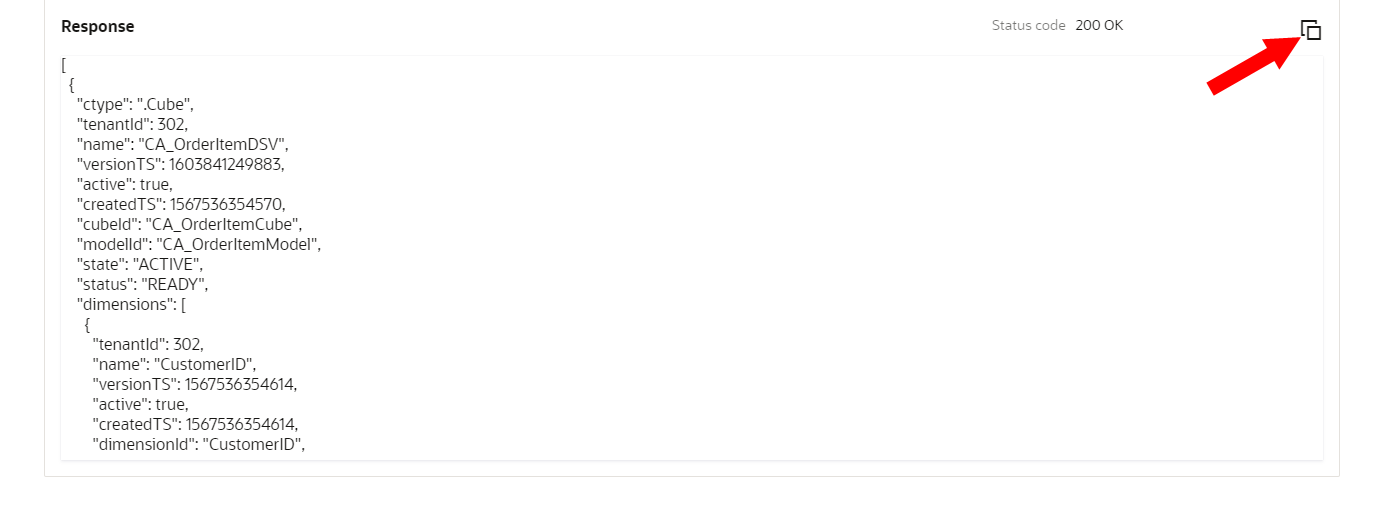
- In the input field, enter models/[modelId name]/cubes/[cubeId] and click Run.
- Click Copy
 .
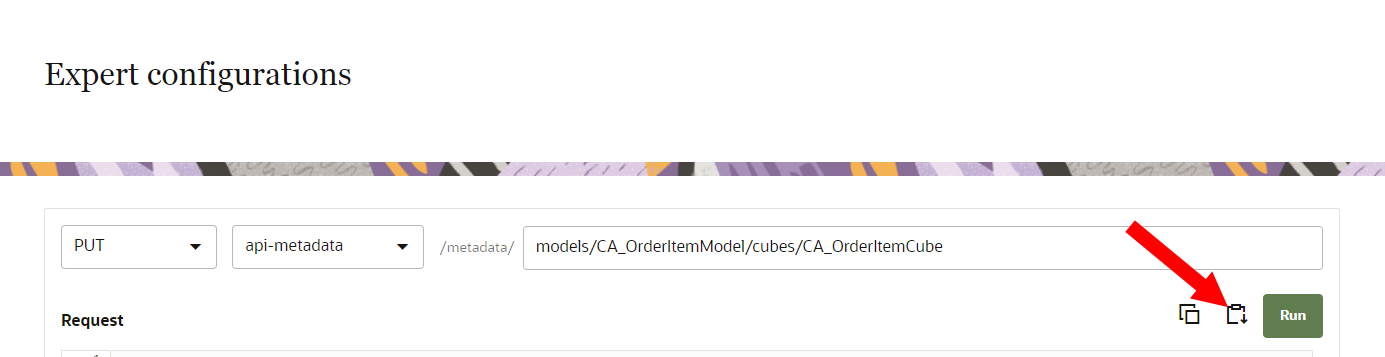
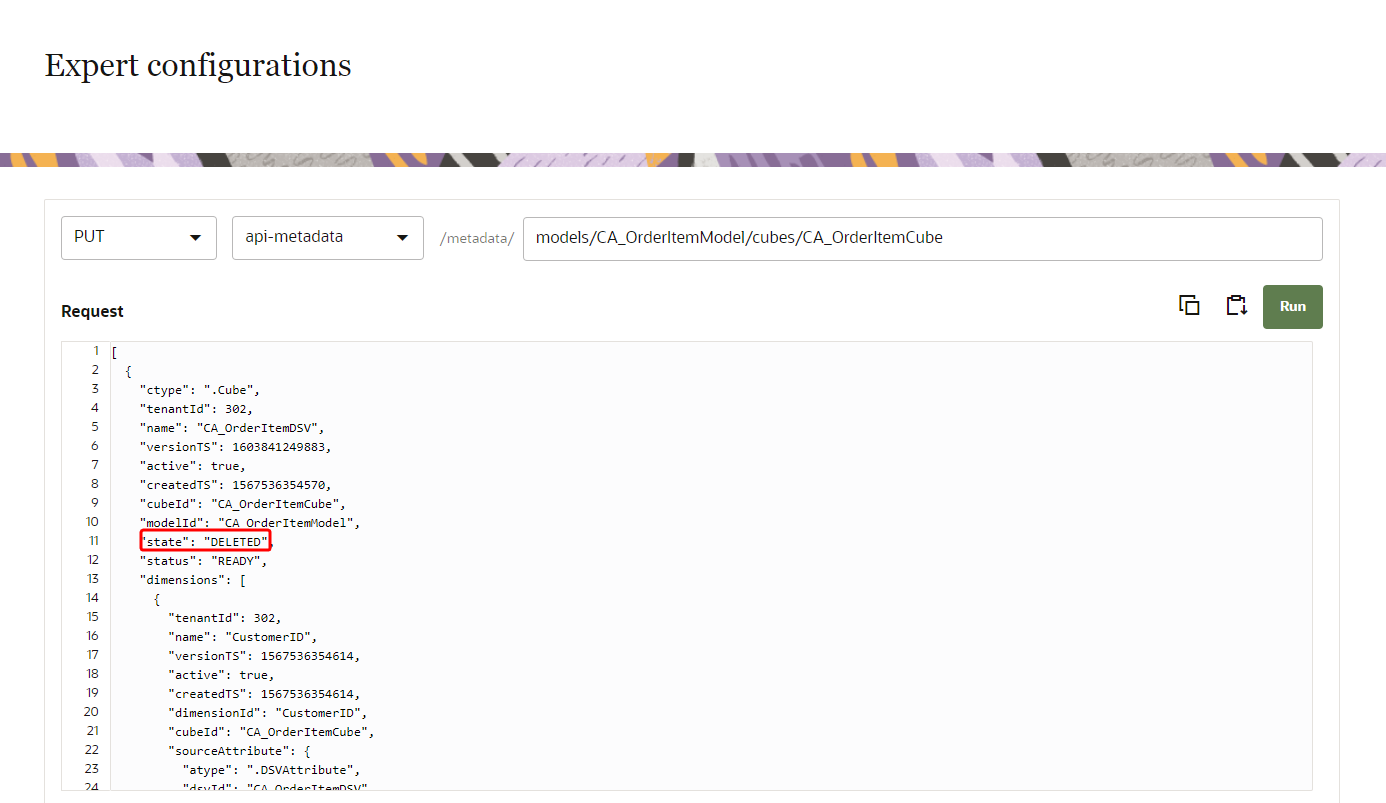
. - Select PUT and api-metadata. Make sure the existing entry for models/[modelId name]/cubes/[cubeId] remains.
- Click Paste
 .
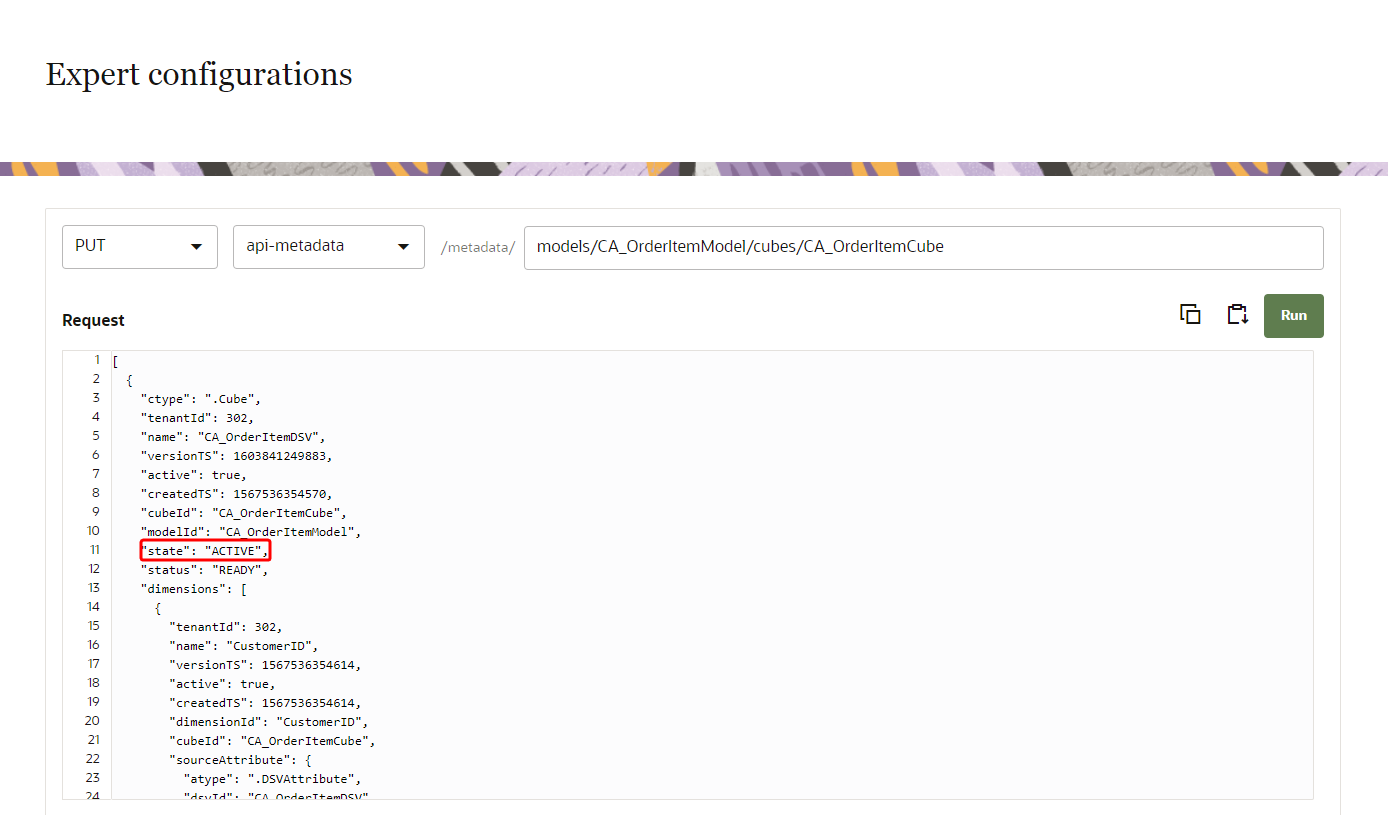
. - In the Request section, update "state": "ACTIVE" to "state": "DELETED".
- Click Run.


To update a deleted cube to active:
- Navigate to the expert config page of Oracle Unity by going to the following URL: https://[your cxunity hostname]/data/?root=expertConfig.
- Select GET and api-metadata.
- In the input field, enter models and click Run.
- In the Response section, note the model "name" you want to update. You will use this model ID name in the next step. The naming convention for models is: CR_[master entity]_Model. For example, the model ID name for MasterCustomer is CR_MasterCustomer_Model.
- In the input field, enter models/[modelID name] and click Run.
- Note the "cubeId" for the model. You will use this cube ID name in the next step. The naming convention for cubes is: CR_[master entity]_Cube. For example, the cube for MasterCustomer is CR_MasterCustomer_Cube.
- In the input field, enter models/[modelId name]/cubes/[cubeId] and click Run.
- Click Copy .
- Select PUT and api-metadata. Make sure the existing entry for models/[modelId name]/cubes/[cubeId] remains.
- Click Paste .
- In the Request section, update "state": "DELETED" to "state": "ACTIVE".
- Click Run.
Segmentation attribute lookups