Ongoing User Security
This section describes tasks that are typically performed within or with the NetSuite Point of Sale (NSPOS) secure environment after the initial implementation.
Register Use
A cashier, sales associate, or other authorized operator can perform the following customer transactions from an NSPOS register:
-
Process Sales Transactions
-
Apply Discounts
-
Make limited adjustments to how Sales Taxes are applied
-
Suspend, Resume, Cancel Transactions
-
Print and reprint Receipts
-
Look up Past Transactions
-
Change the Sales Associate assigned to a transaction
-
Process Sales Orders
-
Process Returns
-
Sell or redeem a Gift Card or Gift Certificate
For information about daily register tasks involving transactions, see Basic Sales Transactions in the NetSuite Point of Sale Administrator Guide.
Auto Log Out for Idle Time
It's important not to leave an NSPOS register unattended. The methods used to lock out a register if it's left idling depend on the cashier or other user's role.
-
Administrator role - If a register is left idle for 15 minutes, the administrator is logged off and the register switches to Closed Mode. Access to NSPOS from the register is denied until that user or another user logs on.
-
Non-administrator roles - The idle time minutes allowed can be adjusted by role. See Update a Password Policy to find the password policy associated with a role. Then update the Auto Logout Period in Minutes field.
Lock Down vs. Log Out
An automatic lock down disables access to NSPOS registers while leaving the cashier logged in. A log out ends the cashier's NSPOS session.
-
When locked down:
-
NSPOS appears closed, but the cashier is still logged in.
-
Any task or transaction that the cashier had open before lock down is kept open. This behavior means that the cashier can continue where they left off.
-
Only the logged in cashier or an administrator can unlock an NSPOS register.
-
-
When Logged out:
-
The cashier is logged off NSPOS, closing the session. The register isn't 'locked down.'
-
Any task or transaction that was open before log out is closed.
-
For administrators customizing NSPOS settings, logging out causes any unsaved changes to be lost.
-
Any cashier or other user can log into a register after the previous user has logged out.
-
You should never leave an NSPOS register unattended with an open session under any circumstances. If a cashier must leave the register area, they should log off first.
Cashiers must log out when their shift ends. Otherwise, NSPOS will lock down after a predetermined period and a cashier starting a new shift on the register will be unable to log in.
To open a register that was left locked after shift end, either the logged in cashier must return to unlock NSPOS or the manager must locate an administrator to perform the task.
Employee Set up and Maintenance
NSPOS uses a combination of NetSuite ERP operations and functions available from the register to manage employee access.
Set up a new Employee (Operator)
Employees are called operators in NSPOS. Administrators set up new NSPOS operators for their retail business. Set up takes place in the NetSuite ERP online application and in the manager tools found in NSPOS. The second part can be performed from any NSPOS register.
The procedure is to:
-
Create the Employee record and RA-Operator ID in NetSuite
-
Complete the Operator setup in NSPOS using the Manager Functions button.
By default, the Manager Functions button is located on the main (bottom) button bar in the Journal window. Your company's custom setup may have the button in a different location or under a different name.
For complete steps, see Setting up a New Employee in the NetSuite Point of Sale Administrator Guide.
Reset an Employee's Password
Administrators can reset an employee's (operator's) NSPOS password from any register. This procedure can be used when they have forgotten their password, believe it has been compromised, or as part of a standard security task.
See Resetting an Employee NSPOS Password in the NetSuite Point of Sale Administrator Guide.
Change an Employee's Security Role Assignment
Administrators can adjust a NSPOS security role assignment. This adjustment can be used for permanent assignments or for things like covering a shift gap by temporarily assigning a manager role to a sales associate/cashier. The administrator can reverse temporary assignments by using the same procedure.
See Changing an Employee's Security Role in the NetSuite Point of Sale Administrator Guide.
Block an Employee's Access to NSPOS
Administrators can remove an employee's (operator's) access to sign into NSPOS by setting their role to Disabled. This role change doesn't remove the employee from the system, but it does lock them out. Keeping the employee in the system is important in the event you must research their NSPOS history.
See Disabling an Employee's Access to NSPOS in the NetSuite Point of Sale Administrator Guide.
Assign Operator Roles to Limit Access
In NSPOS, we call employees or users that perform register tasks or are responsible for maintaining the application operators. Operators include all positions below. The list of duties isn't comprehensive. These are brief descriptions only and your business might use its own customized positions or roles.
-
Sales Associates - Perform sales transactions and work with customer information.
-
Specialists - Perform tasks that require training and responsibilities beyond a basic sales associate.
-
Openers/Closers - Perform sales associate and specialized tasks plus can be delegated to perform beginning of day and end of day till tasks.
-
Managers - Perform beginning of day and end of day till tasks, can sign in during transactions to authorize discounts or other overrides, run reports and assist employees with optional time clock issues.
-
Administrators - Set up employees, customize NSPOS to fit business needs, perform other administrator and system tasks.
|
Operator Role / Group |
Operator Role / Group ID |
Resource ID |
|
Sales Associate, Cashier, xPOS Access |
100 |
2 |
|
Specialist |
200 |
2 |
|
Opener / Closer |
500 |
9050 |
|
Manager |
700 |
9070 |
|
System Administrator |
900 |
9090 |
Password Requirements
Signing into NSPOS requires entering a User ID and Password. NSPOS uses the Payment Card Industry Software Security Framework (PC SSF) to determine requirements for setting and maintaining passwords. See Appendix: PCI SSF Information for NSPOS in the NetSuite Point of Sale Administrator Guide.
NSPOS uses different password requirements for administrator roles and roles that don't require administrator-level access. Administrators can adjust the requirements for non-administrator roles.
Requirements for Administrator Roles
Administrators can't adjust the requirements for their role.
-
Passwords must be at least 7 characters and include both letters and numbers.
-
Passwords must change every 90 days.
-
New passwords must be different than the previous 5 passwords.
Default Requirements for Non-administrator Roles
For managers, sales associates and other operators, the administrator is responsible for setting up their passwords and password policies per your store or company's policies. Administrators can adjust the requirements for non-administrator roles by adjusting a role's password policy. See Update a Password Policy.
The following are the default requirements for non-administrator roles:
-
Length must be at least 8 characters, maximum 128 characters
-
Must include at least 1 number (
0-9) -
Must include at least 1 lowercase alpha character (
a-z) -
Must include at least 1 uppercase alpha character (
A-Z) -
Must include at least 1 non-alphanumeric character (
!@#$%^&*.:;~'` "*/\+?-,_|=()[]{}<>) -
Passwords expire after 180 days
-
Account is locked after 5 failed login attempts
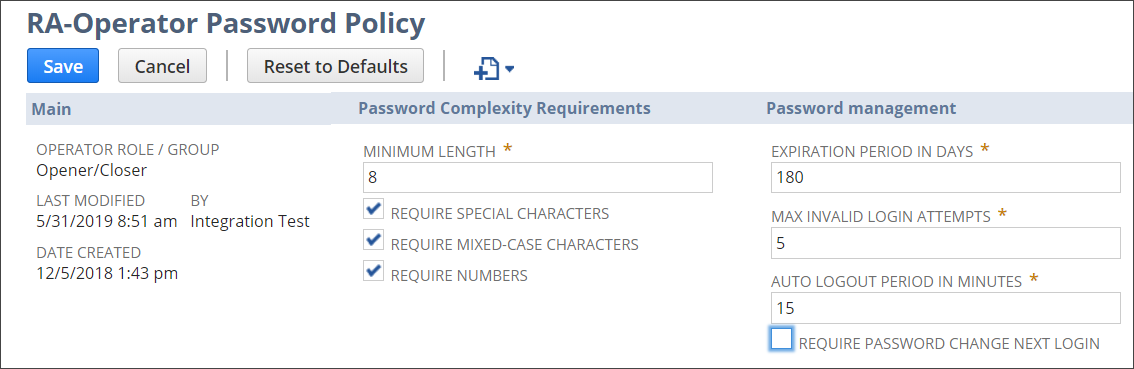
Update a Password Policy
Administrators make updates to a password policy by editing a Role's NetSuite ERP RA-Operator Password Policy record. Each Role has a separate record and can have a unique policy. Policy updates download to your registers during the normal synchronization process.
If a user is assigned a different Role, they might be required to change their password at the next login.
To update Password Policy rules:
-
Log in to NetSuite as an administrator.
-
Go to Customization > Lists, Records & Fields > Record Types.
-
Locate the RA-Operator Password Policy row.
-
Click List.
The RA-Operator Password Policy List displays the current password setup for all Roles.
-
Click Edit for a Role to make changes.
 Tip:
Tip:Use the System Notes subtab on the record to view your history of Password Policy changes.
-
Select the Operator Role/Group to which the password policy will apply.
-
Set the desired policy for the Role:
-
Minimum Length - Enter the minimum password character length allowed.
-
Values: 8 - 128
-
Default: 8
-
-
Require Special Characters - If checked, password must include at least one non-alphanumeric character (
!@#$%^&*.:;~'` "*/\+?-,_|=()[]{}<>).-
Values: Yes (checked), No (cleared)
-
Default: Yes
-
-
Require Mixed-Case Characters - If checked, password must include at least one uppercase alphabetic character (
A-Z) and one lowercase alphabetic character (a-z).-
Values: Yes (checked), No (cleared)
-
Default: Yes
-
-
Require Numbers - If checked, password must include at least one number (
0-9).-
Values: Yes (checked), No (cleared)
-
Default: Yes
-
-
Expiration Period in Days - Number of days after current password was set before user is required to change their NSPOS password.
A value of 0 (zero) means that passwords don't expire.
-
Values: 0 - 365
-
Default: 180
-
-
Max Invalid Login Attempts - Number of failed login attempts before the user's account is locked. If a user is locked out, they can't log in until an administrator unlocks their account.
See Unlocking an Employee NSPOS Account in the NetSuite Point of Sale Administrator Guide.
A value of 0 (zero) means the Invalid Login Attempts feature is disabled.
-
Values: 0 - 10
-
Default: 5
-
-
Auto Logout Period in Minutes - If a register is left idle for this period, the register automatically logs the user out. They must log in again to resume activity.
A value of 0 (zero) means the Auto Logout Period feature is disabled.
-
Values: 0 - 60
-
Default: 15
-
-
Require Password Change Next Login - If checked, all users with the selected Role must change their password the next time they log in.
-
Values: Yes (checked), No (cleared)
-
Default: No
-
Tip:Use the User Notes subtab to list why a policy was changed. Click New Note.

-
-
Click Save.
Minimum Security Standards Warning
If an administrator sets one or more fields to values that don't meet minimum guidelines, NetSuite ERP displays a warning when they click Save.
The administrator can:
-
Click OK to update the policy, or
-
Click Cancel to go back and adjust the settings.