Configuring Tenders
Note:
Only tenders of type Miscellaneous, Currency, and Credit Card can be created through Oracle Retail Xstore Office. Tender type codes (tnd_tndr_typcode) must be pre-defined in the Xcenter (part of Oracle Retail Xstore Office) database to create tenders.
Base Oracle Retail Xstore Point of Service only supports USD (US Dollar), CAD (Canadian Dollar), EUR (Euro), GBP (British Pound), and JPY (Japanese Yen) without additional Oracle Retail Xstore Point of Service changes. If support for other currencies is required, contact your Oracle representative for more information.
...continued from step 4
-
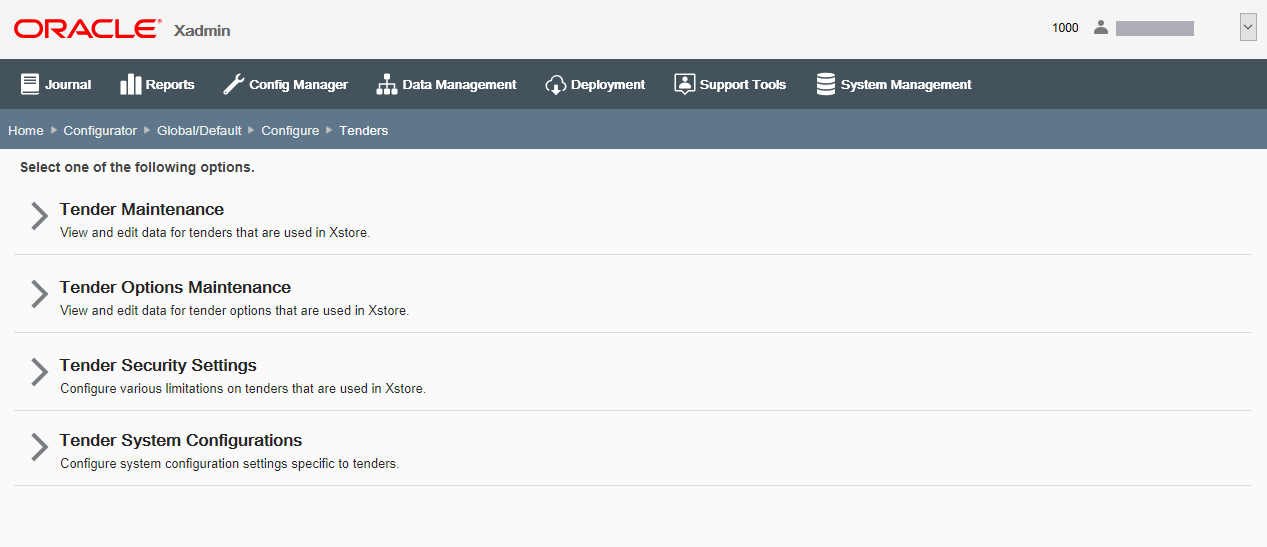
Select an option from the Tender Configuration page:
Figure 5-47 Tender Configuration Page Options
-
Select Tender Maintenance to view and edit data for tenders that are used in Oracle Retail Xstore Point of Service. Continue with step 2 below.
Note:
The Tender Maintenance option is only available at the global level.
-
Select Tender Options Maintenance to view and edit data for tender options that are used in Oracle Retail Xstore Point of Service. Skip to Tender Options Maintenance.
-
Select Tender Security Settings to configure tender limitations in Oracle Retail Xstore Point of Service. Skip to Tender Security Settings.
-
Select Tender System Configurations to configure the system configuration settings that apply specifically to tenders. Skip to Tender Configuration: System Configuration Options.
-
-
Select a Tender Type from the list, then click Next.
-
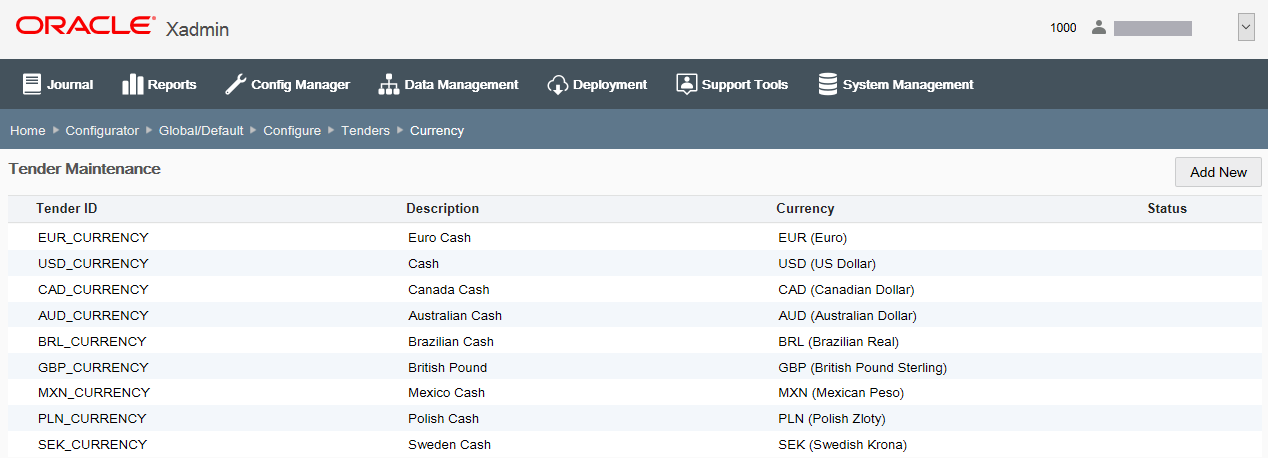
At the Tender Maintenance page, add a new tender or edit an existing tender:
Figure 5-48 Tender Maintenance Page - Currency Example
If adding a new tender:
-
Click Add New.
Note:
Only tenders of type Miscellaneous, Currency, and Credit Card can be created through Oracle Retail Xstore Office.
-
Complete the fields as required, then click Next. See Tender Configurations for a list of tender configuration options.
-
Skip to step 4 on page 54 to review your selections.
If editing an existing tender:
-
Select the tender in the list.
-
At the Tender Detail window, click Edit.
-
Complete the fields as required, then click Next. See Tender Configurations for a list of tender configuration options.
-
Continue with step 4 below to review your selections.
-
-
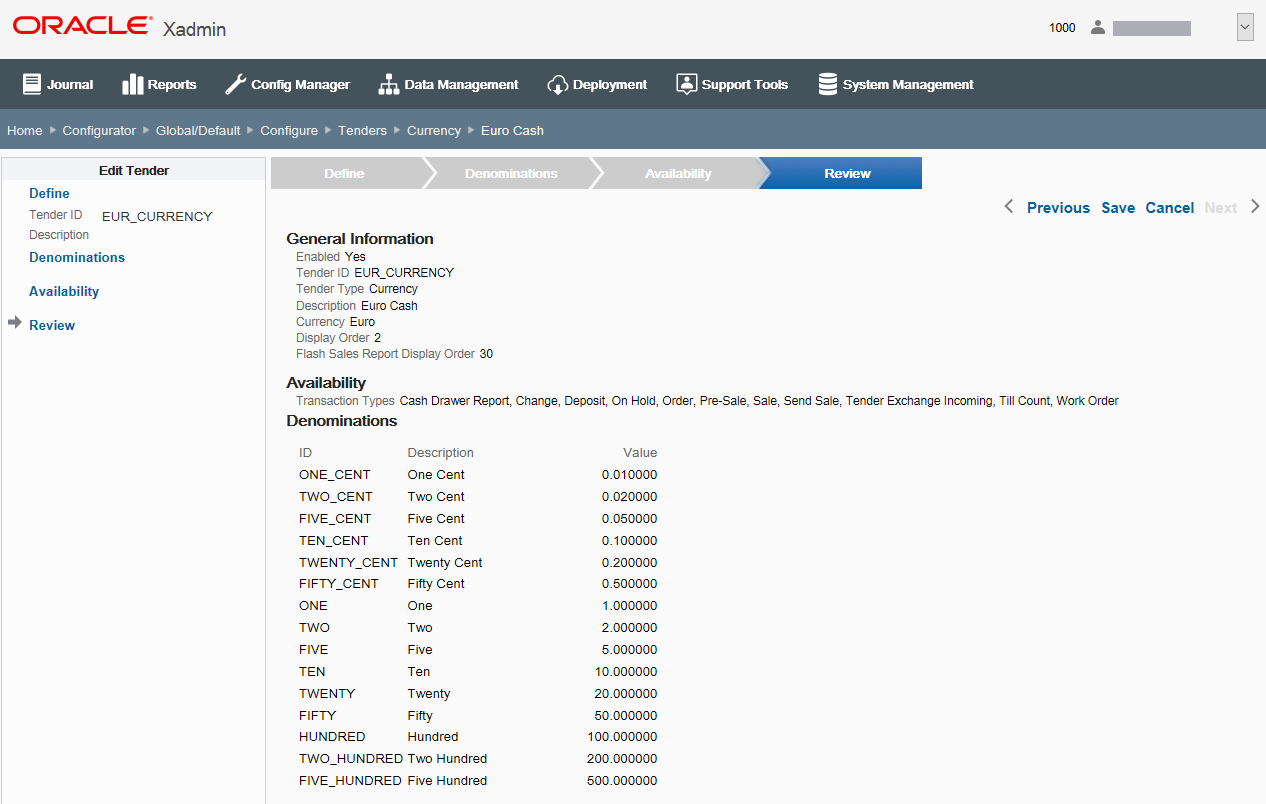
Review the tender information you selected:
Figure 5-49 Tender Information Review
-
To save the tender, click Save. The tender is added to the Tender list.
-
To edit the tender:
-
Click Previous to go back one page, or select a configuration option in the Edit Tender section in the left panel of the window.
After making your changes, click Save. The new tender is added to the Tender list.
-
-
To discard the tender changes, click cancel. When prompted, click Yes to confirm you want to cancel tender setup.
-
-
After completing tender setup, Oracle Retail Xstore Office returns to the Tender Maintenance page.
-
To deploy your changes, see Deploying Configuration Changes.
-
To view a summary list of a profile element's configuration changes to identify how it differs from the global configuration, see Viewing Configuration Changes.
-
[CONFIGURATION OVERRIDES & STORE SPECIFIC OVERRIDES ONLY] - To delete the current profile element configuration changes, see Delete Profile Configuration Overrides.
-
[STORE SPECIFIC OVERRIDES ONLY] - To copy store configurations from another store, see Copy Store Configurations
-
Tender Configurations
This section describes the available tender configurations.
Basic Information
Define the basic information for the tender, then click Next.
-
Tender ID - Enter the tender identifier. This value can only be edited in Add mode.
-
Description - Enter a text description of the tender.
-
Locale - If needed, select a translation locale and enter the description for the locale.
-
Currency - Set up the Currency ID:
Note:
This option allows you to set the Currency ID on any tender to a keyword "*" that represents the local currency. For any tenders that have this keyword "*" set as the currency ID, Oracle Retail Xstore Point of Service will retrieve the local currency ID from SysConfig.xml
This makes it easier to set up tender types to always use the local currency of the store rather than needing to explicitly define each tender with a specific currency ID.
For example, rather than setting up Visa/USD, Visa/CAD, Visa/AUD, and so on., it is possible to simply use the "*" keyword for the Visa tender to instruct Oracle Retail Xstore Point of Service to retrieve the store's local currency ID automatically for Visa.
-
To set the Currency ID to Xstore's local currency, disable the "Does this tender use a specific Currency?" check box. This automatically sets the currency ID to "*". In Oracle Retail Xstore Point of Service, this "*" value is recognized as a directive to use the local currency for the tender.
-
To set the Currency ID to a specific value, enable the "Does this tender use a specific Currency?" check box. When prompted, select a Currency ID from the list of available currencies. Oracle Retail Xstore Point of Service will use the selected Currency ID for the tender.
-
-
Include in Flash Sales Report? - If selected, the tender will be included on the Flash Sales Report. When prompted enter the order in which it should appear on the report in the Flash Sales Report Display Order field.
-
Display Order - Determines the order in which tenders display on the count page during closing.
-
Enabled check box - When selected, the tender is available for use.
Denominations Information [DENOMINATION Tender Types Only]
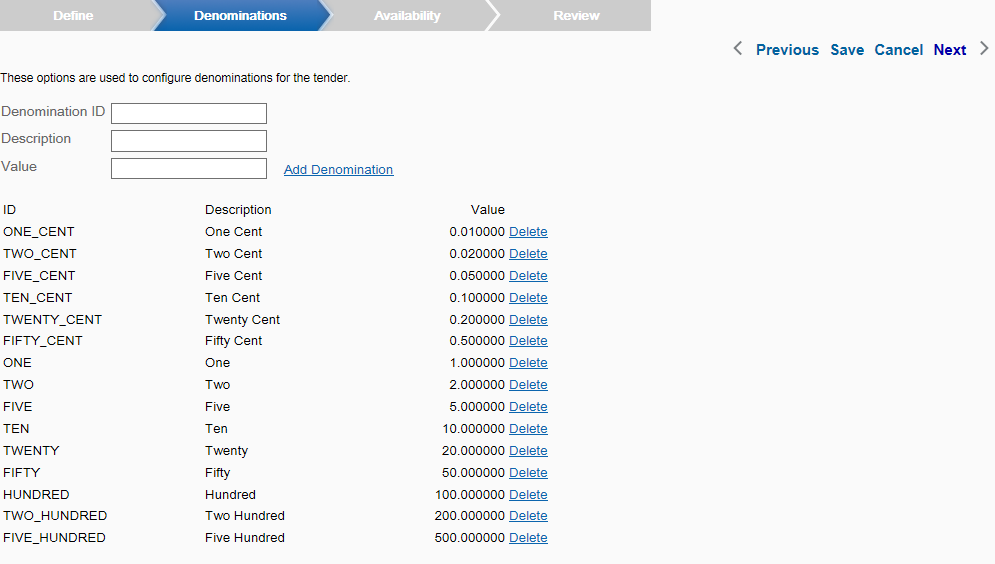
Configure denominations for the tender.
Figure 5-50 Denomination Information Tab
-
To add a new denomination, enter the following denomination detail, then click Add Denomination:
-
Denomination ID - The denomination identifier.
-
Description - The denomination description
-
Value - The denomination value
Note:
A Delete option is available after adding a denomination.
-
Tender Options Maintenance
-
Select Tender Options Maintenance from the Tender Configuration page (Figure 5-47).
-
Select a Tender Type from the list, then click Next.
-
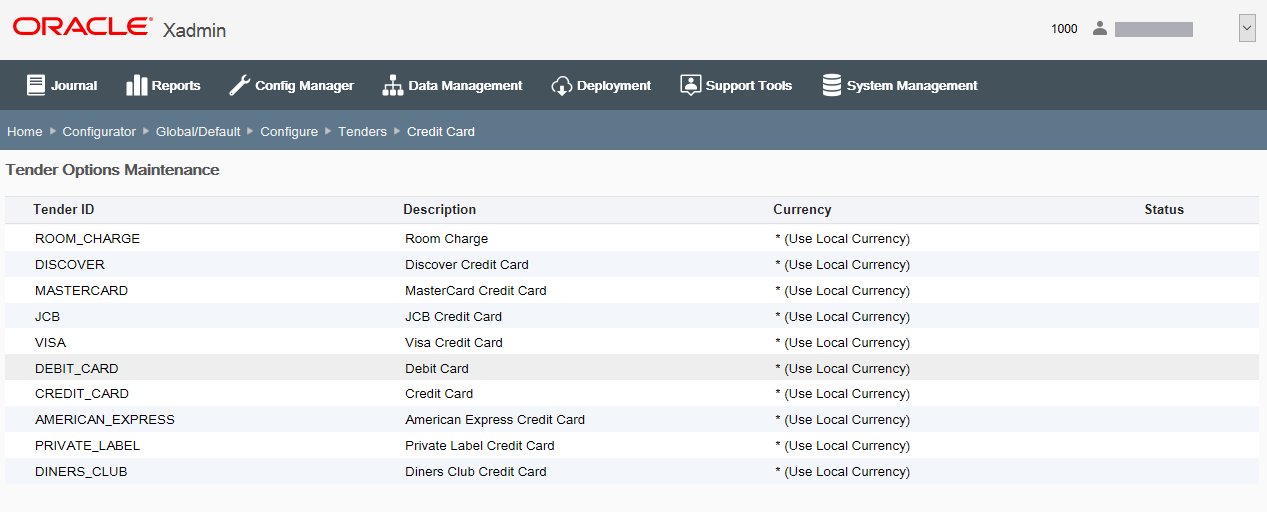
At the Tender Options Maintenance page, select a tender from the list.
Figure 5-51 Tender Options Maintenance Page
-
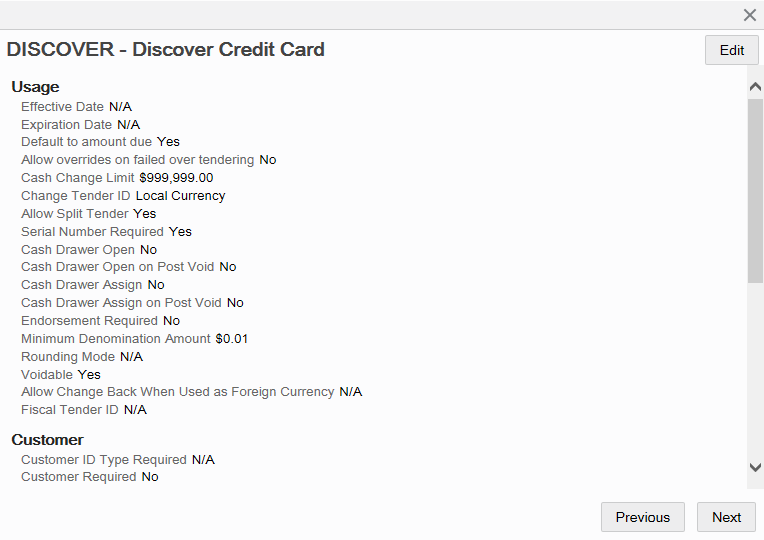
At the Tender Options Detail window, click Edit.
Figure 5-52 Tender Options Detail Window
-
Complete the fields as required, then click Next. See Tender Options Configuration for a list of configuration options.
-
Review your selections and skip to step 4 on page 54 to complete tender options setup.
Tender Options Configuration
This section describes the tender options.
Usage Information
Define how the tender will be used.
-
Effective Date - [OPTIONAL] Enter the effective date. Allows entry using the calendar component.
-
Expiration Date - [OPTIONAL] Enter the expiration date. Allows entry using the calendar component.
-
Does this tender default the tender amount to the amount due? - If selected, the amount due from the customer is shown as a default value in the focus bar at tendering.
-
Is a failed over tendering attempt allowed to be overridden for this tender? - If selected, the over tender limit can be overridden.
-
Is there a limit to the amount of cash change? - If selected, enter the maximum amount of cash that can be given as change when this tender is used as payment.
-
Is there a required tender to give as change when the cash change limit has been exceeded? - If selected, choose the tender to be used as change after the cash change limit has been reached.
-
-
Are split tenders allowed? - When selected (default), this tender can be used if there are tenders in the current transaction. If this option is not selected, the tender amount entered cannot be less than what is due on the transaction.
-
Is a serial number required? - If selected, the serial number of the tender type must be captured as part of the tender process.
-
Open cash drawer? - If selected, the cash drawer opens when the tender type is offered by the customer.
-
Open cash drawer on Post Void? - If selected, open the cash drawer each time a post void is performed using this tender.
-
Assign cash drawer? (Networked cash drawers only)
-
Assign cash drawer on Post Void? (Networked cash drawers only)
-
Is endorsement/franking required? - If selected, an endorsement or franking is required before this tender can be accepted.
-
Is this tender able to be voided? - If selected, this tender can be voided.
-
Is there a minimum denomination amount used for currency rounding for this tender? - If selected, enter the minimum denomination value when prompted.
-
When used as foreign currency, is change allowed back on this tender? - If selected, giving change in foreign cash currency is allowed. If not selected, any change due is given in the local currency.
-
Is there a required fiscal tender ID?
Customer Information
Define how the customer will use the tender.
-
Is customer identification required? - If selected, choose the type of customer identification required.
-
Is customer association required? - If selected, a customer must be associated with this tender.
-
Is customer signature required? - If selected, a customer signature is required before this tender can be accepted.
-
Are there a minimum and maximum days for a return with this tender? - If selected, enter the minimum number of days and maximum number of days allowed for return of an item to use this tender for refund.
Authorization Information [AUTH tender types only]
Configure authorization rules for the tender.
-
Is a swipe on a magnetic stripe reader (MSR) required? - If selected, the tender must be inserted into the magnetic card reader.
-
Is authorization required? - If selected, authorization is required before the tender can be accepted.
Enter/select authorization information when prompted:
-
Authorization Method - Select the authorization method from the list.
-
Is postal code entry required? - If selected, a postal code must be associated with this tender.
-
Is expiration date entry required? - If selected, this type of tender requires an authorization expiration date and it must be recorded at the time of settlement. (Used to enable expiration date prompting for a major credit tender.)
-
Is CID entry required when swiped? - If selected, the card ID is required when this card is swiped.
-
Is CID entry required when keyed? - If selected, the card ID is required when this card is keyed into the system manually.
-
Is PIN entry required? - If selected, the customer must enter a personal identification number (PIN) to validate the method of payment.
-
Count Information [COUNT Tender Types Only]
Specify the options used to configure counting and reporting rules for the tender.
-
Is this tender counted independently from tender type? - If selected, the tender will be counted separately. When prompted, choose the Till Count Method to be used from the list. If not selected, the tender will be counted as part of its tender category grouping.
Note:
This option is automatically selected for cash currency and cannot be deselected.
-
Is a recount required if tender does not balance? - If selected, enter the Close Count Discrepancy Threshold value when prompted.
-
Reporting Group - Select the reporting group for the tender:
-
Tender Summary group
-
Foreign Currency group
-
-
Is a suggested deposit amount required? - If selected, enter the Suggested Deposit Threshold value when prompted.
-
Are the counts and amounts pre-populated? - If selected, the system counts the tender automatically to populate the system tender.
Tender Security Settings
Note:
The combination of Tender ID, Security Group, Usage Code, and Entry Method must be unique.
-
Select Tender Security Settings from the Tender Configuration page (see Figure 5-42).
-
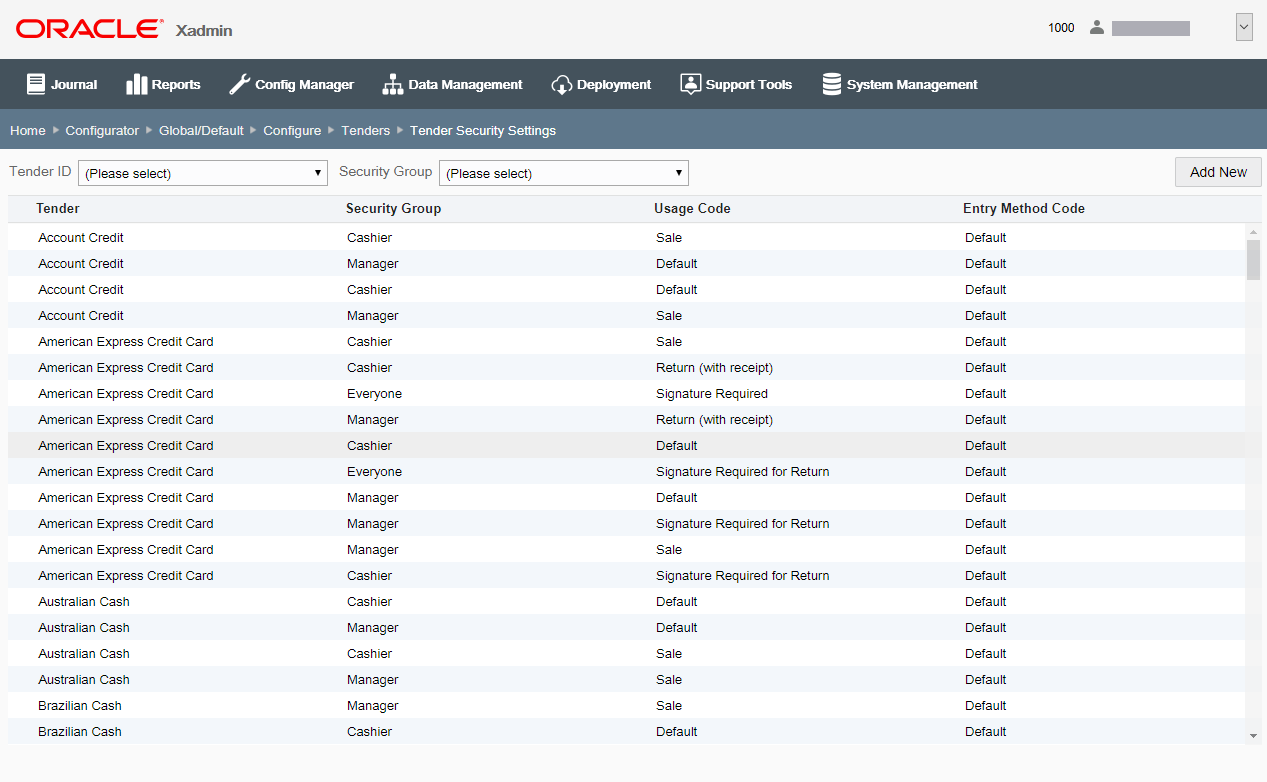
At the Tender Security Settings page, you can add a new security setting or edit an existing one.
Figure 5-53 Tender Security Settings Page
Note:
Use the Tender ID and Security Group filters to locate a tender/ security group in the list.
If adding a new tender security setting:
-
Click Add New.
-
At the Security Setting Detail window, complete the fields as required, then click Save. See Tender Security Settings Configuration Options for a list of configuration options.
If editing an existing tender security setting:
-
Select the tender security setting in the list.
-
At the Security Setting Detail window, complete the fields as required, then click Save. See Tender Security Settings Configuration Options for a list of tender configuration options.
-
-
After completing tender security setting setup, Oracle Retail Xstore Office returns to the Tender Security Settings list page.
-
To deploy your changes, see Deploying Configuration Changes.
-
To view a summary list of a profile element's configuration changes to identify how it differs from the global configuration, see Viewing Configuration Changes.
-
[CONFIGURATION OVERRIDES & STORE SPECIFIC OVERRIDES ONLY] - To delete the current profile element configuration changes, see Delete Profile Configuration Overrides.
-
[STORE SPECIFIC OVERRIDES ONLY] - To copy store configurations from another store, see Copy Store Configurations.
-
Tender Security Settings Configuration Options
The available configuration options depend upon the selected Tender and Usage Code.
General Information
Note:
The following fields cannot be changed in edit mode.
-
Tender ID - Select the tender identifier from the list.
-
Security Group - Select the security group from the list.
-
Usage Code - Select the usage code from the list.
-
Entry Method Code - Select the entry method code from the list.
Limits
-
Maximum amount allowed to over tender - Enter the maximum amount allowed to over tender.
-
Minimum amount Accepted - Enter the minimum amount that can be accepted.
-
Maximum amount Accepted - Enter the maximum amount that can be accepted.
Online Authorization Rules
[only shown for tenders that require authorization]
-
Authorization needed when amount is above - Enter the maximum value that can be accepted without authorization.
-
Maximum amount allowed to authorize - Enter the maximum value of an individual tender type that can be authorized either in-house or by a third party. This especially applies to checks where the check authorization company sets a ceiling by retailer.
Offline Authorization Rules
[only shown for tenders that require authorization]
-
Authorization needed when amount is above - Enter the maximum value that can be accepted without authorization when in offline mode.
-
Maximum amount allowed to authorize - Enter the maximum value of an individual tender that the system accepts without authorization when in offline mode.
Tender Configuration: System Configuration Options
Note:
The system configuration options for tenders in this feature are simply a subset of the system configuration options available from Oracle Retail Xstore Point-of-Service System Config Options. See Configuring Xstore Point-of-Service System Config Options for more information.
The following configurations apply specifically to tenders. The categories have been set up as follows:
-
Charity
-
Closing Options
-
Discount Options
-
House Accounts
-
Opening Options
-
Returns
-
Store Specific
-
Tender
-
Tender Options
-
Till Accountability
Charity
-
Enable Prompting User When Voiding Charity Line Item? - Determines whether the system displays the notification message when a charity item is voided if tendering is canceled.
Closing Options
-
Perform Till Count During Close? - Determines whether the system prompts the associates to perform a till closing count at register close.
Discount Options
-
Define the rounding method used for the application of discounts - How Should Price Be Rounded After Discount Applied? Select the local currency amount
-
Half Up - Round to the nearest neighbor unless equidistant, then round up.
-
Half Down - Round to the nearest neighbor unless equidistant, then round down.
-
Half Even - Round to the nearest neighbor unless equidistant, then round to even neighbor. Example: 2.5 rounds to 2 while 3.5 rounds to 4.
-
Ceiling - Round toward positive infinity. Note: This is the opposite of FLOOR and never decreases the calculated value.
-
Down - Round to the next digit; closer to zero.
-
Floor - Round down toward negative infinity. Note: This is the opposite of CEILING and never increases the calculated value.
-
Up - Round to the next digit; away from zero.
-
Unnecessary - Rounding is not necessary.
-
-
Tender rounding as transaction discount - Determines whether or not the system allows applying a discount/markup for tender rounding.
House Accounts
-
Manager Override When Tender Amount Exceeds House Account Balance? - Determines whether the system prompts for manager override if the tender amount exceeds the remaining balance of the house account.
-
If set to Yes, and a manager-level user is logged in, the system displays the credit limit and prompts the user to proceed.
-
If set to Yes, and a user lower than the manager privilege is logged in, and the user chooses to proceed with exceeding the credit limit, the manager security login displays for approval.
-
If set to No, the system does not prompt for manager override.
-
-
Prompt for user information on house account transaction. - Determines whether or not the system prompts for the account user information on any activity for House Accounts.
-
Require the customer to be a House Account owner. -Determines whether or not the system requires the customer of the retail transaction to be the House Account owner in order to access House Account functionality (tender, payment).
-
Specify the amount allowed to over tender the House Account tender over the credit limit. - The threshold amount the system allows when the House Account tender amount exceeds the account credit limit.
-
Specify the phone number to call for manual authorization of a House Account tender over the credit limit. -The phone number for the associates to call for authorization when the House Account tender amount exceeds the account credit limit and the exceeded amount is below the threshold amount.
Opening Options
-
Bypass Till Counts on Registers without Cash Drawers - This applies to Register Accountability Only. Used for registers that do not have a cash drawer or do not handle cash. Select Yes to prevent the system from prompting for begin or end count during the register open or close. The system automatically moves all tender amounts from the register/handheld to the store bank. This applies to Register Accountability Only. Used for registers that do not have a cash drawer or do not handle cash. Answer Yes to prevent the system from prompting for begin or end count during the register open or close. The system automatically moves all tender amounts from the register to the store safe.
Returns
-
Prompt For Tender On Credit Card Returns? - Determines whether the system prompts for refund tender amount to be credited back to the original sale credit card.
-
If Yes, the system prompts for the amount to credit back to the original card.
-
If No, the entire refund amount will be credited back to the selected original credit card.
-
Store Specific
-
Default the type of ID for tenders requiring customer identification. - Select the default identification type used for certain tenders that require customer identification information. Valid Values: Drivers License, Social Security, Military ID, Credit Card, Employee ID, Customer Card, Any identification type.
Tender
-
Allow multiple incoming tenders in one transaction. - Determines whether the system allows multiple incoming (exchange from) tenders in a tender exchange transaction.
-
Allow multiple outgoing tenders in one transaction. - Determines whether the system allows multiple outgoing (exchange to) tenders in a tender exchange transaction.
-
Default tender ID to use for change if not specifically configured. - Select the change tender ID the system will use by default if the system cannot find the valid change tender based on the sale tenders. Valid Values: Issue Store Credit, Issue Gift Card.
-
Prompt user to imprint credit card for manual cards. - Determines whether the system prompts the associate to imprint the credit card when there is a manually entered credit card tender in the completed sale transaction.
-
Minimum denomination increment value for quick cash buttons. . - The Quick Cash Buttons will display in increments based on this entry for the minimum denomination factor.
-
Enable Quick Cash Buttons - Determines whether the Quick Cash Button functionality is enabled.
Tender Options
-
Define the threshold for cash tender to invoke additional inofrmation collection. - If the amount of cash paid by a customer exceeds this threshold amount, the system will display the IRS form to gather additional customer information.
-
Display rounded cash total. - Only applicable for currency rounding; indicates whether the rounded cash total is displayed below the transaction total in the viewport.
-
Export hashed account number. - Determines whether or not to include the hashed account number in PosLog.xml.
-
Inform users with a message that no signature is required. - This option controls turning off/on the information message displayed when processing a transaction below a configured value.
-
Method used for masking vouchers and gift card numbers.. - Enter the voucher number masking method.
-
CREDITCARD - Mask all but the last 4-digits of the Account Number.
-
MASK_LAST_4 - Mask (****) the last 4-digits of the Account Number.
-
-
Define the minimum check number the system will accept. - Enter the lowest check number the system will accept when the customer pays with a check.
-
Prompt for birth date when a check is tendered. - Determines whether the system prompts for the customer's birthdate when the customer pays with a check.
-
Require pin pad entry for debit tender. - Determines whether a pin pad device is required for tendering with a debit card.
-
Specify the rounding Method to use for local currency. - Select the local currency amount rounding method.
-
Half Up - Round to the nearest neighbor unless equidistant, then round up.
-
Half Down - Round to the nearest neighbor unless equidistant, then round down.
-
Half Even - Round to the nearest neighbor unless equidistant, then round to even neighbor. Example: 2.5 rounds to 2 while 3.5 rounds to 4.
-
Ceiling - Round toward positive infinity. Note: This is the opposite of FLOOR and never decreases the calculated value.
-
Down - Round to the next digit; closer to zero.
-
Floor - Round down toward negative infinity. Note: This is the opposite of CEILING and never increases the calculated value.
-
Up - Round to the next digit; away from zero.
-
Unnecessary - Rounding is not necessary.
-
Till Accountability
-
Count method used for store safe depositt. - The store bank deposit till count method. This configuration is only valid if the store requires an end count of the store bank at store close. Valid Values:
-
Storebank Complete - Brings up the entire store bank end count screen for all tenders.
-
Remaining Cash - Prompt the user to enter the total cash NOT to be deposited to the bank institution.
-
Complete Deposit - Deposit all tenders from the store bank to the bank institution.
-
-
Skip initial count summary. - When initiating a count, determines whether the system displays the tender summary list or the first tender to be counted.
-
Validate cash refund amounts against the current till count. - Determines whether the system validates refund cash amounts to ensure the current till cash amount is greater than the refund cash amount.