14 Tree View
In this chapter you can learn how to build tree structures in your JavaFX application, add items to the tree views, process events, and customize the tree cells by implementing and applying cell factories.
The TreeView class of the javafx.scene.control package provides a view of hierarchical structures. In each tree the highest object in the hierarchy is called the "root." The root contains several child items, which can have children as well. An item without children is called "leaf."
Figure 14-1 shows a screen capture of an application with a tree view.
Creating Tree Views
When you build a tree structure in your JavaFX applications, you typically need to instantiate the TreeView class, define several TreeItem objects, make one of the tree items the root, add the root to the tree view and other tree items to the root.
You can accompany each tree item with a graphical icon by using the corresponding constructor of the TreeItem class or by calling the setGraphic method. The recommended size for icons is 16x16, but in fact, any Node object can be set as the icon and it will be fully interactive.
Example 14-1 is an implementation of a simple tree view with the root and five leaves.
Example 14-1 Creating a Tree View
import javafx.application.Application;
import javafx.scene.Node;
import javafx.scene.Scene;
import javafx.scene.control.TreeItem;
import javafx.scene.control.TreeView;
import javafx.scene.image.Image;
import javafx.scene.image.ImageView;
import javafx.scene.layout.StackPane;
import javafx.stage.Stage;

public class TreeViewSample extends Application {

    private final Node rootIcon = new ImageView(
        new Image(getClass().getResourceAsStream("folder_16.png"))
    );

    public static void main(String[] args) {
        launch(args);
    }

    @Override
    public void start(Stage primaryStage) {
        primaryStage.setTitle("Tree View Sample");

        TreeItem<String> rootItem = new TreeItem<> ("Inbox", rootIcon);
        rootItem.setExpanded(true);
        for (int i = 1; i < 6; i++) {
            TreeItem<String> item = new TreeItem<> ("Message" + i);
            rootItem.getChildren().add(item);
        }
        TreeView<String> tree = new TreeView<> (rootItem);
        StackPane root = new StackPane();
        root.getChildren().add(tree);
        primaryStage.setScene(new Scene(root, 300, 250));
        primaryStage.show();
    }
}
All the tree items created within the for loop are added to the root item by calling the getChildren and add methods. You can also use the addAll method instead of the add method to include all the previously created tree items at once.
You can specify the root of the tree within the constructor of the TreeView class when you create a new TreeView object as shown in Example 14-1, or you can set it by calling the setRoot method of the TreeView class.
The setExpanded method called on the root item defines the initial appearance of the tree view item. By default, all TreeItem instances are collapsed, and must be manually expanded if required. Pass the true value to the setExpanded method, so that the root tree item looks expanded when the application starts, as shown in Figure 14-2.
Figure 14-2 Tree View with Five Tree Items
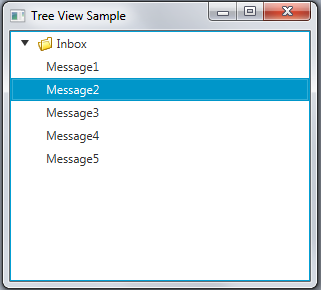
Description of "Figure 14-2 Tree View with Five Tree Items"
Example 14-1 creates a simple tree view with the String items. However, a tree structure can contain items of different types. Use the following generic notation of the TreeItem constructor to define application-specific data represented by a tree item: TreeItem<T> (T value). The T value can specify any object, such as UI controls or custom components.
Unlike the TreeView class, the TreeItem class does not extend the Node class. Therefore, you cannot apply any visual effects or add menus to the tree items. Use the cell factory mechanism to overcome this obstacle and define as much custom behavior for the tree items as your application requires.
Implementing Cell Factories
The cell factory mechanism is used for generating TreeCell instances to represent a single TreeItem in the TreeView. Using cell factories is particularly helpful when your application operates with an excessive amount of data that is changed dynamically or added on demand.
Consider an application that visualizes human resources data of a given company, and enables users to modify employee details and add new employees.
Example 14-2 creates the Employee class and arranges employees in groups according to their departments.
Example 14-2 Creating a Model of the Human Resources Tree View
import java.util.Arrays;
import java.util.List;
import javafx.application.Application;
import javafx.scene.Node;
import javafx.scene.Scene;
import javafx.scene.control.TreeItem;
import javafx.scene.control.TreeView;
import javafx.scene.image.Image;
import javafx.scene.image.ImageView;
import javafx.scene.paint.Color;
import javafx.stage.Stage;

import javafx.beans.property.SimpleStringProperty;
import javafx.scene.layout.VBox;

public class TreeViewSample extends Application {

    private final Node rootIcon =
        new ImageView(new Image(getClass().getResourceAsStream("root.png")));
    private final Image depIcon =
        new Image(getClass().getResourceAsStream("department.png"));
    List<Employee> employees = Arrays.<Employee>asList(
            new Employee("Jacob Smith", "Accounts Department"),
            new Employee("Isabella Johnson", "Accounts Department"),
            new Employee("Ethan Williams", "Sales Department"),
            new Employee("Emma Jones", "Sales Department"),
            new Employee("Michael Brown", "Sales Department"),
            new Employee("Anna Black", "Sales Department"),
            new Employee("Rodger York", "Sales Department"),
            new Employee("Susan Collins", "Sales Department"),
            new Employee("Mike Graham", "IT Support"),
            new Employee("Judy Mayer", "IT Support"),
            new Employee("Gregory Smith", "IT Support"));
    TreeItem<String> rootNode;

    public static void main(String[] args) {
        launch(args);
    }

    public TreeViewSample() {
        this.rootNode = new TreeItem<>("MyCompany Human Resources", rootIcon);
    }

    @Override
    public void start(Stage stage) {
        rootNode.setExpanded(true);
        for (Employee employee : employees) {
            TreeItem<String> empLeaf = new TreeItem<>(employee.getName());
            boolean found = false;
            for (TreeItem<String> depNode : rootNode.getChildren()) {
                if (depNode.getValue().contentEquals(employee.getDepartment())){
                    depNode.getChildren().add(empLeaf);
                    found = true;
                    break;
                }
            }
            if (!found) {
                TreeItem<String> depNode = new TreeItem<>(
                    employee.getDepartment(),
                    new ImageView(depIcon)
                );
                rootNode.getChildren().add(depNode);
                depNode.getChildren().add(empLeaf);
            }
        }

        stage.setTitle("Tree View Sample");
        VBox box = new VBox();
        final Scene scene = new Scene(box, 400, 300);
        scene.setFill(Color.LIGHTGRAY);

        TreeView<String> treeView = new TreeView<>(rootNode);

        box.getChildren().add(treeView);
        stage.setScene(scene);
        stage.show();
    }

    public static class Employee {

        private final SimpleStringProperty name;
        private final SimpleStringProperty department;

        private Employee(String name, String department) {
            this.name = new SimpleStringProperty(name);
            this.department = new SimpleStringProperty(department);
        }

        public String getName() {
            return name.get();
        }

        public void setName(String fName) {
            name.set(fName);
        }

        public String getDepartment() {
            return department.get();
        }

        public void setDepartment(String fName) {
            department.set(fName);
        }
    }
}
Each Employee object in Example 14-2 has two properties: name and department. TreeItem objects corresponding to the employees are referred as tree leaves, whereas the tree items corresponding to the departments are referred to as tree items with children. The name of the new department to be created is retrieved from an Employee object by calling the getDepartment method.
When you compile and run this application, it creates the window shown in Figure 14-3.
Figure 14-3 List of Employees in the Tree View Sample Application
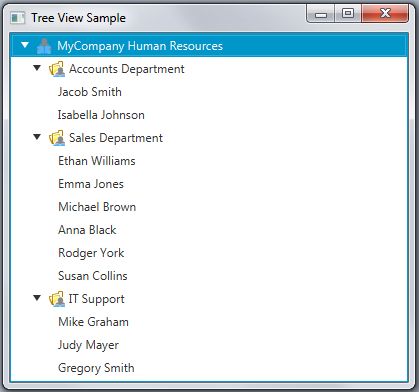
Description of "Figure 14-3 List of Employees in the Tree View Sample Application"
With Example 14-2, you can preview the tree view and its items, but you cannot change the existing items or add any new items. Example 14-3 shows a modified version of the application with the cell factory implemented. The modified application enables you to change the name of an employee.
Example 14-3 Implementing a Cell Factory
import java.util.Arrays;
import java.util.List;
import javafx.application.Application;
import javafx.scene.Node;
import javafx.scene.Scene;
import javafx.scene.control.TextField;
import javafx.scene.control.TreeCell;
import javafx.scene.control.TreeItem;
import javafx.scene.control.TreeView;
import javafx.scene.image.Image;
import javafx.scene.image.ImageView;
import javafx.scene.input.KeyCode;
import javafx.scene.input.KeyEvent;
import javafx.scene.paint.Color;
import javafx.stage.Stage;
import javafx.beans.property.SimpleStringProperty;
import javafx.scene.layout.VBox;

public class TreeViewSample extends Application {

    private final Node rootIcon =
        new ImageView(new Image(getClass().getResourceAsStream("root.png")));
    private final Image depIcon =
        new Image(getClass().getResourceAsStream("department.png"));
    List<Employee> employees = Arrays.<Employee>asList(
            new Employee("Jacob Smith", "Accounts Department"),
            new Employee("Isabella Johnson", "Accounts Department"),
            new Employee("Ethan Williams", "Sales Department"),
            new Employee("Emma Jones", "Sales Department"),
            new Employee("Michael Brown", "Sales Department"),
            new Employee("Anna Black", "Sales Department"),
            new Employee("Rodger York", "Sales Department"),
            new Employee("Susan Collins", "Sales Department"),
            new Employee("Mike Graham", "IT Support"),
            new Employee("Judy Mayer", "IT Support"),
            new Employee("Gregory Smith", "IT Support"));
    TreeItem<String> rootNode;

    public static void main(String[] args) {
        Application.launch(args);
    }

    public TreeViewSample() {
        this.rootNode = new TreeItem<>("MyCompany Human Resources", rootIcon);
    }

    @Override
    public void start(Stage stage) {
        rootNode.setExpanded(true);
        for (Employee employee : employees) {
            TreeItem<String> empLeaf = new TreeItem<>(employee.getName());
            boolean found = false;
            for (TreeItem<String> depNode : rootNode.getChildren()) {
                if (depNode.getValue().contentEquals(employee.getDepartment())){
                    depNode.getChildren().add(empLeaf);
                    found = true;
                    break;
                }
            }
            if (!found) {
                TreeItem<String> depNode = new TreeItem<>(
                    employee.getDepartment(),
                    new ImageView(depIcon)
                );
                rootNode.getChildren().add(depNode);
                depNode.getChildren().add(empLeaf);
            }
        }

        stage.setTitle("Tree View Sample");
        VBox box = new VBox();
        final Scene scene = new Scene(box, 400, 300);
        scene.setFill(Color.LIGHTGRAY);

        TreeView<String> treeView = new TreeView<>(rootNode);
        treeView.setEditable(true);
        treeView.setCellFactory((TreeView<String> p) ->
            new TextFieldTreeCellImpl());

        box.getChildren().add(treeView);
        stage.setScene(scene);
        stage.show();
    }

    private final class TextFieldTreeCellImpl extends TreeCell<String> {

        private TextField textField;

        public TextFieldTreeCellImpl() {
        }

        @Override
        public void startEdit() {
            super.startEdit();

            if (textField == null) {
                createTextField();
            }
            setText(null);
            setGraphic(textField);
            textField.selectAll();
        }

        @Override
        public void cancelEdit() {
            super.cancelEdit();
            setText((String) getItem());
            setGraphic(getTreeItem().getGraphic());
        }

        @Override
        public void updateItem(String item, boolean empty) {
            super.updateItem(item, empty);

            if (empty) {
                setText(null);
                setGraphic(null);
            } else {
                if (isEditing()) {
                    if (textField != null) {
                        textField.setText(getString());
                    }
                    setText(null);
                    setGraphic(textField);
                } else {
                    setText(getString());
                    setGraphic(getTreeItem().getGraphic());
                }
            }
        }

        private void createTextField() {
            textField = new TextField(getString());
            textField.setOnKeyReleased((KeyEvent t) -> {
                if (t.getCode() == KeyCode.ENTER) {
                    commitEdit(textField.getText());
                } else if (t.getCode() == KeyCode.ESCAPE) {
                    cancelEdit();
                }
            });
        }

        private String getString() {
            return getItem() == null ? "" : getItem().toString();
        }
    }

    public static class Employee {

        private final SimpleStringProperty name;
        private final SimpleStringProperty department;

        private Employee(String name, String department) {
            this.name = new SimpleStringProperty(name);
            this.department = new SimpleStringProperty(department);
        }

        public String getName() {
            return name.get();
        }

        public void setName(String fName) {
            name.set(fName);
        }

        public String getDepartment() {
            return department.get();
        }

        public void setDepartment(String fName) {
            department.set(fName);
        }
    }
}
The setCellFactory method called on the treeView object overrides the TreeCell implementation and redefines the tree items as specified in the TextFieldTreeCellImpl class.
The TextFieldTreeCellImpl class creates a TextField object for each tree item and provides the methods to process editing events.
Note that you must explicitly call the setEditable(true) method on the tree view to enable editing all its items.
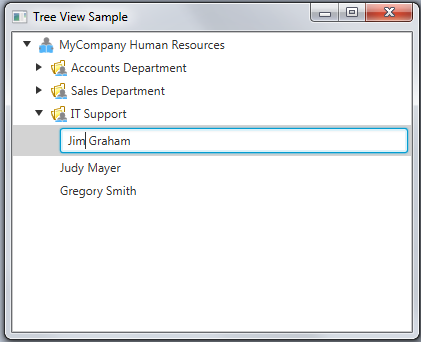
Compile and run the application in Example 14-3. Then try to click the employees in the tree and change their names. Figure 14-4 captures the moment of editing a tree item in the IT Support department.
Adding New Tree Items on Demand
Modify the Tree View Sample application so that a human resources representative can add new employees. Use the bold code lines of Example 14-4 for your reference. These lines add a context menu to the tree items that correspond to the departments. When the Add Employee menu item is selected, the new tree item is added as a leaf to the current department.
Use the isLeaf method to distinguish between department tree items and employee tree items.
Example 14-4 Adding New Tree Items
import java.util.Arrays;
import java.util.List;
import javafx.application.Application;
import javafx.scene.Node;
import javafx.scene.Scene;
import javafx.scene.control.TextField;
import javafx.scene.control.TreeCell;
import javafx.scene.control.TreeItem;
import javafx.scene.control.TreeView;
import javafx.scene.image.Image;
import javafx.scene.image.ImageView;
import javafx.scene.input.KeyCode;
import javafx.scene.input.KeyEvent;
import javafx.scene.paint.Color;
import javafx.stage.Stage;
import javafx.beans.property.SimpleStringProperty;
import javafx.event.ActionEvent;
import javafx.scene.control.ContextMenu;
import javafx.scene.control.MenuItem;
import javafx.scene.layout.VBox;

public class TreeViewSample extends Application {

    private final Node rootIcon =
        new ImageView(new Image(getClass().getResourceAsStream("root.png")));
    private final Image depIcon =
        new Image(getClass().getResourceAsStream("department.png"));
    List<Employee> employees = Arrays.<Employee>asList(
            new Employee("Jacob Smith", "Accounts Department"),
            new Employee("Isabella Johnson", "Accounts Department"),
            new Employee("Ethan Williams", "Sales Department"),
            new Employee("Emma Jones", "Sales Department"),
            new Employee("Michael Brown", "Sales Department"),
            new Employee("Anna Black", "Sales Department"),
            new Employee("Rodger York", "Sales Department"),
            new Employee("Susan Collins", "Sales Department"),
            new Employee("Mike Graham", "IT Support"),
            new Employee("Judy Mayer", "IT Support"),
            new Employee("Gregory Smith", "IT Support"));
    TreeItem<String> rootNode =
        new TreeItem<>("MyCompany Human Resources", rootIcon);

    public static void main(String[] args) {
        Application.launch(args);
    }

    @Override
    public void start(Stage stage) {
        rootNode.setExpanded(true);
        for (Employee employee : employees) {
            TreeItem<String> empLeaf = new TreeItem<>(employee.getName());
            boolean found = false;
            for (TreeItem<String> depNode : rootNode.getChildren()) {
                if (depNode.getValue().contentEquals(employee.getDepartment())){
                    depNode.getChildren().add(empLeaf);
                    found = true;
                    break;
                }
            }
            if (!found) {
                TreeItem depNode = new TreeItem(employee.getDepartment(),
                    new ImageView(depIcon)
                );
                rootNode.getChildren().add(depNode);
                depNode.getChildren().add(empLeaf);
            }
        }

        stage.setTitle("Tree View Sample");
        VBox box = new VBox();
        final Scene scene = new Scene(box, 400, 300);
        scene.setFill(Color.LIGHTGRAY);

        TreeView<String> treeView = new TreeView<>(rootNode);
        treeView.setEditable(true);
        treeView.setCellFactory((TreeView<String> p) ->
            new TextFieldTreeCellImpl());

        box.getChildren().add(treeView);
        stage.setScene(scene);
        stage.show();
    }

    private final class TextFieldTreeCellImpl extends TreeCell<String> {

        private TextField textField;
        private final ContextMenu addMenu = new ContextMenu();

        public TextFieldTreeCellImpl() {
            MenuItem addMenuItem = new MenuItem("Add Employee");
            addMenu.getItems().add(addMenuItem);
            addMenuItem.setOnAction((ActionEvent t) -> {
                TreeItem newEmployee =
                    new TreeItem<>("New Employee");
                getTreeItem().getChildren().add(newEmployee);
            });
        }

        @Override
        public void startEdit() {
            super.startEdit();

            if (textField == null) {
                createTextField();
            }
            setText(null);
            setGraphic(textField);
            textField.selectAll();
        }

        @Override
        public void cancelEdit() {
            super.cancelEdit();

            setText((String) getItem());
            setGraphic(getTreeItem().getGraphic());
        }

        @Override
        public void updateItem(String item, boolean empty) {
            super.updateItem(item, empty);

            if (empty) {
                setText(null);
                setGraphic(null);
            } else {
                if (isEditing()) {
                    if (textField != null) {
                        textField.setText(getString());
                    }
                    setText(null);
                    setGraphic(textField);
                } else {
                    setText(getString());
                    setGraphic(getTreeItem().getGraphic());
                    if (
                        !getTreeItem().isLeaf()&&getTreeItem().getParent()!= null
                    ){
                        setContextMenu(addMenu);
                    }
                }
            }
        }

        private void createTextField() {
            textField = new TextField(getString());
            textField.setOnKeyReleased((KeyEvent t) -> {
                if (t.getCode() == KeyCode.ENTER) {
                    commitEdit(textField.getText());
                } else if (t.getCode() == KeyCode.ESCAPE) {
                    cancelEdit();
                }
            });

        }

        private String getString() {
            return getItem() == null ? "" : getItem().toString();
        }
    }

    public static class Employee {

        private final SimpleStringProperty name;
        private final SimpleStringProperty department;

        private Employee(String name, String department) {
            this.name = new SimpleStringProperty(name);
            this.department = new SimpleStringProperty(department);
        }

        public String getName() {
            return name.get();
        }

        public void setName(String fName) {
            name.set(fName);
        }

        public String getDepartment() {
            return department.get();
        }

        public void setDepartment(String fName) {
            department.set(fName);
        }
    }
}
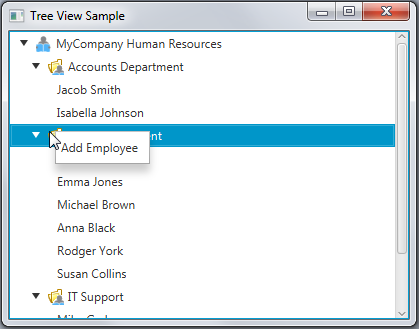
Compile and run the application. Then select a department in the tree structure and right-click it. The context menu appears, as shown in Figure 14-5.
Figure 14-5 Context Menu for Adding New Employees
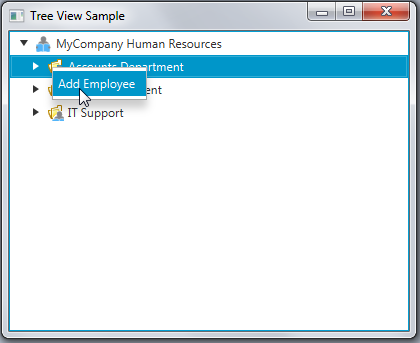
Description of "Figure 14-5 Context Menu for Adding New Employees"
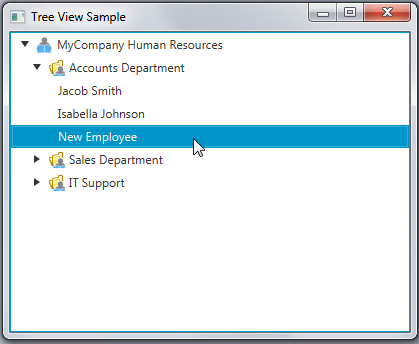
When you select the Add Employee menu item from the context menu, the new record is added to the current department. Figure 14-6 shows a new tree item added to the Accounts Department.
Because editing is enabled for the tree items, you can change the default "New Employee" value to the appropriate name.
Using Tree Cell Editors
You can use the following tree cell editors available in the API: CheckBoxTreeCell, ChoiceBoxTreeCell, ComboBoxTreeCell, TextFieldTreeCell. There classes extend the TreeCell implementation to render a particular control inside the cell.
Example 14-5 demonstrates the use of the CheckBoxTreeCell class in the UI that builds a hierarchical structure of checkboxes.
Example 14-5 Using the CheckBoxTreeCell Class
import javafx.application.Application;
import javafx.scene.Scene;
import javafx.scene.control.*;
import javafx.scene.control.cell.CheckBoxTreeCell;
import javafx.scene.layout.StackPane;
import javafx.stage.Stage;

public class TreeViewSample extends Application {

    public static void main(String[] args) {
        launch(args);
    }

    @Override
    public void start(Stage primaryStage) {
        primaryStage.setTitle("Tree View Sample");

        CheckBoxTreeItem<String> rootItem =
            new CheckBoxTreeItem<>("View Source Files");
        rootItem.setExpanded(true);

        final TreeView tree = new TreeView(rootItem);
        tree.setEditable(true);

        tree.setCellFactory(CheckBoxTreeCell.<String>forTreeView());
        for (int i = 0; i < 8; i++) {
            final CheckBoxTreeItem<String> checkBoxTreeItem =
                new CheckBoxTreeItem<>("Sample" + (i+1));
                    rootItem.getChildren().add(checkBoxTreeItem);
        }

        tree.setRoot(rootItem);
        tree.setShowRoot(true);

        StackPane root = new StackPane();
        root.getChildren().add(tree);
        primaryStage.setScene(new Scene(root, 300, 250));
        primaryStage.show();
    }
}
Example 14-5 builds the tree view by using the CheckBoxTreeItem class instead of the TreeItem. The CheckBoxTreeItem class was specifically designed to support the selected, unselected, and indeterminate states in tree structures. A CheckBoxTreeItem instance can be independent or dependent. If a CheckBoxTreeItem instance is independent, any changes to its selection state do not impact its parent and child CheckBoxTreeItem instances. By default, all the ChechBoxTreeItem instances are dependent.
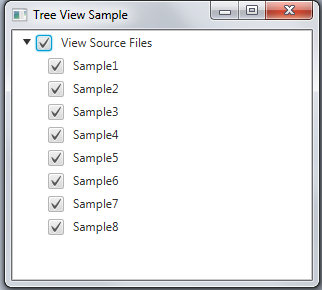
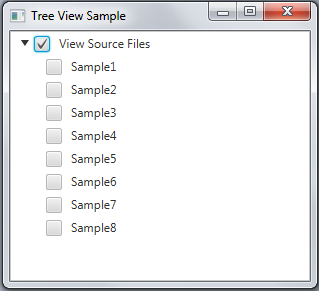
Compile and run Example 14-5, then select the View Source Files item. You should see the output shown in Figure 14-7, where all the child items are selected.
To make a CheckBoxTreeItem instance independent, use the setIndependent method: rootItem.setIndependent(true);.
When you run the TreeViewSample application, its behavior should change as shown in Figure 14-8.
The TreeTableView control provides additional capabilities to present tree structures in table forms. See the Tree Table View chapter for more information about these controls.
Related Documentation
