15 Tree Table View
This chapter describes the TreeTableView user interface component, which is a control designed to help you to visualize an unlimited hierarchy of data, presented in columns.
The TreeTableView component has much in common with the TreeView and TableView controls: it combines and extends some aspects of their functionality.
Figure 15-1 Sample of a TreeTableView Component

Description of "Figure 15-1 Sample of a TreeTableView Component"
Creating a TreeTableView control
A basic implementation of a TreeTableView component in your application can be done by the following steps:
-
Create tree items.
-
Create the root element.
-
Add the tree items to the root element.
-
Create one or several columns.
-
Define cell content.
-
Create a tree table view.
-
Assign columns to the tree table view.
In some cases, you can omit or hide the root element. Example 15-1 implements these steps to create a simple tree table view control.
Example 15-1 TreeTableView with One Column
import javafx.application.Application;
import javafx.beans.property.ReadOnlyStringWrapper;
import javafx.scene.Group;
import javafx.scene.Scene;
import javafx.scene.control.TreeTableColumn;
import javafx.scene.control.TreeTableColumn.CellDataFeatures;
import javafx.scene.control.TreeItem;
import javafx.scene.control.TreeTableView;
import javafx.stage.Stage;

public class TreeTableViewSample extends Application {

    public static void main(String[] args) {
        Application.launch(args);
    }

    @Override
    public void start(Stage stage) {
        stage.setTitle("Tree Table View Samples");
        final Scene scene = new Scene(new Group(), 200, 400);
        Group sceneRoot = (Group)scene.getRoot();

        //Creating tree items
        final TreeItem<String> childNode1 = new TreeItem<>("Child Node 1");
        final TreeItem<String> childNode2 = new TreeItem<>("Child Node 2");
        final TreeItem<String> childNode3 = new TreeItem<>("Child Node 3");

        //Creating the root element
        final TreeItem<String> root = new TreeItem<>("Root node");
        root.setExpanded(true);

        //Adding tree items to the root
        root.getChildren().setAll(childNode1, childNode2, childNode3);

        //Creating a column
        TreeTableColumn<String,String> column = new TreeTableColumn<>("Column");
        column.setPrefWidth(150);

        //Defining cell content
        column.setCellValueFactory((CellDataFeatures<String, String> p) ->
            new ReadOnlyStringWrapper(p.getValue().getValue()));

        //Creating a tree table view
        final TreeTableView<String> treeTableView = new TreeTableView<>(root);
        treeTableView.getColumns().add(column);
        treeTableView.setPrefWidth(152);
        treeTableView.setShowRoot(true);
        sceneRoot.getChildren().add(treeTableView);
        stage.setScene(scene);
        stage.show();
    }
}
The cell factory defined for the column specifies the content to be placed into this column for each tree item.
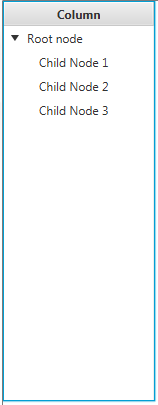
When you compile and run Example 15-1, it produces the output shown in Figure 15-2.
Figure 15-2 Simple TreeTableView Component

Description of "Figure 15-2 Simple TreeTableView Component"
creates a simplified tree view component with one column, whereas in your application you often operate with the extended set of data. The next section shows you how to represent the personal data of the Sales Department employees from the Tree View use case.
Adding Several Columns
Extend the use case described in the Tree View chapter and provide more information about each employee of the Sales Department. shows you how to add columns.
Example 15-2 Creating a TreeTableView Component With Two Columns
import java.util.Arrays;
import java.util.List;
import javafx.application.Application;
import javafx.beans.property.ReadOnlyStringWrapper;
import javafx.beans.property.SimpleStringProperty;
import javafx.scene.Group;
import javafx.scene.Scene;
import javafx.scene.control.TreeTableColumn;
import javafx.scene.control.TreeItem;
import javafx.scene.control.TreeTableView;
import javafx.scene.image.Image;
import javafx.scene.image.ImageView;
import javafx.scene.paint.Color;
import javafx.stage.Stage;

public class TreeTableViewSample extends Application {

    List<Employee> employees = Arrays.<Employee>asList(
        new Employee("Ethan Williams", "ethan.williams@example.com"),
        new Employee("Emma Jones", "emma.jones@example.com"),
        new Employee("Michael Brown", "michael.brown@example.com"),
        new Employee("Anna Black", "anna.black@example.com"),
        new Employee("Rodger York", "roger.york@example.com"),
        new Employee("Susan Collins", "susan.collins@example.com"));

    private final ImageView depIcon = new ImageView (
            new Image(getClass().getResourceAsStream("department.png"))
    );

    final TreeItem<Employee> root =
        new TreeItem<>(new Employee("Sales Department", ""), depIcon);
    public static void main(String[] args) {
        Application.launch(TreeTableViewSample.class, args);
    }

    @Override
    public void start(Stage stage) {
        root.setExpanded(true);
        employees.stream().forEach((employee) -> {
            root.getChildren().add(new TreeItem<>(employee));
        });
        stage.setTitle("Tree Table View Sample");
        final Scene scene = new Scene(new Group(), 400, 400);
        scene.setFill(Color.LIGHTGRAY);
        Group sceneRoot = (Group) scene.getRoot();

        TreeTableColumn<Employee, String> empColumn =
            new TreeTableColumn<>("Employee");
        empColumn.setPrefWidth(150);
        empColumn.setCellValueFactory(
            (TreeTableColumn.CellDataFeatures<Employee, String> param) ->
            new ReadOnlyStringWrapper(param.getValue().getValue().getName())
        );

        TreeTableColumn<Employee, String> emailColumn =
            new TreeTableColumn<>("Email");
        emailColumn.setPrefWidth(190);
        emailColumn.setCellValueFactory(
            (TreeTableColumn.CellDataFeatures<Employee, String> param) ->
            new ReadOnlyStringWrapper(param.getValue().getValue().getEmail())
        );

        TreeTableView<Employee> treeTableView = new TreeTableView<>(root);
        treeTableView.getColumns().setAll(empColumn, emailColumn);
        sceneRoot.getChildren().add(treeTableView);
        stage.setScene(scene);
        stage.show();
    }

    public class Employee {

        private SimpleStringProperty name;
        private SimpleStringProperty email;
        public SimpleStringProperty nameProperty() {
            if (name == null) {
                name = new SimpleStringProperty(this, "name");
            }
            return name;
        }
        public SimpleStringProperty emailProperty() {
            if (email == null) {
                email = new SimpleStringProperty(this, "email");
            }
            return email;
        }
        private Employee(String name, String email) {
            this.name = new SimpleStringProperty(name);
            this.email = new SimpleStringProperty(email);
        }
        public String getName() {
            return name.get();
        }
        public void setName(String fName) {
            name.set(fName);
        }
        public String getEmail() {
            return email.get();
        }
        public void setEmail(String fName) {
            email.set(fName);
        }
    }
}
In Example 15-2, you modify the structure of data in the Employee class and define two properties corresponding to an employee's name and email address. The TreeTableView component provides two columns to represent them, respectively.
Inspect the code fragment shown in Example 15-3. It creates cell factories for two columns. The setCellValueFactory methods define TreeItem content for each column, so that the Employee column contains the Employee.name property values, and the Email column contains the Employee.email property values.
Example 15-3 Implementing Cell Factories for Employee and Email Columns
//Cell factory for the data the Empoyee column
        empColumn.setCellValueFactory(
            (TreeTableColumn.CellDataFeatures<Employee, String> param) ->
            new ReadOnlyStringWrapper(param.getValue().getValue().getName())
        );
        //Cell factory for the data in the Email column
        emailColumn.setCellValueFactory(
            (TreeTableColumn.CellDataFeatures<Employee, String> param) ->
            new ReadOnlyStringWrapper(param.getValue().getValue().getEmail())
        );
When you compile and run the application from Example 15-2, the output shown in Figure 15-3 appears.
Figure 15-3 TreeTableView Component with Employee and Email Columns

Description of "Figure 15-3 TreeTableView Component with Employee and Email Columns"
The default style of the tree table forces all tree elements to be expanded and all table columns to be shown. However, you can change these and other default settings by using the corresponding properties and methods of the TreeTableView and TreeTableColumn classes.
Altering Visual Appearance
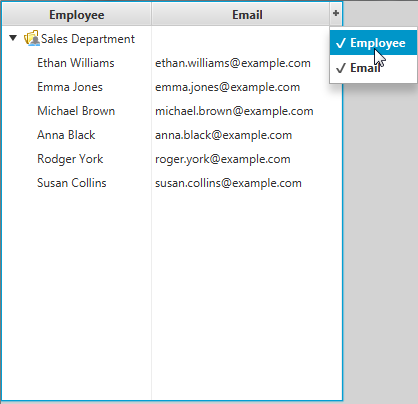
You can enable showing the table menu button, so that users of your application will be able to toggle the visibility of the table columns. Call the treeTableView.setTableMenuButtonVisible(true); method for the treeTableView object. The method adds the "+" button to the table header. Figure 15-4 captures the moment when a user hides the Employee column.
Figure 15-4 TreeTableView With the Enabled Table Menu Button

Description of "Figure 15-4 TreeTableView With the Enabled Table Menu Button"
You can also control the visibility of the root tree item by using the setShowRoot method of the TreeTableView class: treeTableView.setShowRoot(false);. The false value, passed to it, hides the root as shown in Figure 15-5.
Figure 15-5 TreeTableView Control Without the Root Tree Item

Description of "Figure 15-5 TreeTableView Control Without the Root Tree Item"
You can sort data in columns by clicking the column headers and switching the sorting modes from ascending to descending and vice versa. In addition to the built-in sorting support, data sorting is available through the TreeTableColumn and TreeTableView properties listed in Example 15-4.
Example 15-4 Sorting Mode Settings
//Setting the descending mode of sorting for the Email column
emailColumn.setSortType(TreeTableColumn.SortType.DESCENDING);
//Setting the ascending mode of sorting for the Email column
emailColumn.setSortType(TreeTableColumn.SortType.ASCENDING);
//Applying the sorting mode to all tree items
treeTableView.setSortMode(TreeSortMode.ALL_DESCENDANTS);
//Applying the sorting mode only to the first-level nodes
treeTableView.setSortMode(TreeSortMode.ONLY_FIRST_LEVEL);
Managing Selection Mode
The default selection model implemented for the TreeTableView class is defined in the MultipleSelectionModel abstract class that specifies the default value as SelectionMode.SINGLE. To enable multiple selection of the tree items and cells, use a combination of the setSelectionModel and setCellSelectionEnabled methods. See Table 15-1 for more information about available values and the resulting behavior.
Table 15-1 Selection Model Settings
| setSelectionModel | setCellSelectionEnabled | Behavior |
|---|---|---|
|
|
|
Enables selection of a single row in the table. |
|
|
|
Enables selection of a single cell in the table. |
|
|
|
Enables selection of several rows in the table. |
|
|
|
Enables selection of several cells in several rows. |
For example, you can implement a selection of several cells in several rows for the TreeTableView component as shown in Example 15-5.
Example 15-5 Enabling Multiple Selection for the Cells
treeTableView.getSelectionModel().setSelectionMode(SelectionMode.MULTIPLE);
treeeTableView.getSelectionModel().setCellSelectionEnabled(true);
Figure 15-6 shows the cells that you can select after the lines in are added to the code of the TreeTableViewSample application.
Figure 15-6 Multiple Selection of Table Cells

Description of "Figure 15-6 Multiple Selection of Table Cells"
Because the TreeTableView control encapsulates all features of table view and tree view, you might want to see the Table View and Tree View chapters for more information about additional capabilities.
Related Documentation

