Remove a Hard Drive
Hard drives are hot-service components that can be replaced by customers. For the location of the hard drives, see Hard Drive Configuration.
 | Caution - This procedure requires that you handle components that are sensitive to electrostatic discharge. This discharge can cause failure of server components. |
-
Locate the drive in the server that you want to remove.
-
See Hard Drive Configuration for the locations of the drives in the server.
-
See Determine Which Hard Drive Is Faulty to locate a faulty drive.
-
-
Determine if you need to shut down the OS to replace the drive, and perform
one of the following actions:
- If the drive cannot be taken offline without shutting down the OS, follow instructions in Power Off the Server (Oracle ILOM), and go to Step 4.
- If the drive can be taken offline without shutting down the OS, go to Step 3.
-
Take the drive offline:
-
For a standard drive:
-
At the Oracle Solaris prompt, type the cfgadm
-al command to list all drives in the device tree,
including drives that are not configured.
# cfgadm -al
This command lists dynamically reconfigurable hardware resources and shows their operational status. In this case, look for the status of the drive you plan to remove. This information is listed in the Occupant column.
Example:
Ap_id                       Type         Receptacle   Occupant        Condition
...
c2                          scsi-sas     connected    configured      unknown
c2::w5000cca00a76d1f5,0     disk-path    connected    configured      unknown
c3                          scsi-sas     connected    configured      unknown
c3::w5000cca00a772bd1,0     disk-path    connected    configured      unknown
c4                          scsi-sas     connected    configured      unknown
c4::w5000cca00a59b0a9,0     disk-path    connected    configured      unknown
...
You must unconfigure any drive whose status is listed as configured, as described in .
-
Unconfigure the drive using the cfgadm -c
unconfigure command.
Example:
# cfgadm -c unconfigure c2::w5000cca00a76d1f5,0
Replace c2::w5000cca00a76d1f5,0 with the drive name that applies to your situation.
- Verify that the blue Ready to Remove LED on the drive is lit.
-
At the Oracle Solaris prompt, type the cfgadm
-al command to list all drives in the device tree,
including drives that are not configured.
-
For an NVMe Drive:
-
Determine the name of the NVMe drive to be removed.
# hotplug list -lc
Locate the name of the drive, such as /SYS/DBP/NVME0 in this example.
You can use this same command to check the state of the drive at other stages of the removal procedure.
-
Disable the NVMe drive.
# hotplug disable /SYS/DBP/NVME0
Check that the drive's state has changed from ENABLED to POWERED.
# hotplug list -lc
-
Power down the NVMe drive.
# hotplug poweroff /SYS/DBP/NVME0
Check that the drive's state has changed from POWERED to PRESENT.
# hotplug list -lc
In this state, the blue OK to Remove LED on the NVMe drive is lit.
Note - Do not remove the drive unless the blue OK to Remove LED is lit.
-
Determine the name of the NVMe drive to be removed.
-
For a standard drive:
-
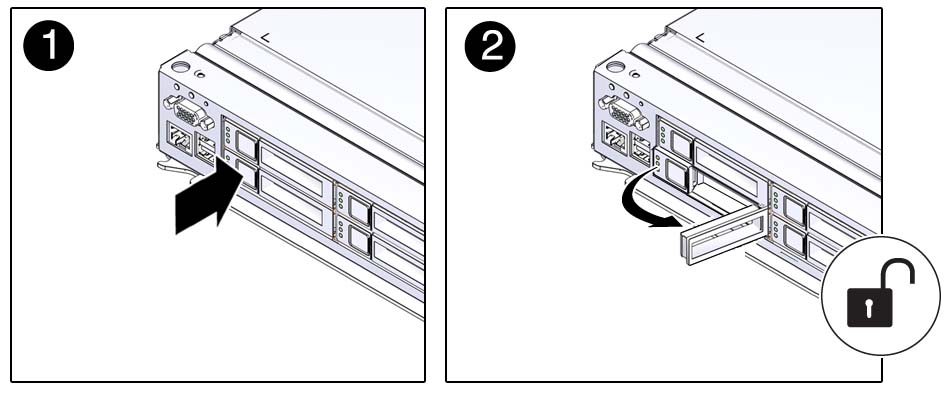
Press the drive release button to unlock the drive.

-
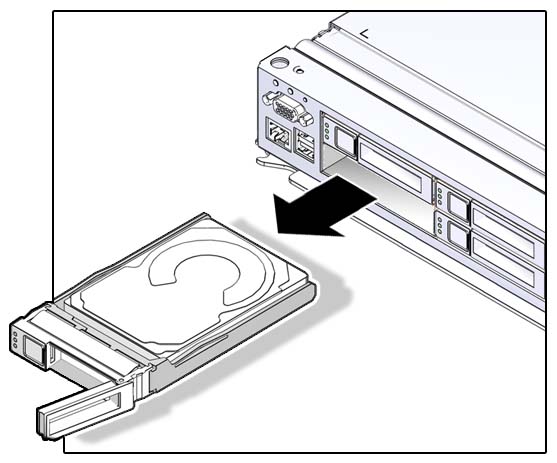
Pull on the latch to remove the drive from the server.

Caution - The latch is not an ejector. Do not force the latch too far to the right. Doing so can damage the latch.

-
After you remove an NVMe drive, check that the drive slot's state has changed
to EMPTY.
# hotplug list -lc
-
Install the replacement drive or a filler tray.
See Install a Hard Drive.