Working With the EDM for Sun Master Index
The topics listed here provide procedures, conceptual information, and reference information for using the Enterprise Data Manager (EDM) to monitor and maintain the data in Sun master index applications.
Note that Java CAPS includes two versions of Sun Master Index. Sun Master Index (Repository) is installed in the Java CAPS repository and provides all the functionality of previous versions in the new Java CAPS environment. Sun Master Index is a service-enabled version of the master index that is installed directly into NetBeans. It includes all of the features of Sun Master Index (Repository) plus several new features, like data analysis, data cleansing, data loading, and an improved Data Manager GUI. Both products are components of the Sun Master Data Management (MDM) Suite. This document relates to Sun Master Index (Repository) only.
What You Need to Know
These topics provide information you should to know before you start to work with the EDM.
-
System Record and SBR Components in a Master Index (Repository)
-
Identification Numbers for each Entity in the Master Index (Repository)
What You Need to Do
These topics provide instructions on how to use the EDM to monitor and maintain data in master index applications.
More Information
These topics provide additional information you should know when using the EDM:
Related Topics
Several topics provide information and instructions for implementing and using a Repository-based master index application. For a complete list of topics related to working with Sun Master Index (Repository), see Related Topics in Developing Sun Master Indexes (Repository).
About the Enterprise Data Manager
The Enterprise Data Manager (EDM) is a web-based interface that allows you to access, monitor, and maintain the data stored by the master index applications you create using Sun Master Index. The EDM provides the ability to search for, add, update, deactivate, merge, unmerge, and compare object profiles. You can also view and correct potential duplicate profiles, view transaction histories, view an audit log, and print reports.
The EDM is your primary tool to view and maintain the data stored in the master index database and cross-referenced by a master index application.
About Sun Master Index (Repository)
Sun Master Index provides a flexible framework to allow you to create matching and indexing applications called master index applications. It is an application building tool to help you design, configure, and create a master index application that will uniquely identify and cross-reference the business objects stored in your system databases. Business objects can be any type of entity for which you store information, such as customers, patients, vendors, businesses, hardware parts, and so on. Sun Master Index allows you to define the data structure of the business objects to be stored and cross-referenced. In addition, you define the logic that determines how data is updated, standardized, weighted, and matched in the master index database.
The following topics provide additional information about Sun Master Index, the master index applications created by Sun Master Index, and the Enterprise Data Manager (EDM).
About Master Index Applications (Repository)
The applications created by Sun Master Index are enterprise-wide master index applications that maintain the most current information about the objects in your business enterprise. A master index application creates a single, consistent view of all object data by providing an automatic, common identification process regardless of the location or system from which the data originates. Object profiles from various locations are cross-referenced using an enterprise-wide unique identifier (EUID) assigned to each profile by a master index application. By creating EUIDs, a master index application can identify many types of participants, such as customers, employees, contacts, and so on.
The identifying and general information for all objects is centralized in one shared index. A master index application is designed specifically to support scattered business locations and disparate information systems across an enterprise, as well as various applications from multiple vendors. Maintaining a centralized database for multiple systems enables a master index application to integrate data throughout the enterprise while allowing local systems to continue operating independently. A master index application makes it easy to find information that was previously scattered among multiple systems.
Features of Master Index Applications (Repository)
The components of the master index applications you create are highly configurable, allowing each master index application to be customized for your specific data processing needs. Primary features of a master index application include the following:
-
Centralized Information – A master index application maintains a centralized database, enabling the integration of data records throughout the enterprise while allowing local systems to continue operating independently. The index stores copies of local system records and the single best record (SBR), which represents the most accurate and complete data for each object. This database is the central location of all object information and identifiers, and is accessible throughout the enterprise. Records from various systems are cross-referenced using the EUID assigned by a master index application to each object profile.
-
Configurability – Before deploying a master index application, you can customize the components and processing capabilities of the system. The configurable components include:
-
The types of objects to index
-
The types of data stored
-
The standardization and match engines to use
-
Matching, standardization, and phonetic conversion rules
-
Survivorship and weighting rules for determining the SBR
-
The types of queries available
-
How queries are blocked, or grouped, for match processing
-
EDM appearance
-
Searches available to the EDM
-
Local ID validation rules
Cross-referencing – A master index application serves as a global cross-reference, matching profiles across disparate source systems and simplifying the process of sharing data between systems. A master index application uses the local identifiers assigned by your existing systems as a reference, allowing you to maintain your current systems and practices.
-
-
Data Cleansing – A master index application uses configurable matching algorithm logic to uniquely identify object profiles and to identify duplicate and potential duplicate profiles. A master index application provides the ability to easily merge or resolve duplicates, and can be configured to automatically match profiles that are found to be duplicates of one another.
-
Data Updates – A master index application provides the ability to add, update, deactivate, merge, and delete data in the database tables through messages received from external systems or the EDM. Messages received from external systems and the EDM are checked for potential duplicates during processing.
-
Updates to External Systems – The Sun Enterprise Service Bus provides a master index application with the ability to publish updated information to external systems, provided the external systems can accept incoming messages. This is handled through a JMS Topic to which a master index application publishes XML messages that contain the updates.
-
Identification – A master index application employs configurable probabilistic matching technology. This technology uses a matching algorithm to formulate an effective statistical measure of how closely profiles match. Using a state-of-the-art algorithm in real-time mode and establishing a common method of locating profiles, a master index application consistently and precisely identifies objects within an enterprise.
-
Integration – Relying on the Sun Enterprise Service Bus, a master index application provides the power and flexibility to identify, route, and transform data to and from any system or application throughout your business enterprise. It can accept incoming transactions and distribute updates to any external system, providing seamless integration with the systems in your enterprise.
-
Matching Algorithm – A master index application is designed to use the Sun Match Engine or a custom matching algorithm to provide a matching probability weight between object profiles. You define matching thresholds, which control how potential duplicates and automatic merges are determined.
-
Unique Identifier – A master index application assigns an enterprise-wide unique identifier (EUID) to each object added to the database. The index uses the EUID to cross-reference the local IDs assigned to each object by the various computer systems throughout the enterprise.
Functions of the Enterprise Data Manager
While a master index application cleanses data automatically as it is entered through external system messages or through the EDM, there are instances where it cannot be determined automatically whether two object profiles truly match one another. In these cases, manual review through the EDM is needed to verify the status of the two profiles and then to possibly join two potential duplicate profiles or separate two profiles that were automatically joined. The EDM provides additional functions to help you maintain the data you store. Using the EDM, you can perform the following activities.
-
View an Object’s History – The system provides a complete transaction history of each object profile by recording all changes to each object’s data. This allows you to view before and after images of a profile for each change made. The table also records the user ID of the person who made the changes. This history is maintained for both the local system records and the SBR.
-
Search for Object Profiles – Using the EDM, you can search for specific objects or sets of objects. The EDM allows you to perform different types of searches using different combinations of data elements, and returns a list of potential matches to your search criteria. For certain searches, the results are assigned a matching weight that indicates the probability of a match.
-
Maintain Object Data – The EDM supports all the necessary features for maintaining object profiles. It allows you to add new profiles; view, update, deactivate, or reactivate existing profiles; and compare profiles for similarities and differences. You can also view each local system record associated with an SBR.
-
Compare Object Data – The EDM allows you to compare two object profiles in a side-by-side comparison so you can evaluate their differences or similarities. You can also compare different objects within one object profile in the same comparison view. For example, you can compare the profile’s SBR with a record from System A; or you can compare a profile’s record from System A with its record from System B.
-
View and Resolve Potential Duplicates – Using algorithm matching logic, a master index application has the ability to identify potential duplicate profiles, and the EDM provides the ability to manually correct the duplicate profiles. Profiles that are potential duplicates can be viewed online in a side-by-side comparison. Potential duplication is resolved by either merging the profiles in question or removing their potential duplicate flags.
-
Merge and Unmerge Profiles – You can compare potential duplicate profiles and then merge the profiles if you find them to be actual duplicates of one another. Using the merge feature, you can determine which profile to retain as the active profile. The EDM also allows you to merge system records between object profiles and to specify which information from each system record to preserve in the resulting profile. If two object profiles or system records are merged in error, you can unmerge them, returning the information to the original records. You can also view a history of merges for a profile by viewing its merge tree.
-
Audit Log – The system administrator can specify that a log be maintained of each instance that object data is accessed from the EDM. This log provides information such as the user ID of the user who accessed the data, the type of action that was performed against the data, and the date and time of access. From the audit log, you can also view a transaction history for each transaction that caused an audit log entry.
-
Security – Security is provided through the application server and includes basic access to the database through user login IDs and passwords, as well as access to specific functions and actions of a master index application. Access can be restricted by functions, actions within functions, data element, and user ID.
Learning about EDM Object Profiles
The information about an object in a master index application is stored in an object profile. The profile includes information from all of the system records for that object and also includes a record that contains the best information about the object according to a master index application. See the following topics for information about object profiles.
-
System Record and SBR Components in a Master Index (Repository)
-
Identification Numbers for each Entity in the Master Index (Repository)
EDM Object Profile Components
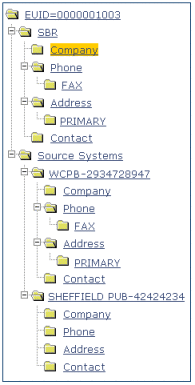
An object profile, also known as an enterprise record, is a set of information that describes characteristics of an individual object in the master index application. Figure 1 illustrates an EUID tree for an object profile, which shows all components of a profile.
Figure 1 Object Profile Components
A profile contains two types of records:
-
System Records – A system record is a set of information from an external system that shares data with a master index application. A profile might contain several system records.
-
Single Best Record – The single best record (SBR) is a set of information derived from the best information from each system record in an object profile (as determined by the survivor calculator). Each object profile has only one SBR.
System Records
System records are different from the SBR in that each system record contains a system and local ID pair and only contains data from a specific system. The information in the system records of an object profile is used to determine the best value for the SBR in that profile. If an object profile only contains one system record, the SBR will be identical to that system record. However, if an object profile contains multiple system records, the SBR might be identical to one system record but will more likely include a combination of information from all system records. Certain actions against a system record will cause the SBR to be changed, such as updating, deactivating, or merging a system record. Each active object profile must have at least one active system record. If all system records in a profile are deactivated, then the entire profile will also be deactivated.
Single Best Record
The single best record (SBR) for an object profile is made up of a combination of information from all active system records associated with that object profile. The SBR represents the information that is determined by the master index application to be the most reliable and current of all system records in an object profile. The SBR is dynamic and is recalculated each time an update is made to an associated system record, a merge or unmerge affects the object profile, or a system record in the profile is deactivated or reactivated. You can use the overwrite capability of the EDM to update the SBR directly or you can update a system record and allow the survivor calculator to determine how to update the SBR (for more information, see Survivor Calculator).
If you use the overwrite capability to update a field, that field remains locked and cannot be updated by changes to system records until the field is unlocked. For more information about the overwrite function and locked fields, see Updating the SBR versus System Records.
Survivor Calculator
The survivor calculator determines which information from each system record in an object profile is stored in the SBR for that profile. The calculator uses information defined by the system administrator to calculate the SBR. By default, the survivor calculator uses a weighted strategy for most fields, using the relative reliability assigned to each system in combination with the reliability given to the most recently updated value.
For some fields, such as alias and auxiliary IDs, a union strategy is typically used. This means that all unique alias names and auxiliary IDs from all systems are included in the SBR. For detailed information about the survivor calculator and configuring the survival strategy, see Understanding Sun Master Index Configuration Options (Repository) and Configuring Sun Master Indexes (Repository).
Object Profile Indicators on the EDM
In a master index application, an object profile or system record can have three different statuses: active, inactive, or merged. The EDM uses special characters in the EUID tree to indicate profiles or system records that have a status other than active. The EDM also uses indicators in the EUID tree to denote the type of profile you are viewing when a side-by-side comparison of the same EUID is displayed. For example, when a transaction history is displayed, the previous image of the profile appears in parentheses. Table 1 lists and describes each indicator.
Table 1 Object Profile Indicators|
Indicator |
Status |
|---|---|
|
No indicator. |
The status of the profile or system record is active. |
|
The status of the profile or system record is inactive. For example, EUID=~1001002135. In addition to the tilde, the EUID appears in fuchsia typeface. |
|
|
The status of the profile or system record is merged. For example, EUID=*1001002135. In addition to the asterisk, the EUID appears in brown typeface. Note – When an asterisk appears next to a profile on the Transaction History Search Results page, it means the transaction history could not be accessed. |
|
|
Brackets indicate that the records displayed are the same version of the same profile. This is used on the Comparison page when comparing different components of the same profile. The EUID on the left appears in brackets. For example, EUID=[1001002135]. |
|
|
When a transaction or merge history is displayed, the EUID representing the previous version of the displayed profile appears in parentheses. This profile represents the status of the profile before the transaction or merge occurred. For example, EUID=(1001002135). |
System Record and SBR Components in a Master Index (Repository)
In a master index application, each system record and SBR in an object profile contains a set of sub-objects that store different types of information about the object. Generally, a record contains a parent object and several child objects. A record can have only one parent object, but can have multiple child objects and multiple instances of each child object with each instance being identified by a unique field. For example, in a master person index a record can only contain one person name and social security number (contained in the parent object), but could have multiple addresses and telephone numbers (contained in child objects). Each address must be of a different type, such as a home address, billing address, or mailing address.
Identification Numbers for each Entity in the Master Index (Repository)
Each object profile in a master index application is assigned a unique identification number in addition to the local IDs assigned by individual systems. Each object has one unique identification number throughout your organization, and a unique identification number within each system with which they are registered.
EUID
Every object profile in the master index system is assigned an enterprise-wide unique identification number. This number is the same for that object regardless of the system from which the object information originates. This number is called the enterprise-wide unique identifier (EUID) and is used to cross-reference object profiles in order to accurately identify the objects throughout your organization.
Local ID
A local ID is a unique local identification number that is assigned to an object in each system at which it is registered. These numbers are assigned using a numbering system unique to each local system, and are used internally by the systems to identify each object. A master index application uses an object’s EUID to cross-reference its local IDs in different systems. Note that the name of the Local ID field is configurable and might be different for your implementation.
Working with the Enterprise Data Manager
The EDM is a web-based application, which means you access the application through an internet browser. The EDM uses standard web-based features, such as hyperlinks, data fields, and action buttons, to help you enter information and navigate through the different pages. The following topics provide basic information about the design of the EDM and logging in to and out of the application.
Logging in to the Enterprise Data Manager
Before you can use the EDM, you must first log in to the application by entering the correct URL in your web browser and then specifying your login ID and password. Make sure you have a user ID and password for the master index application before logging in. The application server running the master index application must be started before you can log in to the EDM.
The URL for the EDM is:
http://host:port/app_nameedm |
where
-
host is the name of the server machine.
-
port is the port number used by the EDM.
-
app_name is the name of the master index application.
The port number for the Sun Java System Application Server is listed in the domain.xml file in the http-listener element (8080 by default). The domain.xml file is located in app_server_home\domains\domain_name\config.
 To Log in to the EDM
-
Launch a web browser (Internet Explorer 6.0 with SP1 or later).
-
In the Address field, enter the appropriate URL.
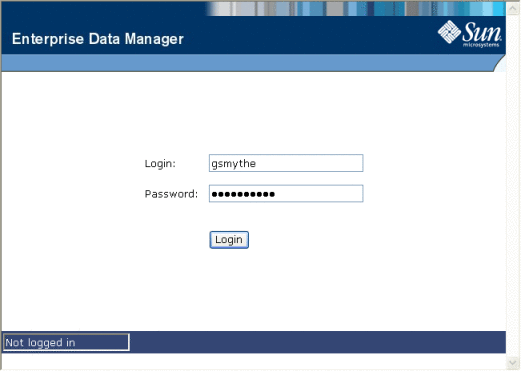
The login page appears.
Figure 2 EDM Login Page
-
Enter your login ID and password in the appropriate fields.
-
Click Login.
The initial page appears. (By default, the initial page is the Search page, but this is configurable.)
Note –After a certain period of inactivity, the EDM automatically logs off and returns you to the Login page when you try to perform an activity on the EDM. Simply reenter your user name and password to access the EDM again. The system administrator can set the inactivity period at the server level in the session-timeout element of default-web.xml (in logicalhost_home\is\domains\domain_name\config) or at the application level in web.xml in the master index application .war file (located in the deployment .ear file) or in the deployment folder itself. The application level overrides any values set at the server level. The default inactivity period is 30 minutes.
Enterprise Data Manager Security Permissions
Security for the EDM is defined at the function level. You might not be able to perform all the functions described in this guide depending on the security permissions you are assigned. For more information about functions you can perform, see your system administrator. Security for the EDM is defined in the application server.
Enterprise Data Manager Navigation Tips
The EDM provides hyperlinks and command buttons to help you access and move through the EDM pages. When you place the cursor over links and images on the EDM pages, tooltips appear to provide additional information. Information is also provided to facilitate the use of screen readers and other assistive technology.
Navigating the EDM Functions
The actions you can perform on the EDM are grouped into five primary functions: Search, Matching Review, History, Create System Record, and Reports. The main menu on all EDM pages provides hyperlinks to each of these functions, as shown in Figure 3. The first page to appear for each function, except the Create System Record function, is a search page. The names of these headings can be modified for your application.
Figure 3 Main Menu Navigation Tools

-
Search – The Search function allows you to perform a search for an object profile or set of object profiles in the master index application. From the associated pages, you can compare two object profiles, compare records in one object profile, view all information for one object profile, update an object profile, view a transaction history of an object profile, view an object’s potential duplicates, or merge object profiles or system records.
-
Matching Review – The Matching Review function allows you to perform a search for potential duplicate profiles or for any profiles that were updated by an assumed match. From the associated pages, you can compare, merge, or resolve potential duplicate profiles, and you can view and reverse assumed match transactions.
-
History – The History function allows you to perform a search for transaction histories or audit log entries. From the Transaction History pages, you can compare information about an object before and after a transaction occurred, select object profiles to unmerge, and view a merge history for an object profile. From associated Transaction History pages, you can unmerge object profiles. The audit log pages allow you to view information about transactions in which data about an object was accessed through the EDM.
-
Create System Record – The Create System Record function allows you to create new object profiles by creating a system record. When you save the information in the system record, the master index application automatically generates the SBR using the survivor calculator.
-
Reports – The Reports function allows you to display and print reports about certain transactions performed both from the EDM and from messages sent in from external systems. You can run reports from either the EDM or from a command line.
Navigating the EDM Search Pages
When you perform a search for object information using the Search, History, or Matching Review functions, information appears in three different pages. The Search page displays the fields you can use as search criteria, the Search Result page displays a list of search result profiles, and the detail pages display the object profiles you select from the results list. Once you perform a search, you can navigate back through these pages using the hyperlinks provided in a secondary menu below the main menu, as shown in the following figure. The Matching Review page for potential duplicate searches includes an additional results page called the Associated Records page.
Figure 4 Search Page Navigation Tools

The behavior of the commands on the secondary menu for Search, Matching Review, and History is described in Table 2.
Table 2 Secondary Menu Navigational Tools|
Menu Option |
Description |
|---|---|
|
Returns to the original search page with the search criteria filled in. |
|
|
Returns to the search results list. |
|
|
Detail Page Name |
This is the name of the current detail page. Clicking this menu option does not perform any action unless you perform a merge from the Comparison page. In this case the Comparison option becomes active and returns to the Comparison page. |
|
This option becomes available when you select Transaction History or Potential Duplicate from the View/Edit page. It returns to the View/Edit page. |
Navigating the EDM Detail Pages
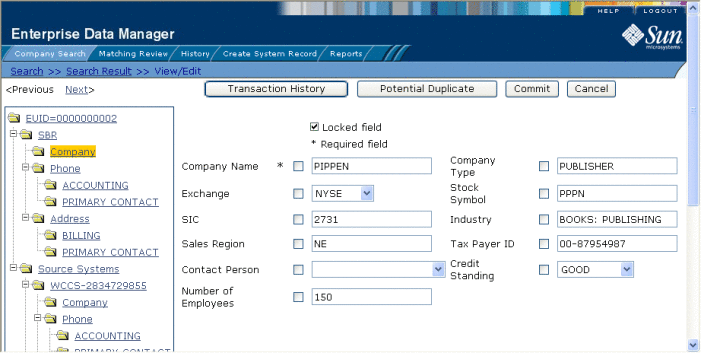
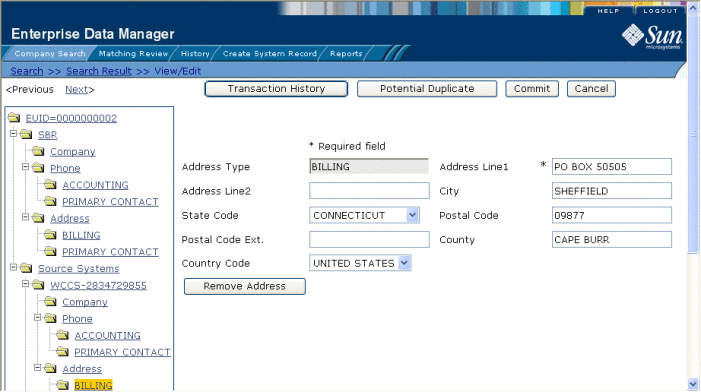
The detail pages display an EUID tree view of the object profile on the left and the detailed information for the selected tree-view object on the right. If you are viewing a comparison of object profiles, the tree views appear in the outer sections of the page, with the detailed information in the center. Figure 5 illustrates a sample of the View/Edit page and shows the tree view on the left with the parent object of the SBR selected. The detailed information displayed on the right is associated with the selected parent object. When you select a different object from the tree view, the detailed information in the right portion of the page changes accordingly.
Figure 5 Sample View/Edit Page
Logging Out of the EDM
Before you exit the EDM, make sure you have saved any changes. To exit the EDM, click Logout in the upper right corner of the page. The Login page reappears.
Learning About Object Queries on the EDM
Before you can view or update object information, you need to perform a search for the object. There are several different search capabilities within the EDM. You can perform lookups for specific object profiles using unique identifiers, such as the EUID or local ID, and you can perform broader searches using data from the parent or child objects as criteria.
The following topics provide information about working with EDM searches and the types of searches that are defined by default.
About the EDM Search Function
By default, the Search tab includes three different search pages: Lookup, Search, and Comparison Lookup. The design of the search functionality provides flexibility in designing database queries. You can narrow a search for a specific object or a range of objects using various search fields located on the search pages and then view your search results on the Search Result page. When you select a specific object from the Search Result page, detailed information for that object appears on the View/Edit page.
The Lookup Page
The Lookup page of the Search function allows you to perform lookups using unique identifiers to find a specific object profile. By default, the unique identifiers you can use as search criteria include the EUID or local ID and system. When you perform this type of search, the Search Result page is generally bypassed and the View/Edit page appears displaying information about the matching profile
The Search Page
The Search page allows you to perform various types of searches against the database using a combination of fields as criteria. By default, you can perform three types of searches on this page. You specify the search type by selecting the appropriate option button in the upper portion of the Search page.
-
Alphanumeric Search – This type of search is an exact match search, meaning it only returns profiles that exactly match the criteria you specify. Most fields in this search allow wildcard characters if the exact value is unknown.
-
Phonetic Search – This type of search compares the phonetic values of certain fields entered as criteria. The object profiles returned by a phonetic search are assigned a matching probability weight to indicate how closely they match the search criteria. Phonetic searches are not exact match searches and allow for misspellings or data entry errors.
-
Blocker Search – This type of search allows you to perform searches against the database using predefined combinations of fields as criteria. The object profiles returned by these searches are assigned a matching probability weight to indicate how closely they match the search criteria. For information about the predefined field combinations, see your system administrator.
The Comparison Lookup Page
The Comparison Lookup page of the Search function allows you to perform a search for multiple object profiles by entering their EUIDs. You can then select two of the resulting records to view on the Comparison page. Use this type of search if you want to compare object profiles and you know the EUIDs of the object profiles to compare.
The Search Result Page
The Search Result page of the Search function displays a list of object profiles found in the database that closely match the search criteria you entered. The results list appears in a table, with the number of profiles returned for the search displayed above the table. This page displays information to help you identify the object profile, such as the EUID or address information. This page also displays a list of the search criteria entered for the search that returned the displayed list. For more information about search results and the Search Result page, see Working with Search Results on the EDM.
Types of EDM Searches
There are several different methods of searching for objects, depending on the search criteria you enter. The search pages of the Search function are organized into different sections that allow you to perform different types of searches based on specific categories of criteria. On the Simple Lookup page, you can only perform one type of search at a time, using the fields from only one search section.
Note –
The names of the search types are configurable. Searches are described below by their default names and by their default search criteria. See your system administrator if you have questions about how your search pages are configured.
EUID Lookup
You can perform an EUID Lookup using the field in the Enterprise Unique ID section of the Simple Lookup page. Enter the object’s EUID number to perform an exact match search against the database.
Local ID Lookup
The Local ID section of the Simple Lookup page consists of two required fields, System and Local ID. To increase search accuracy, you can only select a system listed in the drop-down list and the Local ID field is case-sensitive. The name of this section is configurable and might have been modified for your implementation. See your system administrator for more information.
Advanced Search
On the Search page, you can perform three different types of advanced searches: alphanumeric, phonetic, and blocking. The fields displayed on the Search page are configured by the system administrator. You can enter as much information as needed to narrow down the search appropriately. For blocking searches (and some phonetic searches), certain combinations of criteria are required to perform a search. The search is only carried out for the combinations that have complete data.
For example, a blocking search might be configured to search on the following combinations:
-
Company Name and Sales Region
-
Company Name and Address Line1
-
Tax Payor ID
-
Stock Symbol and Address Line1
If Company Name, Address Line1, and Stock Symbol are entered as criteria, only the second and fourth combinations are carried out. The returned result set would include any records that match on Company Name and Address Line1 or that match on Stock Symbol and Address Line1. If only Company Name is entered as criterion, no records are returned since it does not fulfill any of the combination requirements.
Comparison Lookup
The Comparison Lookup function provides a simple way to search for two or more records to compare in a side-by-side comparison. You can enter up to five EUIDs as search criteria, and all records matching any of the specified EUIDs are returned.
Searching by Ranges on the EDM
Your system administrator can configure the search pages to allow you to enter a range by which to search for certain fields. For example, you might want to search for profiles with a specific name, but with a date that falls within a five-year range. If a field is defined for searching by a user-defined range, the EDM displays a ”from’ field and a ”to’ field so you can specify the range (for example, “Date From” and “Date To”). If you only enter a value in the ”from’ field, the EDM searches for profiles with a value greater than or equal to that value. If you only enter a value in the ”to’ field, the EDM searches for profiles with a value less than or equal to that value.
Ranges can also be defined as the entered value plus or minus a specific value. For example, a date field can be configured to search for dates that fall within a range five years earlier than the date you enter and five years later than the date you enter. Finally, ranges can be defined as specific upper and lower limits. These limits are used when no value is entered. For example, if you perform a search without the date, the EDM searches between the defined lower and upper limits. If you enter only a ”from’ date, the EDM searches between the date you entered and the defined upper limit. For more information about how your system has been configured for range searching, see your system administrator.
Required Fields on the EDM
Certain fields might be required for the searches on the EDM. If a field is marked with an asterisk (*), it is required. If multiple fields are marked with daggers (†), at least one of those fields must be populated in order to perform the search. The required fields can vary depending on the type of search you are performing.
Searching for Object Profiles on the EDM
The following topics provide step-by-step instructions to help you perform the various types of searches available on the EDM. To move from one field to another on the search pages without using the mouse, press the Tab key. Note that the name of the Local ID section is configurable, and might have a different title.
Performing an EUID Lookup on the EDM
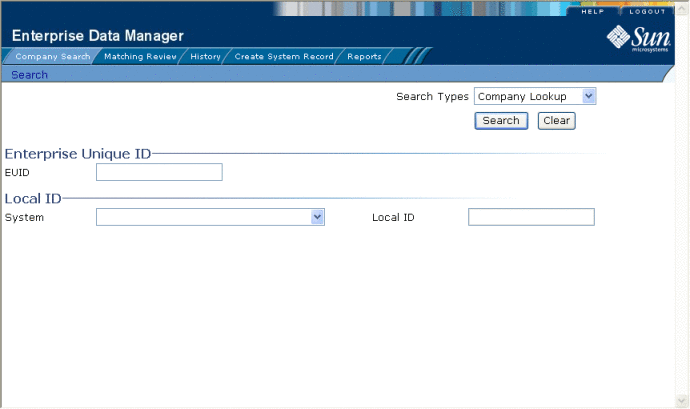
To search for an object profile using only an object’s EUID, you need to enter the EUID number in the EUID Search section of the Lookup page. This type of search should result in only one matching profile.
Figure 6 Lookup Page
 To Perform an EUID Lookup
-
On the Search page, select app_name Lookup from the Search Types drop-down list (where app_name is the name of the master index application) .
-
In the Enterprise Unique ID section, enter the object’s EUID.
-
Click Search or press Enter to initiate the search.
The View/Edit page appears, displaying detailed information about the object whose EUID you entered.
Performing a Local ID Lookup on the EDM
To search for an object profile by its local ID in a specific system, you need to enter search criteria in the Local ID section of the Lookup page. This type of search should result in only one matching profile. If the Local ID field contains alphabetic characters, the criterion is case-sensitive.
Note –
The name of this section might have been modified for your implementation. See your system administrator for more information.
 To Perform a Local ID Lookup
-
On the Search page, select app_name Lookup from the Search Types drop-down list (where app_name is the name of the master index application)
The Lookup page appears (see Figure 6).
-
In the System field, enter the computer system, such as a registration system, for which the object’s local ID is known.
-
In the Local ID field, enter the object’s unique identification code at the specified system.
Note –If alphabetic characters are entered in this field, the search is case-sensitive. This field name might have been modified for your implementation.
-
Click Search or press Enter to initiate the search.
The Search Result page is bypassed, and the View/Edit page appears.
Performing an Alphanumeric Search on the EDM
To perform an alphanumeric search for an object profile, you need to specify identifying information for the object on the Alphanumeric Search page. This type of search might result in several matching profiles.
Note –
Make your search as specific as possible. This type of search does allow wildcard characters; use a percent sign (%) to indicate unknown characters. Any required fields are marked with an asterisk (*). If at least one field in group of fields is required, the fields in that group are marked with a dagger (†). In addition, range searching is supported for any field type that has two fields, one with “From” appended to the name and one with “To” appended to the name (for example, “DOB From” and “DOB To”). If your EDM is set up for range searching, see the system administrator for more information about how it is configured.
Figure 7 Alphanumeric Search Page
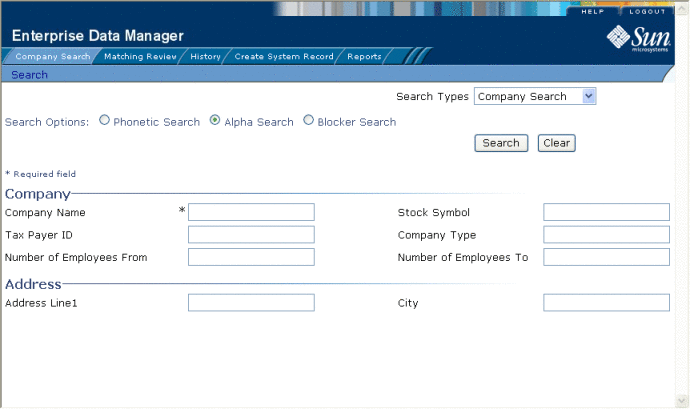
 To Perform an Alphanumeric Search
-
On the Search page, select app_name Search from the Search Type drop-down list (where app_name is the name of the master index application).
-
Select the option button next to Alpha Search.
-
Enter the search criteria for the object you want to find.
-
Click Search or press Enter to initiate the search.
The Search Result page appears with a list of matching profiles. If only one matching profile is returned, the View/Edit page appears.
Note –The system administrator can choose whether to display the EUID field or the local ID and system fields on this page. Any values entered into these optional fields take precedence over information entered into other search fields. For example, if an invalid EUID is entered but valid first and last names are entered, no results are returned due to the invalid EUID. The EUID field takes precedence over the local ID and system fields.
Performing a Phonetic Search on the EDM
To perform a phonetic search for an object profile, you need to specify identifying information for the object on the Phonetic Search page. This search might return several profiles.
Figure 8 Phonetic Search
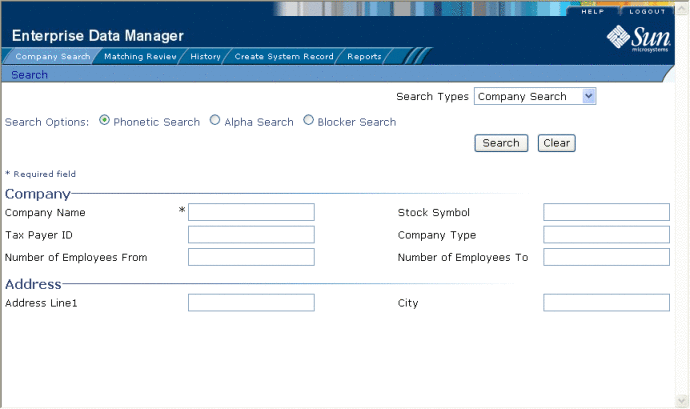
 To Perform a Phonetic Search
-
On the Search page, select app_name Search from the Search Type drop-down list (where app_name is the name of the master index application).
-
Select the option button next to Phonetic Search.
-
Enter the search criteria for the object you want to find.
Note –Certain combinations of data might be required to perform a phonetic search. See your system administrator for more information. For more information about phonetic searches, see Advanced Search.
-
Click Search to initiate the search.
The Search Result page appears with a list of matching profiles. If only one matching profile is found, the results page is bypassed and the View/Edit page appears.
Note –The system administrator can choose whether to display the EUID field or the local ID and system fields on this page. Any values entered into these optional fields take precedence over information entered into other search fields. For example, if an invalid EUID is entered but valid first and last names are entered, no results are returned due to the invalid EUID. The EUID field takes precedence over the local ID and system fields.
Performing a Blocker Search on the EDM
To perform a blocker search for an object profile, you need to specify identifying information for the object on the Blocker Search page. This search might return several profiles.
Figure 9 Blocker Search
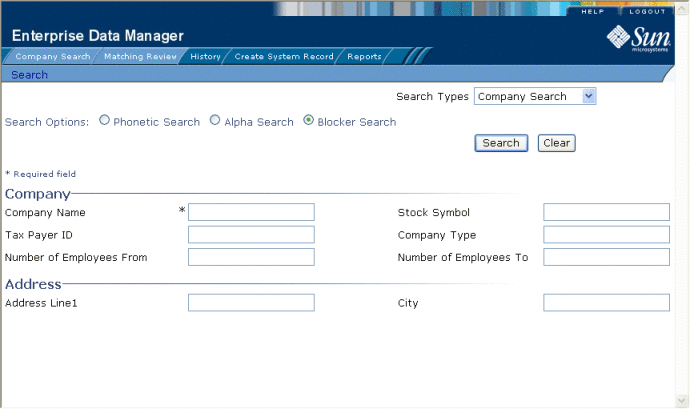
 To Perform a Blocker Search
-
On the Search page, select app_name Search from the Search Types drop-down list (where app_name is the name of the master index application).
-
Select the option button next to Blocker Search.
-
Enter the search criteria for the object you want to find.
For more information about criteria combinations for blocker searches, see Advanced Search. See your system administrator if you do not know the criteria combinations defined for the blocker search.
-
Click Search to initiate the search.
The Search Result page appears with a list of matching profiles. If only one matching profile is found, the results page is bypassed and the View/Edit page appears.
Note –The system administrator can choose whether to display the EUID field or the local ID and system fields on this page. Any values entered into these optional fields take precedence over information entered into other search fields. For example, if an invalid EUID is entered but valid first and last names are entered, no results are returned due to the invalid EUID. The EUID field takes precedence over the local ID and system fields.
Performing an EUID Comparison Lookup on the EDM
To perform a search by EUID for multiple profiles to compare, you need to specify each EUID on the Comparison Lookup page. You can enter from two to five EUIDs to compare in the search results list, and then select one or two of the resulting profiles to compare information.
Figure 10 Comparison Lookup Page
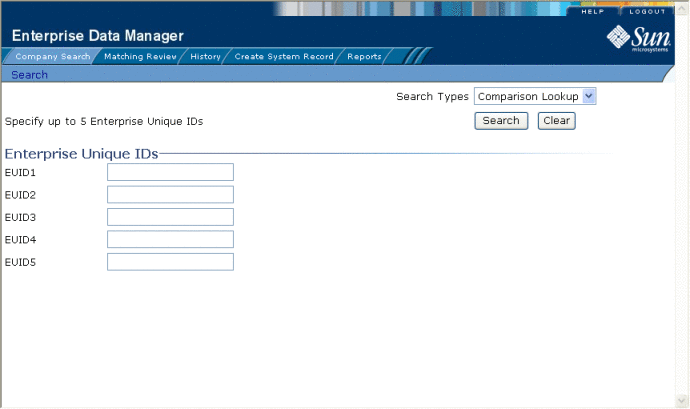
 To Perform an EUID Comparison Lookup
-
On the Search page, select Comparison Lookup from the Search Types drop-down list.
-
Enter at least two, and up to five, EUIDs.
-
Click Search or press Enter to initiate the search.
The Search Result page appears with a list of matching profiles. To learn how to compare profiles, see Comparing Object Information on the EDM.
Working with Search Results on the EDM
The following topics describe the Search Result page, how to sort and select the profiles that match the searches you perform, and how to print a search result report. The criteria that you entered for a search appear above the results list table on the result page.
Viewing the Results of a Search
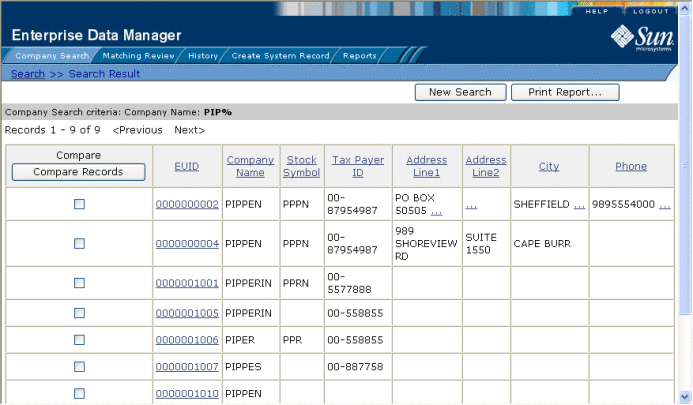
The matching profiles that result from an object search appear in table format on the Search Result page. The table displays a limited number of fields contained in the SBR of the object profile.
Figure 11 Search Results List
 To View the Profiles on the Search Result Page
-
Perform a search for the object whose profile you want to access.
If more than one record matches the criteria, the Search Result page appears.
-
In the results list, view the information presented for each returned profile to determine which profile you want to view.
-
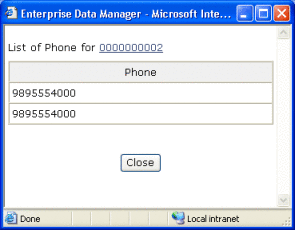
If an address or telephone number field is included in the results list and contains an ellipsis (“...”), you can click the ellipsis to view additional address or telephone information, as shown in Figure 12 and Figure 13.
Figure 12 Address Information Page
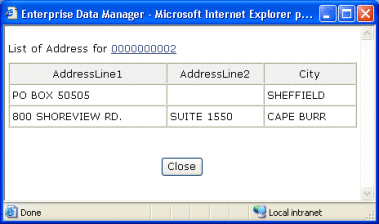
Figure 13 Telephone Information Page
-
When you are finished viewing the additional address or telephone information, click Close.
-
To view the following page of search results, click Next>.
-
To return to the previous page of results, click <Previous.
-
To select a profile to display on the View/Edit page, click the EUID of that profile.
-
To perform a new search, click New Search in the upper portion of the page.
-
To view and print the results in a report, click Print Report.
Sorting the Results of Your Search
The matching profiles that result from an object search appear in table format on the Search Result page. By default, the results are sorted by EUID, but you can sort the results by any column in the table.
 To Sort the Profiles on the Search Result Page
-
Perform a search for the object whose profile you want to access.
-
In the results list that appears on the Search Result page, click the column heading of the column by which you want to sort the results.
Note –Clicking a heading once sorts the profiles in ascending order; clicking the heading a second time sorts the profiles in descending order.
Selecting a Profile from the Results List
From the search results list, you can select one object profile in order to view detailed information for that profile or you can select two object profiles to compare the information in both profiles. You can also select one object profile to compare different components of that profile.
 To Select a Profile to View
-
Perform a search for the object profiles you want to view.
-
To view detailed information for one object profile, click the EUID of that profile.
The View/Edit page appears, displaying the parent object for that profile.
-
To compare two object profiles, select the check boxes to the left of each profile you want to compare, and then click Compare Records.
The Comparison page appears, displaying a side-by-side comparison of the two profiles.
-
To compare different components of one object profile, select the check box to the left of the profile you want to view, and then click Compare Records.
The Comparison page appears, displaying a side-by-side comparison of two instances of the same object profile.
Note –Once a comparison check box is selected in the search results list, it remains checked until you clear it. If you return to the Search Result page from the Comparison page, clear the selected check boxes before making another selection.
Creating and Printing a Search Result Report
You can create a report displaying all results of a search, and then print that report to a designated printer.
 To Create and Print a Search Result Report
-
Perform a search for the object profiles you want to view.
Note –You cannot print a search result report for a search that results in only one matching profile since the Results page does not appear in that case; the View/Edit page appears instead.
-
In the upper right portion of the Search Result page, click Print Report.
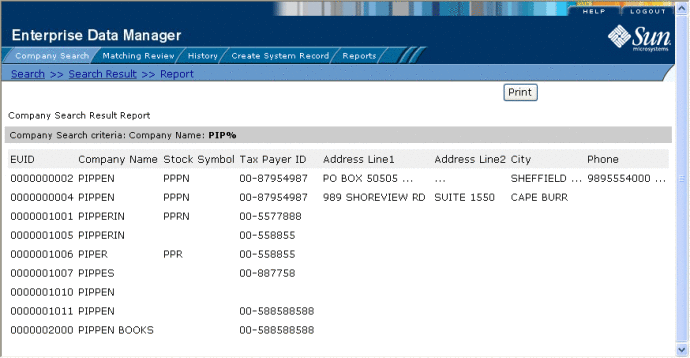
The Search Result Report page appears (see Figure 14).
Figure 14 Search Result Report Page
-
To print the report, click Print, and then select a printer from the Print dialog box.
Note –This reporting capability is provided on all search result pages.
Learning About Object Profile Views on the EDM
Before you can view object information, you need to perform a search for the object using one of the search techniques described under Searching for Object Profiles on the EDM. Once you retrieve a search results list, you can view an object’s detailed information, compare object profiles, view a merge transaction history for a profile, and view a history of all transactions for a profile.
You can view object information in any of the following formats.
Object Profile Details on the EDM
When you select a profile on the Search Result page, detailed information about the selected object appears on the View/Edit page. This page is divided into two sections. The left side of the page is a tree view that displays the EUID, the components of the SBR, and the components of each system record. You can select a component from the EUID tree to display detailed information about that component in the right portion of the page. The View/Edit page displays the selected object’s information, and you can select any record component to view additional information. From the View/Edit page, you can perform several actions, such as viewing a transaction history for the object, viewing potential duplicate profiles, deactivating the profile, updating object information, and so on.
The Tree View
A tree view on the left side of the View/Edit page displays an outline of the profile, including the SBR and any associated system records. This is called the EUID tree.
Figure 15 Object Profile Tree View
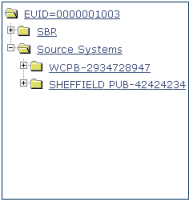
You can expand this tree view to view the different types of information contained in the SBR and in each system record. A plus sign (+) to the left of an item indicates that the item contains additional information. For certain components, a type appears in the tree to indicate a record. For example, an address or telephone number might have a type, such as Home or Office, that appears in the tree; but for an alias name, the entire name might appear.
Figure 16 Expanded Object Profile Tree View

Information Fields
The right side of the View/Edit page displays detailed information about the item that is selected in the EUID tree. For example, if you have a master company index application, selecting the parent object (Company) might display information about the company’s name, industry type, tax ID number, and so on. Selecting a specific address type displays information about a specific address for the company. For more information about object profiles, see Learning about EDM Object Profiles.
Object Profile Comparisons on the EDM
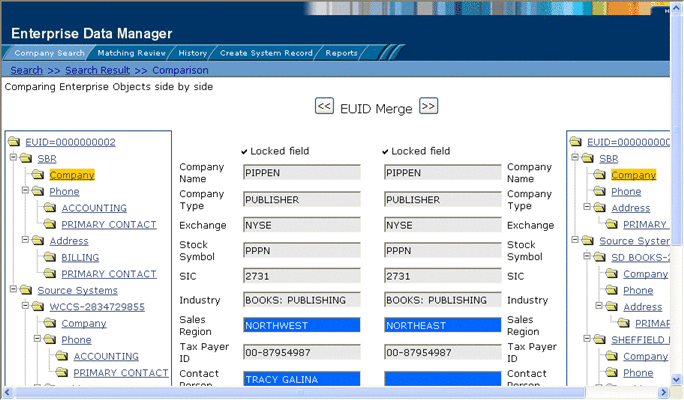
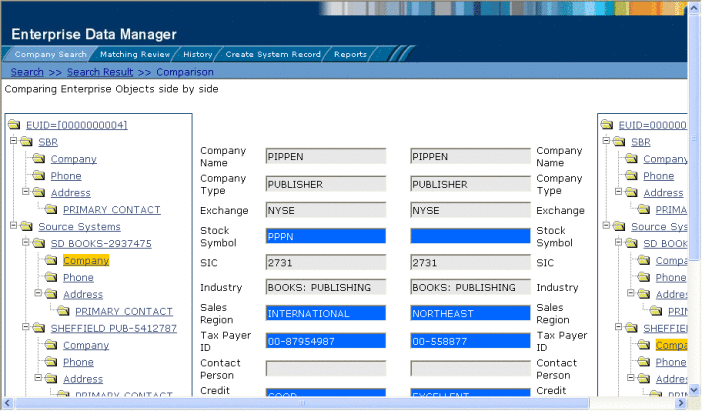
You can compare two different object profiles by selecting the profiles to compare from a search results list. You can also compare different components of one object profile. The Comparison page allows you to view the selected profiles or components of one profile in a side-by-side comparison with the differences between the two sides highlighted. Like the View/Edit page, the Comparison page displays an EUID tree for each profile, from which you can select the type of information you want to compare. This design allows you to compare one object’s SBR with another’s SBR, one object’s system records with another’s system records, or one object’s SBR with another’s system records. You can also compare a profile’s SBR with one of its own system records or two system records from one profile. This gives you a complete comparison between object profiles and between the different records in an object profile.
Differences between displayed profiles are only highlighted when viewing the same type of information on each side. For example, viewing two SBR addresses highlights the differences, but viewing an SBR address and system object address does not. From the Comparison page, you can merge object profiles or system records if they are found to represent the same object.
Object Profile Transaction Histories on the EDM
You can view a history of all transactions performed against object profiles either by performing a search as described in Searching for Object Profiles on the EDM or by performing a Transaction History search on the History page (described in Viewing a Profile's Transaction History on the EDM). You can trace the events that modified an object profile from the time the profile was added to the master index application to the most previous transaction, including merged and deactivated profiles.
The Transaction History page allows you to view a side-by-side comparison of one object profile before and after a transaction occurred against that profile. Like the Comparison page, the Transaction History page displays an EUID tree for each profile, from which you can select the type of information you want to compare with differences between the two profiles highlighted. For a true comparison, be sure the type of information you are viewing is the same on both sides of the page. You can also compare an SBR against an SBR, an SBR against a system record, or a system record against a system record. From associated Transaction History pages, you can unmerge previously merged profiles.
Object Profile Merge Histories on the EDM
On the Merge History page, you can display a history of the merges that have affected a specific object profile. The merge history appears in an EUID tree format on the left side of the page. The top level displays the EUID of the current active profile. The two profiles at the second level show you the EUIDs of the profiles that were merged to form the top-level profile. If there are profiles listed at the third level, they display the EUIDs of the profiles that were merged to form the profile above them. There might be several levels of merges displayed in an object’s merge history.
The right side of the page displays information about the merge transactions that involved the EUID that is selected in the EUID tree on the left. You can select a specific transaction to view a transaction history comparison for that merge transaction.
The EDM Audit Log
The audit log allows you to track and view all instances in which information about the objects in the master index application was accessed through the EDM. If audit logging is enabled, an audit log entry is created each time the EDM accesses database tables that contain object information. The audit log keeps a record of each time the tables are accessed, along with the database function used to access the tables, the login ID of the user accessing the tables, the date and time the tables were accessed, and the EUIDs of the object profiles that were accessed. The audit log is enabled and disabled in the Enterprise Data Manager file in the master index project.
Viewing Object Profile Information on the EDM
The View/Edit page displays object profiles in a series of pages you can select and view. You can view information associated with any of the SBR or system record components in an object profile. The SBR contains the information that is determined to be the most current and accurate information about that object from all external systems. By default, when the View/Edit page first appears, the SBR is visible and the system record information is not shown.
The system records associated with a profile contain information that is stored in the external systems that share information with the master index application. The information in a system record might not match the information in the SBR. You can view several different types of information about an object, including the following:
Viewing Object Profiles on the EDM
The View/Edit page displays object profiles in a series of pages you can select and view. You can view information associated with any of the SBR or system record components in an object profile. The SBR contains the information that is determined to be the most current and accurate information about that object from all local systems. By default, when the View/Edit page first appears, information in the SBR is visible.
The system records associated with a profile contain the information that is stored in the external systems that share information with the master index application. The information in an object’s system records might not match the information stored in the object’s SBR.
Figure 17 View/Edit Page - SBR

 To View Object Information
-
Using one of the search methods described in Searching for Object Profiles on the EDM, display the object profile you want to view on the View/Edit page.
-
To view different types of information in the SBR for the displayed object, do the following:
-
In the EUID tree in the left portion of the page, expand the SBR until you can see the object type you want to view.
-
To view the parent object in the SBR, select the first folder in the SBR tree.
-
To view a child object in the SBR, expand the child object type you want to view and then select any of its sub-folders.
-
-
To view different types of information in a system object for the displayed object, do the following:
-
In the EUID tree in the left portion of the page, expand Source Systems.
-
Expand the system name and local ID you want to view.
-
To view the parent object in the system record, select the first folder under the expanded system name and local ID.
-
To view a child object in the system record, expand the child object type you want to view and then select any of its sub-folders, as shown in Figure 18.
Figure 18 View/Edit Page - System Records
-
-
From the View/Edit page, you can do any of the following:
-
To modify object information, follow the appropriate procedure under Modifying Profile Information on the EDM.
-
To view a history of transactions for the displayed profile, click Transaction History in the upper portion of the View/Edit page (for more information, see Viewing a Profile's Transaction History on the EDM).
-
To view potential duplicates of the displayed profile, click Potential Duplicate in the upper portion of the View/Edit page (for more information, see Working with Potential Duplicate Profiles on the EDM).
-
To view detailed information for the following object in the search results list, click Next> in the upper portion of the page.
-
To view detailed information for the preceding object in the search results list, click <Previous in the upper portion of the page.
-
Comparing Object Information on the EDM
Using the Comparison function of the EDM, you can compare two object profiles side-by-side to check for similarities and differences. You can also compare different components of the same object profile. From the EUID trees, you can select the type of information to view and whether to view SBR or system record information.
Comparing two Object Profiles
To compare two different object profiles, you must perform a search for the profiles to compare and then select them from the results list. The Comparison page contains an EUID tree on each side of the page, one for each profile you are comparing.
Figure 19 Comparison Page - Two Object Profiles
 To Compare two Object Profiles
-
Perform a search for the object profiles you want to compare, as described in Searching for Object Profiles on the EDM.
Note –If you know the EUIDs of the object profiles to compare, use the Comparison Lookup to retrieve those profiles.
-
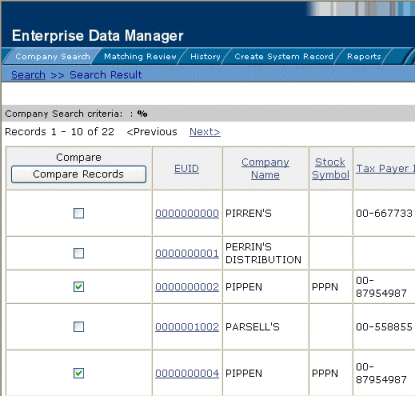
On the search results list, select the check boxes to the left of the two object profiles you want to compare.
Figure 20 Selecting Two Profiles to Compare
-
In the first cell of the results table, click Compare Records.
The Comparison page appears with SBR information displayed with any differences between the two profiles highlighted.
-
To view and compare different types of information, select the type of information you want to view from the EUID trees on both sides of the page (for more information, review the instructions under Viewing Object Profiles on the EDM).
Note –If you select different types of information from the two sides, differences are not highlighted (for example, if you view SBR address data on one side and system record address data on the other side; or if you view SBR address data on one side and SBR phone data on the other).
-
To merge object information, do either of the following:
-
To combine the two object profiles, see Merging Object Profiles on the EDM.
-
To combine two system records in the displayed object profiles, see Merging System Records on the EDM.
-
Comparing Records in one Object Profile
To compare different components of one object profile, you must perform a search for that profile and then select it from the results list. The Comparison page contains an EUID tree on each side of the page, both containing the most current version of the profile you are comparing.
Figure 21 Comparison Page - One Object Profile
 To Compare Records in one Object Profile
-
Perform a search for the object profile you want to view, as described in Searching for Object Profiles on the EDM.
-
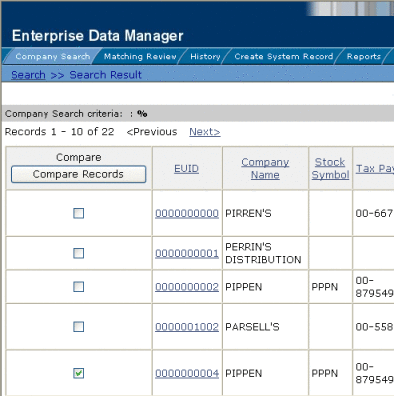
On the search results list, select the check box to the left of the object profile you want to compare.
Figure 22 Selecting one Profile to Compare
-
In the first cell of the results table, click Compare Records.
The Comparison page appears with SBR information displayed.
-
To view and compare different types of information, select the type of information you want to view from the EUID trees on both sides of the page (for more information, review the instructions under Viewing Object Profiles on the EDM).
Note –If you select different types of information from the two sides, differences are not highlighted (for example, if you view SBR address data on one side and system record address data on the other side; or if you view SBR address data on one side and SBR phone data on the other). However, if you view two different types of addresses the differences are highlighted.
-
To merge two system records in the displayed object profile, see Merging System Records on the EDM.
Viewing a Profile's Transaction History on the EDM
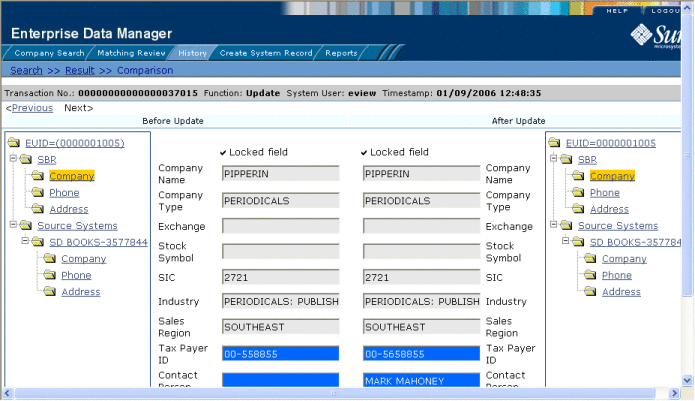
Using the History function, you can view historical information for a specific object, and compare the object’s profile before and after a specific transaction occurred to determine what information was modified as a result of the transaction. The Transaction History page contains an EUID tree for the before image and one for the after image. From the EUID trees you can specify the type of information to view and whether to view SBR or system record information.
The image on the left side of the Transaction History Comparison page reflects the object’s information before the transaction occurred. The image on the right reflects the object’s information after the transaction occurred. If the displayed record has no historical data, then the message “There is nothing to show in this area.” appears in the left side of the page.
Note –
In addition to the instructions given here, you can also access a transaction history by performing a search for an object profile, displaying the profile on the View/Edit page, and then clicking Transaction History.
Figure 23 Transaction History Comparison Page
 To View a Transaction History
-
Obtain information about the object, such as the EUID, a system in which the object was registered, or a specific transaction performed against the object’s profile.
-
On the EDM main menu, click History.
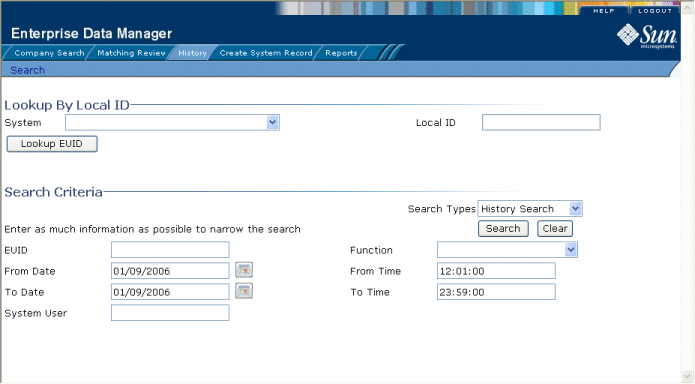
The Transaction History Search page appears.
Figure 24 Transaction History Search Page
-
Do one of the following:
-
To search for a record by system and local ID, enter the system and local ID in the upper section of the window and then click Lookup EUID.
If an EUID is found, it is populated into the EUID field in the Search Criteria section.
-
To search by EUID or transactional information, enter the search criteria for the object you want to view (for more information, see About Transaction History Search Fields on the EDM).
-
-
On the Transaction History Search page, click Search.
If more than one transaction matches the search, the Transaction History Result page appears with a list of matching profiles (for more information, see About Transaction History Results Fields on the EDM).
Figure 25 Transaction History Results
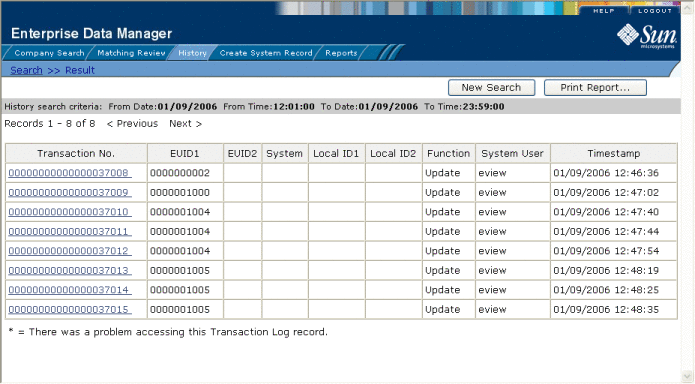
-
If the Transaction History Result page appears, click the transaction number of the transaction you want to view.
Note –If an asterisk appears next to a transaction, it means the transaction history cannot be accessed.
The Transaction History Comparison page appears, displaying information in the SBR with any differences between the before and after image highlighted in blue.
-
Select the type of information you want to view from the EUID trees on both sides of the page (for more information, review the instructions under Viewing Object Profiles on the EDM).
Note –If you select different types of information from the two sides, differences are not highlighted (for example, if you view SBR address data on one side and system record address data on the other side; or if you view SBR address data on one side and SBR phone data on the other).
-
If you are viewing a merge transaction, additional options appear in the upper left portion of the page, allowing you to view different images for the transaction (see Figure 26).
-
If you are viewing an unmerge transaction, additional options appear in the upper right portion of the page, allowing you to view different images for the transaction (see Figure 27).
About Transaction History Search Fields on the EDM
The fields located on the Transaction History Search page allow you to specify search criteria for the transactions you want to view. Note that the “Lookup By Local ID” section is customizable and might have been changed for your implementation.
Table 3 Transaction History Search Fields|
In this field … |
type or select ... |
|---|---|
|
Lookup By Local ID Section |
|
|
The system in which the local ID is known. |
|
|
The local ID corresponding to the record you want to find and the system selected in the previous field. This field name might be different for your implementation. |
|
|
Search Criteria Section |
|
|
The object’s enterprise-wide unique identifier assigned by the master index application. |
|
|
The type of transaction that caused the object’s profile to change. See Table 5 for more information about transaction types. |
|
|
The beginning date for the search. The query is performed for transactions that fall between the From Date and To Date. |
|
|
The beginning time for the search using 24-hour notation. The query is performed for transactions that fall between the From Time and To Time on the specified dates. If no time is entered, the default value is 00:01 (12:01 A.M.). |
|
|
The ending date for the search. |
|
|
The ending time for the search using 24-hour notation. If no time is entered, the default value is 24:00. |
|
|
The login ID of the user who performed the transaction for which you are searching. |
|
About Transaction History Results Fields on the EDM
The fields located on the Transaction History Result page help you identify a specific object profile and transaction to view. Additional fields might be added to this page by the system administrator. The LID fields are configurable and might have been changed for your implementation.
Table 4 Transaction History Results Fields|
This field … |
displays this information … |
|---|---|
|
The sequential identification code of the transaction that caused the transaction history record. |
|
|
The enterprise-wide unique identification number of the first object profile involved in the transaction. |
|
|
The enterprise-wide unique identification number of the second object profile involved in the transaction. |
|
|
The name of the system in which the transaction that created the history record occurred. |
|
|
The local ID of the first system record involved in the transaction. |
|
|
The local ID of the second system record involved in the transaction. This is only used for system record merges, unmerges, and transfers. |
|
|
The type of transaction that changed the object profile and caused the history record to be written. See Table 5 for a description of each transaction type. |
|
|
The login ID of the user who performed the transaction. |
|
|
The date and time the transaction occurred. |
Transaction History Transaction Types on the EDM
Each transaction performed by the master index application is assigned a transaction type, indicating the type of action that was performed. Table 5 lists and describes each transaction type.
Table 5 Transaction Type Descriptions|
Transaction Type |
Description |
|---|---|
|
This transaction type is assigned when a new object profile is added to the database, whether it is through a direct add or through reversing an assumed match. |
|
|
This transaction type is assigned when a deactivated object profile is reactivated. |
|
|
This transaction type is assigned when an active object profile is deactivated. |
|
|
This transaction type is assigned when two object profiles are merged. |
|
|
This transaction type is assigned when two object profiles are unmerged. |
|
|
This transaction type is assigned when two system records are merged. |
|
|
This transaction type is assigned when a system record is transferred from one object profile to another. |
|
|
This transaction type is assigned when two system records are unmerged. |
|
|
This transaction type is assigned when an object profile is modified in any way other than those described above. This includes such transactions as modifying an object profile, reversing an assumed match, deactivating or reactivating a system record, and adding or removing a child object (such as an address or telephone number). |
Viewing a Profile's Merge History on the EDM
When an object profile is displayed on the Transaction History page, you can display a history of all merges performed against the profile, allowing you to trace the origin of certain information contained in the profile. You can view a history for each merge transaction in the merge history tree.
Viewing a Merge History Tree
The master index application tracks all merges performed against each object profile in the database. You can view a history of merges that affect a specific object profile and you can view each EUID that was merged to form the final merge result profile. The merge history appears in a tree structure in the left portion of the Merge History page, showing each pair of profiles that were merged under the displayed object profile. In the right portion of the page, transaction details appear for the EUID that is highlighted in the merge history tree.
Figure 28 Merge History Tree
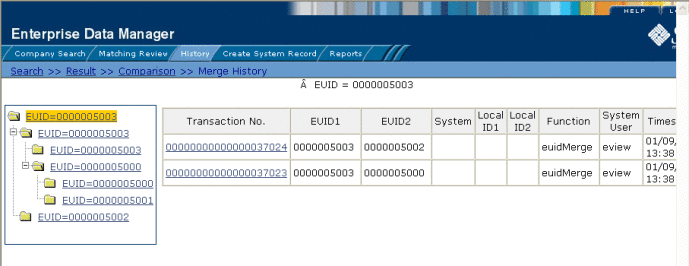
 To View an Object’s Merge History
-
On the Transaction History Search page, perform a search for the object whose merge history you want to view (for more information, see Viewing a Profile's Transaction History on the EDM).
-
On the Transaction History Result page, click the transaction number to the left of the EUID whose merge history you want to view.
The Transaction History page appears.
-
In the upper portion of the page, click Merge Tree (if Merge Tree is not visible, the EUID does not have a merge history to view).
The Merge History page appears with the merge tree on the left and transaction summaries in the right.
-
To view a summary of merge transactions for a merged profile, select the EUID of that profile from the merge history tree.
The transaction summary appears in the right portion of the page.
-
To view transaction information for two merged profiles, click the profile above the merged pair.
Transaction information appears in the right portion of the page.
Viewing an Object Profile From a Merge History Tree
When you view an object’s merge history, you can also view a transaction history of any merged pair in the merge history list. The profiles you display from the merge history list contain the information about the profile before the merge occurred.
 To View an Object Profile From a Merge History
Tree
-
Display a merge history tree, as described in Viewing a Merge History Tree.
-
Expand the merge history tree in the left portion of the Merge History page until you see the EUID of the object profile you want to view, and then select that EUID.
-
In the transaction list in the right portion of the page, click the transaction ID for the merge transaction you want to view.
The Transaction History page appears, displaying transaction details for the transaction you selected.
Viewing the EDM Audit Log
Using the Audit Log function, you can view a record of each instance an EDM user accessed information about any object in the master index database. The audit log includes instances in which an object profile appeared in a search results list; was viewed or compared; was added, updated, or deactivated; or was merged or unmerged. The audit log can be enabled or disabled by the system administrator.
Figure 29 Audit Log Detail page
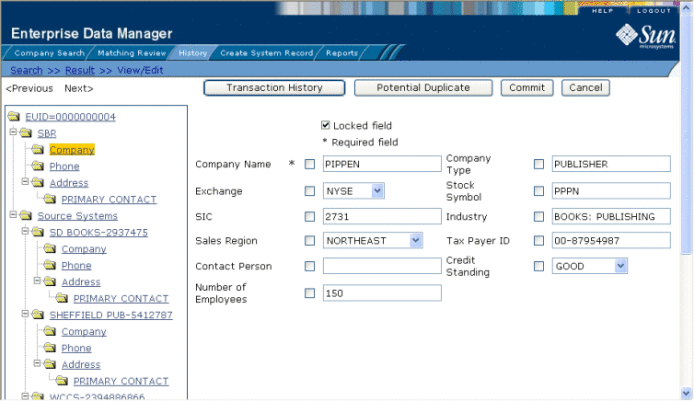
 To View the Audit Log
-
Obtain information about the instances you want to view, such as the EUID, a time frame for when they occurred, the type of function that caused the audit log entries, the user who performed the functions, and so on.
-
On the EDM main menu, click History.
The History Search page appears with the Transaction History Search page displayed.
-
Select Audit Log Search from the Search Types drop-down list.
Figure 30 Audit Log Search Page
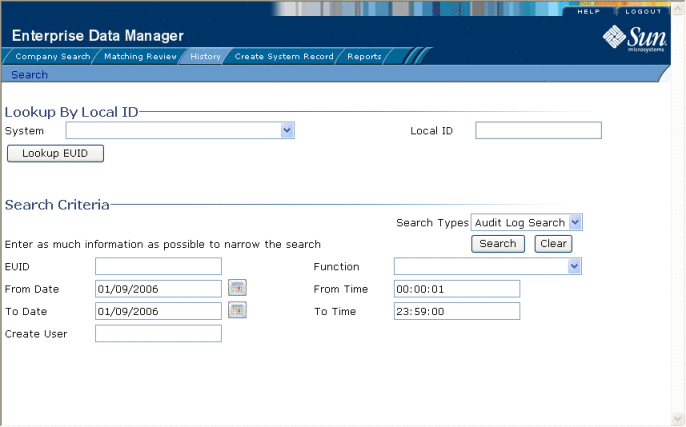
-
Do one of the following:
-
To search for a profile by system and local ID, enter the system and local ID in the upper section of the window and then click Lookup EUID.
If an EUID is found, it is populated into the EUID field in the Search Criteria section.
-
To search by EUID or transactional information, enter the search criteria for the object you want to view (for more information, see About Audit Log Search Fields on the EDM).
-
-
In the right portion of the page, click Search.
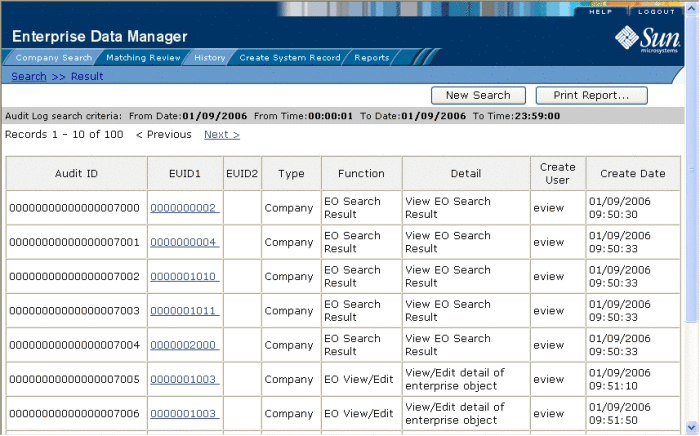
The Audit Log Result page appears with a list of instances in which the data was accessed. For information about the fields displayed on this page, see About Audit Log Results Fields on the EDM.
Figure 31 Audit Log Result Page
-
To view additional information about a specific Audit Log entry, click an EUID in the row containing the entry you want to view.
The View/Edit page appears.
-
To view details for the previous entry in the results list, click <Previous.
-
To view details for the following entry in the results list, click Next>.
About Audit Log Search Fields on the EDM
The fields located on the Audit Log Search page allow you to enter search criteria about the audit log entries you want to view.
Table 6 Audit Log Search Fields|
In this field … |
type or select ... |
|---|---|
|
Lookup By Local ID Section |
|
|
The system of the system in which the local ID is known. |
|
|
The local ID corresponding to the record you want to find and the system selected in the previous field. This field name might be different for your implementation. |
|
|
Search Criteria Section |
|
|
The object’s enterprise-wide unique identifier assigned by the master index application. |
|
|
The category type for the records whose audit log entries you want to view. |
|
|
The type of transaction that created the audit log entries you want to view. For more information about transaction types, see Audit Log Functions on the EDM. |
|
|
The login ID of the user whose transactions you want to view. |
|
|
The beginning date for the search. The query is performed for audit log entries that fall between the From Date and To Date. |
|
|
The beginning time for the search using 24-hour notation. The query is performed for audit log entries that fall between the From Time and To Time on the specified dates. If no time is specified, the default value is 00:01 (12:01 A.M.). |
|
|
The ending date for the search. |
|
|
The ending time for the search using 24-hour notation. If no time is specified, the default value is 24:00. |
|
About Audit Log Results Fields on the EDM
The fields located on the Audit Log Result page display information about the instances in which object data was accessed, where those instances match the search criteria you entered.
Table 7 Audit Log Results Fields|
This field … |
displays this information ... |
|---|---|
|
The unique ID code in the audit log for the audit log entry. |
|
|
The EUID of the first object profile whose information was accessed. |
|
|
The EUID of the second object profile whose information was accessed in the same transaction (as would occur in the case of a profile comparison or merge). |
|
|
The category type of the object represented by the EUID. |
|
|
The primary transaction type that was used to access information. For more information about transaction types, see Audit Log Functions on the EDM |
|
|
Specific information about the actions taken against the profile, such as the EDM page that was accessed or the type of function performed against a profile. |
|
|
The login ID of the user who accessed the information. |
|
|
The date and time that the information was accessed. |
Audit Log Functions on the EDM
The audit log creates an audit entry whenever data is accessed through the EDM. The following table lists and describes each audit log function. Some of these functions refer to the actual viewing of data on an EDM page; others refer to an action taken against that data, such as clicking the merge or unmerge Confirm button or resolving a potential duplicate pair.
Table 8 Audit Log Function Descriptions|
Audit Log Function |
Description |
|---|---|
|
A user added a new object profile to the database from the Create System Record page or by reversing an assumed match. |
|
|
A user viewed profile summaries on the Associated Records page of a potential duplicate search. |
|
|
A user viewed two assumed match profiles on the Assumed Match page. |
|
|
A user viewed the results of a search for assumed matches. |
|
|
A user permanently resolved two potential duplicate records on the Potential Duplicate Comparison page. |
|
|
A user viewed two object profiles on the Comparison page. |
|
|
A user viewed profile summaries on the Search Results page after performing a search for object profiles. |
|
|
A user viewed an object profile on the View/Edit page. |
|
|
A user initiated a merge of two object profiles. This function refers to when the user views the merge result prior to clicking Confirm. |
|
|
A user finalized an unmerge of two object profiles. |
|
|
A user initiated an unmerge of two object profiles. This function refers to when the user views the unmerge result prior to clicking Confirm. |
|
|
A user compared the before and after image of an object profile on the Transaction History Comparison page. |
|
|
A user viewed the results of a transaction history search on the Transaction History Search Results page. |
|
|
A user initiated a merge of two system records. This function refers to when the user has selected LID Merge but has not finalized the merge. |
|
|
A user finalized a merge of two system records. |
|
|
A user finalized an unmerge of two system records. |
|
|
A user initiated an unmerge of two system records. This function refers to when the user views the unmerge result record prior to clicking Confirm. |
|
|
A user viewed the results of a search for potential duplicates. |
|
|
A user finalized a merge of two object profiles or two system records. |
|
|
A user viewed a merge tree. This function appears for each object profile included in the merge tree. |
|
|
A user viewed two object profiles on the Potential Duplicate Comparison page. |
|
|
A user resolved two potential duplicate records on the Potential Duplicate Comparison page. |
|
|
A user reversed an assumed match. |
|
|
A user initiated an unmerge of two system records or two object profiles. This function refers to when the user views the unmerge result record prior to clicking Confirm. |
|
|
A user changed the status two object profiles on the Potential Duplicate Comparison page from Resolved to Unresolved. |
|
|
A user modified a profile on the View/Edit window. Updates include any changes made to a profile, including activating and reactivating system records, adding or removing child objects, and so on. |
|
|
A user viewed a merge tree. |
Adding an Object Profile on the EDM
This section provides the step-by-step instructions you need in order to add object profiles to the master index database. When you add an object profile, you are actually creating a system record. The master index application calculates the SBR portion of the object profile when you commit the system record to the database. Adding an object profile includes the following steps:
Step 1: Obtain Information about the Object
Before you begin to add a new object to the master index application, you should obtain certain information about the object. If necessary, review the fields displayed on the pages of the EDM to learn what types of information you should know. You should provide as much information as is available for each object.
Step 2: Specify a System and Local ID
Each object profile is associated with at least one system record. Before you add data to an object profile, you must specify the object’s local ID in a specific system. This creates the system record component of the object profile.
Figure 32 Create System Record - System and Local ID
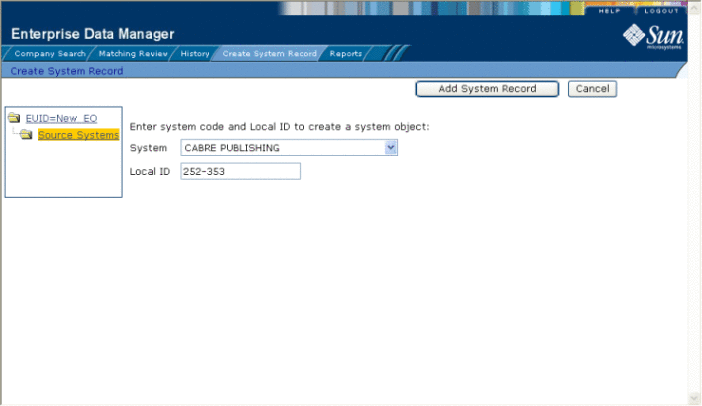
 To Specify a System and Local ID
-
On the EDM main menu, select Create System Record.
The Create System Record page appears.
-
In the System field, select the name of the system that assigned the local ID to the object.
-
In the Local ID field, enter the local ID assigned to the new object by the specified system.
Note –The name of the Local ID field might have been modified for your use. See your system administrator for more information.
-
Click Add System Record.
The page changes to display parent object fields.
-
Continue to Step 3: Specify Parent Object Information.
Step 3: Specify Parent Object Information
When you add a new object profile to the master index database, you need to enter certain information about the object. The required information varies depending on the type of objects in the index and the configuration of the application.
Figure 33 Create System Record - Parent Object
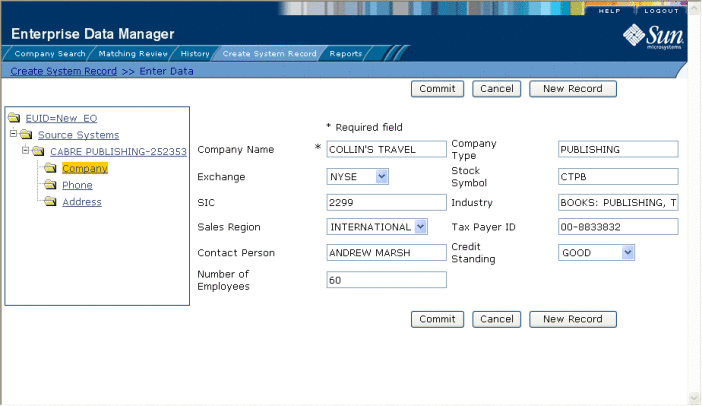
 To Specify Parent Object Information
-
Complete Step 2: Specify a System and Local ID.
The parent object of the system record appears.
-
On the Create System Record page, fill in the open fields.
-
Continue to Step 4: Specify Child Object Information.
Step 4: Specify Child Object Information
After you specify information for the parent object in the object profile, you can add child objects to the profile.
Figure 34 Create System Record - Child Objects
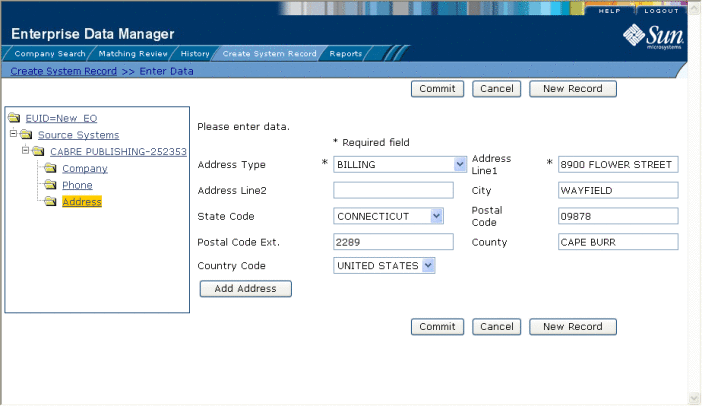
 To Specify Child Object Information
-
In the EUID tree, expand the Source System folder to display the type of child object you want to add, and then highlight that child type.
The page changes to display the fields associated with that child object type.
-
Fill in any open fields.
-
Click Add child_type, where child_type is the type of child object you are adding.
For example, if you are adding an address, click Add Address.
-
Continue to Step 5: Save the Object Profile.
Step 5: Save the Object Profile
After you specify all the required information for an object profile, save the profile to the database or the information you entered will be lost.
 To Save the Object Profile
-
Complete Step 4: Specify Child Object Information.
-
Click Commit.
A confirmation dialog box appears.
Note –The confirmation dialog box informs you whether a new profile was added to the database, a new profile was added and it has potential duplicates, or an existing profile was updated with the information you entered.
-
On the confirmation dialog box, click OK.
The new object profile is saved to the database.
-
To add another object profile, click New Record, and then repeat the steps beginning with Step 1: Obtain Information about the Object.
Learning About EDM Maintenance Tasks
Object profile maintenance involves a number of tasks you can perform to ensure that your database contains the most current and accurate information. These tasks include editing, adding, and deleting information, detecting and fixing profiles that are potential duplicates of each other, merging and unmerging object profiles or system records, and deactivating object profiles or system records that are no longer active.
The following topics provide additional information to help you understand data maintenance tasks for the master index application.
Matching Probability Weights
When you add a new object profile to the master index application, the new profile is automatically checked for any similarities to profiles that already exist in the database. Matching probability weights between existing profiles and the new profile are then calculated using matching algorithm logic. This weight indicates how closely two profiles match each other. If the matching probability weight for two profiles is above a specific number (defined in the master index application configuration files), the profiles are considered to be potential duplicates. If the weight between two profiles is high enough, they are assumed to be a match and the existing profile is updated with the new information (for more information, see Assumed Matches).
Merging Profiles on the EDM
You can merge object profiles that are found to represent the same object and you can merge system records between object profiles. During a system record merge, you can specify which fields from each record to retain in the final, merged system record. After an object profile merge, all information from all the system records involved in the merge is stored in the surviving profile. You might need to review the final merge result profile to determine which, if any, system records should be deactivated.
The SBR for the surviving profile is determined by the survivor calculator, taking into account all system records involved in the merge. If you merge two profiles that have duplicate child objects (for example, each profile has an Office address) and the union survivor calculator is used, then the most recently modified of the two child objects is stored in the SBR.
Surviving and Non-surviving Profiles
When you perform an object profile merge, you are working with two object profiles. The non-surviving profile is the profile that is not retained after the merge. The surviving profile is retained after the merge. During an object profile merge, the system records in the non-surviving profile are transferred to the surviving profile, and the non-surviving profile is given a status of “Merged”. The SBR for the surviving object profile is recalculated based on the existing system records for that profile along with the newly merged system records. The EUID of the surviving profile is always retained. The information that is discarded during a merge is stored in the transaction table, making it possible to restore the profiles to their original EUIDs if they were merged in error.
System Record Merges
You can merge two system records together only if they originated from the same external system. The system records can belong to the same object profile or each can belong to a different profile. When the merge includes two different object profiles, the profile from which the system record is merged is called the merge from profile; the object profile into which the system record is merged is called the merge to profile. If you merge the only active system record in one object profile into a system record in a different object profile, the merge from profile is deactivated (since there are no active system records remaining, there is nothing from which to create the SBR). During a system record merge, you can select fields from the non-surviving system record to be retained in the surviving system record.
Undoing a Merge
If you merge two object profiles or system records in error, you can unmerge the profiles or records, moving the information back into the original object profiles or system records. Any modifications that were made to the surviving object profile or system record after the merge are retained after the profiles or records are unmerged. If a system record merge caused the “merge from” object profile to be deactivated, unmerging the system records reactivates that profile.
Assumed Matches
If you add a new object profile and the master index application determines that the object you are adding already exists in the database, the master index application assumes the profiles are a match and updates the existing object profile. This is known as an assumed match. An assumed match only occurs when the probability of a match between the new profile and the existing profile is above the match threshold specified by your system administrator.
Potential Duplicates
Potential duplicates are two object profiles that possibly represent the same object. If you add a new object and the master index application determines that the object you are adding might already exist in the database, the two profiles are listed as potential duplicates of one another. Profiles are listed as potential duplicates if the probability of a match between the two profiles is above the duplicate threshold but below the match threshold. Because object information is entered from various sources, an object profile might have several potential duplicates. In this case, it is important to identify the potential duplicates and to determine whether the profiles represent the same object.
Handling Potential Duplicates on the EDM
The Matching Review function allows you to locate any profiles that are similar enough that they could represent the same object. You can compare potential duplicate profiles side-by-side to determine if they do represent the same object. Once you have determined whether the profiles are duplicates, you can use one of the following methods to correct the potential duplicate listing.
Merge
If you conclude that the profiles represent the same object, you need to determine which EUID to retain and then merge the profiles. For a description of the merge process, see Merging Profiles on the EDM.
Resolve
If you conclude that two potential duplicate profiles do not represent the same object, you can mark the profiles as being resolved. Doing this does not change any information for either profile, but it flags them as not being potential duplicates of one another. There are two methods of resolving potential duplicates.
-
Resolve – This type of resolution allows the profiles to be listed as potential duplicates again if one of the profiles is updated and, after its potential duplicates are reevaluated, the profiles still have a matching weight above the duplicate threshold.
-
Resolve Permanently – This type of resolution marks the profiles as not being duplicates, and does not allow the pair to be listed as duplicates after any future updates to either record. This is a permanent resolution.
Update Tips for the EDM
There are special circumstances for updating object profiles, such as cases where two users update the same profile at the same time, updating the SBR versus updating a system record, and so on.
Concurrent Users
If you have the same object profile open for editing as another EDM user, only the user who commits their changes first will be able to save their changes. If you try to commit changes after the first user clicks Commit, an error message appears and you will be unable to commit your changes. In order to update the profile with your changes, you must reload the profile by performing a search for that profile. You can then edit the profile and commit your changes.
Updating the SBR versus System Records
Every time a system record is updated, the survivor calculator determines whether the new information should be populated into the SBR. This includes updates from the EDM and from local systems. Typically, when you update information in an object profile, you update the system record, which kicks off the survivor calculator. However, the EDM also allows you update the SBR directly, overriding the survivor calculator's version of the SBR.
When you update an SBR field, the overwrite check box is automatically selected so you can save the changes to the database. You can also select the overwrite check box to lock an SBR field and prevent it from being updated by any system record changes or by the survivor calculator until the overwrite check box is cleared. When a field is unlocked, the survivor calculator immediately recalculates the best value for that field based on the system records in the profile.
If a field in a child object, such as an Address or Phone object, is locked, then the key field (in this case, Address Type or Phone Type), is automatically locked. When you add a child object (such as a telephone number or address) directly to the SBR, all fields in that object are automatically locked and cannot be overwritten by the survivor calculator. If you unlock all the fields in that object, it is removed from the SBR by the survivor calculator.
Use this capability cautiously, since fields updated in the SBR cannot be overwritten by new information from local systems until the overwrite check box is cleared. You can only update an SBR and select or clear the overwrite check box if you have explicit security permissions to do so.
Modifying Profile Information on the EDM
Once an object profile has been added to the master index application, you can modify information about that object, update the object's single best record, add system records to the profile, or change the status of a system record or object profile. If you make any of these modifications, the survivor calculator determines what changes, if any, should be made to the SBR. You can only modify the SBR directly if you have overwrite permissions.
Perform any of the following tasks to update profile information.
Modifying Parent Object Information
If the parent object information for an object profile changes, you can update the information in either the SBR or the affected system record. If you update the system record, then the survivor calculator determines what changes, if any, should be made to the SBR. You must have overwrite permissions to update the SBR directly.
Figure 35 View/Edit Page - Parent Object
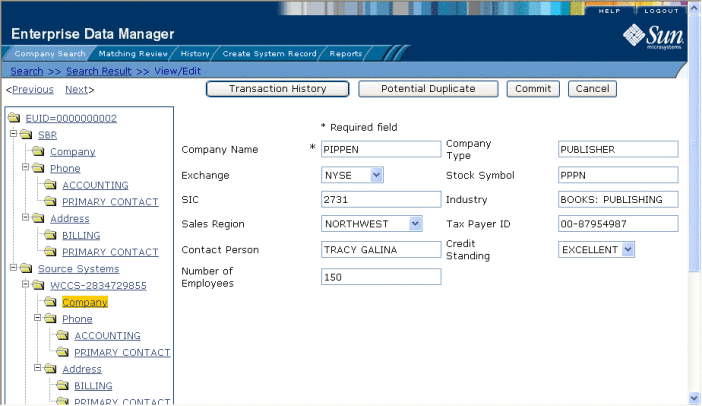
 To Modify Parent Object Information
-
Using one of the search methods described in Searching for Object Profiles on the EDM, display the object profile you want to modify on the View/Edit page.
-
Do one of the following:
-
Modify the fields in the right portion of the page.
-
If you are working in the SBR, make sure the overwrite check box to the left of the field is selected for each field you modify.
-
When you are done modifying information, click Commit.
The page refreshes, and, if you modified a system record, the SBR is recalculated based on the new information.
Adding a Child Object on the EDM
If additional information becomes available about an object, you might need to add a new child object to the object profile. For example, if additional address information becomes available, you might need to add a new address record to the SBR or to the affected system record.
Figure 36 View/Edit Page - Child Objects

 To Add a Child Object
-
Using one of the search methods described in Searching for Object Profiles on the EDM, display the object profile you want to modify on the View/Edit page.
-
Do one of the following:
-
To add the child object to the SBR, select the child object type under SBR in the EUID tree in the left portion of the View/Edit page.
For example, to add an address record, select Address.
-
To add the child object to a system record, select the child object type under that system record in the EUID tree in the left portion of the View/Edit page.
-
-
Enter the new information in the fields in the right portion of the page.
-
In the lower left portion of the page, click Add child_type (where child_type is the type of child object you are adding).
-
Click Commit.
The page refreshes, and, if you modified a system record, the SBR is recalculated based on the new information.
Note –If you added the information to the SBR, all fields in the new record are automatically locked, and will not be updated by incoming system messages. If all fields in the child object are unlocked, that object is removed from the SBR.
Modifying a Child Object on the EDM
If information about an object changes, you might need to modify information for an existing child object.
 To Modify a Child Object
-
Using one of the search methods described in Searching for Object Profiles on the EDM, display the object profile you want to modify on the View/Edit page.
-
Do one of the following:
-
Modify the fields in the right portion of the page.
-
If you are working in the SBR, make sure the overwrite check box to the left of the field is selected for each field you modify.
-
When you are done modifying information, click Commit.
The page refreshes, and, if you modified a system record, the SBR is recalculated based on the new information.
Deleting a Child Object on the EDM
If a child object is entered incorrectly or becomes obsolete, you can delete the object from the affected system record. Child objects can only be deleted from the SBR if they were added directly to the SBR. Deleting a child object cannot be undone.
 To Delete a Child Object
-
Using one of the search methods described in Searching for Object Profiles on the EDM, display the object profile you want to modify on the View/Edit page.
-
Under the affected system record in the EUID tree in the left portion of the View/Edit page, select the child object you want to remove.
-
Do one of the following:
-
If the child object is in the SBR, deselect the overwrite check box for each field in the child object.
Note –This can only be done if the child object was added directly to the SBR.
-
Click Commit.
The page refreshes, and the SBR is recalculated based on the new information.
Updating the Single Best Record Directly on the EDM
Unless a field in an SBR is locked for overwrite, the value for that field is recalculated by the survivor calculator each time the object profile is updated. If you determine that a value in the SBR is the most accurate data and should not be updated, you can lock the field. If you unlock a locked field, the value of that field is automatically recalculated by the survivor calculator as soon as the unlock action is committed.
Locking an SBR Field
When you lock a field in an SBR, that field can only be updated through the EDM by a user who has overwrite permissions. Locking a field in the SBR removes the survivor calculator from the update process for that field and any updates made to or by system records will not update the locked fields in the SBR.
Figure 37 Locked fields in an SBR
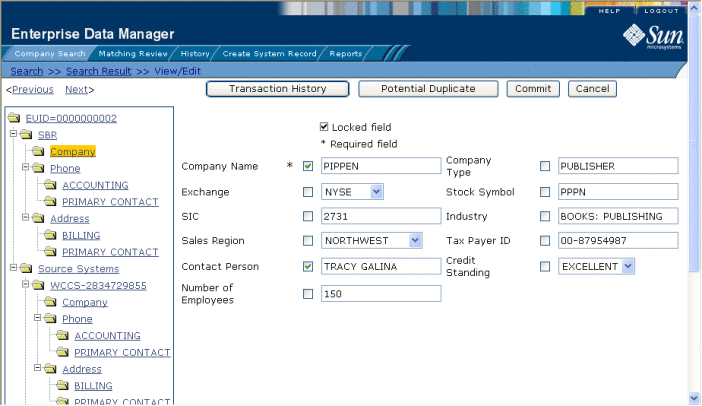
 To Lock a Field in the SBR
-
Using one of the search methods described in Searching for Object Profiles on the EDM, display the object profile containing the field you want to lock on the View/Edit page.
-
In the EUID tree, select the component in the SBR containing the field you want to lock.
-
If necessary, update the value of the field to be locked.
-
Select the overwrite check box to the left of the field.
-
Click Commit.
The field is now locked and cannot be edited by updates to system records until the lock is removed.
Unlocking an SBR Field
Once you unlock a field for overwrite in an SBR, the SBR is recalculated by the survivor calculator and the field can be updated by changes made to system records. If you added a child object to an SBR and then unlock all fields in the new object, that object is removed from the SBR by the survivor calculator.
Figure 38 Unlocked Fields in an SBR
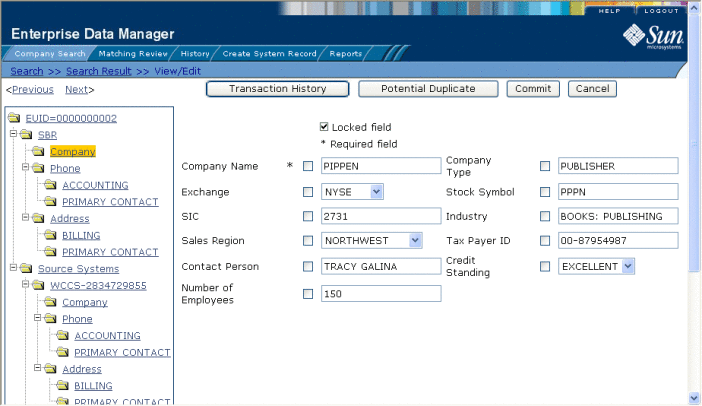
 To Unlock an SBR Field
-
Using one of the search methods described in Searching for Object Profiles on the EDM, display the object profile containing the field you want to unlock on the View/Edit page.
-
In the EUID tree, select the object in the SBR that contains the field you want to unlock.
-
Clear the overwrite check box to the left of the field you want to unlock.
-
Click Commit.
The field is now unlocked and can be edited by updates to system records. The SBR is recalculated by the survivor calculator.
Adding a System Record to an Object Profile on the EDM
If an object has local IDs in addition to those already recorded in the master index application, you can add the local IDs to the object’s profile by adding a system record to the profile. To add a local ID to an object profile, you need to specify information such as the system that assigned the local ID, certain parent-object information, and the local ID itself. When you add a system record to an object profile, the survivor calculator determines what changes, if any, should be made to the SBR.
You cannot add a new local ID and system pair to an object profile if that same local ID and system pair already exists in another object profile.
Figure 39 View/Edit Page - System Records

 To Add a System Record to an Object Profile
-
Using one of the search methods described in Searching for Object Profiles on the EDM, display the object profile you want to modify on the View/Edit page.
-
In the EUID tree in the left portion of the page, select Source Systems.
-
FollowStep 2: Specify a System and Local ID throughStep 5: Save the Object Profile.
When you commit the changes, the page refreshes and the SBR is recalculated based on the new information.
Note –You only need to enter required fields in order to save the new system record. Required fields are indicated by an asterisk (*).
Deactivating a Profile or System Record on the EDM
If an object profile or system record is no longer active, you cannot delete the profile or record, but you can deactivate it. Once you deactivate a record, you can reactivate it if needed. Deactivating an object profile deactivates all system records associated with that profile and removes the potential duplicate listings for that profile. If you deactivate a system record, the survivor calculator determines what changes, if any, should be made to the SBR.
Deactivating an Object Profile
Deactivated profiles cannot be modified, and in some cases, cannot be viewed. If you deactivate a profile in error, you can reactivate it if needed.
Figure 40 View/Edit Page - Deactivate
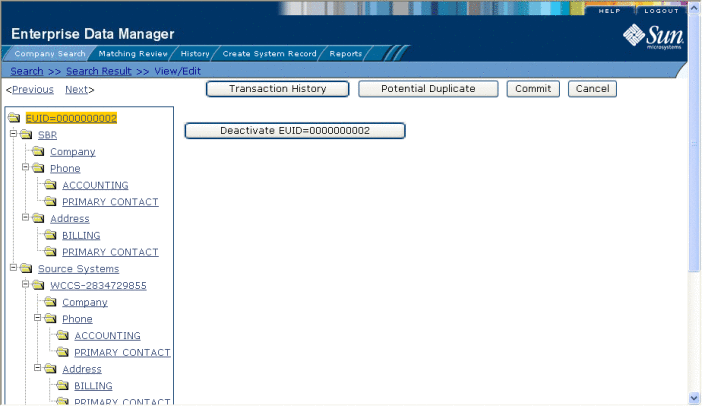
 To Deactivate an Object Profile
-
Using one of the search methods described in Searching for Object Profiles on the EDM, display the object profile you want to update on the View/Edit page.
-
In the EUID tree in the left portion of the page, highlight the EUID number of the object profile.
-
Click Deactivate EUID=EUID_number, where EUID_number is the EUID of the object profile to deactivate.
-
In the upper right section of the page, click Commit.
The profile is deactivated in the database and the EUID appears in fuchsia with a tilde (~) next to it.
Deactivating a System Record
If an existing local ID for an object becomes obsolete, you can deactivate the system record with that local ID for the object profile. An object profile must have at least one active local ID; if you deactivate an object’s last active system record, the entire profile is deactivated. When you deactivate a system record from an object profile, the survivor calculator determines what changes, if any, should be made to the SBR.
 To Deactivate a System Record
-
Using one of the search methods described in Searching for Object Profiles on the EDM, display the object profile you want to modify on the View/Edit page.
-
In the EUID tree in the left portion of the page, expand Source Systems, and then select the system and local ID of the system record you want to deactivate.
-
Click Deactivate system-ID, where system is the system name and ID is the local ID number for the system record you want to deactivate.
-
Click Commit.
The page refreshes and the SBR is recalculated based on the new information.
Reactivating a Profile or System Record on the EDM
Once an object profile or system record is deactivated, you can reactivate it if needed. Reactivating a profile causes the potential duplicates for the profile to be recalculated. Reactivating a system record causes the SBR to be recalculated.
Reactivating an Object Profile
If an object profile is deactivated in error or becomes active again, you can reactivate that profile. Reactivating a profile returns the profile to its status just prior to when it was deactivated.
Note –
When you reactivate an object profile, all system records associated with that profile are changed to active status, regardless of their prior status. Review each system record to verify that its status is correct after the reactivation.
Figure 41 View/Edit Page - Reactivate
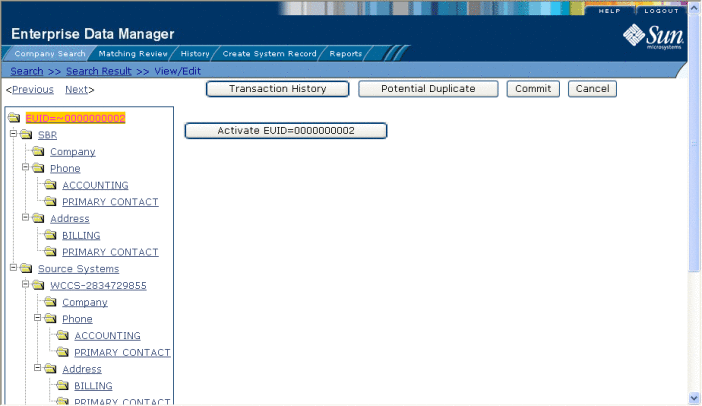
 To Reactivate an Object Profile
-
Using one of the search methods described in Searching for Object Profiles on the EDM, display the object profile you want to update on the View/Edit page.
-
In the EUID tree in the left portion of the page, highlight the EUID number of the object profile.
-
Click Activate EUID=EUID_number, where EUID_number is the EUID of the object profile to deactivate.
-
In the upper right section of the page, click Commit.
The profile is reactivated in the database, the EUID typeface changes from fuchsia to black, and the tilde (~) is removed.
Reactivating a System Record
If a system record was deactivated in error or is no longer inactive, you can easily reactivate the system record.
 To Reactivate a System Record
-
Using one of the search methods described in Searching for Object Profiles on the EDM, display the object profile you want to modify on the View/Edit page.
-
In the EUID tree in the left portion of the page, expand Source Systems, and then select the system and local ID of the system record you want to reactivate.
-
Click Activate system-ID, where system is the system name and ID is the local ID number for the system record you want to reactivate.
-
Click Commit.
The page refreshes and the SBR is recalculated based on the new information.
Working with Potential Duplicate Profiles on the EDM
The Matching Review function of the EDM allows you to view any object profiles that are marked as potential duplicates of each other by the master index application. You can search for and view potential duplicate profiles on the EDM, and then fix the potential duplication by either merging or resolving the two profiles. You can view potential duplicates that are resolved, but not those that are merged.
Perform any of the following tasks to monitor and fix potential duplicate profiles.
Finding Potential Duplicate Profiles on the EDM
Potential duplicate profiles are determined based on the matching probability weight that indicates how closely two profiles match. You can easily find and compare potential duplicate profiles using the EDM.
Figure 42 Potential Duplicate Comparison Page
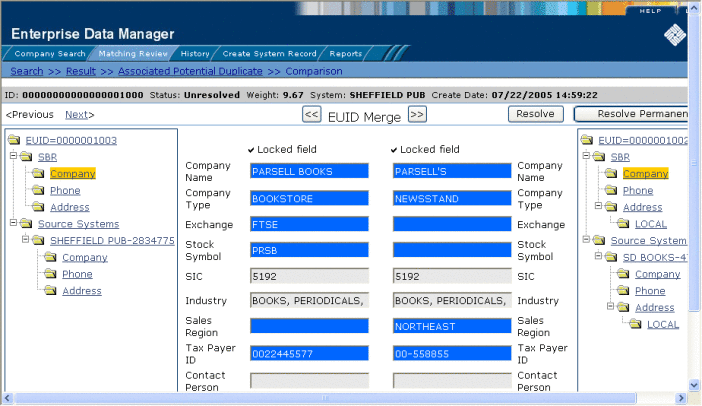
 To Find Potential Duplicates
-
Obtain information about the object whose potential duplicates you want to view, such as a system in which they are registered or the login ID of the user who created the object profile.
-
On the EDM, select Matching Review. The Matching Review Search page appears.
Figure 43 Matching Review Search Page
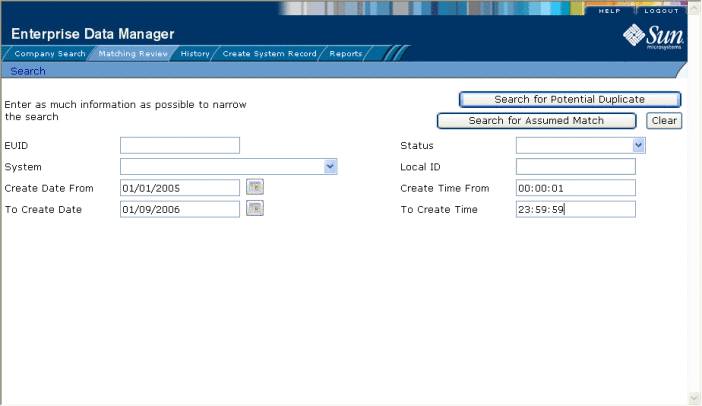
-
On the Matching Review Search page, enter your search criteria (for more information, see About Matching Review Search Fields on the EDM).
-
In the upper portion of the page, click Search for Potential Duplicate.
If more than one potential duplicate pair matches the search, the Potential Duplicate Result page appears (for more information, see About Potential Duplicate Results Fields on the EDM).
Figure 44 Potential Duplicate Search Results List
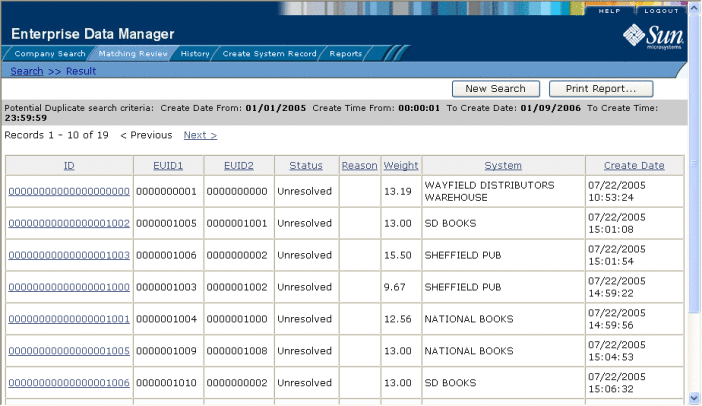
If only one potential duplicate pair matches the search, the Comparison page appears.
-
In the Results list, click the ID of the pair of potential duplicate profiles you want to compare.
-
Do one of the following:
-
If the profiles you selected have additional potential duplicates, then the Associated Records page appears. Continue to step 7.
-
If the profiles do not have additional duplicates, the Comparison page appears with the two profiles displayed side-by-side (see Figure 42). Skip to step 8.
Figure 45 Associated Records List
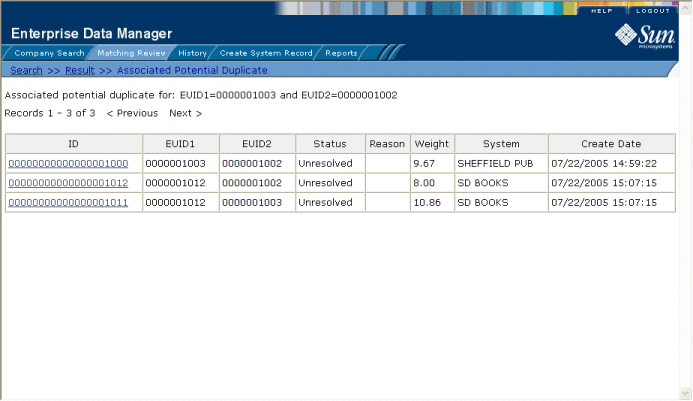
-
-
On the Associated Records page, click the ID of the pair of profiles you want to compare. The Comparison page appears with any differences between the two profiles highlighted in blue (see Figure 42).
Tip –If there is more than one page of results on the Associated Records, click Next to view the next page.
-
To compare child object information in the SBR:
-
To compare child object information in system records:
-
Under Source Systems in both the right and left EUID trees, expand the folder containing the source system you want to view, and then expand the folder containing the type of child object you want to view.
-
Select a specific child object to view from each EUID tree.
Note –If you select different types of data for each side, the differences between the two profiles are no longer highlighted (for example, if you choose SBR address data on one side and system record address data on the other, or if you choose SBR address data on one side and SBR phone data on the other).
-
-
To view the next entry in the potential duplicate results list, click Next>.
-
To view the previous entry in the potential duplicate results list, click <Previous.
-
To return to the potential duplicates results list, click Result.
About Matching Review Search Fields on the EDM
The fields located on the Matching Review Search page allow you to specify information about the potential duplicate or assumed match profiles you want to view.
Table 9 Matching Review Search Fields|
In this field … |
type or select ... |
|---|---|
|
The enterprise-wide unique identification number of one of the profiles you want to view. |
|
|
The potential duplicate status of the profiles you want to view. Possible values for this field are Unresolved, Resolved, or Permanently Resolved. |
|
|
The external system with which the object profile that caused the potential duplicate flag is associated. |
|
|
The local ID associated with the object profile in the specified system. The name of this field might be different for your implementation. |
|
|
A beginning create date for the profiles you want to view. The query is performed for transactions that were created between the Create Date From (and Create Time From) and the To Create Date (and To Create Time). |
|
|
The beginning create time for the profiles you want to view (using 24-hour notation). If no time is entered, the default value is 00:01 (12:01 A.M.). |
|
|
The ending create date for the profiles you want to view. |
|
|
The ending create time for the profiles you want to view (using 24-hour notation). If no time is entered, the default value is 24:00. |
About Potential Duplicate Results Fields on the EDM
The fields located in the potential duplicate results list help you to identify a potential duplicate pair to display on the Comparison page.
Table 10 Potential Duplicate Results Fields|
This field … |
displays this information … |
|---|---|
|
The potential duplicate ID of the transaction that caused the potential duplicate pair. |
|
|
The enterprise-wide unique identification number of the object profile whose addition to the database created the potential duplicate listing. |
|
|
The enterprise-wide unique identification number of the profile that was flagged as a potential duplicate with the profile identified by EUID1. |
|
|
The potential duplicate status of the potential duplicate pair. |
|
|
The reason that the profiles were listed as potential duplicates. |
|
|
The matching probability weight between the two profiles in each row. |
|
|
The system with which the object profile identified by EUID1 is associated. |
|
|
The date and time that the transaction that caused the potential duplicate listing occurred. |
Merging Potential Duplicate Profiles on the EDM
When you compare two potential duplicate profiles, you might find that the object profiles represent the same entity, or that a system record from one profile actually belongs in the other profile. You can perform either an object profile merge or a system record merge to correct this. When you merge two profiles, the SBR of the surviving profile(s) is automatically recalculated based on the system records involved in the merge.
For more information about merging object profiles, see Combining Object Information on the EDM.
 To Combine Object Profiles
-
Compare two potential duplicate profiles, as described in Finding Potential Duplicate Profiles on the EDM.
-
Determine which of the two profiles you want to keep, and then click the EUID Merge arrows pointing toward that profile.
The merge result profile appears, allowing you to view the profile that will be saved after the merge.
-
Click Confirm to finalize the merge, or Cancel to return to the Comparison page and review the profiles again.
-
Check the surviving object profile to determine whether any system records need to be merged or deactivated.
 To Combine System Records
-
Compare the system records from two potential duplicate profiles, as described in Finding Potential Duplicate Profiles on the EDM.
-
Determine which of the two system records you want to keep.
-
Highlight both system records to be merged, and then click the LID Merge arrows pointing toward the system record you want to keep.
-
To retain any fields from the non-surviving system record, select the option button next to each field you want to keep.
-
To specify which child objects to retain, do the following for each type of child object:
-
In the upper portion of the page, click Merge.
The merge result record appears, allowing you to view the information that will be saved in the SBR after the merge.
-
Click Confirm to finalize the merge or click Cancel to return to the Comparison page and review the profiles again.
Resolving Potential Duplicate Profiles on the EDM
When you compare two potential duplicate profiles and determine that they do not represent the same object, you can resolve the two profiles to flag the profiles as not being potential duplicates. There are two types of resolution. Resolve removes a potential duplicate flag, but if one of the resolved profiles is updated the records might be listed as potential duplicates again. Resolve Permanently flags the two profiles as being permanently resolved.
 To Resolve two Potential Duplicate Profiles
-
Compare two potential duplicate profiles, as described in Finding Potential Duplicate Profiles on the EDM.
-
Do one of the following:
-
On the confirmation dialog box, click OK.
The status of the potential duplicate entry is changed to Resolved and the profiles are no longer regarded as possible duplicates of one another.
Working with Assumed Matches on the EDM
The Matching Review function of the EDM allows you to view any object profiles that were automatically updated by the master index application as a result of an assumed match. You can reverse the assumed match if necessary. This section provides instructions for finding profiles updated by an assumed match and then reversing the update if necessary. Perform the following tasks to work with profiles that were automatically matched.
Finding Assumed Matches on the EDM
You can find object profiles that were updated by an assumed match using the Matching Review function of the EDM. When you search for assumed matches, you can select an object profile to view from a results list.
Figure 46 Assumed Match Page
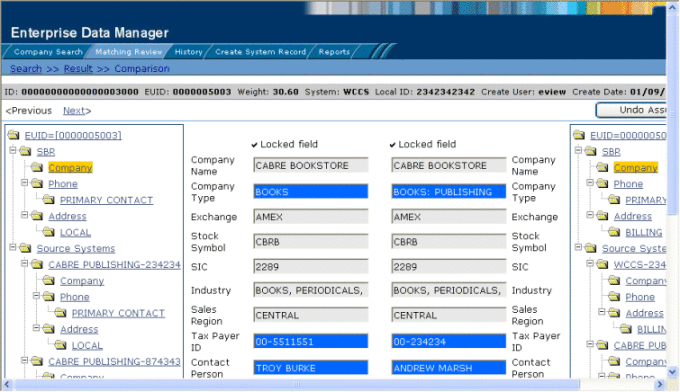
 To Find Assumed Matches
-
Obtain information about the object profile you want to view, such as their EUID, a system in which they are registered, or the login ID of the user who added the record that caused the update.
-
On the EDM, select Matching Review. The Matching Review Search page appears.
Figure 47 Matching Review Search Page
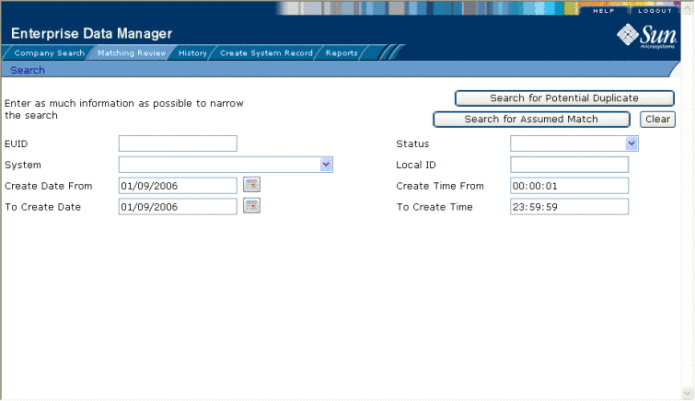
-
On the Matching Review Search page, enter the search criteria (for more information, see About Matching Review Search Fields on the EDM).
-
In the upper portion of the page, click Search for Assumed Match.
One of the following occurs:
-
If more than one profile matches the search criteria, the Assumed Match Result page appears (for more information, see About Assumed Match Results Fields on the EDM). Continue to step 5.
-
If only one profile matches the search criteria, the Assumed Match page appears with a comparison of the two profiles that were combined with the differences between the two profiles highlighted in blue. Skip to step 6.
Figure 48 Assumed Match Results List
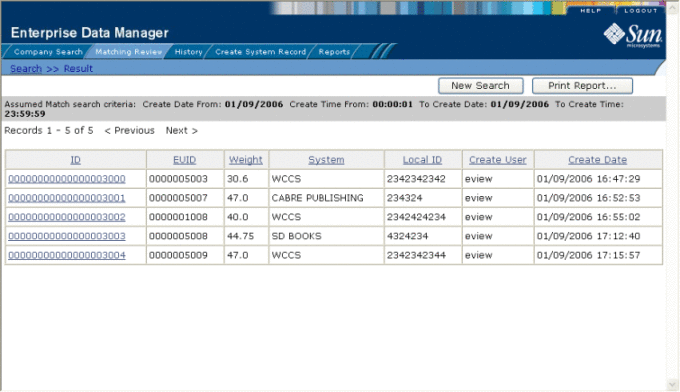
-
-
In the Results list, click the ID of the assumed match profile you want to view.
The Assumed Match page appears with the parent object of the SBR displayed.
-
To view additional information about the object, review the instructions provided under Viewing Object Profiles on the EDM.
-
To view the next entry in the assumed match results list, click Next>.
-
To view the previous entry in the assumed match results list, click <Previous.
-
To return to the assumed match results list, click Result.
About Assumed Match Results Fields on the EDM
The fields located in the assumed match results list help you to identify an assumed match transaction to display on the Comparison page.
Table 11 Assumed Match Results Fields|
This field … |
displays this information … |
|---|---|
|
The assumed match ID of the transaction that caused the assumed match. |
|
|
The enterprise-wide unique identification number of the object profile that was updated by the assumed match. |
|
|
The matching probability weight between the updated profile and the record that caused the assumed match. |
|
|
The system with which the record that caused the assumed match is associated. |
|
|
The local ID in the above system for the record that caused the assumed match. The name of this field might be different for your implementation. |
|
|
The login ID of the user who added the profile that created the assumed match. |
|
|
The date and time the transaction that caused the assumed match occurred. |
Reversing an Assumed Match on the EDM
If you find that an assumed match was made in error, you can reverse the assumed match. This process returns the updated object profile to its status just prior to the assumed match update, creates a new object profile for the record that caused the assumed match, and recalculates the SBR for the existing profile.
 To Reverse an Assumed Match
-
View the assumed match profile, as described in Finding Assumed Matches on the EDM.
-
In the upper portion of the page, click Undo Assumed Match.
A confirmation dialog box appears, providing the EUID number of the new profile that will be created as a result of reversing the match.
-
On the confirmation dialog box, click OK.
The assumed match is reversed, the updated profile is returned to its state prior to the assumed match, and a new object profile is created for the system record that caused the assumed match. Any changes that were made after the assumed match but before reversing the assumed match are retained.
Combining Object Information on the EDM
When you determine that two profiles represent the same object, you can merge the profiles to form one profile that contains the object’s most current information. You can also merge system records within one profile or from one profile to another. The resulting profile is called the Merge Result Record. The SBR for the surviving profile(s) is automatically recalculated based on the system records involved in the merge.
You can display the object profiles to merge using the Search function or the Matching Review function. This section describes how to merge records using the Search function. For information about merging records using the Matching Review function, see Merging Potential Duplicate Profiles on the EDM.
The following topics provide instructions for merging profiles or system records.
Merging Object Profiles on the EDM
When you merge object profiles, all of the system records associated with the non-surviving object profile are transferred to the surviving object profile. The non-surviving profile is given a status of merged and is no longer active. The SBR of the surviving profile is recalculated based on the new system records that were added to the profile due to the merge. After merging two profiles, review the system records in the active profile to determine whether any of them should be deactivated.
Figure 49 Comparison Page - Merging Object Profiles
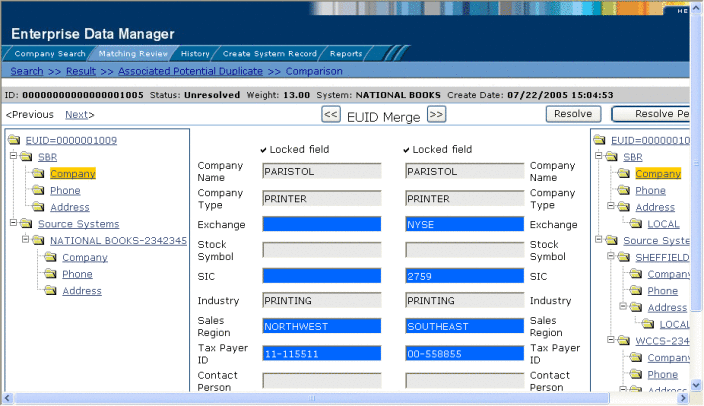
 To Merge Object Profiles
-
Perform a search for the object profiles you want to merge using any of the search procedures described in Searching for Object Profiles on the EDM.
-
Select the check boxes to the left of the two profiles you want to merge in the results list.
-
In the first cell of the results table, click Compare Records.
The Comparison page appears.
-
Determine which of the two profiles you want to keep, and then click the EUID Merge arrows pointing toward that profile.
The merge result profile appears, allowing you to view the profile that will be saved after the merge.
-
Click Confirm to finalize the merge, or Cancel to return to the Comparison page and review the profiles again .
Merging System Records on the EDM
You can merge a system record from one object profile into a system record from another object profile or you can merge two system records in one profile, as long as both system records originated from the same system. You can also specify which, if any, information to save from the non-surviving system record. When you merge system records, the non-surviving system record is transferred into the object profile of the surviving system record, and is given a status of merged. The SBR of the surviving profile is automatically recalculated.
Note –
If you do not specify which child objects to retain during a system record merge, the master index application chooses for you; however, the EDM can be configured such that you must select which child objects to retain for certain object types (see your system administrator for more information about how your EDM is configured). If specifying child objects to retain is optional and you do not manually select the child objects, the default is to retain all child objects of a unique type from both system records. If there are any child objects of the same type, the default is to retain only the child object of the surviving system record. For example, if one system record has an office address and the other has a home address, both addresses are retained; but if both system records have a home address, the address of the surviving system record is retained.
Figure 50 Merging System Records
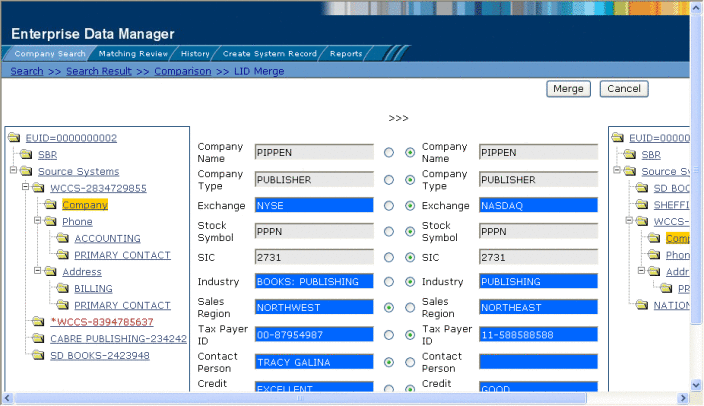
 To Merge System Records
-
Perform a search for the object profiles whose system records you want to merge using any of the search procedures described in Searching for Object Profiles on the EDM.
-
Select the check boxes to the left of the two profiles containing the system records you want to merge.
-
In the first cell of the results table, click Compare Records.
The Comparison page appears with the differences between the two records highlighted in blue.
-
Highlight the parent object of the system records you want to merge in the EUID trees.
Two LID Merge arrow buttons appear at the top of the page.
-
Click the LID Merge arrows pointing toward the profile containing the system record you want to retain.
-
To retain any fields from the non-surviving system record, select the parent objects in the system objects to merge, and then select the option button next to each field you want to keep.
-
To specify which child objects of the two system objects to retain, do the following for each type of child object:
-
In the upper portion of the page, click Merge.
The merge result record appears, allowing you to view the information that will be saved in the SBR after the merge.
-
Click Confirm to finalize the merge or click Cancel to return to the Comparison page and review the profiles again.
After you merge two system records, the surviving system record is updated, and the non-surviving system record is transferred to the “merge to” profile and is marked as merged. The SBRs for both object profiles involved in the merge are recalculated. If the “merge from” profile no longer has any system records, it is deactivated.
Unmerging Object Information on the EDM
If two object profiles or system records are merged in error, you can unmerge the profiles or system records. The unmerge function is accessed from the Transaction History window.
Figure 51 Unmerge Page
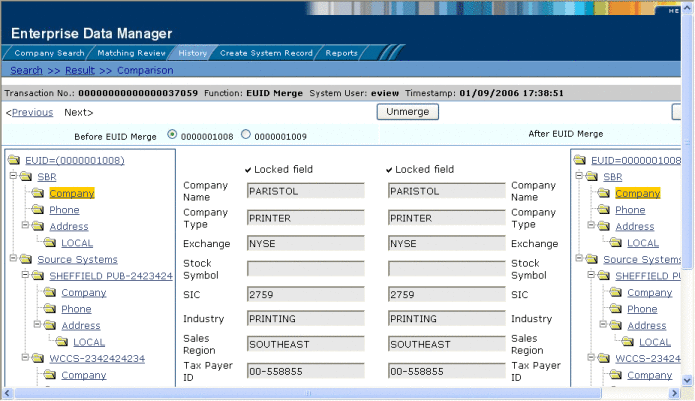
The following topics provide instructions for unmerging profiles and system records.
Unmerging Object Profiles on the EDM
If two object profiles are merged in error, the profiles can easily be separated by unmerging the two profiles. When you unmerge two object profiles, the information is returned to the original profiles, the system records are returned to their original profiles, and any changes that were made after the merge are retained. Any system records that were added while the profiles were merged are associated with the profile that was active at the time. After you unmerge two object profiles, verify that the system records were distributed correctly in the resulting records.
 To Unmerge two Merged Object Profiles
-
Obtain information about the object profile that is still active after the merge process, such as the EUID, the system that caused the merge, and so on.
-
Perform a search for the merge transaction, as described in Viewing a Profile's Transaction History on the EDM. (You can also access the Transaction History Search Result page by displaying the active profile on the View/Edit page, and then clicking Transaction History.)
-
From the Results list, select the merge transaction you want to unmerge. (This must be the most recent merge transaction for the profile and must have a function of EUID Merge.)
The Transaction History page appears.
Note –The profiles that appear on the Transaction History page display the information contained in the surviving object profile before and after the merge occurred. Select the option button next to the second EUID in the upper portion of the window to view a before image of the non-surviving profile.
-
In the upper portion of the page, click Unmerge.
The page changes to display side-by-side images of how the records will appear after they are unmerged.
-
Do one of the following:
Unmerging System Records on the EDM
If two system records are merged in error, the records can easily be separated by unmerging the two system records. When system records are unmerged, the system record that became inactive is reactivated and, if the system record was merged from a different object profile, it is returned to its original profile. The SBR is recalculated for all affected object profiles. Any changes made to the surviving system record following the merge are retained after the unmerge transaction.
 To Unmerge two Merged System Records
-
Obtain information about either object profile involved in the merge, such as the EUID, the system that caused the merge, and so on.
-
Perform a search for the merge transaction, as described in Viewing a Profile's Transaction History on the EDM. (You can also access the Transaction History Search Result page by displaying the active profile on the View/Edit page, and then clicking Transaction History.)
-
From the Results list, select the merge transaction you want to unmerge. This must be the most recent merge transaction for the system record, and has a function of System Record Merge.
The Transaction History page appears.
Note –The profiles that appear on the Transaction History page display the information contained in the object profile into which the system record was merged both before and after the merge occurred.
-
In the upper portion of the page, click Unmerge.
The page changes to display side-by-side images of how the records will appear after they are unmerged.
-
Do one of the following:
Learning About EDM Reports
Sun Master Index provides a set of production, activity, and search result reports that can be generated from the EDM. The production reports provide information about the current state of the data in the master index application, helping you monitor stored data and determine how that data needs to be updated. This information also helps verify that the matching logic and weight thresholds are defined correctly. Activity reports provide statistical information for transactions over specific periods of time. Search result reports allow you to print a list of profiles in a search result set.
The following topics provide additional information to help you understand and work with the default reports.
EDM Production Reports
Production reports provide information about the transactions that are processed through the master index database. These reports provide lists of potential duplicate profiles, merge transactions, unmerge transactions, assumed matches, updates, and deactivated profiles for a specified time period. The information you find in these reports provides valuable information about how data is being processed with the current configuration. In addition to running the production reports daily, you should run them against any data that has been loaded from existing systems into the master index database in batch format.
Production reports can be run for the current day, the previous day, or for a date range you specify. If you run your daily reports in the evening, you should run the current day’s reports. If you run your daily reports in the morning, you should run the previous day’s reports.
-
Assumed Match Report - This report displays information about any profiles that were automatically updated by incoming data during the specified time period. The information in this report, in combination with data from the potential duplicate report, helps you determine whether the matching threshold for assumed matches is accurate. You should review this report daily to ensure that no assumed matches were made in error.
-
Deactivated Record Report - This report displays a list of all profiles that were deactivated during the specified time period. Review this report daily to ensure that no profiles were deactivated in error. Sun master index applications provide the ability to reactivate any deactivated profile.
-
Potential Duplicate Report - This report displays information about object profiles that were marked as potential duplicates of one another during the specified time period. The information provided in this report can help you determine whether the matching threshold and the duplicate threshold are configured accurately. Review this report daily to ensure potential duplicates are managed in a timely manner, and use this report as a work list when processing potential duplicates.
-
Merge Transaction Report - This report displays a list of all enterprise records that were merged during the specified time period. Review this report daily to ensure that no profiles were merged in error. Sun master index applications provide the ability to unmerge any merged profiles.
-
UnMerge Transaction Report - This report displays a list of all enterprise records that were unmerged during the specified time period.
-
Update Report - This report displays object profiles whose information was updated during the specified time period. Review this report daily to verify the updates made in a given day. This report can help explain why a resolved potential duplicate listing was reinstated to the potential duplicate list.
EDM Activity Reports
Activity reports should be run weekly, monthly, and yearly to obtain statistical data about the transactions that are processed through the master index database. These reports give the number of each type of transaction performed for the specified week, month, or year. They also provide cumulative information for the week, month, or year to date. The information you find in these reports helps analyze the condition of the data by giving you the number of potential duplicates created, the number of assumed matches, and so on.
-
Weekly Activity Report - This report displays a summary of transactions that occurred against the database on each day for the specified calendar week (always Sunday through Saturday). The information provided in this summary includes the number of each of the following transactions performed each day.
-
Add
-
Update
-
EUID Deactivate
-
EUID Merge
-
EUID Unmerge
-
LID Merge
-
LID Unmerge
-
LID Transfer
Monthly Activity Report - This report displays a summary of transactions that occurred against the database during the specified month. You can run this report for any calendar month. The information provided in this summary includes the number of each of the following transactions that were performed for the month:
-
Add
-
EUID Deactivate
-
EUID Merge
-
EUID Unmerge
-
LID Merge
-
LID Unmerge
-
Unresolved Potential Duplicates
-
Resolved Potential Duplicates
Yearly Activity Report - This report displays a summary of transactions that occurred against the database for the specified calendar year. You can run this report for any calendar year. The information provided in this report includes a summary of each transaction listed for the monthly activity report above.
-
EDM Search Result Reports
In addition to viewing a search result list on an EDM window, you can create and print a search result report. This allows you to view a complete list of all profiles in a result set rather than viewing them one page at a time. You can generate search result reports for general, transaction history, assumed match, potential duplicate, and audit log search results. These reports are accessed from the Search Results page for the search you performed. Search result reports can be viewed online or sent to a printer of your choice. The fields that appear on the reports depend on the fields that appear on the Results page for the type of search you performed. For instructions on running a search result report, see Creating and Printing a Search Result Report.
Configuring EDM Reports
The report files are configured by the Enterprise Data Manager file (edm.xml) in the master index project. For detailed information and instructions on configuring the reports, see Configuring Sun Master Indexes (Repository) and Understanding Sun Master Index Configuration Options (Repository).
Masked Data and EDM Reports
Though the EDM can be configured to hide certain fields from users who do not have the appropriate security permissions, reports generated from the EDM will display the hidden data if those fields are configured to appear on the reports. Be sure to only give access to users who should be able to view this information, or do not include hidden fields in the reports.
Running EDM Reports
Reports are run from the Reports page of the EDM and from various Search Result pages. You need the appropriate security permissions to run the production, activity, and search reports from the EDM. Production and activity reports require that a time period be defined in the search criteria. Both types of report are run from the Reports page on the EDM.
 To Run Reports From the EDM
-
Log in to the EDM, and then click the Reports tab.
The Reports Search page appears (see Figure 52).
Figure 52 Reports Search Page
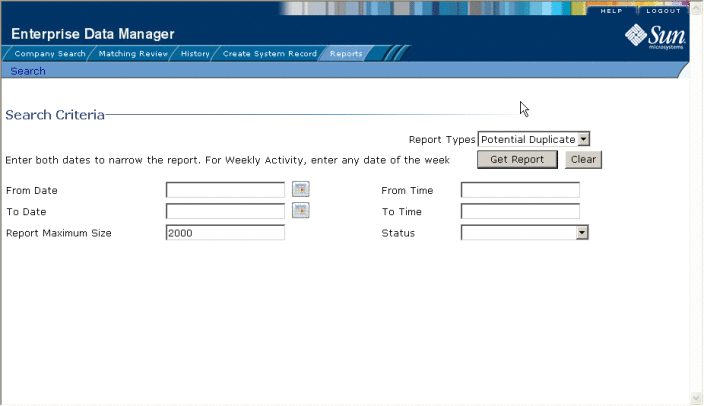
-
On the Reports Search page, select the type of report to run from the Report Types list, and then fill in the search criteria (see About Report Search Fields on the EDM).
-
Click Get Report.
The selected report appears (see Figure 53).
Figure 53 Potential Duplicate Report Sample
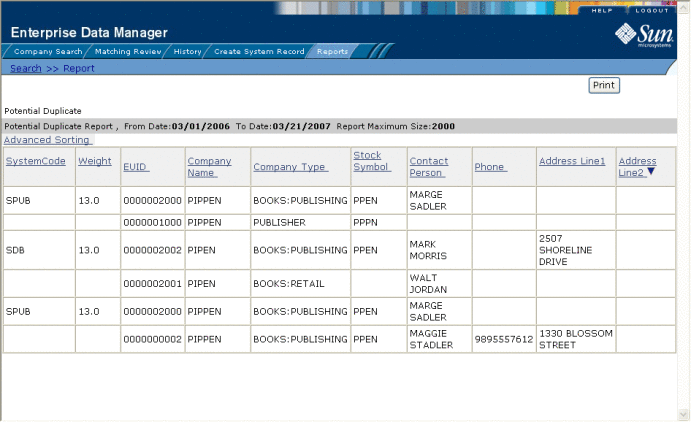
-
To sort the report by a single column, click that column name.
-
To change whether the column is sorted by ascending or descending order, click again on the column.
-
To sort by multiple columns, do the following:
-
Click Advanced Sorting.
The advanced sorting fields appear.
Figure 54 Advanced Sorting for Reports
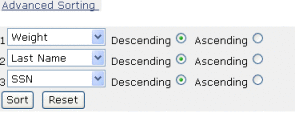
-
In the first field, select the name of the primary sorting column and then select Descending or Ascending for the sort order.
-
Repeat the above step for the second and third sorting columns, if any.
-
Click Sort.
-
-
To print the report, click Print in the upper right portion of the window.
About Report Search Fields on the EDM
The fields on the Report Search page let you specify a date range for each report. For Potential Duplicate reports, you can also specify the status of the potential duplicates returned by the search. For the Weekly Activity Report, you only need to enter one date; the report will automatically display information for the calendar week containing that date.
Table 12 Report Search Fields|
In this field ... |
type or select ... |
|---|---|
|
The start date for the report. The report will retrieve transactions that occurred beginning on this date through the date specified in the To Date field. |
|
|
The start time for the report, in the format HHmmss. |
|
|
The end date for the report. |
|
|
The end time for the report, in the format HHmmss. |
|
|
For Potential Duplicate and Assumed Match reports only, the number of records to display for the report. This allows you to limit the size of the report. |
|
|
For Potential Duplicate reports only, the status of the potential duplicate pairs to retrieve. You can specify all statuses by leaving this field blank, or you can select Resolved, Unresolved, or Permanently Resolved. This field is not visible for any other type of report. |
- © 2010, Oracle Corporation and/or its affiliates


