Use Case: Configuring a Private Virtual Network
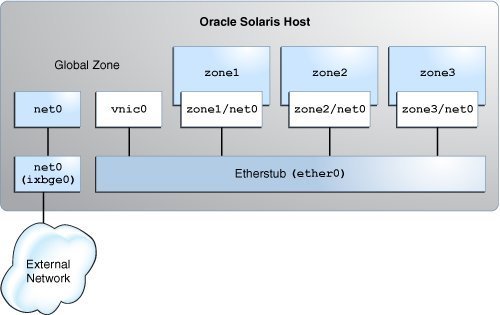
This use case shows how to create a private virtual network and enable it to send network traffic outside the system. The scenario is based on the configuration in the following figure:
Figure 6 Use Case: Private Virtual Network Setup

The configuration on the Oracle Solaris host is as follows:
-
The primary interface of the global zone is net0.
-
The zones, zone1, zone2, and zone3, are configured with the VNIC anet resources and the etherstub ether0 is set as the lower link for the zones.
-
The VNIC vnic0 is configured over the etherstub ether0.
This use case is based on the following assumptions:
-
The primary interface, net0, is configured for the system with the IP address 192.0.2.20/27 and the default router IP address 192.0.2.1/27.
-
The first zone, zone1, is created as a new zone. The second zone zone2 already exists on the system and needs to be reconfigured with an anet resource.
-
The third zone, zone3, is reconfigured by using Live Zone Reconfiguration. For examples, see How to Modify Zone Resources and Properties in Creating and Using Oracle Solaris Zones.
The following table shows the IP addresses that are configured for the zones and their respective default routers in the private virtual network setup.
|
The tasks that follow show how to configure this network.
How to Configure the Private Virtual Network
The global zone performs routing and NAT, so you need to connect the global zone to both the private virtual network and the physical NIC. You connect the global zone to the physical NIC by configuring the primary interface in the global zone. You connect the global zone to the private virtual network by creating vnic0 over the etherstub ether0.
Before You Begin
Ensure that your role has the appropriate rights profile to perform this procedure. See Using Rights Profiles to Perform Network Configuration.
-
Create the etherstub ether0.
$ dladm create-etherstub ether0
-
Create the VNIC vnic0 over ether0 with 192.0.2.33/27 as its IP address.
$ dladm create-vnic -l ether0 vnic0
$ ipadm create-ip vnic0
$ ipadm create-addr -a 192.0.2.33/27 vnic0
The VNIC vnic0 acts as the default router for the zones.
-
Create zone1 with the VNIC anet resource and set ether0 as the lower link.
Configure zone1 with the IP addresses that are displayed in Figure 2, Table 2, IP Addresses Configured for the Zones in the Private Virtual Network Setup.
global$ zonecfg -z zone1
Use 'create' to begin configuring a new zone.
zonecfg:zone1> create -t SYSsolaris
zonecfg:zone1> select anet linkname=net0
zonecfg:zone1:anet> set lower-link=ether0
zonecfg:zone1:anet> set allowed-address=192.0.2.34/27
zonecfg:zone1:anet> set defrouter=192.0.2.33/27
zonecfg:zone1:anet> end
zonecfg:zone1> commit
zonecfg:zone1> exit
-
Install and boot zone1.
global$ zoneadm -z zone1 install
global$ zoneadm -z zone1 boot
-
Log in to zone1 and complete the zone configuration.
global$ zlogin -C zone1
-
Reconfigure zone2 with an anet resource and set ether0 as the lower link.
Configure zone2 with the IP addresses that are displayed in Figure 2, Table 2, IP Addresses Configured for the Zones in the Private Virtual Network Setup.
global$ zonecfg -z zone2
zonecfg:zone2> select anet linkname=net0
zonecfg:zone2:anet> set lower-link=ether0
zonecfg:zone2:anet> set allowed-address=192.0.2.35/27
zonecfg:zone2:anet> set defrouter=192.0.2.33/27
zonecfg:zone2:anet> end
zonecfg:zone2> commit
zonecfg:zone2> exit
-
Reboot and log in to the zone zone2.
global$ zoneadm -z zone2 reboot
global$ zlogin zone2
-
Reconfigure zone3 and set ether0 as the lower link.
global$ zonecfg -z zone3
zonecfg:zone3> select anet linkname=net0
zonecfg:zone3:anet> set lower-link=ether0
zonecfg:zone3:anet> end
zonecfg:zone3> commit
zonecfg:zone3> exit
-
Configure the IP address and default gateway for zone3.
Configure zone3 with the IP addresses that are displayed in Figure 2, Table 2, IP Addresses Configured for the Zones in the Private Virtual Network Setup.
global$ zoneadm -z zone3 apply
global$ zlogin zone3
zone3$ ipadm create-ip net0
zone3$ ipadm create-addr -a 192.0.2.36/27 net0/v4
zone3$ route -p add default 192.0.2.33/27
How to Enable IP Forwarding and NAT
You can enable the private virtual network to send network traffic outside the system by enabling IP forwarding and network address translation (NAT) in the global zone.
Before You Begin
Ensure that your role has the appropriate rights profile to perform this procedure. See Using Rights Profiles to Perform Network Configuration.
-
Enable IP forwarding in the global zone.
global$ ipadm set-ifprop -p forwarding=on -m ipv4 net0
global$ ipadm set-ifprop -p forwarding=on -m ipv4 vnic0
-
From the global zone, configure NAT in the /etc/firewall/pf.conf file for the primary interface.
global$ cat /etc/firewall/pf.conf
map net0 192.0.2.0/2 -> 0/32  portmap tcp/udp auto
map net0 192.0.2.0/27 -> 0/32
For information about packet filter, see Chapter 4, Oracle Solaris Firewall in Securing the Network in Oracle Solaris 11.4.
-
Start the firewall service to enable NAT.
global$ svcadm enable network/firewall
- (Optional)
Check whether you can send the network traffic outside the system by
pinging the default router of the system from any of the zones.
$ ping 192.0.2.1/27