
Creating Journal Entries
This section discusses how to:
Enter journal header information.
Specify journal entry currency defaults.
Specify exchange rate.
Specify journal entry reversal options.
Specify commitment control options.
Enter journal line information.
View T-account information.
Specify journal search criteria.
Initiate the calculate amount process.
Use separate debit and credit.
Retrieve a system rate.
Enter an exchange rate manually.
Calculate using the calculate rules.
Select a journal entry template and journal line copy down options.
View the journal audit log.
Enter projects information.
Access the secondary ledger lines.
Use statistics codes.
Specify journal entry totals.
View journal entry errors.
Specify journal entry approval options.
Pages Used to Create Journal Entries
|
Page Name |
Definition Name |
Navigation |
Usage |
|---|---|---|---|
|
Journal Entry - Header |
JOURNAL_ENTRY1 |
|
Enter journal header information that uniquely identifies the journal by business unit, journal ID, and journal date. It also contains options for setting, adjusting, and reversing entries and foreign currencies. |
|
Journal Entry Currency Default |
JOURNAL_ENTRY_CUR |
On the Journal Entry - Header page, click Currency Defaults. |
Enter the currency information that appears by default in the individual journal lines. |
|
Exchange Rate Detail |
EXCH_RT_DTL |
On the Journal Entry Currency Default page, click Exchange Rate Detail. |
Shows the exchange rate details based on the information that you entered on the Journal Entry Currency Default page. |
|
Journal Entry Reversal |
JOURNAL_ENTRY_RVR |
On the Journal Entry - Header page, click Reversal. |
Specify the date of an automatically reversed entry. |
|
Commitment Control |
JOURNAL_ENTRY_KK |
On the Journal Entry - Header page, click Commitment Control. |
Specify the commitment control amount type for a journal if you use the commitment control option. |
|
Attachments |
JOURNAL_ATT_SEC |
On the Journal Entry - Header page, click Attachments. |
Attach relevant and useful files that are related to the journal entry. |
|
Journal Entry - Lines |
JOURNAL_ENTRY2_IE |
|
Record the transactions making up the journal—the debit and credit entries. Once you enter the header and lines, you can request further processing on the page. |
|
Journal Entry Template List |
JOURNAL_ENTRY_TMP |
On the Journal Entry - Lines page, click Template List. |
Select the template that defines which columns appear in the lines scroll area. Also specify the field values to be copied down to new lines when you click the Insert Journal Lines button. |
|
Selection Criteria |
JRNL_SRCH_SEC |
On the Journal Entry - Lines page, click the Search Criteria link. |
Specify search values for any or all fields listed. |
|
Change ChartField Values |
JRNL_SUSP_CF_SEC |
On the Journal Entry - Lines page, click Change Values. |
Apply changes to all displayed journal lines by entering the existing field value and the correct value. |
|
Search Audit Logs |
FS_AUDITLOG_SEARCH |
On the Journal Entry - Lines page, click View Audit Logs. |
View the audit trail for the journal entry. |
|
Secondary Ledger Lines |
JOURNAL_ENTRY_SEC |
Click the Secondary Lines button on the Journal Entry - Lines page. |
View secondary ledger lines. |
|
T-Account |
TACCOUNT_VIEW_SEC |
Click the T-Account link on the Journal Entry - Lines page. |
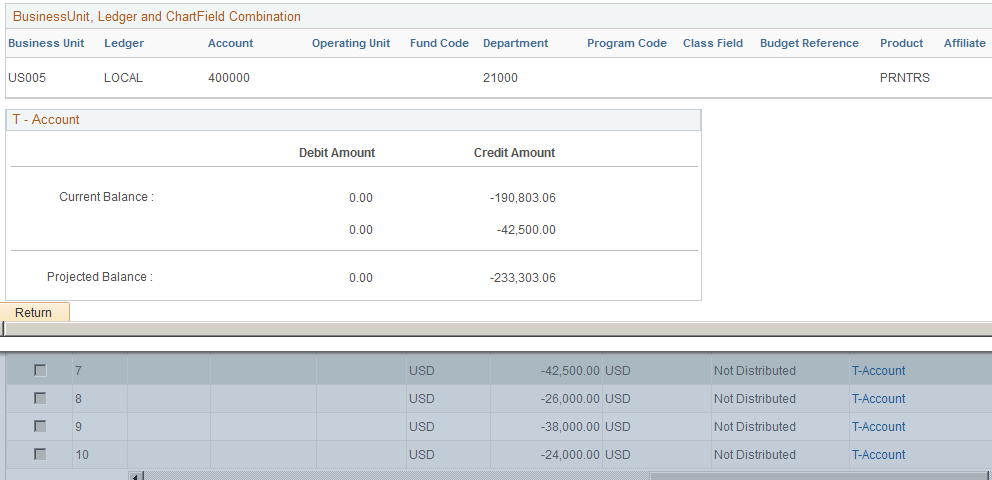
Check the effect of a particular line on the relevant balance (same ChartField combination) directly from the Journal Entry - Lines page. Enable the T-Account field to appear on the Lines page by selecting a Journal Entry Template that includes the T-Account field. The T-Account field is located on the Miscellaneous tab of the Journal Entry Template page for selection. |
|
Journal Entry - Totals |
JOURNAL_ENTRY_T_IC |
|
Specify control debit and credit amounts, unit value of statistical entries, and the number of lines. These controls enable you to enforce a greater degree of control over the journal entry process. |
|
Journal Entry - Errors |
JOURNAL_ENTRY_E_IC |
|
Determine which errors the system encountered. |
|
Journal Entry - Approval |
JOURNAL_ENTRY_A_IC |
|
Select the current journal for approval if you use PeopleSoft Workflow to approve journals for posting. |
Journal Entry - Header Page
Use the Journal Entry - Header page (JOURNAL_ENTRY1) to enter journal header information that uniquely identifies the journal by business unit, journal ID, and journal date.
It also contains options for setting, adjusting, and reversing entries and foreign currencies.
Image: Journal Entry - Header page
This example illustrates the fields and controls on the Journal Entry - Header page. You can find definitions for the fields and controls later on this page.

Note: This page or related pages operate in deferred processing mode. Most fields are not updated or validated until you save the page or refresh it by clicking a button, link, or selecting a tab. This delayed processing has various implications for the field values on the page—for example, if a field contains a default value, any value that you enter before the system updates the page overrides the default. The system updates quantity balances or totals only when you save or click the Calculate Amount button.
| Journal ID |
If the Use Next Journal ID option is selected for your user preference, the Journal field is unavailable and automatically changes to NEXT. When you save the journal, the system automatically assigns the next journal ID to the journal. |
| Date |
Determines the period to which the system posts the journals, unless it is an adjusting entry. For business units using a holiday list ID, the journal entry page requires that journal date be a working day, regardless of the accounting period. If you initially enter a date on a non-working day, you'll receive an error message suggesting the next working day. You must manually enter this or another working date before entering journal entry pages. |
| Long Description |
Enter text that describes the purpose of the journal or explain any anomalies in the transaction. The first 30 characters of your description appear in prompt lists for this journal. |
| Ledger Group |
Select the ledger group to which this journal posts. |
| Auto Generate Lines |
Select this check box if the ledger group contains multiple ledgers. If the Keep Ledgers in Sync (KLS) option for MultiBook ledgers is selected on the Ledger Group - Definition page, the Auto Generate Lines check box should always be selected, which enables the system to generate journal lines automatically to support transaction detail for each ledger in the group. For example, suppose that you enter a two-line journal entry for a ledger group that contains three ledgers, the journal entry or edit process generates two lines for each ledger. |
| Ledger |
Enter a ledger within the ledger group to indicate that all the journal lines must be posted to that ledger, or leave this field blank to indicate that the journal lines can be distributed to secondary ledgers. Use this field only if the ledger group contains multiple ledgers, KLS is off, and the Auto Generate Lines option is not selected. If the ledger group is a commitment control ledger group, you must select a ledger. Once you start entering journal lines, you cannot change the values in the Ledger Group, Auto Generate Lines, or Ledger fields. Otherwise, your journal lines would be out of sync with your journal header. |
| Adjusting Entry |
Select Adjusting Entry if this is an adjusting entry. When you select to create an adjusting entry, the Period field becomes available and you can select the adjustment period to which you want the entry to post. The periods (and fiscal year) from which to select are prompted from the adjustment periods and adjustment years as defined in the Open Period Update page that is associated with the ledger group for the anchor business unit of the journal. If this is a Non-Adjusting Entry, you cannot change the accounting period value. The journal date determines the accounting period to which the entry posts based upon the calendar that is defined within the Ledgers For A Unit page for the primary business unit of the journal. Note: Year-end adjustments are segregated from the regular accounting periods to prevent the distortion of period-to-period results. They are recorded in special adjustment periods (as defined on the detail calendar). They are posted to the target ledger in the adjustment year and period that are designated as the default on the Open Period Update page. (You can override the default adjustment period on the Journal Header page.) You can post prior year adjustments while processing the current year activity, as long as you have associated that prior year with the adjustment period on the Open Period Update page. If the adjustment period and associated fiscal year are not designated as open on the Open Period Update page, a warning message notifies you that the journal cannot post to the closed period. Note: When journals are loaded from an external source, there may be a discrepancy between the fiscal year on the Journal Header page and the fiscal year that is open for the corresponding adjustment period on the Open Period Update page. By default, the Journal Edit process selects the fiscal year from the Open Period Update page that is associated with the open adjustment period, changes the fiscal year on the header and processes the journal as valid. You can specify the journal edit handling on the General Ledger Definition – Journal Options page for the Adjustment Year Not Exist field value to control this behavior. The Override field value is the default option, which allows the Journal Edit process to change the fiscal year on the header to the fiscal year that is associated with the open adjustment period (Open Period Update page), thereby passing validation. The Recycle option assumes that the original fiscal year on the adjustment journal header is correct, but since it is not the year that is associated with the open adjustment period, the journal will be in error. See Defining Journal Processing Options for a Business Unit. |
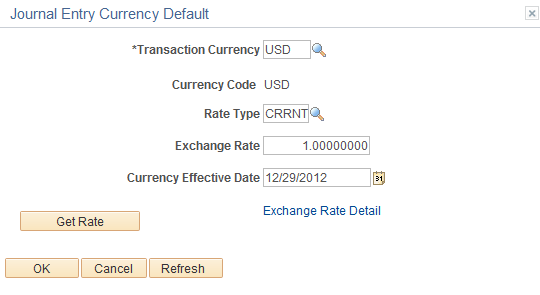
Journal Entry Currency Default Page
Use the Journal Entry Currency Default page (JOURNAL_ENTRY_CUR) to enter the currency information that appears by default in the individual journal lines.
Image: Journal Entry Currency Default page
This example illustrates the fields and controls on the Journal Entry Currency Default page. You can find definitions for the fields and controls later on this page.
Exchange Rate Detail Page
Use the Exchange Rate Detail page (EXCH_RT_DTL) to view the exchange rate details based on the information that you entered on the Journal Entry Currency Default page.
Journal Entry Reversal Page
Use the Journal Entry Reversal page (JOURNAL_ENTRY_RVR) to specify the date options for an automatic reversal entry.
Image: Journal Entry Reversal page
This example illustrates the fields and controls on the Journal Entry Reversal page. You can find definitions for the fields and controls later on this page.

Select the appropriate reversal option:
ADB Reversal
If the ledger group supports average daily balance reporting, you must select the method that is used to populate the ADB date of the reversal entry.
Important! Reversals are identified as valid and ready to post when the Post process creates them, and you do not need to edit them. When the journal date falls within the journal dates, fiscal year, and open periods specified on the Journal Post page, the system posts reversals as soon as they are created.
Journal Entry - Commitment Control Page
Use the Commitment Control page (JOURNAL_ENTRY_KK) to specify the commitment control amount type for a journal if you use the commitment control option.
See Entering and Processing Commitment Control Journal Entries in General Ledger.
Journal Entry - Lines Page
Use the Journal Entry - Lines page (JOURNAL_ENTRY2_IE) to record the transactions making up the journal—the debit and credit entries.
Once you enter the header and lines, you can request further processing on the page.
Image: Journal Entry - Lines page (1 of 4)
This example illustrates the fields and controls on the Journal Entry - Lines page (1 of 4). You can find definitions for the fields and controls later on this page.
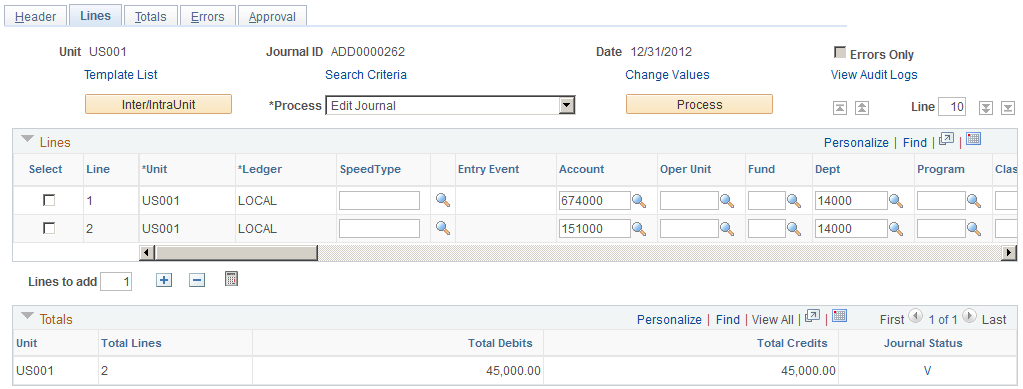
Image: Journal Entry - Lines page (2 of 4)
This example illustrates the fields and controls on the Journal Entry - Lines page (2 of 4). You can find definitions for the fields and controls later on this page.
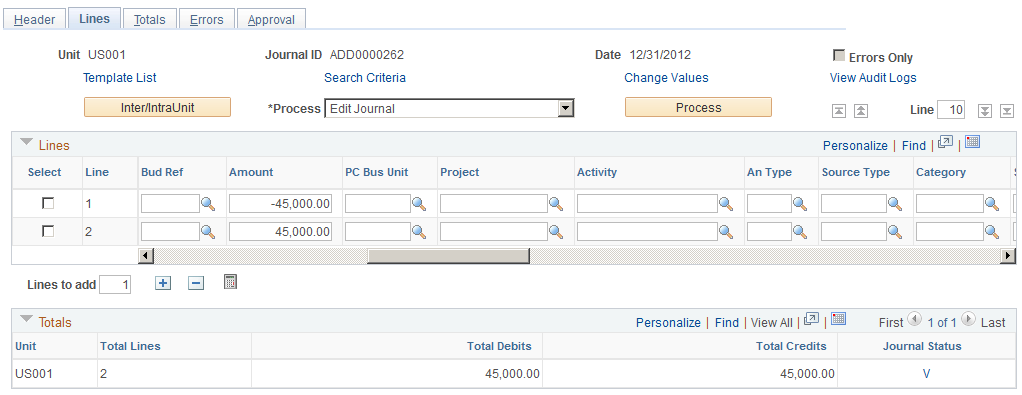
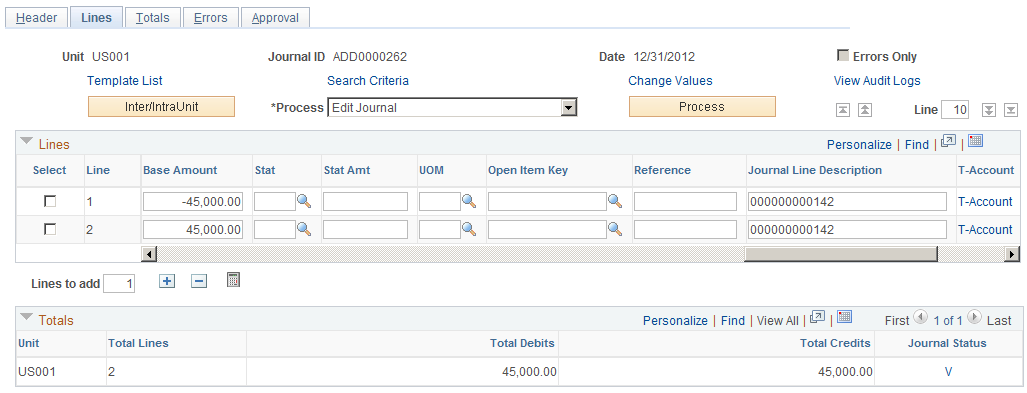
Image: Journal Entry - Lines page (3 of 4)
This example illustrates the fields and controls on the Journal Entry - Lines page (3 of 4). You can find definitions for the fields and controls later on this page.

Image: Journal Entry - Lines page (4 of 4)
This example illustrates the fields and controls on the Journal Entry - Lines page (4 of 4). You can find definitions for the fields and controls later on this page.
Note: The columns that appear on this page are controlled by your choices on the journal entry template (click Template List link), as well as by clicking the Personalize link to hide or sort columns.
Note: This page or related pages operate in deferred-processing mode. Most fields are not updated or validated until you save the page or refresh it by clicking a button or link or selecting a tab. This delayed processing has various implications for the field values on the page. For example, if a field contains a default value, any value that you enter before the system updates the page overrides the default. Another implication to keep in mind is that the system updates quantity balances or totals only when you save or when you click the Calculate Amount button.
| Process |
To perform a task, select the task that you want to perform and click this button. Values are: Budget Check Journal: Select to run the Commitment Control Budget Processor process (FS_BP) to check the journal lines for the control budget. The journal edit process must validate the journal before it can be budget checked. Copy Journal: Select and click the Process button to access the Journal Entry Copy page. Enter changes in journal information for the newly copied journal. This is an online copy journal version of the journal copy process that is done using PeopleSoft Process Scheduler. Descriptions for the fields on this page are the same as those described in the section for the copy journal using PeopleSoft Process Scheduler. Delete Journal: Deletes the current journal. There are two journal deletion methods: Physical Delete or Logical Delete. The system's treatment of deleted journals depends upon which Journal Delete method that you selected on the Installation Options - General Ledger page. Edit Chartfield: Initiates the journal ChartField Edit process (GL_JEDIT_CF0) to verify whether the journal has any ChartField-related errors, including ChartField edit, combo ChartField edit, and alternate account edit. Edit Journal: Initiates the Journal Edit process (GL_JEDIT_0) immediately. Post Journal: Initiates the Journal Post COBOL process (GLPPPOST) immediately. If the journal requires validation, the Journal Edit process automatically initiates prior to posting. If you are using PeopleSoft Workflow and require approval, you'll receive an error message if you select this option for unapproved journals. Print Journal: When you choose this option and click the Process button, the system creates the Journal Entry Detail report (GLX7501, or GLX7502 for separate debit and credit), which is a printed copy of the journal in BI Publisher format. Note: When you select Print Journal in the Process field and click the Process button, Report Manager and Process Monitor links become available on the Journal Entry - Lines page. Refresh Journal: Retrieves this journal from the database to the page again. You can do this when you think others may have changed the journal after you originally retrieved it. Submit Journal: Initiates journal approval through workflow processing. If you are not using PeopleSoft Workflow, you'll receive an error message when you select this option. When submitted, the worklist items for the user who submitted the journal is marked as worked. Note: For the sake of efficiency, you can edit journals and post later using background processing. If you want to edit and post more quickly, however, you can select the options listed on this page. Edit / Pre-Check: This selection only appears if Enable Budget Pre-check was selected for General Ledger on the Installation Options - Commitment Control page (Set Up Financials/Supply Chain, Install, Installation Options, Commitment Control),. When you select Edit / Pre-Check, the journal will be edited and run through the Budget Processor. However, the Budget Processor will only check the journal and the funds will not be reserved. For example, Commitment Control amounts will not be posted to LEDGER_KK. |
| Template List |
Click to access the Journal Entry Template List page in which you specify a previously created template that defines the columns that appear in the Lines scroll area. Fields are visible on journal lines unless you create specific journal entry templates to make them unavailable. |
| Search Criteria |
This link appears after you save the newly entered journal or when you bring up an existing journal. Click the link to access the GL Journal Entry Processing page, where you can specify search values for any or all fields listed. |
| Change Values |
Click this link to access the Change ChartField Values page to make global changes to the ChartField values to use in your journal entry. Enter the existing field value and the desired value. The change is applied to the journal lines that appear in the Line scroll area. This link does not appear for journals that have been posted. |
| View Audit Logs |
Click this link to launch a new window, which accesses the Search Audit Logs page where you can view an audit trail of the journal events. This page includes information such as user ID, event code, event name, event date and time of the journal processes such as create, delete, edit, mark-to-post, mark-to-unpost, post, unmark-to-post, unmark-to-unpost, unpost and update. Note: The Search Audit Logs page accesses journal events that are populated in the GL Journal Audit record (GL_AUD_JRNL) if the corresponding events are enabled for audit logging. |
| Inter/IntraUnit |
Click to display the number of rows per interunit or intraunit group box. |
| Errors Only |
Select to refresh the Line scroll area with only journal lines that contain errors. To move sequentially through all journal lines having errors, click the first row arrow to the left of the chunking text box to move to the first line of the journal before selecting the Errors Only check box. |
 |
The First Row and Last Row arrow buttons on the outer left and right go to the beginning and end of the journal lines, respectively. The Previous Group and Next Group arrow buttons, on the inner left and right respectively, display journal lines in increment of the number that you entered in the chunking field. Selecting any of these arrow buttons automatically refreshes the screen. If you have specified search criteria, this navigation (or chunking) displays lines that match the search criteria in the specified chunks. For example, suppose that you specify 10 lines be displayed and in the search criteria, you want all journal lines for department 100 to appear. The system displays an initial ten lines that contain department 100. By clicking the arrow buttons as they are available, you can display the next 10 lines or the previous ten lines, and so on. All changes to the journal must be saved before using these buttons. |
| Line |
Enter the incremental number of lines in the chunking text box that you want to retrieve. |
T-Account Page
Use the T-Account page (TACCOUNT_VIEW_SEC) to check the effect of a particular line on the relevant balance (same ChartField combination) directly from the Journal Entry - Lines page. Enable the T-Account field to appear on the Lines page by selecting a Journal Entry Template that includes the T-Account field. The T-Account field is located on the Miscellaneous tab of the Journal Entry Template page for selection. Once you have enabled the T-Account field within a Journal Entry Template, make sure you have selected that particular template by clicking the Template List link from the Lines page.
The T-Account feature includes Multibook capabilities as well as Separate Debit and Credit functionality.
Click the T-Account link from the Lines page to access the T-Account page, which opens in a modal window:
Image: T-Account pageT-Account
This example illustrates the fields and controls on the T-Account page. You can find definitions for the fields and controls later on this page.
Journal Lines Chunking
Lines are displayed in chunks as determined by the number of lines you enter in the chunking text box, starting from the current top line in the journal lines grid. All changes must be saved before changing this number.
Journal Lines Additions, Deletions, and Calculations
You can add journal lines, delete journal lines, and use the journal line calculator.


Selection Criteria Page
Use the Selection Criteria page (JRNL_SRCH_SEC) to specify search values for any or all fields listed.
Image: Selection Criteria page
This example illustrates the fields and controls on the Selection Criteria page. You can find definitions for the fields and controls later on this page.

When you enter the search criteria, the GL Journal Line Number field displays the starting line number for your search. For example, if you enter 1 here and 10 in the number of lines text box next to the Errors Only check box on the Journal Entry - Lines page, the system retrieves journal lines 1 through 10. Enter the selection criteria, including any wildcards. These wildcards assist you in finding the exact information that you need. Unless you enter one of the following wildcards, General Ledger assumes that you want an exact match:
For example, you could search for a blank in the Account, Operating Unit Department, Product, Project ID, Affiliate and Foreign Currency Code fields by entering a tilde (~) in each field.
Return to the journal Lines page.
Initiating the Calculate Amount Process
The Calculate Amount process examines changes in the amount-related fields (such as foreign currency, foreign amount, rate type, exchange rate, base currency, and monetary base amount). It calculates the unchanged field based on the system rule or the specified rule in the Calculate field. If none of the amount-related fields are changed on a particular line, no calculation process is initiated on that line even if you click the Calculate Amount button. After the value is calculated, the journal totals and balancing ChartFields totals are updated to reflect the new totals.
The Calculate Amount process is automatically initiated in the following situations:
When you save the journal, including when you click the Save button, run remote journal edit, run remote journal ChartField edit, run remote call journal post, run remote call budget checking, select copy journal, or submit the journal to workflow.
When you click the Insert Journal Lines button to insert new lines.
When you click the Delete Selected Journal Lines button to delete lines.
When you click the Secondary Lines (>>) button to access the Secondary Lines page.
When you click the Exchange Rate Detail (>>) button to view the exchange rate detail.
When you click the VAT link to access the VAT page.
When you change the business unit or ledger value on the line.
When you use the SpeedType page to select a speed type.
The Calculate Amount process performs the following steps:
For each journal line on the journal line grid, the system compares all field values with the prior values stored in the buffer to determine whether there are any changes.
If there are any changes on foreign currency, rate type, exchange rate, or base currency, the system determines the new exchange rate.
This also initiates exchange rate checking before the new exchange rate can be accepted. The new exchange rate is then converted to rate multiplier and rate divisor values.
If there are any changes in foreign amount, exchange rate, or base amount, the system calculates the unchanged amount based on the system rule or the rule that you specify in the Calculate field.
The system then adjusts the journal totals and balancing ChartField totals to reflect the new totals.
Even if there is no amount field change, but there is a ChartField value changed, the system adjusts the balancing ChartFields totals accordingly.
If it is a MultiBook ledger group with auto-generate lines turned on, the system also reflects the changes to the corresponding secondary ledger lines.
If the account is a VAT-applicable or VAT account, the journal VAT rows reflect the new values.
Note: Online Journal Entry uses deferred processing, which reduces the number of trips to the server. However, the Business Unit and Ledger fields on the journal line grid use non-deferred processing. The main reason is because changes to these two fields can change the base currency value. Without refreshing the base currency value immediately, it could become confusing. The Business Unit field value usually remains the same unless it is an interunit journal. You can change the ledger value only when it involves a KLS-off MultiBook ledger group with auto-generate lines turned off and when a blank ledger value is on the journal header. Because both are rare occurrences, server trips should not be an issue in most instances.
Encountering Errors in the Calculate Amount Process
The Calculate Amount process performs various checks, including separate debit and credit amount checking, as well as exchange rate checking. When the process encounters an error, an error message appears and the Error field changes to red. The process does not necessarily stop on an error. If the Calculate Amount process has been automatically initiated, the process may behave differently. In some instances, the process stops, and in other instances, it continues. Here are various scenarios:
When you save a journal, the save process stops, an error message appears, and the journal cannot be saved until you correct the error.
When you click the Insert Journal Lines button to insert new lines, the insert process stops, an error message appears, and new lines cannot be inserted until you correct the error.
When you click the Delete Selected Journal Lines button, the lines identified as deleted are first deleted and then the Calculate Amount process is initiated. If the process encounters an error, those identified lines are deleted.
When you click the Secondary Lines (>>) button to access a secondary lines page, the Exchange Rate Detail (>>) button to view the exchange rate detail, or the VAT link to access the VAT page, you cannot transfer to the pages until you correct the error.
When you change the business unit or ledger, or use the SpeedType page to select a speed type, the changes on the Business Unit, Ledger, and ChartField field values are processed and the Calculate Amount process is initiated. Even if the calculation process encounters an error, the line changes.
Enter the business unit or ledger for the journal line in the corresponding fields. Click the button next to the Ledger field to access the Secondary Journal Lines page to view the lines for the secondary ledger if you have a ledger group with multiple ledgers.
If you are using a speed type key to enter frequently used ChartField combinations automatically, click the SpeedType button and select the appropriate speed type code. For example, to record revenue from product sales , you can enter an S or SR. Select the speed type, SREV, that you previously defined to populate the account number, sales department, and product code.
To record the transaction, you must enter the account number and ChartField values for operator unit, department ID, product, and affiliate. Use the bottom scroll bar to view more fields on the grid.
Note: Control accounts and control alternate accounts are not available for online entry in General Ledger. However, you can choose to use an account that rolls up in the same line item or that is open to online entry in General Ledger. General Ledger also reserves four accounts for system-generated balancing lines: suspense, interunit from/to, base currency rounding adjustment, and currency position. You never need to enter these accounts directly. When the journal is edited, the system automatically generates the account and amount.
The Currency, Foreign Amount, Rate Type, Exchange Rate, Exchange Rate Detail, and Base Amount fields appear even if the transaction item is a base currency line.
For amount fields where you enter both debits and credits to the same field, you enter debits as positive values (without a plus sign); however, you must enter credits using the negative sign.
Using Separate Debit and Credit
If you enabled the Separate DR/CR Amount Fields option on the Ledgers for a Unit - Definition page for a detail ledger, amounts appear in the separate debit and credit for both foreign Amount and Base Amount fields.
If you enter a foreign debit and credit amounts on the same journal line, an error message appears, and you must remove one of the amounts. The same is true if you enter a base amount.
Note: The N/R movement field is available only if you have performed the separate debit and credit configuration.
The N/R movement field supports reversing-debit and reversing-credit entries for error correction for the separate debit and credit configuration if you chose this option. You can offset a reversing debit or credit by a natural debit or credit to create a balanced journal entry. For example, suppose that cash is overstated by 1,000 and accounts receivable is understated by 1,000 due to an improper posting. Here are the correcting entries:
| Accounts Receivable |
1,000.00 DR (N) Natural Debit |
| Cash |
(1,000.00) DR (R) Reversing Debit |
These are the sign meanings:
Edit error suspense lines have the same value as the suspended line. Accrual reversals populate the movement with R if the original line was N, and vice versa. This works the same way for journals that are not posted.
If the base currency for the business unit differs from your entry transaction currency (foreign currency), enter the rate type and/or the exchange rate to convert to the appropriate base amount. If you want the system to retrieve a defined exchange rate, enter only the rate type. As a result, the system automatically populates the exchange rate, base amount (or base DR amount and base CR amount if using the Separate DR/CR option) fields.
The Exchange Rate field value must always be 1, and the foreign Amount field must equal the base amount when the journal line is a base currency line.
Note: Journal entries loaded to your system using spreadsheet journals import or flat file journal import must be edited using batch edit only. Imported journals do not yet have all values populated and should not be edited online. After importing journals if you open them online you get a warning message stating that they must be edited first. It is only after the batch edit that the journals display complete and correct information regarding separate debit credit reversals and the appropriate monetary amount sign.
Retrieving a System Rate
To retrieve a system rate, the from currency, to currency, rate type, and currency effective date values are all required. Without any one of them, the system-derived exchange rate cannot be retrieved. Usually, the from currency is the foreign currency, the to currency is the base currency, and the currency effective date is specified as the currency default on the Journal Header page.
The system uses the following rules when retrieving the system rate to be used as the exchange rate for the journal line:
The system uses the rate type value specified on the line to retrieve the system rate.
However, this does not ensure successful retrieval of a system rate. If there is no market rate defined for the transaction currency, the retrieved system rate may be zero. In this case, a message is issued to alert you to the zero exchange rate value.
If there is no rate type specified on the line, the system rate is zero.
Entering an Exchange Rate Manually
When you manually enter an exchange rate on a foreign currency line, the rate that you enter overrides any automatically generated system rate. This occurs even if you enter a rate type.
The Rate Type field is clear when you manually enter values. However, the manual rate may not be accepted by the system.
The system performs the following two tests for manually entered exchange rates:
The system checks the currency quotation method. If the method is defined as Triangulation, Cross Rate as the Primary Visual Rate, and Do Not Allow Cross Rate Override, you cannot enter a manual rate. If you try to enter a manual rate, an error message appears, and the system ignores the manual rate. This currency quotation method requires the rate type to retrieve the system rate and issues an error message requiring you to enter a rate type to continue.
The variance between the system rate and the manual rate is calculated, and if it is over the tolerance that you defined for maximum variance on the Rate Definition page, a stop error type or a warning message appear, depending on the setting. You cannot enter a manual rate if you receive a stop error type. A warning message allows you to continue.
The system must use slightly different rules to retrieve the system rate when it is to be used as the base rate for variance checking. The reason is because if the rate type specified on the line is blank, the system cannot use a zero value for variance checking.
The system must find a nonblank rate type to retrieve the system rate to use as the base rate for variance checking. The system is subject the following hierarchy of rules:
Use the rate type specified on the journal line if it is not blank.
Use the rate type specified on the journal header if it is not blank.
Use the rate type specified for the ledger on the Detail Ledger Group Definition page.
Use the required default rate type specified for the ledger on the Detail Ledger Group Definition page.
Note: To use exchange rate variance checking functionality, define the market rates.
Manual Rates and Deriving the Rate Multiplier and Rate Divisor
If the manually entered exchange rate passes the two tests for currency quotation method and variance, the system can accept the manual rate. However, because the exchange rate is entered manually as one value, the system has to convert it to two values—rate multiplier and rate divisor, depending on whether the currency quotation method is direct or indirect and if currency triangulation is specified.
The following conditions hold if true:
If the quote method is direct and there is no triangulation, the rate multiplier equals the exchange rate, and the rate divisor is 1.
If the quote method is indirect and there is no triangulation, the rate multiplier is 1, while the rate divisor equals the exchange rate.
If there is triangulation, the system uses the cross rate entered to recalculate either the rate multiplier or rate divisor based on the recalculate option defined for the currency quotation method.
For example, if the currency quotation method defined for USD to a non participating euro currency (NPC) is Direct, Triangulate through EUR, Allow Override Cross-Rate, and Cross-Rate Recalculate is USD -> EUR, the system recalculates the USD -> EUR rate and leaves the EUR -> NPC rate as is. This means the rate divisor is recalculated while the rate multiplier is left unchanged.
The following table lists the combinations of currency, rate type, and exchange rate changes and shows which exchange rate, for a particular scenario, that the system uses for the foreign currency journal line:
|
Scenario |
Currency Changed? |
Rate Type Changed? |
Manual Exchange Rate Changed? |
The Exchange Rate Used by the System |
|---|---|---|---|---|
|
1 |
Yes |
Yes |
Yes |
If the manual exchange rate is not zero, the currency quotation method is selected. If the quotation method is defined as triangulation, cross rate as the primary visual rate, and do not allow cross rate override, a message appears, and the system ignores the manually entered exchange rate. A rate type is required. If the Rate Type field is blank, an error message appears, and the Rate Type field changes to red. |
|
If the currency quotation is not subject to the above restriction, it retrieves the system rate. If the system rate is not zero, it compares the system rate with the manual rate for variance checking. If the currency quotation method is over maximum variance and the error type is stop, an error message appears, and the Exchange Rate field changes to red. If the currency quotation method is over maximum variance, but the error type is warning, a warning message appears. The Rate Type field clears and the manual rate serves as the exchange rate. If the currency quotation method is not over maximum variance and there is no system rate, the manual rate serves as the new exchange rate and the Rate Type field clears. |
||||
|
If the manual exchange rate is zero, it the system clears the Rate Type field and uses zero as the new exchange rate. |
||||
|
2 |
Yes |
No |
Yes |
Same as scenario number 1. |
|
3 |
Yes |
Yes |
No |
|
|
4 |
Yes |
No |
No |
Please note that, in this scenario, the exchange rate is treated as unchanged. Depending on whether a foreign amount and/or monetary base amount changes, the exchange rate can be recalculated. See the amount change rules for more information. For example, if you change the foreign currency, foreign amount, and monetary base amount but leave the rate type and exchange rate as is, the system recalculates the exchange rate based on the new foreign amount and monetary base amount. |
|
5 |
No |
Yes |
Yes |
Same as scenario number 1. |
|
6 |
No |
No |
Yes |
Same as scenario number 1. |
|
7 |
No |
Yes |
No |
Same as scenario number 3. |
|
8 |
No |
No |
No |
When the exchange rate is unchanged, the system uses the previous exchange rate. |
Calculating Using the Calculate Rules
The calculate value determines how and which of the foreign amount, exchange rate, and base amount fields are calculated for the line item. The default calculation rule is system rule.
If the values generated for foreign amount, exchange rate, or base amount by the system rule are different from those that you want, you can change them using other calculate rules.
When you change any of these values, you must be aware of the possible actions and select the correct calculate value to achieve your proposed change. For example, if you want to change the foreign amount and not the base amount, but you expect the system to calculate and change the exchange rate to result in the original base amount, the system rule does not calculate the exchange rate but does calculate the base amount.
Note: Changed means the new value is different from the prior value. The new value can be zero or nonzero. The prior value can also be zero or nonzero. If you change a field to a new value but then change it back to the prior value before you initiate the calculation process, the field is treated as unchanged. The system tracks changes by comparing the prior value stored in the buffer with the new value when the calculation process is initiated.
Here are the calculate rules and their actions:
You can use the journal entry template to make the Calculate field unavailable just as you can do this with other fields. For example, you can define a base currency journal entry template that can be used for entering base currency lines only.
Checking When the Exchange Rate is Calculated
The exchange rate is calculated based on the foreign amount and monetary base amount when the following are true:
The Calculate field value on each journal line is set to Exchange Rate.
The Calculate field value on each journal line is set to System Rule, and both the foreign amount and monetary base amount change.
The Calculate field value on each journal line is set to System Rule, the foreign amount (or monetary base amount) changes, the exchange rate doesn't change, and the exchange rate value is zero.
The Calculate field value on each journal line is set to System Rule; the foreign amount, monetary base amount, and exchange rate all change; the monetary base amount is not equal to foreign amount multiplied by exchange rate; and the exchange rate value is zero.
The system also performs two exchange rate tests to:
Check the currency quotation method.
If it is defined as Triangulation, Cross Rate as the Primary Visual Rate, and Do Not Allow Cross Rate Override, a system rate must be used, because the exchange rate cannot be calculated.
Check the variance between the system rate and the calculated exchange rate to determine whether its over tolerance.
The calculated exchange rate cannot exceed the tolerance if the error type is stop.
Note: The Journal Entry process uses deferred processing, which reduces the number of trips to the server. For example, when you enter a department ID, the system won't validate your entry until the next trip to the server is requested.
Note: The Journal Entry process uses the columns selected in the journal entry template to display the values in the line scroll area. If any columns listed above do not appear in your journal line, it is likely that these columns are not selected in your journal entry template. You must modify your journal entry template to select these columns or choose another journal entry template that has these columns selected.
Totals
To aid in balancing the journal, a running total of the number of lines, the total debits, total credits, journal status, and budget status of the journal appear at the bottom of the Journal Entry - Lines page. Only balanced entries can post to balanced ledgers.
Journal Entry Template List Page
Use the Journal Entry Template List page (JOURNAL_ENTRY_TMP) to select the journal entry template that defines which columns appear in the lines scroll area.
Also specify the field values to be copied down to new lines when you click the Insert Journal Lines button.
Image: Journal Entry Template List page: Chartfield tab
This example illustrates the fields and controls on the Journal Entry Template List page: Chartfield tab. You can find definitions for the fields and controls later on this page.
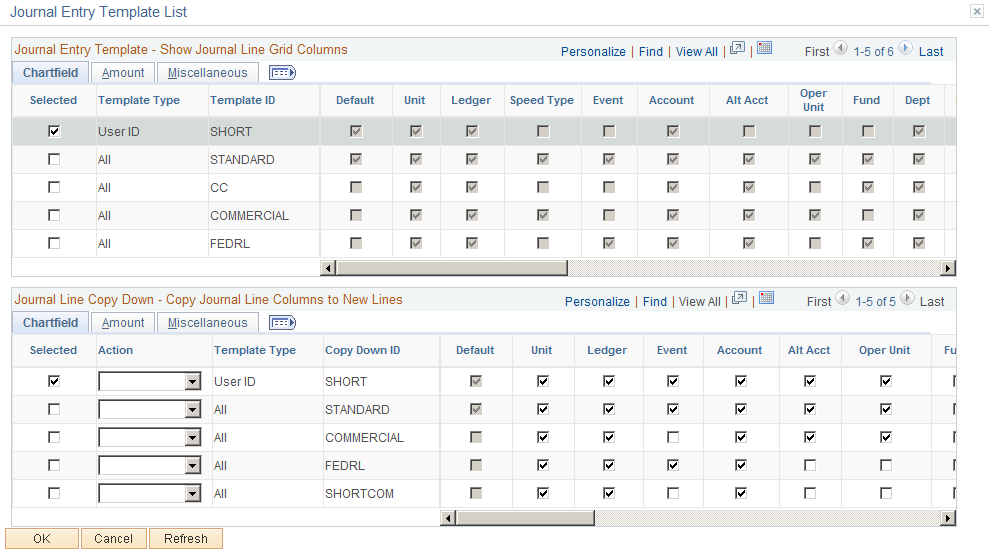
Select the template that includes the columns that you want to appear in the Journal Entry - Lines page scroll area.
Also specify the field values to be copied down to new lines when you click the Insert Journal Lines button on the Journal Lines page. The journal line copy-down settings for templates appear in Journal Line Copy Down group box at the bottom of the same page as the Journal Entry Template grid.
Chartfield Tab - Journal Entry Template
Select the Chartfield tab.
Note: If a particular ChartField column is selected, it does not necessarily appear on the journal line grid. It appears only if the column is selected and it is one of the ChartFields for the current journal's ledger. For example, if scenario is not a ChartField for the current journal's ledger, it is not shown on the journal line grid even if it is selected on the template. Active project ChartFields, such as PC Business unit, Activity, Source Type, Category, Subcategory, and Analysis Type are available if Project ID is selected in the template.
Note: If you want to add or change a template definition, you must do so on the Journal Entry Template page (Set Up Financials/Supply Chain, Common Definitions, Journals).
Chartfield Tab - Journal Line Copy Down
When you add a journal line on the Journal Entry - Lines page, the fields that you selected on the Journal Entry Template - Journal Line Copy Down page are copied from the preceding line.
You define a variety of copy down templates on the Journal Entry Template page. You can select any of these copy down templates for your journal when you click the Template List link from the Journal Entry - Lines page. These predefined templates copy down the values for the fields that are selected on the template when you enter journals. For example, you can define one template to copy down all fields and another to copy down all fields except the amount fields.
Note: You can temporarily change your copy down selections on the Journal Entry Template List page for the current journal. However, these changes are ignored after you exit the current journal. To save the changes, you must do so on the Journal Entry Template page, which is accessed under Set Up Financials/Supply Chain, Common Definitions, Journals, Journal Entry Template.
| Action |
Select to Check All or Uncheck All check boxes for a Copy Down ID. |
| Default |
Select if the template was designated as the default template on the Journal Entry Template - Template page. |
Amount Tab
Select the Amount tab.
Image: Journal Entry Template List page: Amount tab
This example illustrates the fields and controls on the Journal Entry Template List page: Amount tab. You can find definitions for the fields and controls later on this page.
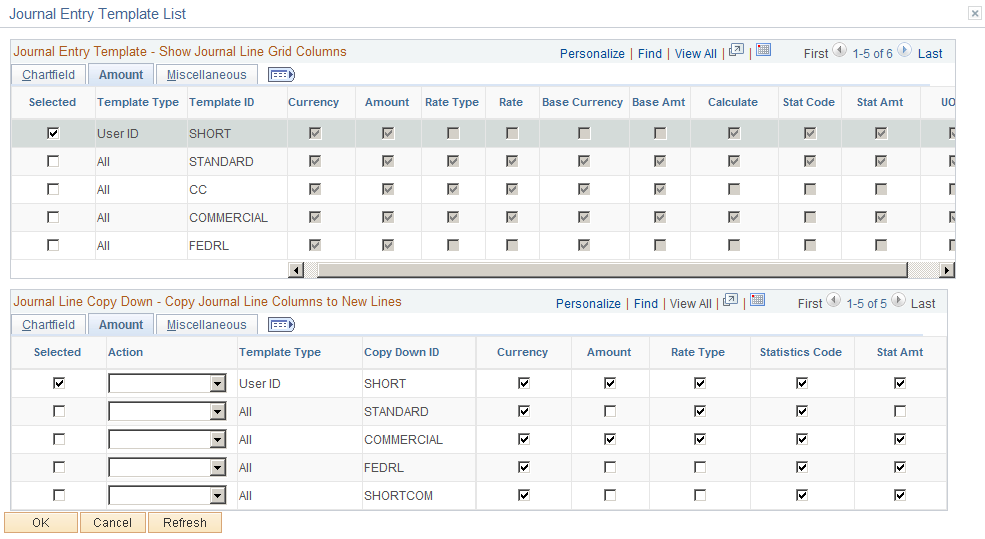
This tab displays the amount-related columns that will appear on your journal for the Template ID that you select. From the Journal Line Copy Down group box, select the amount-related columns that you want to be copied down when you add a journal line.
Miscellaneous Tab
Select the Miscellaneous tab.
Image: Journal Entry Template List page: Miscellaneous tab
This example illustrates the fields and controls on the Journal Entry Template List page: Miscellaneous tab. You can find definitions for the fields and controls later on this page.
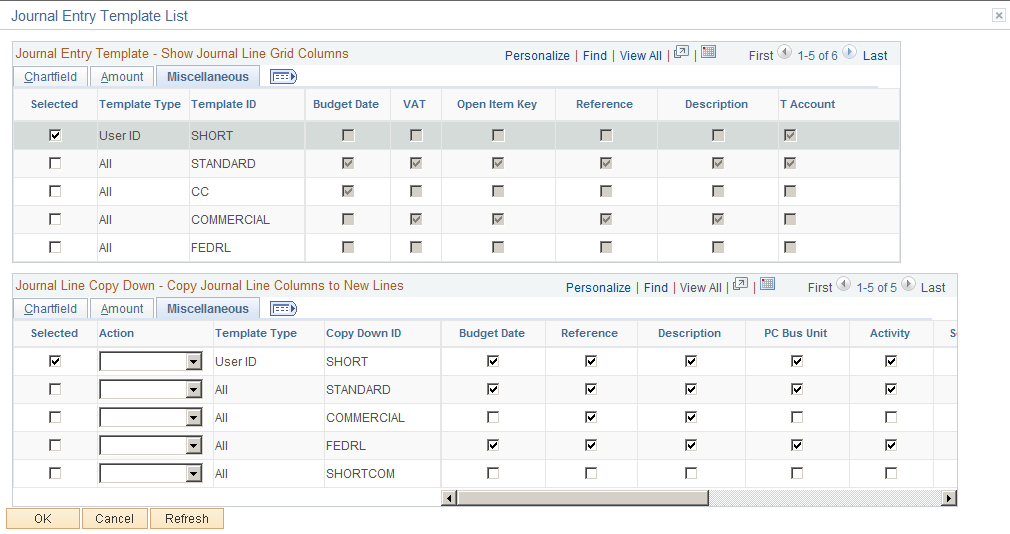
The Journal Entry Template List - Miscellaneous tab displays the miscellaneous columns that will appear on your journal for the Template ID that you select. From the Journal Line Copy Down group box, select the miscellaneous fields that you want to be copied down when you add a journal line.
Note: Even if the Budget Date check box is selected, it does not necessarily appear as a column on the journal line grid. It appears only if you select it here and the current journal line has the Commitment Control process enabled. Similarly, if you select the VAT column here, it appears as a column on the journal line grid only if you select it here and the business unit of the current journal line has the VAT process enabled.
Search Audit Logs Page
Use the Search Audit Logs page (FS_AUDITLOG_SEARCH) to view the audit trail for the journal entry.
Upon clicking the View Audit Logs link, a new window launches with the Search Audit Logs page, which displays the audit log data for the journal. You can enter search criteria and view audit log information for other journals as well.
Image: Search Audit Log page
This example illustrates the fields and controls on the Search Audit Log page. You can find definitions for the fields and controls later on this page.

The search results display journal audit data by event code, which is defined on the Register for Audit Logging page (this page cannot be accessed through the menu).
Entering Projects Information
Access the Journal Entry - Lines page.
Note: Active project ChartFields, such as PC Business unit, Activity, Source Type, Category, Subcategory, and Analysis Type are available if Project ID is selected in the journal entry template.
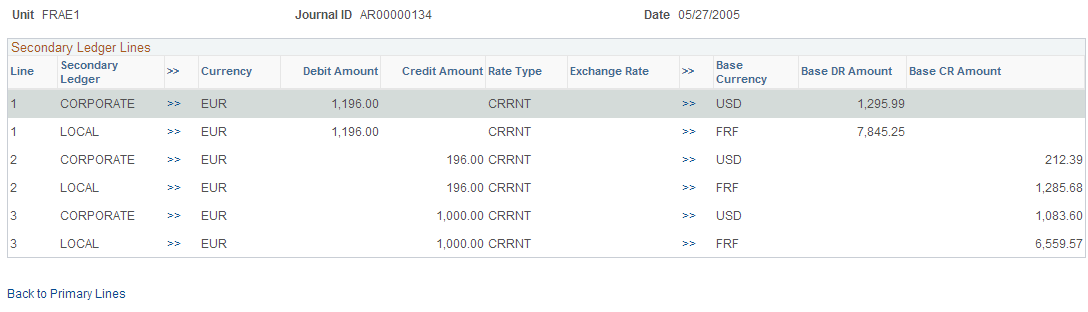
Accessing the Secondary Ledger Lines
Use the Secondary Ledger Lines page (JOURNAL_ENTRY_SEC) to view secondary ledger lines.
Image: Secondary Ledger Lines page
This example illustrates the fields and controls on the Secondary Ledger Lines page. You can find definitions for the fields and controls later on this page.
Note: This page or related pages operate in deferred processing mode. Most fields are not updated or validated until you save the page, refresh it by clicking a button or link, or selecting a tab. This delayed processing has various implications for the field values on the page. For example, if a field contains a default value, any value that you enter before the system updates the page overrides the default. Another implication to keep in mind is that the system updates quantity balances or totals only when you save or click the Calculate Amount button.

Note: Before making changes to the secondary lines, carefully review the calculate rules, options, and requirements for various changes that are detailed in the documentation for the Journal Entry - Lines page.
Using Statistics Codes
Statistics codes, like statistical accounts, are used to identify nonmonetary amounts. They are associated with a specific unit of measure. To enter a statistical amount on the same journal line with a related monetary amount, you can select a statistics code in the Stat (statistics) field on the Journal Entry - Lines page. When you select a statistics code, also enter the statistical amount for a unit and the corresponding UOM (unit of measure) for that statistics code.
Because all statistical and monetary fields are potentially available on the journal line depending on your selection of templates, error messages may appear during the save process when you have entered inconsistent data. Error messages are issued if any of the following occurs:
The account is a statistical account, but the statistic code, foreign amount, monetary amount, foreign currency, rate type, or exchange rate is not blank.
The account is a statistical account, but the statistic amount is blank.
The account is a monetary account and the statistic code is blank, but the statistic amount is not blank.
When you receive an error message, the cursor moves to the error field of the journal line that is in error. If the field was originally unavailable because of the Journal Entry template definition, the column is shown so that the cursor can be positioned.
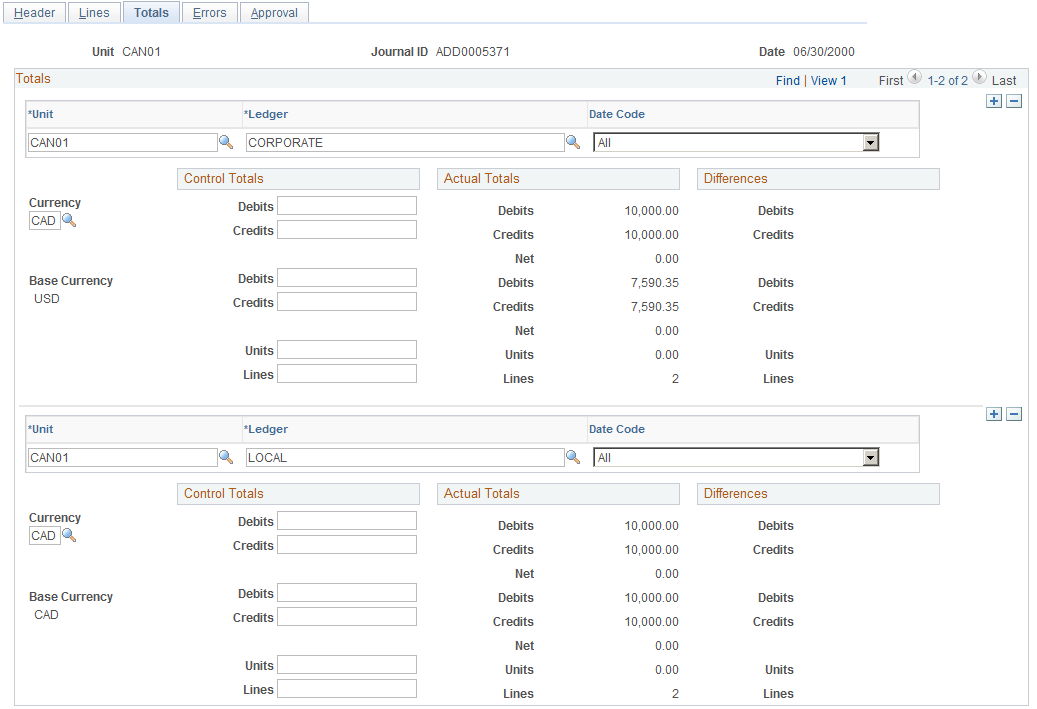
Journal Entry - Totals Page
Use the Journal Entry - Totals page (JOURNAL_ENTRY_T_IC) to specify control debit and credit amounts, unit value of statistical entries, and the number of lines.
These controls enable you to enforce a greater degree of control over the journal entry process.
Image: Journal Entry - Totals page
This example illustrates the fields and controls on the Journal Entry - Totals page. You can find definitions for the fields and controls later on this page.
Note: This page or related pages operate in deferred processing mode. Most fields aren't updated or validated until you save the page, refresh the page by clicking a button or link, or selecting a tab. This delayed processing has various implications for the field values on the page—for example, if a field contains a default value, any value that you enter before the system updates the page overrides the default. Another implication to keep in mind is that the system updates quantity balances or totals only when you save or otherwise refresh the page.
Note: Refresh the page after any changes.
Journal Entry - Errors Page
Use the Journal Entry - Errors page (JOURNAL_ENTRY_E_IC) to determine which errors the system encountered.
Image: Journal Entry - Errors page
This example illustrates the fields and controls on the Journal Entry - Errors page. You can find definitions for the fields and controls later on this page.

You can view journal header and line errors on the Errors page of the journal entry component. You can also view journal entry line errors on the Journal Entry - Lines page by clicking the X in the Error column. You are directed to the Journal Entry - Errors page to review explanatory text. When General Ledger encounters errors during editing, it marks the journal lines and either recycles or suspends the journal. It saves recycled journals but won't post them until you correct the errors. You can post entries to your suspense account that have invalid ChartFields, different signs on the transaction and base amount, or unbalanced debit and credit amounts. You define error-processing options at the business unit, ledger group, and journal source level. Access the Journal Entry - Errors page to determine which errors the system encountered. When you are finished, click the line number in error. This enables you to access the Journal Entry - Lines page. The cursor is positioned on the line and field in error, so that you can make corrections.
Note: This page or related pages operate in deferred processing mode. Most fields are not updated or validated until you save the page or refresh it by clicking a button, link, or selecting a tab. This delayed processing has various implications for the field values on the page. For example, if a field contains a default value, any value that you enter before the system updates the page overrides the default. Another implication to keep in mind is that the system updates quantity balances or totals only when you save or otherwise refresh the page.
Journal Entry - Approval Page
Use the Journal Entry - Approval page (JOURNAL_ENTRY_A_IC) to select the current journal for approval if you have enabled PeopleSoft workflow to approve journals for posting.
Image: Journal Entry - Approval page
This example illustrates the fields and controls on the Journal Entry - Approval page. You can find definitions for the fields and controls later on this page.
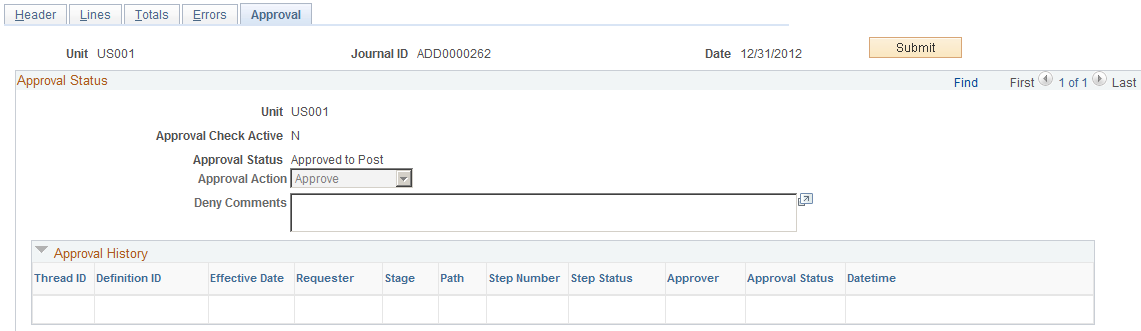
If you have enabled approval workflow and validated the journal, you can submit it for approval from this page. You can configure the Approval Framework to enable journal approval using the Journal Entry component. With this configuration, approvers can access the journal entry for approval through their worklist. You can also enable the journal email approval process using Integration Broker and the Email Collaboration Framework (EMC).
You can also use the GL Journal Approval component (Manage GL Journal Approval component for mass journal approval).
Understanding Configurable Workflow
See Approving Journals Using the GL Journal Approval Components.
See Article ID 1329609.1 on My Oracle Support website for details regarding journal approval using Approval Framework.
Approval Status
The Approval Check Active field indicates whether there is an approval workflow process required for the journal.
See General Ledger Definition - Approval Options Page.
This page displays the current approval status:
In the Approval Action list box, select the appropriate action for this journal:
The Deny Comments field contains the reason for the denial.
Approval History
The Approval History group box lists the step and path, with the status and applicable date and time stamp and user ID for the various activities in the approval process.