
Setting Up Application-Specific Installation Options
Use the Installation Options component (INSTALLATION) to set up application-specific installation options for PeopleSoft applications.
This section discusses how to:
Define Asset Management installation options.
Define Billing installation options.
Define additional Billing installation options.
Define Contracts installation options.
Define eSettlements installation options.
Define Expenses installation options.
Define urgency criteria for expense transactions.
Define General Ledger installation options.
Define Grants installation options.
Define Grants Portal options.
Set up Inventory installation options.
Define starting values for automatically generated numbers in Inventory.
Set Real Estate Management installation options.
Set Manufacturing installation options.
Set Mobile Inventory Management installation options.
Set up Payables installation options.
Define planning installation options.
Define Program Management installation options.
Define Project Costing installation options.
Define Project Costing integration installation options.
Define Purchasing installation options.
Define Receivables installation options.
Select Receivables balance display options.
Define Order Management installation options.
Define Resource Management installation options.
Define Services Procurement installation options.
Define Staffing installation options.
Enable multiple jobs for staffing front office.
Define Strategic Sourcing installation options.
Set up Supplier Contract Management installation options.
Define Treasury installation options.
Pages Used to Set Up Application-Specific Installation Options
|
Page Name |
Definition Name |
Navigation |
Usage |
|---|---|---|---|
|
Asset Management |
INSTALLATION_AM |
|
Review delivered transaction types, enable asset processing features, enable depreciation attributes, set system-wide options, and enable Asset Lifecycle Management solution integration options. |
|
Billing - General Options |
INSTALLATION_BI |
|
Define installation options specific to Billing. |
|
Billing-Federal Options |
INSTALLATION_BI3 |
|
Define installation options specific to Billing. |
|
Billing-Integration Options |
INSTALLATION_BI2 |
|
Define installation options specific to Billing. |
|
GL Options (general ledger options) |
BI_CHG_GL_OPT_SEC |
Select System, Business Unit or Type in the GL Options group box on the Billing Integration Options page. |
Define GL Level and Deferred Revenue options at the business-unit or bill-type level. This page enables you to set your GL Level and Deferred Revenue default levels without accessing different pages. GL Level is required on this page. |
|
Contracts |
INSTALLATION_CA |
|
Define installation options that are specific to Contracts. |
|
eSettlements |
INSTALLATION_EM |
|
Define installation options for eSettlements. |
|
Expenses |
INSTALLATION_EX |
|
Define installation options for Expenses. |
|
Urgency (in Days) |
EX_URGENCY_SETUP |
Click the Urgency Options link on the Installation Options - Expenses page. |
Configure urgency levels for expense reports, time reports, travel authorizations, and cash advances by entering the number of days that the system uses to calculate and trigger a high, medium, or low urgency level for a transaction. |
|
General Ledger |
INSTALLATION_GL |
Set Up Financials/Supply Chain, Install, Installation Options, General Ledger |
Define installation options and mobile approval options for General Ledger. |
|
Grants |
INSTALLATION_CSR |
|
Define Grants installation options. Use this page to indicate that you can include optional attachments, to establish cost-sharing analysis types for each feeder system with which you plan to use the Grants cost-sharing features, and to determine the source for calculating unliquidated obligation balances for the Federal Financial Report. |
|
Grants Portal |
INSTALLATION_GMPT |
|
Define Grants Portal options. |
|
Inventory |
INSTALLATION_INV |
|
Define several settings used by PeopleSoft Inventory; including staged date options, interunit transaction options, unit of measure conversion methods for bar code transactions, methods to number accounting entry lines, search limitations for the Storage Location Search page, and default values for lot IDs, serial numbers, and receiver information. In addition, use this page to define the default hold code applied to material stock requests when they fail to pass the Screen For Denied Parties process (SCM_FSS). |
|
Inventory Counters |
INSTALL_IN_COUNTERS |
|
Define the starting values for your automatically generated numbers. |
|
Lease Administration |
INSTALLATION_RE |
|
Select to enable lease activation for a lease. If selected, the roles defined can activate leases. Also, set mapping instructions for the Site Map page. |
|
Manufacturing |
INSTALLATION_MG |
|
Set the calculated quantity per assembly (QPA) rounding precision. This rounding precision is reflected in PeopleSoft Manufacturing, Engineering, Cost Management, and Supply Planning. |
|
Installation Options – Mobile Inventory |
INSTALLATION_MIN |
Set Up Financials/Supply Chain, Install, Installation Options, Mobile Inventory |
Define installation options for Mobile Inventory Management. |
|
Payables |
INSTALLATION_AP |
|
Define the posting method and enable federal payment schedule processing, late interest charge calculation, evaluated discount, and document association processing options for your Payables application. |
|
Planning |
INSTALLATION_PL |
|
Define the message numbers and default planning instance for Supply Planning. |
|
Program Management |
INSTALLATION_PGM |
|
Establish program management system defaults for workflow and email notification. |
|
Project Costing |
INSTALLATION_PC |
|
Establish default settings for project fields and control fields used across Project Costing. |
|
Project Costing Integration |
INSTALLATION_PCINT |
|
Establish the parameters for integration processes between Project Costing and other applications. |
|
Purchasing |
INSTALLATION_PO |
|
Define general purchasing controls, requisition loader parameters, procurement card controls, and vendor attributes. In addition, you can define the maximum number of rows to display on various PeopleSoft Purchasing pages and select Oracle BI Publisher as the purchase order reporting tool for both PeopleSoft Purchasing and PeopleSoft eProcurement. |
|
Receivables |
INSTALLATION_AR |
|
Define the installation options that are particular to your Receivables application. |
|
AR Parallel Processing Options |
PARALLEL_AR_SBP |
Click the Parallel Processing Options link on the Receivables page. |
Specify the number of partitions to run in parallel for the Payment Predictor (ARPREDCT), Receivable Update (ARUPDATE), Aging (AR_AGING), and Statements (AR_STMTS) processes. |
|
AR Account Overview Balances |
ACCT_BAL_SBP |
Click the Account Overview Balance Display Options link on the Receivables page. |
Specify which balances to display on the Account Overview - Balances page. |
|
Order Management |
INSTALLATION_OM |
|
Set order, quote, and buying agreement chunking parameters and enable SES search, claimback, and feature function security. |
|
Resource Management |
INSTALLATION_RS |
|
Define the installation options that are specific to your Resource Management application. |
|
Services Procurement Installation Options |
INSTALLATION_SP |
|
Define Services Procurement installation options. |
|
Staffing Installation |
INSTALLATION_FO |
|
Define Staffing Front Office and Pay/Bill Management installation options. |
|
PeopleTools Options |
PSOPTIONS |
|
Enable multiple jobs. Doing so will enable the employee record number to appear on the Employees search page and on the Job Data page. |
|
Sourcing Installation Options |
INSTALLATION_AUC |
|
Use to set up award details bid display options and multichannel framework sourcing defaults. |
|
Supplier Contract Management |
INSTALLATION_CS |
|
Set up Supplier Contract Management installation options. |
|
Treasury |
INSTALLATION_TR |
|
Define integration options for accounting, JD Edwards General Ledger, and PeopleSoft Financial Gateway functionality. |
Installation Options - Asset Management Page
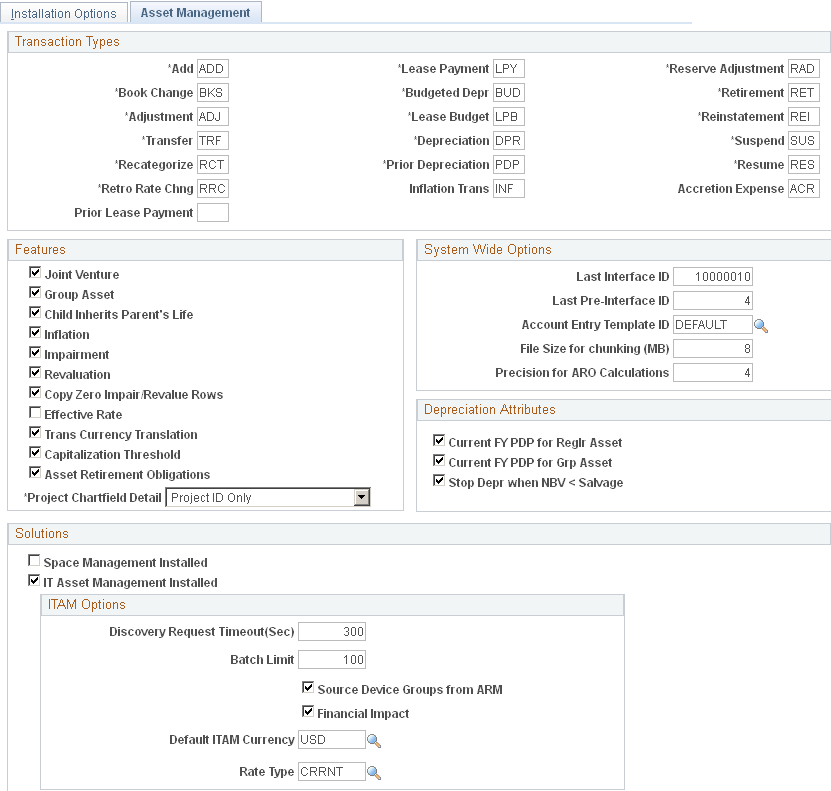
Use the Asset Management page (INSTALLATION_AM) to review delivered transaction types, enable asset processing features, enable depreciation attributes, set system-wide options, and enable Asset Lifecycle Management solution integration options.
Image: Installation Options - Asset Management page
This example illustrates the fields and controls on the Installation Options - Asset Management page. You can find definitions for the fields and controls later on this page.
Transaction Types
The transaction types shown are delivered with the system and represent the types of asset transactions commonly used. You can rename the transaction types using new abbreviations as needed but only until you begin entering actual asset transactions into the system. Once you have done so, you can no longer modify the transaction types table.
| Accretion Expense |
This transaction type is used in recording the period-to-period changes in the carrying amount of the asset retirement obligation recorded as expense for income statement purposes. This field appears when you enable the Asset Retirement Obligations feature (Asset Retirement Obligations check box in the Features group box). See Accounting for Asset Retirement Obligations. |
| Prior Lease Payment |
This transaction type is used when a lease payment is made in the current period for a prior period. The Prior Lease Payment (PLP) transaction type functions similarly to the Lease Payment (LPY) transaction type for accounting entry purposes. See Accounting Entry Template IDs Page |
Features
Asset management supports various processing features to meet the requirements of your location or industry.
System Wide Options
| Last Interface ID |
Primarily informational, assigned incrementally by the system. After you set this number, the next interface will be assigned a value one greater than the number you set. |
| Last Pre-Interface ID |
Primarily informational, assigned incrementally by the system. After you set this number, the next pre-interface will be assigned a value one greater than the number you set. |
| Precision for ARO Calculations |
This field appears when you enable the Asset Retirement Obligations feature (Asset Retirement Obligations check box in the Features group box). Select to specify the number of decimals to use for rounding in the Liability calculations. Example: The formula for Liability is: (Expected Cash Flows Adjusted for Market Risk) * (1/(1+credit adjusted risk free rate) ^ estimated life). This formula can produce a large number of decimal places and reporting precision requirements vary; therefore, the system uses the number as specified in this field to round the result. Suppose that Precision for the ARO Calculation is 4. The Liability is calculated as follows: A = Expected Cash Flows Adjusted for Market Risk B = round((1+credit adjusted risk free rate) ^ estimated life, 4) Liability = A * round(1/B,4) For more information, see Accounting for Asset Retirement Obligations. |
Note: Pre-Interface ID is one of the keys to the Pre-Interface table used by the PeopleSoft Payables/Purchasing to Asset Management interface. When inserting data into the Pre-Interface table, Payables and Purchasing use the Last Pre-Interface ID field and then increment the ID counter by one. You can enter a different Last Pre-Interface ID before using the interface; otherwise, the system uses a value of 1. If the Pre-Interface table contains rows of data, the last pre-interface ID must be greater than or equal to the largest pre-interface ID number found in the table.
Depreciation Attributes
Solutions
Asset Management is the core product in the PeopleSoft Asset Lifecycle Management (ALM) Solution suite of integrated products. The other products are:
Real Estate Management.
IT Asset Management.
Maintenance Management.
Billing - General Options Page
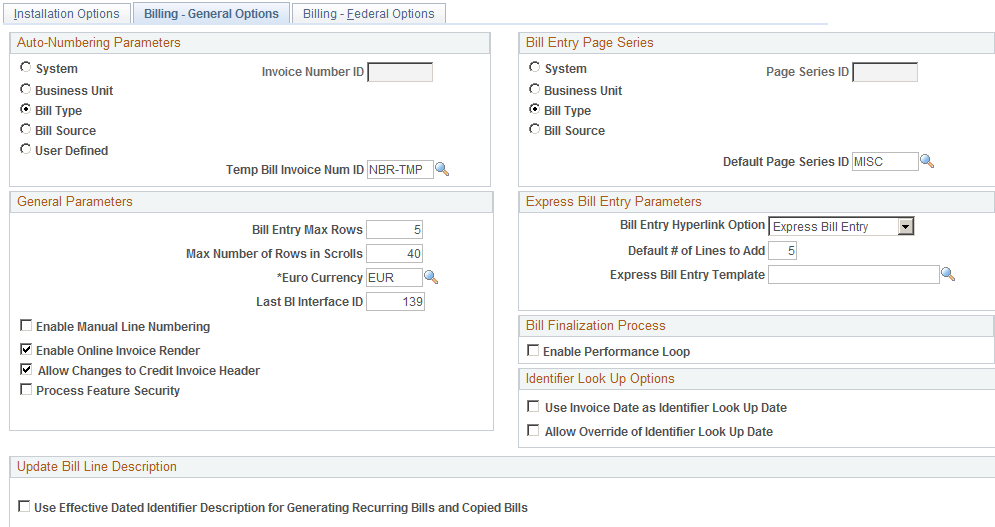
Use the Billing - General Options page (INSTALLATION_BI) to define installation options specific to Billing.
Image: Billing - General Options page
This example illustrates the fields and controls on the Billing - General Options page. You can find definitions for the fields and controls later on this page.
Note: You must first define valid invoice number IDs on the Invoice Number page and define valid page series IDs on the Bill Entry Page Series page.
The Auto-Numbering Parameters group box determines the system level that controls the assignment of invoice numbers. The Bill Entry Page Series group box determines which Billing pages you want to access and in what order during bill entry or inquiry. For example, you can place pages that you rarely use at the end of your page series. In each group box, select from the following options:
Changing the Default Level of the Invoice Number and Page Series IDs
|
To Define at the Level of: |
Move to: |
|---|---|
|
Business Unit |
Billing Definition - Business Unit 1 page |
|
Bill Type |
Bill Type 2 page |
|
Bill Source |
Bill Source 2 page |
|
User Defined criteria (for invoice number IDs only) |
Invoice Number page |
Important! The invoice number ID is required at the level that you define in the Auto-Numbering Parameters group box. If you change the parameters in this group box, you must move to the appropriate page and define the default value for the level that you want. For example, if you change the autonumber parameters from Bill Type to Bill Source, you must go to the Bill Source page and assign an invoice numbering ID at the bill source level. You must also ensure that every bill source you set up in your system has an invoice number ID definition. Failing to follow these implementation requirements can cause unexpected results in future process runs.
General Parameters
Warning! The larger the values that you enter in these fields, the greater the possibility that system response time will degrade.
Express Bill Entry Parameters
Bill Finalization Process
Identifier Look Up Options
Update Bill Line Description
Billing - Federal Options Page
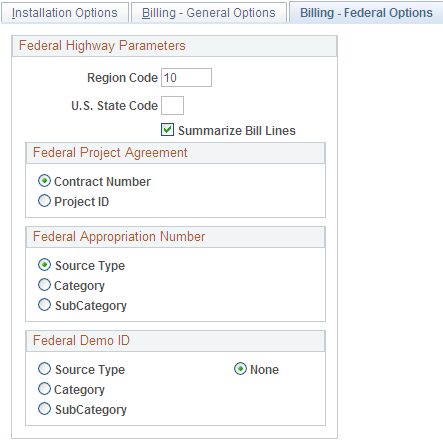
Use the Billing-Federal Options page (INSTALLATION_BI3) to define installation options specific to Billing.
Image: Billing-Federal Options page
This example illustrates the fields and controls on the Billing-Federal Options page. You can find definitions for the fields and controls later on this page.
| Region Code |
Enter a 2 character Region Code. There is no prompt list for the Region Code field. |
| State Code |
Select a value for state code from the prompt list. |
Select one of the options in the Federal Appropriation Number group box to define which field will be used to store the value for Federal Appropriation. The available options are Source Type, Category, SubCategory, and None. The field selected is used by the Federal Highway Billing flat file extract process to group detail rows. If the Federal Appropriation Number is set to a value other than None, the Region Code and State Code fields cannot be left blank since they are going to create the extract flat file if the flag is not set to None.
Billing - Integration Options Page
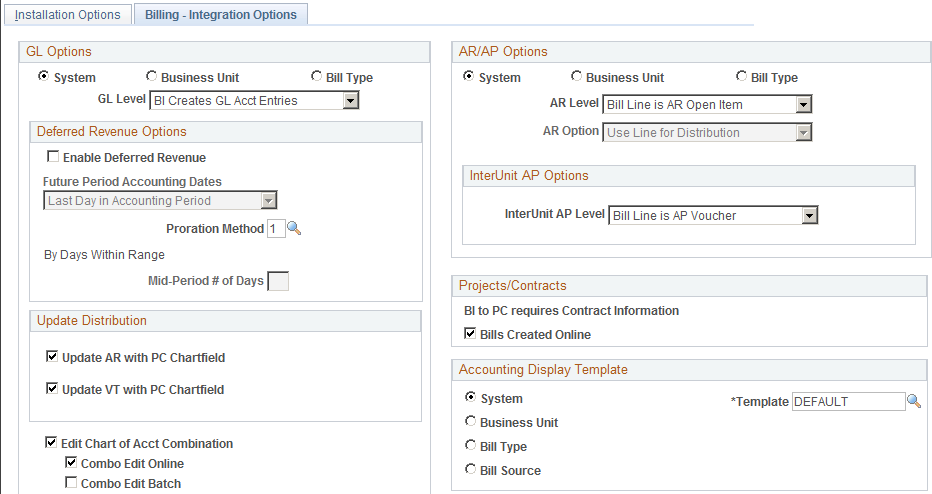
Use the Billing-Integration Options page (INSTALLATION_BI2) to define installation options specific to Billing.
Image: Installation Options - Billing - Integration Options page
This example illustrates the fields and controls on the Installation Options - Billing-Integration Options page. You can find definitions for the fields and controls later on this page.
GL Options
Deferred Revenue Options
If you select System in the GL Options group box, the following fields are available for entry. If you select Business Unit or Bill Type in the GL Options group box, the following fields are available for entry on the GL Options page, where you can define default values for the business unit or bill type definition.
Note: If you enable deferred revenues, be certain to set up deferred revenue accounts in your general ledger system.
AR/AP Options
Note: For invoices subject to ChartField inheritance processing, the Load AR Pending Items process creates pending items in the receivables system based on a summarized set of balanced ChartFields of accounting entry type AR when the AR level is set to Header is AR Open Item and the AR option is set to Use Header for Distribution.
Note: Select the AR option Use Line for Distribution if you want one invoice as an open item, but you want to use more than one receivables account. Project data is tracked in Receivables at the item distribution level. If you want project cost data to flow through Billing to Receivables, you may need to use this option.
Projects/Contracts
Accounting Display Template
Note: Bill entry accounting templates affect which ChartFields appear online. They do not determine whether a ChartField is populated with a value. A ChartField may be populated automatically with a value defined in the distribution code.
Installation Options - Contracts Page
Use the Contracts page (INSTALLATION_CA) to define installation options that are specific to Contracts.
Image: Installation Options - Contracts page
This example illustrates the fields and controls on the Installation Options - Contracts page. You can find definitions for the fields and controls later on this page.
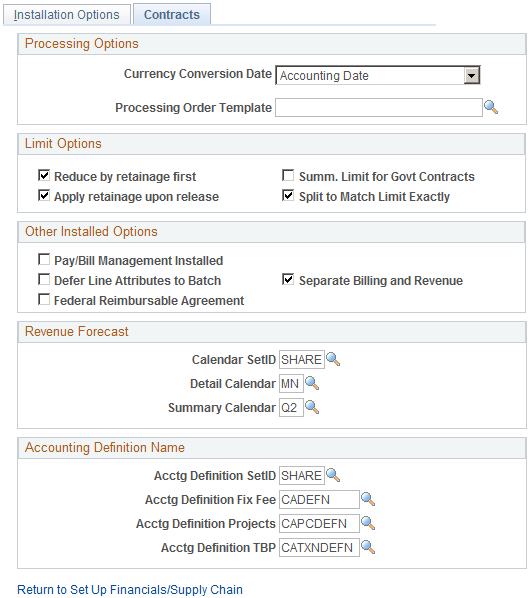
Processing Options
Limit Options
The limit options enable you to apply retainages to limits that you have defined for a contract line. For example, you could have a contract line associated with a project that has a 10,000.00 USD limit and have that contract line associated with a retainage of 10%. If you select Reduce by retainage first, the system applies the 10% retainage to the transaction before the transaction is compared to the limit. Thus, if a 5,000.00 USD transaction comes through, the system applies only 4,500.00 USD (5,000.00 USD–500.00 USD retainage) against the limit. If you select Apply retainage upon release, the system applies accumulated retainages to the limit for the contract line once you have released the retainages on the billing plan with which you have associated the contract line. In this example, when you release the retainage on the Billing Plan, the system applies the 500.00 USD to the limit. If you do not select either option, the system applies the gross transaction to the limit up-front.
| Processing Order Template |
Select a template that you want the system to use during the Limits Process to determine the sequence in which transactions are processed based on your business process. This list is based on the Processing Order Templates defined in the Process Order Template page. See Setting Up a Processing Order Template. Note: Processing Order Templates are optional. If Processing Order Template is not used then by default transactions are processed based on RESOURCE_ID_FROM and RESOURCE_ID field values. |
Other Installed Options
Revenue Forecast
The Detail and Summary calendars control the time period for which you forecast revenue. For forecasting based on predetermined dates (such as an In Progress apportionment revenue plan), the events are summarized into the corresponding period of each calendar. For forecasting that uses the estimated start and end date (such as an as-incurred revenue plan), the amount is spread evenly over the periods of the detail calendar, and then those periods are grouped into the periods of the summary calendar.
Note: Use the budget period calendar to modify the choices that appear on the detail and summary calendars.
Accounting Definition Name
Installation Options - eSettlements Page
Use the eSettlements page (INSTALLATION_EM) to define installation options for eSettlements.
Image: Installation Options - eSettlements page
This example illustrates the fields and controls on the Installation Options - eSettlements page. You can find definitions for the fields and controls later on this page.
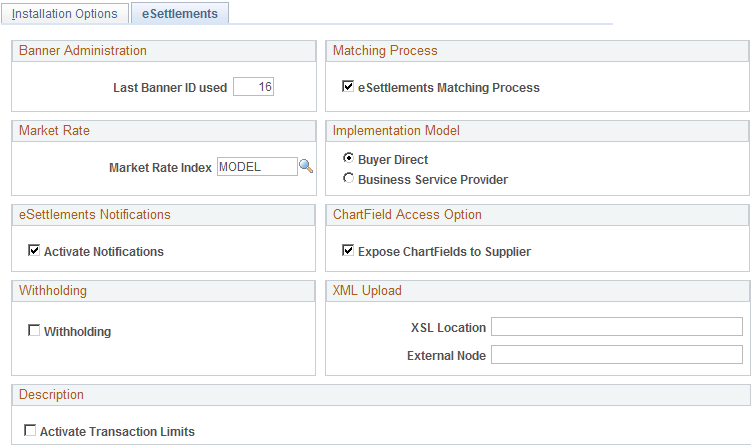
Important! Because certain eSettlements processes depend on the check box selections on the Installed Products page documented in this topic, ensure that you have selected the Payables check box on that page. You must select this check box even if you have not purchased Payables.
Installation Options - Expenses Page
Use the Expenses page (INSTALLATION_EX) to define installation options for Expenses.
Image: Installation Options - Expenses page
This example illustrates the fields and controls on the Installation Options - Expenses page. You can find definitions for the fields and controls later on this page.
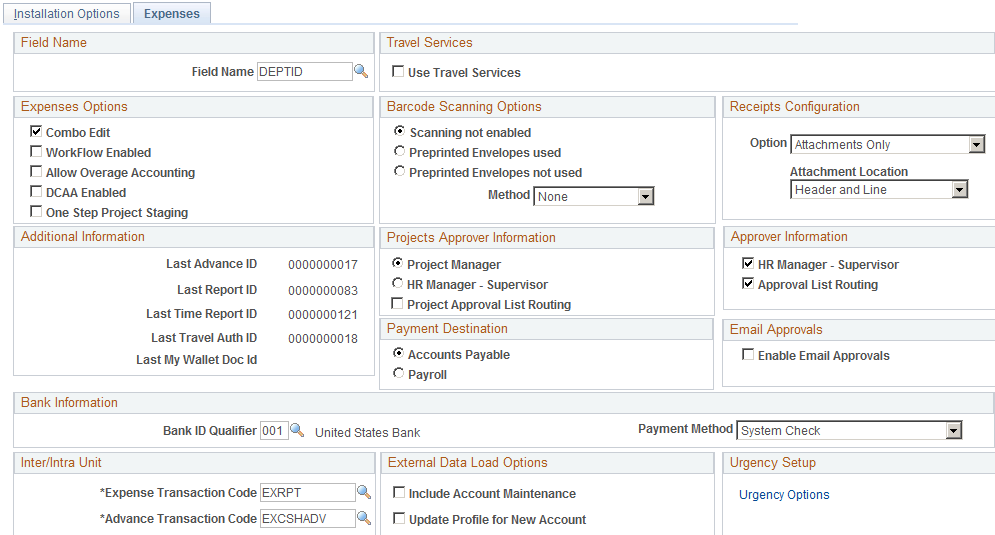
Field Name
Travel Services
Expenses delivers an integration solution that enables Expenses customers to connect quickly and easily to their online travel partners to manage employee travel profiles and their associated travel reservations. To use the travel services feature for Expenses, you must enable the travel services features at the Installation Options level.
Expenses Options
Decide if you want to implement any or all of the following expense system options:
Barcode Scanning Options
Expenses supports the use of bar code scanning to facilitate document tracking. Select one of the following scanning options:
Note: To scan bar codes, you must acquire and install the Code 39 True Type Font, which is not delivered with PeopleSoft applications.
Receipts Configuration
Additional Information
Projects Approver Information
If you use Project Costing, you can enable project managers to approve expense documents before they undergo final processing. This option is used by PeopleSoft Workflow and your email system to route expense documents for first-line approvals.
Approver Information
Select HR Manager - Supervisor, Approval List Routing, or both; however, you must select at least one. Selecting both check boxes implies special or supplemental approvals after the HR Supervisor approval. Expenses approval system use these options to route expense documents for approvals.
Payment Destination
Email Approvals
Bank Information
This section contains fields used to set up the movement of direct deposit data from your payroll system to Expenses.
Inter/Intra Unit
External Data Load Options
Installation Options - Urgency (in Days) Page
Use the Installation Options - Urgency (in Days) page (EX_URGENCY_SETUP) to configure urgency levels for expense reports, time reports, travel authorizations, and cash advances by entering the number of days that the system uses to calculate and trigger a high, medium, or low urgency level for a transaction.
Image: Installation Options – Expenses Urgency (in Days) page
This example illustrates the fields and controls on the Installation Options – Expenses Urgency (in Days) page. You can find definitions for the fields and controls later on this page.
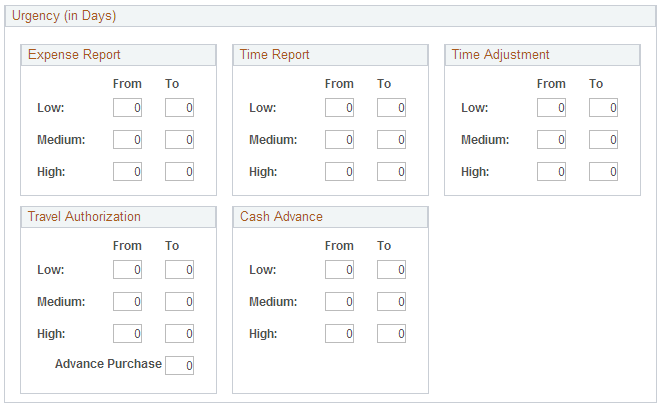
Urgency settings enable approvers to determine which expense transactions need immediate attention. You use the Urgency (in Days) page to configure the number of days that trigger a low, medium, or high urgency icon for each expense transaction. When an urgency level is triggered for an expense transaction, the appropriate urgency icon appears next to the transaction on the Summary Approvals page, on the report, as well as in email approvals.
When viewing the expense transaction, the Urgency column displays these symbols for the different levels of urgency:
|
Urgency Level |
Icon |
|---|---|
|
High |
Red square |
|
Medium |
Yellow triangle |
|
Low |
Green circle |
Installation Options - General Ledger Page
Use the Installation Options - General Ledger page (INSTALLATION_GL) to specify the journal workflow options for general ledger journal entries and standard budget journals.
Image: Installation Options - General Ledger page
This example illustrates the fields and controls on the Installation Options - General Ledger page. You can find definitions for the fields and controls later on this page.
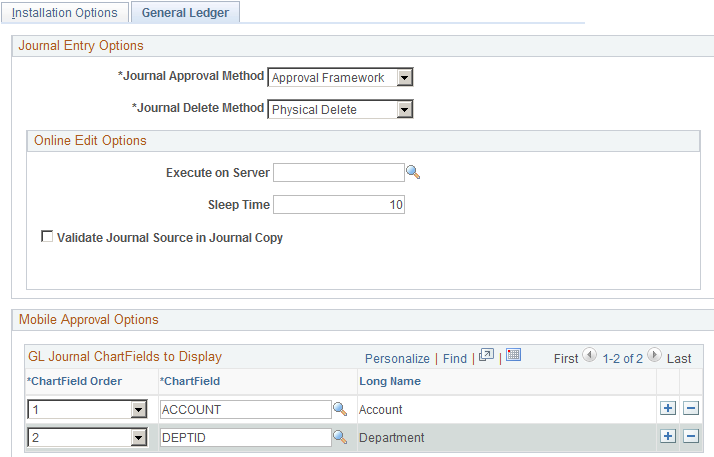
Journal Entry Options
| Journal Approval Method |
Specify one of the following journal workflow approval methods for general ledger journal entries and standard budget journals:
|
Mobile Approval Options – GL Journal ChartFields to Display
Installation Options - Grants Page
Use the Installation Options - Grants page (INSTALLATION_CSR) to define Grants installation options.
Use this page to indicate that you can include optional attachments, to establish cost-sharing analysis types for each feeder system with which you plan to use the Grants cost-sharing features, and to determine the source for calculating unliquidated obligation balances for the Federal Financial Report.
Image: Installation Options - Grants page
This example illustrates the fields and controls on the Installation Options - Grants page. You can find definitions for the fields and controls later on this page.
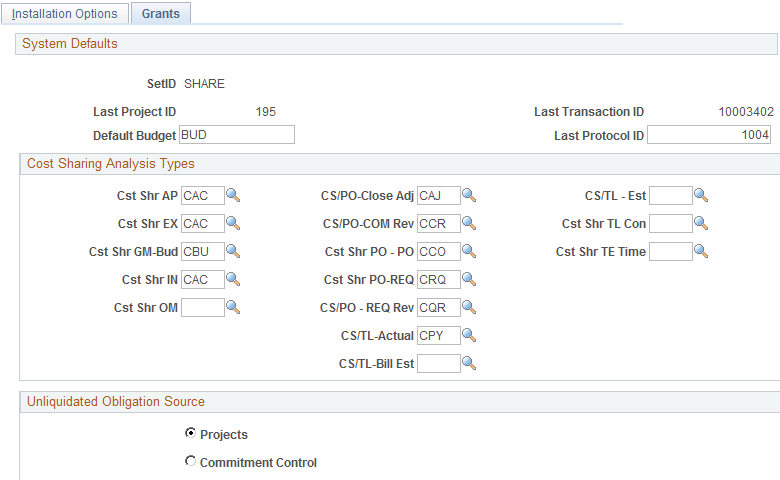
Use the Cost Sharing Analysis Types group box to establish cost-sharing analysis types for each feeder system with which you plan to use the Grants cost-sharing feature. Depending on the feeder systems in which the transactions originated, the system automatically assigns a cost-sharing analysis type to a transaction that includes designated cost-sharing ChartFields.
Use the Unliquidated Obligation Source group box to indicate the source for calculating federal and recipient unliquidated obligation balances for the Federal Financial Report.
Installation Options - Grants Portal Page
Use the Grants Portal page (INSTALLATION_GMPT) to define Grants Portal options.
Image: Installation Options - Grants Portal page
This example illustrates the fields and controls on the Installation Options - Grants Portal page. You can find definitions for the fields and controls later on this page.

Use this page to set up installation options for the Grants Portal.
Transaction Source
The fields that appear on this page are different depending on the option selected in the Transaction Source group box.
Group by
Overlap Award Budget Period
Use the Overlap Award Budget Period group box to set grants portal staging rules for overlapping budget periods within the same award.
Select First if you want the grants portal staging process to set budget periods that fall in the same time period to the earlier budget period.
Select Last if you want the grants portal staging process to set budget periods that fall in the same time period to the later budget period.
Reporting Tree Selection
Reporting Analysis Group
Budget and Transaction Detail
Select the ChartFields to appear on the Transaction Inquiry pages.
Installation Options - Inventory Page
Use the Installation Options - Inventory page (INSTALLATION_INV) to define several settings used by PeopleSoft Inventory; including staged date options, interunit transaction options, unit of measure conversion methods for bar code transactions, methods to number accounting entry lines, search limitations for the Storage Location Search page, and default values for lot IDs, serial numbers, and receiver information.
In addition, use this page to define the default hold code applied to material stock requests when they fail to pass the Screen For Denied Parties process (SCM_FSS).
Image: Inventory page
This example illustrates the fields and controls on the Inventory page. You can find definitions for the fields and controls later on this page.

Installation Options - Inventory Counters Page
Use the Inventory Counters page (INSTALL_IN_COUNTERS) to define the starting values for your automatically generated numbers.
Installation Options - Lease Administration Page
Use the Installation Options - Lease Administration page (INSTALLATION_RE) to select to enable lease activation for a lease.
If selected, the roles defined can activate leases. Also, set mapping instructions for the Site Map page.
System Defaults
Installation Options - Manufacturing Page
Use the Installation Options - Manufacturing page (INSTALLATION_MG) to set the calculated quantity per assembly (QPA) rounding precision.
This rounding precision is reflected in PeopleSoft Manufacturing, Engineering, Cost Management, and Supply Planning.
Image: Installation Options - Manufacturing page
This example illustrates the fields and controls on the Manufacturing page. You can find definitions for the fields and controls later on this page.
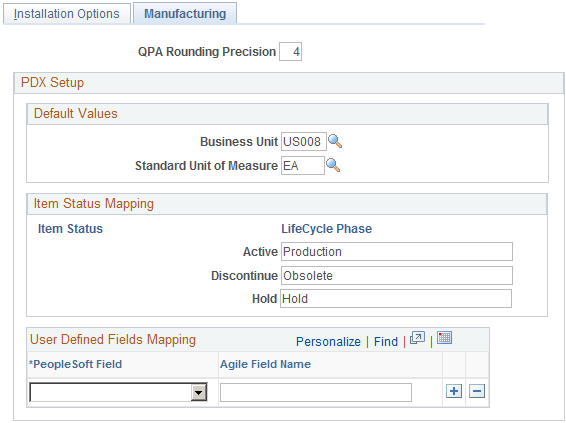
PDX Setup
Installation Options - Mobile Inventory Page
Use the Installation Options – Mobile Inventory page (INSTALLATION_MIN) to define installation options for Mobile Inventory Management.
Image: Installation Options - Mobile Inventory: Guided Count task flow page
This example illustrates the fields and controls on the Installation Options - Mobile Inventory: Guided Count task flow page. You can find definitions for the fields and controls later on this page.

Use Mobile Inventory Management installation options pages to tailor PeopleSoft Mobile Inventory Management task flows for mobile devices. Values for this page are the same values used for user preferences.
You can define installation options these task flows in Mobile Inventory Management:
Adjustments
Bin to Bin Transfer
Delivery, Delivery Cart
Express Issue
Count by Location, Count by Item, Guided Count, and Manual Count
Item Stock Inquiry
Par Count
Perform Putaway
Receiving Ad Hoc and Receiving PO
Installation Options - Payables Page
Use the Payables page (INSTALLATION_AP) to define the posting method and enable federal payment schedule processing, late interest charge calculation, evaluated discount, and document association processing options for your Payables application.
Image: Installation Options - Payables page
This example illustrates the fields and controls on the Payables page. You can find definitions for the fields and controls later on this page.
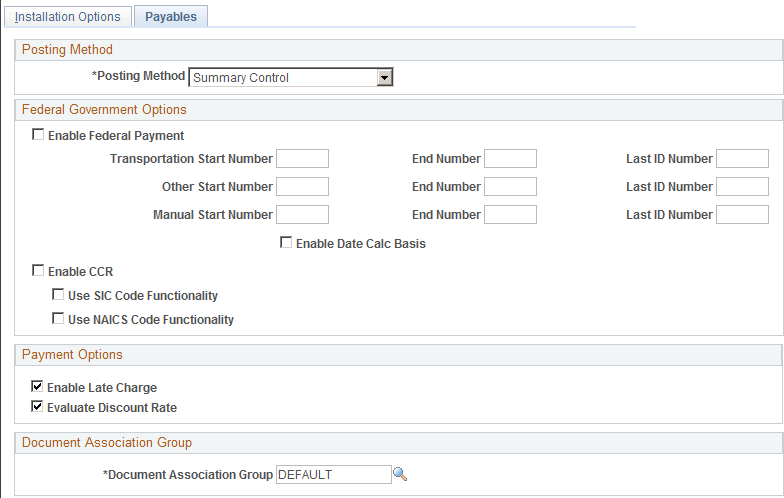
Posting Method
Warning! Select one posting method at implementation and do not change it. If you go back later and select another posting method, there could be ramifications to general ledger journals, such as out-of-balance entries.
Federal Government Options
Payment Options
Installation Options - Planning Page
Use the Installation Options - Planning page (INSTALLATION_PL) to define the message numbers and default planning instance for Supply Planning.
Installation Options - Program Management Page
Use the Installation Options - Program Management page (INSTALLATION_PGM) to establish program management system defaults for workflow and email notification.
Image: Installation Options - Program Management page
This example illustrates the fields and controls on the Installation Options - Program Management page. You can find definitions for the fields and controls later on this page.
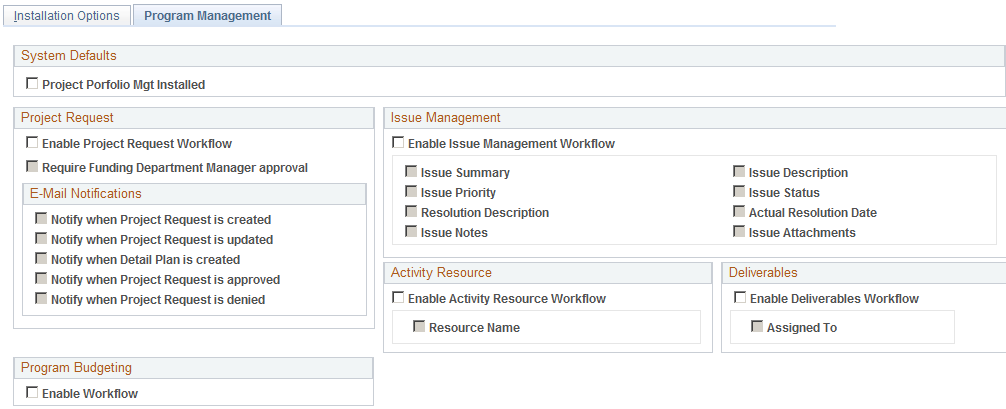
System Defaults
See PeopleSoft Project Portfolio Management
Project Request
Project Request - E-Mail Notifications
Issue Management
| Enable Issue Management Workflow |
Select to activate the Issue Management workflow options on this page. |
| Issue Summary |
Select to trigger workflow to the appropriate program, project, or activity owner when a user changes the issue summary on the Issue page. |
| Issue Priority |
Select to trigger workflow to the appropriate program, project, or activity owner when a user changes the issue priority on the Issue page. |
| Resolution Description |
Select to trigger workflow to the appropriate program, project, or activity owner when a user changes the issue resolution description on the Issue page. |
| Issue Notes |
Select to trigger workflow to the appropriate program, project, or activity owner when a user changes the issue notes on the Issue - Notes and Attachments page. |
| Issue Description |
Select to trigger workflow to the appropriate program, project, or activity owner when a user changes the issue description on the Issue page. |
| Issue Status |
Select to trigger workflow to the appropriate program, project, or activity owner when a user changes the issue status on the Issue page. |
| Actual Resolution Date |
Select to trigger workflow to the appropriate program, project, or activity owner when a user changes the issue actual resolution date on the Issue page. |
| Issue Attachments |
Select to trigger workflow to the appropriate program, project, or activity owner when a user adds issue attachments on the Issue - Notes and Attachments page. |
Installation Options - Project Costing Page
Use the Installation Options - Project Costing page (INSTALLATION_PC) to establish default settings for project fields and control fields used across Project Costing.
Image: Installation Options - Project Costing Page
This example illustrates the fields and controls on the Installation Options - Project Costing page. You can find definitions for the fields and controls later on this page.
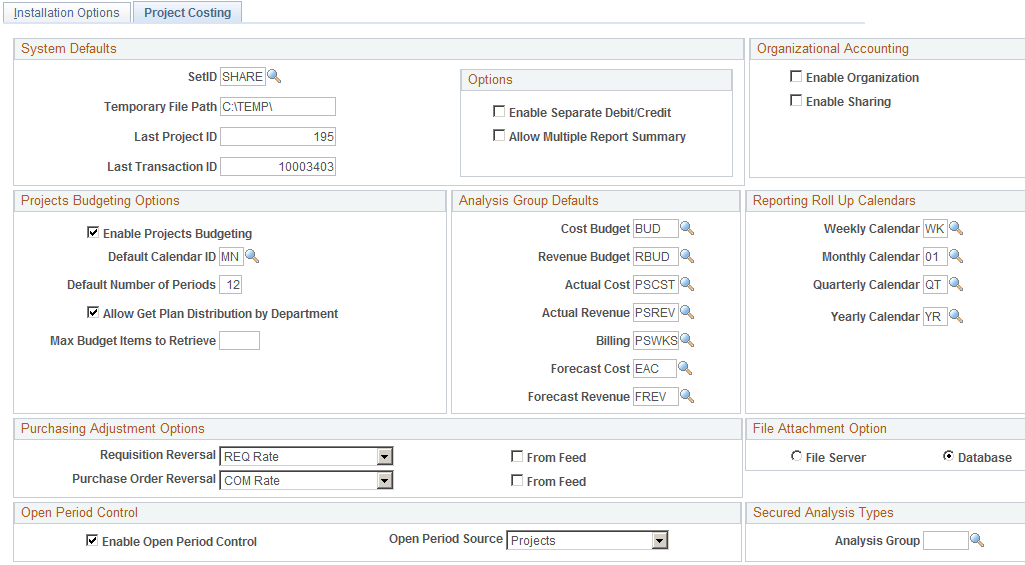
The Installation Options - Project Costing page and Installation Options - Project Costing Integration page are built over core tables that are shared among many PeopleSoft applications. The values entered on these pages affect the table structures that are used to define operational defaults. Because certain tables work together in groups, the order in which they are set up requires that data on some of the tables must be established before others. If you already use other PeopleSoft applications, such as General Ledger to track financial transactions, much of the financial framework is already set up.
Many of the project and control field default values that you set up on the Installation Options - Project Costing page can be overridden at the individual project and activity level.
You must enter at least one record on this page.
Warning! If Project Costing is installed, do not create projects through the Design ChartFields menu, since it represents a subset of project information and is driven by setID instead of by business unit.
System Defaults
| SetID |
Enter a setID that identifies the default control tables tableset. |
| Temporary File Path |
Enter a file path and directory on the application server that are needed to import a third-party application and project tree into Project Costing. The Load Projects and Activities Application Engine process (PC_INTF_GEN), which is used to load projects and activities into Project Costing, stages the project tree as a flat file to this directory and invokes the Projects Tree Integration Application Engine process (PC_TREE_LOAD) to load it into Project Costing. The default value is c:\temp\. |
| Last Project ID |
Enter a numeric value that specifies the last project ID issued. |
| Last Transaction ID |
Enter a numeric value that specifies the last transaction ID issued. The default value is 10000000. |
| Enable Separate Debit/Credit |
Select to enable separate debit and credit entries for account processing. The default value is deselected. |
| Allow Multiple Report Summary |
Select to refresh the rows in the Project Transactions Reporting table (PC_RPO) based on the user's operator ID and the security defined for that user. If deselected, the system overwrites the Project Transactions Reporting table each time that the Report Summarization Application Engine process (PC_RPO) runs and is not subject to project-level security. See Creating and Modifying Reports Using the Report Summarization Process. |
Organizational Accounting
Projects Budgeting Options
Analysis Group Defaults
| Cost Budget |
Select a default analysis group to use for cost budgets in Project Costing budgeting. The analysis group that you enter in this field appears as a default value for the Cost Budget analysis group on new projects. You can override the default value at the project level. |
| Revenue Budget |
Select a default analysis group to use for revenue budgets in Project Costing budgeting. The analysis group that you enter in this field appears as a default value for the Revenue Budget analysis group on new projects. You can override the default value at the project level. |
| Actual Cost |
Select a default analysis group to use for actual cost transactions throughout the Project Costing system. The analysis group that you enter in this field appears as a default value for the Actual Cost analysis group on new projects. You can override the default value at the project level. |
| Actual Revenue |
Select a default analysis group to use for revenue transactions throughout the Project Costing system. The analysis group that you enter in this field appears as a default value for the Actual Revenue analysis group on new projects. You can override the default value at the project level. |
| Billing |
Select a default analysis group to use for billing transactions throughout the Project Costing system. |
| Forecast Cost |
Select a default analysis group to represent the estimate at completion costs for a project. The analysis group that you enter in this field appears as a default value for the Forecast analysis group on new projects. You can override the default value at the project level. |
| Forecast Revenue |
Select a default analysis group that appears as the default forecast revenue analysis group on the Project Costing Definition page. The FREV analysis group is predefined and contains the same analysis types as the PSREV analysis group plus the ETB (billing estimate to complete) analysis type. Users can modify this value to any analysis group that is defined in the system. See Analysis Groups. |
Reporting Roll Up Calendars
Enter the calendar ID that determines how the system summarizes the Project Transaction table by week, month, quarter, and year. The calendars contain the start and end dates of each period.
Purchasing Adjustment Options
File Attachment Option
A file storage system uses a file transfer protocol (FTP) to store files to either a database or a file server. The system used is determined by the URL that is passed as the first parameter in the attachment built-in function and maintained on the URL Maintenance page.
See PeopleSoft Asset Lifecycle Management, Enterprise Service Automation, Financial Management, Staffing Front Office, and Supply Chain Management Product-Specific Installation Instructions.
Open Period Control
Secured Analysis Types
Installation Options - Project Costing Integration Page
Use the Installation Options - Project Costing Integration page (INSTALLATION_PCINT) to establish the parameters for integration processes between Project Costing and other applications.
The Installation Options - Project Costing Integration page establishes controls that the system uses when Project Costing integrates with other PeopleSoft applications.
Image: Installation Options - Project Costing page
This example illustrates the fields and controls on the Installation Options - Project Costing page. You can find definitions for the fields and controls later on this page.
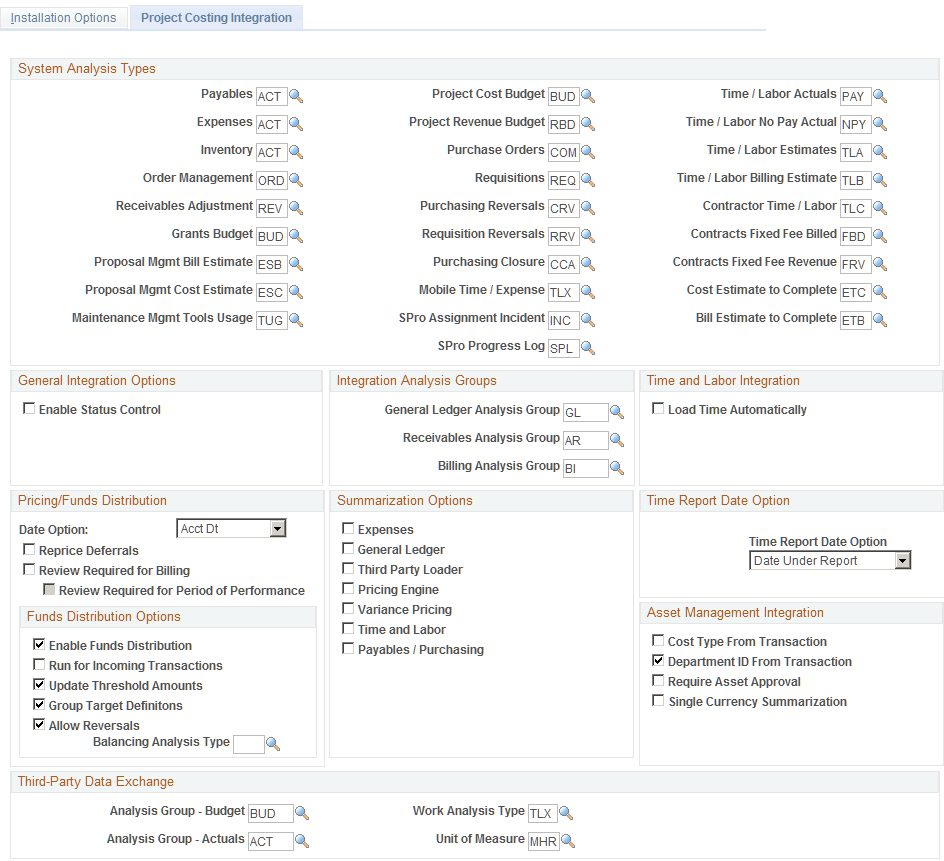
You must enter at least one record on this page.
System Analysis Types
Enter analysis types to associate with transactions that come into Project Costing from each of the installed feeder applications. During the integration process, Application Engines use the analysis types that you enter on this page.
The PeopleSoft Project Costing documentation contains separate topics on integration with other PeopleSoft applications that discuss analysis types that the system uses for each integration.
General Integration Options
Integration Analysis Groups
| General Ledger Analysis Group |
Specify an analysis group that contains analysis types to use for journal entry. |
| Receivables Analysis Group |
Specify an analysis group that contains analysis types to use for integrating with receivables transactions. See Understanding Transaction-Related Control Data and Setting Up Transaction-Related Information. |
| Billing Analysis Group |
Specify an analysis group that contains analysis types to use for integrating with manual billing transactions. See Understanding Transaction-Related Control Data and Setting Up Transaction-Related Information. |
Time and Labor Integration
| Load Time Automatically |
Select for PeopleSoft Time and Labor to publish time and labor actual PAY rows to the Project Transaction table (PROJ_RESOURCE) as soon as payroll is complete. If deselected, you must run the Time and Labor to Project Costing Application Engine process (PC_TL_TO_PC) manually to load the data into the Project Transaction table from a staging table. The default value is deselected. See Reviewing and Loading Data to PeopleSoft Project Costing Tables. |
Pricing/Funds Distribution
| Date Option |
Specify the type of date (accounting or transaction) to use for resolving rates for both pricing and funds distribution. The rates for both of these processes are effective-dated. The default value is accounting date. |
| Reprice Deferrals |
Select to reprice a row that has been priced but not billed. The default value is deselected. |
| Review Required for Billing |
Select to require project transactions to be reviewed before they can be billed. You can override this option at the project type level and for individual projects. Conduct reviews by using the Project Manager Review component (PC_PM_REVIEW). The default value is deselected. |
| Review Required for Period of Performance |
Select to separate Period Of Performance exceptions on the Manager Transaction Review search page. Note: This check box is enabled only if Review Required for Billing check box is selected. |
Funds Distribution Options
The system uses these settings to determine how to handle fund distribution at the installation level.
Summarization Options
Use this group box to determine feeder and pricing summarization options. This group box enables you to select the integrating applications (such as Expenses, General Ledger, Third-Party Loader, and so on) and the Pricing engine processes in which you want to invoke transaction summarization.
For additional information about Feeder and Pricing Summarization:
Time Report Date Option
| Date Option |
Select the date option that the system uses to process time reports that are created in Expenses and brought into Project Costing. Available options are: Date Under Report: The dates entered on time reports when they are created in Expenses are the same dates that the system uses when the time reports are imported into Project Costing. This is the default value. Period End Date: The time report end date determines the accounting period to which the system charges time in Project Costing. This setting is particularly important when the reporting period spans the end of one accounting period and the beginning another accounting period. For example, assume that you use monthly accounting periods and enter weekly time reports. If a month ends in the middle of a week, and therefore the reporting period spans the end and beginning of two accounting periods, the time is charged in Project Costing to the accounting period for which the reporting period ended—the latter of the two accounting periods. See Setting Up Time and Expense ChartFields for PeopleSoft Project Costing. |
Asset Management Integration
| Cost Type From Transaction |
Select to group and summarize the transactions to send to Asset Management by the cost types of the rows in the Project Transaction table instead of the cost type specified on the Define Assets page. The default value is deselected. See Define Assets Page. |
| Department ID from Transaction |
Select to group and summarize the transactions to send to Asset Management by the department ID of the rows in the Project Transaction table instead of the department specified on the Define Assets page. The default value is selected. |
| Require Asset Approval |
Select to require approval of asset capitalization transactions before they are sent to the Asset Management Loader tables. This option applies to assets that you create or adjust in Project Costing. It does not apply to asset retirement transactions. Deselect the option to enable optional approval of assets. If approval is optional, assets with statuses of New and Approved are eligible to be sent to Asset Management. The default value is deselected. |
| Single Currency Summarization |
Select this option in a single currency environment if you have no need to send transaction currency detail to Asset Management when you capitalize assets. The capitalization processes ignore the five currency fields—Transaction Currency Code, Currency Effective Date, Rate Multiplier, Rate Divisor, and Rate Type—to achieve a greater level of summarization. Deselect this option if you want to send currency transaction detail to Asset Management when you capitalize assets. |
Third-Party Data Exchange
The system uses these settings to exchange data between Project Costing and the Microsoft Project 2002 scheduling application.
| Analysis Group - Budget |
Select the analysis group from which to assign an analysis type for budget rows that you import from Microsoft Project. The analysis type from this group is later selected during the Microsoft Project integration process. See Understanding Integration of PeopleSoft Project Costing with Microsoft Project. |
| Analysis Group - Actuals |
Select the analysis group by which all transaction rows with an analysis type belonging to the group will be sent from Project Costing to Microsoft Project. Only transactions with analysis types in the specified analysis group will be synchronized between Project Costing and Microsoft Project. |
| Work Analysis Type |
Select an analysis type to assign to work transactions (time entries) that are sent from Microsoft Project to the Project Transaction table. The default value is TLX. |
| Unit of Measure |
Select the unit of measure for budget rows brought into Project Costing from Microsoft Project. The default setting is hours (MHR). |
Installation Options - Purchasing Page
Use the Installation Options - Purchasing page (INSTALLATION_PO) to define general purchasing controls, requisition loader parameters, procurement card controls, and vendor attributes.
In addition, you can define the maximum number of rows to display on various PeopleSoft Purchasing pages and select Oracle BI Publisher as the purchase order reporting tool for both PeopleSoft Purchasing and PeopleSoft eProcurement.
Image: Installation Options — Purchasing
This example illustrates the fields and controls on the Installation Options — Purchasing. You can find definitions for the fields and controls later on this page.
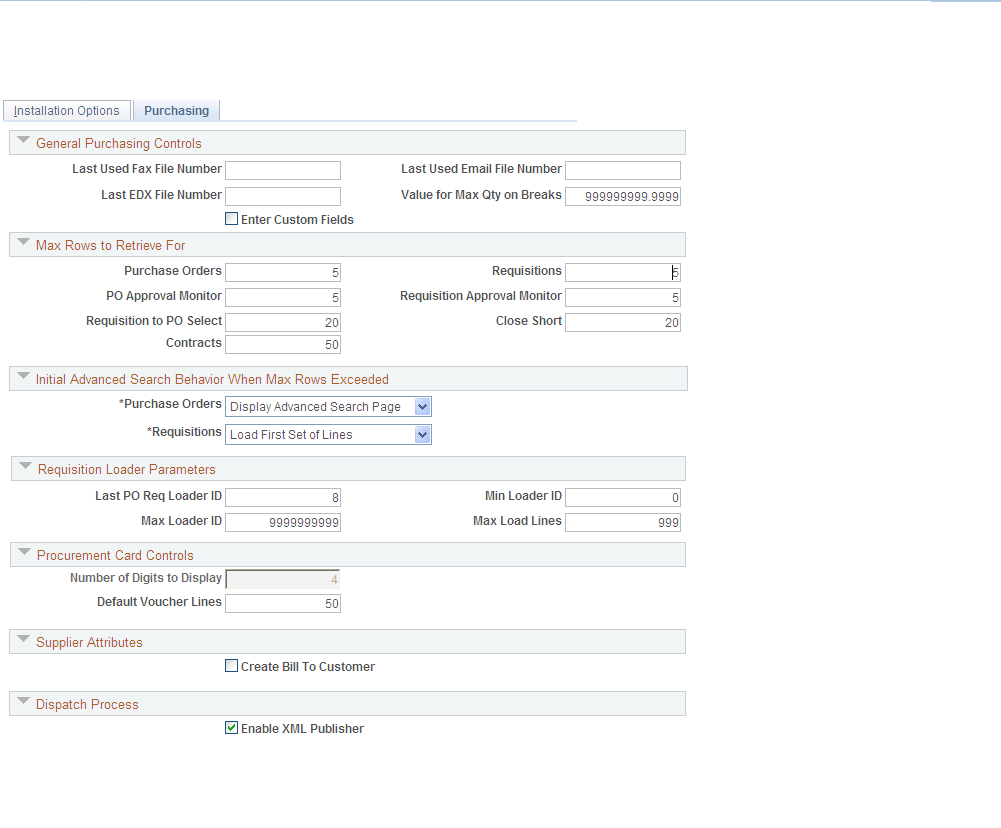
General Purchasing Controls
Max Rows to Retrieve For
Use this group box to define the number of rows that the system retrieves when you perform a search function. For example, if you are using the PeopleSoft Purchasing application to search for purchase orders, and if there are 500 purchase order lines and the purchase order chunk size is set to 20, then the system only loads and displays 20 purchase order lines at a time when you click the Search button.
Initial Advanced Search Behavior When Max Rows Exceeded
Use this region to specify the default method for the system to use to initialize searches for purchase order and requisition lines. Chunking controls the number of lines that the system initially loads when you open a purchase order or requisition. This is a process in which the system places a small subset of transaction lines in a buffer.
Note: A chunk is not the same as a page full of data. It represents all of the rows that are in the scroll at a given point in time.
The system uses the default method when the maximum number of rows defined for chunking has been exceeded. The default methods are specified in the Purchase Orders and Requisitions fields in the Max Rows to Retrieve for region. For example, if the chunk size is 10, and 20 lines are in the purchase order or requisition, the system uses the method that you define on this page to handle the initial search for lines when you open the transaction. Or, if the chunk size is 10, and only two lines are in the purchase order or requisition, then the system does not implement chunking and displays the two lines when the transaction is opened.
Requisition Loader Parameters
Procurement Card Controls
| Number of Digits to Display |
Enter the number of digits that appear for the procurement card. Note: By default, the system displays only the last four digits of the card. |
Vendor Attributes
Dispatch Process
See the product documentation for PeopleTools: BI Publisher for PeopleSoft.
Installation Options - Receivables Page
Use the Receivables page (INSTALLATION_AR) to define the installation options that are particular to your Receivables application.
Collection Credit Exposure
The fields in the Collection Management Credit Exposure group box determine how the Condition Monitor process (AR_CNDMON) calculates a customer's outstanding balance. The process uses the adjusted balance to determine whether customers are approaching or have exceeded their credit limits.
The following table shows what the available credit and outstanding receivables (AR) balance would be if you select none of the check boxes or if you select a single option when a customer's credit limit is 65,000,000.00:
|
Type of Amount |
No Selection |
Select Unapplied Payments |
Select In-Process Payments |
Select Disputed Items |
|---|---|---|---|---|
|
Credit Limit |
65,000,000.00 |
65,000,000.00 |
65,000,000.00 |
65,000,000.00 |
|
Open AR Balance |
65,475,343.21 |
65,475,343.21 |
65,475,343.21 |
65,475,343.21 |
|
Unapplied Payments |
not applicable (N/A) |
35,876,525.91 |
N/A |
N/A |
|
In Process Payments |
N/A |
N/A |
125,000.00 |
N/A |
|
Disputed Items |
N/A |
N/A |
N/A |
91,276.10 |
|
Outstanding AR Balance |
65,475,343.21 |
29,598,817.30 |
65,350,343.21 |
65,384,067.11 |
|
Available Credit |
-475,343.21 |
35,401,182.70 |
-350,343.21 |
-387,067.11 |
Collection Options
The fields in the Collection Options group box define additional options for collection and exception monitoring.
AR Account Overview Balances Page
Use the AR Account Overview Balances page (ACCT_BAL_SBP) to specify which balances to display on the Account Overview - Balances page.
The Account Overview - Balances page displays a list of balances for a customer. By default, all balances appear in the list. Deselect the check boxes for the balances that you do not want to display for your organization.
Installation Options - Order Management Page
Use the Order Management page (INSTALLATION_OM) to set order, quote, and buying agreement chunking parameters and enable SES search, claimback, and feature function security.
Order/Quote Defaults
Buying Agreement Defaults
| Maximum Lines Displayed |
Enter the maximum number of lines to be displayed on the buying agreement before chunking is used. |
Hold Workbench Defaults
Defining Resource Management Installation Options
This section discusses how to set up Resource Management application-specific installation options. The field values that appear by default on this page when you first install Resource Management are required to support demonstration data that is delivered with your application. You must evaluate each option and enter values based on your organization's business structure, practices, rules, and procedures.
The Installation Options - Resource Management page is divided into these regions:
Service Order Options
Organization Structure
Reporting Options - Billing Rates
Reporting Options - Task Categories
Calendar Options
PeopleSoft Services Procurement Integration Options
PeopleSoft Services Procurement Integration Options - Job Defaults for Person
Profile Secure Data Options
Profile Display Options
Optimization
Capacity Planning Setup - Default UOM Display
Capacity Planning Setup - Default Capacity Planning Region
Capacity Planning Setup - Unit of Measure Conversions
See Understanding PeopleSoft Resource Management and PeopleSoft HRMS.
See Resource Matching.
See PeopleSoft Resource Management Implementation.
Installation Options - Resource Management Page
Use the Installation Options - Resource Management page (INSTALLATION_RS) to define the installation options that are specific to your Resource Management application.
Image: Installation Options - Resource Management page (1 of 7)
This example illustrates the fields and controls on the Installation Options - Resource Management page (1 of 7). You can find definitions for the fields and controls later on this page.
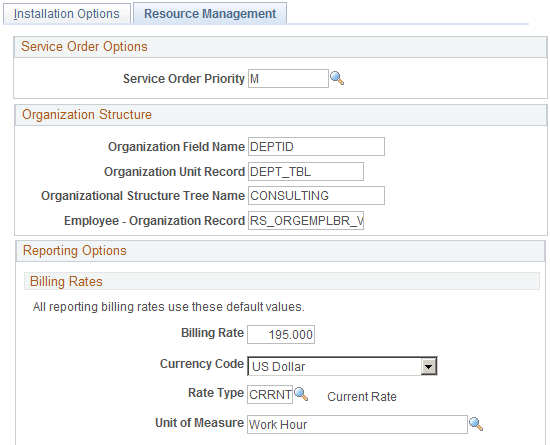
Image: Installation Options - Resource Management page (2 of 7)
This example illustrates the fields and controls on the Installation Options - Resource Management page (2 of 7). You can find definitions for the fields and controls later on this page.

Image: Installation Options - Resource Management page (3 of 7)
This example illustrates the fields and controls on the Installation Options - Resource Management page (3 of 7). You can find definitions for the fields and controls later on this page.
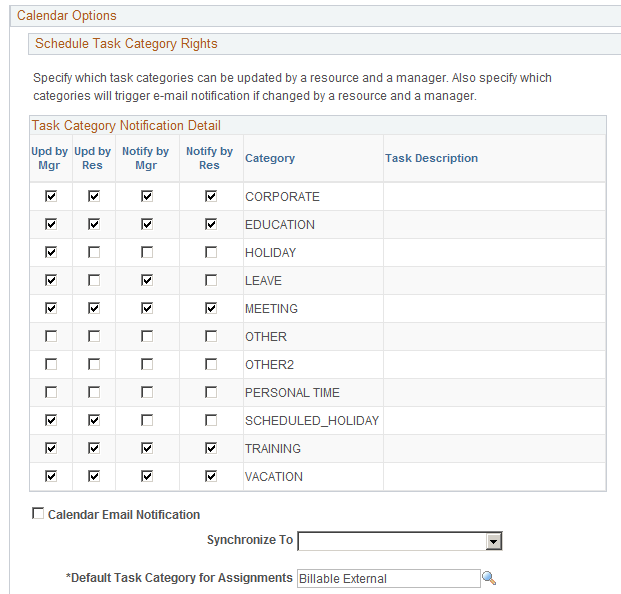
Image: Installation Options - Resource Management page (4 of 7)
This example illustrates the fields and controls on the Installation Options - Resource Management page (4 of 7). You can find definitions for the fields and controls later on this page.

Image: Installation Options — Resource Management page (5 of 7)
This example illustrates the fields and controls on the Installation Options — Resource Management page (5 of 7). You can find definitions for the fields and controls later on this page.

Image: Installation Options - Resource Management page (6 of 7)
This example illustrates the fields and controls on the Installation Options - Resource Management page (6 of 7). You can find definitions for the fields and controls later on this page.
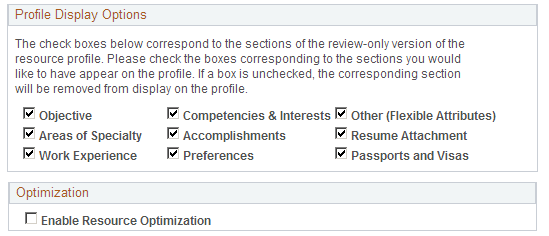
Image: Installation Options - Resource Management page (7 of 7)
This example illustrates the fields and controls on the Installation Options - Resource Management page (7 of 7). You can find definitions for the fields and controls later on this page.
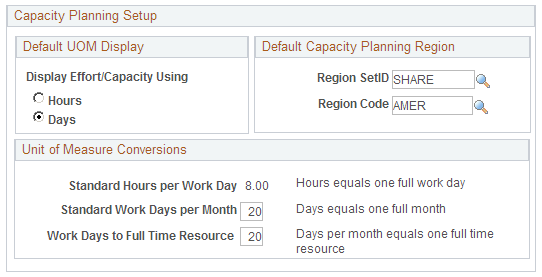
Service Order Options
Organization Structure
Reporting Options - Billing Rates
Reporting Options - Task Categories
| Category and Task Chart Color |
Select task categories and corresponding chart colors to appear on the Resource Schedule chart if you enter the chart from the:
|
Calendar Options
PeopleSoft Services Procurement Integration Options
This group box appears only if you install Services Procurement and select the Allow Non-Employees to be established as Resources option on the Resource Setup - Common Installation Options page.
See Understanding Integration with PeopleSoft Services Procurement.
PeopleSoft Services Procurement Integration Options - Job Defaults for Person
If you allow non-employee data to be maintained in the FSCM database, you can create new non-employee data records—automatically or manually—for Services Procurement person IDs that are established as resources. The values that you enter in these fields appear by default on the Convert Person ID to Resource page when you establish a person ID as a resource. Users can modify the values as needed on the Convert Person ID to Resource page or in the Employee Personal Data component (RS_CM_PERSONAL).
See Establishing PeopleSoft Services Procurement Service Providers as Resources.
Profile Secure Data Options
The Profiles Secure Data Options group box enables you to secure or unsecure data tabs for Resource Profiles. When entering this page, the group box is expanded to display the Enable Secure Data 1 and Enable Secure Data 2 Tab check boxes along with the corresponding Data Field check boxes.
Until you select the Enable Secure Data 1 Tab check box, the corresponding Data Field check boxes are unavailable for selection. Selecting a data field under either column will enable the field to be displayed on the secured tabs in the Resource Profile component.
Note: You can choose one or more fields to appear on either or both tabs. When you select a field to appear on either Secure Data 1 tab or the Secure Data 2 tab or both, it is considered to be a secure field.
Note: Passport and visas, and the expiry date of those visas would still be visible to users who do not have access to the secure data. Just the passport and visa numbers will not be visible to users without security access to this data.
Profile Display Options
Optimization
Select the Enable Resource Optimization option to enable the system to publish the messages that are necessary for Resource Optimization. If this check box is deselected, the optimization messages will not be published, even if the messages are active.
Note: Messages must be activated before they can be published.
Capacity Planning Setup - Default UOM Display
Capacity Planning Setup - Default Capacity Planning Region
Capacity Planning Setup - Unit of Measure Conversions
| Standard Hours per Work Day |
Displays the number of hours that equal one full work day. The standard hours per work day are specified on the Resource Setup - Common Installation Options page. See Setting Up Resources. |
| Standard Work Days per Month |
Enter the number of work days that equal one full month for the purpose of planning capacity. |
| Work Days to Full Time Resource |
Enter the number of days per month that equal one full-time resource for the purpose of planning capacity. Typically this value is the same as the standard work days per month. |
Services Procurement Installation Options Page
Use the Services Procurement Installation Options page (INSTALLATION_SP) to define Services Procurement installation options.
Image: Services Procurement Installation Options page
This example illustrates the fields and controls on the Services Procurement Installation Options page. You can find definitions for the fields and controls later on this page.
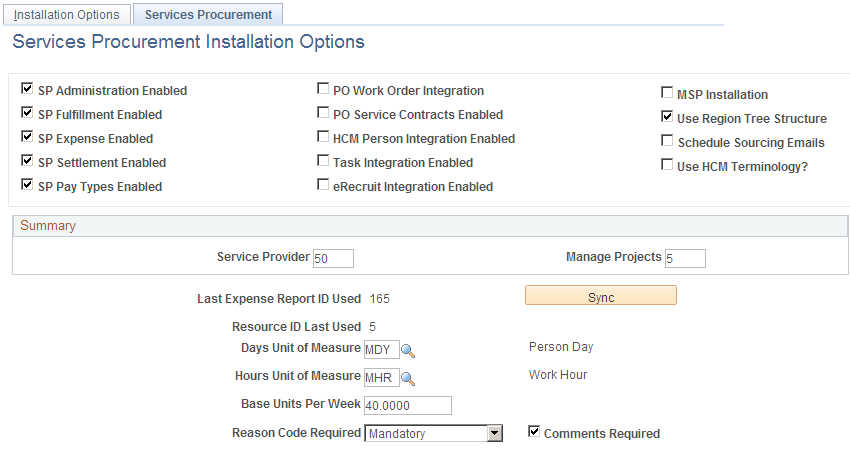
Warning! If your organization uses PeopleSoft Customer Relationship Management and Services Procurement, the source tables containing the PERSON_ID field are not integrated in this release of Services Procurement. Depending on how you implement the use of PERSON_ID in Services Procurement, the values in one table may override the values in the other table.
Installation Options - Staffing Installation Page
Use the Installation Options - Staffing Installation page (INSTALLATION_FO) to define Staffing Front Office and Pay/Bill Management installation options.
Note: This page is shared by Staffing Front Office and Pay/Bill Management. Some of the options are common to both applications and some apply only to either Staffing Front Office or Pay/Bill Management.
Image: Staffing Installation page (1 of 2)
This example illustrates the fields and controls on the Staffing Installation page (1 of 2). You can find definitions for the fields and controls later on this page.
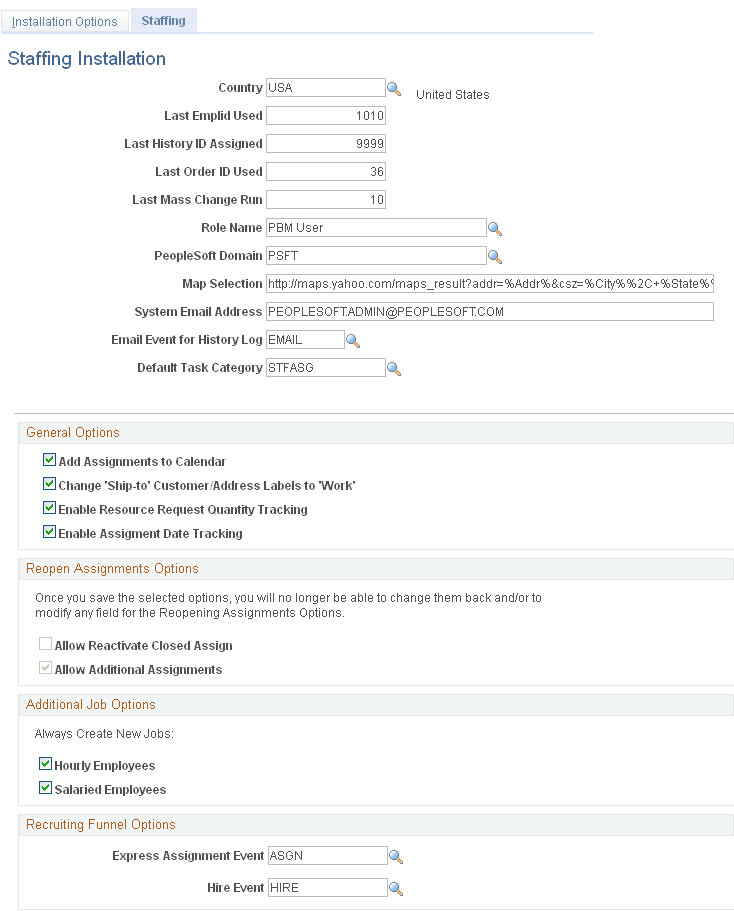
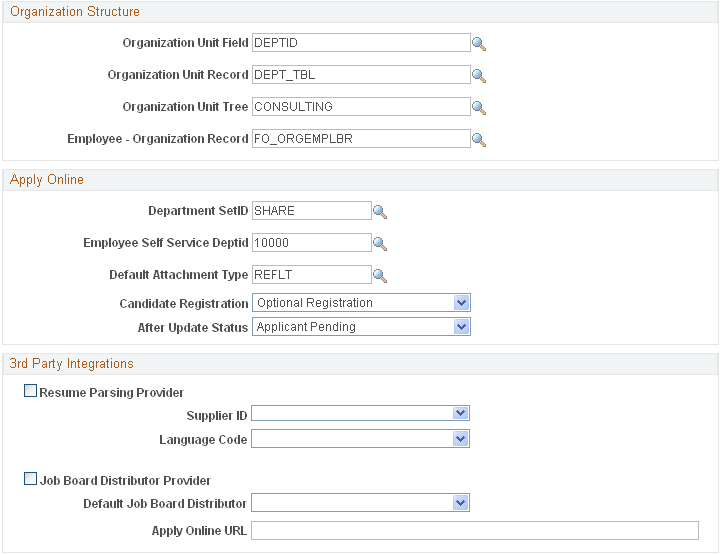
Image: Staffing Installation page (2 of 2)
This example illustrates the fields and controls on the Staffing Installation page (2 of 2). You can find definitions for the fields and controls later on this page.
Review the information in the Installation Options table before completing any transactions in the system. The installation options table is global, not driven by setID. It has only one row of data.
Note: The four organization structure fields are necessary when using Staffing Front Office and when using resource groups to narrow the criteria of PeopleMatch and PeopleSearch. The page shown provides an example of how to populate these fields using a department tree.
| Country |
Select the default country for Staffing Front Office and Pay/Bill Management. The system uses the entry in this field as a default for formatting addresses on multiple pages throughout these two applications. |
| Last Emplid Used(last employee identifier used) |
Enter the last employee ID that was given to an employee when hired into Staffing Front Office. This field is only used when Staffing Front Office is installed but Pay/Bill Management is not. If Pay/Bill Management is installed, a similar field from HRMS is used for this purpose. |
| Last History ID Assigned |
Enter the last history ID number used for creating history items in Staffing Front Office. |
| Last Order ID Used |
Enter the last order ID used to create orders in Staffing Front Office, Pay/Bill Management, and Resource Management. These three applications share the same order tables and follow the same automatic numbering logic. |
| Last Mass Change Run |
Enter the last number used for the Mass Assignment Rate Change Request process. |
| Role Name |
Select the user role for those who will have manager access to the Review Agenda/History process. |
| PeopleSoft Domain |
Enter the domain name if you are using 3rd party integrations. This field defines the PSFT domain for mapping processes with 3rd party suppliers. |
| Map Selection |
Enter the URL string used for mapping addresses. For example: http://maps.mapapplication.com/maps_result?addr=%Addr%&csz=%City %%2C+%State%%2C+%Postal%&country=%Country%&new=1&name=&qty= You must use these values in your string, regardless of what mapping software you use: %Addr%, %City%, %State%, %Postal%, and %Country%. The system uses these variables when launching the map within the Customer component. |
| System Email Address |
Enter a generic email address to be used when sending system emails. |
| Email Event for History Log |
Select an event that the system uses when a user logs a history item for sent emails. |
| Default Task Category |
Select a task category that the system uses when assignments are created in the resource calendar. |
General Options
Reopen Assignments Options
Additional Job Options
These options apply only when Pay/Bill Management is installed. They enable you to choose to have your system reuse employee job records across different assignments or to always create a new employee job record for each assignment. Even if you decide to reuse job records across assignments, the system still provides the option to power users to force the creation of an additional job for one specific assignment when needed.
When Staffing Front Office is installed but Pay/Bill Management is not, the application will use employee job record number 0 (zero) for all assignments.
Recruiting Funnel Options
Setting up these options allows you to integrate the onboarding process with the assignment and hire process. From the Recruiting Funnel, Candidate Summary page, the system can automatically bring up the Assignment Header or the Applicant – Contact Information page by adding an event type.
Organization Structure
These options apply only when Staffing Front Office is installed. They capture information about the tree used to define resource groups. Resource groups can be used to narrow the search criteria in PeopleMatch and PeopleSearch. You can use a tree by candidate department ID or location code to define resource groups.
- Organization Unit Field
-
Enter the name of the field that will be used to join with the Organization Unit Tree.
- Organization Unit Record
-
Enter the table that contains the valid values and descriptions for the organization unit field you entered in the Organization Unit Field field.
- Organization Unit Tree
-
Enter the name of the tree to use to define your resource groups.
- Employee - Organization Record
-
Enter the record that tracks the organizational unit to which the resource belongs through the specified Organization Unit Field.
Apply Online
These options appear only when Staffing Front Office is installed. The functionality is not available when only Pay/Bill Management is installed.
3rd Party Integrations
Sourcing Installation Options Page
Use the Sourcing Installation Options page (INSTALLATION_AUC) to use to set up award details bid display options and multichannel framework sourcing defaults.
Image: Sourcing Installation Options Page
This example illustrates the fields and controls on the Sourcing Installation Options page . You can find definitions for the fields and controls later on this page.
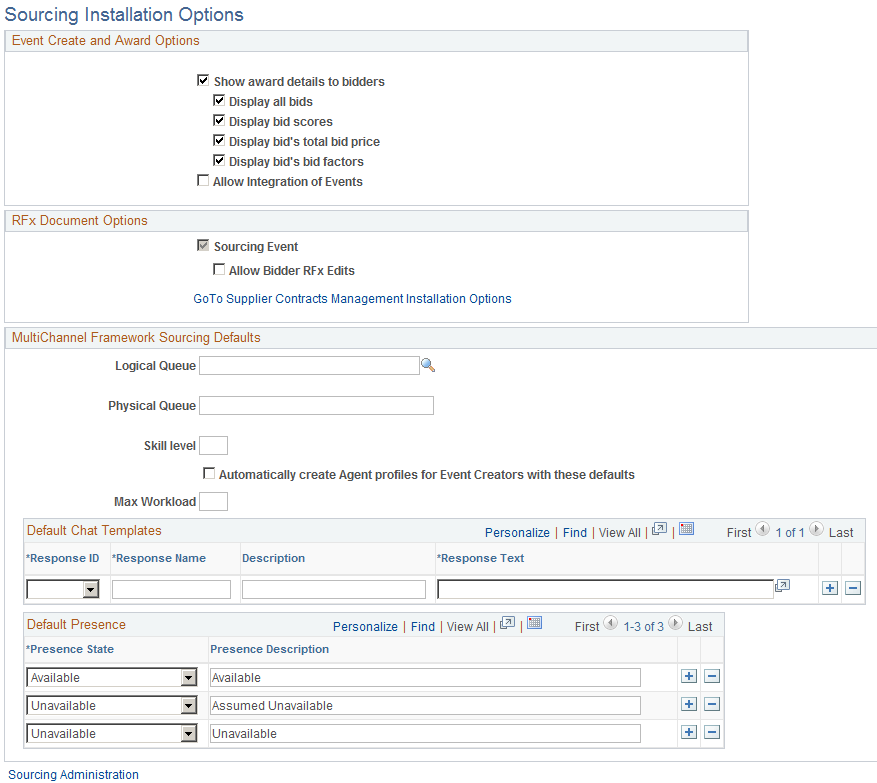
Event Create and Award Options
| Allow Integration of Events |
Select to allow posting of events to third-party sites. When selected, you will be able to configure third party integration of events for a Sourcing Business Unit. |
RFx Document Options
| Sourcing Event |
Select to enable the use of Supplier Contracts to create an RFx document. |
| Allow Bidder RFx Edits |
Select if the bidder is allowed to edit the RFx document. |
MultiChannel Framework Sourcing Defaults
See the product documentation for PeopleTools: PeopleSoft MultiChannel Framework.
Installation Options - Supplier Contract Management Page
Use the Installation Options - Supplier Contract Management page (INSTALLATION_CS) to set up Supplier Contract Management installation options.
Use this page to define servers, server paths, compare and render options, searching, syndication options, and required approvals.
Server Path
Use this group box to define default server locations for use in the file creation processes within Supplier Contract Management.
Document Compares & Rendering
Use this group box to define default settings when you want to enable server-side Microsoft Word processing. This includes comparisons of the current contract document with a temporarily created version of the same Microsoft Word document. You create the temporary version using the Regenerate or Refresh button on the Document Management page. Also, you can optionally create a Microsoft Word .doc template version of the Extended Markup Language (XML) generated documents to send to suppliers who might be using a version of Microsoft Word prior to Microsoft Word 2003. In each of these cases, system processing must render a Microsoft Word comparison file or a .doc template file for the server.
Search Parameters
Use this group box to specify search options. Supplier Contract Management uses PeopleSoft Search Technology to perform content searches on elements in the library. For example, you can search clauses and sections, the latest versions contract document content, and transactional-related contract data for purchasing contracts.
| Chunk Size |
Enter the number of returned rows that you want to retrieve and display when you perform a search. If you do not enter a value, the system retrieves 20 rows at a time. |
Processing Options
Use this group box to define processing options for syndication and contract documents. Syndication is the exchange of contract information between PeopleSoft contracts and third-party systems. Using syndication, the system publishes contract information from Purchasing contracts to third-party systems. This enables the third-party system to create the contract. Using syndication, the system can also receive and consolidate contract performance information from third-party systems.
The syndicate options control additional information that the system might publish with the contract. Depending on the capabilities of the remote system as well as the consistency of setup data between the two systems, you might not want to syndicate this optional information.
The default value for all check boxes in this group box is deselected.
Approvals Required
Use this group box to define high-level information for supporting collaboration workflow and approvals.
Installation Options - Treasury Page
Use the Installation Options - Treasury page (INSTALLATION_TR) to define integration options for accounting, JD Edwards General Ledger, and PeopleSoft Financial Gateway functionality.
Image: Installation Options - Treasury page
This example illustrates the fields and controls on the Installation Options - Treasury page. You can find definitions for the fields and controls later on this page.
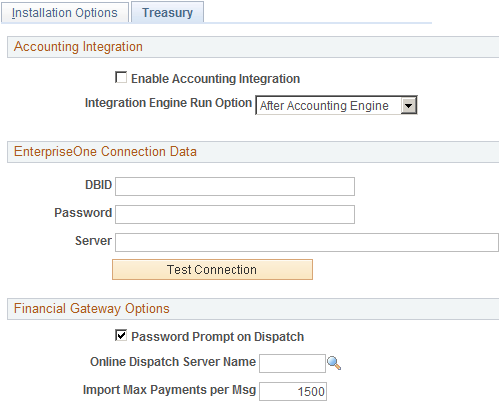
EnterpriseOne Connection Data
The fields in the EnterpriseOne Connection Data group box are required only for importing data from Oracle's JD Edwards (EnterpriseOne) General Accounting tables for the purpose of generating a cash position worksheet in Enterprise Cash Management.
See JD Edwards EnterpriseOne Application Integrations with PeopleSoft Enterprise Applications.
Financial Gateway Options