
Compute node provisioning is a complex orchestrated process involving various configuration and installation steps and several reboots. Due to connectivity fluctuations, timing issues or other unexpected events, a compute node may become stuck in an intermittent state or go into error status. The solution is to reprovision the compute node.
Reprovisioning is to be applied only to compute nodes that fail to complete provisioning.
For correctly provisioned and running compute nodes, reprovisioning functionality is blocked in order to prevent incorrect use that could lock compute nodes out of the environment permanently or otherwise cause loss of functionality or data corruption.
Reprovisioning a Compute Node when Provisioning Fails
Log in to the Oracle PCA Dashboard.
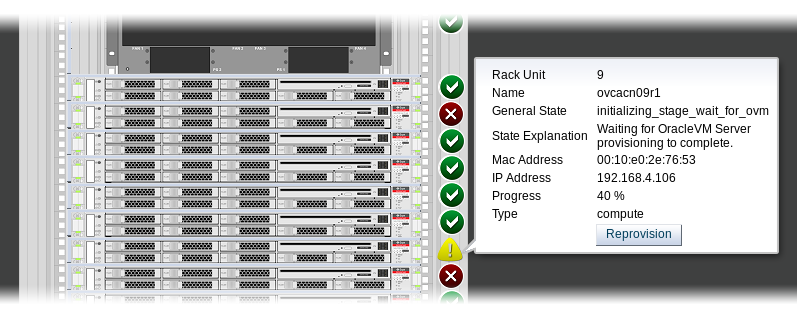
Go to the Hardware View tab.
Roll over the compute nodes in Warning or Error status.
A pop-up window displays a summary of configuration and status information.
If the compute node provisioning is incomplete and the server is in error status or stuck in an intermittent state for several hours, click the Reprovision button in the pop-up window.
When the confirmation dialog box appears, click OK to start reprovisioning the compute node.
If compute node provisioning should fail after the server was added to the Oracle VM server pool, additional recovery steps could be required. The cleanup mechanism associated with reprovisioning may be unable to remove the compute node from the Oracle VM configuration. For example, when a server is in locked state or owns the server pool master role, it must be unconfigured manually. In this case you need to perform operations in Oracle VM Manager that are otherwise not permitted. You may also need to power on the compute node manually.
Removing a Compute Node from the Oracle VM Configuration
Log into the Oracle VM Manager user interface.
For detailed instructions, see Section 4.2, “Logging in to the Oracle VM Manager Web UI”.
Go to the Servers and VMs tab and verify that the server pool named
Rack1_ServerPooldoes indeed contain the compute node that fails to provision correctly.If the compute node is locked due to a running job, abort it in the Jobs tab of Oracle VM Manager.
Detailed information about the use of jobs in Oracle VM can be found in the Oracle VM User's Guide. Refer to the sections entitled Jobs Tab and Working with the Jobs Framework.
Remove the compute node from the Oracle VM server pool.
Refer to the Oracle VM User's Guide and follow the instructions in the section entitled Removing an Oracle VM Server from a Server Pool.
Delete the compute node from Oracle VM Manager.
Refer to the Oracle VM User's Guide and follow the instructions in the section entitled Deleting Oracle VM Servers from Oracle VM Manager.
When the failing compute node has been removed from the Oracle VM configuration, return to the Oracle PCA Dashboard, to reprovision it. If the compute node is powered off and reprovisioning cannot be started, power on the server manually.