Introducing Pick Slip Generation

Purpose: Pick Slip Generation controls the warehouse workload by determining the volume and type of orders to print. This program allows you to print pick slips as needed.
Pick slip generation:
• Selects the order detail lines to include on pick slips
• Determines whether to split orders into separate pick slips based on cubing and other criteria
• Performs credit card authorizations
• Reserves stock at the item/location level if it is already reserved in order entry at the item/warehouse level or, using batch reservation, reserves stock which is not reserved in order entry
• Groups authorized pick slips into spool files for printing
Reservation freeze? Pick slip generation also evaluates the status of the Reservation freeze field for an item warehouse, the Reservation freeze flag and the Physical freeze flag for an item location, and the Frz (Freeze) field for a warehouse location. If there is a freeze at any level, pick slips will not print. Instead, the system prints the Item Stock Allocation Error Report listing the items that were ordered but not picked and the reason why the inventory was not picked.
Picks not included? If you run pick slip generation and the system does not include the picks you were expecting, you can use Pick Print Eligibility (WPPE) to determine the reason why the picks for an order were not included.
In this topic:
• Selecting Order Lines for Pick Slip Generation
• System Control Values that Apply to Pick Slip Generation
• Available Pick Slip Generation Documents
• Assigning a Pick Control Number to the Master Pick Slip
• Confirming the Master Pick Slip
• Separating QuickPick Pick Slips from Regular Pick Slips
• Let Down Replenishment Setup
• Let Down Replenishment Processing
• Performing Batch Reservation
• Generating Pick Slips for Reserved Stock
• Billing Gift Certificates and Pre-Billable Items
• Examples of Cart/Bin Picking with Cubing and without Cubing
• Printing SmartPost Pick Slips
• Determining Which FedEx SmartPost Label to Print on the Pick Slip
• Sample SmartPost Pick Slip Contents
• Item Stock Allocation Error Report
• Batch Pull Sheet Item Summary Report
• Pick Slip Generation Analysis Report
Selecting Order Lines for Pick Slip Generation

Purpose: The system prints pick slips based on:
• Order information (the system generates pick slips only for open orders).
• Selection criteria defined in Working with Pick Slip Generation (WPSG).
• System Control Values that Apply to Pick Slip Generation
The system prints pick slips, pull sheets and possibly a report or batch item pull label. Pick slips sort by warehouse zone and order number, whereas pull sheets sort by warehouse zone, location and picking sequence. Pick slips can include one item and several locations for picking.
The system can print a report along with the pick slips and pull sheets. The type of report depends on your current operating environment; see Available Pick Slip Generation Documents.
Retail pickup and delivery orders: Before generating a pick slip for a retail pickup or delivery order, the system first submits a status inquiry request to Locate to confirm that the order has not been canceled. See Fulfilling Retail Pickup and Delivery Orders in CWDirect for background.

During Pick Slip Generation, the system checks the arrival date for each line on an order to determine when to print the pick slip.
Arrival Date - (Pick Processing Days + Transfer Lead Days + Lead Days) < or = Today's Date.
The system generates picks slips if this system-calculated date is less than or equal to today's date; otherwise, the system holds the printing of the pick slips until the date is within the allotted time frame.
Fields used in the arrival date calculation:
Arrival date is the date when the customer wants to receive the order. This date controls whether inventory is reserved and pick slips printed immediately.
See Reviewing Reservation Types.
Pick processing days is a system control value that represents the number of days it takes your company, on average, to pick, pack, and ship an order. This is your internal lead time. The system uses this number to determine when to generate a pick slip.
Transfer lead days represents the number of days it takes to ship the order from the drop point. This may be a centralized warehouse (if you must ship from one warehouse to another) or a drop point (which is a place where another shipper picks up the package and delivers it to its destination to save shipping charges).
The transfer lead days is defined in the Warehouse Drop Point record (see Fulfillment Editing Warehouse Drop Points (EWDP)).
Lead days represents the number of days it takes a shipper to deliver the order to its destination. The SCF represents the first 3 positions of the destination postal code.
System Control Values that Apply to Pick Slip Generation
System Control Value |
Description |
Defines the name of the program that prints pick slips. |
|
Defines the name of the program that is used to print batch pull sheets. |
|
Defines the name of the program that is used to print cart/bin batch pull sheets. |
|
Indicates if the system allocates inventory from specific warehouse locations or exclusively from the primary location. |
|
If you have this system control value set to Y, the system prints the Batch Pull Sheet Item Summary Report. |
|
Defines the name of the program that sorts the pick slips; see Sorting Pick Slips. |
|
Indicates whether you are sorting gift pick slips separately from non-gift pick slips. |
|
Indicates whether you are sorting foreign pick slips separately from domestic pick slips. |
|
Generate Coordinate Groups at Pick Gen for Ship Complete Orders (E10) |
Defines whether the system assigns coordinate groups to items on a ship complete order during pick slip generation. |
Defines if the system checks whether items that are assigned the same coordinate group code are part of a set before determining if a pick slip can be generated. |
|
Defines whether single-line picks break into separate cart/bin pull sheets based on location zone. |
|
Defines whether pick generation prints two extra pick control labels for a pick slip. |
|
If you have this system control value set to Y, the system does not print a pick ticket for an order when items on the order create item stock allocation errors. |
|
If a print program name has been defined in this system control value, the system prints a Batch Item Pull Label for each item/location in the pick slip batch. |
|
Defines whether to load the location codes for a pick slip to the Picking sequence array field in the Pick Sort GH file, for use in sorting pick slips. |
|
Defines whether to update the Order combination type field during order entry. Order combination type can be used as a criterion for pick slip generation when you want to print pick slips for items belonging to one or more long SKU classes. |
|
Indicates whether to assign pending invoice numbers to qualifying orders at pick slip generation. |
|
Indicates if the system generates price tickets during pick slip generation for retail store orders. |
|
Defines whether the system performs QuickPick Zone processing. The value you enter in this field represents the zone the system treats as the QuickPick zone during pick slip allocation and printing. See QuickPick Zone Processing. |
|
The pick slip generation job generates Gift Acknowledgements for gift orders if this system control value is set to P and the customer is not eligible to receive a shipment confirmation email, as described under Shipment and Return Confirmation Emails. |
|
Pick slip generation also triggers replenishment if the Let Down Replenishment (C36) system control value is set to REPORT or RPT/EXEC. See Warehousing Replenish Primary Locations Overview. |
|
The date to use when determining whether to override the ship via on a pick slip based on a special shipper override in pick slip generation. |
|
Cubing System Control Values See Performing Cubing for an overview. |
|
Enter Y in this field if you want the system to perform cubing during Pick Slip Generation. |
|
|
|
|
|
Cart Bin Picking System Control Values See Using Cart/Bin Picking for an overview. |
|
Enter Y in this system control value to indicate that you wish to use the cart bin picking feature to generate pick slips and pull sheets during pick slip generation. |
|
Enter Y in this system control value to sort picks in a batch by the pick sequence number defined in the Pick sequence number field in Work with Locations (WLOC). |
|
Enter the cubic volume of the smallest bin in a cart. |
|
Enter the total cubic volume of the cart. |
|
Enter the minimum number of picks that can be contained in a cart. |
|
Enter the maximum number of single line pick slips to include in a single batch. |
|
Enter the maximum number of multi-line pick slips to include in each batch. |
|
Enter the maximum number of zones (up to six) allowed on a multi-line pick slip before another batch is generated. |
|
Wave Picking System Control Values See Using Wave Picking for an overview. |
|
Enter Y in this system control value if you want the system to generate pick slips using wave picking functionality. |
|
Enter the print program the system uses to print Pick Wave Labels. |
|
Available Pick Slip Generation Documents
Pick Slip Generation Document |
When It Prints |
Pick Slip |
If a print program is defined in the Pick Printing Program (C37) system control value, the system prints pick slips. See Generating Pick Slips for Reserved Stock for more information on how the system determines which pick slips to generate. Also, see Sample Pick Slip Contents for a description of the information that prints on a pick slip. |
Replenishment Transaction Reports |
If you have set the Let Down Replenishment (C36) system control value to print reports, you can print Replenishment Transaction Reports using the Replenish Primary Locations menu option. See Warehousing Working with Replenishment Control (MSRP). |
The system generates this list when you generate pick slips, if you are Using Cart/Bin Picking. |
|
If an order detail line cannot be picked, the system prints an Item Stock Allocation Error Report which lists the units of inventory that were ordered but not picked and the reason why the inventory was not picked. |
|
If you have the Print Batch Pull Sheet Item Summary (C59) system control value set to Y, the system prints the Batch Pull Sheet Item Summary Report. |
|
If a print program name has been defined in the Batch Item Pull Label Printing Program (F63) system control value, the system prints a Batch Item Pull Label for each item/location in the pick slip batch. |
|
If you have the Use Wave Picking (J87) system control value set to Y, the system prints the Wave Summary Report. |
|
If you have the Use Wave Picking (J87) system control value set to Y and a print program defined in the Pick Wave Label Print Program (J88) system control value, the system prints a Pick Wave Label for each location/SKU/pick control number in a pick wave. |
|
The system always generates the Pick Slip Generation Analysis Report, which lists each order evaluated for pick slip generation, providing information on whether the order was selected and, if not, the reason for exclusion. |
|
The system always generates the Pick Unit Report, which summarizes the number of pick slips, units, and total dollar value of single-line and multi-line pick slips. Note: The system does not generate this report if the Use Wave Picking (J87) system control value set to Y. |
|
The system generates this report if you perform authorization during pick slip generation. The system produces two versions of the report: one includes declines, and one includes authorized pick slips; see Reviewing Authorizations for an overview. |
Drop ship items are items that you do not stock in inventory. When a customer orders a drop ship item, you order the item from your supplier (vendor). The vendor ships the item directly to your customer.
System Control Values for Drop Ship Pick Slips
System Control Value |
Description |
Indicates whether the price, the extended price, merchandise total, freight, handling, and additional charges print on drop ship pick slips. |
|
Indicates whether drop ship picks will be limited to printing one detail line (item) per pick slip. |
|
Determines the amount to authorize for drop ship purchase orders and drop ship pick slips. |
|
Defines whether the system prints out a separate drop ship invoice for each ship alone item on an order. |
|
Defines the name of the print program the system uses when drop ship pick slips are printed. |
|
Defines whether the system displays drop ship items as backordered on the regular pick slip even after a drop ship pick slip or purchase order has been generated for the drop ship item. |
|
CWCollaborate System Control Values See Drop Ship Integration Values Screen (H20) for a list of the system control values related to the CWCollaborate interface. |
|
Pick label: If you use multiple pick label tracking with a PC manifesting system, the system will produce only one label for a drop ship pick slip. See the Use Pick Label Tracking in Manifest Interface? (D48) system control value and Selecting Vendors for Drop Ship Processing (MDSP).
DROPSHIP Authorization Records in W Status
A pop-up window displays when you select to generate pick slips if a drop ship work record exists for a drop ship order paid with a credit card and the credit card did not receive an approved authorization during drop ship processing due to transmission failure.
The system creates a record in the Drop Ship Work file when you process drop ship orders. The record remains in the Drop Ship Work file until the corresponding authorization transaction in the CC Authorization Transaction file receives an approved authorization. The drop ship output (pick slip or purchase order) is not produced until the credit card on the order receives an approved authorization.
When you receive this pop-up window during pick slip generation, you can either:
• press F9 to generate pick slips without first re-sending the drop ship order for authorization. When you generate pick slips, the system sends all authorization records in the CC Authorization Transaction file to the authorization service for authorization, including the authorization transaction associated with the drop ship order. If you do this, a record remains in the Drop Ship Work file for the drop ship order, but the corresponding authorization record no longer exists in the CC Authorization Transaction file. To generate drop ship output for the drop ship order, you need to delete the record from the Drop Ship Work file and process drop ship orders again. Note: When you process drop ship orders again, the system sends an authorization transaction to the authorization service for the drop ship order that was stranded in the Drop Ship Work file. You will need to make sure that you do not receive a double authorization for the drop ship order since the authorization transaction associated with the drop ship order was sent to the authorization service when you ran pick slip generation.
Note: You will continue to receive this pop-up window when you generate pick slips until you delete the record in the Drop Ship Work file.
• press F11 to return to the Work with Pick Slip Generation Options Screen without generating pick slips. You can verify with the authorization service whether the drop ship authorization was received.
• If the authorization was received by the authorization service, use the Reprocess Drop Ship Authorizations Screen (RPDS) to receive the authorization file. If the drop ship order receives an approved authorization, the system generates the drop ship output (pick slip or purchase order) and deletes the record from the Drop Ship Work file.
• If the authorization was not received by the authorization service, check the CC Authorization Transaction file to verify that only the authorization transaction for the drop ship order exists. Then, use the Reprocess Drop Ship Authorizations Screen (RPDS) to resend the drop ship authorization transaction for authorization. If the drop ship order receives an approved authorization, the system generates the drop ship output (pick slip or purchase order) and deletes the record from the Drop Ship Work file and CC Authorization Transaction file. Note: If authorization transactions exist in the CC Authorization Transaction file for non-drop ship orders, the system sends the authorization transactions to the authorization service when you reprocess drop ship authorizations.
DROPSHIP Auth records in 'W' status. Press F9 to accept error and continue, F11 to exit processing.
F9=Accept F11=Reject |
Screen Option |
Procedure |
Continue to generate pick slips without correcting the drop ship error |
Press F9. The system sends all records in the CC Authorization Transaction file to the Authorization Service, including the authorization associated with the drop ship order. |
Return to Work with Pick Slip Generation without generating pick slips |
Press F11. The system returns you to the Work with Pick Slip Generation Options Screen allowing you to correct the drop ship error before generating pick slips. |
For more information: See Selecting Vendors for Drop Ship Processing (MDSP) for more information on processing drop ship orders.
You can print a master pick slip for a multi-recipient order if:
• the Master carton label field in the Order Header file is set to Y. If you are entering a business to business order, you can enter Y in the Master carton field on the Work with B2B Order Screen.
• you generate pick slips for master label orders only (the Master label orders only pick slip generation option is set to Y). See Working with Pick Slip Generation (WPSG), for more information on selecting to generate pick slips for master label orders only.
In this situation, the system prints a master pick slip that displays the sold-to customer's name and address and the order totals across all ship-to customers. The system also prints separate pick slips that display the sold-to customer's name and address, the ship-to customer's name and address, the items being shipped to the ship-to customer, and the order totals for the ship-to customer. Each pick slip is assigned a pick control number.
Assigning a Pick Control Number to the Master Pick Slip
When you generate pick slips for master label orders only, the system assigns the master pick slip the second pick control number defined for the pick slip generation run.
The system also updates the Master label field and the Part of master label field in the Pick Control Header file when you generate pick slips for master label orders only. If the pick control number represents the master pick slip, the system updates the Master label field to Y. If the pick control number is part of a master label orders pick generation run, the system updates the Part of master label field to Y.
Example: Master label orders only
You generate pick slips for order #3442 using the Master label orders only pick slip generation option. The order contains 3 ship-to customers and the Master carton label field for the order is set to Y.
In this situation, the system generates 4 pick slips:
• 3442-1 (master pick slip)
• 3442-1
• 3442-2
• 3442-3
Each pick slip is assigned a pick control number:
• 3442-1 (master pick slip) = pick control number 2026
• 3442-1 = pick control number 2025
• 3442-2 = pick control number 2027
• 3442-3 = pick control number 2028
This table shows how the system assigns the pick control number to the master pick slip using the information in the example.
Order/ship to |
Pick control # |
Master carton # |
Master label? |
Part of master label? |
3442-1 |
2026 |
2026 |
N |
Y |
3442-1 |
2025 |
2026 |
Y |
Y |
3442-2 |
2027 |
2026 |
N |
Y |
3442-3 |
2028 |
2026 |
N |
Y |
Confirming the Master Pick Slip
You can use the master pick slip to confirm all of the pick slips that were generated in the pick slip run at one time if the Hold Invoices for Multi-Recipient Orders (G07) system control value is set to Y.
When you confirm the pick control number that represents the master pick slip, the system:
• submits each pick slip that was generated in the pick slip run to Billing.
• creates an invoice for each pick slip.
• closes the order.
If you confirm a pick control number that does not represent the master pick slip for the order, the system:
• places the pick slip in a B (billing pending) status.
• does not create an invoice.
• keeps the order in an open status.
• writes an order transaction history message indicating that the pick slip has been confirmed.
If the Hold Invoices for Multi-Recipient Orders (G07) system control value is set to N, you cannot confirm the pick control number that represents the master pick slip. Instead, you must confirm each pick control number separately or confirm by the billing batch number associated with the pick slip run.
As you confirm each pick slip, the system:
• submits only the pick slip associated with the pick control number to Billing.
• creates an invoice for the pick slip.
• closes the order for the specific ship to customer if all of the items the ship to customer was expecting to receive have been shipped. All other pick slips that were generated in the pick slip run are still available to confirm and the order remains in an open status for each of the other ship to customers.
An order may split into several pick slips for any of the following reasons:
• Different warehouse: An item on the order is in a different warehouse than other items on the order
• Different ship via: An item on the order is assigned to a different ship via than other items on the order
• Special handling/personalization: An item on the order requires special handling or personalization
• Stored value card: An item on the order is flagged as a physical stored value card; see Stored Value Card Purchase and Activation
• Ship alone: An item on a multi-line order is flagged to ship alone
• Hazardous: An item is flagged as hazardous
• Location class: An item or SKU has a different location class than other items on the order
• Cubing: The system is performing cubing to determine how many cartons will be required to ship the order
You can specify that you want to print pick slips for complete orders only, single-line orders only, or multi-line orders only and you can specify that you do not want to split orders which include special handling items.
See Working with Pick Slip Generation (WPSG), for more information on selection criteria for pick slips.
Which Location Class Should Be Used to Split an Order?
CWDirect uses the location class defined at the SKU level to determine if an order should split into several pick slips if you generate pick slips using a pick slip template that has the Selected location classes field set to Y. If you generate pick slips using a pick slip template that has the Selected location classes field set to N, CWDirect only uses the location class defined at the item level to determine if an order should split into several pick slips.
If a SKU has a location class defined in the Pick SKU Location Class Override file and you generate pick slips using a pick slip template that has the Selected location classes field set to Y, the system uses the location class defined at the SKU level to determine if an order should split into several pick slips. If the SKU does not have a location class defined, the system uses the location class defined at the item level to determine if an order should split into several pick slips. You can assign a SKU to a location class at the SKU Location Class/Picks Screen. You can assign an item to a location class at the Create Item Screen.
Example: The following location classes are assigned to item ABC.
Item/SKU |
Location class at item level |
Location class at SKU level |
ABC RED SMLL |
S1 |
S2 |
ABC GRN LRGE |
S1 |
S3 |
ABC BLUE MEDM |
S1 |
|
ABC YELW XLRG |
S1 |
S2 |
In this example,
• if you generate pick slips for the selected location classes S1, S2, and S3, items ABC RED SMLL, ABC GRN LRGE, ABC BLUE MEDM, and ABC YELW XLRG print on pick slips. The order splits into several pick slips: 1 pick slip contains ABC BLUE MEDM, 1 pick slip contains ABC RED SMLL and ABC YELW XLRGE, and 1 pick slip contains ABC GRN LRGE.
• if you generate pick slips for the selected location class S1, only item ABC BLUE MEDM prints on a pick slip.
• if you generate pick slips for the selected location class S2, only items ABC RED SMLL and ABC YELW XLRG print on a pick slip.
• if you generate pick slips for the selected location class S3, only item ABC GRN LRGE prints on a pick slip.
Purpose: One way the system decides which items are selected for picks is by using the cubing feature. To use the Cubing feature, you must define a Cube value for each item/SKU you wish to perform cubing for and set the Perform Cubing? (B36) system control value to Y.
During cubing, the system checks the cubing value of a carton, and determines how many items can ship in a single carton. If more than one carton is needed, the system:
• Re-evaluates each carton in relation to the overall cubic value of the items on the pick slip.
• Ensures that the minimum number of cartons is used.
• Packs the cartons in the most efficient way, maximizing the carton space to include the most items possible.
• Generates a pick slip for each carton required for the order.
System Control Values that Apply to Cubing
System Control Value |
Description |
Y = indicates that you want the system to perform cubing during pick slip generation. N = indicates that you do not want the system to consider the dimension of the item when determining the number of pick slips to print. |
|
The maximum weight that a carton can hold. If Perform Cubing? (B36) has been set to Y, the system uses this value to determine the total number of items, based on the total weight, that can ship in one carton. |
|
The maximum cubic value for a carton. If Perform Cubing? (B36) has been set to Y, the system uses this value to determine the number of items that can ship in one carton. The value can represent an actual cubic value of a standard carton size, or it can represent a relational value between an item and a box. |
Cubing an Order
During pick slip printing, the system “cubes” the order into multiple pick slips. The system:
1. Creates carton #1 for the order.
2. Places the first unit of the first item being shipped in this carton.
3. Loads the cube value of the item (as defined in the Item/SKU file) as the total cube value for the carton, and the weight of the item as the total weight in the carton.
For each subsequent unit of every item being shipped, the system:
1. At carton #1, adds the cube value of the item to the total cube value already in the carton.
• If the new total cube value for the carton exceeds the Maximum Cube Value for a Carton (B45), the system proceeds to the next carton. If not, the system adds the weight of the item to the total weight already in the carton.
• If the new total weight exceeds the Maximum Weight of a Carton (B46), the system proceeds to the next carton. If not, the unit is placed in carton #1 and the system increases the total cube value and the total weight of the carton.
2. Repeat step 1 for each additional carton which has been created for the order. If all the existing cartons have been checked and the unit cannot fit in any of them, the system creates a new carton and places the unit in this carton.
Once these steps are complete for each order, the system creates one pick slip (and one pick control number) for each carton required. The system will cube a single order into a maximum of 999 cartons; however, if the order is too big to fit in 999 cartons, all the overflow is loaded into carton number 999.
Purpose: The system supports batch authorizations during pick slip generation.
Rules and procedures that apply to batch authorizations:
• Regulations require that the vendor authorizes the correct amount and does not authorize without being able to ship the order; therefore, the system authorizes credit cards for only the amount that can actually be reserved and shipped.
• Credit cards should not be reauthorized on a continual basis; therefore, the system does not reauthorize credit cards continually.
• All authorization transactions will be stored for historical purposes and are available for display in Order Inquiry.
During pick slip generation, orders with any credit card payment type will be processed for authorization.
The Authorization file is electronically transmitted to the authorization service.
If using CWIntegrate, the system generates an Authorization Request XML Message (CWAuthorizationRequest) and sends the message to the outbound MQ queue defined for the Batch Credit Card Authorization integration layer job in Working with Integration Layer Processes (IJCT) to send to the CWIntegrate site that translates the transmits batch authorization requests to the service bureau. The CWIntegrate site uses a leased line for transmission to the service bureau. See Processing Authorizations and Deposits using CWIntegrate.
If using a leased line, the file is transmitted automatically. Set the Communication type field defined for the authorization service to L (leased line).
You must purchase a leased line in order to have a direct connection to the authorization service. The system uses the port number and provider network address defined for the authorization service.
If you perform online and batch authorizations and wish to use a modem for batch authorizations and deposits, set the Communication type field defined for the authorization service to D (dial-up/modem connection) or blank. The system does not use the Communication type field for online credit card authorizations. The leased line used for online authorizations is defined in the Online Authorization Socket Server job. If you perform batch and online authorizations, make sure the port number you define for batch authorizations is different from the port number you define for online authorizations.
If using an autodial modem, the file is transmitted automatically. Set the Communication type field defined for the authorization service to D (dial-up/modem connection).
The modem type (auto-dial or manual dial) and telephone number are defined on the iSeries.
If using a manual-dial modem, a message will be sent to the SYSOPR message queue. Set the Communication type field defined for the authorization service to D (dial-up/modem connection).
The system operator must dial the modem telephone number (identified in the message) and answer the message to begin transmitting the Authorization file.
The communications line stays varied on in a *Connect Pending status for services that do not provide immediate turnaround (responses), such as AMEX. Also a message similar to the following is sent to the SYSOPR message queue:
Waiting to receive auths from __________________.s
Options: C or V.
You must wait to receive the authorizations. The amount of time you wait is based on the size of the authorization file plus a certain amount of time before and after transmitting the file.
For example, if transmitting to AMEX, you must figure on waiting 5 minutes before and after sending the file plus waiting a certain amount of time based on the size of the file itself. This means that, although the message to receive the file appears right away, you do not respond to the message with a V to receive the file until the appropriate amount of time has elapsed.
When are pick slips printed? If there are enough orders with pay types other than credit card to fill the pick slip, the pick slip is printed. If there are not enough orders with pay types other than credit card, the system calculates the amount to apply against each payment type and sends a record for each pay type that needs authorization.
All payment types for pick slips must be authorized before the pick slip prints in a single run. If one payment type is authorized and one is not authorized, the successful authorization is retained. If the order goes out for reauthorization within a certain number of days (defined in the Reauthorization days field in the Pay Type file), the original authorization will be used.
If there is a problem with the communications line, credit card picks will not print; however, all other picks will print.
Online credit card authorization: You can generate pick slips for orders with a credit card payment method that has already received an approved authorization by setting the Preauthorized orders only field for the pick slip template to Y.
If this field is set to Y, the system prints pick slips for orders containing pre-paid payment methods, such as cash or check, and credit card payment methods that have been authorized for the entire dollar amount associated with the card.
Any orders containing credit cards that require authorization when the Use Auto Authorization Interface (C14) system control value is set to Y, will be excluded from the pick slip generation run. In order to receive an authorization during pick slip generation, the Preauthorized orders only field for the pick slip template must be set to N. See System Operations Performing Online Credit Card Authorizations for an overview and required set up.
Consolidating invoices: The Consolidated Invoice (B49) system control value controls how invoices are sent. If you choose to consolidate invoices, the system sends one authorization and one bill. If you choose not to consolidate invoices, the system sends one authorization for each pick slip.
Deferred and installment pay plans: If the Auth full amount (Authorize full amount) field for the Flexible Payment Option is set to Y, the full pickable amount is sent for authorization. If this field is set to N, and:
• the order contains an installment payment plan, the first installment amount for the pickable merchandise is sent for authorization.
• the order contains a deferred payment plan, $1.00 is sent for authorization.
Note: If the Authorize full pickable amount field is set to Y, the system submits the full amount of the pick slip for authorization, even though this amount will not be deposited immediately.
AVS response: If the credit card charge is approved (authorized) but the credit card fails the address verification check, the authorization may be placed on hold (based on the value in the Hold reason field in the Vendor Response file). The order header is also placed on AT (declined credit card) hold. You must contact the customer and obtain correct address information, then take the order header and credit card pay type off of hold through the Release Held Orders function and resend for authorization or cancel the order. A pick slip is not generated until the credit card receives an approved authorization and passes AVS verification. See Address Verification Service (AVS).
Deposits: Authorization numbers and authorization amounts should match the deposits. The system pulls the authorization numbers from the authorization history records for the order/payment method to try to match the authorizations and deposits. See System Operations Processing Auto Deposits (SDEP).
Automatic authorization: You can approve all authorizations for a service bureau automatically if you want to avoid waiting for the response file.
This option is available if all of the following are true:
• the Default Vendor Response for Automatic Authorizations (G10) system control value contains a valid response code for the service bureau,
• the Immediate response field for the service bureau is set to N, and
• the user has the required authority, as controlled by the Continue Authorization without Receipt (A90) secured feature.
You might choose automatic authorization if you expect a substantial delay before you receive the authorization file from the service bureau, you want to approve and print pick slips quickly, and the possibility of the orders failing authorization is slight.
Credit cards requiring authorizations less than the automatic authorization dollar threshold: When you perform batch authorization, the system determines if the authorization amount qualifies for automatic authorization.
• If the credit card amount to authorize is less than the dollar amount defined in the $ Threshold for Automatic Authorization # Assignment (K36) system control value and you have defined an authorization number in the Authorization Number for Authorizations Under $ Threshold (K37) system control value, the system does not send the credit card to the service bureau for authorization and instead assigns the authorization number defined in the Authorization Number for Authorizations Under $ Threshold (K37) to the credit card.
• If the $ Threshold for Automatic Authorization # Assignment (K36) or Authorization Number for Authorizations Under $ Threshold (K37) system control value is blank, the credit card amount to authorize is less than $1.00, and you have defined an authorization number in the Authorization Number for Authorizations Under $1.00 (I08) system control value, the system does not send the credit card to the service bureau for authorization and instead assigns the authorization number defined in the Authorization Number for Authorizations Under $1.00 (I08) system control value to the credit card.
• If an authorization number is not defined in the Authorization Number for Authorizations Under $ Threshold (K37) or Authorization Number for Authorizations Under $1.00 (I08) system control value, the system sends the credit card to the service bureau for authorization, regardless of the amount that requires authorization.
Stored Value Card Balance Inquiry: If the Perform Balance Inquiry during Batch Authorizations (J19) system control value is set to Y, the system sends a stored value card balance inquiry request to the service bureau before performing batch authorization against the stored value card.
• If the remaining balance on the stored value card is equal to or greater than the amount to authorize, the system performs batch authorization against the stored value card.
• If the remaining balance on the stored value card is less than the amount to authorize, and:
• The stored value card is the catch-all pay type on the order, the system does not perform batch authorization for the order and does not generate a pick slip for the order. In addition, if a Hold Reason for Stored Value Cards with Insufficient Funds (J18) is defined, the system places the order on hold.
• The stored value card is not the catch-all pay type on the order, the system performs batch authorization for the order to authorize the stored value card pay type for the remaining balance and the catch-all pay type for the remaining authorization amount.
See Batch Authorization Balance Inquiry for more information.
Authorization Inquiry: Batch authorization inquiry allows you to perform an authorization inquiry against a credit card in order to receive a response for an online authorization transaction that did not complete during order entry so that the credit card does not have to go out for authorization during batch authorization.
The system submits an authorization inquiry request before performing batch authorization against a credit card if:
• The Authorization service for the credit card pay type on the order matches the authorization service defined in the Authorization Service for Authorization Inquiries (K29) system control value, and
• The Online Auth Verification Only (I96) system control value is set to N or blank, and
• An authorization history record exists for the credit card pay type on the order that did not receive a response from the service bureau. The system considers an authorization history record open if an associated record exists in the Online Authorization file in a *SENT, *RDY or *RCVD status.
Note: Once an authorization inquiry is processed for an open online authorization, the system will not reprocess the online authorization transaction. If an approved response is not received for the authorization inquiry, the system will send the card out for batch authorization.
Declined authorization inquiry: If the service bureau returns a declined authorization response for the open authorization, the system:
• Updates the record in the Online Authorization file with the values in the response message.
• Updates the status of the integration layer process control record to CMP (Complete).
• Updates the authorization history record for the open authorization transaction. The system updates the Status of the authorization history record to D (Decline) and the Vendor response with the decline reason.
• Continues with batch authorization to authorize the shippable amount on the pick slip or drop ship order.
Approved authorization inquiry: If the service bureau returns an approved authorization response for the open authorization, the system:
• Updates the record in the Online Authorization file with the values in the response message.
• Updates the status of the integration layer process control record to CMP (Complete).
• Updates the authorization history record for the open authorization transaction. The system updates the Status of the authorization history record to A (Authorized) and the Vendor response with the approved reason.
• Determines if the authorized amount on the authorization history record covers the shippable amount on the pick slip or drop ship order.
• If the authorized amount covers the shippable amount, the system continues with regular processing and does not call batch authorization since an authorization is not needed.
• If the authorized amount does not cover the shippable amount, the system continues with batch authorization to authorize the shippable amount on the pick slip or drop ship order, minus the amount that has already been authorized.
See Batch Authorization Inquiry Processing for more information.
Authorization reports: The system produces two versions of the Credit Card Authorization Listing: one includes declines, and one includes authorized pick slips.
For more information: See Using Batch Authorization for more information on authorizing credit cards using batch authorization during pick slip generation.
Defining locations: As the system searches for locations, it will attempt to allocate only from locations defined as “pickable.” The following warehouse location types exist:
Primary: Primary locations are the main picking locations, although a primary location may be defined as pickable or non-pickable. These locations may contain more than one item/SKU.
Pickable primary locations will be filled during replenishment from other locations, based on the setting of the Replenish from Location Type (A66) and Replenish from Primary during Let Down Replenishment (J42) system control values. Item/location records will have min/max values used in the replenishment. Non-reservable primary locations will be excluded from the replenishment system.
Secondary: Secondary locations may be pickable or non-pickable, and they can contain more than one item/SKU.
Pickable secondary locations can be replenished from other locations, based on the setting of the Replenish from Location Type (A66) and Replenish from Primary during Let Down Replenishment (J42) system control values. Item/location records associated with these locations will never be deleted by the system. Pickable and non-pickable secondary locations will be used to replenish primary locations. Non-reservable locations will be excluded from the replenishment system.
Bulk: Bulk locations are used to store overstock quantities. They usually contain case or carton quantities, can be defined as pickable or non-pickable, and can contain more than one item/SKU.
Bulk locations can be replenished automatically only via Primary Location Replenishment Processing. Quantities stored in bulk locations are used to replenish primary or secondary locations. Item/location records associated with bulk locations will be deleted by the system when the on-hand in that location reaches zero. Non-reservable locations are excluded from the replenishment system.
Temporary locations: Temporary locations are assigned by the system or an operator to temporarily store inventory until it can be put away or picked. A temporary location cannot exist without at least one item/location record associated with it. When stock is moved into a temporary location, the system creates an item/location record. When the on-hand in the item/location reaches zero, the system will delete the location and the item/location records. CWDirect will not allocate merchandise from a temporary location even if the location is defined as pickable. In order to allocate stock, you must move the merchandise to a non-temporary, pickable location.
Allocating Stock
The following conditions apply when the system attempts to allocate stock from a warehouse location.
• If you have set aside merchandise by flagging it as non-pickable, the program does not attempt to allocate that stock.
• If multiple primary locations exist, the program attempts to allocate the entire quantity from a single primary location. If the quantity on the pick cannot be allocated in full from a single primary location, the program begins checking the pickable secondary locations and bulk locations (in that order).
• If a case quantity is specified on the pick, the program will begin searching locations to find case quantities. If the customer has ordered a piece quantity, but you stock it in cases in the warehouse, the program will translate the piece quantity to case quantity, if possible. If there is a case and a piece location on the pick, the program allocates the piece quantity from the piece location and the case quantity from a case location.
System control values related to allocating stock:
System Control Value |
Description |
Determines whether the system will consider available inventory in allocating stock, or will allocate from the primary location only. Y = the system will attempt to allocate stock from the first location (primary, secondary, or bulk) with enough inventory to fulfill the order. N = the system will allocate the entire quantity printed on the pick slips from the item's primary primary location regardless of whether there is enough stock in this location. (The “primary primary” location is stored in the Primary loc (Primary location) field in the SKU file.) If there is not enough inventory in the primary location to fulfill the orders, you must run the Replenish Primary Locations program to transfer inventory from secondary and bulk locations to the primary location. See Warehousing Replenish Primary Locations Overview. |
|
Include Bulk Locations in Primary Primary Availability (F87) |
Determines how the system calculates availability. Y = the system includes bulk locations quantity in available pick quantity for the primary primary location. (The “primary primary” location is stored in the Primary loc (Primary location) field in the SKU file.)After you have generated pick slips, you must run the Replenish Primary Locations program to transfer inventory from the bulk location to the primary primary location. See Warehousing Replenish Primary Locations Overview. N = the system does not include bulk locations in calculating primary primary location availability. If this system control value is set to Y, the Check Location Quantities During Pick Generation (C54) system control value must also be set to Y. |
Include Secondary Locations in Primary Primary Availability (F88) |
Y = the system includes the quantity in secondary locations in the available pick quantity for the primary primary location. After you have generated pick slips, you must run the Replenish Primary Locations program to transfer inventory in the bulk location to the primary primary location. (The “primary primary” location is stored in the Primary loc (Primary location) field in the SKU file.) See Warehousing Replenish Primary Locations Overview. N = the system does not include bulk locations in calculating primary primary location availability. If this system control value is set to Y, the Check Location Quantities During Pick Generation (C54) system control value must also be set to Y. |
Enter a code in this field to define whether the system performs QuickPick Zone processing. The value you enter in this field represents the zone the system treats as the QuickPick zone during pick slip allocation and printing. See QuickPick Zone Processing for more information. |
Purpose: If a zone is defined in the QuickPick Zone Identifier (J41) system control value the system performs QuickPick Zone processing during pick slip allocation and printing.
The code you enter in the QuickPick Zone Identifier (J41) system control value must represent a valid zone for a location. This is the Zone field in the Location file, as displayed in the Zone field for a location record in Creating and Maintaining Locations (WLOC).
Typically, the Zone field displays as the first character of the Location field for a location record. However, the first character of the Location field does not have to represent the zone.
Note: The system does not validate that the code you enter in this field is a valid zone; however, if you enter a code that is not a valid zone, the system will never perform QuickPick Zone processing.
The system considers all other zones that do not match the zone defined in the QuickPick Zone Identifier (J41) system control value as regular, or non-QuickPick, zones. For example, if zone A is defined as the QuickPick zone, zones B, C, D, etc. are considered regular, non-QuickPick, zones.
QuickPick zone setup for set and non-inventory items: In order for QuickPick zone processing to work correctly, you should perform the following setup for your set items and non-inventory items.
• Set items (Kit type S): In order to pick a set item from both within and outside the QuickPick zone, you must create two “fake” item locations for the set header: one item location within the QuickPick zone, and one item location outside the QuickPick zone. A primary primary location does not need to be setup. If the set item is only available within the QuickPick zone, then create one “fake” item location for the set header within the QuickPick zone; if the set item is only available outside the QuickPick zone, then create one “fake” item location for the set header outside the QuickPick zone.
• Non-inventory items: For each of your non-inventory items, create two “fake” item locations: one item location within the QuickPick zone, and one item location outside the QuickPick zone. A primary primary location does not need to be setup.
QuickPick Zone Processing
When you generate a pick slip and a zone is defined in the QuickPick Zone Identifier (J41) system control value, the system performs the following steps.
1. The system tries to allocate all of the reserved items on the order from the QuickPick zone.
If the item has multiple item/locations in the QuickPick zone, the system allocates the inventory in the pickable location with enough inventory to fill the line, searching the locations in the following sequence:
• Allocate the inventory from the primary primary location.
• If the primary primary location does not have enough inventory to fill the line (or the primary primary location is not part of the QuickPick zone), allocate the inventory from the first pickable location in alphabetical sequence in the QuickPick zone that has enough inventory to fill the line. The system first searches all pickable primary locations and then searches pickable secondary and bulk locations.
• If no location in the QuickPick zone has enough inventory to fill the line, allocate the inventory across pickable locations in the QuickPick zone.
• If all pickable locations in the QuickPick zone do not have enough inventory to fill the line:
• If Let Down Replenishment is enabled, move stock from other locations to fill the required quantity.
• If Let Down Replenishment is not enabled or the system cannot allocate all of the reserved items on the order from the QuickPick zone, continue to the next step.
2. The system tries to allocate all of the reserved items on the order from non-QuickPick zones.
If the item has multiple item/locations in the non-QuickPick zones, the system allocates the inventory in the pickable location with enough inventory to fill the line, searching the locations in the following sequence:
• Allocate the inventory from the primary primary location.
• If the primary primary location does not have enough inventory to fill the line (or the primary primary location is part of the QuickPick zone), allocate the inventory from the first pickable location in alphabetical sequence in the non-QuickPick zones that has enough inventory to fill the line. The system first searches all pickable primary locations and then searches pickable secondary and bulk locations.
• If no location in the non-QuickPick zones has enough inventory to fill the line, allocate the inventory across pickable locations in the non-QuickPick zones.
• If all pickable locations in the non-QuickPick zones do not have enough inventory to fill the line:
• If Let Down Replenishment is enabled, move stock from other locations to fill the required quantity.
• If Let Down Replenishment is not enabled or the system cannot allocate all of the reserved items on the order from non-QuickPick zones, continue to the next step.
3. The system tries to allocate the reserved items on the order from a pickable item/location in any zone.
The system allocates the reserved item, regardless of whether the item/location is in the QuickPick zone or in a non-QuickPick zone.
If the item has multiple item/locations across all zones, the system allocates the inventory in the pickable location with enough inventory to fill the line, searching the locations in the following sequence:
• Allocate the inventory from the primary primary location.
• If the primary primary location does not have enough inventory to fill the line, allocate the inventory from the first pickable location in alphabetical sequence that has enough inventory to fill the line. The system first searches all pickable primary locations and then searches pickable secondary and bulk locations.
• If no location has enough inventory to fill the line, allocate the inventory across pickable locations, regardless of zone.
• If all pickable locations do not have enough inventory to fill the line:
• If Let Down Replenishment is enabled, move stock from other locations to fill the required quantity.
• If Let Down Replenishment is not enabled, print the item on the Item Stock Allocation Error Report, based on the setting of the Withhold Picks due to Item Allocation Error (F04) system control value.
Note: In order to perform QuickPick Zone processing, the Check Location Quantities During Pick Generation (C54) system control value must be set to Y.
Separating QuickPick Pick Slips from Regular Pick Slips
If FLR1150 or FLR1157 is defined in the Pick Printing Program (C37) system control value, the system creates a separate spool file for pick slips that contain items allocated from the QuickPick zone.
• Spool file QUICKZONE contains pick slips with all lines allocated from the QuickPick zone.
• Spool file REGULAR contains pick slips with all lines allocated from non-QuickPick zones.
• Spool file MIXED contains pick slips with lines allocated from both the QuickPick zone and non-QuickPick zones. Note: MIXED also displays if the pick slip is picking from more than 6 zones.
Regardless of QuickPick zone, the system creates a separate spool file for pick slips, based on warehouse/ship via priority combination.
See Sorting Pick Slips for more information on when the system creates separate spool files for pick slips and the sequence in which the system sorts pick slips within spool files.
Splitting an order into several pick slips: Allocating items based on QuickPick zone does not impact whether an order splits into several pick slips. See Splitting an Order for the reasons why an order may split into several pick slips.
QuickPick Example -- Printing Pick Slips by QuickPick Zone
You generate pick slips for the following orders.
Order # |
Warehouse |
Zone |
Ship via priority |
1234 |
5 |
Q (QuickPick) |
1 |
1235 |
5 |
P (non-QuickPick) |
1 |
1236 |
5 |
Q and P (Mixed) |
1 |
1237 |
5 |
Q (QuickPick) |
2 |
1238 |
5 |
P (non-QuickPick) |
2 |
1239 |
5 |
Q and P (Mixed) |
2 |
1240 |
6 |
Q (QuickPick) |
1 |
1241 |
6 |
P (non-QuickPick) |
1 |
1242 |
6 |
Q and P (Mixed) |
1 |
1243 |
6 |
Q (QuickPick) |
2 |
1244 |
6 |
P (non-QuickPick) |
2 |
1245 |
6 |
Q and P (Mixed) |
2 |
Results: The system generates the following spool files.
Spool File # |
Name |
Generated For |
1 |
QUICKZONE |
Warehouse 5/Ship via priority 1. All lines are allocated to the QuickPick zone. |
2 |
REGULAR |
Warehouse 5/Ship via priority 1. All lines are allocated to non-QuickPick zones. |
3 |
MIXED |
Warehouse 5/Ship via priority 1. Lines are allocated to both the QuickPick zone and non-QuickPick zones. |
4 |
QUICKZONE |
Warehouse 5/Ship via priority 2. All lines are allocated to the QuickPick zone. |
5 |
REGULAR |
Warehouse 5/Ship via priority 2. All lines are allocated to non-QuickPick zones. |
6 |
MIXED |
Warehouse 5/Ship via priority 2. Lines are allocated to both the QuickPick zone and non-QuickPick zones. |
7 |
QUICKZONE |
Warehouse 6/Ship via priority 1. All lines are allocated to the QuickPick zone. |
8 |
REGULAR |
Warehouse 6/Ship via priority 1. All lines are allocated to non-QuickPick zones. |
9 |
MIXED |
Warehouse 6/Ship via priority 2. Lines are allocated to both the QuickPick zone and non-QuickPick zones. |
10 |
QUICKZONE |
Warehouse 6/Ship via priority 2. All lines are allocated to the QuickPick zone. |
11 |
REGULAR |
Warehouse 6/Ship via priority 2. All lines are allocated to non-QuickPick zones. |
12 |
MIXED |
Warehouse 6/Ship via priority 2. Lines are allocated to both the QuickPick zone and non-QuickPick zones. |
QuickPick Example -- Allocate from QuickPick Zone
In this example, zone Q is defined as the QuickPick zone in the QuickPick Zone Identifier (J41) system control value.
An order contains the following reserved order lines:
Line # |
Item |
Quantity |
1 |
VCS20QPSB |
2 |
2 |
VCS10QPSB |
1 |
The items on the order are located in the following item/locations:
Item |
Zone |
Location |
Quantity |
VCS20QPSB |
Q (primary, pickable) |
Q1 |
1 |
Q2 |
2 |
||
P (primary, pickable) |
M1 |
12 |
|
M2 |
12 |
||
S (secondary, pickable) |
S1 |
60 |
|
S2 |
60 |
||
B (bulk, non-pickable) |
B1 |
120 |
|
B2 |
120 |
||
VCS10QPSB |
Q (primary, pickable) |
Q1 |
1 |
P (primary, pickable) |
M1 |
12 |
|
S (secondary, pickable) |
S1 |
60 |
|
B (bulk, non-pickable) |
B1 |
120 |
When you generate a pick slip for the order, the system determines that all of the order lines can be allocated from the QuickPick zone. The system allocates all items from the QuickPick zone:
Item |
Location |
Allocated Quantity |
VCS20QPSB |
Q2 |
2 |
VCS10QPSB |
Q1 |
1 |
QuickPick Example -- Allocate from QuickPick Zone with Let Down Replenishment
In this example, zone Q is defined as the QuickPick zone in the QuickPick Zone Identifier (J41) system control value. In addition, the Let Down Replenishment (C36) system control value is set to REPORT or RPT/EXEC and the Let down replenishment -- Fill to max field for the pick slip generation template is set to N.
An order contains the following reserved order lines:
Line # |
Item |
Quantity |
1 |
VCS20QPSB |
3 |
2 |
VCS10QPSB |
5 |
The items on the order are located in the following item/locations:
Item |
Zone |
Location |
Quantity |
VCS20QPSB |
Q (primary, pickable) |
Q1 |
1 |
Q2 |
2 |
||
P (primary, pickable) |
M1 |
12 |
|
M2 |
12 |
||
S (secondary, pickable) |
S1 |
60 |
|
S2 |
60 |
||
B (bulk, non-pickable) |
B1 |
120 |
|
B2 |
120 |
||
VCS10QPSB |
Q (primary, pickable) |
Q1 |
1 |
P (primary, pickable) |
M1 |
12 |
|
S (secondary, pickable) |
S1 |
60 |
|
B (bulk, non-pickable) |
B1 |
120 |
When you generate a pick slip for the order, the system determines that all of the order lines cannot be allocated from the QuickPick zone unless Let Down Replenishment is performed. Because Let Down Replenishment is enabled, the system moves the quantity required from bulk to fill the pick quantity:
Item |
From Location |
Move Quantity |
To Location |
VCS10QPSB |
B1 |
4 |
Q1 |
The system allocates all items from the QuickPick zone:
Item |
Location |
Allocated Quantity |
VCS20QPSB |
Q1 |
1 |
Q2 |
2 |
|
VCS10QPSB |
Q1 |
5 |
QuickPick Example -- Allocate from Non-QuickPIck Zone
In this example, zone Q is defined as the QuickPick zone in the QuickPick Zone Identifier (J41) system control value. In addition, the Let Down Replenishment (C36) system control value is set to *NONE or blank.
An order contains the following reserved order lines:
Line # |
Item |
Quantity |
1 |
VCS20QPSB |
6 |
2 |
VCS10QPSB |
1 |
The items on the order are located in the following item/locations:
Item |
Zone |
Location |
Quantity |
VCS20QPSB |
Q (primary, pickable) |
Q1 |
1 |
Q2 |
2 |
||
P (primary, pickable) |
M1 |
12 |
|
M2 |
12 |
||
S (secondary, pickable) |
S1 |
60 |
|
S2 |
60 |
||
B (bulk, non-pickable) |
B1 |
120 |
|
B2 |
120 |
||
VCS10QPSB |
Q (primary, pickable) |
Q1 |
1 |
P (primary, pickable) |
M1 |
12 |
|
S (secondary, pickable) |
S1 |
60 |
|
B (bulk, non-pickable) |
B1 |
120 |
When you generate a pick slip for the order, the system determines that all of the order lines cannot be allocated from the QuickPick zone unless Let Down Replenishment is performed. Because Let Down Replenishment is not enabled, the system allocates all items from non-QuickPick zones:
Item |
Location |
Allocated Quantity |
VCS20QPSB |
M1 |
6 |
VCS10QPSB |
M1 |
1 |
QuickPick Example -- Allocate from QuickPick and Non-QuickPick Zones (Mixed)
In this example, zone Q is defined as the QuickPick zone in the QuickPick Zone Identifier (J41) system control value.
An order contains the following reserved order lines:
Line # |
Item |
Quantity |
1 |
VCS10Q |
1 |
2 |
VCS10QP |
1 |
3 |
VCS10P |
1 |
The items on the order are located in the following item/locations:
Item |
Zone |
Location |
Quantity |
VCS10Q |
Q (primary, pickable) |
Q1 |
28 |
VCS10QP |
Q (primary, pickable) |
Q1 |
15 |
P (primary, pickable) |
M1 |
50 |
|
VCS10P |
P (primary, pickable) |
M1 |
25 |
When you generate a pick slip for the order, the system determines that not all of the order lines can be allocated from the QuickPick zone, but one of the order lines can only be allocated from the QuickPick zone. The system allocates the items from both the QuickPick zone and non-QuickPick zones:
Item |
Location |
Allocated Quantity |
VCS10Q |
Q1 |
1 |
VCS10QP |
M1 |
1 |
VCS10P |
M1 |
1 |
QuickPick Example -- Allocate from QuickPick with Insufficient Inventory
In this example, zone Q is defined as the QuickPick zone in the QuickPick Zone Identifier (J41) system control value. In addition, the Let Down Replenishment (C36) system control value is set to *NONE or blank.
An order contains the following reserved order lines:
Line # |
Item |
Quantity |
1 |
VCS20QPB |
5 |
2 |
VCS10QPB |
5 |
The items on the order are located in the following item/locations:
Item |
Zone |
Location |
Quantity |
VCS20QPB |
Q (primary, pickable) |
Q1 |
1 |
Q (primary, pickable) |
Q2 |
1 |
|
P (primary, pickable) |
M1 |
1 |
|
P (primary, pickable) |
M2 |
1 |
|
B (bulk, non-pickable |
B1 |
120 |
|
B (bulk, non-pickable) |
B2 |
120 |
|
VCS10QPB |
Q (primary, pickable) |
Q1 |
1 |
P (primary, pickable) |
M1 |
1 |
|
B (bulk, non-pickable) |
B1 |
120 |
When you generate a pick slip for the order, the system determines that the items cannot be allocated from the QuickPick zone or the non-QuickPick zones unless Let Down Replenishment is performed. Because Let Down Replenishment is not enabled, the system prints the items on the Item Stock Allocation Error report, based on the setting of the Withhold Picks due to Item Allocation Error (F04) system control value.
Location |
Error |
Item |
Ordered |
Available |
BULK1 |
Loc unpickable; No stock in Pck |
VCS10QPB |
5 |
2 |
BULK1 |
Loc unpickable; No stock in Pck |
VCS20QPB |
5 |
4 |
Overview: Let Down Replenishment is automatic restocking of primary locations initiated by the system when you generate pick slips. The system can recommend, or recommend and immediately process, a replenishment transfer, to insure that inventory quantities in primary locations will be adequate for the pick slips you have generated. The Let Down Replenishment (C36) system control value determines whether the system initiates replenishment when you generate pick slips, and whether the system completes the replenishment transfer, or recommends but does not complete the transfer.
Primary location replenishment: The replenishment program can also be run on demand from Working with Replenishment Control (MSRP). See Replenish Primary Locations Overview for an overview.
Before you can process a Let Down Replenishment, you need to perform the necessary setup. Setup includes:
The following system control values relate to Let Down Replenishment. To view the system control values required for Primary Location Replenishment, see Primary Location Replenishment Setup.
System Control Value |
Description |
Allows you to determine the location types from which inventory will be pulled during Let Down Replenishment. BULK = The system replenishes from bulk locations only. SECONDARY = The system replenishes from secondary locations only. SEC/BULK = The system replenishes from bulk and secondary locations. When both location types are used, the system will replenish from bulk locations first in earliest placement date/zone/aisle sequence, then from secondary locations in earliest placement date/zone/aisle sequence. |
|
Defines whether the system includes primary locations in the type of locations from which you can replenish stock when performing Let Down Replenishment. • If both bulk and secondary locations are evaluated for stock, the system evaluates the bulk locations first in earliest placement date/zone/aisle sequence. • Secondary locations are evaluated next in earliest placement date/zone/aisle sequence if there is insufficient stock in the bulk locations to fulfill the Let Down Replenishment. • Primary locations are evaluated last in earliest placement date/zone/aisle sequence if there is insufficient stock in both the bulk and secondary locations to fulfill the Let Down Replenishment. |
|
Allows you to include the number of units needed to fulfill printed pick tickets in the replenishment calculation. By using this option, the system reduces the on-hand quantity in the primary location by the number of units that are to be picked before determining the quantity to replenish. The system also reduces the quantity on-hand in the location that will be used to replenish the primary location by this amount, before determining the quantity available to move. |
|
Defines whether the system performs Let Down Replenishment when you generate pick slips, and whether the replenishments will be immediately processed based on the system-recommended inventory transfers, or will be recommended but not processed. NONE (or blank) = The system does not perform Let Down Replenishment. REPORT = The system creates the Replenish Control record and its details; however, item transfers are not processed immediately. You can use the Working with Replenishment Control (MSRP) menu option to print Replenishment Detail reports for each replenishment request, or print consolidated replenishment reports for several replenishments generated on the same day. You can then confirm and process the item transfers after reviewing the reports. RPT/EXEC = The system creates the Replenish Control record and its details; furthermore, item transfers are processed automatically and the system generates the Replenishment Detail by 'From' Location Report. |
|
Allows you to evaluate multiple locations for an item during pick slip generation. Enter Y in this field if you want to use Let Down Replenishment. The system will generate pick slips based on available inventory in bulk and/or secondary locations, and optionally primary locations, and recommend replenishments to primary locations as needed. |
|
Defines the print program used to print consolidated replenishment reports: • Consolidated Replenishment Report by From Location • Consolidated Replenishment Report by Item/SKU • Consolidated Replenishment Report By To Location You can use these reports to consolidate replenishment information from multiple let down replenishment transactions processed on the same day. To print consolidated replenishment reports, the following system control values must be set to these values: • Replenish from Location Type (A66): BULK, SECONDARY, or SEC/BULK. • Check Location Quantities During Pick Generation (C54): Y • Let Down Replenishment (C36): REPORT Leave this field blank if you do not want to print consolidated reports. Regardless of the setting of this system control value, you can print detailed replenishment reports using the Working with Replenishment Control (MSRP) menu option: • Replenishment Detail by 'From' Location Report |
|
Rounding for Casepacks from Bulk in Let Down Replenishment (J43) |
Defines whether the system is required to move stock from bulk locations to primary locations in case packs during Let Down Replenishment, and whether to round up or round down to a case pack, based on the quantity required by Let Down Replenishment and the Maximum quantity defined for the item location. ROUND DOWN: Move stock from bulk locations in case packs during Let Down Replenishment and move enough case packs to fulfill the pick slips and stock the primary location without going over the maximum quantity defined for the item location. ROUND UP: Move stock from bulk locations in case packs during Let Down Replenishment and move enough case packs to fulfill the pick slips and stock the primary location to meet the maximum quantity defined for the item location, even if reaching the maximum means that the maximum quantity is exceeded. |
Type: Identifies which locations can be replenished, and which locations will be used to replenish. Valid location types are primary, secondary, bulk, and temporary. Primary locations are the only locations that will be replenished; secondary and bulk locations are the location types that can be used to replenish the primary location. In addition, primary locations can be used to replenish if the Replenish from Primary during Let Down Replenishment (J42) system control value is set to Y.
Freeze: The freeze status of the location indicates whether the location is on hold. If the primary location is frozen, it cannot be replenished. If the secondary or bulk location is frozen, inventory in the location cannot be used to replenish a primary location.
Note: Locations can be automatically flagged for Physical freeze during physical inventory. See Resetting the Freeze Flags (RPFF).
The following fields must be completed for the replenishment calculation to be performed.
Min qty: The minimum number of units of the item/SKU that should be kept in the item location.
Max qty: The maximum number of units of the item/SKU that should be kept in the item location.
Reservation freeze flag: Indicates whether the item location is frozen. If the item in the primary location is frozen, it cannot be replenished. If the item in the secondary or bulk location is frozen, inventory in the location cannot be used to replenish a primary location. In addition, Pick Slip Generation does not print pick slips for an item/location that is frozen.
Physical freeze: If the item location has a physical freeze status of Y, the inventory in the location will not be available to replenish the primary location. The physical freeze status of the primary location being replenished is not evaluated in the replenishment process.
Reservation freeze: Indicates whether the item warehouse is frozen. If the item is frozen at the warehouse level, it will not be evaluated for replenishment or pick slip allocation at any location.
Item File
Pieces/case (Pieces per case): Defines the number of units that fit in a case. The system uses this value during Let Down Replenishment if the Rounding for Casepacks from Bulk in Let Down Replenishment (J43) system control value contains a value, indicting the system must move stock from bulk locations in case packs.
Pick Slip Gen Options File
Let down replenishment -- Fill to max: Defines whether the system stocks the locations during Let Down Replenishment just enough to allow picking or enough to fulfill all pick slips, plus refill the item location.
• Y = During Let Down Replenishment, the system will calculate the quantity required to fulfill the pick slips and to refill the location back to its maximum quantity.
• N (default) = During Let Down Replenishment, the system will only move enough stock to cover the open pick slips.
Note: If the Replenish from Primary during Let Down Replenishment (J42) system control value is selected and the only location available to move stock from is a primary location, the system will only move the quantity required to cover the open pick slips, regardless of the setting of the Let down replenishment -- Fill to max field.
Let Down Replenishment Processing
The system performs the following steps during Let Down Replenishment.
1. Determines if a pickable location for the item on the order has enough inventory to fill the pick slip.
• If a pickable location for the item on the order has enough inventory to fill the pick slip, the system does not call Let Down Replenishment, and instead, allocates stock from the pickable location and generates a pick slip for the order.
• If a pickable location for the item on the order does not have enough inventory to fill the pick slip, the system calls Let Down Replenishment.
2. Calculates the replenishment quantity.
The setting of the Let down replenishment -- fill to max field for the pick slip generation template determines the quantity required during Let Down Replenishment.
• If this field is set to N, the system will only move enough stock to the pickable primary location to cover the open pick slips. See Let Down Replenishment Example -- Fill to Pick for an example.
• If this field is set to Y, the system will move enough stock to cover the open pick slips, plus an additional amount to fill the pickable primary location to its maximum quantity. See Let Down Replenishment Example -- Fill to Max for an example.
Calculating the replenishment quantity: The system uses the following calculations to determine the replenishment quantity required for Let Down Replenishment:
Adjusted on hand quantity in primary location calculation:
On-hand quantity + Positive pending transfer quantity - Negative pending transfer quantity - Printed quantity (if included) = Adjusted on-hand quantity
• The amount of any pending transfers to the location (a positive pending transfer quantity) is added to the on-hand quantity so that the location is not over-replenished.
• The amount of any pending transfers from the location (a negative pending transfer quantity) is subtracted from the on-hand quantity so that the location is not under-replenished.
• The Include Print Quantity in Available Calculations (A65) system control value determines whether the quantity on printed pick tickets is included in the calculation so that the location will also be replenished for the items currently being shipped.
If Let down replenishment -- fill to max is set to N: Pick slip quantity - Adjusted on-hand quantity = Replenishment Quantity
If Let down replenishment -- fill to max is set to Y: Maximum quantity - Adjusted on-hand quantity + Pick slip quantity = Replenishment Quantity
3. Determines where to get the inventory.
• If the Replenish from Location Type (A66) system control value is set to BULK, the system only gets inventory from eligible bulk item locations in earliest placement date/zone/aisle sequence.
• If the Replenish from Location Type (A66) system control value is set to SECONDARY, the system only gets inventory from eligible secondary item locations in earliest placement date/zone/aisle sequence.
• If the Replenish from Location Type (A66) system control value is set to SEC/BULK, the system gets inventory first from eligible bulk locations in earliest placement date/zone/aisle sequence. If the bulk locations cannot fulfill the entire quantity needed for replenishment, the system then gets inventory from secondary locations in earliest placement date/zone/aisle sequence.
• Additionally, if the Replenish from Primary during Let Down Replenishment (J42) system control value is set to Y, and the bulk and/or secondary locations cannot fulfill the entire quantity needed for replenishment, the system then gets inventory from other primary locations in earliest placement date/zone/aisle sequence. See Let Down Replenishment Example -- Replenish from Primary for an example.
The freeze status of the location is also evaluated. If any of the following fields is set to Y, the location will not be used to replenish the primary location:
File |
Field |
Item Location |
Reservation freeze flag |
Item Location |
Physical freeze |
4. Calculates the quantity to move from each bulk and/or secondary location.
If the location is eligible to be used to replenish the pickable primary location, the following calculation is performed to determine the available quantity to move from the secondary or bulk location:
On hand quantity - Printed quantity (if included) - Negative pending transfer quantity = Quantity to Move
• Negative pending transfer quantities indicate that inventory in the location is in the process of being transferred from the location, but the transfer is not yet reflected in the on-hand quantity. Because this inventory has already been marked for transfer, it is subtracted from the on-hand quantity so that it will not be included in multiple transfers.
• Positive pending transfer quantities indicate that inventory is in the process of being transferred to the location, but the transfer is not yet reflected in the on-hand quantity. Because the inventory may or may not be in the location, it is not included in the on-hand quantity.
• If the Include Print Quantity in Available Calculations (A65) system control value is set to Y, the quantity on printed pick tickets is included in the calculation.
All eligible locations are evaluated in earliest placement date/zone/aisle sequence until the required quantity to replenish is reached, or until all eligible locations have been evaluated.
What if the quantity available to move does not cover the pick slip quantity? If the quantity that is available to move to the primary location does not cover the pick slip quantity, the system will not perform Let Down Replenishment and instead, print the item on the Item Stock Allocation Error report.
5. Determines if stock moved from bulk locations must be moved in case packs.
The setting of the Rounding for Casepacks from Bulk in Let Down Replenishment (J43) system control value defines whether stock moved from bulk locations must be moved in case packs.
• If this system control value is blank, the system moves only the number of units required by Let Down Replenishment.
• If this system control value is set to ROUND DOWN, the system moves stock from bulk locations in case packs during Let Down Replenishment and, if the replenishment quantity reaches the maximum quantity defined for the item location, the system will move case packs without going over the maximum quantity defined for the item location.
Example: Case packs contain a quantity of 12. Pick slips require 18 units. The quantity defined for the item location after the units for the pick slips have been removed is 30. The maximum quantity for the item location is 50. The Let down replenishment -- fill to max field for the pick slip generation template is set to Y. In this scenario, the system moves 3 case packs of 12 (36 units). 18 units are allocated to the pick slips. 18 units are moved to the item location, bringing the quantity to 48 (30 + 18 = 48; 2 units under the maximum quantity of 50). See Let Down Replenishment Example -- Round Down for Case Packs and Fill to Max for an additional example.
• If this system control value is set to ROUND UP, the system moves stock from bulk locations in case packs during Let Down Replenishment and, if the replenishment quantity reaches the maximum quantity defined for the item location, the system moves enough case packs to meet the maximum quantity defined for the item location, even if reaching the maximum means that the maximum quantity is exceeded.
Example: Case packs contain a quantity of 12. Pick slips require 18 units. The quantity defined for the item/location after the units for the pick slips have been removed is 30. The maximum quantity for the item/location is 50. The Let down replenishment -- fill to max field for the pick slip generation template is set to Y. In this scenario, the system moves 4 case packs of 12 (48 units). 18 units are allocated to the pick slips. 30 units are moved to the item/location, bringing the quantity to 60 (30 + 30 = 60; 10 units over the maximum quantity of 50). See Let Down Replenishment Example -- Round Up for CasePacks and Fill to Max for an additional example.
The system uses the Pieces per case field in the Item file to determine the number of units in a case. If the Pieces per case field for an item is blank, the system assumes a quantity of 1 unit in a case and will replenish by unit instead of case pack during Let Down Replenishment.
5. Creates and confirms the Replenishment Control request.
As the system evaluates the primary locations to replenish and the quantities that will be moved from the bulk and/or secondary locations to replenish them, a record for each pending transfer transaction is added to the Replenishment Control request. When the request is generated:
• The Pending field in the Item Location file for the primary location is increased by the total quantity to transfer.
• The Pending field in the Item Location file for each bulk and secondary location that will be used to replenish the location is decreased by the quantity to transfer from that location.
6. Looks at the Let Down Replenishment (C36) system control value to determine how to proceed.
• If the Let Down Replenishment (C36) system control value is set to REPORT, the system generates the pick slips and the Replenishment Detail by 'From' Location Report but does not process the replenishment. To complete the replenishment, you will need to:
• Use the Replenishment Detail by 'From' Location Report as a worksheet to move the recommended replenishment quantity to the primary location.
• Use the Working with Replenishment Control (MSRP) menu option to process the replenishment. When you select to process the replenishment, the system submits the RPLN_UPD job, as outlined in the next step.
• If the Let Down Replenishment (C36) system control value is set to RPT/EXEC, the system continues to the next step.
8. Submits the RPLN_UPD job.
The RPLN_UPD job:
• Increases the on-hand quantity in the primary location by the transaction amount.
• Decreases the pending transfer quantity in the primary location by the transaction amount.
• Decreases the on-hand quantity in the location from which the inventory was transferred by the transaction amount.
• Decreases the pending transfer quantity in the location from which the inventory was transferred by the transfer amount.
• Updates the Inventory Transaction History file with the transaction activity.
• Deletes the processed replenishment control request from the system.
9. Generates the pick slips.
The system also generates the Replenishment Detail Report by Item. You can use this report as a worksheet to move the recommended replenishment quantity to the primary location before you confirm the pick slip.
Let Down Replenishment Example -- Replenish from Primary
In this example:
• The Let Down Replenishment (C36) system control value is set to RPT/EXEC or REPORT.
• The Replenish from Location Type (A66) system control value is set to SEC/BULK.
• The Replenish from Primary during Let Down Replenishment (J42) system control value is set to Y.
• The Include Print Quantity in Available Calculations (A65) system control value is set to Y.
• The Let down replenishment -- fill to max field for the pick slip generation template is set to N.
• The Rounding for Casepacks from Bulk in Let Down Replenishment (J43) system control value is blank.
The following item locations exist for item VCS20PSB in warehouse 5.
Location |
Type |
Max |
Min |
On Hand |
Printed |
Pending |
Date |
B1 |
Bulk |
120 |
12 |
120 |
0 |
-108 |
4/06/06 |
B2 |
Bulk |
120 |
12 |
24 |
0 |
0 |
4/05/06 |
S1 |
Secondary |
60 |
12 |
6 |
0 |
0 |
4/04/06 |
S2 |
Secondary |
60 |
12 |
1 |
0 |
0 |
4/03/06 |
M1 |
Primary |
60 |
12 |
6 |
2 |
2 |
4/02/06 |
M2 |
Primary |
60 |
12 |
10 |
0 |
0 |
4//01/06 |
A customer places an order for item VCS20PSB for a quantity of 50.
When you generate a pick slip for the order, the system allocates the quantity of 50 against location M1 (the item’s primary location) and performs the following steps:
• Calculates the Adjusted on hand quantity for the primary item location: On hand quantity + Positive pending quantity - Negative pending quantity - Printed quantity = Adjusted on hand quantity.
Location |
On Hand Qty |
Pending Qty |
Printed Qty |
Adjusted On Hand Qty |
M1 |
6 |
2 |
2 |
6 |
• Calculates the Replenishment quantity for the primary item location: Pick slip quantity - Adjusted on hand quantity = Replenishment quantity.
Location |
Pick Slip Qty |
Adjusted On Hand Qty |
Replenishment Qty |
M1 |
50 |
6 |
44 |
• Calculates the available quantity to move from bulk, secondary, and other primary locations: On hand quantity - Printed quantity - Negative pending transfer quantity = Quantity available to move.
Location |
On Hand Qty |
Printed Qty |
Pending Qty |
Available Qty To Move |
B1 |
120 |
0 |
-108 |
12 |
B2 |
24 |
0 |
0 |
24 |
S1 |
6 |
0 |
0 |
6 |
S2 |
1 |
0 |
0 |
1 |
M2 |
60 |
0 |
0 |
10 |
Total quantity eligible to replenish primary locations: |
53 |
|||
• Determines the sequence in which to take stock from the eligible locations. The system first looks at bulk locations in Earliest placement date/Zone/Aisle sequence. If the bulk locations cannot fulfill the replenishment quantity, the system then looks at secondary locations in Earliest placement date/Zone/Aisle sequence. If the secondary locations cannot fulfill the replenishment quantity, the system then looks at other primary locations in Earliest placement date/Zone/Aisle sequence. In this example, the sequence is:
• B2: Bulk location, Placement date 4/05/06, Zone B, Aisle 02
• B1: Bulk location, Placement date 4/06/06, Zone B, Aisle 01
• S2: Secondary location, Placement date 4/03/06, Zone S, Aisle 02
• S1: Secondary location, Placement date 4/04/06, Zone S, Aisle 01
• M2: Primary location, Placement date 4/01/06, Zone P, Aisle 02
• Creates the Replenish Control record, indicating the recommended replenishment quantity to move from bulk and secondary locations to the primary location.
From Location |
To Location |
Qty to Move |
B1 |
M1 |
12 |
B2 |
M1 |
24 |
S2 |
M1 |
1 |
S1 |
M1 |
6 |
M2 |
M1 |
1 |
• Updates the Pending quantity for the item locations, based on the recommended replenishment quantities. Also updates the Printed quantity for the primary location:
Location |
Type |
Max |
Min |
On Hand |
Printed |
Pending |
B1 |
Bulk |
120 |
12 |
120 |
0 |
-120 |
B2 |
Bulk |
120 |
12 |
24 |
0 |
-24 |
S1 |
Secondary |
60 |
12 |
6 |
0 |
-6 |
S2 |
Secondary |
60 |
12 |
1 |
0 |
-1 |
M1 |
Primary |
60 |
12 |
6 |
52 |
46 |
M2 |
Primary |
60 |
12 |
10 |
0 |
-1 |
• Processes the Let Down Replenishment and updates the On hand quantity and Pending quantity for the item locations:
Location |
Type |
Max |
Min |
On Hand |
Printed |
Pending |
B1 |
Bulk |
120 |
12 |
108 |
0 |
-108 |
M1 |
Primary |
60 |
12 |
50 |
52 |
2 |
M2 |
Primary |
60 |
12 |
9 |
0 |
0 |
When you confirm the pick slip, the system updates the On hand quantity and Printed quantity for the item locations:
Location |
Type |
Max |
Min |
On Hand |
Printed |
Pending |
B1 |
Bulk |
120 |
12 |
108 |
0 |
-108 |
M1 |
Primary |
60 |
12 |
0 |
2 |
2 |
M2 |
Primary |
60 |
12 |
9 |
0 |
0 |
Let Down Replenishment Example -- Fill to Pick
In this example:
• The Let Down Replenishment (C36) system control value is set to RPT/EXEC or REPORT.
• The Replenish from Location Type (A66) system control value is set to SEC/BULK.
• The Include Print Quantity in Available Calculations (A65) system control value is set to Y.
• The Let down replenishment -- fill to max field for the pick slip generation template is set to N.
• The Rounding for Casepacks from Bulk in Let Down Replenishment (J43) system control value is blank.
The following item locations exist for item VCS20PSB in warehouse 5.
Location |
Type |
Max |
Min |
On Hand |
Printed |
Pending |
Date |
B1 |
Bulk |
120 |
12 |
120 |
0 |
-108 |
4/06/06 |
B2 |
Bulk |
120 |
12 |
24 |
0 |
0 |
4/05/06 |
S1 |
Secondary |
60 |
12 |
60 |
0 |
0 |
4/04/06 |
S2 |
Secondary |
60 |
12 |
60 |
0 |
0 |
4/03/06 |
M1 |
Primary |
60 |
12 |
6 |
2 |
2 |
4/02/06 |
A customer places an order for item VCS20PSB for a quantity of 50.
When you generate a pick slip for the order, the system allocates the quantity of 50 against location M1 (the item’s primary location) and performs the following steps:
• Calculates the Adjusted on hand quantity for the primary item location: On hand quantity + Positive pending quantity - Negative pending quantity - Printed quantity = Adjusted on hand quantity.
Location |
On Hand Qty |
Pending Qty |
Printed Qty |
Adjusted On Hand Qty |
M1 |
6 |
2 |
2 |
6 |
• Calculates the Replenishment quantity for the primary item location: Pick slip quantity - Adjusted on hand quantity = Replenishment quantity.
Location |
Pick Slip Qty |
Adjusted On Hand Qty |
Replenishment Qty |
M1 |
50 |
6 |
44 |
• Calculates the available quantity to move from bulk and secondary locations: On hand quantity - Printed quantity - Negative pending transfer quantity = Quantity available to move.
Location |
On Hand Qty |
Printed Qty |
Pending Qty |
Available Qty To Move |
B1 |
120 |
0 |
-108 |
12 |
B2 |
24 |
0 |
0 |
24 |
S1 |
60 |
0 |
0 |
60 |
S2 |
60 |
0 |
0 |
60 |
Total quantity eligible to replenish primary locations: |
156 |
|||
• Determines the sequence in which to take stock from the eligible locations. The system first looks at bulk locations in Earliest placement date/Zone/Aisle sequence. If the bulk locations cannot fulfill the replenishment quantity, the system then looks at secondary locations in Earliest placement date/Zone/Aisle sequence. In this example, the sequence is:
• B2: Bulk location, Placement date 4/05/06, Zone B, Aisle 02
• B1: Bulk location, Placement date 4/06/06, Zone B, Aisle 01
• S2: Secondary location, Placement date 4/03/06, Zone S, Aisle 02
• S1: Secondary location, Placement date 4/04/06, Zone S, Aisle 01
• Creates the Replenish Control record, indicating the recommended replenishment quantity to move from bulk and secondary locations to the primary location.
From Location |
To Location |
Qty to Move |
B1 |
M1 |
12 |
B2 |
M1 |
24 |
S2 |
M1 |
8 |
• Updates the Pending quantity for the item locations, based on the recommended replenishment quantities. Also updates the Printed quantity for the primary location:
Location |
Type |
Max |
Min |
On Hand |
Printed |
Pending |
B1 |
Bulk |
120 |
12 |
120 |
0 |
-120 |
B2 |
Bulk |
120 |
12 |
24 |
0 |
-24 |
S1 |
Secondary |
60 |
12 |
60 |
0 |
0 |
S2 |
Secondary |
60 |
12 |
60 |
0 |
-8 |
M1 |
Primary |
60 |
12 |
6 |
52 |
46 |
• Processes the Let Down Replenishment and updates the On hand quantity and Pending quantity for the item locations:
Location |
Type |
Max |
Min |
On Hand |
Printed |
Pending |
B1 |
Bulk |
120 |
12 |
108 |
0 |
-108 |
S1 |
Secondary |
60 |
12 |
60 |
0 |
0 |
S2 |
Secondary |
60 |
12 |
52 |
0 |
0 |
M1 |
Primary |
60 |
12 |
50 |
52 |
0 |
• When you confirm the pick slip, the system updates the On hand quantity and Printed quantity for the item locations:
Location |
Type |
Max |
Min |
On Hand |
Printed |
Pending |
B1 |
Bulk |
120 |
12 |
108 |
0 |
-108 |
S1 |
Secondary |
60 |
12 |
60 |
0 |
0 |
S2 |
Secondary |
60 |
12 |
52 |
0 |
0 |
M1 |
Primary |
60 |
12 |
2 |
2 |
0 |
Let Down Replenishment Example -- Fill to Max
In this example:
• The Let Down Replenishment (C36) system control value is set to RPT/EXEC or REPORT.
• The Replenish from Location Type (A66) system control value is set to SEC/BULK.
• The Include Print Quantity in Available Calculations (A65) system control value is set to Y.
• The Let down replenishment -- fill to max field for the pick slip generation template is set to Y.
• The Rounding for Casepacks from Bulk in Let Down Replenishment (J43) system control value is blank.
The following item locations exist for item VCS20PSB in warehouse 5.
Location |
Type |
Max |
Min |
On Hand |
Printed |
Pending |
Date |
B1 |
Bulk |
120 |
12 |
120 |
0 |
-108 |
4/06/06 |
B2 |
Bulk |
120 |
12 |
24 |
0 |
0 |
4/05/06 |
S1 |
Secondary |
60 |
12 |
60 |
0 |
0 |
4/04/06 |
S2 |
Secondary |
60 |
12 |
60 |
0 |
0 |
4/03/06 |
M1 |
Primary |
60 |
12 |
6 |
2 |
2 |
4/02/06 |
A customer places an order for item VCS20PSB for a quantity of 50.
When you generate a pick slip for the order, the system allocates the quantity of 50 against location M1 (the item’s primary location) and performs the following steps:
• Calculates the Adjusted on hand quantity for the primary item location: On hand quantity + Positive pending quantity - Negative pending quantity - Printed quantity = Adjusted on hand quantity.
Location |
On Hand Qty |
Pending Qty |
Printed Qty |
Adjusted On Hand Qty |
M1 |
6 |
2 |
2 |
6 |
• Calculates the Replenishment quantity for the primary item location: Maximum quantity - Adjusted on hand quantity + Pick slip quantity = Replenishment quantity.
Location |
Max Qty |
Adjusted On Hand Qty |
Pick Qty |
Replenishment Qty |
M1 |
60 |
6 |
50 |
104 |
• Calculates the available quantity to move from bulk and secondary locations: On hand quantity - Printed quantity - Negative pending transfer quantity = Quantity available to move.
Location |
On Hand Qty |
Printed Qty |
Pending Qty |
Available Qty To Move |
B1 |
120 |
0 |
-108 |
12 |
B2 |
24 |
0 |
0 |
24 |
S1 |
60 |
0 |
0 |
60 |
S2 |
60 |
0 |
0 |
60 |
Total quantity eligible to replenish primary locations: |
156 |
|||
• Determines the sequence in which to take stock from the eligible locations. The system first looks at bulk locations in Earliest placement date/Zone/Aisle sequence. If the bulk locations cannot fulfill the replenishment quantity, the system then looks at secondary locations in Earliest placement date/Zone/Aisle sequence. In this example, the sequence is:
• B2: Bulk location, Placement date 4/05/06, Zone B, Aisle 02
• B1: Bulk location, Placement date 4/06/06, Zone B, Aisle 01
• S2: Secondary location, Placement date 4/03/06, Zone S, Aisle 02
• S1: Secondary location, Placement date 4/04/06, Zone S, Aisle 01
• Creates the Replenish Control record, indicating the recommended replenishment quantity to move from bulk and secondary locations to the primary locations.
From Location |
To Location |
Qty to Move |
B1 |
M1 |
12 |
B2 |
M1 |
24 |
S2 |
M1 |
60 |
S1 |
M1 |
8 |
• Updates the Pending quantity for the item locations, based on the recommended replenishment quantities. Also updates the Printed quantity for the primary location:
Location |
Type |
Max |
Min |
On Hand |
Printed |
Pending |
B1 |
Bulk |
120 |
12 |
120 |
0 |
-120 |
B2 |
Bulk |
120 |
12 |
24 |
0 |
-24 |
S1 |
Secondary |
60 |
12 |
60 |
0 |
-8 |
S2 |
Secondary |
60 |
12 |
60 |
0 |
-60 |
M1 |
Primary |
60 |
12 |
6 |
52 |
106 |
• Processes the Let Down Replenishment and updates the On hand quantity and Pending quantity for the item locations:
Location |
Type |
Max |
Min |
On Hand |
Printed |
Pending |
B1 |
Bulk |
120 |
12 |
108 |
0 |
-108 |
S1 |
Secondary |
60 |
12 |
52 |
0 |
0 |
M1 |
Primary |
60 |
12 |
110 |
52 |
2 |
• When you confirm the pick slip, the system updates the On hand quantity and Printed quantity for the item locations:
Location |
Type |
Max |
Min |
On Hand |
Printed |
Pending |
B1 |
Bulk |
120 |
12 |
108 |
0 |
-108 |
S1 |
Secondary |
60 |
12 |
52 |
0 |
0 |
M1 |
Primary |
60 |
12 |
60 |
2 |
2 |
Let Down Replenishment Example -- Round Down for Case Packs and Fill to Max
In this example:
• The Let Down Replenishment (C36) system control value is set to RPT/EXEC or REPORT.
• The Replenish from Location Type (A66) system control value is set to SEC/BULK.
• The Include Print Quantity in Available Calculations (A65) system control value is set to Y.
• The Let down replenishment -- fill to max field for the pick slip generation template is set to Y.
• The Rounding for Casepacks from Bulk in Let Down Replenishment (J43) system control value is set to ROUND DOWN.
• The Pieces per case field for the item is set to 12, indicating 12 units are contained in a case.
The following item locations exist for item VCS20PSB in warehouse 5.
Location |
Type |
Max |
Min |
On Hand |
Printed |
Pending |
Date |
B1 |
Bulk |
120 |
12 |
84 |
0 |
0 |
4/06/06 |
B2 |
Bulk |
120 |
12 |
36 |
0 |
0 |
4/05/06 |
M1 |
Primary |
60 |
12 |
6 |
2 |
2 |
4/02/06 |
A customer places an order for item VCS20PSB for a quantity of 50.
When you generate a pick slip for the order, the system allocates the quantity of 50 against location M1 (the item’s primary location) and performs the following steps:
• Calculates the Adjusted on hand quantity for the primary item location: On hand quantity + Positive pending quantity - Negative pending quantity - Printed quantity = Adjusted on hand quantity.
Location |
On Hand Qty |
Pending Qty |
Printed Qty |
Adjusted On Hand Qty |
M1 |
6 |
2 |
2 |
6 |
• Calculates the Replenishment quantity for the primary item location: Maximum quantity - Adjusted on hand quantity + Pick slip quantity = Replenishment quantity.
Location |
Max Qty |
Adjusted On Hand Qty |
Pick Qty |
Replenishment Qty |
M1 |
60 |
6 |
50 |
104 |
• Calculates the available quantity to move from bulk and secondary locations: On hand quantity - Printed quantity - Negative pending transfer quantity = Quantity available to move.
Location |
On Hand Qty |
Printed Qty |
Pending Qty |
Available Qty To Move |
B1 |
84 |
0 |
0 |
84 |
B2 |
36 |
0 |
0 |
36 |
Total quantity eligible to replenish primary locations: |
120 |
|||
• Determines the sequence in which to take stock from the eligible locations. The system looks at bulk locations in Earliest placement date/Zone/Aisle sequence. In this example, the sequence is:
• B2: Bulk location, Placement date 4/05/06, Zone B, Aisle 02
• B1: Bulk location, Placement date 4/06/06, Zone B, Aisle 01
• Creates the Replenish Control record, indicating the recommended replenishment quantity to move from bulk and secondary locations to the primary locations.
From Location |
To Location |
Qty to Move |
B1 |
M1 |
60 |
B2 |
M1 |
36 |
• Updates the Pending quantity for the item locations, based on the recommended replenishment quantities. Also updates the Printed quantity for the primary location:
Location |
Type |
Max |
Min |
On Hand |
Printed |
Pending |
B1 |
Bulk |
120 |
12 |
84 |
0 |
-60 |
B2 |
Bulk |
120 |
12 |
36 |
0 |
-36 |
M1 |
Primary |
60 |
12 |
6 |
52 |
98 |
• Processes the Let Down Replenishment and updates the On hand quantity and Pending quantity for the item locations:
Location |
Type |
Max |
Min |
On Hand |
Printed |
Pending |
B1 |
Bulk |
120 |
12 |
24 |
0 |
0 |
M1 |
Primary |
60 |
12 |
102 |
52 |
2 |
• When you confirm the pick slip, the system updates the On hand quantity and Printed quantity for the item locations:
Location |
Type |
Max |
Min |
On Hand |
Printed |
Pending |
B1 |
Bulk |
120 |
12 |
24 |
0 |
0 |
M1 |
Primary |
60 |
12 |
52 |
2 |
2 |
Let Down Replenishment Example -- Round Up for CasePacks and Fill to Max
In this example:
• The Let Down Replenishment (C36) system control value is set to RPT/EXEC or REPORT.
• The Replenish from Location Type (A66) system control value is set to SEC/BULK.
• The Include Print Quantity in Available Calculations (A65) system control value is set to Y.
• The Let down replenishment -- fill to max field for the pick slip generation template is set to Y.
• The Rounding for Casepacks from Bulk in Let Down Replenishment (J43) system control value is set to ROUND UP.
• The Pieces per case field for the item is set to 12, indicating 12 units are contained in a case.
The following item locations exist for item VCS20PSB in warehouse 5.
Location |
Type |
Max |
Min |
On Hand |
Printed |
Pending |
Date |
B1 |
Bulk |
120 |
12 |
84 |
0 |
0 |
4/06/06 |
B2 |
Bulk |
120 |
12 |
36 |
0 |
0 |
4/05/06 |
M1 |
Primary |
60 |
12 |
6 |
2 |
2 |
4/02/06 |
A customer places an order for item VCS20PSB for a quantity of 50.
When you generate a pick slip for the order, the system allocates the quantity of 50 against location M1 (the item’s primary location) and performs the following steps:
• Calculates the Adjusted on hand quantity for the primary item location: On hand quantity + Positive pending quantity - Negative pending quantity - Printed quantity = Adjusted on hand quantity.
Location |
On Hand Qty |
Pending Qty |
Printed Qty |
Adjusted On Hand Qty |
M1 |
6 |
2 |
2 |
6 |
• Calculates the Replenishment quantity for the primary item location: Maximum quantity - Adjusted on hand quantity + Pick slip quantity = Replenishment quantity.
Location |
Max Qty |
Adjusted On Hand Qty |
Pick Qty |
Replenishment Qty |
M1 |
60 |
6 |
50 |
104 |
• Calculates the available quantity to move from bulk and secondary locations: On hand quantity - Printed quantity - Negative pending transfer quantity = Quantity available to move.
Location |
On Hand Qty |
Printed Qty |
Pending Qty |
Available Qty To Move |
B1 |
84 |
0 |
0 |
84 |
B2 |
36 |
0 |
0 |
36 |
Total quantity eligible to replenish primary locations: |
120 |
|||
• Determines the sequence in which to take stock from the eligible locations. The system looks at bulk locations in Earliest placement date/Zone/Aisle sequence. In this example, the sequence is:
• B2: Bulk location, Placement date 4/05/06, Zone B, Aisle 02
• B1: Bulk location, Placement date 4/06/06, Zone B, Aisle 01
• Creates the Replenish Control record, indicating the recommended replenishment quantity to move from bulk and secondary locations to the primary locations.
From Location |
To Location |
Qty to Move |
B1 |
M1 |
72 |
B2 |
M1 |
36 |
• Updates the Pending quantity for the item locations, based on the recommended replenishment quantities. Also updates the Printed quantity for the primary location:
Location |
Type |
Max |
Min |
On Hand |
Printed |
Pending |
B1 |
Bulk |
120 |
12 |
84 |
0 |
-72 |
B2 |
Bulk |
120 |
12 |
36 |
0 |
-36 |
M1 |
Primary |
60 |
12 |
6 |
52 |
110 |
• Processes the Let Down Replenishment and updates the On hand quantity and Pending quantity for the item locations:
Location |
Type |
Max |
Min |
On Hand |
Printed |
Pending |
B1 |
Bulk |
120 |
12 |
12 |
0 |
0 |
M1 |
Primary |
60 |
12 |
114 |
52 |
2 |
When you confirm the pick slip, the system updates the On hand quantity and Printed quantity for the item locations:
Location |
Type |
Max |
Min |
On Hand |
Printed |
Pending |
B1 |
Bulk |
120 |
12 |
12 |
0 |
0 |
M1 |
Primary |
60 |
12 |
64 |
2 |
2 |
Let Down Replenishment Example -- Round for CasePacks and Fill to Pick
In this example:
• The Let Down Replenishment (C36) system control value is set to RPT/EXEC or REPORT.
• The Replenish from Location Type (A66) system control value is set to SEC/BULK.
• The Include Print Quantity in Available Calculations (A65) system control value is set to Y.
• The Let down replenishment -- fill to max field for the pick slip generation template is set to N.
• The Rounding for Casepacks from Bulk in Let Down Replenishment (J43) system control value is set to ROUND DOWN or ROUND UP.
• The Pieces per case field for the item is set to 12, indicating 12 units are contained in a case.
The following item locations exist for item VCS10PSB in warehouse 5.
Location |
Type |
Max |
Min |
On Hand |
Printed |
Pending |
Date |
B1 |
Bulk |
120 |
12 |
84 |
0 |
0 |
4/06/06 |
S1 |
Secondary |
60 |
12 |
60 |
0 |
0 |
4/05/06 |
M1 |
Primary |
60 |
12 |
6 |
0 |
0 |
4/02/06 |
A customer places an order for item VCS10PSB for a quantity of 55.
When you generate a pick slip for the order, the system allocates the quantity of 55 against location M1 (the item’s primary location) and performs the following steps:
• Calculates the Adjusted on hand quantity for the primary item location: On hand quantity + Positive pending quantity - Negative pending quantity - Printed quantity = Adjusted on hand quantity.
Location |
On Hand Qty |
Pending Qty |
Printed Qty |
Adjusted On Hand Qty |
M1 |
6 |
0 |
0 |
6 |
• Calculates the Replenishment quantity for the primary item location: Pick slip quantity - Adjusted on hand quantity = Replenishment quantity.
Location |
Pick Slip Qty |
Adjusted On Hand Qty |
Replenishment Qty |
M1 |
55 |
6 |
49 |
• Calculates the available quantity to move from bulk and secondary locations: On hand quantity - Printed quantity - Negative pending transfer quantity = Quantity available to move.
Location |
On Hand Qty |
Printed Qty |
Pending Qty |
Available Qty To Move |
B1 |
84 |
0 |
0 |
84 |
S1 |
60 |
0 |
0 |
60 |
• Determines the sequence in which to take stock from the eligible locations. The system first looks at bulk locations in Earliest placement date/Zone/Aisle sequence. If the bulk locations cannot fulfill the replenishment quantity, the system then looks at secondary locations in Earliest placement date/Zone/Aisle sequence. In this example, the sequence is:
• B1: Bulk location, Placement date 4/06/06, Zone B, Aisle 01
• S1: Bulk location, Placement date 4/05/06, Zone S, Aisle 01
• Creates the Replenish Control record, indicating the recommended replenishment quantity to move from bulk and secondary locations to the primary locations.
From Location |
To Location |
Qty to Move |
B1 |
M1 |
60 |
• Updates the Pending quantity for the item locations, based on the recommended replenishment quantities. Also updates the Printed quantity for the primary location:
Location |
Type |
Max |
Min |
On Hand |
Printed |
Pending |
B1 |
Bulk |
120 |
12 |
84 |
0 |
-60 |
S1 |
Secondary |
60 |
12 |
60 |
0 |
0 |
M1 |
Primary |
60 |
12 |
6 |
55 |
60 |
• Processes the Let Down Replenishment and updates the On hand quantity and Pending quantity for the item locations:
Location |
Type |
Max |
Min |
On Hand |
Printed |
Pending |
B1 |
Bulk |
120 |
12 |
24 |
0 |
0 |
S1 |
Secondary |
60 |
12 |
60 |
0 |
0 |
M1 |
Primary |
60 |
12 |
66 |
55 |
0 |
Note: The system updates the on hand quantity in the primary location to a quantity over the maximum quantity in order to meet the pick slip quantity and still move stock from bulk in case packs.
When you confirm the pick slip, the system updates the On hand quantity and Printed quantity for the item locations:
Location |
Type |
Max |
Min |
On Hand |
Printed |
Pending |
B1 |
Bulk |
120 |
12 |
24 |
0 |
0 |
S1 |
Secondary |
60 |
12 |
60 |
0 |
0 |
M1 |
Primary |
60 |
12 |
11 |
0 |
0 |
Purpose: The Batch Reservation option is used to reserve stock and print pick slips for orders which do not have stock reserved during order entry. This program evaluates orders and reserves stock to the orders as necessary.
When is batch reservation used? The system control value Immediate Reservation (A64) determines whether or not you reserve stock during order entry. If this value is set to N, stock is not reserved until you run batch reservation during pick slip generation. If the value is set to Y, stock is reserved during order entry, but there are some exceptions to immediate reservation, for example:
• orders for zone reservation coded (weather sensitive) items. See Shipping Zone Reservation Overview.
• orders received via tape, EDI or telecommunications from a third party order service
How to perform batch reservation: You can perform batch reservation by entering 10 beside a pick slip description at the Work with Pick Slip Generation Options Screen. The system submits the batch job (BTCH_RSV). The pick slips are generated according to your batch reservation environment, as defined by System Control file values.
How stock is reserved: If you are using batch reservation, Order Entry will not attempt to reserve stock as orders are entered; instead, stock is backordered and the backorder quantity is entered in the Item/Warehouse file. The system reserves stock when a batch program is submitted from the pick slip generation menu.
Once the necessary criteria have been entered, the system sorts the open orders to find all orders matching these criteria. Stock is reserved for those orders using the following calculation:
Calculation:
On-hand - Protected - Reserved - Reserve transfer = Quantity available for reservation
See Reviewing Reservation Types.
Generating Pick Slips for Reserved Stock
Purpose: The Generate Picks function is used to sort and print pick slips. Once the pick slip criteria have been selected, the system populates the Pick Control Header and Pick Control Detail files and assigns billing batch and cart batch numbers to the pick slips in the batch and a pick control number to each individual pick slip. If the Generate Invoice Number at Pick Gen (H80) system control value is set to Y, the system may also assign a pending invoice number at this time. These files are used when voiding or reprinting a pick, during confirmation and during manifest processing. The system generates pick slips which detail quantity printed and location. See Sample Pick Slip Contents for examples of pick slips. Your pick slips may differ, depending on the program you use to generate and print pick slips.
How to generate pick slips: You can accept the criteria that were entered by entering 9 next to a pick slip description and pressing Enter at the Work with Pick Slip Generation Options Screen. The system submits a batch job (PICK_GEN) to generate the pick slips.
Specifying the identcode: If the Prefix of Identcode (I28) system control value is not blank, the system displays a pop-up window for you to specify the next identcode.
Next Identcode #: 24
Enter=Continue
|
The Identcode is a nine-position, numeric field, and the next available number from the Identcode number assignment defaults. See the Prefix of Identcode (I28) system control value for an overview.
Date/time selection: During pick slip generation, the system checks the arrival date for each line on an order and calculates when to print the pick slip.
The system generates pick slips if the system-calculated arrival date for the order line is equal to or earlier than today's date; otherwise, the system holds the printing of pick slips until the date is within the allotted time frame.
The system also checks the time entered on each open, reserved order and prints pick slips only for those orders that were entered before the PICK_GEN job began. This prevents the job from running continuously and including each new order entered.
Billing Gift Certificates and Pre-Billable Items
The pick slip generation job triggers billing of gift certificates and pre-billable items; however, these updates do not take place if your pick slip generation options exclude the order. For example, if you generate pick slips for selected order numbers, and the order for a pre-bill item is not specified, the pre-billing does not take place.
Gift certificates: See Working with Gift Certificates for more information on selling, assigning numbers to, billing, and distributing gift certificates.
Pre-billable items: See Pre Billed Amount Item (J72) for an overview on pre-billing items.
Note: The pick slip generation job bills gift certificates and pre-billable items only if the credit card on the order is authorized.
Separating spool files: The system creates separate spool files for pick slips based on:
• Warehouse: The warehouse where the item was allocated is the primary sort for pick slips. The system creates separate spool files for each warehouse.
• Ship via priority: Within each warehouse, the system sorts pick slips by the priority of the ship via, in descending order. For example, all pick slips with a ship via priority of 9 will be printed before those with a lower priority. The system creates separate spool files for each ship via priority.
Note: If any of the orders selected for pick slips have a ship via priority of 0 (blank), you will get duplicate pick slips.
Additional Pick Slip Breaks
Special handling picks: If the Split special handling picks field on the Pick Slip Generation (1 of 2) Screen is set to Y, the system will create a separate spool file for special handling items. If an order contains both special handling and non-special handling items, the system will split the pick slip for the order between the two spool files.
Stored value card items: The system looks at the setting of the Combine Stored Value Cards on One Pick Ticket (J53) system control value to determine how to generate pick slips for stored value card items.
• If this system control value is set to Y, the system creates a separate spool file for all physical stored value card items on a ship to order.
• If this system control value is set to N, the system creates a separate spool file for each order line containing a physical stored value card.
Regardless of the setting of this system control value, the system prints physical stored value cards on a separate pick slip(s) from other items on the order. In addition, if the physical stored value card item is set up as a ship alone item (Ship alone is S), the system generates a separate pick slip for each unit of a stored value card item.
Example: If an order contains both physical stored value card items and non-stored value card items and the Combine Stored Value Cards on One Pick Ticket (J53) system control value is set to N, the system will split the pick slip for the order between multiple spool files: 1 spool file for the regular items on the order, and a separate spool file for each order line containing a physical stored value card item.
For each stored value card item printed, the system creates a record in the Pick Stored Value Card File. Additionally, the system includes the physical stored value card item on the Pick Unit Report. See Stored Value Card Purchase and Activation for more information on generating pick slips for stored value card items.
Non-inventory items: A non-inventory item will still be included on a pick slip with any other items. If you specify a location for a non-inventory item, this location appears on the pick slip; however, the location is not included in the normal sort sequence.
QuickPick zones: If FLR1157 or FLR1152 is defined in the Pick Printing Program (C37) system control value and a zone is defined in the QuickPick Zone Identifier (J41) system control value, the system creates a separate spool file for pick slips that contain items allocated from the QuickPick zone.
• Spool file QUICKZONE contains pick slips with all lines allocated from the QuickPick zone.
• Spool file REGULAR contains pick slips with all lines allocated from non-QuickPick zones.
• Spool file MIXED contains pick slips with lines allocated from both the QuickPick zone and non-QuickPick zones. Note: MIXED also displays if the pick slip is picking from more than 6 zones.
Regardless of QuickPick zone, the system still creates a separate spool file for pick slips, based on warehouse/ship via priority combination. For example, if an order contains two items, one item allocated from the QuickPick zone in warehouse 5 and the other item allocated from the QuickPick zone in warehouse 6, the system will generate two QUICKZONE pick slips: one for each warehouse.
Sorting within Spool Files
The system then sorts pick slips in the following sequence:
1. gift orders/non-gift orders (defined by the Gift flag on the Order Header screen)
2. foreign/domestic orders (defined by whether the Country for the shipping address on an order matches the Default Country for Customer Address (B17) defined in the System Control file)
3. single line (single item)/multi-line (multiple item) orders
4. warehouse zones (sorted alphabetically)
To summarize, the sort for pick slips for a ship via priority is:
• Gift/Foreign/Single-line picks
• Gift/Foreign/Multi-line picks
• Gift/Domestic/Single-line picks
• Gift/Domestic/Multi-line picks
• Non-gift/Foreign/Single-line picks
• Non-gift/Foreign/Multi-line picks
• Non-gift/Domestic/Single-line picks
• Non-gift/Domestic/Multi-line picks
Within each of these sorts, the system further sorts the pick slips by the location zone in the warehouse.
The system also uses this pick slip sort sequence for the Pull Sheets and Cart/Bin Pull Sheets.
System control values to configure the sorting sequence for pick slips:
System Control Value |
Description |
If either or both of these values is set to N, the PICK_GEN job will skip these criteria when sorting pick slips. For instance, if both of these values are set to N, the sort for a ship via priority would be: • Single-line picks by zone • Multi-line picks by zone |
|
If you set the Pick Sort Program Name (C65) field in the System Control file to FLR0557, the system does not perform any of the sorting described above. You might want to use this program if you use an external program or service to produce pick slips; in this case, eliminating the sorting will avoid wasting system resources. In this case, the system will ignore cart/bin picking and will not print the Item Stock Allocation Error Report or Pick Cart/Batch Pull Sheet. |
|
If you set this field to Y, the system sorts pick slips based on the Pick sequence number defined for the location. In this situation, the system uses the Pick Sort GH file (FLPSGH) to store the information it needs to determine the sorting sequence for the pick slips. Note: You can also set this field to Y to have the system populate the Pick Sort GH file with the location code(s) for the item(s) on each pick slip. |
|
If you set this field to Y, the Picking sequence array field in the Pick Sort GH file will contain the location code(s) for each pick slip rather than the pick sequence number. If you set this field to N or leave it blank, this field will contain the picking sequence number(s) for the locations. Note: The setting of this system control value is considered only if the Sort Picks by Pick Sequence (E89) system control value and the Check Location Quantities During Pick Generation (C54) system control value are set to Y. |
Note: The sorting order of your pick slips will vary, depending on the program defined in the Pick Sort Program Name (C65) system control value.
Using pick slips: Your pickers can use the pick slip or the pull sheet to pick inventory from the warehouse. The pick slip is sorted by Zone and Order Number. Pull sheets are sorted by Zone, Location and Picking Sequence. A picking sequence is assigned when creating location codes and is used to minimize the time it takes pickers to maneuver around the warehouse.
Pick slips can have one item and several locations to pick from. All locations, except temporary locations, can be defined as pickable. If an order detail line cannot be picked, the system generates an Item Stock Allocation Error Report which lists the units of inventory that were ordered but not picked and the reason why the inventory was not picked.
Overview: Cart/bin picking is used to generate a batch pick slip list for one picker to handle in a single pick slip run. This chapter describes how the system uses cart/bin picking to sort your pick slips.
Cart/bin picking:
• Groups items together for picking by determining the total number of items that can fit on a single picking cart.
• Generates a Pick Cart/Batch Pull Sheet for each cart.
• Sorts and groups orders by batch number.
The system writes an order history message, visible on the Display Order History Screen, that contains the pick, warehouse, and cart/bin numbers.
System Control Values for Cart/Bin Picking
Use the Edit Cart/Bin Values screen to set the Use Cart/Bin Picking? (B38) system control value. The Break Single Line Picks by Zone (E33) system control value also controls the process.
System Control Value |
Description |
Y indicates that you want to use cart/bin picking to generate pick slips and pull sheets during Pick Slip Generation. This feature generates a batch pick slip list for a single picker to handle in a single run. If you enter Y, you must complete all fields on the Edit Cart/Bn Values screen, except Minimum Number of Picks in a Cart (B47). N causes the system to generate pick slips and pull sheets, but items will not be grouped into batches. |
|
Y indicates that the system considers the information in the Pick sequence number field in Creating and Maintaining Locations (WLOC) when sorting picks in a batch. The system sorts by zone, then pick sequence number and considers the following when breaking a batch: • single and multiple line picks • gift picks • foreign and domestic picks • batch capacity (number of picks in a batch or cube) The system sorts picks in order of picking sequence within via priority but mixes across pick sequences. |
|
|
Example: Two separate pick slips contain the following items: Pick A: item: A, zone: C, pick sequence #: 0000009 item: B, zone: C, pick sequence #: 0000004 item: C, zone: C, pick sequence #: 0000005 item: D, zone: B, pick sequence #: 0000004 Pick B: item: A, zone: C, pick sequence #: 0000009 item: Q, zone: C, pick sequence #: 0000008 item: C, zone: C, pick sequence #: 0000005 If Sort Picks by Pick Sequence (E89) is set to Y, the system sorts the items in the following order: |
|
Pick B: zone: C, pick sequence #: 0000005 zone: C, pick sequence #: 0000008 zone: C, pick sequence #: 0000009 Pick A: zone: B, pick sequence #: 0000004 zone: C, pick sequence #: 0000004 zone: C, pick sequence #: 0000005 zone: C, pick sequence #: 0000009 You can review batches sorted by pick sequence number in the Pick Sort GH file (FLPSGH). The system loads the first 25 picking sequences on the pick ticket only. If the Load Location into Pick Sequence (G34) system control value is set to Y, the location code(s), rather than the pick sequence number(s), will be loaded into the Picking sequence array field of the Pick Sort GH file. See Sorting Pick Slips. |
|
N or blank indicates that the system does not consider the pick sequence number when sorting picks in a batch. See the Maximum Number of Zones (B41) system control value. |
This field represents the cubic volume of the smallest bin within a cart, and applies to multi-line picks. |
|
This field represents the total cubic volume of the cart. Note: All cubing dimensions for evaluating cubic value of items, carts, and batches should be rendered in the same unit of measure throughout the system, whether you use inches, feet, or a point rating. |
|
The minimum number of picks that can be contained in a cart. Example: • If you define the minimum number of picks as 20, each batch must contain at least 20 pick slips. • If the next batch to be created will contain only 15 picks, the 15 pick slips will be added to the batch, rather than creating a new batch of 15 pick slips, because it is less than the required minimum of 20. • If the number of picks to be batched is less than the quantity you entered, the picks will be added to the current batch instead of creating a new batch that would be less than the minimum size. |
|
This value represents the maximum number of single line pick slips that can be included in a single batch. This value sets a break point for a batch and is usually dependent upon the number of bins in a cart. The system determines the following when creating a new batch of pick slips: • When the number of single line picks to be included in a batch equals the maximum number defined; a new batch is created. • When the total cubic value of the items in a batch is greater than the cubic volume of the cart, a new batch is created even if the maximum number of picks has not been reached. |
|
This value indicates whether to break single line pick slips into separate cart/bin batches based on the warehouse zone where the items are located. |
|
The maximum number of multi-line picks to be included in each batch. A multi-line pick is a pick slip that contains two or more line items. This value sets a break point for the batches and is usually dependent upon the number of bins in your packing cart. |
|
The maximum number of zones (up to 6) allowed on a multi-line pick slip before another batch is generated. Multiple line pick slips can contain items located in more than one zone. Pick slips that have items in the same zones will be included in the same batch. Separate batches will be created for pick slips that have items located in more zones than the number you specify in the Maximum Number of Zones (B41) field. Example: A pick slip with items to be picked in zones A, B, and D will not be included in the same batch as a pick slip with items to be picked in zones A, B, and R. However, a pick slip with items to be picked in zones A, B, and D will be included in the same batch as a pick slip with items to be picked in zones A and D. The system determines the following when creating a new batch of pick slips: |
|
|
• Multi-line picks are generated by zone combinations; all picks must be within the zone combination, which is the first position of the location code. When the zone combination changes, a new batch is generated. If the quantity of multi-line picks for a batch is 30, and only 18 picks can be generated for the zone combination, the batch will contain only 18 picks. • When the number of multi-line picks to be included in a batch is equal to the maximum number defined, a new batch is generated. • The system determines the number of bins needed for a multi-line pick slip/order based on the total cubic volume of the items and the cubic volume of a bin. If the system determines that there are not enough bins in the cart to accommodate the batch, a new cart/batch is created. |
Examples of Cart/Bin Picking with Cubing and without Cubing
Example 1: Cart bin picking with cubing
Criteria:
• Total cube for batch = 31,000
• Total number of orders in batch = 10
• Minimum bin size = 3,000
• Total number of multi-line picks = 5
• Break single line picks by zone = Y
Explanation:
Using the criteria, the system performs cubing and separates the single line picks from the multi-line picks. Within this grouping, the picks are further grouped by zone or by pick sequence number depending on the value entered in the Sort Picks by Pick Sequence (E89) system control value. In compiling each batch, the program accumulates the total cubic measurement for each line. When it has reached a total cube of 31,000 or ten single line picks, it creates a batch. The program continues to do this until all single line picks are written to the Pick Slip Print file. The program then does the same with the multi-line picks (using 5 picks or 31,000 cube for total batch limits) until all picks are exhausted.
Example 2: Cart bin picking without cubing
Criteria:
• Total cube for batch = 30,000
• Total number of orders in batch = 10
• Minimum, bin size = 3,000
Explanation:
Using the criteria, the system sorts the orders by warehouse zone or by pick sequence number depending on the value entered in the Sort Picks by Pick Sequence (E89) system control value. In compiling the orders for a single batch, the system accumulates the total cube for the orders. The accumulated cube and the number of orders will be evaluated against the system control values. Once the program reaches either an accumulated cube of 30,000 or ten orders, it will create a batch. The number of bins to be used on the cart would be determined by dividing the minimum bin size of 3,000 into the total cube for the order. The system may only assign five orders to a batch based on the cube; only 5 bins would be needed.
Purpose: If the Use Wave Picking (J87) system control value is set to Y, the system performs wave picking during pick slip generation.
Wave picking, or batch order picking, is the simultaneous picking of multiple customer orders, done to improve the efficiency of the overall picking operation. During pick slip generation, the system generates multiple waves (pick batches) in a single pick slip generation run. Orders are picked from various zones simultaneously, providing a fast method of picking. You can create a separate wave (pick batch) based on whether the pick slip contains an item that requires special handling, whether the order is an express-ship order, or whether the order is being shipped to an international address. You can further separate waves by whether the pick slip is a single-line pick slip or multi-line pick slip. In addition, for each type of wave, you can define the maximum number of pick slips that can be included in a single wave (pick batch) before the system generates a new wave.
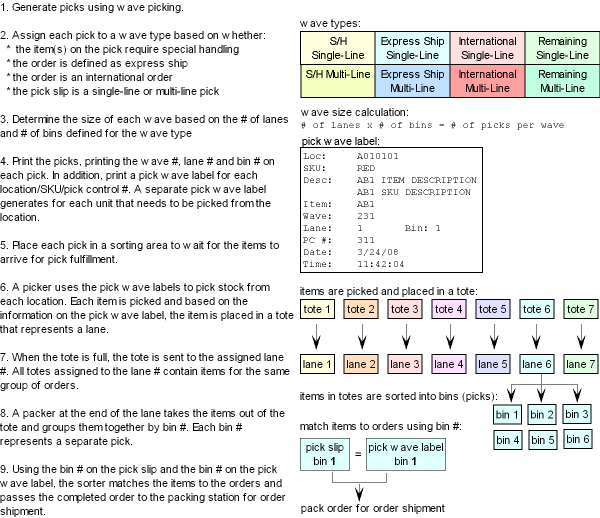
In order to use wave picking during pick slip generation, you must perform the following setup.
• System Control Values for Wave Picking
• Work with Pick Slip Generation (WPSG)
System Control Values for Wave Picking
System Control Value |
Description |
Enter Y in this system control value to use wave picking during pick slip generation. |
|
Enter the program you use to print pick wave labels. The base print program is FLR1212. |
|
Enter the program you use to print pick slips. The pick print program that supports wave picking is FLR0439; this program includes the wave, lane, and bin number on the pick slip. |
|
Enter the program you use to sort data on pick slips. The pick sort program that supports wave picking is FLR0395; this program allows you to sort pick slips in wave, lane, bin number sequence. |
|
Enter N or leave this system control value blank if you use wave picking. Note: If this system control value is set to Y, the system generates pick slips using cart/bin picking and ignores the wave picking options you define. |
Work with Pick Slip Generation (WPSG)
Pick slip generation options: If you define specific selection criteria for the pick slip generation template, the system performs wave picking within the boundaries defined for the pick slip generation template. For example, if you enter Y in the Selected orders option, the system performs wave picking for the selected orders only.
If you would like all orders selected for wave picking, using the wave picking options to determine how the orders are separated and sorted into different wave types, you should not define any specific selection criteria for the pick slip generation template that you use for wave picking.
Note: When using wave picking, you should continue to define pick slip generation options to define which orders you would like to select for pick slip generation; you can then use the pick wave options to further define how you would like those orders to separate and sort into different waves based on wave type.
To include special handling: In order to include items that require special handling in the pick slip generation run, the Include special handling field for the pick slip generation template must be set to Y or the Special handling only field for the pick slip generation template must be set to Y. The Order level spcl hndl (Order level special handling) field for the pick slip generation template controls whether the system evaluates the Include special handling and Special handling only fields defined for the pick slip generation template at the order level or the order detail line level; see Evaluating Special Handling at the Order Level and Evaluating Special Handling at the Order Detail Line Level for more information.
Split special handling picks: In order to have the pick wave options control whether the system separates pick slips that contain an item that requires special handling into its own wave, the Split special handling picks field for the pick slip generation template must be set to N.
For more information: See Selecting Order Lines for Pick Slip Generation for more information on defining selection criteria for a pick slip generation template.
Pick wave options: Enter 8 next to a pick slip generation template to define the following pick wave options.
Pick Wave Option |
Description |
Which wave types to generate |
The Select field for each wave type controls whether the system separates the wave type into its own wave during pick slip generation. You can create a separate wave for the following wave types: • Special Handling, Single-Line Pick • Special Handling, Multi-Line Pick • Express Ship, Single-Line Pick • Express Ship, Multi-Line Pick • International, Single-Line Pick • International, Multi-Line Pick • Single-Line Pick • Multi-Line Pick Wave Type Default When you first advance to the Work with Wave Picking Options screen, the Select field for each wave type is set to Y, indicating the system separates the wave type into its own wave during pick slip generation. See Wave type for a description of each wave type. Express Ship Wave Types: Ship Via Priority If you select the Express Ship, Single-Line Pick and/or the Express Ship, Multi-Line Pick wave type, you must define the ship via priority that is used to identify an express ship via. See Ship via priority for a description of the ship via priority defined for the Express Ship wave types. |
|
Special Handling Wave Types In order to generate a Special Handling, Single-Line and/or Special Handling, Multi-Line wave type, the Include special handling field for the pick slip generation template must be set to Y or the Special handling only field for the pick slip generation template must be set to Y. The Order level spcl hndl (Order level special handling) field for the pick slip generation template controls whether the system evaluates the Include special handling and Special handling only fields defined for the pick slip generation template at the order level or the order detail line level; see Evaluating Special Handling at the Order Level and Evaluating Special Handling at the Order Detail Line Level for more information. |
The size of the wave |
The # of lanes and # of bins you define for each wave type determines the size of the wave (the number of pick slips that can be included in a single wave before a new wave must be generated). Once a wave type reaches the maximum number of lanes and bins, the system creates a new wave for that particular wave type. The system uses the following calculation to determine the number of pick slips that can be included in a single wave: # of lanes x # of bins = # of picks per wave Wave Size Default When you first advance to the Work with Wave Picking Options screen, the # of lanes and # of bins for each wave type is 0; before you generate pick slips using wave picking options, you must first define a # of lanes and # of bins for each wave type. If you generate pick slips before defining a # of lanes and # of bins, the system can generate only one wave for each selected wave type. |
The order in which the waves are generated |
The Wave sequence defines the order in which the system generates each type of wave during pick slip generation; for example, you may wish to generate waves that contain items that require special handling first. Wave Sequence Default When you first advance to this screen, the default Wave sequence is: • Special Handling Single (Wave sequence 1) • Special Handling Multi (Wave sequence 2) • Express Single (Wave sequence 3) • Express Multi (Wave sequence 4) • International Single (Wave sequence 5) • International Multi (Wave sequence 6) • Single Line (Wave sequence 7) • Multi Line (Wave sequence 8) |
If you do not define wave options:
• If you enter Y in the Use Wave Picking (J87) system control value but do not enter 8 next to a pick slip generation template before running pick slip generation, the system generates pick slips, assigning all of the pick slips to a “blank” wave; the system generates the Wave Summary Report with the Wave type blank. Even though the Wave type is blank, the system continues to assign a wave number, lane number and bin number to each pick slip in the “blank” wave.
• If you enter Y in the Use Wave Picking (J87) system control value and enter 8 next to a pick slip generation template but do not set up each wave type (you do not define a # of lanes or # of bins for each wave type and do not specify a Ship via priority for the Express Single and Express Multi wave types), the system places picks slips that contain an item that requires special handling in the Special Handling Single or Special Handling Multi wave types and places all other pick slips in the Express Single or Express Multi wave type. Because a # of lanes and # of bins is not defined, the system can generate only one wave for each wave type.
When you generate a pick slip and you Use Wave Picking (J87), the system performs the following steps.
• Determine the Orders to Include in the Pick Slip Generation Run for Wave Picking
• Determine Which Wave Types Generate a Separate Wave During Pick Slip Generation
• Determine the Number of Pick Slips to Include in a Single Wave
• Determine Which Pick Slips to Include in the Wave Type
• Determine the Order in Which the Waves are Generated
• Assign a Wave Number, Lane Number, and Bin Number to Each Pick Slip
• Generate the Pick Slips and Other Wave Picking Documents
Determine the Orders to Include in the Pick Slip Generation Run for Wave Picking
The system uses the selection criteria defined for the pick slip generation template you use for wave picking to determine which orders to include in the pick slip generation run.
For example, if the Selected orders field is selected for the pick slip generation template, the system only selects the order numbers you specify for the pick slip generation run.
See Selecting Order Lines for Pick Slip Generation for more information on defining selection criteria for a pick slip generation template.
Determine Which Wave Types Generate a Separate Wave During Pick Slip Generation
The Select field for each wave type on the Work with Wave Picking Options Screen controls whether the system separates the wave type into its own wave (pick batch) during pick slip generation.
• If the Select field for the wave type is set to Y, the system generates a separate wave for the wave type during pick slip generation.
• If the Select field for the wave type is set to N, the system does not generate a separate wave for the wave type during pick slip generation. Instead, the system includes the pick slips that would fall under this wave type into another eligible wave type.
Wave types: The types of waves that you can generate in a single pick slip generation run are:
Wave Type |
Description |
Special Handling Single |
Special Handling, Single-Line Pick: The system generates a separate wave for single-line pick slips that require special handling. Note: In order to generate a Special Handling, Single-Line and/or Special Handling, Multi-Line wave type, the Include special handling field for the pick slip generation template must be set to Y or the Special handling only field for the pick slip generation template must be set to Y. The Order level spcl hndl (Order level special handling) field for the pick slip generation template controls whether the system evaluates the Include special handling and Special handling only fields defined for the pick slip generation template at the order level or the order detail line level; see Evaluating Special Handling at the Order Level and Evaluating Special Handling at the Order Detail Line Level for more information. |
Special Handling Multi |
Special Handling, Multi-Line Pick: The system generates a separate wave for multi-line pick slips that require special handling. A multi-line pick slip is a pick slip that contains two or more line items. Note: In order to generate a Special Handling, Single-Line and/or Special Handling, Multi-Line wave type, the Include special handling field for the pick slip generation template must be set to Y or the Special handling only field for the pick slip generation template must be set to Y. The Order level spcl hndl (Order level special handling) field for the pick slip generation template controls whether the system evaluates the Include special handling and Special handling only fields defined for the pick slip generation template at the order level or the order detail line level; see Evaluating Special Handling at the Order Level and Evaluating Special Handling at the Order Detail Line Level for more information. |
Express Single |
Express Ship, Single-Line Pick: The system generates a separate wave for single-line pick slips that contain an express ship via. The system considers a ship via express ship if the ship via priority for the ship via on the order header matches the ship via priority defined for the Express Single or Express Multi wave type. Note: If you do not define a ship via priority for the Express Single and Express Multi wave types, the system places every order, except those that fall under the Special Handling Single or Special Handling Multi wave types in the Express wave types. |
Express Multi |
Express Ship, Multi-Line Pick: The system generates a separate wave for multi-line pick slips that contain an express ship via. The system considers a ship via express if the ship via priority for the ship via on the order header matches the ship via priority defined for the Express Single or Express Multi wave type. Note: If you do not define a ship via priority for the Express Single and Express Multi wave types, the system places every order, except those that fall under the Special Handling Single or Special Handling Multi wave types in the Express wave types. |
International Single |
International, Single-Line Pick: The system generates a separate wave for single-line pick slips that ship to an international address. The system considers an address an international address if the country code does not match the country code defined in the Default Country for Customer Address (B17) system control value. |
International Multi |
International, Multi-Line Pick: The system generates a separate wave for multi-line pick slips that ship to an international address. The system considers an address an international address if the country code does not match the country code defined in the Default Country for Customer Address (B17) system control value. |
Single Line |
Single Line Pick: The system generates a separate wave for single-line pick slips that do not fall into any other wave type. |
Multi Line |
Multi Line Pick: The system generates a separate wave for multi-line pick slips that do not fall into any other wave type. Note: The system includes pick slips containing a regular item and a non-inventory item, such as a gift box, in the multi-line wave type. |
Wave selection examples:
Wave Types Selected |
Results |
Single Line Multi Line |
The system generates a separate wave for: • single-line pick slips (a pick slip that contains one line item). Because no other single-line wave types are selected, this wave type includes: • single-line pick slips that contain an item that requires special handling. • single-line pick slips that contain an express ship via. • single-line pick slips that ship to an international address. • multi-line pick slips (a pick slip that contains two or more line items). Because no other multi-line wave types are selected, this wave type includes: • multi-line pick slips that contain one or more items that require special handling. • multi-line pick slips that contain an express ship via. • multi-line pick slips that ship to an international address. |
Special Handling Single Special Handling Multi Single Line Multi Line |
The system generates a separate wave for: • single-line pick slips that contain an item that requires special handling. • multi-line pick slips that contain one or more items that require special handling. • single-line pick slips that do not contain an item that requires special handling. Because the Express Single and International Single wave types are not selected, this wave type includes: • single-line pick slips that contain an express ship via, unless the pick also requires special handling. • single-line pick slips that ship to an international address, unless the pick also requires special handling. • multi-line pick slips that do not contain an item that requires special handling. Because the Express Multi and International Multi wave types are not selected, this wave type includes: • multi-line pick slips that contain an express ship via, unless the pick also requires special handling. • multi-line pick slips that ship to an international address, unless the pick also requires special handling. |
Express Single Express Multi Single Line Multi Line |
The system generates a separate wave for: • single-line pick slips for express-ship orders. • multi-line pick slips for express-ship orders. • single-line pick slips for non-express ship orders. Because the Special Handling Single and International Single wave types are not selected, this wave type includes: • single-line pick slips that contain an item that requires special handling, unless the pick slip is also flagged as express ship. • single-line pick slips that ship to an international address, unless the pick slip is also flagged as express ship. • multi-line pick slips for non-express ship orders. Because the Special Handling Multi and International Multi wave types are not selected, this wave type includes: • multi-line pick slips that contain one or more items that require special handling, unless the pick slip is also flagged as express ship. • multi-line pick slips that ship to an international address, unless the pick slip is also flagged as express ship. |
International Single International Multi Single Line Multi Line |
The system generates a separate wave for: • single-line pick slips for international orders. • multi-line pick slips for international orders. • single-line pick slips for domestic orders. Because the Special Handling Single and Express Single wave types are not selected, this wave type includes: • single-line pick slips that contain an item that requires special handling, unless the pick is also flagged as international. • single-line pick slips that contain an express ship via, unless the pick is also flagged as international. • multi-line pick slips for domestic orders. Because the Special Handling Multi and Express Multi wave types are not selected, this wave type includes: • multi-line pick slips that contain an item that requires special handling, unless the pick is also flagged as international. • multi-line pick slips that contain an express ship via, unless the pick is also flagged as international. |
Special Handling Single Special Handling Multi Express Single Express Multi International Single International Multi Single Line Multi Line |
The system generates a separate wave for: • single-line pick slips that contain an item that requires special handling. • multi-line pick slips that contain one or more items that require special handling. • single-line pick slips for express-ship orders. • multi-line pick slips for express-ship orders. • single-line pick slips for international orders. • multi-line pick slips for international orders. • single-line pick slips for domestic, non-express ship orders that do not contain an item that requires special handling. • multi-line pick slips for domestic, non-express ship orders that do not contain an item that requires special handling. |
Determine the Number of Pick Slips to Include in a Single Wave
For each selected wave type, the system determines the number of pick slips to include in a single wave.
The # of lanes and # of bins you define for each wave type determines the size of the wave (the number of pick slips that can be included in a single wave before a new wave must be generated). Once a wave type reaches the maximum number of lanes and bins, the system creates a new wave for that particular wave type. If you wish to generate a single wave for a particular wave type, set the # of lanes to 9999999 and the # of bins to 999.
Wave size calculation: The system uses the following calculation to determine the number of pick slips that can be included in a single wave:
# of lanes x # of bins = # of picks per wave
Note: When you first advance to the Work with Wave Picking Options screen, the # of lanes and # of bins for each wave type is 0; before you generate pick slips using wave picking options, you must first define a # of lanes and # of bins for each wave type. If you generate pick slips before defining a # of lanes and # of bins, the system can only generate one wave for each selected wave type.
Wave size examples:
# of lanes |
# of bins |
Calculation |
Results |
1 |
10 |
1 x 10 = 10 |
The system includes 10 pick slips in a single wave before a new wave must be generated. Example: Picks 1-10 = lane 1, bins 1-10 |
2 |
3 |
2 x 3 = 6 |
The system includes 6 pick slips in a single wave before a new wave must be generated. Example: Picks 1-3 = lane 1, bins 1-3 Picks 4-6 = lane 2, bins 1-3 |
5 |
20 |
5 x 20 = 100 |
The system includes 100 pick slips in a single wave before a new wave must be generated. Example: Picks 1-20 = lane 1, bins 1-20 Picks 21-40 = lane 2, bins 1-20 Picks 41-60 = lane 3, bins 1-20 Picks 61-80 = lane 4, bins 1-20 Picks 81-100 = lane 5, bins 1-20 |
Determine Which Pick Slips to Include in the Wave Type
For each selected wave type, the system determines which pick slips to include in the wave type.
Wave type hierarchy: Because a pick slip can be associated with more than one wave type, the system uses the following hierarchy to determine which wave type to assign to a pick slip.
1. Special Handling, Single Line
2. Special Handling, Multi Line
3. Express Ship, Single Line
4. Express Ship, Multi Line
5. International, Single Line
6. International, Multi Line
7. Single Line
8. Multi Line
Splitting an order: An order may split into several pick slips for any of the following reasons:
• Different warehouse
• Different ship via
• Special handling
• Stored value card
• Ship alone
• Hazardous
• Location class
• Cubing
Based on whether the system generates a single pick slip or multiple pick slips for an order can determine the wave type the system assigns to the order. See Splitting an Order for more information on when the system splits an order into several pick slips.
Example: If an order contains one regular item and one ship alone item, the system generates two pick slips instead of one pick slip: one pick slip for the regular item and one pick slip for the ship alone item. Because the system generated two single-line pick slips for the order instead of one multi-line pick slip for the order, the system places the pick slips into one of the Single Line wave types instead of one of the Multi Line wave types.
Wave hierarchy examples: The table below provides examples of which wave type the system assigns to a pick slip, based on whether an item on the pick slip requires special handling, if the order is express shipped, if the order ships to an international address, and if the pick slip is a single-line or multi-line pick slip.
Pick # |
S/H |
Express |
Ship To |
Single/Multi Line |
Included in Wave Type: |
1 |
Y |
N |
domestic |
single-line |
Special Handling, Single Line |
2 |
Y |
Y |
domestic |
single-line |
Special Handling, Single Line |
3 |
Y |
N |
international |
single-line |
Special Handling, Single Line |
4 |
Y |
Y |
international |
single-line |
Special Handling, Single Line |
5 |
Y |
N |
domestic |
multi-line |
Special Handling, Multi Line |
6 |
Y |
Y |
domestic |
multi-line |
Special Handling, Multi Line |
7 |
Y |
N |
international |
multi-line |
Special Handling, Multi Line |
8 |
Y |
Y |
international |
multi-line |
Special Handling, Multi Line |
9 |
N |
Y |
domestic |
single-line |
Express Single |
10 |
N |
Y |
international |
single-line |
Express Single |
11 |
N |
Y |
domestic |
multi-line |
Express Multi |
12 |
N |
Y |
international |
multi-line |
Express Multi |
13 |
N |
N |
international |
single-line |
International Single |
14 |
N |
N |
international |
multi-line |
International Multi |
15 |
N |
N |
domestic |
single-line |
Single Line |
16 |
N |
N |
domestic |
multi-line |
Multi Line |
Determine the Order in Which the Waves are Generated
The system determines the order in which the waves are generated.
The Sequence # defined for each wave type defines the order in which the system generates waves in the pick slip generation run, where sequence # 1 is the first wave generated and sequence # 99 is the last wave generated.
If all wave types have the same sequence number: If you define the same Sequence # for all wave types, the system generates waves in the following sequence:
• Express Multi
• Express Single
• International Multi
• International Single
• Multi Line
• Special Handling Multi
• Special Handling Single
• Single Line
Wave generation sequence examples:
Wave Type |
Wave Seq |
Results |
Special Handling Single Special Handling Multi Express Single Express Multi International Single International Multi Single Line Multi Line |
1 2 3 4 5 6 7 8 |
The system generates waves in the following order: 1. Special Handling Single wave 2. Special Handling Multi wave 3. Express Single wave 4. Express Multi wave 5. International Single wave 6. International Multi wave 7. Single Line wave 8. Multi Line wave |
Special Handling Single Special Handling Multi Express Single Express Multi International Single International Multi Single Line Multi Line |
5 6 1 2 3 4 7 8 |
The system generates waves in the following order: 1. Express Single wave 2. Express Multi wave 3. International Single wave 4. International Multi wave 5. Special Handling Single wave 6. Special Handling Multi wave 7. Single Line wave 8. Multi Line wave |
Special Handling Single Special Handling Multi Express Single Express Multi International Single International Multi Single Line Multi Line |
5 6 3 4 1 2 7 8 |
The system generates waves in the following order: 1. International Single wave 2. International Multi wave 3. Express Single wave 4. Express Multi wave 5. Special Handling Single wave 6. Special Handling Multi wave 7. Single Line wave 8. Multi Line wave |
Special Handling Single Special Handling Multi Express Single Express Multi International Single International Multi Single Line Multi Line |
1 5 2 6 3 7 4 8 |
The system generates waves in the following order: 1. Special Handling Single wave 2. Express Single wave 3. International Single wave 4. Single Line wave 5. Special Handling Multi wave 6. International Multi wave 7. Express Multi wave 8. Multi Line wave |
Assign a Wave Number, Lane Number, and Bin Number to Each Pick Slip
The system assigns a wave number to each wave and assigns a lane and bin number to each pick slip.
The order in which the waves are generated determines the wave number assigned to each wave and the lane and bin assigned to each pick slip. Because you can generate multiple waves in a single pick slip generation run, there can be several wave numbers in a single pick slip generation run.
Wave components:
• Wave # = The PCH Billing batch # in the Pick Control Header file; the system assigns the wave number using the PCH Billing Batch # (A13) number assignment value.
• For each pick slip:
• Lane # = The Cart bin batch # in the Pick Control Header file; the system assigns the lane number using the Cart Batch # (A26) number assignment value. The lane number represents the tote where the items on the pick are placed during pick fulfillment. All totes assigned to the lane number contain items for the same group of orders.
• Bin # = The Cart bin # in the Pick Sort GH file; the system assigns the bin number based on the number of bins in a lane. For example, if each lane has 120 bins, then each lane has bin numbers 1-120. The bin number represents a separate pick.
For example, if the number of lanes is 7 and the number of bins in a lane is 120, then each wave can have 840 pick slips, which are split across 7 lanes with 120 bins per lane.
• Wave 1 consists of lane 1 and bins 1-120
• Wave 2 consists of lane 2 and bins 1-120
• Wave 3 consists of lane 3 and bins 1-120
• Wave 4 consists of lane 4 and bins 1-120
• Wave 5 consists of lane 5 and bins 1-120
• Wave 6 consists of lane 6 and bins 1-120
• Wave 7 consists of lane 7 and bins 1-120
If you use more than one warehouse, the system sorts the waves by warehouse.
Generate the Pick Slips and Other Wave Picking Documents
The system generates the picks slips and other pick slip generation documents.
Pick slip: If print program FLR0439 is defined in the Pick Printing Program (C37) system control value, the system prints the wave number, lane number and bin number In place of the billing batch number and cart batch number that prints on the pick slip. W# displays before the wave number, lane, and bin number.
Sorting pick slips: Regardless if you are using wave picking, the system creates separate spool files for pick slips based on:
• Warehouse
• Ship via priority
Optionally:
• Special handling
• Stored value card items
See Sorting Pick Slips for more information on when the system creates a separate spool file for pick slips.
Wave Summary report: The Wave Summary Report lists the type of waves generated during the pick slip generation run. For each wave type, the report lists the number of pick slips, number of units, and order amount.
Pick Unit report: If you are using wave picking, the system does not generate the Pick Unit Report.
Pick wave labels: The systems uses the print program defined in the Pick Wave Label Print Program (J88) system control value to print Pick Wave Labels. The base print program is FLR1212. If the Pick Wave Label Print Program (J88) system control value is blank, the system does not print pick wave labels.
You can use the pick wave label to attach to an item that you pick so that it can be sorted to the appropriate order for shipment. See Wave Picking Illustration.
A separate pick wave label prints for each location/SKU/pick control number in a pick wave, sorted in wave/lane/bin number sequence. The system prints a separate pick wave label for each unit of the SKU that needs to be picked from the location for the pick control number (order).
Pick wave label example: The following pick slips are included in a wave:
Wave # |
Lane # |
Bin # |
Pick Control # |
Item/SKU |
Qty |
Location |
231 |
1 |
1 |
311 (order # 724) |
BC3 |
1 |
A010101 |
AB1 BLUE |
1 |
A010204 |
||||
1 |
A010205 |
|||||
1 |
2 |
312 (order # 725) |
DE5 RED |
2 |
B010101 |
|
DW9 |
1 |
B010302 |
In this example, the system prints 6 pick wave labels:
pick wave label 1: |
Loc: A010101 SKU: Desc: BC3 ITEM DESCRIPTION Item: BC3 Wave: 231 Lane: 1 Bin: 1 PC #: 311 Date: 3/24/08 Time: 11:42:04 |
pick wave label 2: |
Loc: A010204 SKU: BLUE Desc: AB1 ITEM DESCRIPTION AB1 BLUE SKU DESCRIPTION Item: AB1 Wave: 231 Lane: 1 Bin: 1 PC #: 311 Date: 3/24/08 Time: 11:42:04 |
pick wave label 3: |
Loc: A010205 SKU: BLUE Desc: AB1 ITEM DESCRIPTION AB1 BLUE SKU DESCRIPTION Item: AB1 Wave: 231 Lane: 1 Bin: 1 PC #: 311 Date: 3/24/08 Time: 11:42:04 |
pick wave label 4: |
Loc: B010101 SKU: RED Desc: DE5 ITEM DESCRIPTION DE5 RED SKU DESCRIPTION Item: DE5 Wave: 231 Lane: 1 Bin: 2 PC #: 312 Date: 3/24/08 Time: 11:42:04 |
pick wave label 5: |
Loc: B010101 SKU: RED Desc: DE5 ITEM DESCRIPTION DE5 RED SKU DESCRIPTION Item: DE5 Wave: 231 Lane: 1 Bin: 2 PC #: 312 Date: 3/24/08 Time: 11:42:04 |
pick wave label 6: |
Loc: B010302 SKU: Desc: DW9 ITEM DESCRIPTION Item: DW9 Wave: 231 Lane: 1 Bin: 2 PC #: 312 Date: 3/24/08 Time: 11:42:04 |
The following wave options have been selected for the pick slip generation option you use for wave picking:
Wave Type |
# Lanes |
# Bins |
Wave Seq |
# Picks per Wave |
Special Handling Single |
1 |
2 |
8 |
1 lane x 2 bins = 2 picks per wave |
Single Line |
2 |
2 |
6 |
2 lanes x 2 bins = 4 picks per wave |
Multi Line |
1 |
6 |
7 |
1 lane x 6 bins = 6 picks per wave |
When you run pick slip generation, the system generates a separate pick slip for the following orders:
Order # |
Pick # |
S/H |
Express |
Ship To |
Single or Multi Line Pick |
576 |
1 |
N |
N |
domestic |
single-line pick |
577 |
2 |
N |
N |
domestic |
multi-line pick |
578 |
3 |
Y |
N |
domestic |
single-line pick |
579 |
4 |
Y |
N |
domestic |
multi-line pick |
580 |
5 |
N |
Y |
domestic |
single-line pick |
581 |
6 |
N |
Y |
domestic |
multi-line pick |
582 |
7 |
Y |
Y |
domestic |
single-line pick |
583 |
8 |
Y |
Y |
domestic |
multi-line pick |
585 |
9 |
N |
N |
international |
single-line pick |
586 |
10 |
N |
N |
international |
multi-line pick |
587 |
11 |
Y |
N |
international |
single-line pick |
588 |
12 |
Y |
N |
international |
multi-line pick |
592 |
13 |
N |
Y |
international |
single-line |
593 |
14 |
N |
Y |
international |
multi-line |
594 |
15 |
Y |
Y |
international |
single-line |
595 |
16 |
Y |
Y |
international |
multi-line |
The system determines which pick slips to include in each wave type and the size of each wave.
Wave Type |
# Picks per Wave |
Results |
Special Handling Single |
1 lane x 2 bins = 2 picks per wave |
Wave 1 pick 3 (lane 1, bin 1) pick 7 (lane 1, bin 2) Wave 2 pick 11 (lane 1, bin 1) pick 15 (lane 1, bin 2) |
Single Line |
2 lanes x 2 bins = 4 picks per wave |
Wave 3 pick 1 (lane 1, bin 1) pick 5 (lane 1, bin 2) pick 9 (lane 2, bin 1) pick 13 (lane 2, bin 2) |
Multi Line |
1 lane x 6 bins = 6 picks per wave |
Wave 4 pick 2 (lane 1, bin 1) pick 4 (lane 1, bin 2) pick 6 (lane 1, bin 3) pick 8 (lane 1, bin 4) pick 10 (lane 1, bin 5) pick 12 (lane 1, bin 6) Wave 5 pick 14 (lane 1, bin 1) pick 16 (lane 1, bin 2) |
The system uses the Sequence # defined for each wave type to determine the order in which to generate the waves.
Wave Type |
Wave Seq |
Waves Generated |
Wave Order |
Special Handling Single |
8 |
Wave 1 pick 3 (lane 1, bin 1) pick 7 (lane 1, bin 2) Wave 2 pick 11 (lane 1, bin 1) pick 15 (lane 1, bin 2) |
Wave 3 Wave 4 Wave 5 Wave 1 Wave 2 |
Single Line |
6 |
Wave 3 pick 1 (lane 1, bin 1) pick 5 (lane 1, bin 2) pick 9 (lane 2, bin 1) pick 13 (lane 2, bin 2) |
|
Multi Line |
7 |
Wave 4 pick 2 (lane 1, bin 1) pick 4 (lane 1, bin 2) pick 6 (lane 1, bin 3) pick 8 (lane 1, bin 4) pick 10 (lane 1, bin 5) pick 12 (lane 1, bin 6) Wave 5 pick 14 (lane 1, bin 1) pick 16 (lane 1, bin 2) |
|
The information presented here is included on your pick slip only if your unique print program supports it. The Pick Printing Program (C37) system control value identifies the pick slip printing program to use.
• Order number and ship to number: The order number and the ship-to number. The order number prints above and to the right of the shipping address and again above and to the right of the items on the pick slip.
• Billing batch number: The batch number for a group of pick slips. The system assigns a billing batch number to a pick slip generation run; you can use the billing batch number to confirm all of the pick slips in the batch at one time.
If print program FLR0439 is defined in the Pick Printing Program (C37) system control value and you are Using Wave Picking, the system prints the wave number in place of the billing batch number. See Using Wave Picking for an overview of the wave picking process.
• Date: The date the pick slip was generated. The date also displays to the right of the ship-to address.
• Sold to name and address:
• Prefix, first name, middle initial, last name, and suffix
• Company
• Address line 1
• Apartment (prints next to address line 1)
• Address line 2 (lines 3 and 4 do not print)
• City, State, Postal code
• Country (A code that represents a country. The country code prints if you are shipping to a country other than the default specified in the Default Country for Customer Address (B17) system control value.)
• Pick slip message: A message that displays on all pick slips in the pick slip generation batch, such as a customer service, warehouse, or gift message. You can enter a pick slip message at the Pick Message code/text field when you select options for the pick slip generation batch.
Ship to label:
• Shipping indicia description and number: Instructions which identify the distribution center (warehouse or drop point) in order to calculate shipping charges. For more information see Fulfillment Working with Ship Via Codes (WVIA).
• Bar Code: You can use the bar code in the PC Manifest system to scan packages at a shipping station and record the information necessary to print the required manifests. The bar code, made up of the company number, pick control number, and carton number, prints on each shipping label. If you are using the pick print program FLR0937, the system will print any additional labels that you specify in the Number of Pick Control Labels (D47) system control value. See PC Manifest Socket Interface.
• Company number: This number identifies the company from which you generated the pick slip.
• Pick control number: A number assigned to a pick slip for tracking throughout the warehouse. You can use the pick control number to confirm a specific pick slip.
• Label number: A number signifying each label produced.
• Order number: The order number.
• Ship-to number: The ship-to number is an unlabeled field separated from the order number field by a hyphen. This value indicates the number of shipping addresses on the order. The system assigns a ship-to number to every order, even if the shipping address and sold to address are the same. The first ship-to address is assigned the number 1.
• Billing/cart batch number: The billing batch number is a system-generated number assigned to each pick slip run. The cart batch number is a system generated number assigned to each cart for cart/bin picking. B# displays before the billing batch number and cart batch number. The cart number is used to sort pull sheets. SeeUsing Cart/Bin Picking.
If print program FLR0439 is defined in the Pick Printing Program (C37) system control value and you are Using Wave Picking, the system prints the wave number, lane number and bin number In place of the billing batch number and cart batch number that prints on the pick slip. W# displays before the wave number, lane, and bin number. See Using Wave Picking for an overview of the wave picking process.
• Ship to name and address:
• Prefix, first name, middle initial, last name, and suffix
• Company
• Address line 1 (Apartment prints next to address line 1)
• Address line 2 (lines 3 and 4 do not print)
• City, State, Postal code
• Country (A code that represents a country. The country code prints if you are shipping to a country other than the default specified in theDefault Country for Customer Address (B17) system control value.)
• Attention line from the order header
• Customer number: The number assigned by the system to identify the sold-to customer.
• Shipper: The first 10 positions of the ship via carrier description, such as UPS or Federal Express.
• Ship via code: The ship via code is on the pick slip only if you enter a ship via override for a ship-to address; otherwise, the value 0 displays.
• Order level message: Order level messages are comments entered on the order for the customer, such as a gift message, or delivery instructions for the shipper. You can enter a message at the Work with Order Messages Screen, available by pressing F23 in order entry, order maintenance, or order inquiry. The print flag must be set to ‘P’ (print on pick) or ‘B’ (print on both) at the Work with Order Messages screen for the message to print on the pick slip.
• Pick slip message: Pick slip messages defined for the pick slip generation template you used to generate the pick slip.
Pick slip header information:
• Date of order: The date the order was placed.
• Purchase order number: The purchase order number, if any, that was provided by the sold-to customer. Purchase orders are used primarily by A/R customers. You can enter a purchase order number on the Work with Order screen in order entry.
• Source code: The code defined on the order header to identify a group of customers.
• Packer: A code that represents an inventory picker or packer in your warehouse. You can assign a picker/packer code at the Work with Pickers/Packers Screen.
• Shipped via: This is the ship via carrier for package delivery, such as UPS or Federal Express.
• Customer number: The number assigned by the system to identify the sold-to customer.
• Order number: The order number identifies the order and ship-to number of this pick slip.
• Page number: The page number of this pick slip.
Pick slip detail information:
• Line number: The order detail line number for each item on the pick slip. You can enter up to 999 lines on one order.
• Items ordered: The quantity of the item ordered.
• Items shipped: The quantity of the item shipped on this pick slip.
• Items backordered: The quantity of the item that is currently unavailable. The system displays drop ship items as backordered on the pick slip until you generate a drop ship pick slip or purchase order for the drop ship items. However, the system continues to display drop ship items as backordered even after a drop ship pick slip or purchase order has been generated for the drop ship items if the Add Printed Drop Ship Lines as Backordered on Pick (E93) system control value is selected.
• Location code: The location in the warehouse from which the item is picked. The code may vary depending on the warehouse the item is picked from. A separate pick slip will print for items picked from more than one location in a warehouse.
Note: A non-inventory item will still be included on a pick slip with any other items. If you specify a location for a non-inventory item, this location appears on the pick slip; however, the location is not included in the normal sort sequence.
• Item/SKU: A code that represents a unit of inventory. A SKU code will print if the item is SKU’ed.
Note: The item may have been ordered using a different item number if it is part of a continuity item or a set.
• Continuity items are sold together but delivered at regular intervals, such as days or months. The item’s kit type field must be set to C. For more information on continuity items, see Merchandising Entering Continuity Set Information (WCNT).
• A set item is a group of items which are sold together as a unit. A separate pick slip will print for each item included in the set with the message **Other Items Shipped Separately**. The total for the set will print on one pick slip. Items that make up a set are referred to as component items; these might also be sold separately. The item’s kit type field must be set to S. For more information on set items, see Merchandising Entering Set Information (WSET).
• Item comments: Any information or comments about an item or SKU. Comments can be entered at the base item level or SKU level by entering 19 next to an item at the Work with Items Screen.
• Order line message: Order line messages flagged with a code of P (print on pick) or B (print on both) print on the pick slip. You can enter an order line message by entering 23 next to an item at the Work with Order Lines screen.
• Special handling instructions: A detailed description of any special handling option, such as color, material, monogramming, engraving, style, or size prints underneath any item to receive special handling. The special handling charge is included in the shipping and handling total on the pick slip. Custom special handling information that prints on the pick slip is the special handling option, the customer response, and the special handling charge.
• Description: A description of the item and SKU if the item is SKU’ed.
• Unit price: The amount the customer will pay for each unit of the item.
• Extension: The item price times the quantity shipped.
Pick slip totals:
• Total merchandise: The total extended price of all items on the pick slip. This total does not include backordered items, items shipped separately, or items with allocation stock errors.
• Shipping and handling: The total shipping and handling including any freight, additional freight, duty, additional charges, and special handling.
Note: If a negative additional charge is applied to the order, the system deducts the amount from this total.
• Sales tax: The total tax for all items on the pick slip. This total may include tax on shipping and handling, additional charges, and GST (Goods and Service tax) and PST (Provincial Service tax) tax rates which are specific to companies that operate in Canada and orders shipped to and within Canadian boundaries. For more information on GST and PST tax rates see Installation Setting Up Order Entry Values.
Note: Sales tax does not include VAT (Value Added Tax), a taxing method that applies in only certain states and countries and includes the tax in the price of the item. For more information on VAT, see the description of the Tax Included in Price (E70) system control value.
• Order total: Total merchandise, shipping and handling, additional charges, and tax.
• Total paid: The amount the customer prepaid, including coupons, gift certificates, and credits. This total is zero if the customer used a credit card or A/R payment method.
• Refund: The amount you owe the customer if the prepaid amount is more than the amount due.
• Balance due: The amount the customer owes you if the prepaid amount is less than the amount due. This amount is zero if the total balance was prepaid or a credit card was applied to the order.
• Total: Total merchandise, shipping and handling, tax, and additional charges.
• TSHP: The total number of units shipped on this pick slip.
Special considerations:
• Different ship-to: The name and address of a different ship-to customer. The number of additional ship-to addresses displays to the right of the customer number. A separate pick slip prints for each additional ship-to address. You can define a ship-to address that is different from the sold-to customer address by pressing F7 in order entry for a Customer ship-to address, F14 in order entry for Order ship-to address, or F19 in order entry for a Recipient ship-to address.
• Gift order: A separate pick slip without dollar totals will print stating this is a gift order. **GIFT ACKNOWLEDGEMENT** will print above the dollar totals line on the pick slip. Also, the SmartLabel printing is suppressed if you use SmartLabel processing (see Using SmartLabel Returns Processing). You can define an order as a gift order by setting the Gift field to Y on the Work with Order screen in Order Entry.
• Gift certificate: The pick slip displays **COUPON/GIFT CERTIFICATE APPLIED TO YOUR ORDER** if a gift certificate is used as a payment method. The order total is the complete amount of the order on the pick slip. The balance due is the amount due if the gift certificate is for an amount less than the total of the order.
• Flexible Payment Options: A deferred payment or installation billing option. The first line of the pay plan message will print on the pick slip when you assign a flexible payment option to the order. For more information refer to System Operations Working with Flexible Payment Options (WFPO).
• Warehouse: A separate pick slip prints for those items which are located in a warehouse other than the primary location for the item, and for items reserved in more than one warehouse. The warehouse location for a non-inventory item will not print on the pick slip. The item’s primary, primary location, as defined in the Non-inv SKU system control value, will print on the pick slip. The system picks inventory from the location or warehouse where the inventory is available.
• Ship alone items: A separate pick slip is generated for items specified as ship alone. **Other Items Shipped Separately** appears on all pick slips for the order.
• Cubing: A cumulative cubic volume of all items ordered. Total cube is calculated by multiplying the cubic volume of each item times the quantity ordered. During pick slip generation, the system checks the cubing value of a carton, and determines how many items can ship in a single carton. The system generates a pick slip for each carton required for the order. To use the cubing feature, you must define a cube value for each item/SKU you wish to perform cubing for and set the Perform Cubing? (B36) system control value to Y. The cubing total will display between the refund total and the balance due total on the pick slip. See Performing Cubing.
FedEx SmartPost1 is a service of FedEx Ground offered to large volume shippers to ship high volumes of low-weight packages to residential customers. FedEx picks up the packages at the fulfillment center, sorts the packages to the proper destination postal codes, tracks the packages during the route to the destination postal code, and delivers the packages to regional USPS sorting facilities and has USPS make the final delivery to the residence.
SmartPost pick slips include a FedEx SmartPost label (in addition to the shipping/billing label) so that you do not have to print the SmartPost label at the manifesting station (unless there is more than one package). In addition, the pick slip prints on an 8 1/2 x 14 form using a laser printer.
• Determining Which FedEx SmartPost Label to Print on the Pick Slip
• Sample SmartPost Pick Slip Contents
In order to print a SmartPost pick slip, you must complete the required setup.
System Control Value |
Description |
The base print program that prints a FedEx SmartPost label on the pick slip is FLR1198. |
|
Enter the nine-position D-U-N-S number to include in the barcode on the FedEx SmartPost label. The D-U-N-S number is a unique, nine-position ID assigned by the Dun & Bradstreet Corporation to identify business entities. Note: Enter the nine digits only, omitting any hyphens or spaces. For example, if your D-U-N-S number is 01-234-56789, enter 0123456789. |
|
Enter the application ID prefix to include in the barcode on the FedEx SmartPost label. |
|
Enter the application ID to include in the barcode on the FedEx SmartPost label. |
|
Enter the USPS service type that controls the service type description to print above the barcode on the SmartPost pick slip. Enter 02 to print the FedEx SmartPost Label: Delivery Confirmation 1lb and Over (Default Label) or FedEx SmartPost Label: Delivery Confirmation Under 1lb. Enter 56 to print the FedEx SmartPost Label: Non-Delivery Confirmation Under 1lb. |
In Working with Ship Via Codes (WVIA):
• Create a ship via called SmartPost to avoid any confusion at the post office regarding the actual ship via.
• Enter SP in the Ship via type to indicate that you wish to print SmartPost pick slips for the specified ship via.
• Define ship via indicia messages to print on the SmartPost label using the Work with Ship Via Indicia Screen. You can create multiple ship via indicias for the same ship via/drop point combination; however, an error message similar to the following displays if you try to create multiple ship via indicias for the same ship via/drop point/indicia description 1 combination: Ship Via Indicia for (1-BC1-BOSTON CENTER) already exists.
• If you have defined 02 in the SmartPost USPS Service Type (J79), you need to create two ship via indicias for the SmartPost ship via:
To print the FedEx SmartPost Label: Delivery Confirmation 1lb and Over (Default Label): |
|
Indicia description 1 |
PARCEL SELECT |
Indicia number |
US POSTAGE PAID |
Indicia description 2 |
SMARTPOST |
Indicia description 3 |
E-VS |
To print the FedEx SmartPost Label: Delivery Confirmation Under 1lb: |
|
Indicia description 1 |
PRSRT STD |
Indicia number |
US POSTAGE AND FEES PAID |
Indicia description 2 |
SMARTPOST |
Indicia description 3 |
E-VS |
• If you have defined 56 in the SmartPost USPS Service Type (J79), you need to create one ship via indicia for the SmartPost ship via:
To print the FedEx SmartPost Label: Non-Delivery Confirmation Under 1lb: |
|
Indicia description 1 |
PRSRT STD |
Indicia number |
US POSTAGE PAID |
Indicia description 2 |
SMARTPOST |
Indicia description 3 |
E-VS |
In Performing Initial Item Entry (MITM), enter the shipping weight of the item/SKU in the Shipping weight field.
When evaluating an item’s shipping weight, the system checks the Ship weight at the SKU level first; if there is no ship weight at the SKU level, the system uses the Ship wgt. (Shipping weight) at the item level.
You must print the SmartPost pick slip on a laser printer that can run IPDS printer emulation, such as the IBM 4028 printer.
Determining Which FedEx SmartPost Label to Print on the Pick Slip
The setting of the SmartPost USPS Service Type (J79) system control value and the Shipping weight of the items on the pick slip determines which FedEx SmartPost label prints on the pick slip.
Available FedEx SmartPost labels are:
• FedEx SmartPost Label: Delivery Confirmation 1lb and Over (Default Label)
• FedEx SmartPost Label: Delivery Confirmation Under 1lb
• FedEx SmartPost Label: Non-Delivery Confirmation Under 1lb
FedEx SmartPost Label: Delivery Confirmation 1lb and Over (Default Label)
The system prints this FedEx SmartPost label if you have completed SmartPost Pick Slip Setup and:
• the SmartPost USPS Service Type (J79) system control value is set to 02.
• the Ship via type for the ship via on the pick slip is SP (SmartPost).
• a ship via indicia is defined for the ship via and associated drop point. In addition, the Indicia description 1 field does NOT contain PRTSRT STD.
• the total shipping weight of the items on the pick slip is zero OR equal to or greater than one pound.
In addition, the system prints this label if the pick slip does not meet the requirements to print the FedEx SmartPost Label: Delivery Confirmation Under 1lb or FedEx SmartPost Label: Non-Delivery Confirmation Under 1lb.
For more information: See FedEx SmartPost Label for a description of the information on this label.
FedEx SmartPost Label: Delivery Confirmation Under 1lb
The system prints this FedEx SmartPost label if you have completed SmartPost Pick Slip Setup and:
• the SmartPost USPS Service Type (J79) system control value is set to 02.
• the Ship via type for the ship via on the pick slip is SP (SmartPost).
• a ship via indicia is defined for the ship via and associated drop point. In addition, the Indicia description 1 field contains PRTSRT STD.
• the total shipping weight of the items on the pick slip is less than one pound.
For more information: See FedEx SmartPost Label for a description of the information on this label.
FedEx SmartPost Label: Non-Delivery Confirmation Under 1lb
The system prints this FedEx SmartPost label if you have completed SmartPost Pick Slip Setup and:
• the SmartPost USPS Service Type (J79) system control value is set to 56.
• the Ship via type for the ship via on the pick slip is SP (SmartPost).
• a ship via indicia is defined for the ship via and associated drop point. In addition, the Indicia description 1 field contains PRTSRT STD.
• the total shipping weight of the items on the pick slip is less than one pound. Note: If the total shipping weight of the items on the pick slip is one pound or greater, and all other criteria to print the label are met, the system prints the FedEx SmartPost Label: Delivery Confirmation 1lb and Over (Default Label).
For more information: See FedEx SmartPost Label for a description of the information on this label.
Sample SmartPost Pick Slip Contents
The information that prints on the SmartPost pick slip is presented below. See Printing SmartPost Pick Slips for more information on how to print a SmartPost pick slip.
Note: The contents and format for your unique SmartPost Pick print program may differ from the base SmartPost Pick print program FLR1198.
Pick Slip Header Information
Pick slip header information displays above and below the sold to label and ship to label.
Pick slip header information above sold to and ship to labels:

• Order number and Ship to number: The order number and ship to number prints above the sold to name and address and above the ship to name and address.
• Number of shipments: The number of previous shipments made against the associated order.
• Billing batch number and Cart batch number: B# displays before the billing batch number and cart batch number.
• Date: The date the pick slip was generated. The date prints above the sold to name and address and above the ship to name and address.
• Ship via code: The ship via code assigned to the pick slip. The ship via code displays to the right of the date.
Pick slip header information below sold to and ship to labels:

• Pay type description: The first 20 positions of the payment method on the order. If the order contains multiple payment methods, the first 2 payment methods display on the pick slip.
• Ship to customer number
• Ship via description: The first 10 positions of the ship via description.
• Pick slip message: A message that displays on all pick slips in the pick slip generation batch, such as a customer service, warehouse, or gift message. You can enter 3 pick slip message lines in the Pick Message code/text field when you select options for the pick slip generation batch.
• Order level messages: The first four printable order level messages. You can enter a message at the Work with Order Messages Screen, available by pressing F23 in order entry, order maintenance, or order inquiry. The print flag must be set to P (print on pick) or B (print on both) at the Work with Order Messages screen for the message to print on the pick slip.
• Order date: The date the order was placed.
• Purchase order #: The purchase order number, if any, that was provided by the sold-to customer. Purchase orders are used primarily by A/R customers. You can enter a purchase order number on the Work with Order screen in order entry.
• Source code: The source code defined on the order header to identify a group of customers.
• Ship via description: The first 10 positions of the ship via description.
• Packer: A code that represents an inventory picker or packer in your warehouse. You can assign a picker/packer code at the Work with Pickers/Packers Screen.
• Ship to customer number
• Order number
• Pick slip page number: If the page number is greater than 1, the system underlines the number.
Sold To Name and Address
The sold to label displays on the left-hand side of the pick slip.
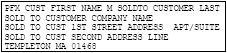
• Prefix, First name, Middle initial, Last name, and Suffix (The first 40 positions of the sold to name displays; if the sold to name is greater than 40 positions, the system drops the suffix and truncates the last name)
• Company
• Address line 1 and Apartment
• Address line 2 (lines 3 and 4 do not print)
• City, State, Postal code and Country (The country prints only if the address is for a country other than the default specified in the Default Country for Customer Address (B17) system control value.)
Ship To Name and Address
The ship to label displays on the right-hand side of the pick slip.
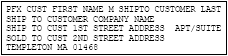
• Prefix, First name, Middle initial, Last name, and Suffix (The first 40 positions of the ship to name displays; if the ship to name is greater than 40 positions, the system drops the suffix and truncates the last name)
• Company
• Address line 1 and Apartment
• Address line 2 (lines 3 and 4 do not print)
• City, State, Postal code and Country (The country prints only if the address is for a country other than the default specified in theDefault Country for Customer Address (B17) system control value.)
Pick Slip Detail Information

• Location code: The location in the warehouse where the item is picked. If the item is picked from more than one location, the system prints each location for the item on the pick slip.
• Quantity shipped/printed: The quantity of the item printed on the pick slip for the specified location.
• Quantity backordered: The quantity of the item that is currently unavailable to ship. The system displays drop ship items as backordered on the pick slip until you generate a drop ship pick slip or purchase order for the drop ship items. However, the system continues to display drop ship items as backordered even after a drop ship pick slip or purchase order has been generated for the drop ship items if the Add Printed Drop Ship Lines as Backordered on Pick (E93) system control value is selected.
• Item/SKU: A code for the item and SKU.
• The system includes non-inventory items on the pick slip. If you defined a location for the non-inventory item, the system displays the location on the pick slip.
• If you have defined an alias for the item, the system prints the alias instead of the item code on the pick slip.
• For set items, the price of the set prints next to the main set item or components items, based on whether your price the set item at the set master level or component level.
• Item/SKU description: A description of the item/SKU.
• Unit price: The unit price for the item/SKU.
• Extended price: The extended price for the item/SKU; this is the item price times the quantity shipped.
Information that can print for an item on the pick slip:
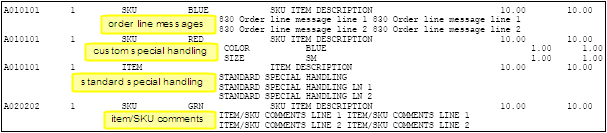
• Order line messages: Order line messages flagged with a code of P (print on pick) or B (print on both) print on the pick slip. You can enter an order line message by entering 23 next to an item at the Work with Order Lines screen. You can print up to 1000 order line messages.
• Special handling instructions: The system prints both standard special handling and custom special handling on the pick slip. The special handling charge is included in the shipping and handling total on the pick slip.
• Standard special handling: You can print up to 100 lines of standard special handling.
• Custom special handling: The system prints the special handling option, the customer response, and the special handling charge. You can print up to 999 lines of custom special handling.
• Item/SKU comments: Any information or comments about an item or SKU. Comments can be entered at the base item level or SKU level by entering 19 next to an item at the Work with Items Screen. You can print up to 104 lines of item/SKU comments.
Pick Slip Messages
For multi-page pick slips, the system prints any pick slip messages on the last page of the pick slip.

• TSHIP: The total number of units shipped on this pick slip.
• Deferred/installment billing message: If you have assigned a deferred payment or installation billing option to the order, the first line of the pay plan message prints on the pick slip. For more information refer to System Operations Working with Flexible Payment Options (WFPO).
• Coupon/Gift certificate payment method message: The pick slip displays *COUPON/GIFT CERTIFICATE APPLIED TO YOUR ORDER* if a gift certificate is used as a payment method. The order total is the complete amount of the order on the pick slip. The balance due is the amount due if the gift certificate is for an amount less than the total of the order.
• Shipped separately message: A separate pick slip is generated for items specified as ship alone. **Other Items Shipped Separately** appears on all pick slips for the order.
Pick Slip Totals
For multi-page pick slips, the system prints the pick slip totals on the last page of the pick slip.

• Shipped merchandise: The total extended price of all items on the pick slip. This total does not include backordered items, items shipped separately, or items with allocation stock errors.
• Shipping and handling: The total shipping and handling including any freight, additional freight, duty, additional charges, and special handling.
If a negative additional charge is applied to the order, the system deducts the amount from this total.
• Sales tax: The total tax for all items on the pick slip. This total may include tax on shipping and handling, additional charges, and GST (Goods and Service tax) and PST (Provincial Service tax) tax rates which are specific to companies that operate in Canada and orders shipped to and within Canadian boundaries. For more information on GST and PST tax rates see Installation Setting Up Order Entry Values.
Sales tax does not include VAT (Value Added Tax), a taxing method that applies in only certain states and countries and includes the tax in the price of the item. For more information on VAT, see the description of the Tax Included in Price (E70) system control value.
• Shipment total: Total merchandise, shipping and handling, additional charges, and tax for the items on the pick slip.
• Total paid: The amount the customer prepaid, including coupons, gift certificates, and credits. This total is zero if the customer used a credit card or A/R payment method.
• Refund: The amount you owe the customer if the prepaid amount is more than the amount due.
• Balance due: The amount the customer owes you if the prepaid amount is less than the amount due. This amount is zero if the total balance was prepaid or a credit card was applied to the order.
• Shipping weight: The total shipping weight of the items on the pick slip, including the dunnage weight of the packing materials, as defined in Working with Dunnage Weight (WDUN).
For multi-page pick slips, the system prints the FedEx SmartPost label on the last page of the pick slip.
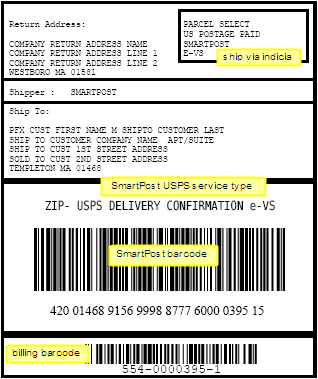
• Return address: The return address defined for the CWDirect company in Work with Companies (WCMP). This consists of:
• Company return address name
• Company return address line 1
• Company return address line 2
• Company return address city, state, and postal code
If a return address has not been defined for the CWDirect company, the system prints the company address defined in Work with Companies (WCMP). This consists of:
• Company description
• Company address line 1
• Company address line 2
• Company address city, state, and zip code
• Ship via indicia: The ship via indicia information defined for the ship via code on the pick slip. This consists of:
• Indicia description 1
• Indicia number
• Indicia description 2
• Indicia description 3
• Shipper: The first 10 positions of the Ship via description for the ship via code on the pick slip.
• Ship to: The ship to customer name and address. This consists of:
• Ship to customer prefix, first name, middle initial, last name, and suffix
• Ship to company name
• Ship to address line 1 and apartment
• Ship to address line 2
• Ship to address line 3
• Ship to city, state, and postal code
• SmartPost USPS service type: The description of the service type code defined in the SmartPost USPS Service Type (J79) system control value.
• For USPS service type 02, ZIP - USPS DELIVERY CONFIRMATION e-VS defaults.
• For USPS service type 56, ZIP - e-VS defaults.
• SmartPost barcode: The SmartPost barcode and barcode text. The barcode text consists of:
• Application prefix ID defined in the SmartPost Application ID Prefix (J77) system control value (420 in the sample barcode)
• Ship to customer postal code (01468 in the sample barcode)
• Application ID defined in the SmartPost Application ID (J78) system control value (91 in the sample barcode)
• USPS service type defined in the SmartPost USPS Service Type (J79) system control value (56 in the sample barcode)
• D-U-N-S number defined in the SmartLabel D-U-N-S Number (I47) system control value (999887776 in the sample barcode)
• Pick control number (0000367 in the sample barcode)
• Ship via code (11 in the sample barcode)
Important: The SmartPost USPS service type and SmartPost barcode do not print (remain blank) on the pick slip if the ship via on the pick slip is not defined as a SmartPost ship via (the Ship via type for the ship via is not SP) OR the system control values related to SmartPost pick slips are not populated (see SmartPost Pick Slip Setup).
• Billing (Shipping) barcode: The billing/shipping barcode and barcode text. The barcode text consists of:
• Company code: The company where you generated the pick slip. (554 in the sample barcode)
• Pick control number (0000367 in the sample barcode)
• Label number: Pick slip label number. (1 in the sample barcode)
Return Label
The return label prints on the bottom-right corner of the pick slip above the Billing/Shipping Labels. For multi-page pick slips, the system prints the return label on the last page of the pick slip.

• Return address: The company return address defined in Work with Companies (WCMP); if a return address is not defined, the system prints the company address.
• Company name
• Company address line 1
• Company address line 2
• City, state code, and postal code
• Order number barcode: The barcode identifies the order number for the return. You can scan this barcode during returns processing to access the order being returned quickly.
• Ship to name and Address:
• Prefix, First name, Middle initial, Last name, and Suffix (The first 40 positions of the ship to name displays; if the ship to name is greater than 40 positions, the system drops the suffix and truncates the last name)
• Company
• Address line 1 and Apartment
• Address line 2 (lines 3 and 4 do not print)
• City, State, Postal code and Country (The country prints only if the address is for a country other than the default specified in theDefault Country for Customer Address (B17) system control value.)
• Order number and Ship to number
• Ship to customer number
The billing/shipping barcodes print in three places on the SmartPost pick slip:
• under the SmartPost barcode on the FedEx SmartPost Label
• on two smaller pull-off labels on the bottom-right corner of the pick slip
You can use the barcode in the PC Manifest system to scan packages at a shipping station and record the information necessary to print the required manifests.
For multi-page pick slips, the system prints the barcodes on the last page of the pick slip.
• Billing (Shipping) barcode: The billing/shipping barcode and barcode text. The barcode text consists of:
• Company code: The company where you generated the pick slip. (554 in the sample barcodes)
• Pick control number (0000395 in the sample barcodes)
• Label number: Pick slip label number. (2 and 3 in the sample barcodes)
- FedEx Smartpost is a registered trademark of FedEx Corporate Services, Incorporated, its parent and its parent’s subsidiary companies in the United States and other countries.
| Working with Interactive Reservation (MIRV) | Contents | SCVs | Search | Glossary | Reports | Solutions | XML | Index | Pick Cart/Batch Pull Sheet |

FU01_04 CWDirect 18.0.x 2018 OTN