(Classic) Adding Organizational Instances
These topics list common elements and discuss how to add organizational instances for people [employees, contingent workers, and person's of interest (POIs)] using the classic pages.
|
Page Name |
Definition Name |
Usage |
|---|---|---|
|
JOB_DATA1 |
Enter position and location information for a person's job, including the regulatory region, company, department, and location. |
|
|
JOB_DATA_JOBCODE |
Enter information about a person's job, including status, employee class, shift, or standard hours. |
|
|
POSN_INCUM_DAT_SEC |
View the incumbents for a reports to position. |
|
|
JOB_LABOR |
Enter National Labor agreement data if the employee or contingent worker belongs to a National Labor agreement. |
|
|
JOB_DATA2 |
Enter payroll processing data. The payroll system and pay group information that you enter here affects component compensation processing on the Job Data - Compensation page. |
|
|
JOB_DATA_SALPLAN |
Enter information about a person's salary plan. |
|
|
JOB_DATA3 |
Enter compensation information. |
|
|
Contract Change Prorate Options Page |
JOB_CNT_CHG_SEC |
Choose how to handle contract pay when there is a change to the contract amount. |
|
EMPLOYMENT_DTA1 |
Enter optional data, such as a worker's business title. |
|
|
JOB_DATA_ERNDIST |
Distribute a person's compensation for one job among different departments, job codes, accounts, shifts, position numbers, or general ledger pay types. If the person's pay is regularly charged to more than one cost center, designate how much to allocate to each cost center. |
|
|
JOB_DATA_BENPRG |
Specify the benefit program in which a person is enrolled for benefits in PeopleSoft Human Resources or PeopleSoft Benefits Administration. |
|
|
PERSON_CHECKLIST |
Ensure that the human resources administrators perform all the required administrative tasks for a person, create a checklist listing all the items that need to be completed and the person responsible for completing them. |
|
|
PERS_APPL_INFO |
Define applicant referral information. |
|
|
EMPLOYEE_CHECKLIST |
To ensure that the human resources administrators perform all the required administrative tasks for an employee, create a checklist listing all the items that need to be completed and the person responsible for completing them. |
Note: The Job Search (HC_HR_JOB_DATA) search index supports real time indexing (RTI) with PeopleTools version 8.59.07 or higher. When enabled, RTI allows real-time updates to the indexed data to provide job search using the latest information.
For more information about Real Time Indexing, refer to PeopleTools Search Technology, “Administering Real Time Indexing.”
Field or Control |
Description |
|---|---|
Go To Row |
Click icon to enter a date or row number in which you would like to view. |
Benefits Program Participation |
Click to Access the Benefit Program Participation page. |
Cross Border Worker |
Select if the person lives in one country and works in another. These people have special tax and social security needs. |
Employment Data |
Click to access the Employee Information page. |
Earnings Distribution |
Click to access the Job Earnings Distribution page. |
FA Holiday Type (festive advance holiday type) |
Select the festive advance holiday type. |
Festive Advance Eligible From |
Select the date on which the person becomes eligible for the selected festive advance pay program. |
Festive Advance Pay Program |
Select the festive advance pay program for the person. |
Job Data |
Click to access the Work Location, Job Information, Job Labor, Payroll, Salary Plan, and Job Data - Compensation pages. |
Military Status |
Select the person's current military status. |
Owns 5% (Or More) of Company |
Select if the person owns five percent or more of the company. The system uses this field to identify highly compensated employees for the Non-Discrimination Testing – 401(k)/401(m) report (NDT004) in the Manage Base Benefits business process of PeopleSoft Human Resources. |
Regulatory Region |
Select the regulatory region. |
Religion |
Select the religion. You set up religion on the Religions page. Note: (AUS and NZL) Set this field to Not Applicable. |
Security Clearance |
If the person receives a security clearance, enter the level of clearance: Classified, Secret, or Top Secret. |
Use the Work Location page (JOB_DATA1) to enter position and location information for a person's job, including the regulatory region, company, department, and location.
Navigation:
This example illustrates the fields and controls on the Work Location page (1 of 2). You can find definitions for the fields and controls later on this page.

This example illustrates the fields and controls on the Work Location page (2 of 2). You can find definitions for the fields and controls later on this page.
Field or Control |
Description |
|---|---|
Military Service |
Select the military service in which the person is serving. Displays when the Military check box is selected on the Installation Table. This field is available if you are adding a new Job Data record, when you are not adding a new Job Data record this field is display only. |
Effective Date |
Enter the effective date. When you add a new instance with the action of Hire, the effective date that you enter here becomes the hire and original hire date. |
Effective Sequence |
Enter a number to track multiple administrative actions that occur on the same day. The default value is 0, the correct number for new instances. |
Action and Reason |
Select the action requiring you to create or modify this record. The system displays a default value when you create a new employment, contingent worker, or POI instance. Reason codes are associated with the action you select. Note: During data conversion into the PeopleSoft system for new customers, it may be appropriate to correct the default action value, such as Hire, to a value that reflects the person's current information, but changing the Action code for the first row of job data is not otherwise appropriate. |
HR Status |
Displays the status of the current job record. A person can have an active HR status but an inactive job or payroll status. |
Payroll Status or Job Status |
The page displays the Payroll Status text for employee employment instances. Displays the payroll status of the current job record. Some changes that you make to this field trigger Retro Pay or Final Check processing. A Retro Pay Request is triggered by any payroll status change with an effective date that's earlier than or equal to the latest pay end date of a check already paid to the employee. A Final Check Request is triggered by any payroll status change that's based on one of the action or reason codes that are defined in the Final Check Action/Reason table. The page displays the Job Status text for contingent worker or POI instances. |
Job Indicator |
Indicate whether this is the person's primary or secondary job for this organizational relationship. Select Not Applicable if those selections don't apply to this job. This field is used to process people with more than one organizational instance in a single organizational relationship. |
Calculate Status and Dates |
Click this button to calculate the person's HR, job, or payroll status and the employment dates so that you can review the changes before you save the component. The system displays this button when you make a change to the effective date or one of the status fields. You do not need to click this button to refresh the status and date fields. The system will refresh these fields when you save the component. |
Maintain/View Notes |
Click this icon to access the Job Data Notepad page. |
Position Number |
If you drive part or all of the system by position, select a position number. Define positions in the Add/Update Position Info component. When you leave the Position Number field, the system completes position-related fields in the Job Data component with default data from the Add/Update Position Info component, including job code, department, location, supervisor level, reports to, and full- or part-time status. The corresponding fields become unavailable for entry. PeopleSoft Human Resources issues a warning message if you assign a person to a position that is already filled and if the new appointment exceeds the maximum headcount for that position. The system calculates the headcount and displays the appropriate indicator in the Open/Filled field in the Add/Update Position Info component when you change assignments. When Manage Primary Incumbent is enabled on the Position Management Installation Page, and you made a change to a person’s position, the system issues a warning message about updating the primary incumbent information and recommends reviewing the Manage Primary Incumbents Page. This happens when:
The system will also send a push notification to the position administrator to review the Manage Primary Incumbents page. For additional information see Managing Primary Incumbent Information for a Position. Note: Oracle PeopleSoft delivers Notification Composer Framework to manage the setup and administration of all notifications in one central location. Once you have adopted the Notification Composer feature, you must use it to create new notifications and manage your existing notifications. Notifications delivered with HCM Image 47 or later must use Notification Composer. For more information about Notification Composer Framework, see Understanding Notification Composer. |
Position Entry Date |
When you enter a position number for this person, the system populates this field with the effective date and this field becomes unavailable for entry. You can override the default by clicking the Override Position Data button. If you are entering a transaction that returns a person to active status from an inactive status, the system will populate the field with the effective date of that transaction. For example, if you are rehiring a person as of September 1, 2014, the field will update to reflect this rehire date. |
Override Position Data and Use Position Data |
Click Override Position Data to enter exceptions to the default position data for this person. This opens up the unavailable fields, including Job Code and Department, and you can override the entries that are in those fields. For example, the worker might have a higher salary grade than the standard grade that is associated with the position. When you click Override Position Data, the button becomes the Use Position Data button, and vice versa. This button is available only on new rows of data. Warning! When a position override is selected for the purpose of setting a supervisor ID as manager instead of using the defaulted reports to value by leaving it blank, be aware that approval processes that use partial position management will attempt to resolve the position’s reports to manager from the Position Data table before using the supervisor ID supplied in Job Data. The approval process will route the approval to the reports to manager instead of the supervisor. Note: If you override the defaults for position-related data, you must maintain the employee data manually; the system doesn't update the position data on the Job Data pages with data from the Add/Update Position Info component unless you click Use Position Data. |
Position Management Record |
The system selects this check box when you make changes to fields in the Add/Update Position Info component that initiate a system update of fields here. A selected check box indicates that the system inserts a data row on the Job Data pages. |
Regulatory Region |
If you have specified a regulatory region for the position you associated with this person, the system enters a default regulatory region and this field becomes unavailable for entry, unless you click the Override Position Data button. If you have not assigned the person to a position, then the system populates the field by default with the regulatory region for the person, based on your user preferences entered in the Org Defaults by Permission Lst component. You can override the default. |
Company |
If you have specified a company for the position you associated with this person, the system enters a default company and this field becomes unavailable for entry, unless you click the Override Position Data button. If you have not assigned the person to a position and you assigned a company to a department in the Department table, a default company code appears, and this field becomes unavailable for entry. If you did not designate a company on the Department table, select a company here. PeopleSoft Payroll for North America requires employees and supported types of persons of interest to be associated with companies that have the correct tax report type, as configured on the Company Table - Tax Details page:
|
Business Unit |
If you have specified a business unit for the position you associated with this person, the system enters a default business unit and this field becomes unavailable for entry, unless you click the Override Position Data button. If you have not assigned the person to a position, then the system populates the field by default with the business unit for the person, based on your user preferences. You can override the default. The business unit that you assign to the person on this page and the setID functionality in PeopleSoft Human Resources Management affect the way that default values work throughout the PeopleSoft Human Resources system. Your entry in this field controls the departments, locations, job codes, salary plans, and so on that you see on the remaining Job Data component pages. |
Department |
If you have specified a department for the position you associated with this person, the system enters a default department and this field becomes unavailable for entry, unless you click the Override Position Data button. If you have not assigned the person to a position, select the department code for this person. When you leave the field, the system inserts a default supervisor or reports to ID on the Job Information page if you entered a default supervisor or reports to ID for this department in the Department table. The system enters default values for the following fields on the Job Data - Payroll page: Employee Type and Pay Group (which you associate with a company in the Company table). Depending upon other data setup, the system might enter a default holiday schedule. See Setting Up Holiday Schedules. Note: Because this page can contain multiple data rows, the system doesn't always warn you that you must complete the Department field. However, if you change data in another field on the page, the system issues a warning and won't let you leave the field until you select a department code. |
Department Entry Date |
If you have specified a department for the position you associated with this person, the system enters a default department entry date and this field becomes unavailable for entry, unless you click the Override Position Data button. When you leave the Department field, the system displays the date on which the person is first assigned to this department. However, if you are entering a transaction that returns a person to active status from an inactive status, the system will populate the field with the effective date of that transaction. For example, if you are rehiring a person as of September 1, 2014, the field will update to reflect this rehire date. |
Location |
If you have specified a location for the position you associated with this person, the system enters a default location and this field becomes unavailable for entry, unless you click the Override Position Data button. If you have not assigned the person to a position and you assigned a location to a department in the Department table, the system displays the department location, if the default location setID that you define in the Department table matches the control location set ID that is defined for that business unit in the TableSet Control - Record Group table. You can change the location code. If you did not designate a location on the Department table, select a location here. Note: For workers paid through PeopleSoft Payroll for North America, the location that appears here does not determine the person's primary work state and location that appear on the paysheets. You specify that information by selecting a tax location code on the Job Data - Payroll page. |
Establishment ID |
Select the person's establishment. Establishments are used for several countries for local regulatory reporting. These reports require that each person be assigned to a single establishment. Establishments in regulatory regions other than USA have a one to one relationship with locations. Note: (USA) In the USA regulatory region, there is a many to many relationship between locations and establishments. USA regulatory reports require that you associate an establishment ID with a person at the job level. Note: (FRA) For payroll purposes, you must always assign persons to an establishment. If a person is assigned to a position, the system enters the establishment ID that is associated with the position and makes the field unavailable. If you associate a non-French position with a French person, the field remains available for entry. |
Date Created |
Displays the date on which you enter this record. |
Last Start Date |
Enter the most recent start date for this organizational instance. |
Expected Job End Date and Expected Return Date |
Enter the end date or return date for this job, if known. If you don't know the date initially, you can enter it later. If this job is a temporary assignment and you do not enter a date in the Expected Job End Date field, you can run the Temporary Assignment w/out End Date report to identify those assignments that do not have an end date. This date is necessary if you want the system to terminate this job and reactivate any substantive job that may be on hold. The system displays the day before the termination effective date as the termination date. |
End Job Automatically |
Select to end the job on the specified date. This stops all related processing for payroll and benefits for this job. You must run the Reactivate/Termination Update process if the organization uses this feature. You can use this feature only if the Automatic Job Termination check box is selected on the Installation Table - Product Specific page. |
Termination Date, Last Date Worked, and Override Last Date Worked |
The system displays the day before the termination effective date as the termination date and the date last worked. These fields display when you have indicated an action that will inactivate or suspend a job. If you rehire the person, the system deselects these fields. When a person returns from leave, the system deselects only the Last Date Worked field. If the date is not accurate, select Override Last Date Worked to enter the date. |
Military
The Military section is available when military is enabled on the Installation Table. Valid values for the service component and component category of the person depend upon the military service you enter at the top of the Work Location page.
Field or Control |
Description |
|---|---|
Service Component |
Indicate the employee's service type for their military service, such as regular, activity reserve, and so forth. |
Component Category |
Enter a service component category to further define for the service component for this person. |
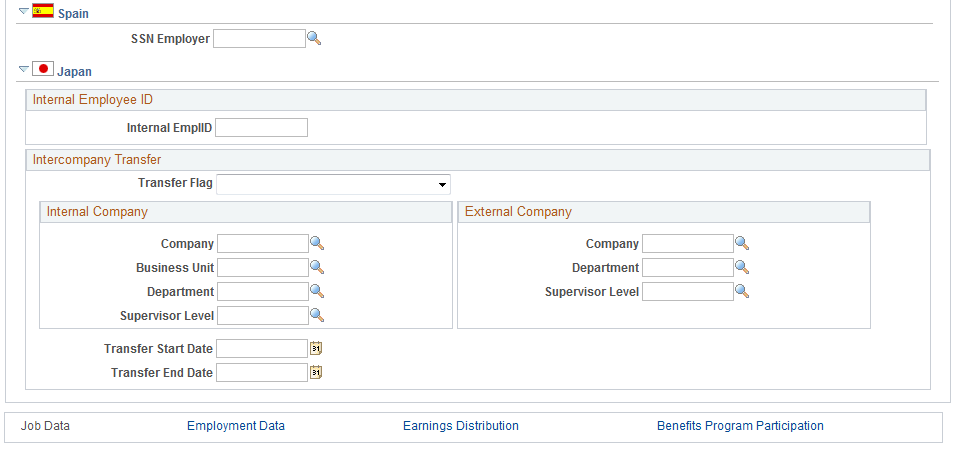
(ESP) Spain
Field or Control |
Description |
|---|---|
SSN Employer (social security number for employer) |
Enter the company SSN, as assigned by the Spanish government, that applies to this person. |
(JPN) Japan
Field or Control |
Description |
|---|---|
Internal EmplID (internal employee ID) |
Enter the person's internal ID. You can store an internal emplID if the company uses meaningful employee IDs, and those IDs themselves need to change with certain employee data changes such as employment type changes. Internal EmplIDs also appear on the JPN Job Summary page, and you can search the system by internal EmplID. |
(JPN) Intercompany Transfer
This region enables you to specify intercompany transfer (shukkou) data for Japan. Enter information about the company and department that the person is transferring to or from in the appropriate group box, Internal Company or External Company. Values for the External Company group box are set up on the Set Up Company/Dept Codes and Set Up Supervisor Level Codes pages.
Field or Control |
Description |
|---|---|
Intercompany Transfer Flag |
Specify whether the data that you enter on the page is home or host company information. The system uses this value in conjunction with intercompany transfer-related action or action reason codes to check the validity of the entries. Values are:
Select the blank value at the top of the list to remove all entries. |
Company |
Select the home or host company. The home or host company ID is a prompt value from the Company component (for internal company transfers) and the Set Up Company/Dept Codes page (for external company transfers). |
Business Unit |
Select the home or host business unit for internal company transfers only. Your entry in this field controls the Department and Supervisor Level field values in the Internal Company group box due to setID functionality for business units. |
Department |
Select the home or host department. The home or host department ID is a prompt value from the Departments component (for internal company transfers) and the Set Up Company/Dept Codes page (for external company transfers). |
Supervisor Level (external supervisor level) |
Select the home or host supervisor level. This value is a prompt value from the Supervisor Lvl Table component (for internal company transfers) and the Set Up Supervisor Level Codes page (for external company transfers). |
Transfer Start Date |
If you enter host data, enter the start date of this intercompany transfer. Don't enter a date if the action is RET (retirement) and the reason is PIT (permanent intercompany transfer). |
Transfer End Date |
If you enter host data, enter the expected end date of this intercompany transfer. Don't enter a date if the action is RET and the reason is PIT. The end date must be equal to or later than the effective date of the worker's current job record. |
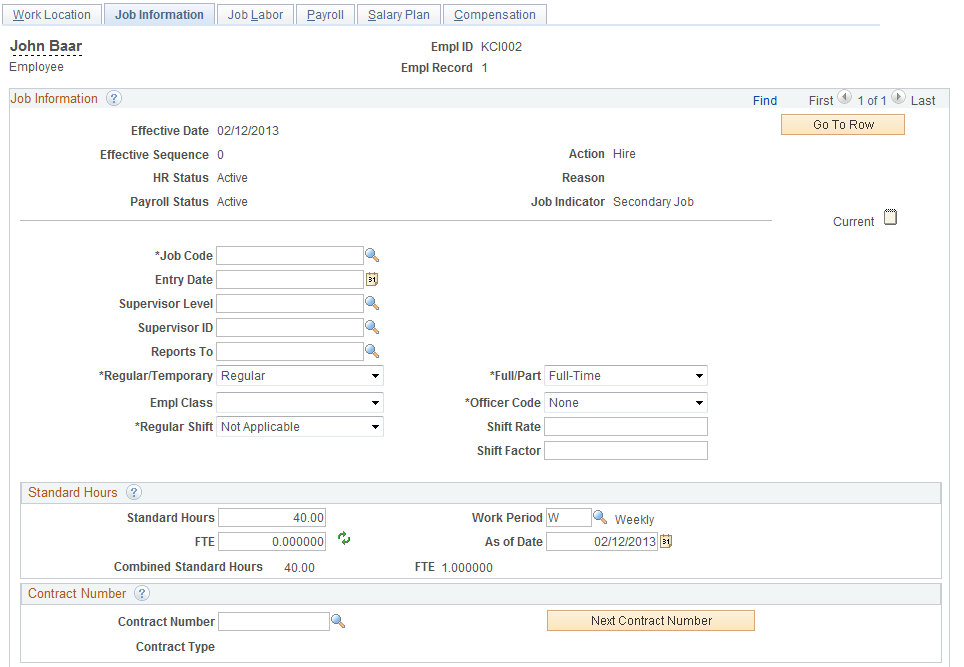
Use the Job Information page (JOB_DATA_JOBCODE) to enter information about a person's job, including status, employee class, shift, or standard hours.
Navigation:
This example illustrates the fields and controls on the Job Information page (1 of 4). You can find definitions for the fields and controls later on this page.
This example illustrates the fields and controls on the Job Information page (2 of 4). You can find definitions for the fields and controls later on this page.
This example illustrates the fields and controls on the Job Information page (3 of 4). You can find definitions for the fields and controls later on this page.
This example illustrates the fields and controls on the Job Information page (4 of 4). You can find definitions for the fields and controls later on this page.
Note: Many values on this page come from the value that you enter in the Department field on the Job Data - Work Location page. You can override most of these default values.
Field or Control |
Description |
|---|---|
Job Code |
If you have specified a job code for the position you associated with this person, the system enters a default job code and this field becomes unavailable for entry, unless you click the Override Position Data button on the Work Location page. If you haven't assigned the person to a position, select the job code for this person. Note: If you are attaching this person to a labor agreement on the Job Labor page and that labor agreement is associated with job codes, you must select a job code that is valid for the labor agreement. PeopleSoft Payroll for North America uses this field to create a pay line on a person's paysheets. The system creates a pay earnings record for each active job code on the person's employment record. See Job Codes Page. |
Entry Date |
When you leave the Job Code field, the system displays the date on which the person is first assigned to this job code. However, if you are entering a transaction that returns a person to active status from an inactive status, the system will populate the field with the effective date of that transaction. For example, if you are rehiring a person as of September 1, 2014, the field will update to reflect this rehire date. If you are using position management, this field is unavailable for entry, unless you click the Override Position Data button on the Work Location page. |
Supervisor Level |
Supervisor levels are a class of position that represent levels of some managerial or supervisory significance and can be used as another type of employee identifier. If you have specified a supervisor level for the position you associated with this person, the system enters a default supervisor level and this field becomes unavailable for entry, unless you click the Override Position Data button. If you did not assigned the person to a position, select the supervisor level code for this person, if applicable. |
Supervisor ID |
When using full Position Management, this field is unavailable. The system will use the Reports To field, which the position provides by default. When using partial or no Position Management, this field is available, however, the system will not allow you to save the page when there are values in both the Supervisor ID and Reports To fields. If you want to enter a supervisor ID when using partial Position Management and a person is assigned to a position, click the Override Position Data button on the Work Location page to enable the Reports To field and remove the value that is provided from the position number. If you have not assigned the person to a position and you assigned a manager ID to a department in the Department table, a default supervisor ID appears. If you did not designate a manager ID on the Department table, enter a supervisor ID here, if applicable. Note: Specify the person's department code before you enter a new supervisor ID. If you enter a supervisor ID before you select a department code, the system overrides the ID each time that you enter or change the person's department. |
Reports To |
Displays the position number, title, and name of the manager associated with this position. When the Manage Primary Incumbent functionality is enabled on the Position Management Installation Page, a View Current Incumbents link will appear instead of the Reports To manager’s name. If you have specified a reports to number for the position you associated with this person, the system enters the default value and this field is unavailable for entry, unless you click the Override Position Data button. Warning! When a position override is selected for the purpose of setting a supervisor ID as manager instead of using the defaulted reports to value by leaving it blank, be aware that approval processes that use partial position management will attempt to resolve the position’s reports to manager from the Position Data table before using the supervisor ID supplied in Job Data. The approval process will route the approval to the reports to manager instead of the supervisor. If you have not assigned the person to a position and you assigned a reports to ID to a department in the Department table, a default reports to ID appears. If you did not designate a reports to ID on the Department table, enter a reports to ID here, if applicable. |
View Current Incumbent link |
This link appears when you have enabled Manage Primary Incumbents on the Position Management Installation Page, the Reports To field is populated, and incumbents have been assigned to this Reports To position. Click this link to access the Current Incumbents Page to view the incumbents for the Reports To position. When there are no incumbents assigned to this Reports To position, the page will issue a message stating that there are no current incumbents to view. |
Regular/Temporary |
Defaults from the position number you associated with this person, and this field is unavailable for entry, unless you click the Override Position Data button. If you have not assigned the person to a position, the system displays the default value from the Job Code Table. You can override this value. |
Full/Part |
Defaults from the position number you associated with this person, and this field is unavailable for entry, unless you click the Override Position Data button. If you have not assigned the person to a position, indicate whether the worker is full-time or part-time. Note: The Manage Base Benefits business process uses the values that you select in the Regular/Temporary and Full/Part fields to determine eligibility requirements. PeopleSoft Payroll for North America uses the full-time or part-time information in conjunction with the holiday schedule. When a holiday falls within a pay period, Payroll for North America prorates the holiday hours for part-time workers. However, proration is based on the standard hours for the worker, not for the pay group. |
Empl Class (employee class) |
Select an employee class, which provides another method of grouping workers. Examples may include Assignee, Expatriate, or Intern. Employee classes are included in the Employee Labor Classification table. To override, access this page in correction mode. The list of values depends on the regulatory region that is specified on the Work Location page and the setID values entered in the Employee Labor Classification component. Note: (CHN) Select the Regular/Temporary field value first and then select the corresponding Empl Class value to enable the company to sort employees correctly. If you select the Regular/Temporary value of Regular, then you should leave theEmpl Class field empty. Normal global payroll taxes will be calculated for the employee. (If you select Regular for Regular/Temporary and Instructor for Empl Class, you can still save the data, but the company will be unable to sort employees correctly or calculate the correct employee number.) If you select Temporary for the Regular/Temporary value, then you can select any of the Empl Class values (Consultant, Contractor, Instructor, Intern, or Others). Remuneration services tax will be calculated in this case. (GBR) The Northern Ireland Fair Employment Monitoring report (UKNI001) uses the employee class to determine the classification of workers. If the organization submits this report, you must use the required employee classes for the report to work correctly. (JPN) Select Host ICT (Hosting Intercompany Transfer) to flag those workers that are hired on an intercompany transfer basis when the company is the host company. |
Officer Code |
Identify highly compensated workers for the Non-Discrimination Testing - 401(k)/401(m) report (NDT004). The default value is None. |
Regular Shift |
Defaults from the position number you associated with this person, and this field is unavailable for entry, unless you click the Override Position Data button. If the worker is working shifts, select the appropriate shift. If the worker doesn't work shifts, leave the Shift Rate and Factor fields blank. The default value is N/A (not applicable). |
Shift Rate andShift Factor |
If you selected the Specified at Employee level option on the Shift table, enter the shift differential for this worker and job. Enter the shift differential as a rate (flat amount), a factor (percentage), or both. Use the first field to enter a flat amount and the second field to enter a percentage. Note: To apply the same shift differential to a group of workers who work the same shift, enter shift information in the Shift table in Payroll for North America. If you specify the differential on the Shift table, the system does not use shift rate information from Job data. See Understanding HCM Information Used in the Payroll Process and Understanding Tables That Support the Payroll Process. |
Classified Ind (classified indicator) |
Associate the position with an FTE Classification (full time equivalents classification) that you established on the Department Budget FTE page. This field is visible only for departments that have been set up to use commitment accounting. Departments are configured to use commitment accounting on the Comm. Acctg and EG page in the Department component. |
Duties Type |
For jobs where the action or reason is temporary assignment, select the type of duties for the temporary assignment from the Temporary Duties Type table. You can use this feature only if the Automatic Job Suspension check box is selected on the Installation Table - Product Specific page. |
Encumbrance Override |
Select to override encumbrance processing at the job level when you create a new organizational instance or add a concurrent job for a worker date if the department uses Commitment Accounting. |
Standard Hours
The standard hours fields defaults from the position number you associated with this person, and these fields are unavailable for entry, unless you click the Override Position Data button. If you have not assigned the person to a position or click the Override Position Data and change the job code, then the system populates the fields by default from the job code. You can override the defaults.
Field or Control |
Description |
|---|---|
Standard Hours |
Displays by default the standard hours for the worker. Change the default value, if required. |
Work Period |
Select a standard work period, the time period during which workers must complete the standard hours. The system uses the annualization factor of the standard work period in combination with the standard hours to calculate full-time equivalency. |
FTE (full-time equivalency) |
Displays the percentage of full-time work that the worker should normally work in this job. The system calculates this value based on the standard hours entry for this job and the standard work period. However, you can override the system-calculated FTE and enter any value. The system issues a warning if you enter a value that is greater than 1.0. |
Combined Std Hours/FTE (combined standard hours/full-time equivalent) |
Displays the total standard hours that are assigned to the worker for all active jobs combined and the worker's total FTE status for all active jobs combined. For example, if a worker holds two jobs, one as a professor with an FTE of .5 and one as a physician with an FTE of .35, the worker's combined FTE is .85 (.5 + .35 ). You can't change or delete this information. Note: The combined FTE that appears here may be different from the total FTE that is calculated for benefits administration eligibility. Combined FTE on this page is the sum of a worker's individual FTEs from active jobs only. |
Contract Number
Field or Control |
Description |
|---|---|
Contract Number or Next Contract Number |
Select the worker's contract number or click the Next Contract Number to associate a contract with a person, if applicable. Note: Existing contracts that have a value in the End Date field (the system displays this field on the prompt page) are not valid selections. The system populates the contract end date when the contract is terminated. If you know when the contract will end, enter the date in the Contract Expected End Date on the Contract Status/Content page. Note: (ESP and FRA) This is a required field when the action is hire, rehire, or transfer for workers who belong to a Spanish or French regulatory region. View the prompt values in the Contract Number field to view all active contracts for that worker. If the worker has no active contracts in the system, click the Next Contract Number button; the system assigns a new contract number. When you save, the system warns you that you must update the contract information for the new contract number that is automatically created for this worker. Access the Contract Data component using the new contract number, and make the necessary updates. Note: (BRA) When you enter a contract number and saves the page, a PeopleCode is run to populate the contract type on the (BRA) Additional Contract Data Page for the worker based on these scenarios: If a contract number is specified and the contract type is populated, the system takes the contract type and identifies the associated legal contract type that is set up on the Legal Contract Type Page of the Legal Contract Type component. If no contract number is specified, or if a contract number is specified but the contract type is not available, the system takes the employee class from the Job Information page, and identifies the associated legal contract type that is set up on the By Employee Classification Page of the Legal Contract Type component. The identified legal contract type is then populated to the Additional Contract Data page as the contract type. |
Contract Type |
Displays the contract type that is associated with the contract number that you select. |
Military
The Military check box must be selected on the Installation Table to view this section.
Information in this military section enables you to define an occupational group at the service member level to quickly identify which service members actually have specialty areas, such as a physician that is an orthopedic surgeon. Additionally, Australia Defense also uses job families, functions and subfunctions to derive pay for the service member. In Canada, a member with a particular specialty, for example, a light-wing pilot, may be paid an additional allowance. These values do not come from the job code.
Field or Control |
Description |
|---|---|
Job Family |
Select a job family to categorize the job for this service member. |
Function |
Select the code that best categorizes the job for this person by function, such as administrative, legal, or management. If you change the job family after entering the function, this field will be deselected. |
Subfunction |
Enter a subfunction to further categorize the job function. If you change the job family for function after entering the subfunction, this field will be deselected. |
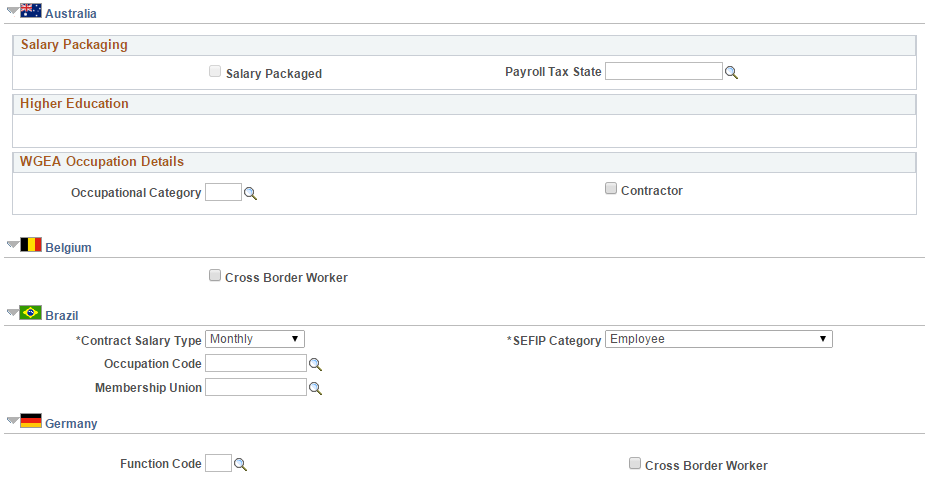
(AUS) Australia - Salary Packaging
Field or Control |
Description |
|---|---|
Salary Packaged |
Select to transfer the worker's salary packaging information into the job data component. |
Payroll Tax State |
Enter the code for the state in which the worker is paid and for which the organization pays the payroll tax. |
(AUS) Australia - Higher Education
These fields are required for DETYA reporting and appear only if the Australian Education & Government check box is selected on the Installation Table - Country Specific page.
Field or Control |
Description |
|---|---|
Annual Contact Hours |
Enter the calculated annual contact hours for this worker. |
Type of Appointment and Appointment Duration |
Select the type of appointment. If you select Limited, enter an appointment duration. |
Teaching Weeks |
Enter the number of teaching weeks for this worker. |
Job Classification |
Select the DETYA job classification. |
(AUS) Australia – WGEA Occupational Details
Field or Control |
Description |
|---|---|
Occupational Category |
Select the occupational category. This field enables you to override a worker’s occupational category with another one that is different from the occupation category configured through the ASCO code and job code. |
Contractor |
Select the check box if the worker is a contractor. |
(BEL) Belgium
Field or Control |
Description |
|---|---|
Cross Border Worker |
Select if the person lives in one country and works in another. These people have special tax and social security needs. |
(BRA) Brazil
Field or Control |
Description |
|---|---|
Contract Salary Type |
Enter the contractual salary code for RAIS. |
SEFIP Category |
Select the worker category for SEFIP. |
Occupation Code |
Specify the occupation code based on the Brazilian Code of Occupation (CBO). This is required for Brazilian workers. Brazilian occupation codes are defined on the CBO Codes BRA Page. |
Membership Union |
Enter the union code that details how to calculate and pay the worker's monthly union dues. |
(DEU) Germany
Field or Control |
Description |
|---|---|
Function Code |
Select the appropriate code for the worker. |
Cross Border Worker |
Select if the person lives in one country and works in another. These people have special tax and social security needs. |
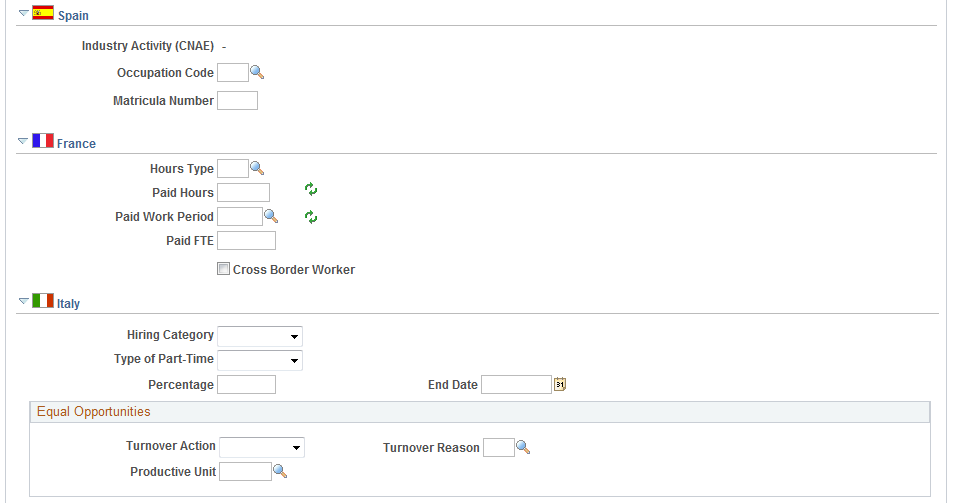
(ESP) Spain
Field or Control |
Description |
|---|---|
Industrial Activity |
Displays the social security number (SSN) employer assigned to the employee. This industrial activity code defines the percent to calculate contributions for work-related accidents and occupational disease |
Occupation Code |
Assign a specific occupational code from the list provided by Social Security if the industry activity done by the employee doesn't match the general activity defined for the social security number he is assigned to. This occupational code determines the percent to calculate contributions for work-related accidents and occupational disease. Note: This information replaces the social security risk code. |
Matricula Number and Next Matricula Number |
Enter or click the button to enter a matricula number. The Spanish government requires every worker to have a matricula number. Employers use this number to compile a matricula book that reports workplace statistics to the government. You maintain matricula numbers in the Location table. |
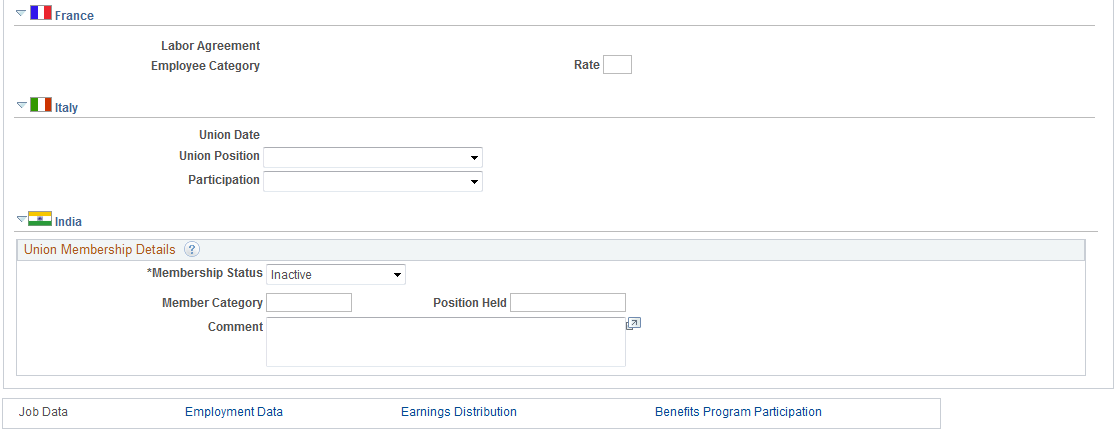
(FRA) France
Field or Control |
Description |
|---|---|
Hours Type |
Select the appropriate hours type from the list. Different hours type options affect a worker's compensation and standard hours. This field is for information only. No payroll calculation is based on information in this field. |
|
Hours Type |
Description |
|---|---|
|
3 × 8 |
Indicates a shift work pattern. For example, in the manufacturing or industrial sector, production can continue around the clock. The production workers are split into three groups with each group working one after the other, eight hours a day. Periodically the workers shift to another group. Shift workers who are working the 12 p.m. to 8 a.m. shift move to the 8 a.m. to 4 p.m. shift. Because this type of work schedule implies a lot of constraints to a worker's personal life, these workers are often paid a shift bonus. |
|
2 × 8 |
A shift work pattern that is similar to the 3 × 8 option, except that there are two work shifts instead of three. |
|
STA |
Work hours follow a regular pattern using the job's standard hours as indicated on the Job Date - Job Information page. |
|
IND |
Work hours follow a regular pattern that is different from the company's default standard hours. Indicate the number of hours in the Standard Hours field on the Job Date - Job Information page. |
Field or Control |
Description |
|---|---|
Paid Hours |
Displays the number of hours for which the worker is paid. The system enters the value that is defined for standard hours (defined for the job code for this worker) as the default in this field only for workers who are part of a French regulatory region. |
Paid Work Period |
Select the period in which the worker should work. If the regulatory region to which the worker is assigned is French, the system inserts the work period that is defined on the Job Code Table - Job Code Profile page as the default value. Values are: A: Annual B: Biweekly C: Contract D: Daily F: Every four weeks M: Monthly Q: Quarterly S: Semimonthly W: Weekly |
Paid FTE |
Displays the ratio of the paid hours to the standard hours reference for workers whose regulatory region is French. The system calculates and inserts a value for this field. |
(ITA) Italy
Field or Control |
Description |
|---|---|
Hiring Category |
If the worker is hired from a special hiring category, indicate the category here. Values are: CIG, Mobility, Protected, Unemployed, and Weak Wrap. |
Type of Part-Time |
If the worker is part-time, indicate the type. Values are: Cyclic (employed only for a certain period of the year, either full or reduced hours), Horizontal (employed five days per week with fewer than full-time hours), and Vertical (employed full-time on certain days but fewer than 40 hours per week). |
Percentage |
Define the percentage of part-time. |
Turnover Action |
Select the turnover action (for example, Layoff or Termination) causing the change in the worker's job. The value that you enter appears in the Equal Opportunities reports. |
Turnover Reason |
Select the reason for the turnover action. The value that you enter appears in the Equal Opportunities reports. |
Productive Unit |
Select the worker's productive unit. You use productive units to group workers based on agreements between unions and employers. |
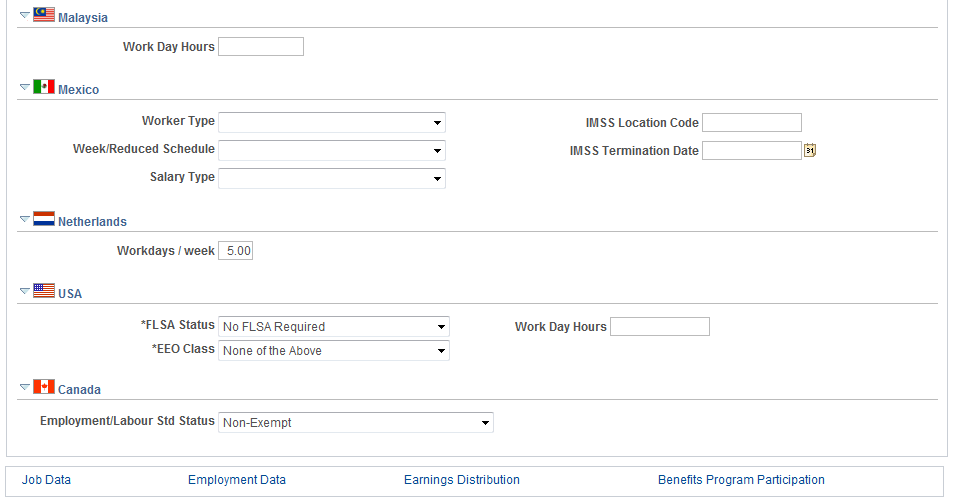
(MYS) Malaysia
Field or Control |
Description |
|---|---|
Work Day Hours |
Enter the standard workday hours that are used for payroll and leave calculations. |
(MEX) Mexico
It is common in Mexico to have two termination dates: the original termination date and the IMSS termination date.
The company must notify IMSS of a worker's termination date five days after the worker leaves. However, there are some exceptions to this rule, such as when a worker is on disability and does not return to the company.
Field or Control |
Description |
|---|---|
Worker Type |
Define the person's worker type. Values are: Construction Eventual, Eventual Worker, and Permanent Worker. This field is used for reporting the type of worker to the SUA. |
IMSS Location Code |
Specify the location code. This field is used to indicate the location of the worker to the SUA. |
Week/Reduction Schedule (reduced weekly schedule) |
Specify the reduced work schedule for the worker. Values are: 1 Day per Week, 2 Days per Week, 3 Days per Week, 4 Days per Week, 5 Days per Week, Complete Week, and Workday Less than 8 Hours. |
IMSS Termination Date |
Enter the IMSS termination date. |
Salary Type |
Select the salary type that the worker receives. Values are: All Salaries, Fixed Salary, Mixed Salary, and Variable Salary. This field is used for reporting to the IMSS. |
(NLD) Netherlands
Field or Control |
Description |
|---|---|
Workdays / week |
Enter the average number of working days per week. The default value is 5, reflecting a full-time job. Enter 0 for standby workers who are only working on demand. You receive a warning if the number of working days is inconsistent with the full- or part-time parameter. Note: From January 1, 2006, PeopleSoft Global Payroll for the Netherlands no longer uses this field to calculate social security premiums for part-time workers. For further information refer to the PeopleSoft Global Payroll for the Netherlands documentation. |
(GBR) UK
The following fields appear only if PeopleSoft Global Payroll for the U.K. is not installed.
Field or Control |
Description |
|---|---|
Tax Code |
Enter the worker's tax code for the current tax year. |
Tax Basis |
Select the basis that is used to calculate the worker's tax. |
(USA) United States of America
Field or Control |
Description |
|---|---|
FLSA Status (Fair Labor Standards Act status) |
FLSA status indicates whether this job is exempt or nonexempt according to the Fair Labor Standards Act. FLSA status also helps determine benefits eligibility in PeopleSoft Benefits Administration. The FLSA status defaults from the position number you associated with this person, and this field is unavailable for entry, unless you click the Override Position Data button. If you have not assigned the person to a position or you click the Override Position Data button and change the job code, then the system populates the fields by default from the job code. You can override the defaults |
Work Day Hours |
Enter the workday hours. The workday hours information is used in the FLSA calculation for the basic rate formula. |
EEO Class (Equal Employment Opportunity class) |
Displays a regulatory status for this job based on the job code that you assign the worker. |
(CAN) Canada
Field or Control |
Description |
|---|---|
Employment/Labour Std Status (employment and labour standards status) |
Use this field to indicate whether the job is Exempt or Non-Exempt according to the provincial Employment Standards Act or Labour Standards Act. If you supply a job code but not a position number, the default value comes from the job code, and the field remains editable. If you supply a position number, the default value comes from the position, and the field becomes read-only unless you click the Override Position Data button on the Work Location page. |
Use the Current Incumbents page (POSN_INCUM_DAT_SEC) to view the incumbents for a reports to position.
Note: This page is available if Manage Primary Incumbent functionality is enabled on the Position Management Installation Page and incumbents have been defined for the Reports To position.
Navigation:
Click the View Current Incumbents link on the Job Information Page.
This example illustrates the fields and controls on the Current Incumbents page
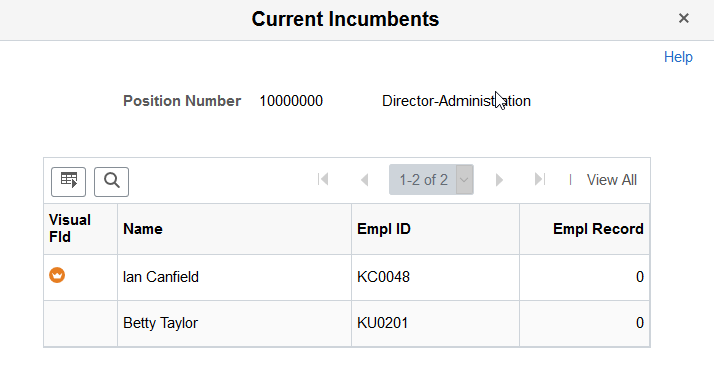
This page displays the incumbents currently in the reports to position.
Field or Control |
Description |
|---|---|
|
Indicates the primary incumbent for this reports to position. Note: This icon will display if a primary incumbent has been defined on the Manage Primary Incumbents Page for this reports to position. |
 (Primary Incumbent) icon
Use the Job Labor page (JOB_LABOR) to enter National Labor agreement data if the employee or contingent worker belongs to a National Labor agreement.
Navigation:
This example illustrates the fields and controls on the Job Labor page (1 of 3). You can find definitions for the fields and controls later on this page.
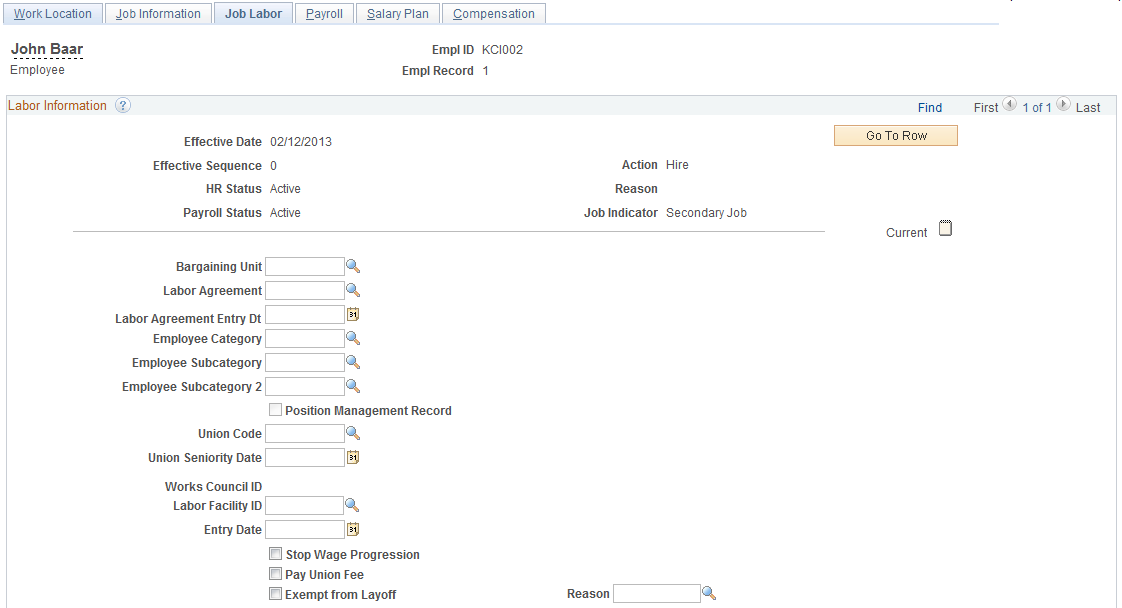
This example illustrates the fields and controls on the Job Labor page (2 of 3). You can find definitions for the fields and controls later on this page.
This example illustrates the fields and controls on the Job Labor page (3 of 3). You can find definitions for the fields and controls later on this page.
Field or Control |
Description |
|---|---|
Bargaining Unit |
Select a code representing the bargaining unit to which the employee belongs. |
Labor Agreement |
Specify which labor agreement applies to this worker. |
Labor Agreement Entry Dt (labor agreement entry date) |
If this worker is part of a national labor agreement, enter the date on which the worker enters the category or subcategory. Also, use this date to track the worker's seniority within the category. |
Employee Category |
Specify the worker category to which the worker belongs under the labor agreement. |
Employee Subcategory |
Select the subcategory that applies to the worker. If the employee category that you select for this person contains subcategories, this field appears. Note: (FRA) This field is unavailable when France is selected as the regulatory region on the Work Location page. Subcategories for France are defined on the Labor Agreement Categories page. |
Employee Subcategory 2 |
Select the secondary subcategory that applies to this worker. If the subcategory that you select for this person contains secondary subcategories, this field appears. Note: (FRA) This field is unavailable when France is selected as the regulatory region on the Work Location page. Subcategories for France are defined on the Labor Agreement Categories page. |
Position Management Record |
The system selects this check box whenever the system inserts this data by updating the incumbent to reflect user-made changes to the Position Management component. |
Union Code |
This field defaults from the position number you associated with a person, and is unavailable for entry, unless you click the Override Position Data button. If the worker belongs to a union, enter the code. |
Union Seniority Date |
Enter the date on which the worker enters the union. |
Works Council ID |
Select the ID of the Works Council representing this employee. |
Labor Facility ID |
Select the facility this worker belongs to. |
Entry Date |
Enter the date the worker began in the labor facility. |
Stop Wage Progression |
If the selected job code is associated with a wage progression salary plan, select to stop wage progression for this worker. The system will not accumulate hours towards a wage progression step for this worker. To resume wage progression, insert a new Job Data row and deselect this check box. |
Pay Union Fee |
Select if a union fee should be paid. The organization can define whether the worker or the employer should pay the fee. This field doesn't affect system processing. |
Exempt From Layoff and Reason |
Select if the worker is exempt from layoff and select a reason for the layoff exemption. |
See PeopleSoft Human Resources Manage Labor Administration.
Assigned Seniority Dates
This grid lists the seniority dates associated with the selected labor agreement.
If the seniority date is set up to default from an existing value, the system will populate them. If the dates are set up to allow overrides, select the Override check box and enter the appropriate date.
If the seniority date is set up for manual entry, enter the appropriate date.
Click the Recalculate Seniority Dates button to recalculate seniority dates as needed.
(DEU) Germany
Describing a German worker's labor category and role in a company is the third step in the German Works Council business process. Before you complete these fields, you must enter codes and values into the setup tables and create an association between the works council decision groups and the personnel action.
Field or Control |
Description |
|---|---|
Tariff |
Displays the tariff, which is a labor contract between the union and the employers' association. The default comes from the worker's location listed in the Location table. You can override this default. |
Tariff Area |
Displays the tariff area, which is usually associated with geographical regions in Germany. The tariff area comes from the worker's location that is listed in the Location table. You can override this default. |
Performance Group |
Select a performance group, such as blue collar or white collar. |
Labor Type |
Specify if a worker is management or nonmanagement. Depending on where this worker belongs, different sets of human resources laws and rules apply. One rule concerns which internal labor committee monitors personnel actions. |
Spokesmen Committee ID |
If you identify a worker as management in the Labor Type field, then the Spokesmen Committee is responsible for the worker, and this field appears. The Spokesmen Committee ID for this worker comes from the worker's location in the Location table. |
(ESP) Spain
Field or Control |
Description |
|---|---|
Union Date |
Enter the date on which the worker joins the union. |
Works Council Function |
If the worker is a member of the works council for the organization, select which role. Values are: Member, President, and Secretary. |
Intercenter Works Council Function |
Select the role that the worker has in the union group (comite intercentros). Values are: Member 1, Member 2, and Member 3. |
Pay Union Fee andUnion Fee Amount |
Select if the worker pays a fee to the union and enter the amount of the fee. |
Fee Start Date and Fee End Date (fee end date) |
Enter the first and last dates on which the union fee should be paid. |
Exempted |
Select if this worker is exempt from a certain amount of work duty to handle works council duties. |
Hours/Month |
Enter the number of hours each month that the worker is exempted from regular work to handle works council business. |
(FRA) France
Field or Control |
Description |
|---|---|
Rate |
Enter the minimum salary calculation rate for this category. The rate is a three-digit number that is used in certain collective agreements to calculate the minimum salary for the subcategories, as defined on the Labor Agreement Categories page for the category. A subcategory can be associated with several possible rates, but only one rate is associated with the worker. |
(ITA) Italy
Use this region to enter the union membership details of workers who belong to a union.
Field or Control |
Description |
|---|---|
Union Date |
Enter the date on which the worker joins the union. |
Union Position |
Select the position that the worker holds in the union, if applicable. |
Participation |
Indicate the worker's level of participation in the union. |
(IND) India
Field or Control |
Description |
|---|---|
Membership Status |
Select whether the worker's union membership status is active or inactive. |
Member Category |
Enter the member category. For example, Staff, Officer, or Workman Category. |
Position Held |
Enter the position that the worker holds. Some of the members of the union may hold office in the union as president, vice president, treasurer, or secretary; you enter this information here. |
(CAN and USA) Reviewing Union Membership in Canada and the U.S.
If you're managing a workforce in Canada or the U.S., you might want to review information about each union organization that the workers belong to and see a list of workers who are members. Use the Union Membership report (PER009) for this purpose. That report displays the worker ID, name, date hired, seniority date, department, location, job title, and shift.
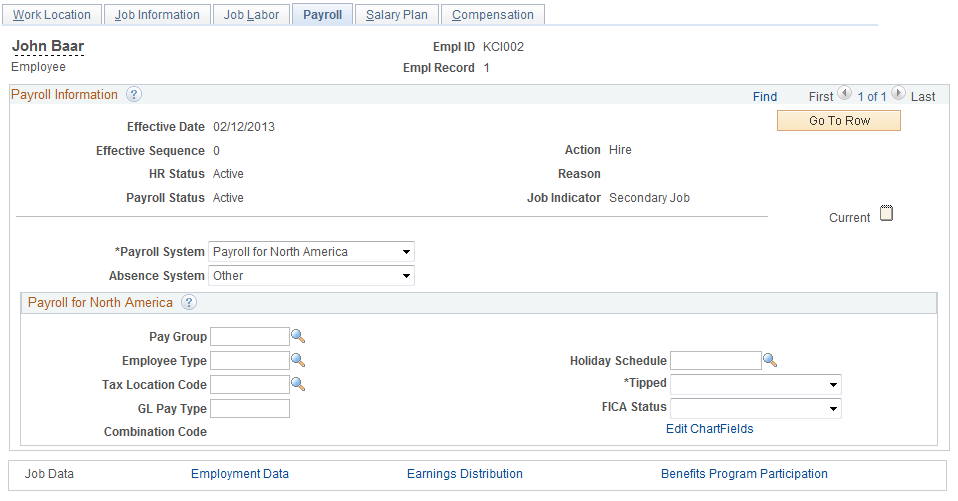
Use the Payroll page (JOB_DATA2) to enter payroll processing data.
The payroll system and pay group information that you enter here affects component compensation processing on the Job Data - Compensation page.
Navigation:
This example illustrates the fields and controls on the Payroll page. You can find definitions for the fields and controls later on this page.
Field or Control |
Description |
|---|---|
Payroll System |
Select the payroll system that is used to process this person's paycheck. The Payroll System field is available for entry only if the Action that was entered on the Work Location page is Change of Pay System or a hire-related action such as Hire, Rehire, or Additional Job. Note: PeopleSoft Payroll for North America does not process payroll for contingent workers. Customers using the E&G contract pay functionality need to add contract workers using the Add Employment Instance component or the Organizational Relationships page. |
Absence System |
Select the absence system that is used to process this person's absences. |
Payroll for North America
If you use PeopleSoft Payroll for North America or PeopleSoft Payroll Interface to process this person's paycheck, complete these fields:
Field or Control |
Description |
|---|---|
Pay Group |
Select a pay group. Available values are the valid pay groups for the country selected on the Company table (not the regulatory region selected in the worker's job data). |
Employee Type |
Displays the employee type; the value depends on the pay group. The system completes the field with the default value from the Pay Group table. If an employee type doesn't exist for this pay group, establish one in the Pay Group table. |
Holiday Schedule |
If you defined a default holiday schedule for the employee's location, the system displays it here. If you left the holiday schedule blank on the Location Profile page and entered a default on the Pay Group table, the system displays it here. |
Tax Location Code |
Select a tax location code. Available values are the valid tax locations for the country selected on the Company table (not the regulatory region selected in the worker's job data). Warning! Do not change a person's tax location code more than once for the same effective date (using effective sequence). The system creates tax records according to the first tax location change only. Tax records for the second tax location change on the same date are not created; instead, the system issues an error message. |
Tipped |
Indicate whether this worker receives tips. This field is available only if you define tips processing in the Company table. Values are: Directly: Select for workers who normally receive tips directly from customers (for example, food servers). Indirectly: Select for workers who do not normally receive tips directly from customers, but who might receive tips occasionally (for example, cooks and kitchen helpers). Not Tipped: Select for workers who are not tipped. |
GL Pay Type (general ledger pay type) |
Organizations can use this field for customized general ledger interfaces. Payroll for North America does not use this field. |
FICA Status |
Select from: EE FICA Exmpt (exempt from employee FICA) Selecting EE FICA Exmpt tracks negative dollar amounts for employee OASDI taxes on wages and tips in tax classes 8A and 9A. The negative EE FICA tax amount is displayed on the wage statement, but the employee portion of the OASDI tax is not withheld from the employee’s check. EE/ER FICA Exmpt (exempt from employee and employer FICA) Selecting EE/ER FICA Exmpt tracks negative dollar amounts for employee OASDI taxes on wages and tips in tax classes 8A and 9A and tracks negative dollar amounts for employer OASDI taxes on wages and tips in tax classes 8 and 9. The negative EE FICA tax amount is displayed on the wage statement, but the employee portion of the OASDI tax is not withheld from the employee’s check. ER FICA Exmpt (exempt from employer FICA) Selecting ER FICA Exmpt tracks negative dollar amounts for employer OASDI taxes on wages and tips in tax classes 8 and 9. Exempt (exempt from OASDI and Medicare) Medicare only Subject (subject to OASDI and Medicare) |
Combination Code |
(Optional) Select the appropriate labor distribution to which to post the hours and earnings for this person. Enter the general ledger combination code in the employee's job data only on an exception basis. If you do not want the employee's earnings charged to the default combination code that is mapped to the earnings code and department, you can enter a different combination code here. For example, you might want to temporarily charge the employee's earnings to a different department. Use Correct History mode to enter or remove the temporary combination code. |
Combination Code |
Displays the combination code that defines a combination of ChartFields. |
Edit ChartFields |
Click this link to access the ChartField Details page for selecting ChartField values. |
Global Payroll
If you use PeopleSoft Global Payroll to process this person's paycheck, complete these fields:
Field or Control |
Description |
|---|---|
Pay Group |
Select a pay group. The payroll system that you select on the Installation Table - Products page determines what value appears here. If Global Payroll is selected, the Global Payroll pay groups appear. Note: The Global Payroll Pay Group field is different from the Payroll for North America Pay Group field. Pay group is very important in Global Payroll. Selecting Global Payroll as your payroll system on the Installation Table - Products page and selecting a pay group is what helps select a payee into the payroll process. |
Use Pay Group Eligibility, Use Pay Group Rate Type, and Use Pay Group As Of Date |
When you select a pay group, these check boxes are automatically selected. Leave the check boxes selected to use the default values from the pay group definition. Deselect the check boxes to override the default values. Note: PeopleSoft Global Payroll stores the values at the Job level only if you override them here. If you add a new effective-dated row to the job record or change the pay group assignment, the system reverts to the pay group defaults. |
Holiday Schedule |
Enter a holiday schedule. If you leave this field blank, Global Payroll processing uses the holiday schedule assigned to the payee's pay group, but does not enter that holiday schedule here. |
Eligibility Group |
This field is blank if the Use Pay Group Eligibility check box is selected. If you want to override the pay group default, deselect the check box and select an eligibility group which specifies earnings, deduction, and absence elements that a payee might be eligible to receive. |
Exchange Rate Type |
This field is blank if the Use Pay Group Rate Type check box is selected. If you want to override the pay group default, deselect the check box and select the currency exchange rate type to use when performing currency conversions for the payee. |
Use Rate As Of |
This field is blank if the Pay Group As Of Date check box is selected. If you want to override the pay group default, deselect the check box and select the pay calendar date to use when retrieving the effective-dated exchange rate information during currency conversions. The Use Rate As Of field works with the Exchange Rate Type field to determine which effective date is retrieved to get the appropriate exchange rate for the calendar period being processed. Exchange rate effective dates include: Period Begin Date, Period End Date, and Payment Date. |
(AUS) Australia
Field or Control |
Description |
|---|---|
Balance Group Nbr (balance group number) |
Enter a balance group number. Balance group numbers identify which Global Payroll accumulator the system should store tax balances in. Tax accumulators are keyed by ID, empl rcd#, pay entity, and balance group number. You use balance group numbers to combine or separate tax balances for multiple jobs (where different tax rates apply) or to separate balances in the case of termination and rehire. A balance group ID for each payment summary is required at the end of the year. There must be a person tax data record for each balance group ID that the person has. |
(HKG) Hong Kong
Field or Control |
Description |
|---|---|
Balance Group Nbr (balance group number) |
Enter a balance group number. When workers are terminated and subsequently rehired in the same or similar position in the same tax year (using the Job Data component in Workforce Administration), there is a legislative reporting requirement in Hong Kong to keep the periods of employment and earnings balances separately. PeopleSoft Global Payroll uses the balance group number to ensure that the relevant periods of employment and balances of a worker in a tax year are stored separately in terms of payroll data. This enables a worker to have multiple tax balances if the worker is terminated and rehired in the same financial year. When a worker is rehired in the same tax year, the balance amount is stored in the system variable CM VR BAL GRP ID, which is attached to each year-to-date (YTD) accumulator. Every time you run the payroll process, the balance that is stored in the system variable CM VR BAL GRP ID is retrieved by the accumulator to resolve the earnings that are generated for each new position. Balance group numbers are used to maintain earnings balances and are used as User Key 2 for all Hong Kong YTD accumulators. |
(NZL) New Zealand
Field or Control |
Description |
|---|---|
Balance Group Nbr (balance group number) |
Enter a balance group number. Balance group numbers identify which Global Payroll accumulator the system should store tax balances in. Tax accumulators are keyed by ID, empl rcd#, pay entity, and balance group number. You use balance group numbers to combine or separate tax balances for multiple jobs (where different tax rates apply) or to separate balances in the case of termination and rehire. A balance group ID for each payment summary is required at the end of the year. There must be a person tax data record for each balance group ID that the person has. |
(SGP) Singapore
Field or Control |
Description |
|---|---|
Balance Group Nbr (balance group number) |
Enter a balance group number. Balance group numbers identify which Global Payroll accumulator the system should store tax balances in. Tax accumulators are keyed by ID, empl rcd#, pay entity, and balance group number. You use balance group numbers to combine or separate tax balances for multiple jobs (where different tax rates apply) or to separate balances in the case of termination and rehire. A balance group ID for each payment summary is required at the end of the year. There must be a person tax data record for each balance group ID that the person has. |
Note: Before entering information for U.S. foreign nationals, use the Substantial Presence Test. Select
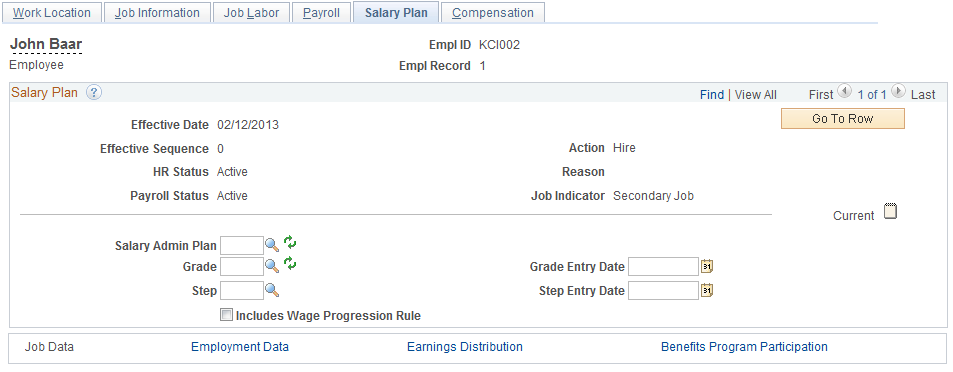
Use the Salary Plan page (JOB_DATA_SALPLAN) to enter information about a person's salary plan.
Navigation:
This example illustrates the fields and controls on the Salary Plan page. You can find definitions for the fields and controls later on this page.
Military
The section appears when military functionality is enabled on the Installation Table. Select a military service for a person on the Work Location page prior to entering a rank or worn rank.
Field or Control |
Description |
|---|---|
Rank |
Enter the service member's earned rank. Valid ranks are defined on the Military Service - Service Ranks page. |
Rank Entry Date |
Enter the date the member received this rank. |
Worn Rank |
Enter the service member's rank insignia while serving in a particular post. The default value for this field comes from the Rank field but it can be overwritten. Changes to the Rank field value will also change the value in this field. Note: To have the system display the worn rank in front of the employee's name at the top of the Personal Data, Job Data, and military pages, you must have Military, Event Manager, and Publish/Subscribe enabled in the system and the Domain status should be active. When a rank is changed on the current row, the event AssignmentMilitaryRankChanged is raised and the Event Manager triggers the handler to update the Names in Personal Data Component. |
Worn Rank Type |
Indicate why the individual is on worn rank. |
Skill Grade |
Select the overall grade level for which the individual has been evaluated |
Note: When military rank information is defined for a service member, the system restricts the salary plan to those plans associated with military ranks on the Military Service table. In addition to this, only the salary grades associated with the specified ranks are available. Therefore, the salary defaulting logic does not apply to military users.
Salary Plan
Field or Control |
Description |
|---|---|
Salary Administration Plan |
Displays the salary administration plan code. This field will default from the position number you associated with a person, and is available for entry regardless if you click the Override Position Data button. If you are not using position management and you associate salary administration plans with locations or job codes, the value that is in this field comes from either the Location or Job Code table, based on setID matching. You can override the default. Note: If you have salary administration plans associated with more that one of these tables, the system uses the default from the last table value entered. For example, first you enter a location that is associated with salary plan KU02 where this salary plan defaults to this page. Then, you enter a job code that is associated with salary plan KU03, and the system will update the salary plan to KU03. If you change the location after hire (and a salary plan is defined in the Location table), then the system does not automatically display a default value for this salary plan. Instead, the system checks if the existing grade and step are still valid for this new salary plan. The existing grade and step must also be defined for the new salary plan. If the grade and step are defined for this new salary plan, then the system displays by default from the Location table the value for the new salary plan. If the grade and step are not defined for this new salary plan, then the system does not change to the salary plan from the Location table. To use auto-calculated premium processing for this person, select a plan that has Auto Calculated Premium selected and an absorbing or nonabsorbing (or both) premium rate code assigned in the Salary Plan table. The system displays auto-calculated-premium-related fields on the Compensation page only if you select an auto-calculated premium plan here. Note: If this worker has a labor agreement and job code with a wage progression salary plan, the system populates this field by default and makes it unavailable for entry. |
Grade |
If you associate a grade with the person's position or job code, the system displays the default value from the appropriate table. Note: If this worker has a labor agreement and job code with a wage progression salary plan, the system populates this field by default and makes it unavailable for entry. |
Grade Entry Date |
Displays the date on which the person first joined this grade. You can override this value. If you are entering a transaction that returns a person to active status from an inactive status, the system will populate the field with the effective date of that transaction. For example, if you are rehiring a person as of September 1, 2014, the field will update to reflect this rehire date. |
Step |
If you associate a step with the person's position or job code, the system displays the default value from the appropriate table. |
Step Entry Date |
Displays the date on which the person first joined this step, or if you are entering a transaction that returns a person to active status from an inactive status, the system will populate the field with the effective date of that transaction. For example, if you are rehiring a person as of September 1, 2014, the field will update to reflect this rehire date. You can override this value. Note: The system verifies the combinations of salary administration plans and grades that you select. |
Includes Wage Progression Rule |
The system selects this check box if the salary plan includes wage progression. |
Use the Compensation page (JOB_DATA3) to enter compensation information.
Navigation:
This example illustrates the fields and controls on the Compensation page. You can find definitions for the fields and controls later on this page.

Field or Control |
Description |
|---|---|
Compensation Rate |
Displays the compensation rate for the person, which is the sum of all base pay salary components. |
Frequency |
Select a compensation frequency. Select Contract for contract persons. The system uses the information that you set up on the Contract Pay page to manage the person's compensation. Note: The Retro Pay functionality in PeopleSoft Payroll for North America and PeopleSoft Global Payroll is triggered by any frequency or compensation rate change with an effective date that is earlier than or equal to the latest pay end date of a check that is already paid to the person. Also for Retro Pay, the Frequency here cannot be hourly. It must be weekly, bi-weekly, semi-monthly or monthly, or a frequency that reflects a pay period amount. |
Auto Calculated Premium
Field or Control |
Description |
|---|---|
Target Comprate (target compensation rate) |
Enter the compensation rate for the person if the person is being compensated at a rate that exceeds the default salary. Auto calculating premium may be: Absorbing. Premium decreases when the compensation rate increases over time in order to maintain the target compensation rate. Non-Absorbing. Premium does not change even when the compensation rate increases over time. The system calculates the difference between this amount and the original job compensation rate and enters the difference in the premium components (the absorbing or nonabsorbing or both premium rate codes of the salary plan) of the person's compensation package. The system then recalculates the compensation rate with the premium component compensation rate. If both an absorbing rate code and a nonabsorbing rate code are associated with the salary plan, the absorbing rate code initially receives the full, calculated amount of the difference between the target compensation rate and the originally calculated job compensation rate. You can then enter some portion of the total calculated premium in the nonabsorbing rate code (in which case the absorbing rate code amount automatically decreases by the same amount so that the target compensation rate remains the same) or delete the nonabsorbing rate code. The system recalculates the job compensation rate, including the premium component compensation rate. You cannot enter a target compensation rate that is less than the original job compensation rate without the premium components. This field is available only if the person's salary plan (on the Salary Plan page) has auto-calculated premium enabled. |
Don't Absorb Changes |
Select to instruct the system to leave absorbable rate codes unchanged if there is a change in the default salary amount. This option only applies to persons who have a target compensation rate and are assigned to a salary plan with the auto calculated premium function enabled and an absorbing premium defined. |
Comparative Information
Field or Control |
Description |
|---|---|
Change Amount |
Displays the change in the amount of compensation for the rate code. |
Change Percent |
Displays the percent of change in the compensation for the rate code. |
Compa-Ratio (comparison ratio) |
Displays the percent-through-range calculation, based on the salary plan and grade and the currency that the organization uses. |
Job Ratio |
Displays the percent-through-range calculation, based on the midpoint salary of the person's job code. The job ratio is available only if the person's job code has job ratio information (midpoint salary, currency, and frequency) defined. |
Pay Rates
This group box contains pay rates that are calculated by using the default frequencies from the country. You can specify the default frequencies by country on the Default Frequencies page.
See Default Frequencies by Country Page.
Field or Control |
Description |
|---|---|
Default Pay Components |
Click to:
If you don't click this button after updating relevant job data fields, the system issues a warning when you attempt to save the new record. If you click OK, the system displays this page, where you can click this button and make any required changes. If you do not click this button, the component package doesn't appear by default until the next time that the default component logic is triggered (either when you click the button or through a batch update process). |
(E&G) Contract Change Prorate Option |
Click to access the Contract Pay Prorate Options page, where you choose how to handle contract pay when there is a change to the contract amount. Use this link only when the payment frequency is C (contract). The link is active only when the row is available for data entry. The system displays the selected proration option to the left of the link so that you can review the settings even when the link is inactive. |
Calculate Compensation |
Click to have the system recalculate the person's compensation without carrying out any rate code defaults or replacing any default values. You cannot modify the person's pay components without recalculating the compensation. |
Pay Components: Amounts Tab
Select the Amounts tab.
Field or Control |
Description |
|---|---|
Rate Code |
Select a rate code. Rate codes are IDs for pay components. The system inserts any compensation information that is associated with this rate code in the pay components grid. Note: If a seniority rate code, or group-based rate code, is inserted as a default, the values for these rate codes are display-only; you can't delete them. |
Comp Rate (compensation rate) |
Displays the compensation rate for the pay component. |
Frequency |
Displays the compensation frequency for the pay component. Note: The Rate Code and Frequency for salaried employees must either be the pay period or Annual. It should not be Hourly. Using an hourly rate code and frequency for salaried employees can adversely impact Retro Pay and FLSA calculations. |
Points |
Displays the salary points that are associated with this rate code, if any. Set the points monetary value on the Company Table page. Associate point value (an integer) with rate codes on the Default Compensation and Non-Base Compensation pages, Salary Step Components page, and Compensation page. To use points, select the Salary Points check box on the Installation Table page. |
Percent |
If the rate type for this rate code is percent, the system displays the percent that is to be applied to the job compensation rate or to a rate code group (if you are using rate code groups). |
Rate Code Group |
Select a rate code group. A rate code group enables you to be more specific when calculating percentage-based components as part of a person compensation package. |
Pay Components: Controls Tab
Select the Controls tab.
Field or Control |
Description |
|---|---|
Source |
Indicates how the pay component gets into the pay components grid. Manual indicates that the pay component is added manually. Salary Step indicates that the pay component is retrieved by default from the salary step. Job Code indicates that the pay component is retrieved by default from the job code, and so on. |
Manually Updated |
This flag indicates whether the pay component is manually updated or the pay component contains only values that appear by default. |
Default Without Override |
Indicates whether you can change the default values of the pay component or the values for this rate code are default values and display-only. |
Pay Components: Changes Tab
Select the Changes tab.
Field or Control |
Description |
|---|---|
Change Amount |
Displays the overall change amount in this pay component rate. |
Change Points |
Displays the overall change amount (in points) for this pay component. This field is visible only if Salary Points is selected on the Installation Table page. |
Change Percent |
Displays the overall change amount for this pay component. This field isn't available for rate codes that have a rate code type of percent or points. |
Pay Components: Conversion Tab
Select the Conversion tab.
Field or Control |
Description |
|---|---|
Converted Comp Rate (converted compensation rate) |
Displays the converted compensation rate for this pay component. The system converts all base pay components to the currency and compensation frequency that you specify. |
Apply FTE (apply full-time equivalent) |
Select if you want the value that is associated with the rate code to be multiplied by the FTE factor for annualization and deannualization. FTE is the percentage of full-time that the worker should normally work in the corresponding job. This field isn't available for rate codes of type percent. |
Use the Employment Information page (EMPLOYMENT_DTA1) to enter optional data, such as a worker's business title.
Navigation:
Click the Employment Data link at the bottom of the Add Employment Instance component.
Click the Employment Data link at the bottom of the New Employment Instance component.
Click the Employment Data link at the bottom of the Add Contingent Worker Instance component.
This example illustrates the fields and controls on the Employment Information page (1 of 4). You can find definitions for the fields and controls later on this page.
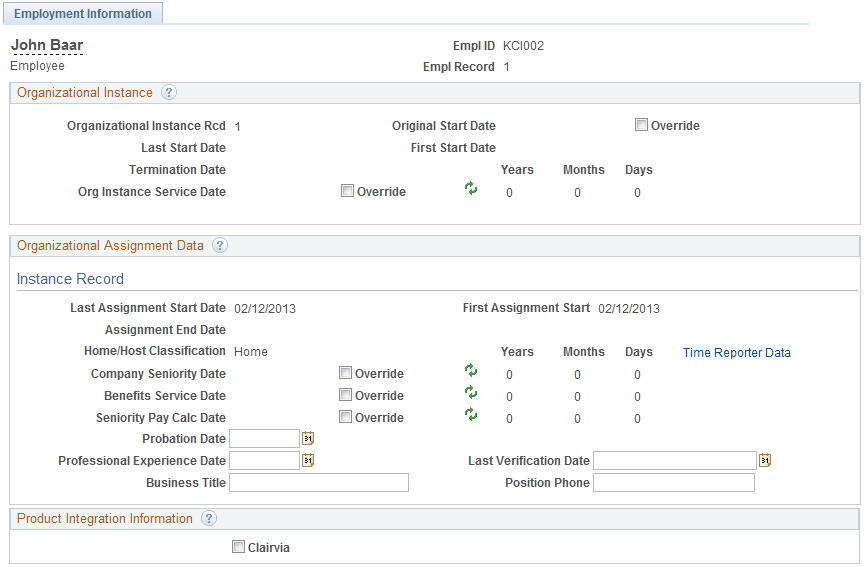
This example illustrates the fields and controls on the Employment Information page (2 of 4). You can find definitions for the fields and controls later on this page.

This example illustrates the fields and controls on the Employment Information page (3 of 4). You can find definitions for the fields and controls later on this page.
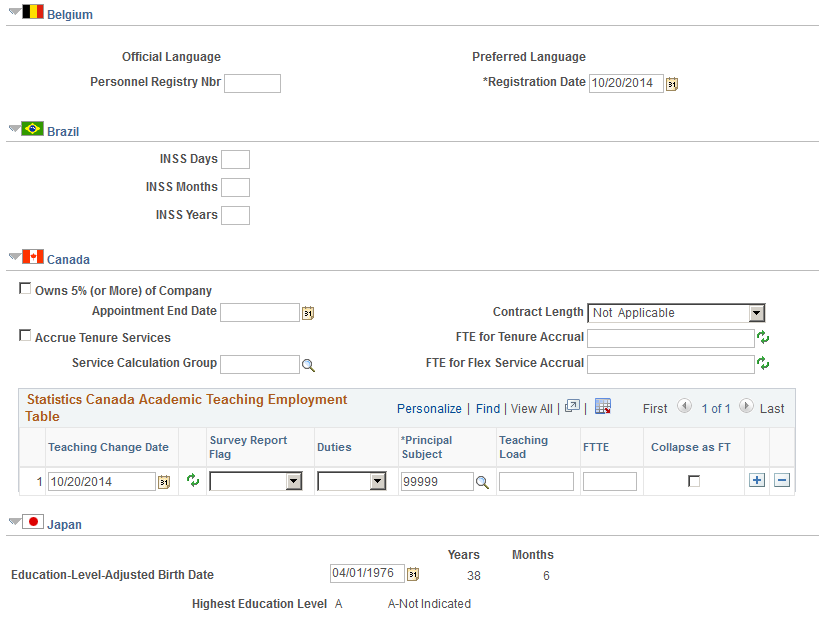
This example illustrates the fields and controls on the Employment Information page (4 of 4). You can find definitions for the fields and controls later on this page.
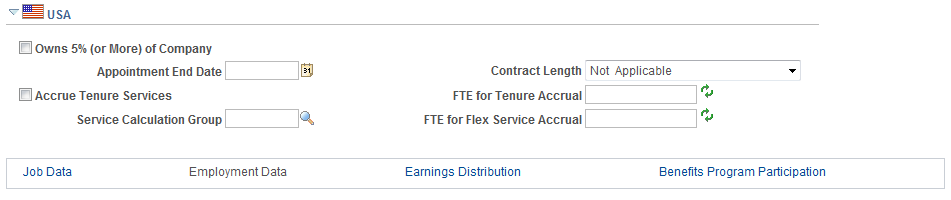
Note: The dates on this page are used in reports and to enable you to track a person's work history.
Organizational Instance
Field or Control |
Description |
|---|---|
Organizational Instance Rcd (organizational instance record) |
The number of the instance associated with this job data record. The organizational instance record number is the same as the ERN of the controlling instance. You can only modify the organizational instance dates when you review this page for the controlling instance. Note: When you review this page for a non-controlling instance, the system makes the rest of the fields in this group box display only because non-controlling instances inherit the instance dates from the controlling instance. |
Original Start Date |
Displays the earliest date that this job data record (emplID/ERN instance) was associated with the organization. The date is provided by default from the effective date of the job record with an action of Hire, Add Contingent Worker, or Add POI Instance. This is not the date the job was created in the system, like the Date Created field on the Work Location page. You can override this date to enter an earlier start date, for example if the person has previously worked for the company or an affiliate or, depending upon company policies, for special cases like jobs with probationary periods, mergers and acquisitions, and so on. |
Last Start Date |
Displays the most recent start date for this organization instance. The system populates this field originally with the effective date of the controlling instance's job data row with the action of HIR and then refreshes it with the effective date of job data rows with the actions REH (for employees) or RNW (for contingent workers). This date is different from the first start date if this organization instance has been inactive and then reactivated. |
First Start Date |
Displays the first start date for this organization instance. The system populates this field with the effective date of the first job data row with the action of HIR (for employees) or ADD (for contingent workers) from the controlling instance. The system uses this date as the hire date in reports. Note: The system does not refresh this date again unless you enter a new row in the controlling instance with one of these actions. You would normally not do this unless you needed to reset the hire date. |
Termination Date |
Displays the effective date of the controlling instance's job data row with the action of TER or COM, if applicable. If you rehire or renew a person's controlling instance, the system deselects this field. |
Org Instance Service Date (organizational instance service date) and Override |
Displays the effective date on which the service of a person commenced with the organization. The date is provided by default from the effective date of the job record with an action of Hire, Add Contingent Worker, or Add POI Instance. Select the Override check box to override this date to enter an earlier service date, for example if the person has previously worked for the company or an affiliate. |
Provider ID |
For contingent workers, displays the ID of the service provider. |
Organizational Assignment Data
Assignments are the job data records tracked under an organizational instance, each identified by a unique emplID/ERN combination. Track the start and completion dates of individual assignments at the assignment level.
Field or Control |
Description |
|---|---|
Last Assignment Start Date |
Displays the most recent start date for this assignment. The system populates this field with the effective date of the job data row with an action that reactivates the assignment. This date is different from the first assignment start date if this assignment has been inactive and then reactivated. |
First Assignment Start |
Displays the first start date for this assignment. The system populates this field with the effective date of the first job data row with an action that activates the assignment (such as HIR or ADD). |
Assignment End Date |
Displays the effective date of the job data row with the action of TER or COM, if applicable. |
Home/Host Classification |
For workers who are on assignments, this field specifies whether the current job is at the worker's home location or the assignment location. For a new hire, select Home. |
Time Reporter Data |
Click to review the PeopleSoft Time and Labor data for this worker. If you don't use PeopleSoft Time and Labor, this link is unavailable. |
Company Seniority Date or Engagement Date |
This field normally displays as the Company Seniority Date field. However, when military functionality is enabled on the Installation Table and this person is a person associated with a rank, this field displays as the Engagement Date field. Based on the date that you enter here, the system calculates the number of years, months, and days of seniority or engagement for a person. |
Benefits Service Date |
Based on the date that you enter here, the system calculates the total years, months, and days of service for a worker, including any credit for military leave or the total amount of time that the worker works for multiple companies in the organization. This date is used to calculate benefits eligibility. |
Seniority Pay Calc Date (seniority pay calculation date) |
Enter the date that the system should use to calculate seniority-based pay. |
Probation Date |
Enter the date on which the worker is placed on probation. |
Professional Experience Date |
Displays the earliest date on which the worker started working in a job that required skills that are directly related to the worker's current position. |
Last Verification Date |
Displays the latest date on which the worker verified his or her personal data in the system. |
Business Title |
Enter the worker's official title, which might be different from the job title. If the employee is in a position, the system displays the current title from the worker’s position. When this field gets its value from the position, and position data is not overridden, you should run the Refresh Person Org Assignments (HR_PERORGASN) process to update the Employment Data record with future dated rows that have become current. For more information on this process, see the Refresh Person Org Assignments Page. |
Position Phone |
Track the worker's primary work phone number. You can also update this field by using the Add/Update Position Info pages. If you drive part or all of the system by position, the system enters the default phone number for the position number that you assign to the worker on the Work Location page. When this field gets its value from the position, and position data is not overridden, you should run the Refresh Person Org Assignments (HR_PERORGASN) process to update the Employment Data record with future dated rows that have become current. For more information on this process, see the Refresh Person Org Assignments Page. |
Note: When you enter a new row with an action of HIR, ADD, POI, ADL, or ASG and save the component, the system sets the Company Seniority Date, Benefits Service Date, and Seniority Pay Calc Date (seniority pay calculation date) fields on this page to the effective date that you enter on the Work Location page as long as the Override date check box is not selected. You can override these fields after saving the component. The system calculates and displays the worker’s service months and days based on the information that you enter in the Company Seniority Date, Service Date, and Seniority Pay Calc Date fields.
Military
The system displays the military section when military functionality is enabled on the Installation Table.
Field or Control |
Description |
|---|---|
Early Promotion Date |
Enter the earliest date this service member may be considered for the next promotion. |
(BEL) Belgium
The system displays the official language, based on the company official language, unless the company is located in Brussels-Capital Region, in which case the preferred language is the default.
Field or Control |
Description |
|---|---|
Personnel Registry Nbr (personnel registry number) |
Enter the number under which the worker is registered in the personnel register. |
(BRA) Brazil
Field or Control |
Description |
|---|---|
INSS Days, INSS Months, and INSS Years (Instituto Nacional de Securidade Social days, months, and years) |
Enter the number of days, months, and years that the worker makes social security contributions before being hired by the company. |
(CAN) Canada
Field or Control |
Description |
|---|---|
Accrue Tenure Services |
Select to activate the tenure accrual. |
FTE for Tenure Accrual |
Enter the FTE to be used in tenure accruals. FTE cannot be greater than 1.0. On multiple jobs, the sum of the FTEs of all the jobs selected to accrue tenure cannot be greater than 1.0. |
Service Calculation Group |
Select the service calculation group that represents a group employees who have the same calculation rules applied to their service accrual process. |
FTE for Flex Service Accrual |
Enter the FTE value to be used in prorating the worker's accrued service. |
(CAN) (E&G) Statistics Canada Academic Teaching Employment Table
The fields in this table are used in the Canada Academic Teaching Surveys business process, a regulatory requirement for Canadian higher-education, degree-granting institutions. Complete this table for all faculty staff if you are required to submit Academic Teaching Surveys to Statistics Canada. Review the information in this table to ensure that it is up-to-date every time that you change a worker's record.
Field or Control |
Description |
|---|---|
Teaching Change Date |
The system adds a new teaching change date row only if you choose to add one. Insert a new row for each teaching appointment if the institution uses the same employee record number to record successive appointments. For the Part-Time Academic Teaching Survey, the system reports the Academic Teaching Employment record that is effective on the end date of the appointment or at the end of the period that is being reported. |
Survey Report Flag |
Displays the report flag value, as specified on the Job Code Table - Job Code Profile page. If the value is N/A, this record isn't reported in academic teaching surveys. You can override this default value. |
Duties |
Displays the duties value, as specified on the Job Code Table - Job Code Profile page. You can override this default. |
Principal Subject |
Select the principal subject that is taught by the worker. |
Teaching Load |
Enter the worker's teaching load during the academic teaching employment. For example, if the worker is teaching three full courses, enter 3.0. If the worker is teaching one full course and one-third of another, enter 1.33. |
FTTE (full-time teaching equivalency) |
Enter the ratio of the teaching load to the full-time teaching equivalency. For example, if teaching four courses constitutes full-time and the worker is teaching three courses, enter .75. |
Collapse as FT (collapse as full-time) |
Select if the employment can be collapsed into the reportable full-time job for the purpose of consolidating salary amounts from jobs that make up a full-time job. Use this field only if the worker:
Don't collapse reportable part-time jobs into a reportable full-time job. (The system doesn't report on the part-time job.) Instead, if you use this field, set up a separate employee record for part-time jobs. |
(JPN) Japan
Field or Control |
Description |
|---|---|
Educ Lvl-Adjsted Birth Date (education-level-adjusted birth date) |
Select the worker's education-level-adjusted birth date. The day and the month are the organization's standard calculation birth date (SCB—usually April 1); the year comes from the worker's education-level-adjusted birth date (ELABi). Although the system calculates this date, you can overwrite it (for example, to give a worker credit for special work experience). |
Years Months |
Displays the worker's highest education level as specified in the Personal Data component. This education level is the starting point for education-level age-related calculations. |
(MYS and SGP) Malaysia and Singapore
After you set up festive advance calculation rules and the pay programs, and associated job codes with pay programs, the eligible workers that are in the workforce are granted festive advances. Assigning the festive advance type to the worker occurs during the hire process after you assign the ethnic group, religion, and job code. However, before you accept those defaults, you might still have some issues to resolve. If you decide that any of the worker's festive advance details should be different, change them on this page.
Field or Control |
Description |
|---|---|
Ethnic Group andReligion |
Displays the values that you enter on the Personal Data - Regional page. |
Festive Advance Pay Program |
Displays the value from the Job Code Table - Job Code Profile page. You can change this default. |
FA Holiday Type (festive advance holiday type) |
Select a festive advance type. Values are: Chinese New Year, Christmas, Deepavali, Hari Raya, and N/A. The default value is the festive holiday that is appropriate to the ethnicity or religion that you enter for this person on the Personal Data - Regional page. You can change this selection. If a person chooses not to receive a festive advance, select N/A. |
Festive Advance Eligible From |
Displays the festive advance eligible from date. If the firm has a probation period that must be served before a worker is entitled to a festive advance, the probation period must be monitored. When you set the probation period in the Festive Advance Pay Program, you set the number of days or months. The system adds this information to the worker's hire date to determine the festive advance eligible from date; this date appears as the default on the FA Employee Details page. When you process the festive advances, the system checks the festive advance eligible from date against the date on which to pay the advance. If the festive advance eligible from date is not yet passed, the worker is not paid a festive advance. Note: This date is used by the festive advance calculation process and the festive advance calculation rule to determine if the worker has served enough time to be eligible for a festive advance. The date is derived from the job commencement date and the probation period in the Festive Advance Pay Program. |
(NLD) Netherlands
Field or Control |
Description |
|---|---|
Relation to Owner |
Select the worker's relationship to the owner, as appropriate. |
(USA) United States of America
Field or Control |
Description |
|---|---|
Accrue Tenure Services |
Select to activate the tenure accrual. |
FTE for Tenure Accrual |
Enter the FTE to be used in tenure accruals. FTE cannot be greater than 1.0. On multiple jobs, the sum of the FTEs of all the jobs selected to accrue tenure cannot be greater than 1.0. |
Service Calculation Group |
Select the service calculation group that represents a group employees who have the same calculation rules applied to their service accrual process. |
FTE for Flex Service Accrual |
Enter the FTE value to be used in prorating the worker's accrued service. |
Use the Job Earnings Distribution page (JOB_DATA_ERNDIST) to distribute a person's compensation for one job among different departments, job codes, accounts, shifts, position numbers, or general ledger pay types.
If the person's pay is regularly charged to more than one cost center, designate how much to allocate to each cost center.
Navigation:
Click the Earnings Distribution link at the bottom of the Add Employment Instance component.
Click the Earnings Distribution link at the bottom of the New Employment Instance component.
Click the Earnings Distribution link at the bottom of the Add Contingent Worker Instance component.
Click the Earnings Distribution link at the bottom of the New Contingent Worker Instance component.
This example illustrates the fields and controls on the Job Earnings Distribution page. You can find definitions for the fields and controls later on this page.
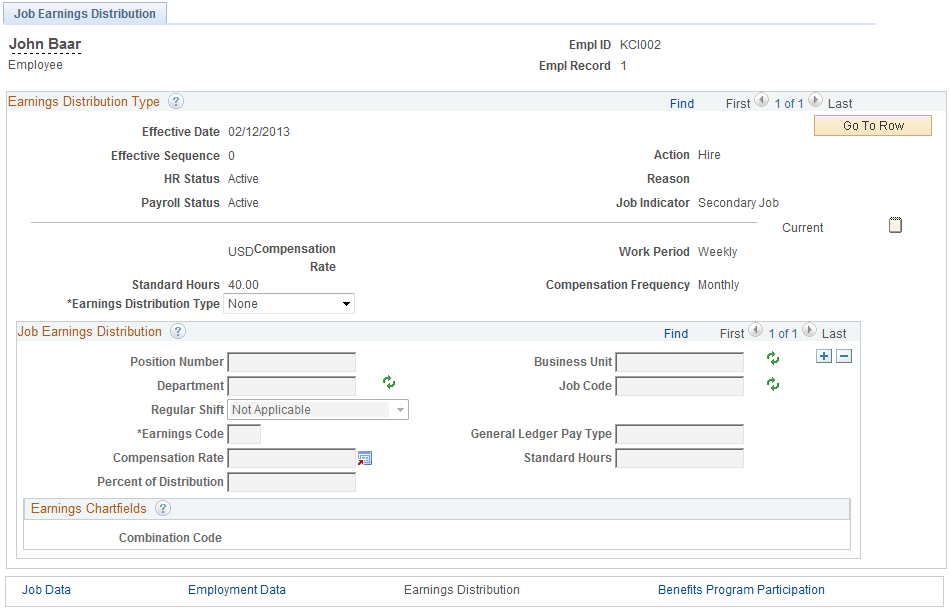
Review these guidelines prior to entering data on the Job Earnings Distribution page:
Skip this page if you don't need to distribute standard earnings for the person.
Payroll for North America uses the department, job code, account, shift, position number, and general ledger type that you enter on the Work Information and Payroll pages to calculate pay earnings records.
The system hides this page when all job rows in the component use PeopleSoft Global Payroll.
However, if any job row has another payroll system (for example, PeopleSoft Payroll for North America or Payroll Interface), then the system displays the page.
Don't use this page to distribute special earnings, such as holiday pay or bonuses; instead, use the processes in PeopleSoft Payroll for North America for handling special earnings.
If you enter a parameter such as department on this page, the parameter overrides the same field on the job record.
If you leave a parameter blank, the system uses the field from the job record.
Field or Control |
Description |
|---|---|
Standard Hours and Work Period |
If you are using position management and click the Override Position Data button, these fields become available. If you change these values on this page, it will also update the same fields on the Job Information page. |
Earnings Distribution Type |
Select an earnings distribution type. Values are:
|
Paying Workers on Disability
Some workers on disability need to be paid at a given percentage of their regular pay. Handle this situation without changing the worker's salary by setting up a disability plan earnings code in the Earnings table, based on a percentage.
Note: This feature works only for hourly workers, not for salaried workers.
When you enter an action of short-term disability with pay or long-term disability with pay, the system changes the worker's status to leave with pay.
To send 100 percent of the worker's pay to the disability plan earnings code, access the Job Data - Job Earnings Distribution page, select the By Percent option, enter the appropriate disability earnings code, and enter a percent of 100.
Note: When you put a worker on disability, don't forget to check additional pay records and make any necessary changes.
Use the Benefit Program Participation page (JOB_DATA_BENPRG) to specify the benefit program in which a person is enrolled for benefits in PeopleSoft Human Resources or PeopleSoft Benefits Administration.
Navigation:
Click the Benefits Program Participation link at the bottom of the Add Employment Instance component.
Click the Benefits Program Participation link at the bottom of the New Employment Instance component.
Click the Benefits Program Participation link at the bottom of the Add Contingent Worker Instance component.
Click the Benefits Program Participation link at the bottom of the New Contingent Worker Instance component.
This example illustrates the fields and controls on the Benefit Program Participation page. You can find definitions for the fields and controls later on this page.
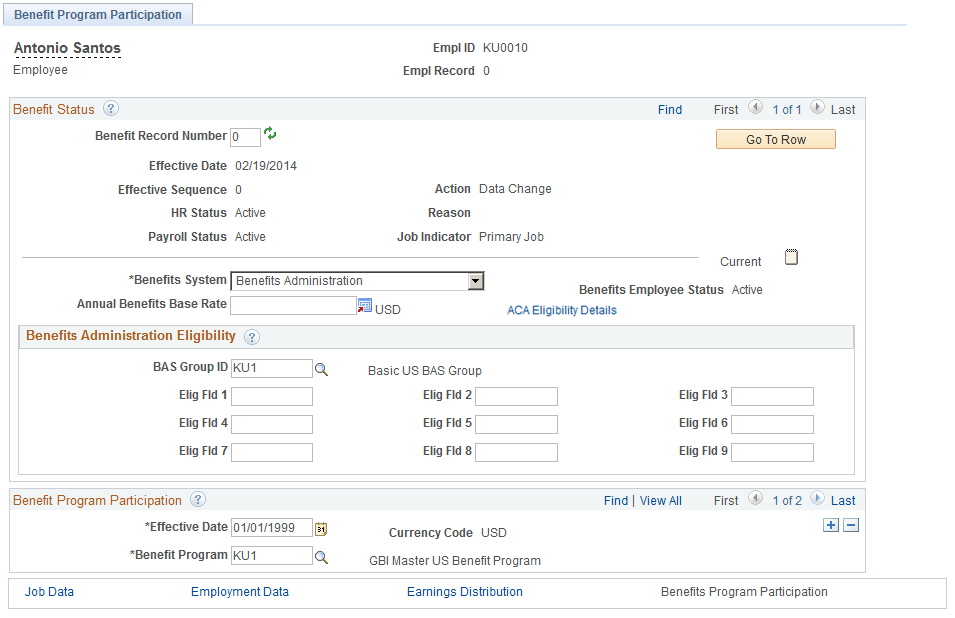
Field or Control |
Description |
|---|---|
Benefit Record Number |
Displays the benefit record number, which is an identifier that links two or more jobs for benefits purposes. The system sets the value to 0. You can override this value to attach this job to a different benefit record number. The system deselects the benefits program data and repopulates it with values that are attached to the benefit record number that you enter. |
Benefits System |
Select the appropriate benefits system. Select Not Managed in PeopleSoft (benefits managed by a system other than PeopleSoft) to filter out persons who have insufficient employment and job information to support benefit enrollment. |
ACA Eligibility Details |
This links is available when the country associated with the regulatory region for this person is USA and the company is associated with an ACA Common ID from the ACA Company Table. If it does not meet these requirements, the link will be hidden. Select this link to access the ACA Employee Eligibility page in Benefits, which enables you to provide details about the employee ACA eligibility. From Job Data, the ACA Employee Eligibility page appears in a modal window. After saving the ACA eligibility details, the system will return you to the Job Data pages. Note: You must save the data you have entered in Job Data before accessing the Benefits component to enter ACA eligibility information. If you select the ACA Eligibility Details link before saving the data, the system will prompt you to save prior to entering the eligibility information. If you click Cancel, the system will return you to the Benefit Program Participation page, where you can continue to enter information or save the job data. If you select OK, the system will save your job data and the ACAEligibility event will be raised if this is a new hire. Important! When adding job data for a new hire, it is possible that you may click the ACA Eligibility Details link before the event handler has processed the event to create the ACA Eligibility record for the employee. If this is the case, the system will display the Benefits ACA Eligibility modal window using the transfer record and you may update the eligibility manually. If the event handler processes the event in the background and creates the ACA Eligibility record for the employee, then you will get a data conflict error when you attempt to save the changes. |
Benefits Administration Eligibility
Field or Control |
Description |
|---|---|
Elig Fld 1–9 (eligibility configuration fields 1−9) |
Enter values to further filter persons' eligibility for a specific benefit. These are client-definable fields. |
Benefit Program Participation
Field or Control |
Description |
|---|---|
Currency Code |
Displays the code of the currency that is specified for the benefit program in the Benefit Program table. |
Benefit Program |
Displays the code that corresponds with the benefits program for the person's pay group, which you specify in the Pay Group table. You can override this value. |
Use the Person Checklist page (PERSON_CHECKLIST) to ensure that the human resources administrators perform all the required administrative tasks for a person, create a checklist listing all the items that need to be completed and the person responsible for completing them.
Navigation:
This example illustrates the fields and controls on the Person Checklist page. You can find definitions for the fields and controls later on this page.

You can have more than one checklist active for a person at any one time.
Field or Control |
Description |
|---|---|
Checklist |
Select the appropriate checklist. The system populates the list with the associated items. |
Person Checklist Items
The system populates this table when you select a checklist. You can add additional items.
Field or Control |
Description |
|---|---|
Item Code |
Displays the checklist item if you selected a checklist. To add items without a checklist, select the item. |
Status |
The system displays a status of Initiated for all new checklist items. Update the status from the following options as necessary:
|
Link ID |
Displays a link to the component used to complete the listed item. For example, the link ID for the item Emergency Contact is Emergency Contact, which links to the Emergency Contact component (EMERGENCY_CONTACT). |
Use the Person Applicant Information page (PERS_APPL_INFO) to define applicant referral information.
Navigation:
This example illustrates the fields and controls on the Person Applicant Information page. You can find definitions for the fields and controls later on this page.
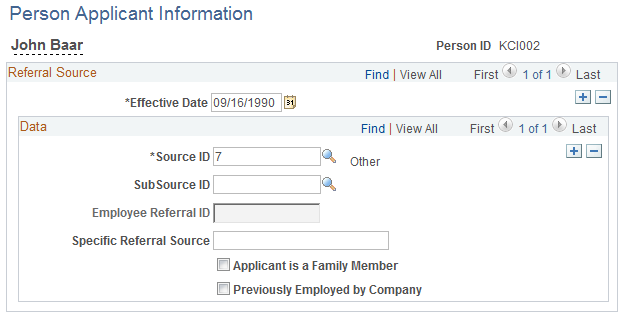
Field or Control |
Description |
|---|---|
Source ID |
Select a referral source for this person. Referral sources are defined using the Source Setup page. |
SubSource ID |
Select a subsource for this person. Subsources are defined on the Marketing page. |
Employee Referral ID |
Select the employee who referred this person. This field is available if the Source ID field equals Employee. |
Specific Referral Source |
Enter any text that further defines the referral information. |
Applicant is a Family Member |
Select this check box if this person is a family member of the referral source. |
Previous Employed by Company |
Select this check box if this person was previously employed by the company. |
Use the Person Assignment Checklist page (EMPLOYEE_CHECKLIST) to ensure that the human resources administrators perform all the required administrative tasks for an employee, create a checklist listing all the items that need to be completed and the person responsible for completing them.
Navigation:
This example illustrates the fields and controls on the Person Assignment Checklist page. You can find definitions for the fields and controls later on this page.
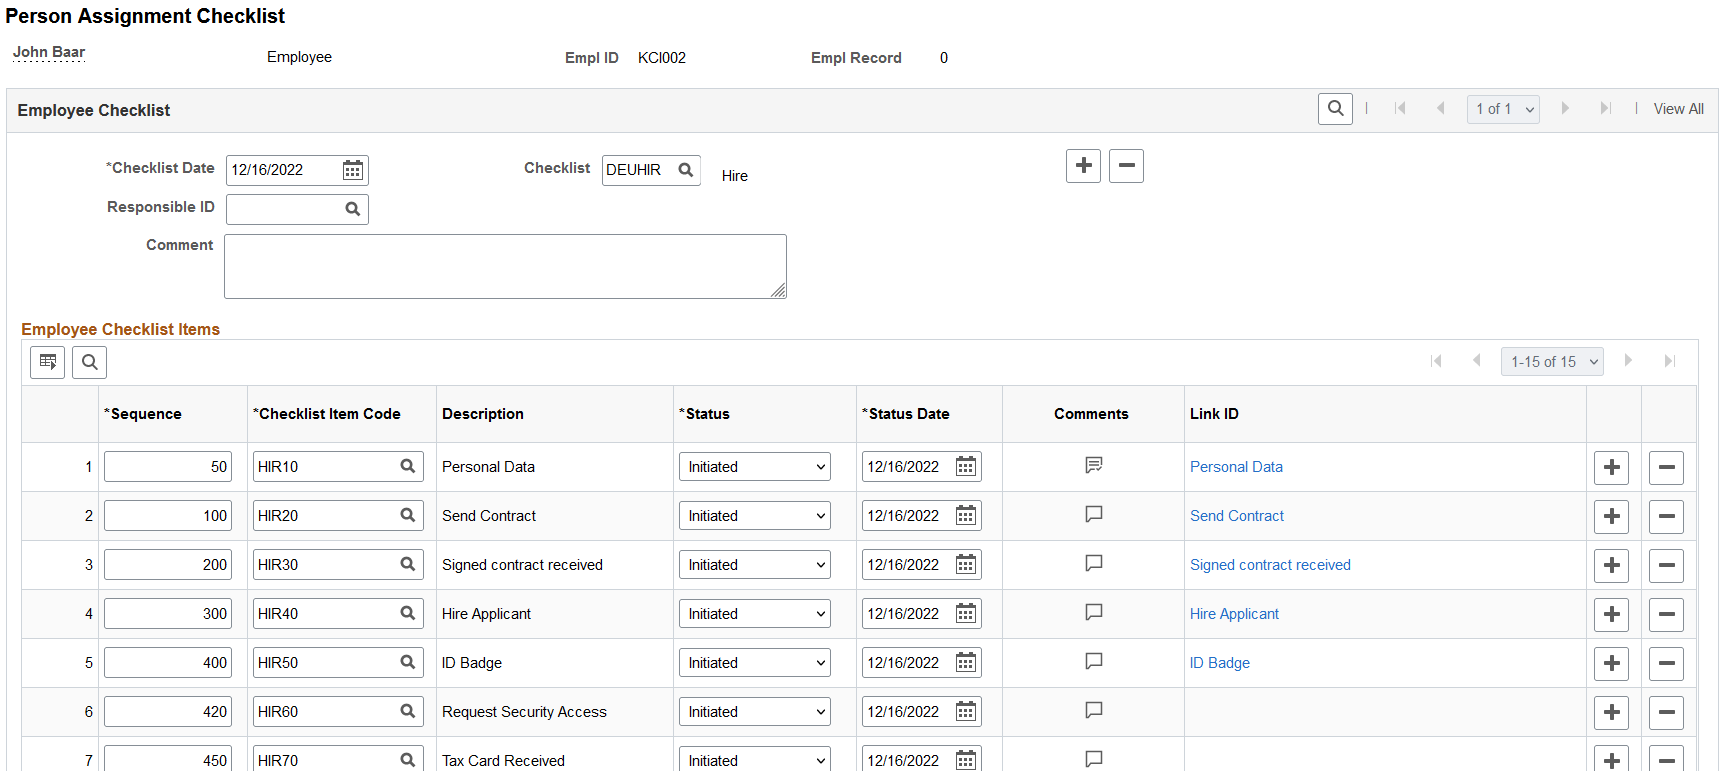
You can have more than one checklist active for an employee at any one time.
Field or Control |
Description |
|---|---|
Checklist |
Select the appropriate checklist. The system populates the list with the associated items. |
Responsible ID |
Select the person who is responsible for making sure the tasks on the checklist are completed. |
Employee Checklist Items
The system populates this table when you select a checklist. You can add additional items.
Field or Control |
Description |
|---|---|
Checklist Item Code |
Displays the checklist item if you selected a checklist. To add items without a checklist, select the item. |
Status |
The system displays a status of Initiated for all new checklist items. Update the status from the following options as necessary:
|
|
Comments
|
Select this icon to access the Checklist Item Comments page to enter or manage additional information about an item. The callout image icon will appear blank when no comments are available and with lines in the callout when comments are present. |
Link ID |
Displays a link to the component used to complete the listed item. For example, the link ID for the item Emergency Contact is Emergency Contact, which links to the Emergency Contact component (EMERGENCY_CONTACT). |
 (empty Comments) icon or
  (populated Comments) icon.