Creating a Custom Segment
For information specific to Not-for-Profit (NFP), see Custom Segments for NFP Financials.
When you create a custom segment, you can choose a label, define its values, and configure other settings. Only the Label field is required to save the segment.
To create a segment, you'll need the right permissions. Authorized users are:
-
Administrative users - Users who have the Administrator role assigned.
-
Other users - Users who have the Create, Edit, or Full level of the Custom Segments permission.
When you create a custom segment, NetSuite automatically sets up a corresponding custom record type to hold its dropdown values. The custom segment is made available as a field across a broad range of record types (including entities, items, CRM, transactions, and more), providing flexibility regardless of record family. Technically, the system creates five underlying custom field component types for each segment-Body, Column, Entity, Event, and Item-which enable the segment to appear in different record contexts. Previously, these each had separate script IDs, but now a unified field ID is used for all components.
For more information, see Custom Records Overview and Custom Field Types.
To create a custom segment:
-
Go to Customization > Lists, Records, & Fields > Custom Segments > New.
-
In the Label field, enter a name for your segment. This name will be used when the segment appears on records or as a transaction column. The custom segment name can't be the same as any other custom object or any classification.
-
In the ID field, enter a unique ID for your custom segment using numbers and letters. For information about best practices and naming conventions, see Conventions for Naming Custom Objects. You can't change this value after you save the segment.
-
The Use as Field ID box is available only for custom segments created before 2019.1. All newer custom fields automatically use the unified ID.
To use a unified ID for the entire custom segment definition, check the Use as Field ID box. When the box is checked, no field ID fields or columns are shown on the Application & Sourcing subtabs because one ID is used for all fields.
Important:If you change the Use as Field ID setting on existing custom segments, your scripting solutions can stop working, or may not work as expected. Verify SuiteScripts, CSV imports, SOAP web services, workflows, formula fields, bundles, SDF, searches, printing templates, and any other customizations that include custom segments. SuiteAnalytics Connect doesn't use the unified ID.
-
After you save the new custom segment, the Custom Record Type field shows the custom record type linked to your segment. Click the custom record type name to open its configuration page. For more information, see Custom Record Types Associated with a Custom Segment.
-
(Optional) Change the Type list from the default List/Record to Multiple Select. This setting controls whether users can select one or multiple values for the segment:
-
List/Record - Users can save only one selection.
-
Multiple Select - Users can save more than one value.
Multiple Select has some limitations. For details, see Custom Segment Types.
-
-
If you no longer need a custom segment, mark it as inactive by checking the Inactive box. For details, see Inactivating a Custom Segment.
-
Select the Display Type to control how your custom segment behaves in NetSuite. You can use display types to make a segment informational only (not stored in your account), non-editable, or to set default values or custom code calculations.
-
Normal: The segment can be edited and used for defaulting and sourcing information.
-
Disabled: The segment can't be edited, but it can be used for defaulting and sourcing information. If there's no default or sourced value, the segment won't appear on forms.
Note:To set the display type option to Disabled for a mandatory custom segment, the segment must define a default value.
-
Hidden: The segment isn't shown on records or transactions, but you can find its value using search. The value is set by defaulting, so you must set a default for the field.
Hidden segments can't be added to custom forms.
In SuiteScript, only user event, scheduled, and Suitelet scripts can set the value of a hidden segment.
Warning:Hiding a custom segment only affects how it's displayed-it doesn't provide field-level security. Hidden segments are still included in the page output and can be viewed in the page source.
-
-
(Optional) To show the customer segment as a column on custom record lists or sublists, check the Show In List box.
-
You can set up filtering for a segment's values if you want their availability to depend on other field selections. This lets you make a segment value available only when certain classifications are selected in other classification fields on the same record. For full details about filtering, see Filtering for a Custom Segment.
To use filtering, select the classifications you want to use to filter the segment's available values in the Filtered by list. Hold down Ctrl to select more than one.
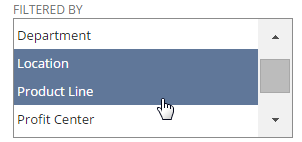
After you set up filtering, use the Set Filters button to configure which values are available for each classification.
-
If appropriate, check the GL Impact box. Checking this box means that, when the segment is used on a transaction, the segment's value is displayed on the GL Impact page.
Important:You can't change the GL Impact setting after you create the segment. For more details aboucreatt GL impact, see Configure a Segment to Appear on the GL Impact Page.
-
In the Help field, enter field-level help for the segment. When you provide help text, users can click the segment's label to view your instructions.
-
If needed, enter notes about the segment in the Description field. These notes are visible only on this segment configuration page.
-
(Optional) Configure additional settings on the segment's subtabs:
-
Values - Create values for the custom segment by adding lines to the Values sublist. If you selected options in the Filtered by field, be sure to fill in the Filtering column for each value you want users to access. For details about configuring filtering for a value, see Setting Filters for Each of the Segment's Values. For details about each column in the Values sublist, see Creating Values Within the Segment Definition.
-
Application & Sourcing - On this subtab, you can do both of the following:
-
Apply the segment to one or more record types. You can also make the segment available on another custom segment or as a column in a transaction sublist. For more details, see Applying a Custom Segment to Record Types.
-
If the segment applies to more than one record type, you can set up dynamic defaulting using the Source List field. This lets you default the segment value on one record to the value saved on another. For more details about configuring dynamic defaulting, see Dynamic Default Value Sourcing for Custom Segments.
-
-
Validation & Defaulting - On this subtab, you can do both of the following:
-
Make the segment required on a record type by checking the Mandatory box. Note that a custom form can be set up to hide the field, which prevents it from being required. For more details, see Making a Custom Segment Mandatory.
-
Choose a static default value for the segment using the Default Selection list. If you've configured dynamic defaulting using the Source List field on the Application & Sourcing subtab, it overrides the static default. For more details, see Configuring Static Defaults for Custom Segments.
-
-
Permissions - Specify the roles needed to use this segment. You can set:
-
Value Management Access Level - Choose which roles can create and edit values for the segment. For details, see Granting a Role Permission to Manage Custom Segment Values.
-
Record Access Level - Choose which roles can view and set values for a segment on a record. For details, see Granting Roles Permission to Set Segment Values on Records.
-
Search/Reporting Access Level - Choose which roles can search based on segment values, customize reports to include segment values as columns and filters, and view segment values on custom reports. For details, see Granting Roles Permission to Use Segments in Searches and Reports.
-
-
Dependent Segments - When editing an existing segment, use this subtab to view segments that use the current segment for filtering.
Note:This subtab is emptly when you crearte a new segment.
-
Display Order - Set the order in which custom segments appear in the body and lines of transactions, other records, and the GL Impact page, if applicable. You can set the display order to reflect the priorities and dependencies. For details see Setting Display Order of All Custom Segments.
-
Translation - Define translations for the segment's label and help text. The Translation subtab appears only if the Multi-Language option is enabled. For more information, see Multi-Language Setup.
-
-
To create your segment, click Save.
After you save, NetSuite creates the custom segment and an associated custom record type. The custom record type uses the same name as your custom segment and appears on the Custom Record Types list page. To add values to the custom segment, edit the custom record type directly
You can use SuiteCloud Development Framework (SDF) to manage custom segments as part of file-based customization projects. For information about SDF, see SuiteCloud Development Framework. You can use Copy to Account to copy an individual custom segments to another account. Each custom segment page has a Copy to Account option in the upper right corner. For information about Copy to Account, see Copy to Account.
Related Topics
- Custom Segment Creation
- Custom Segment Types
- Configuring GL Impact for a Custom Segment Overview
- Filtering for a Custom Segment
- Applying a Custom Segment to Record Types
- Apply to Kit or Assembly Components Setting for Custom Segments and Transaction Line Custom Fields
- Dynamic Default Value Sourcing for Custom Segments
- Validation and Static Default Values for Custom Segments
- User Permissions for a Custom Segment
- Dependent Segments
- Setting Display Order of All Custom Segments