| Skip Navigation Links | |
| Exit Print View | |

|
SPARC SuperCluster T4-4 Enterprise Manager 12c Component of the Oracle Optimized Solution for Enterprise Database Cloud Configuration Guide |
| Skip Navigation Links | |
| Exit Print View | |

|
SPARC SuperCluster T4-4 Enterprise Manager 12c Component of the Oracle Optimized Solution for Enterprise Database Cloud Configuration Guide |
Setting Up the Database as a Service
Prepare the Target Oracle Solaris 11 Zones or Logical Domains
Add Credentials for the Oracle Software Update Center
Add Virtualizations, Cloud, and Chargeback Plug-ins
Install the Cloud Control Agent on the SPARC SuperCluster 1.1
Installing the EM12c Agent(s) on the Oracle Solaris Zones
Add the Oracle Solaris Zones Host Targets
Add the Details of the RAC Cluster
Create an Enterprise Manager Cloud Administrator Role
Create an Enterprise Manager Self Service User
Create a PaaS Infrastructure Zone
Establish Quotas for the Cloud Control User
Database Deployment Procedures are a facility of EM12c that create the requested database(s) on behalf of the Cloud end user and will automatically return to the end user a connection string for the database that has been created.
The following example describes creating a deployment procedure for a single instance database.
Note - The database service template you create here is not instantiated immediately. Instead, it is offered as a service on the database zone that you create next.
This example demonstrates the creation of an Oracle 11gR2 RAC single instance database, however, the same approach applies to creating deployment procedures for RAC Cluster or RAC One Node.
Note that the database storage for Oracle Database 11gR2 will be on the Exadata Storage Cells of the SPARC SuperCluster. This storage will already be established during SuperCluster installation and further administered and provisioned using the SuperCluster/Exadata Zone tools.
The Create Database wizard is displayed.

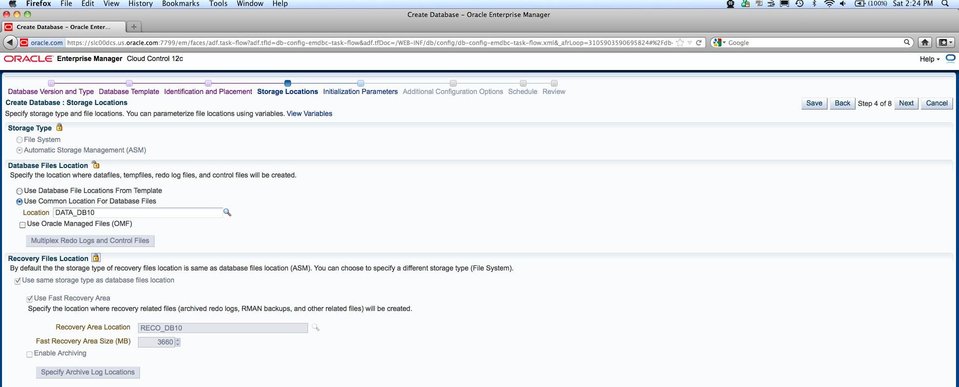
This deployment procedure will be available to cloud end users, so click the lock icons next to each selection so that these values can't be changed by the end users.
The example uses the ORACLE credential created earlier.
This validates the Oracle Home.

When creating a template, these values are for validation purposes only and are not actually used. This is because the Global database name and SID are replaced by EM12c when it creates a unique database instance for the Database Cloud end user.
Do not lock the Identification section, because these values are substituted when database as a service is used.
The verification window is displayed, and the Storage Locations window is displayed.

The storage configuration is validated, and a pop-up window displays the progress of this validation. When the validation has finished successfully, the Create Database : Initialization Parameters window is displayed.

Use this memory setting to control the amount of memory available to the database instances the cloud end user creates. The example uses percentage of available memory for ease of demonstration, but you can also uncheck this to limit each database to a specified amount. For instance, a useful strategy might be to create separate deployment procedures for small, medium, and large memory configurations, where the SGA is set to an absolute value and not a percentage of available memory.
A pop-up window indicates verification is run, then the Create Database : Additional Configurations Options window is displayed.
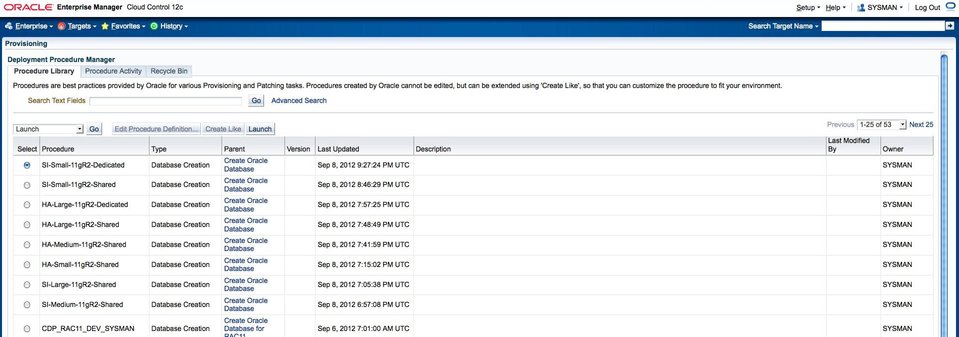
The new Deployment Procedure (in our example SI-Small-11gR2-Dedicated) is now visible in the list of deployment procedures.
