
Defining Application-Specific User Preferences
Use the User Preferences component (OPR_DEFAULT) to define PeopleSoft application-specific user preferences. Use the OPR_DEFAULT_FIN component interface to load data into the tables for this component.
This section discusses how to:
Define Asset Management user preferences.
Define IT Asset Management user preferences.
Define Billing user preferences.
Define Contracts user preferences.
Define General Ledger user preferences.
Define Inventory user preferences.
Define Lease Administration user preferences.
Define Manufacturing user preferences.
Define Sales Order user preferences.
Define Pay Cycle user preferences.
Define Supply Planning user preferences.
Define Project Costing user preferences.
Define Procurement user preferences.
Define contract process preferences.
Define vendor rebate agreement authorization.
Define Payables user preferences.
Define receiving user preferences.
Define requisition user authorizations.
Define purchase order user authorizations.
Define document tolerance authorizations.
Define Promotions Management user preferences.
Define Receivables user preferences.
Define Receivables write-off and discount tolerances.
Define Strategic Sourcing user preferences.
Define Staffing general preferences.
Define Staffing job data preferences.
Define Supplier Contract Management user preferences.
Define Maintenance Management user preferences.
Define Mobile Inventory Management user preferences.
Pages Used to Define Application-Specific User Preferences
|
Page Name |
Definition Name |
Navigation |
Usage |
|---|---|---|---|
|
Asset Management |
OPR_DEF_TABLE_AM1 |
|
Establish date default values, transaction loader processing options, interface table transaction edit options, and property pagelet defaults for a user. |
|
IT Asset Management |
OPR_DEF_TABLE_IT1 |
|
Define user preferences that are specific to IT Asset Management. |
|
Billing |
OPR_DEF_TABLE_BI1 |
|
Define default user preferences that are specific to Billing. |
|
Contracts |
OPR_DEF_TABLE_CA1 |
|
Define default user preferences that are specific to Contracts. |
|
General Ledger |
OPR_DEF_TABLE_GL1 |
|
Set up user defaults for General Ledger. |
|
Inventory |
OPR_DEF_TABLE_IN1 |
|
Define preferences for Inventory users. |
|
Lease Administration |
RE_OPR_DFLTS |
|
Define default lease administration preferences for Real Estate Management users. |
|
Manufacturing |
OPR_DEF_TABLE_MG1 |
|
Maintain the default server by user ID. Configure a default server to run the Update Pick Plan and Automatic Material Release process (SFCONREL). |
|
Orders - Quotations |
OPR_DEF_TABLE_OM2 |
|
Set up the default business unit for quotation processing pages for a user. You can also specify a beginning sequence code for your quotations. |
|
Orders - RMA (orders - returned material authorizations) |
OPR_DEF_TABLE_OM3 |
|
Set up defaults for users who are entering returned material authorizations (RMAs). |
|
Orders - Sales |
OPR_DEF_TABLE_OM1 |
|
Set up business-unit, order-source, and order-group defaults for a user who enters sales order information. You can also specify a beginning sequence code for your sales orders. |
|
PayCycle |
OPR_DEF_TBL_PYCYCL |
|
Define default output destinations for the Pay Cycle Manager and the Express Payment Manager components (PYCYCL_MGR and EXP_PYCYCL_MGR, respectively). These default values are not required to perform any pay cycle process. |
|
Planning |
OPR_DEF_TABLE_PL1 |
|
Select a default planning instance. A planning instance is a set of data (business units, items, supplies, and demands) constituting the inputs and outputs of a supply plan. |
|
Project Costing |
OPR_DEF_TABLE_PC1 |
|
Assign default parameters for transaction processing and set up data entry defaults. |
|
Procurement |
OPR_DEF_TABLE_PM1 |
|
Define options and authorizations for procurement users. |
|
Procurement - Contract Process |
OPR_DEF_CNTRCT_SEC |
Click the Contract Process link on the Procurement page. |
Define contract process preferences by specifying the default contract status and authorized actions for a user. |
|
Procurement - Rebate Authorizations |
OPR_DEF_VRBT_SEC |
Click the Rebate Authorizations link on the Procurement page. |
Define rebate manager maintenance authorization and access rights for vendor rebate agreements. |
|
Procurement - Request for Quote Process |
OPR_DEF_RFQ_SEC |
Click the Request for Quote Process link on the Procurement page. |
Specify the default request for quote (RFQ) status and authorized actions for a user, including the ability to select the vendors to which an RFQ is dispatched. |
|
Procurement - Payables Online Vouchering |
OPR_DEF_TABLE_AP1 |
Click the Payables Online Vouchering link on the Procurement page. |
Specify user voucher authorities, online voucher processing, and quick invoice configuration options for a user. |
|
Procurement - Voucher Styles |
VCHR_AUTHORITY_SEC |
Set Up Financials/Supply Chain, Common Definitions, User Preferences, Define User Preferences, Procurement Click the Payables Online Vouchering link on the Procurement page Click the Security for Voucher Styles link on Payables Online Vouchering page. |
Define user authority (security) for each of the voucher styles. Selections determine whether the user has the authority to add or modify different types of vouchers. You must be in the Update/Display mode to select the Allow Claimback Voucher option. |
|
Procurement - Receiver Setup |
OPR_DEF_RECV_SEC |
Click the Receiver/RTV Setup link on the Procurement page. |
Define receiver and RTV user preferences. |
|
Procurement - Requisition Authorizations |
OPR_REQ_AUTH |
Click the Requisition Authorizations link on the Procurement page. |
Authorize users to initiate and update requisitions for applicable requesters. Define a user's requisition processing authority in relation to applicable requesters. |
|
Procurement - Purchase Order Authorizations |
OPR_PO_AUTH |
Click the Purchase Order Authorizations link on the Procurement page. |
Authorize users to create and update purchase orders for applicable buyers. Define a user's purchase-order processing authority in relation to applicable buyers. |
|
Procurement - Vendor Processing Authority |
OPR_DEF_TABLE_VND1 |
Click the Vendor Processing Authority link on the Procurement page. |
Authorize users to perform vendor maintenance functions (enter, approve, deactivate). |
|
Procurement - Document Tolerance Exceptions Override |
OPR_DEF_DOC_TOL |
Click the Doc Tolerances link on the Procurement page. |
Provide authority to users to override document tolerances. |
|
Promotions Management |
OPR_DEF_TABLE_TD1 |
|
Define default user preferences for promotions management. |
|
Receivables Data Entry 1 |
OPR_DEF_TABLE_AR1 |
|
Define the default group unit, deposit unit, and address that is associated with a user. |
|
Receivables Data Entry 2 |
OPR_DEF_TABLE_AR2 |
|
Specify write-off tolerances and discount tolerances. |
|
Strategic Sourcing |
OPR_DEF_TBL_SS |
|
Create strategic sourcing user preferences and defaults. |
|
Staffing - General Preferences |
OPR_DEF_TABLE_FO1 |
Click the Staffing - General Preferences link. |
Define general user preferences for Staffing Front Office and Pay/Bill Management. |
|
Staffing - Job Data |
OPR_DEF_TABLE_FO2 |
Click the Staffing - Job Data link. |
Define Staffing Front Office and Pay/Bill Management values to be supplied by default to the Job Data section of the Applicant setup pages. |
|
Supplier Contract Management |
OPR_DEF_TABLE_CS |
Set Up Financials/Supply Chain, Common Definitions, User Preferences, Define User Preferences Click the Supplier Contract Management link. |
Define user authorizations for managing contract documents through their life cycles and to grant the types of controls that the user who is defined in the User ID field can perform on documents. |
|
Maintenance Management |
OPR_DEF_TABLE_WM1 |
|
Define default maintenance management preferences. |
|
User Preferences – Mobile Inventory |
MIN_USER_TASK_OPT |
Set Up Financials/Supply Chain, Common Definitions, User Preferences, Define User Preferences, Mobile Inventory and select a task flow. |
Define user preferences for Mobile Inventory Management. |
Asset Management - User Preferences Page
Use the Asset Management - User Preferences page (OPR_DEF_TABLE_AM1) to establish date default values, transaction loader processing options, interface table transaction edit options, and property pagelet defaults for a user.
Image: Asset Management - User Preferences page
This example illustrates the fields and controls on the User Preferences - Asset Management page. You can find definitions for the fields and controls later on this page.
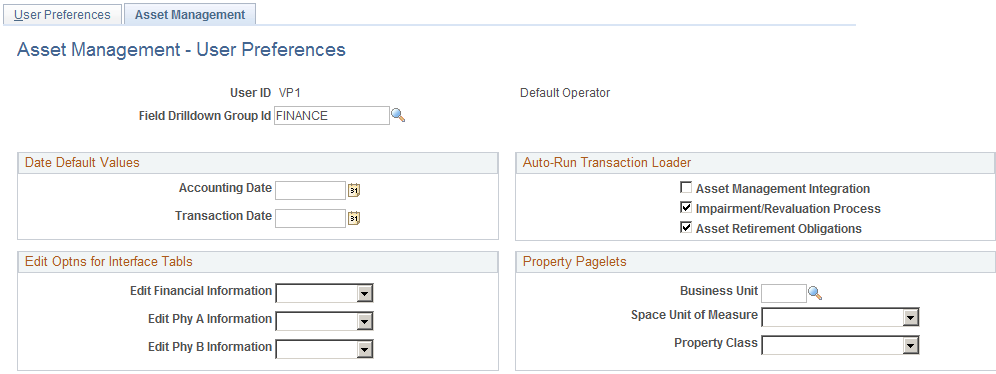
| Field Drilldown Group Id |
Select a drill-down group to be used by online reporting when filtering data. |
Date Default Values
Auto-Run Transaction Loader
| Asset Management Integration |
Select to add transactions from Maintenance Management to the transaction loader process (AMIF1000). |
| Impairment/Revaluation Process |
Select to always run impairment and revaluation processing when running the transaction loader process. See Understanding Adjusting, Transferring, and Evaluating Assets |
| Asset Retirement Obligations |
Select this option to enable automatic always run Asset Retirement Obligation transaction processing when you click the Generate ARC button from either the ARO Measurement page or from the ARO Measurement in Mass – Process Parameters page when running the transaction loader process (AMIF1000). |
Edit Options for Interface Tables
Note: When the interface status is in the status of Errored, On Hold, or Pending, the options to edit the transaction tables come into effect. Depending on the load type, some fields may not be editable even when the All option has been selected. For example, you cannot enter proceeds or removal costs in an FAD (Financial Addition) transaction because those fields are related to retirements.
Property Pagelets
User Preferences - IT Asset Management Page
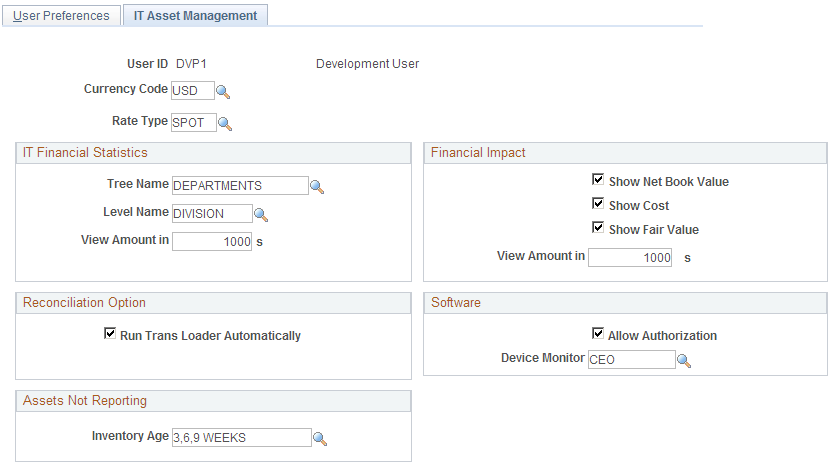
Use the User Preferences - IT Asset Management page (OPR_DEF_TABLE_IT1) to define user preferences that are specific to IT Asset Management.
Image: User Preferences - IT Asset Management page
This example illustrates the fields and controls on the User Preferences - IT Asset Management page. You can find definitions for the fields and controls later on this page.
IT Financial Statistics
Financial Impact
Reconciliation Option
Software
User Preferences - Billing Page
Use the User Preferences - Billing page (OPR_DEF_TABLE_BI1) to define default user preferences that are specific to Billing.
Note: Before you define user preferences, you must configure your default process scheduler servers.
You can initiate Billing processes from a button in the Bill Entry, Bill Inquire, and Bill Summary components as well as from the Direct Invoice Test page.
Note: If you are running a multiprocess job from a button, you can specify only one output destination for all processes within the job. You cannot vary the output destination for individual processes within a job.
In Inventory, you can initiate Billing processes by clicking a link on the Shipping/Issues Order Summary page. When you initiate the process, you can select process options such as the server name and output destination.
Single Action and Direct Invoicing Alternates
Single Action Invoice and Direct Invoice multiprocess jobs comprise groups of processes that you submit to the server as a unit. Billing delivers an alternate set of corresponding Single Action and Direct Invoicing multiprocess jobs that run only up to invoice printing, enabling you to run the remaining processes at another time.
The alternate set of corresponding Single Action and Direct Invoicing multiprocess jobs do not include the following processes:
Currency Conversion (BICURCNV).
Load AR Pending Items (load accounts receivable pending items) (BILDAR01).
Billing Pre-load (BIPRELD).
Load GL Interface (load general ledger interface) (BILDGL01).
Federal Invoice Formats SF1080 and SF1081 Report (BISF108X).
Commitment Control Budget Processor (FSPKBDP3).
Single Action and Direct Invoice Jobs and Corresponding Alternates
The following table lists multiprocess jobs that include certain processes and the corresponding alternate jobs that do not include the processes.
|
Multiprocess Jobs That Include BICURCNV, BILDAR01, BIPRELD,BILDGL01, FSPKBDP3, and BISF108X |
Initiated From |
Corresponding Alternate Jobs That Do Not Include BICURCNV, BILDAR01, BIPRELD, BILDGL01, FSPKBDP3, and BISF108X |
|---|---|---|
|
DIRCTIVC |
Shipping/Issues page |
DIRCTIV2 |
|
BIDIRIVC |
Direct Invoice Test page |
BIDIRIV2 |
|
BIINIU |
Shipping/Issues page |
BIINIU2 |
|
BIJOB03, BIJOB03K |
Bill Entry, Bill Inquiry, and Bill Summary pages |
BIJOB08 |
Note: BIJOB03K includes commitment control only if you enabled commitment control at the installation level.
See the product documentation for PeopleTools: PeopleSoft Process Scheduler.
User Preferences - Contracts Page
Use the User Preferences - Contracts page (OPR_DEF_TABLE_CA1) to define default user preferences that are specific to Contracts.
Image: User Preferences - Contracts page
This example illustrates the fields and controls on the User Preferences - Contracts page. You can find definitions for the fields and controls later on this page.
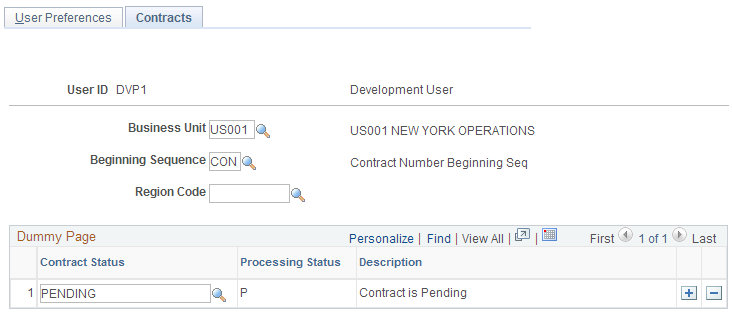
Note: If you have enabled contract status security, you must define the list of contract statuses to which this user is authorized to set a contract.
Contract Status Authorizations
User Preferences - General Ledger Page
Use the User Preferences - General Ledger page (OPR_DEF_TABLE_GL1) to set up user defaults for General Ledger.
Image: User Preferences - General Ledger page
This example illustrates the fields and controls on the User Preferences - General Ledger page. You can find definitions for the fields and controls later on this page.
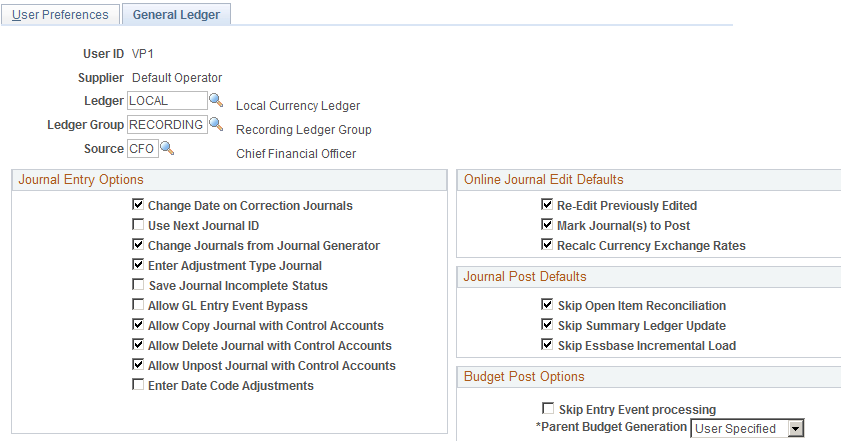
Select the ledger, ledger group, and source to be used as defaults for a user.
Journal Entry Options
Online Journal Edit Defaults
Journal Post Defaults
Budget Post Options
User Preferences - Inventory Page
Use the User Preferences - Inventory page (OPR_DEF_TABLE_IN1) to define preferences for Inventory users.
Order Key Defaults
Enter default values to be used in prompts for the order keys in Inventory.
Auto Numbering
| MSR Beginning Sequence and Receiver Beginning Sequence |
Enter values if you plan to use automatic numbering to manage your stock requests and item numbers. |
Lease Administration - User Preferences Page
Use the User Preferences - Lease Administration page (RE_OPR_DFLTS) to define default lease administration preferences for Real Estate Management users.
Access the Lease Administration page (Set Up Financials/Supply Chain, Common Definitions, User Preferences, Define User Preferences, Lease Administration, Lease Administration - User Preferences).
Image: Lease Administration - User Preferences page
This example illustrates the fields and controls on the Lease Administration - User Preferences page. You can find definitions for the fields and controls later on this page.
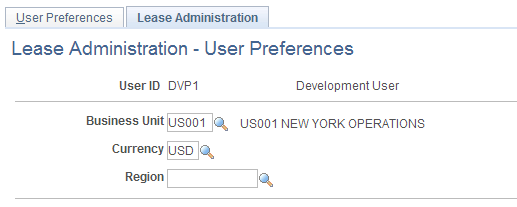
Information that you enter on this page applies solely to the specific user ID that is identified at the top of the page. You can select default values to help minimize data entry.
User Preferences - Manufacturing Page
Use the User Preferences - Manufacturing page (OPR_DEF_TABLE_MG1) to maintain the default server by user ID.
Configure a default server to run the Update Pick Plan and Automatic Material Release process (SFCONREL).
User Preferences - Orders - Sales Page
Use the User Preferences - Orders - Sales page (OPR_DEF_TABLE_OM1) to set up business-unit, order-source, and order-group defaults for a user who enters sales order information.
You can also specify a beginning sequence code for your sales orders.
Order Defaults
Select options as defaults for the sales order for the user ID.
Sales Order Display
This section shows how information is initially displayed during sales order entry based on the default for the business unit.
User Preferences - PayCycle Page
Use the User Preferences - PayCycle page (OPR_DEF_TBL_PYCYCL) to define default output destinations for the Pay Cycle Manager and the Express Payment Manager components (PYCYCL_MGR and EXP_PYCYCL_MGR, respectively).
These default values are not required to perform any pay cycle process.
Output Destination
Note: If these default values are not specified, the output destination will be required to be entered for every report process that is initiated from the Pay Cycle Manager and Express Check components (PYCYCL_MGR and PYMNT_EXPRESS, respectively).
User Preferences – Supply Planning Page
Use the Planning page (OPR_DEF_TABLE_PL1) to select a default planning instance.
A planning instance is a set of data (business units, items, supplies, and demands) constituting the inputs and outputs of a supply plan.
Access the Planning page (Setting Up Financials/Supply Chain, Install, Installation Options, Planning).
User Preferences – Project Costing Page
Use the User Preferences - Project Costing page (OPR_DEF_TABLE_PC1) to assign default parameters for transaction processing and set up data entry defaults.
Image: User Preferences - Project Costing page
This example illustrates the fields and controls on the User Preferences - Project Costing page. You can find definitions for the fields and controls later on this page.
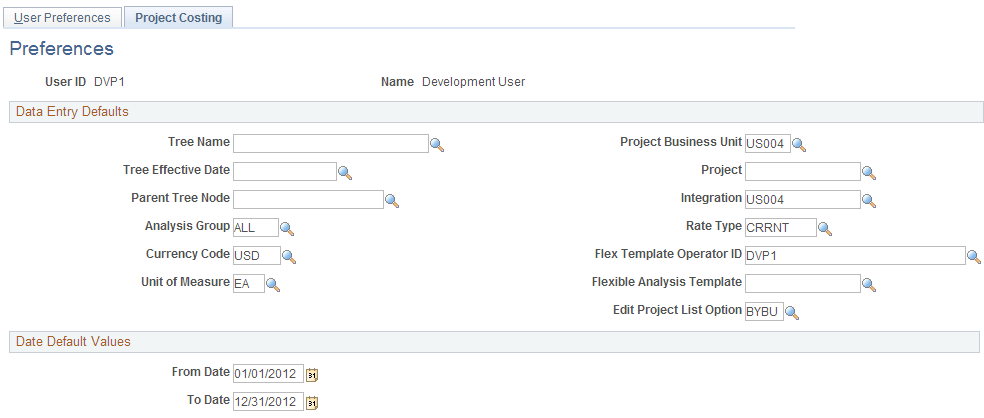
Information that you enter on this page applies solely to the specific user ID that is identified at the top of the page. You can select default values to help minimize data entry.
Data Entry Default Values
User Preferences – Procurement Page
Use the User Preferences - Procurement page (OPR_DEF_TABLE_PM1) to define options and authorizations for procurement users.
Process User Preferences – Contract Process Page
Use the User Preferences - Procurement - Contract Process page (OPR_DEF_CNTRCT_SEC) to define contract process preferences by specifying the default contract status and authorized actions for a user.
Image: User Preferences - Procurement – Contract Process page
This example illustrates the fields and controls on the Procurement – Contract Process page. You can find definitions for the fields and controls later on this page.
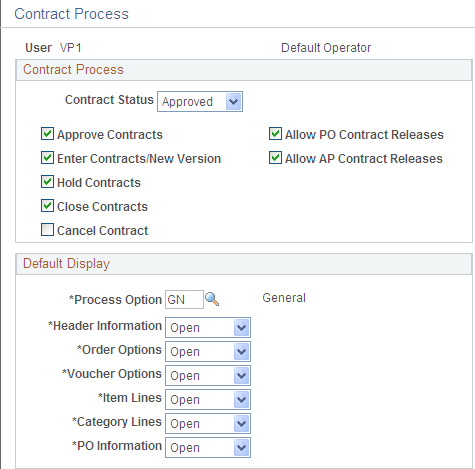
Use this page to specify the default contract statuses and authorized actions for a user and to define how the system initially displays the collapsible areas on the Contract page.
Contract Process
Display Options
Use this grid to define how the system initially displays the collapsible areas on the Contract page. The system applies display settings by expanding and collapsing group boxes as you indicate on this page. Group boxes appear based on the contract process type. So, for example, if the system is applying display options to a contract with a process type of Prepaid Voucher, then only the Header, Amount Summary, and Add Items group boxes are expanded or collapsed.
User Preferences – Vendor Rebate Agreement Authorizations Page
Use the User Preferences - Procurement - Rebate Authorizations page (OPR_DEF_VRBT_SEC) to define rebate manager maintenance authorization and access rights for vendor rebate agreements.
Rebate Agreement Defaults
| Rebate Agreement Status |
Select the default status for the rebate manager when you are creating vendor rebate agreements. Statuses are Approved and Open. |
Allowed Rebate Agreement Actions
Select the check box next to the specific actions that you want the rebate manager to have.
Rebate Manager Access
For more information, see PeopleSoft Purchasing: Defining Supplier (Vendor) Rebate Agreements.
User Preferences – Payables Online Vouchering Page
Use the User Preferences - Procurement - Payables Online Vouchering page (OPR_DEF_TABLE_AP1) to specify user voucher authorities, online voucher processing, and quick invoice configuration options for a user.
Image: Procurement - Payables Online Vouchering page
This example illustrates the fields and controls on the Procurement - Payables Online Vouchering page. You can find definitions for the fields and controls later on this page.
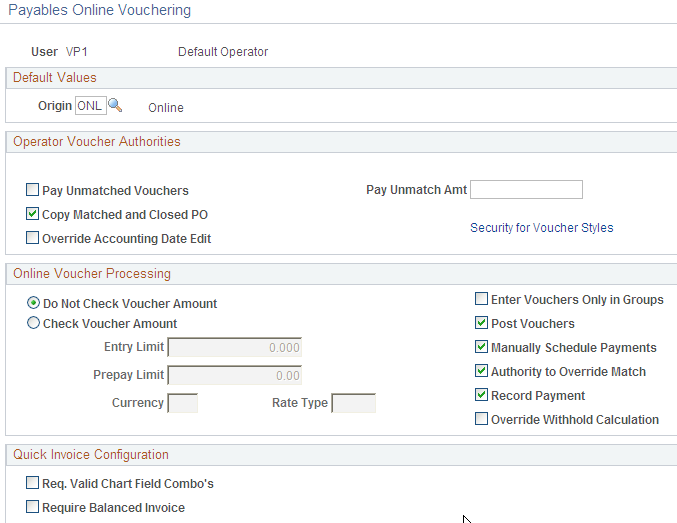
The AP Operator Profile report (APY0003) displays accounts payable user defaults by setID.
User Preferences – Receiving and RTV Page
Use the User Preferences - Procurement - Receiver Setup page (OPR_DEF_RECV_SEC) to define receiver and RTV user preferences.
Mobile Receiving Printer
The options in this group box are used with PeopleSoft Mobile Inventory Management. Use this group box to set up printer default values. These values are used by the Receiving PO and Receiving Ad Hoc components when printing the Mobile Receipt Delivery report.
For additional information about PeopleSoft Mobile Inventory Management:
SeeUnderstanding How to Receive Stock in PeopleSoft Inventory Using Mobile Receiving.
User Preferences – Requisition User Authorizations Page
Use the User Preferences - Procurement - Requisition Authorizations page (OPR_REQ_AUTH) to authorize users to initiate and update requisitions for applicable requesters.
Define a user's requisition processing authority in relation to applicable requesters.
Requesters User Authorization
User Preferences – Purchase Order User Authorizations Page
Use the User Preferences - Procurement - Purchase Order Authorizations page (OPR_PO_AUTH) to authorize users to create and update purchase orders for applicable buyers.
Define a user's purchase-order processing authority in relation to applicable buyers.
Image: User Preferences - Procurement - Purchase Order Authorizations page
This example illustrates the fields and controls on the Procurement - Purchase Order Authorizations page. You can find definitions for the fields and controls later on this page.
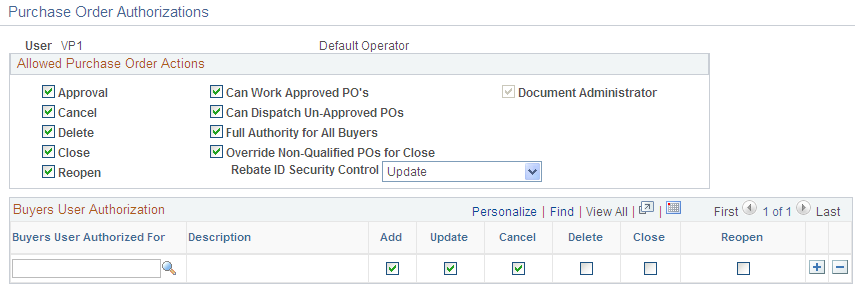
Allowed Purchase Order Actions
User Preferences - Document Tolerance Exceptions Override Page
Use the User Preferences - Document Tolerance Exceptions Override page (OPR_DEF_DOC_TOL) to provide authority to users to override document tolerances.
User Preferences – Promotions Management Page
Use the User Preferences - Promotions Management page (OPR_DEF_TABLE_TD1) to define default user preferences for promotions management.
User Preferences – Receivables Data Entry 1 Page
Use the User Preferences - Receivables Data Entry 1 page (OPR_DEF_TABLE_AR1) to define the default group unit, deposit unit, and address that is associated with a user.
Image: User Preferences – Receivables Data Entry 1 page
This example illustrates the fields and controls on the User Preferences – Receivables Data Entry 1 page. You can find definitions for the fields and controls later on this page.
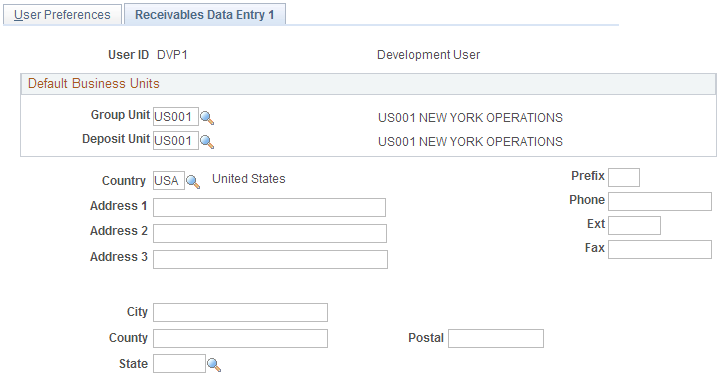
Use the address fields to store addresses for followup letters. The address information that you enter on this page is not validated against any table.
User Preferences - Receivables Data Entry 2 Page
Use the User Preferences - Receivables Data Entry 2 page (OPR_DEF_TABLE_AR2) to specify write-off tolerances and discount tolerances.
Image: User Preferences – Receivables Data Entry 2 page
This example illustrates the fields and controls on the User Preferences – Receivables Data Entry 2 page. You can find definitions for the fields and controls later on this page.
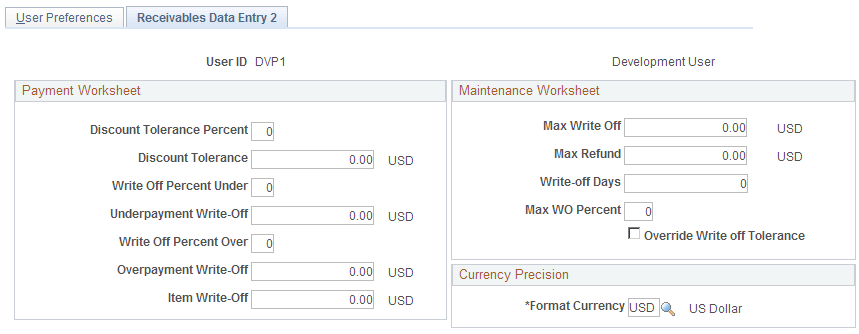
Payment Worksheet
Enter the write-off tolerances and discount tolerances for the payment worksheet.
Maintenance Worksheet
Enter the write-off tolerances for the maintenance worksheet.
Warning! If you do not define write-off tolerances for the user, the system uses zero for the user's write-off tolerances, and the user cannot write off items.
User Preferences – Strategic Sourcing Page
Use the User Preferences - Strategic Sourcing page (OPR_DEF_TBL_SS) to create strategic sourcing user preferences and defaults.
Image: User Preferences - Strategic Sourcing page
This example illustrates the fields and controls on the Strategic Sourcing page. You can find definitions for the fields and controls later on this page.
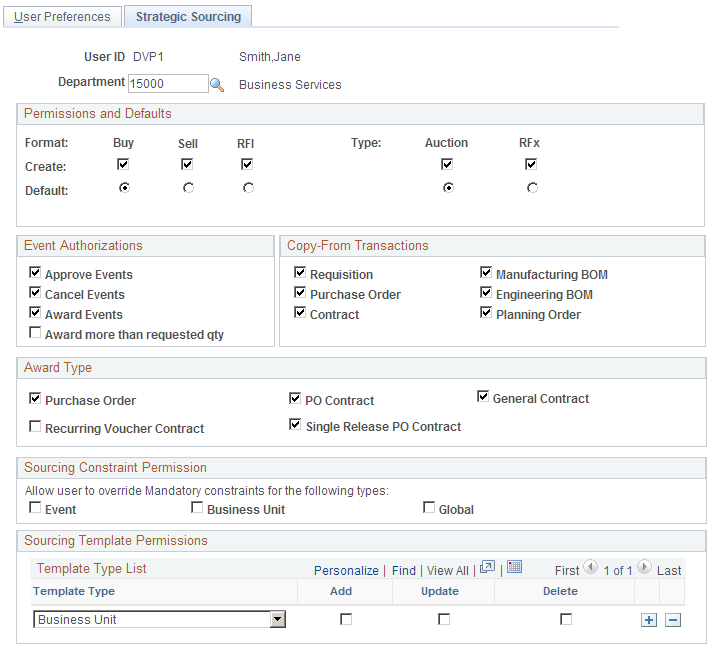
User Preferences – Staffing General Preferences Page
Use the User Preferences - Staffing - General Preferences page (OPR_DEF_TABLE_FO1) to define general user preferences for Staffing Front Office and Pay/Bill Management.
Image: User Preferences - Staffing - General Preferences page
This example illustrates the fields and controls on the Staffing - General Preferences page. You can find definitions for the fields and controls later on this page.
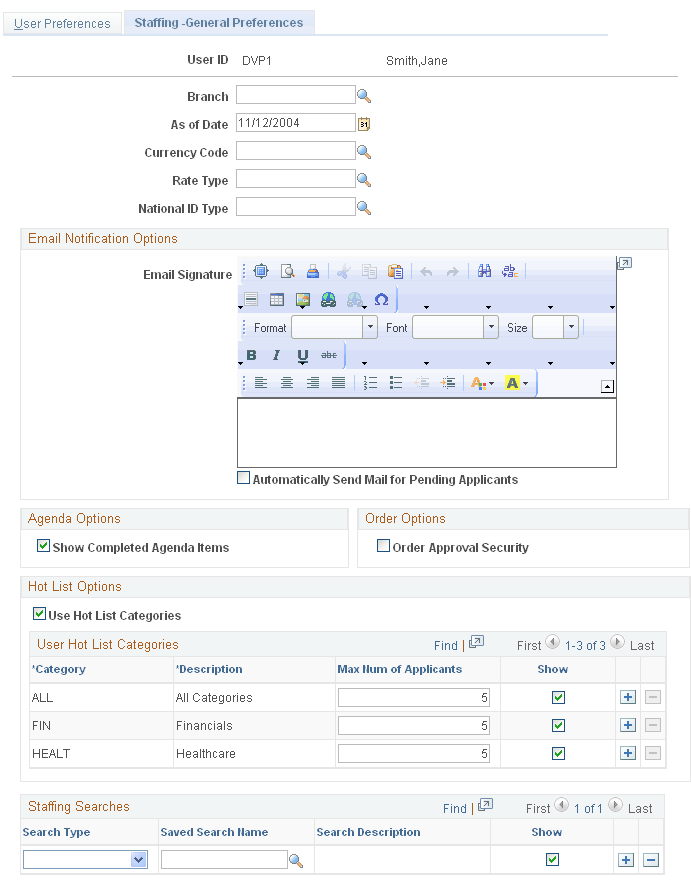
- Branch
-
Enter the staffing branch to be associated with the user ID.
- As of Date
-
Select a date to be used on some reports to populate the AsOfDate variable.
- Currency Code
-
Select an option that the system will use to automatically default to the Customer - General Information page (Customers, Customer Information, General Information) when adding a new customer.
- Rate Type
-
Select an option that the system will use to automatically default to the Customer - General Information page (Customers, Customer Information, General Information) when adding a new customer.
- National ID Type
-
Select a default format for the applicant and employee pages to track a person's tax identification number, such as social security number or social insurance number.
- My Searches
-
Set up the searches you want to appear on the My Searches pagelet. You can also define this by clicking the Customize button on the pagelet.
Email Notification Options
- Email Signature
-
Enter a signature to be used on emails that are sent using the Send Email page.
- Automatically Send Mail For Pending Applicants
-
Select to indicate that the system should automatically send an e-mail to the applicant when a user changes the applicant’s status to Valid or Invalid. This procedure is performed by using the Action button on the Pending Applicants pagelet.
Agenda Options
Order Options
- Order Approval Security
-
This option indicates whether a user can save orders with a status of Approved. When this check box is deselected, users can save only orders with a status of Pending Approval. Orders pending approval can only be saved with a status of Draft and cannot have assignments created. Consider using this feature with the order customer self-service component. For example, you may not want to give order approval access to the user IDs that are granted to your customers.
Hot List Options
- Use Hot List Categories
-
Select this check box to set up categories for the Hot List.
When this option is selected, the system displays the User Hot List Categories grid.
Set up hot list categories using the Hot List Categories page.
- User Applicant Hot List Categories
-
Enter a value in the Maximum Number of Applicants to determine how many applicants the system should display on the pagelet.
Select the Show check box to determine if the category is to be displayed on the pagelet.
The All category represents system data and displays all the hot elements in pagelets regardless of categorization.
Use the add a new row icon to define a new hot list category. If a user defines their own hot category on this page, they must enter the category code, description, maximum number of applicants, and whether to show the category on the pagelet. The user can delete the category as well.
Hot list categories can also be defined using the Hot List Categories page.
Staffing Searches
| Search Type |
Select a search type. |
| Saved Search Name |
Select a search name. |
| Show |
Select to indicate that you want this search type to appear on the My Searches pagelet. |
User Hot List Categories
Specify user specific categories to be displayed on the Applicant Hot List pagelet.
This grid only appears if you select the Set Up for Applicant Hot List Category check box.
Note: You cannot delete any categories that have applicants attached to them.
Defining Staffing Job Data Preferences
Use the User Preferences - Staffing - Job Data page (OPR_DEF_TABLE_FO2) to define Staffing Front Office and Pay/Bill Management values to be supplied by default to the Job Data section of the Applicant setup pages.
Image: User Preferences - Staffing - Job Data page
This example illustrates the fields and controls on the User Preferences - Staffing - Job Data page. You can find definitions for the fields and controls later on this page.
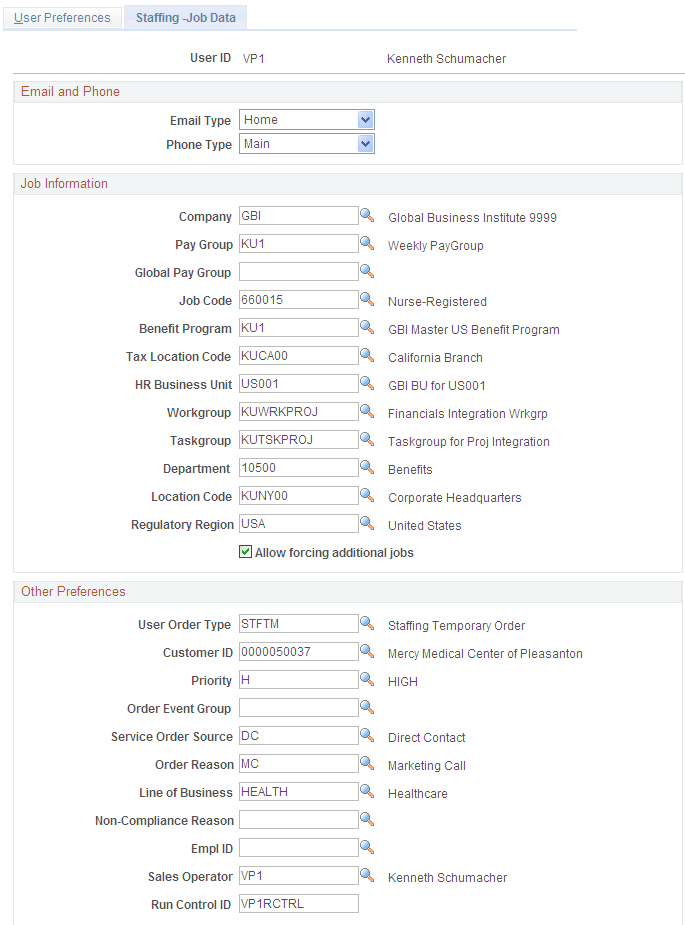
Email and Phone
Job Information
The values entered in the following fields will be used as defaults when you are adding applicants, orders, and new reports to the system. Users can override or keep these default values. After the applicant is hired, if Pay/Bill Management is installed, the applicant field values will be used to create the employee job record in HRMS, driving the process by which the employee should be paid.
User Preferences - Supplier Contract Management Page
Use the User Preferences - Supplier Contract Management page (OPR_DEF_TABLE_CS) to define user authorizations for managing contract documents through their life cycles and to grant the types of controls that the user who is defined in the User ID field can perform on documents.
This user preference page is enabled only for users who have administration rights for authored contracts, and those users can approve library sections and set configurator status.
Document Authorizations
The application administrator uses this group box to grant users security for document administrators and users who will manage section approvals and status changes for configurators.
Authorize Document Access for
These authorizations enable this user to act on behalf of other users who are selected in the Document Administrator column of the grid. You might use this feature, for example, if the selected user is a senior contract administrator, and while members of his department or group are away from the office, then the user has the authority to perform tasks for his or her documents.
User Preferences - Maintenance Management Page
Use the Maintenance Management page (OPR_DEF_TABLE_WM1) to define default maintenance management preferences.
Image: User Preferences – Maintenance Management page
This example illustrates the fields and controls on the User Preferences – Maintenance Management page. You can find definitions for the fields and controls later on this page.
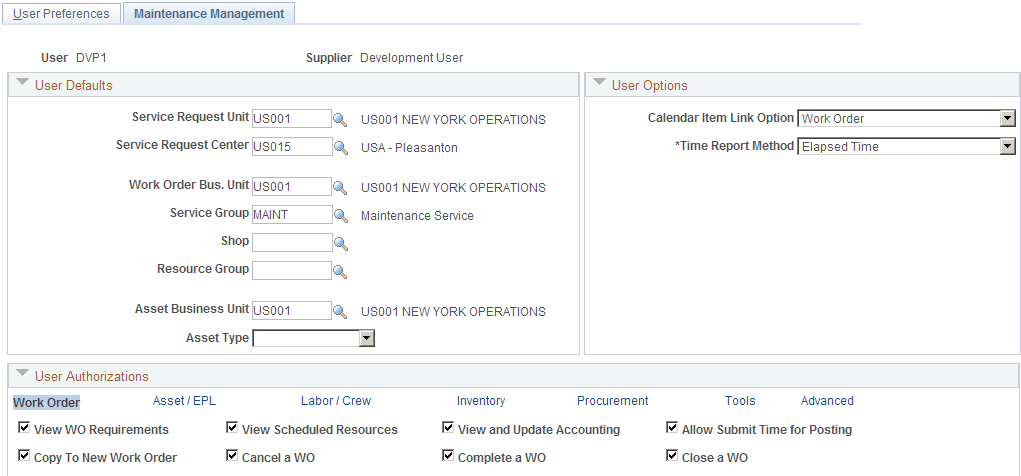
User Defaults
User Options
User Authorizations – Work Order
User Authorizations – Asset/EPL
| Authorized to Set Asset Action |
Select this check box to enable specific users to select the Asset Action for a task on the Requirements page of the work order. The Asset Action dropdown list enables you to install, retire, and replace assets. |
| Authorize Cost Recovery Claim |
Select this check box to enable this user to create a warranty claim. If you do not select this check box, the Warranty Claim link is not available on the Schedules page of the Work Order component. |
| Override Capital Limit |
Select this check box to enable this user to override the capitalization limit on the Task Accounting component, which is set up on the Maintenance Management, Setup, Capitalization Rules component for the asset used in a work order. The user can increase or decrease the minimum amount that it costs to repair an asset in a work order task before it can be capitalized by Project Costing. Note: If you do not select this check box, the capitalization limit cannot be accessed by this user. |
| Allow Planned Downtime |
Select this check box to enable a user to enter planned downtime for an asset specified for a work order task. Users can enter planned and actual downtime for an asset via the Downtime Entry component, a link at the work order task level in the Work Order Component, and a link at the work order task level on the Technician Workbench . When the work order is closed, the asset downtime updates the Asset Maintenance History. This information can be useful for creating warranty claims based on the downtime of an asset. If you do not select this check box, the downtime Planned tab does not display, and users can only enter the actual downtime. Note: Downtime entries are not updated to Warranty Claim processing. |
| Allow Update Non-specific EPLs(allow update non-specific equipment parts lists) |
Select this check box to enable the Add to EPL button for this user, which appears above the Inventory and Purchase/On-Hand grids on the Requirements and Schedules pages in the Work Order and Express Work Order components, and the Requirements grid in the Work Order Task Template component. Equipment Parts List (EPL) templates are set up in PeopleSoft Asset Management (Set Up Financials/Supply Chain, Product Related, Asset Management, Service and Repair) based on categories of assets (asset type, asset subtype, manufacturer's ID, and model). An EPL template lists the parts that are used to maintain and repair assets falling under these asset categories. Non-specific EPL templates refer to any EPL template that is not selected as the default EPL template for the asset that is selected for a work order task. When this user selects an asset for the work order task and clicks the Add To EPL button for one or more selected Inventory or Purchase/On-Hand task rows, the Add to Equipment Parts List page appears. This page lists one or more non-specific EPL templates, which were set up for one or more asset categories that apply to the asset selected for the task. For example, these three EPL templates are set up under the asset type, Facilities, and the asset subtype, HVAC/Heating.
The Asset ID MMFACTLTY0009 is an Air Conditioner Unit that is categorized under the asset type, Facilities, and asset subtype, HVAC/Heating. When you select the asset ID MMFACTLTY0009 for a work order task, define and select one or more inventory item rows that you want to add to one or more EPL templates, and click the Add to EPL button. All three of these EPL templates will appear on the Add to Equipment Parts List page. The user adds the one or more inventory items selected for the task to one or all of the EPL templates by selecting the check box for each EPL template row and clicking the Add to EPL button. |
| Allow Update Asset Default EPL |
Select this check box to enable this user to access the Add to EPL button, which appears above the Inventory and Purchase/On-Hand grids in the Work Order and Express Work Order components, and above the Inventory and Purchase/On-Hand Requirements grid in Work Order Task Template component. You can set up asset definitions in PeopleSoft Asset Management and select a default EPL template for each asset. If the Allow Update Asset Default EPL check box is selected, and this user selects one of these assets, defines and selects one or more inventory or purchase on-hand rows, and clicks the Add to EPL button, the default EPL template defined for the selected asset displays as preselected on the Add to Equipment Parts List page. Important! If you select both the Allow Update Non-specific EPLs and the Allow Update Asset Default EPL buttons, then both the asset default EPL and any non-specific EPLs will appear on the Add to Equipment Parts List page as long as the selected asset has a default EPL selected in its definition. See Setting Up Work Order Templates. |
User Authorizations – Labor/Crew
User Authorizations – Inventory
User Authorizations – Procurement
User Authorizations – Tools
User Authorizations – Advanced
| Allow Access to Search Views |
Select this check box to enable a user to select the View button on the Technician Workbench to access the Task Search page and search for and access any task based on the search criteria entered on the Task Search page. If you do not select this check box, the View button does not appear on the Technician Workbench page for this user. In this case, the technician (user) only has access to specific work order tasks based on predefined views. |
| Allow Access to Other's Tasks |
Select this check box to enable a technician to access another technician's work order task in the Technician's Workbench. Selecting this check box enables a user, other than the assigned user, to remove or change the technician's user ID from the Assigned To field on the Task Search page and search for more than one user's assigned tasks. If this check box is not selected, the Assigned To field on the Task Search page associated with the Technician Workbench defaults to the assigned technician and cannot be modified. Note: Selecting this check box only applies to the Technician Workbench and not the Work Order Completion component. Any user with access to the Work Order Completion component can enter time for multiple employees assigned to one or more tasks associated with a selected work order. |
| Allow Access to WO Security (allow access to work order security) |
Select this check box to enable a user, who is responsible for managing the access of resources to work orders, to click the Technician Work Order Access link on the Miscellaneous page of the Work Order component in order to display the Work Order Access page. If a work order is created with a business unit that has Shop or Shop and Resource Pool selected as the Technician WO Security option on the Definition page of the business unit, then this user can add or remove shops on the Work Order Access page of any work orders created with this business unit. The shop used to create the work order is automatically added to the list and cannot be removed. Resources assigned to any shops listed on the Work Order Access page of a work order have access to the work orders and work order tasks on the Work Order, Express Work Order, and Technician Workbench components. See Setting Up a Work Order Business Unit. See Using the Work Order Miscellaneous Page |
| Apply WO Access Security apply work order access security |
Select this check box to restrict the access of this user to specific work orders, work order tasks, and express work orders associated with business units that have Technician WO Security set up for a resource pool, a shop, or a shop and a resource pool. If this check box is not selected, this user has full access to any work order and work order tasks on the Work Order, Express Work Order, and Technician Workbench components, depending on the user's PeopleSoft Security setup for these components. Note: To enable a specific technician to have access to the work order tasks on the Technician Workbench that are assigned to other technicians, you must also select the Allow Access to Other's Tasks check box. See Business Unit Setup Options. |
User Preferences - Mobile Inventory Management Page
Use the User Preferences – Mobile Inventory page (MIN_USER_TASK_OPT) to define user preferences for Mobile Inventory Management.
Image: User Preferences – Mobile Inventory: page
This example illustrates the fields and controls on the User Preferences – Mobile Inventory: Guided Count page. You can find definitions for the fields and controls later on this page.
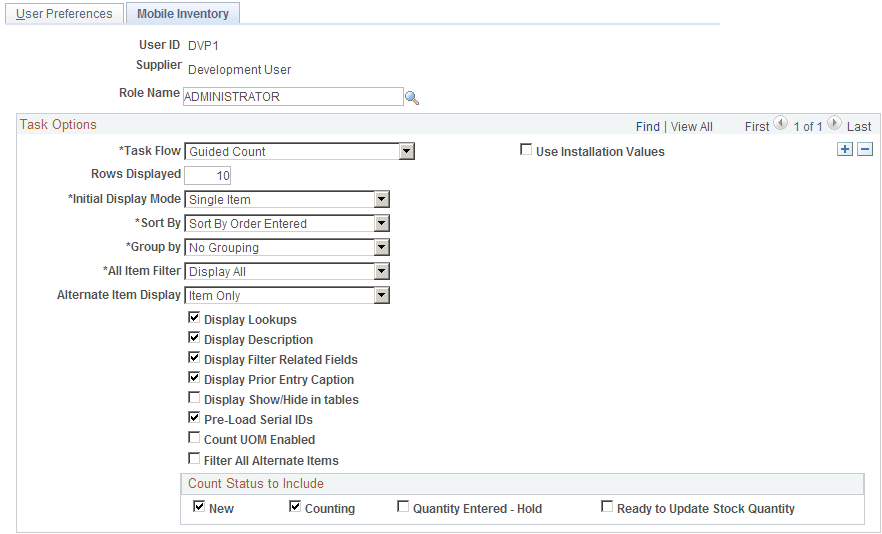
Mobile Inventory Management pages enables you to tailor PeopleSoft Mobile Inventory Management pages for an individual user. User preferences pages are optional in Mobile Inventory Management. When a user ID does not have this page defined or when the Use Installation Values check box is selected, the system uses the values defined for installation values.
User preferences can be defined for these task flows in Mobile Inventory Management:
Adjustments
Bin to Bin Transfer
Delivery, Delivery Cart
Express Issue
Count by Location, Count by Item, Guided Count, and Manual Count
Item Stock Inquiry
Par Count
Perform Putaway
Receiving Ad Hoc and Receiving PO
For additional information about each task flow and the fields that appear for each task flow: