Changing the HBA Default Cache Settings
As an installation option, you can install the VMware ESXi technology on your system after you have installed the HBA in your system. This section describes how to complete the VMware ESXi technology installation on your system by changing the default cache settings of the HBA. If you have already installed the VMware ESXi technology on your system, do not perform the procedures in this section. Instead, go directly to Replacing the Native VMware HBA Driver .
During the VMware ESXi technology installation, the following error message is displayed:
ESXi 5.5 install error: could not create locker database
At this point in the installation, you must change the HBA default cache settings. Based on whether your system BIOS is set to UEFI Boot Mode or Legacy Boot Mode, you need to use a different utility to change the default cache settings for the HBA. Do one of the following:
To Change the HBA Default Cache Settings in UEFI Boot Mode
Perform the procedure in this section if your system BIOS is set to UEFI Boot Mode, and you are installing the VMware technology after you have already installed the HBA in your system.
- Access the MegaRAID Configuration Utility menu of the BIOS Setup Utility, as described in To Verify the Drives and Their Slots (x86).
-
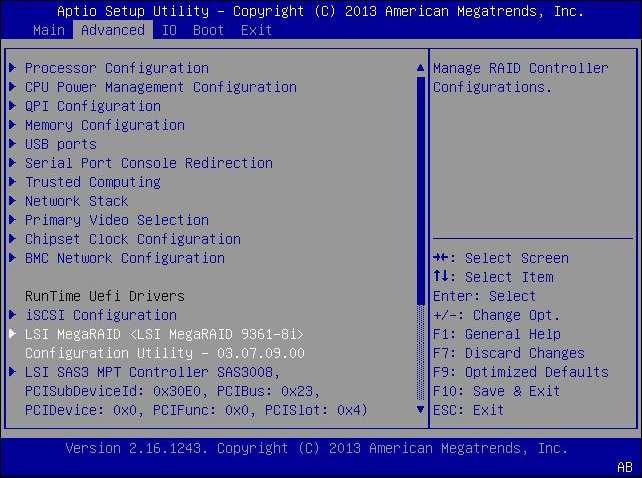
Use the arrow keys to navigate to the LSI MegaRAID Configuration
Utility menu option, and press Enter.
-
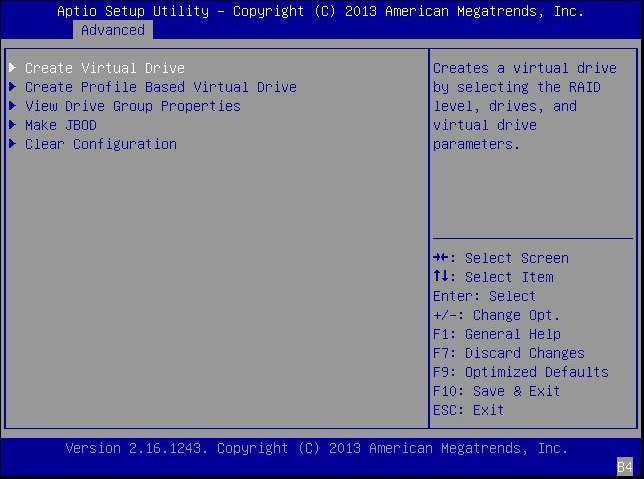
From the menu options that are displayed, navigate to the
Configuration Management menu option, press Enter, and then navigate to
the Create Virtual Drive menu option, and press Enter.
This is the virtual drive upon which you plan to install the VMware ESXi technology.
-
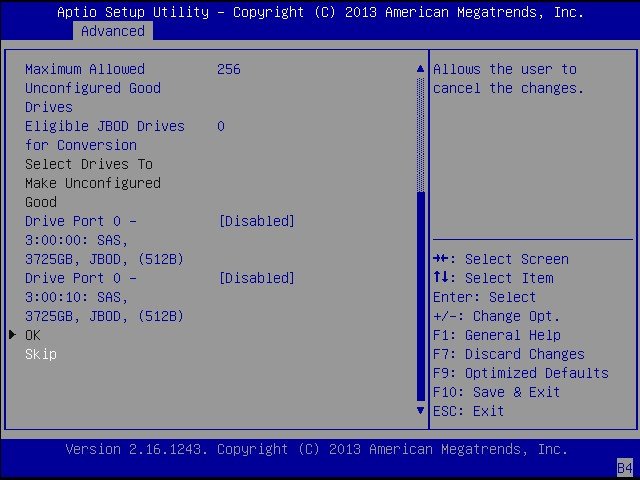
On the page that is displayed, use the arrow keys to navigate to the
Skip field, and press Enter.
-
Review the values of the Read Policy and I/O Policy fields and write
them down.
These are the default HBA cache settings. After the VMware technology installation completes, you will need to revert to these default cache settings.
-
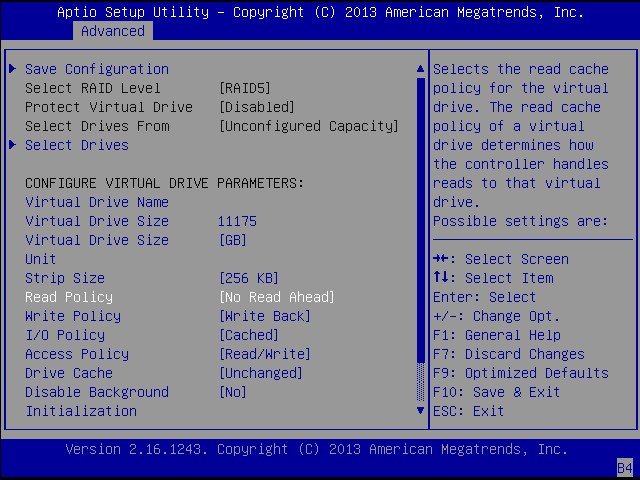
Use the arrow keys to navigate to, and then edit, the following
fields, as follows:
-
Select RAID Level – Use the arrow keys to navigate to this field, and press Enter. From the popup window that is displayed, choose the RAID level that you want for the virtual drive, and press Enter.
-
Read Policy – Use the arrow keys to navigate to this field, and press Enter. From the popup window that is displayed, choose No Read Ahead, and press Enter.
-
I/O Policy –Use the arrow keys to navigate to this field, and press Enter. From the popup window that is displayed, choose Cached, and press Enter.
-
- Use the arrow keys to navigate to the Save Configuration field, and press Enter.
-
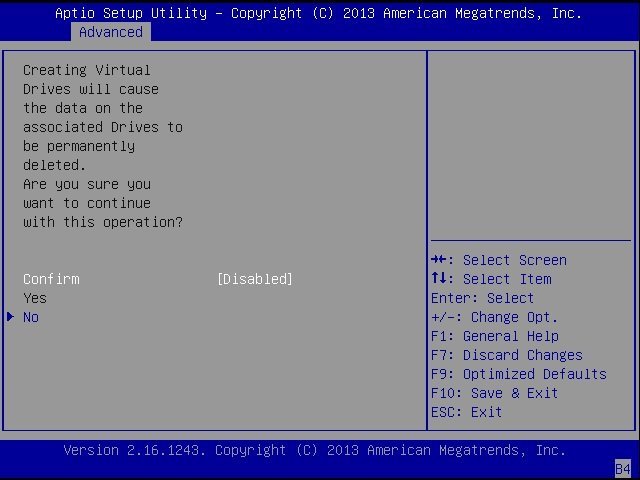
From the screen that is displayed, change the Confirm field value to
Enabled, navigate to the Yes field, and press Enter to save the
configuration.
-
Use the Tab keys to navigate to the Exit tab, select Save Changes and
Exit, and press Enter.
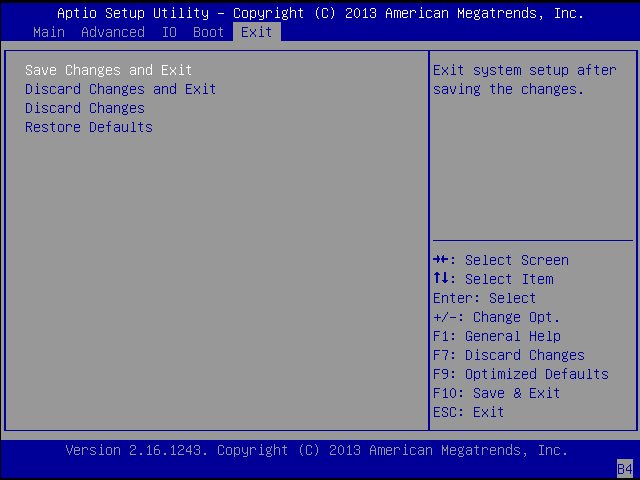
This exits you from the utility. You can now reboot the system to accept the cache setting changes, and then complete the VMware ESXi 5.5 installation.
-
After completing the VMware ESXi technology installation, return to
the utility and revert to the default cache settings (the values that
you wrote down earlier in the procedure).
You can now replace the HBA native driver, as described in Replacing the Native VMware HBA Driver .
To Change the HBA Default Cache Settings in Legacy Boot Mode
Perform the procedure in this section if your system BIOS is set to Legacy Boot Mode, and you are installing the VMware technology after you have already installed the HBA in your system.
- Access the BIOS Configuration Utility, as described in To Verify the Drives Available for Logical Drive Creation (x86).
-
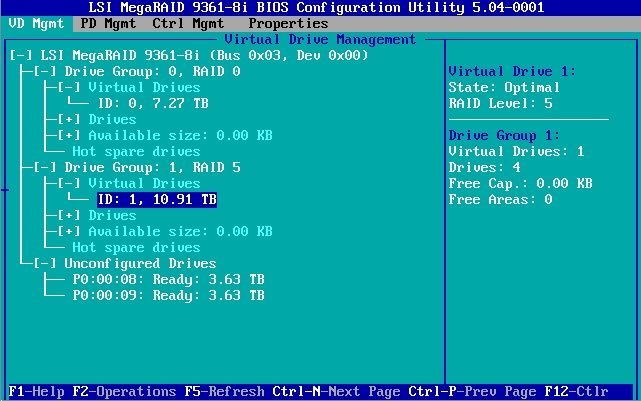
From the main page that is displayed, use the arrow keys to navigate
to the virtual drive upon which you plan to install the VMware ESXi
technology, and press Enter.
-
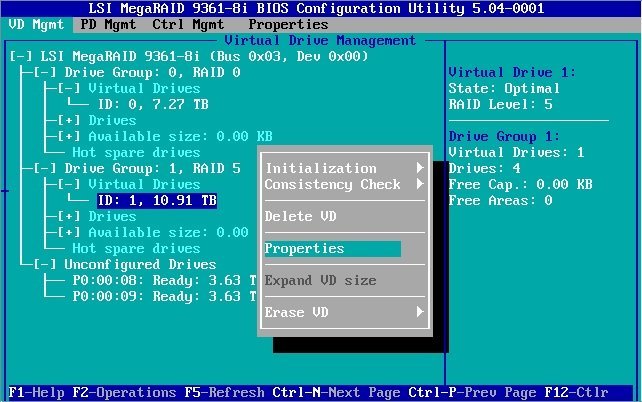
Press F2 to view the Operations menu for the virtual drive, use the
arrow keys to navigate to the Properties menu option, and press
Enter.
-
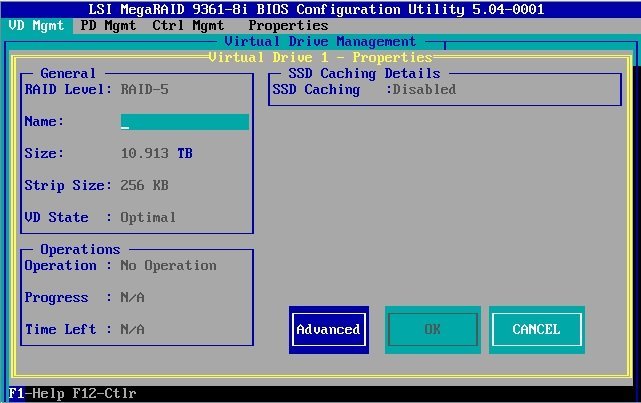
From the page that is displayed, use the arrow keys to navigate to the
Advanced button, and press Enter.
-
Review the values of the Read Policy and I/O Policy fields and write
them down.
These are the default cache settings. You will need to revert to these default cache settings after the VMware technology installation compeletes.
-
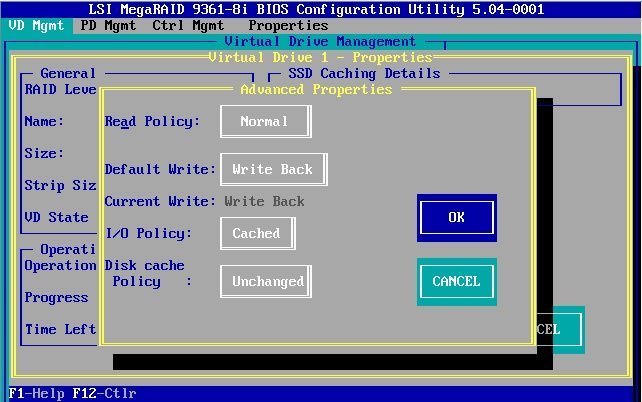
From the Advanced Properties popup window that is displayed, use the
arrow keys to navigate to, and then edit, the following fields as
follows:
-
Read Policy – Navigate to this field, and press Enter. From the popup window that is displayed, choose Normal, and press Enter.
-
I/O Policy – Navigate to this field, and press Enter. From the popup window that is displayed, choose Cached, and press Enter.
-
- Use the arrow keys to navigate to the OK button, and press Enter to exit the Advanced Properties popup window.
-
Use the arrow keys to navigate to the OK button on the Properties page
to save the changes.
You are now returned to the main page of the utility.
-
Press Esc, and at the popup window that is
displayed, use the arrow keys to navigate to the OK button, and press
Enter.
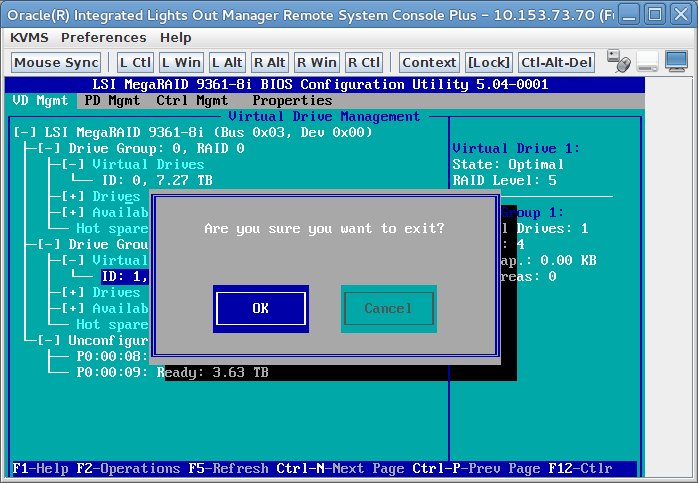
This exits you from the utility. You can now reboot the system to accept the cache setting changes, and then continue with the VMware ESXi technology installation.
-
After completing the VMware ESXi technology installation, access the
utility again and revert to the default cache settings (the values that
you wrote down earlier in the procedure).
You can now replace the native HBA driver, as described in Replacing the Native VMware HBA Driver .