Install the SPM
You can perform this cold-service procedure. The server must be completely powered down before performing this procedure. See Component Service Categories for more information about this category of service procedures.
-
Remove a defective SPM or remove the SPM you will install in a new motherboard.
See Remove the SPM.
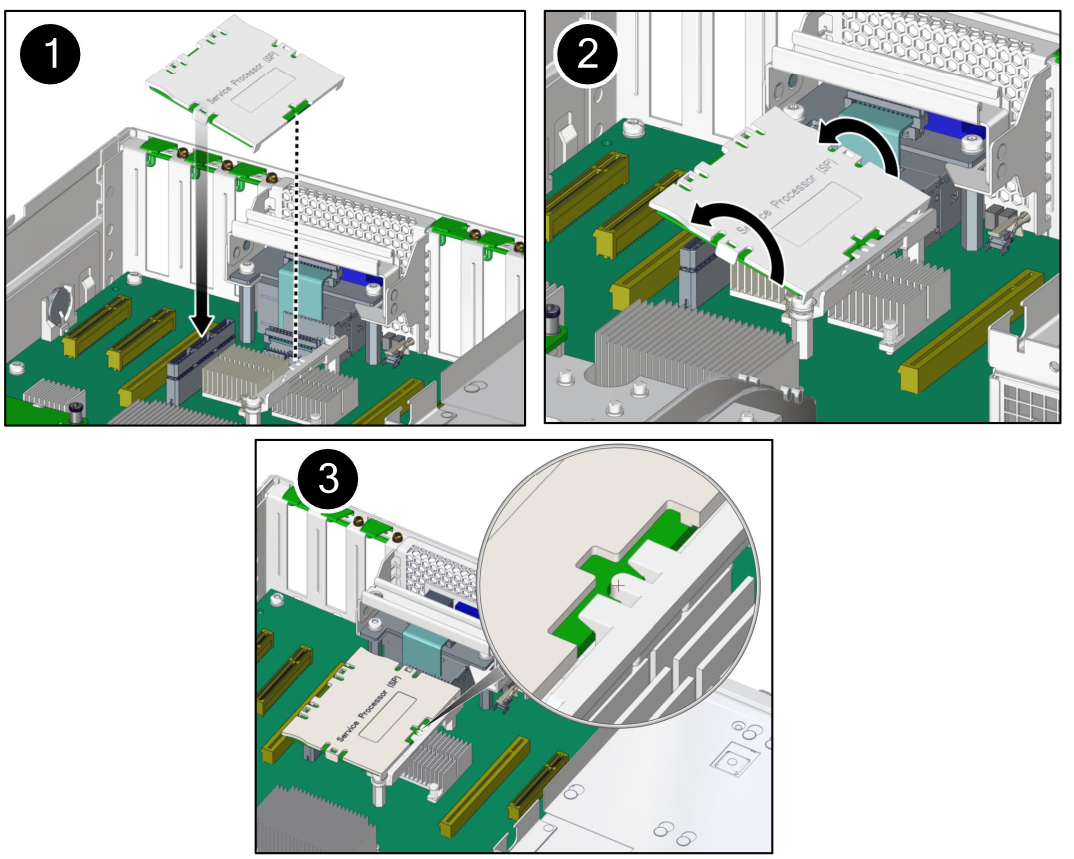
- Lower the side of the
SPM with the Align Tab sticker at an angle onto the SPM support on
the motherboard (panel 1).

- Press the SPM straight down until
it is fully seated in its socket (panel 2).
Ensure that the notched tab at the other end of the SPM is held in place (panel 3).
- Return the server to an operational
condition.
- Install the top cover.
- Return the server to the normal operating position.
- Reconnect the power cords to
the power supplies.
See Attach Power Cords.
- Prior to powering on the server,
connect a terminal or a terminal emulator (PC or workstation) to
the SER MGT port.
Refer to Connect a Terminal or Emulator to the SER MGT Port in SPARC T7-1 Server Installation Guide.
If the replacement SPM detects that the SPM firmware is not compatible with the existing host firmware, further action will be suspended and the following message will be displayed:
Unrecognized Chassis: This module is installed in an unknown or
unsupported chassis. You must upgrade the firmware to a newer
version that supports this chassis.
Note - Whenever you replace the SPM or the motherboard, update the firmware on the server so the portions of firmware in the two components remain consistent. - Configure the NET MGT port
so that it can access the network, and log in to the SPM through
the NET MGT port.
Refer to Configuring SP and Host Network Addresses in SPARC T7 Series Servers Administration Guide, or the Oracle ILOM documentation for network configuration instructions.
- Download the system firmware.
Follow the firmware download instructions in Updating the System Firmware in SPARC T7 Series Servers Administration Guide, or the Oracle ILOM documentation.
Note - You can load any supported system firmware version, including the firmware version that was installed prior to replacing the SPM. - If you created a backup of your
Oracle ILOM configuration, use the Oracle ILOM restore utility to
restore the configuration of the replacement SPM.
Refer to the Oracle ILOM documentation for instructions.
- Power on the server.
See Power On the Server (Oracle ILOM) or Power On the Server (System Power Button).
-
If TPM was initialized on the replaced SPM, complete these steps:
-
Reinitialize TPM and reset the tpmadm failover
command if it was previously in use.
For information about initializing TPM using the Oracle ILOM interface to enable failover, see Securing Systems and Attached Devices in Oracle Solaris 11.3.
-
Restore the TPM data and keys that were backed up to the new SP you
install.
For information about migrating or restoring TPM data and keys, see Securing Systems and Attached Devices in Oracle Solaris 11.3.
-
Reinitialize TPM and reset the tpmadm failover
command if it was previously in use.
- Verify the SPM.
See Verify the SPM.
-
Verify that the SPM date is correct.
-> show /SP/clock /SP/clock Properties: datetime = Tue Sep 07 08:09:59 2013 timezone = GMT (GMT) uptime = 0 days, 00:01:18 usentpserver = disabled ->-
Set the datetime property, if necessary.
-> set /SP/clock datetime=MMDDhhmmYYYY
-
Set the timezone property, if necessary.
-> set /SP/clock timezone=3-to-4-characters
where the timezone value equals a three- or four-character timezone abbreviation, such as EST.
-
Set the datetime property, if necessary.
Related Information
Oracle ILOM documentation