Processing Enrollment Transactions Through the Quick Enrollment Component
This section provides an overview of the Quick Enroll component and discusses how to:
Add or update quick class enrollment requests.
Inquire about enrollment request messages.
The Quick Admit component, Quick Enroll component, and Quick Admit process component are a variation on the fuller processes of admitting students and enrolling them into classes. Typically, you'll use these components in conjunction with each other to accelerate admissions and enrollment procedures where immediate formal processing is not required or is unavailable for students. In addition, collecting admissions information on students who have been quick enrolled might be useful for various funnel reports.
The Quick Admit component and Quick Enroll component, when used together, enable you to rapidly add or update a student's personal data in your system; activate the student in an academic career, academic program, or term; and enroll the student in classes—all in a matter of minutes.
Important! The Recruiting and Admissions documentation for the Quick Admit use component and Quick Admit process component is essential reading for understanding how to quickly admit and enroll students. You should read that documentation to fully grasp the potential of the Quick Enroll component.
The Quick Enroll component enables you to enter, update, and post class enrollment requests for both new and continuing students on a student-by-student basis. The Quick Enroll component has the exact same functionality as the Enrollment Request component, using the same enrollment engine processing and performing the same edit checks. Transactions entered into the Quick Enroll component can be accessed through the Enrollment Request component and vice versa, giving you more flexibility and control over your enrollment requests.
Note that you cannot use the Quick Enroll component to view enrollment transactions processed through the Enrollment page because those transactions do not generate an enrollment request, nor can you view enrollment transaction processed through the Block Enrollment component because those transactions have more than one ID associated with the enrollment request. You can view the latter two enrollment sources only through their respective components.
When you access the Quick Enroll component, a dialog box prompts you to enter the key values of the transaction. The key values are:
|
Field or Control |
Definition |
|---|---|
| ID |
Select from a list of existing student IDs. |
| Academic Career |
Select the academic career to which you want to add or update enrollment requests for the specified student. The system prompts you with only the academic careers in which the student is active. You can activate students in academic careers through either the Quick Admit component or the Student Program/Plan component. |
| Academic Institution |
Select the academic institution in which you want to add or update enrollment requests for the specified student. |
| Term |
Select the term for which you want to add or update enrollment requests for the specified student. The system displays only the terms in which the student is active for the academic career that you selected. |
| Enrollment Request ID |
This identifies the enrollment request as unique from other enrollment requests. The Quick Enroll component uses enrollment request as a key to access transactions. In Add mode, this field is unavailable for edit because the system generates a unique enrollment request ID for you when you save the data in the Quick Enroll component. In other modes, select the enrollment request ID that you want to access. |
| OK |
Click to open the component with the specified key values. |
|
Page Name |
Definition Name |
Navigation |
Usage |
|---|---|---|---|
|
Quick Enrollment |
QUICK_ENROLL3 |
|
Add or update enrollment request transactions for both new and continuing students. The Quick Enroll component has the exact same functionality as the Enrollment Request component. Transactions that you process through the Quick Enroll component can also be accessed through the Enrollment Request component and vice versa. |
|
Enrollment Message Log |
ENRLREQ_MSGLOG_SBP |
Click the Errors link or Messages link in the Status field on the Quick Enrollment page. |
View error message text for a specific row in the enrollment request. |
Access the Quick Enrollment page ().
Image: Quick Enrollment page - Class Enrollment tab
This example illustrates the fields and controls on the Quick Enrollment page - Class Enrollment tab. You can find definitions for the fields and controls later on this page.
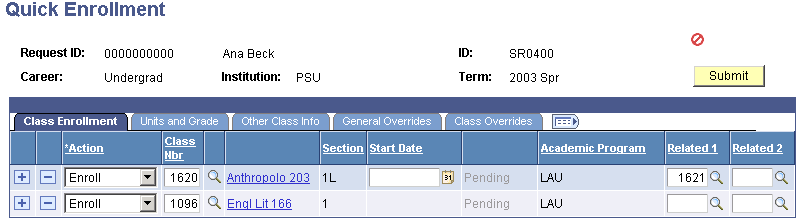
When you use this page for continuing students and a student has a positive or negative service indicator assigned to his or her record, the system displays the corresponding Service Indicator button at the top of the page. Click the button that appears to view the details of specific service indicators.
General Page Elements
|
Field or Control |
Definition |
|---|---|
| Request ID |
Identifies the enrollment request as unique from other enrollment requests. The Enrollment Request component uses an enrollment request as a key to access transactions. In Add mode, this field is unavailable for edit because the system generates a unique enrollment request ID for you when you save the data in the Enrollment Request component. In other modes, select the enrollment request ID upon accessing the component. |
| ID |
The ID of the student for whom you are submitting the enrollment request. |
| Career |
The academic career of the student for whom you are submitting the enrollment request. |
| Institution |
The academic institution for which you are submitting the enrollment request. |
| Term |
The term for which you are submitting the enrollment request. |
 |
Click the Show All Columns button to display all of the fields at the bottom of the page in a single, scrollable grid rather than in separate tabs. |
 |
Click the Show Tabs button to display all of the fields at the bottom of the page in separate tabs rather than a single, scrollable grid. |
| Submit |
Click to process all nonposted rows of the enrollment request for the student. The enrollment engine performs validations as necessary at this time. If the enrollment engine encounters any errors, the system displays an enrollment request status of Errors on the corresponding row of the request. You can view the error messages in the appropriate row's Error Messages group box. Note: You can also save the enrollment request and post groups of them on the Mass Enrollment page. |
Class Enrollment Tab
|
Field or Control |
Definition |
|---|---|
| Action |
An enrollment action is the action performed on the enrollment record. The system by default sets the enrollment action for the request to Enroll, but you can override this default value. Values for this field are delivered with your system as translate values. Do not modify these values in any way. Any modifications to these values require a substantial programming effort. Select from the following choices. Add Grd (add grade): Select to add a grade to the student's enrollment record for the corresponding class. Change Grd (change grade): Select to change a grade on the student's enrollment record for the corresponding class. Chg WL Pos (change wait list position): Select to change the student's wait list position for the corresponding class. Drop: Select to drop the student from the corresponding class. Drop to WL (drop to wait list): Select to drop the student from the corresponding class and move the student to the wait list for that class. Enroll: Select to enroll the student into the corresponding class. Warning! Enrollment request transactions with an action value of Add Grade or Change Grade, are the only types of transactions that create Student Incomplete rows when you assign an Incomplete grade (as defined on the Academic Program Table—Incomplete page). If you use an action of Enroll and populate the grade with an incomplete grade, the system does not create a Student Incomplete row. Norm Maint (normal maintenance): Select to update the student's enrollment record for the corresponding class in normal maintenance mode. Items available for update include grading basis, units, permission, course count, notes, requirement designation, repeat code, and instructor ID. You can use the normal maintenance action to update these items, rather than dropping the class and re-adding it with the new information. Remove Grd (remove grade): Select to remove a grade from the student's enrollment record for the corresponding class. Swap: Select to enable the student to swap the corresponding class in which he or she is enrolled for a different class. The Change To field becomes available for you to enter the new class section in which the student wants to enroll. You can also use this option to swap a student's enrollment from one related class section to another related class section. List the enrollment class section in both the Class Nbr (class number) and Change To fields, select a different related class, then post the enrollment transaction. You cannot use the swap option to add or drop optional nonenrollment component sections. For example, if a student enrolls in a class section without designating the optional nonenrollment component section as a related class, then you cannot use the swap option to add the optional nonenrollment component section to the student's enrollment record. Instead, you must drop the student from the enrollment section, then process another enrollment request to add the student back into the enrollment section and also the optional nonenrollment component section. Likewise, if a student initially enrolls in both the enrollment section and the optional nonenrollment component section but wants to drop the optional nonenrollment component section altogether, you must drop the student from both sections and process another enrollment request to add the student back into the enrollment section only. |
| Class Nbr (class number) |
If you are submitting a new enrollment transaction, enter the number of the class for the term. The system generates a class number when you schedule classes for a term. The class number also appears on the schedule of classes. |
 |
If you do not know the class number from the schedule of classes, click the Search button to view the Basic Class Search page, where you can search the schedule of classes for the class that you want to use for the enrollment transaction. |
| Change To |
This field becomes available when you select an enrollment action of swap. Enter the number of the new class in which the student wants to be enrolled. |
| Class Description |
The Class Description link becomes available after you enter a class number. The text for this link changes according to the title of the class that you selected. Click this link to access the Class Detail page, where you can view detail about the selected class. |
| Sect (section) |
The system displays the section of the class that you selected. |
| Start Date |
When a student attempts to enroll in a class scheduled within an OEE session, the system prompts you to enter a class start date. The date that a student starts an OEE class drives the open entry/open exit processing. A class start date is required for enrollment in OEE classes. |
| Status (unlabeled) |
The system displays the status of the enrollment request. Errors: The enrollment engine was unable to post the submitted enrollment request due to errors. Click this link to view the errors on the Enrollment Message Log page. Pending: The enrollment request is pending submission for enrollment processing. Messages: The enrollment engine was able to successfully post the enrollment request and has returned an informational message, such as the student's wait list position. Click this link to view the messages on the Enrollment Message Log page. Success: The enrollment engine was able to successfully post the enrollment request. |
| Academic Program |
Enter the student's academic program for this enrollment. This field appears if you select the Select Acad Prog During Enroll check box on the Academic Institution 5 page. This field is editable only if the student is active in more than one academic program for this term. In this case, the student's primary academic program for this term appears by default. You can change this value. |
| Related 1 |
If you have select an enrollment action of Enroll or Swap, the Related 1 and Related 2 fields become available for edit. If the class has a related class that is not an auto-enroll class, select that class number in this field. The values that appear are those associated sections that are scheduled for the class in the schedule of classes. |
| Related 2 |
If the class has another related class that is not an auto-enroll class, select that class number in this field. |
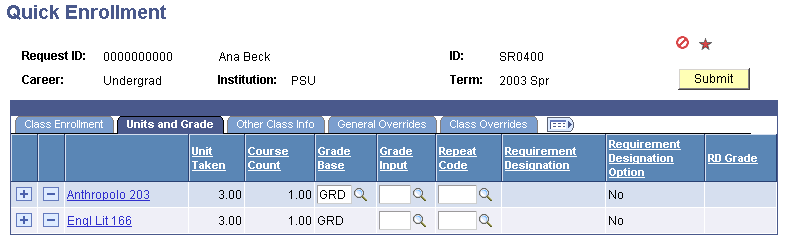
Units and Grade Tab
Select the Units and Grade tab.
Image: Quick Enrollment page - Units and Grade tab
This example illustrates the fields and controls on the Quick Enrollment page - Units and Grade tab. You can find definitions for the fields and controls later on this page.
|
Field or Control |
Definition |
|---|---|
| Unit Taken |
The system uses units taken to calculate the transcript GPA and the enrollment load. The enrollment engine uses units taken to calculate the number of units a student can take in a term. Units taken appear by default from minimum units on the Class Associations page. If minimum units and maximum units are different on the Class Associations page, then the class is defined as having variable units. This field becomes active, and you must enter the number of units the student selects in this field. |
| Course Count |
Indicates the value of the course towards a degree. Some institutions count courses towards a degree as well as units towards a degree. This field indicates the value of the course towards degree progress. This field appears by default from the Course Count field on the Class Associations page. |
| Grade Base |
The system displays the grading basis for the class according to the value set in the corresponding field on the Class Components page of the Class Associations component. If your institution has set the grading basis of the class to student option on the Class Components page, then this field becomes available for edit and students can select their own grading basis. The system determines the prompt values according to the grading scheme for the academic career to which the course belongs, as defined on the Academic Career Table page. However, if your institution has mapped the grading basis from one academic career to another through a grading basis mapping rule (on the Career Pointer Exception Rule page), then the system determines the prompt values according to the grading basis attached to the mapping rule. |
| Grade Input |
This is the final grade given to the student for the class. You can enter the grade here, or you can use the grade roster generator. When a grade is entered and posted, the system displays the grade here. Note: Posting grades through the Quick Enroll, Enrollment Request, and Block Enrollment components automatically runs the repeat checking process if the Repeat Grade Check option is set to all crse (all courses) for the student's academic program. |
| Repeat Code |
Select a repeat code for the enrollment transaction, if applicable. Repeat codes work in conjunction with repeat rules to determine whether a repeated class violates your repeat policies. When the repeat checking process runs, it searches the student's enrollment history to find class enrollments with matching course IDs. When it finds a match, it determines whether the repeat is legal based on the repeat rules that you define. As part of your repeat rule criteria, you can specify that any class enrollment into a course with a particular repeat code should be ignored by the repeat checking process. So, even if the class enrollment violates the total attempts criteria (for example) as defined in the repeat rule, the process does not consider it in violation of the rule, as long as the class enrollment contains the required repeat code. For example, a repeat rule could specify that courses can be repeated only three times. However, you could stipulate that students can repeat the course more than three times if they have permission from the instructor. Thus, you could define a PERM (permission) repeat code and assign it to the class enrollment here. When the repeat checking process identifies this class enrollment as a repeat course, it looks to see if the PERM repeat code is assigned. If PERM is assigned, the repeat checking process does not consider this class enrollment in violation of the repeat rule. You can also define your repeat rules so that the repeat checking process requires that a particular repeat code be assigned to a class enrollment for the repeated course to be evaluated in a particular repeat rule. For example, you could specify that any class enrollment with the ILGL repeat code assigned to it is in violation of the rule. When the repeat checking process identifies a course that violates a repeat rule, the process assigns the class enrollment a repeat code. This repeat code determines how the class enrollment is treated in the student's academic statistics, such as whether the grade is used to calculate the student's grade point average. The repeat code that the repeat checking process assigns appears here. |
| Requirement Designation |
Use this field to select a requirement designation for the class enrollment. |
| Requirement Designation Option |
If there is a requirement designation specified for the corresponding row of the enrollment transaction and that requirement designation is at the student's option, select whether the student elects to take the requirement designation. |
| RD Grade (requirement designation grade) |
You can enter the student requirement designation grade for the class enrollment on this page or through the grade roster. Usually, it is more convenient for you to enter grades for groups of students and classes through the grade roster. Values are Satisfied or Not Satisfied. |
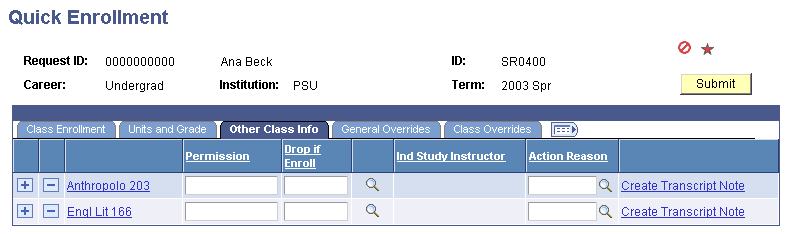
Other Class Info Tab
Select the Other Class Info tab.
Image: Quick Enrollment page - Other Class Info tab
This example illustrates the fields and controls on the Quick Enrollment page - Other Class Info tab. You can find definitions for the fields and controls later on this page.
|
Field or Control |
Definition |
|---|---|
| Permission |
If the student has a general permission for enrollment, enter the number in this field. The system reserves the permission number for the student. |
| Drop if Enroll |
The system displays this field only when the Action field is set to Enroll. Enter the class section that the student wants to drop. The system drops the student from this class section only if the student is successfully enrolled in the class section that the student is currently requesting. The system does not drop the student if he or she is put on a wait list. So if you select the Wait List Okay check box and the student is put on the wait list, the system will not drop the student. When you later run the Wait List process (SRPCWAIT) for the requested class section and the process successfully enrolls the student in that section, the Wait List process then drops the student from the class section that you specify in this field. |
| Ind Study Instructor (independent study instructor) |
If the Instructor Edit field on the Class Associations page is set to anything but No Choice, then this field becomes available for edit. Select the instructor ID responsible for the class if the class is an independent study. |
| Action Reason |
Select the enrollment action reason for the enrollment action. If you select a reason, the enrollment engine automatically retains the student enrollment record even if you are dropping a student from a class during the drop delete period. If you do not select a reason and you are dropping a student from a class during the drop retain record period, the enrollment engine uses the default reason set on the Session Calendar 2 page subject to the time period associated with that reason. |
| Create Transcript Note |
Click to access the Transcript Note page, where you can enter a free-form text that prints on the student's transcript for the class enrollment. |
General Overrides Tab
Select the General Overrides tab.
Image: Quick Enrollment page - General Overrides tab
This example illustrates the fields and controls on the Quick Enrollment page - General Overrides tab. You can find definitions for the fields and controls later on this page.
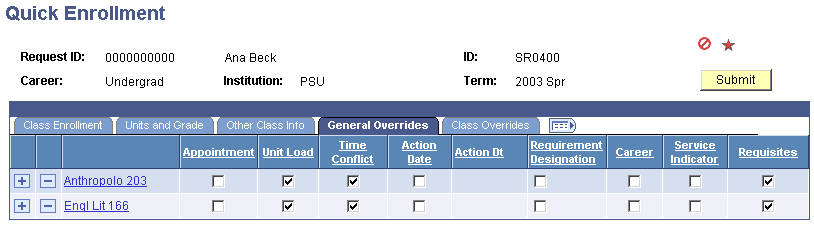
Note: Only overrides that you are authorized to access are available.
|
Field or Control |
Definition |
|---|---|
| Appointment |
Select to override the student's enrollment appointment date, time, and maximum enrollment units. This enables you to enroll the student in the class on the corresponding row of the enrollment request, regardless of the student's enrollment appointment. |
| Unit Load |
Select to have the enrollment engine skip all unit limit checks, including the unit load for the student's enrollment appointment, the term and session unit load, the term and session course count load, the term and session no grade point average (GPA) units, the term and session audit units, and the minimum unit enrollment check. |
| Time Conflict |
Select to disable time conflict checking for class sections when you process the enrollment request. |
| Action Date |
Select to override the action date. The Action Date field becomes available to edit. |
| Action Date |
Select the date that you want to use as the action date for processing this enrollment transaction. The action date is the date that you process the corresponding row of the enrollment transaction. The system records the action date to track the date that you process information. By default, the system uses the current system date. When you are processing an enrollment request and you select to override the action date, this field becomes available for edit. |
| Requirement Designation |
Select to override the requirement designation for the corresponding row of an enrollment request. The Requirement Designation field becomes available to edit. |
| Career |
Select to override academic career pointers and career pointer exception rules for the student's academic career. |
| Service Indicator |
Select to override service holds that have been placed on the student's record. |
| Requisites |
Select to have the enrollment engine bypass requisite checking when you submit the corresponding row of an enrollment request for processing. |
Class Overrides Tab
Select the Class Overrides tab.
Image: Quick Enrollment page - Class Overrides tab
This example illustrates the fields and controls on the Quick Enrollment page - Class Overrides tab. You can find definitions for the fields and controls later on this page.
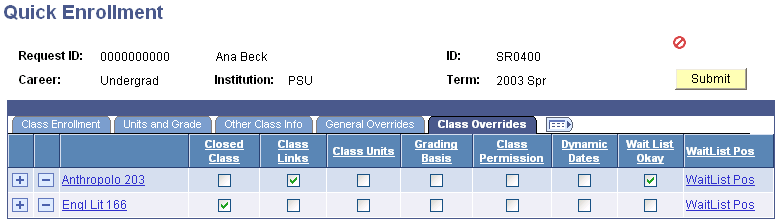
Note: Only overrides that you are authorized to access are available.
|
Field or Control |
Definition |
|---|---|
| Closed Class |
Select to indicate that the class is closed due to capacity size. |
| Class Links |
Select to allow students to add and drop class sections without having to do likewise for the required related component sections in a class association group, to allow students to enroll in a nonenrollment type section, and to allow multiple student enrollment in a course. |
| Class Units |
Select to override the Units Taken field value for both fixed and variable unit classes. |
| Grading Basis |
Select to allow students to enroll into a class with a grading basis other than the one established for the class. The Grading Basis field becomes available for edit so that you can select a different grading basis for the class enrollment. Note: If you select the Grading Basis check box on the Class Overrides tab when you add or change a grade using the Enrollment Request or Quick Enroll components, the STDNT_ENRL.OVRD_GRADING_BASIS is set to Y if the request posts successfully. If you perform an enrollment action on an existing STDNT_ENRL row (that is, the action is not Enroll or Swap), the Grading Basis check box on the Class Overrides tab is automatically selected (ENRL_REQ_DETAIL.OVRD_GRADING_BASIS is set to Y), if the class has an overridden grading basis (STDNT_ENRL.OVRD_GRADING_BASIS = Y). If the enrollment action is Remove Grade, the Grading Basis check box is not available for edit, regardless of a user's enrollment override security, to prevent a grade override being reversed. For actions other than Remove Grade, if you clear the Grading Basis check box on the Class Overrides tab for a class that has an overridden grading basis, the STDNT_ENRL.OVRD_GRADING_BASIS is updated to N. |
| Class Permission |
Select to override general permission and student-specific permission requirements, academic career pointers, and career pointer exception rules. Note: A student with a valid class permission can override course consent, academic career pointers, career pointer exception rules, class capacity size, and requisite checking. |
| Wait List Okay |
Select to allow the student to wait list into a class section even if the class section, combined section, and reserve capacity are full provided that space is available on the wait list and the last date to wait list has not passed. |
| Wait List Pos (wait list position) |
Click this link to access the Wait List Position page, where you can view the student's position on the wait list. This link is available only for enrollment requests in which the student is already on the wait list for the specified class section. |
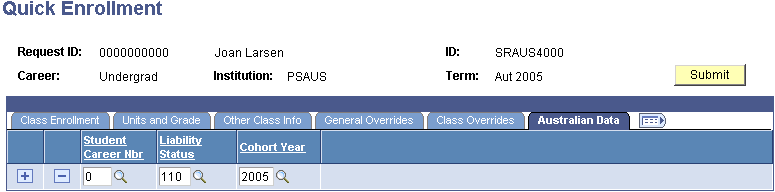
(AUS) Australian Data Tab
Select the Australian Data tab.
Note: This tab is available only if you select the Australia DEST, HECS, Centrelink, TAC check box on Academic Institution 6 page.
Image: Quick Enrollment page - Australian Data tab
This example illustrates the fields and controls on the Quick Enrollment page - Australian Data tab. You can find definitions for the fields and controls later on this page.
|
Field or Control |
Definition |
|---|---|
| Student Career Nbr (student career number) |
Select the student's career number. |
| Liability Status |
If the student has a liability status on the Term Activation - Loan Election page, the system enters that value here. You can override that value for this course enrollment. |
| Cohort Year |
If the student has a cohort year on the Student Program/Plan - AUS Student Program page, the system enters that value here. |
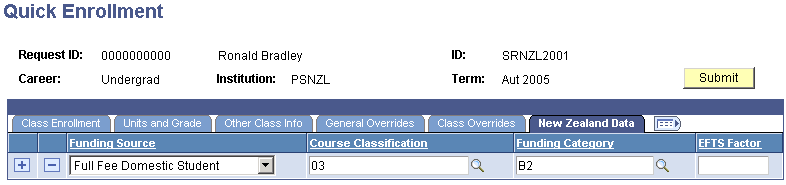
New Zealand Data Tab
Select the New Zealand Data Tab.
Note: This tab is available only if you select the New Zealand Catalog, SDR, EFTS, StudyLink check box on the Academic Institution 6 page.
Image: Quick Enrollment page - New Zealand Data tab
This example illustrates the fields and controls on the Quick Enrollment page - New Zealand Data tab. You can find definitions for the fields and controls later on this page.
|
Field or Control |
Definition |
|---|---|
| Funding Source |
The system enters this value from the student's program. Enter the funding source for the student's program on the Student Program page. |
| Course Classification |
The system enters this value from the Acad Prog NZL (academic program New Zealand) page for course classifications defined with the type Program. For course classifications defined with the type Course, the system enters the value from the course catalog. Set up course classifications on the Course Classifications page. |
| Funding Category |
If the student's program has a course classification type of Program, the first character on the Academic Program table is concatenated with the second character of the course catalog value, otherwise the course catalog value is used. |
| EFTS Factor |
The system enters this value from the course catalog. |
Go To Links
|
Field or Control |
Definition |
|---|---|
| View Enrollment Access |
If your enrollment security is by enrollment access ID, click this link to access the Access to Enrollment Functions page, where you can view your security status for each enrollment function possibility. |
| Calculate Tuition |
Click to access the Tuition Calculation page, where you can calculate tuition for the student. Tuition calculation is located within the Quick Enroll component because when you have changes to a student's academic status that can affect their charges for tuition and fees, you can perform the tuition calculation immediately without having to defer the task. However, tuition calculation is most likely performed by your Student Financials department and should be done by other users only if it concurs with your business rules. The student must be active in at least one career and at least one term before you can use this page, but the student does not necessarily have to be enrolled in any classes. It is possible to calculate tuition for a student if your term fees are set up to use anticipated (projected) billing units. Also, you must have defined appropriate term fees and at least one tuition group. |
| Study List |
Click to access the Student Study List page, where you can view the student's class schedule for the specified term. |
| Enrollment Appointments |
Click to access the Student Enrollment Appointment page, where you can view the student's enrollment appointments for the specified term. |
| Term/Session Withdrawal |
Click to access the Term History component, where you can view all of a student's term statistics for each term of the student's academic career, withdraw the student from the specified term or session, and more. |
Access the Enrollment Message Log page (click the Errors link or Messages link in the Status field on the Quick Enrollment page).
|
Field or Control |
Definition |
|---|---|
| Message Severity |
The posting process displays the severity of each message that it writes to the message log for the corresponding request. For example, if the posting process is unable to post a request due to errors, it displays a severity value of Error. |
| Message Text |
The posting process displays the message text and a detailed explanation of each message that it writes to the message log for the corresponding request. You can view and update messages in the Message Catalog within the appropriate message set. |
Requisite Checking for Adds
When a student fails to satisfy either a catalog requisite or class association requisite while enrolling in a class, the system returns not only a "requisites not met" error but also the Requirement Group long description for both on the Enrollment Message Log page. If a class has a course catalog level requisite and a class association level requisite, the system returns the requirement group description for both, even if the student has met one or the other. Catalog and class association requisites are set up on the Class Requisites page.
For example, a student has failed to satisfy either a catalog or a class association requisite. Depending on how class requisites are set up, the system displays both descriptions if the student satisfies the catalog requisite but not the class association requisite.
Requisite Checking for Drops
When a student attempts to drop a class, the Requisite Checking process runs if one or more of the student's other enrolled classes has a Requirement Group with a requisite type of Co-Requisite. If the dropped class is required as a co-requisite for another enrolled class, the system returns an error message. The system now returns the description for the Requirement Groups with the Co-Requisite requisite type. Catalog and class association requirement groups are set up on the Class Requisites page.
For example, a student is trying to drop class A and class A is a co-requisite for enrolled classes B and C. The system returns the enrollment requirement group description for both of those classes.
Requisite Checking for Self Service
The system displays the long description of the requirement group in error messages not only for administrative but also for student self-service enrollment pages. The PeopleSoft Campus Self Service documentation provides details about how to set up self service to enable this functionality.