Contents
A client can authenticate to API Gateway with a user name and password combination using HTTP basic authentication. When an HTTP Basic Authentication filter is configured, API Gateway requests the client to present a user name and password combination as part of the HTTP basic challenge-response mechanism. API Gateway can then authenticate this user against a user profile stored in an API Gateway local repository, a database, or an LDAP directory.
With HTTP basic authentication, the client's user name and password are concatenated,
base64-encoded, and passed in the Authorization HTTP header as follows:
Authorization: Basic dm9yZGVsOnZvcmRlbA==
The realm presented in the challenge for HTTP basic authentication is the realm currently specified in the server settings (Server Settings > General). For more details, see the API Gateway Administrator Guide.
The HTTP Basic Authentication filter enables you to specify where API Gateway finds user profiles for authentication. API Gateway can look up user profiles in an API Gateway local repository, a database, or an LDAP directory. For details on adding users to a local repository, see Manage API Gateway users.
Complete the following settings:
Name:
Enter an appropriate name for the filter.
Credential Format:
The user name presented to API Gateway during the HTTP basic handshake can be of many formats, usually user name or Distinguished Name (DName). Because API Gateway has no way of inherently telling one format from another (for example, the client's user name could be a DName), you must specify the format of the credential presented by the client. This format is then used internally by API Gateway when performing authorization lookups against third-party Identity Management servers.
Allow client challenge:
HTTP basic authentication can use the following approaches:
-
Direct authentication: The client sends up the
AuthorizationHTTP basic authentication header in its first request to the server. This is used mainly for machine-to-machine transactions where there is no human intervention. -
Challenge-response handshake: The client does not send the
Authorizationheader when sending its request to the server (it does not know that the server requires HTTP basic authentication). The server responds with an HTTP 401 response code, instructing the client to authenticate to the server by sending theAuthorizationheader. The client then sends a second request, this time including theAuthorizationheader and the relevant user name and password. This is typical of situations where a browser is talking to a web server. When the browser receives the HTTP 401 response to its initial request, it displays a dialog to enable the user to enter the user name and password combination.
To force clients to always send the HTTP basic Authorization header to API Gateway,
deselect Allow client challenge. This is selected by default to allow clients
to engage in the HTTP basic authentication challenge-response handshake with API Gateway.
Allow retries:
Select this option to allow the user to retry their user name and password in the browser when an HTTP 401 response code is received (for example, if authentication fails, or is not yet provided). The number of times that the browser displays the user name and password dialog when an HTTP 401 is received is controlled by the browser (usually three times). This setting is not selected by default.
Remove HTTP authentication header:
Select this option to remove the HTTP Authorization header from
the downstream message. If this option is not selected, the incoming
Authorization header is forwarded on to the destination web service.
Repository Name:
Select the name of the authentication repository where all user profiles are stored. This can a local repository, a database, or an LDAP directory.
You can add a new repository under the External Connections node. Right-click the appropriate node under Authentication Repositories (for example, Database Repositories), and select Add a new repository. For more details, see the Authentication repository topic.
The Invalid Attempts section enables you to specify how to handle invalid attempts. You can choose to lock user accounts, ban IP addresses, or both, if a specified number of invalid attempts are made in a specified time period. The invalid attempt information is also stored in a cache.
To lock user accounts, select the Lock user accounts for check box and enter appropriate values in the corresponding fields. For example, to lock user accounts for 30 minutes if 6 invalid attempts are made over 5 minutes, you would enter the values shown in the following figure.
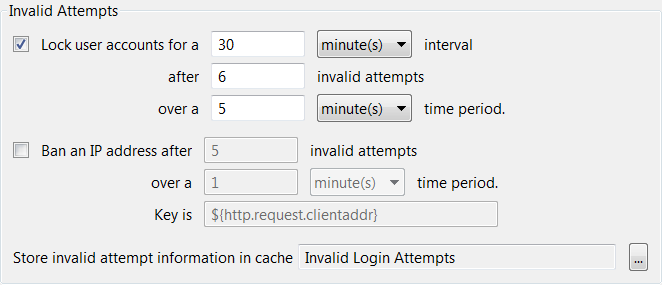
To ban IP addresses, select the Ban IP address after check box and enter appropriate values in the corresponding fields. For example, to ban IP addresses after 5 invalid attempts are made over 1 minute, you would enter the values shown in the preceding figure. In this case you must also enter the attribute that contains the IP address in the Key is field.
Store invalid attempt information in cache:
Click the browse button to choose a local or distributed cache to store invalid attempt information. To create a new cache right-click Caches, and select Add Local Cache or Add Distributed Cache.
