Contents
For API Gateway to trust X.509 certificates issued by a specific Certificate Authority (CA), you must import that CA's certificate into the API Gateway's trusted certificate store. For example, if API Gateway is to trust secure communications (SSL connections or XML Signature) from an external SAML Policy Decision Point (PDP), you must import the PDP's certificate, or the issuing CA's certificate into the API Gateway certificate store.
In addition to importing CA certificates, you can import and create server certificates and private keys in the certificate store. These can be stored locally or on an external Hardware Security Module (HSM). You can also import and create public-private key pairs. For example, these can be used with the Secure Shell (SSH) File Transfer Protocol (SFTP) or with Pretty Good Privacy (PGP).
To view the certificates and keys stored in the certificate store, select Certificates and Keys > Certificates in the Policy Studio tree. Certificates and keys are listed on the following tabs in the Certificates window:
-
Certificates with Keys: Server certificates with associated private keys
-
Certificates: Server certificates without any associated private keys
-
CA: Certificate Authority certificates with associated public keys
You can search for a specific certificate or key by entering a search string in the text box at the top of each tab, which automatically filters the tree.
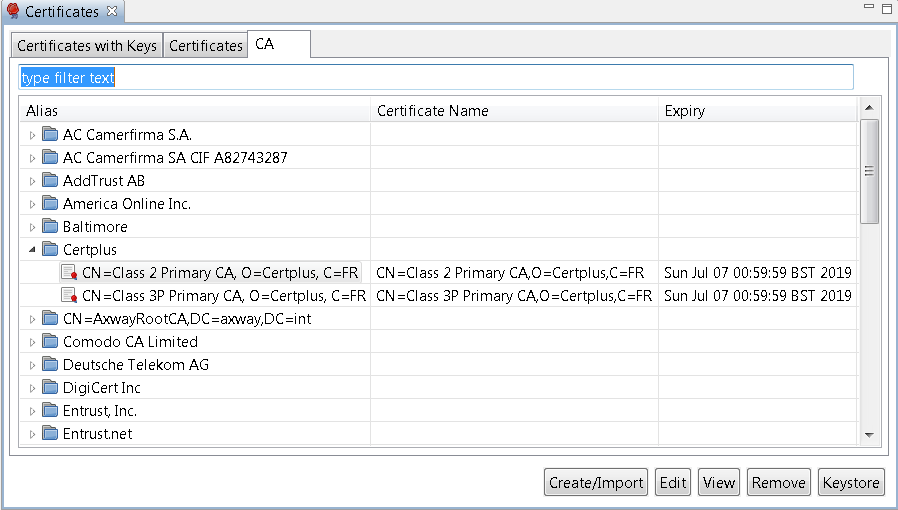
The following options are available at the bottom right of the window:
-
Create/Import: Click to create or import a new certificate and private key. For details, see the section called “Configure an X.509 certificate”.
-
Edit: Select a certificate, and click to edit its existing settings.
-
View: Select a certificate, and click to view more detailed information.
-
Remove: Select a certificate, and click to remove the certificate from the certificate store.
-
Keystore: Click this to export or import certificates to or from a Java keystore. For details, see the section called “Manage certificates in Java keystores”.
To create a certificate and private key, click Create/Import. The Configure Certificate and Private Key dialog is displayed. This section explains how to use the X.509 Certificate tab on this dialog.
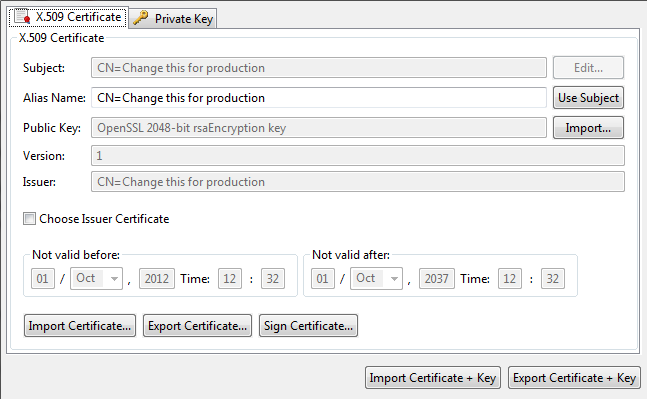
Configure the following settings to create a certificate:
-
Subject:
Click Edit to configure the Distinguished Name (DName) of the subject.
-
Alias Name:
This mandatory field enables you to specify a friendly name (or alias) for the certificate. Alternatively, you can click Use Subject to add the DName of the certificate in the text box instead of a certificate alias.
-
Public Key:
Click Import to import the subject's public key (usually from a PEM or DER-encoded file).
-
Version:
This read-only field displays the X.509 version of the certificate.
-
Issuer:
This read-only field displays the distinguished name of the CA that issued the certificate.
-
Choose Issuer Certificate:
Select to explicitly specify an issuer certificate for this certificate (for example, to avoid a potential clash or expiry issue with another certificate using the same intermediary certificate). You can then click the browse button on the right to select an issuer certificate. This setting is not selected by default.
-
Not valid before:
Select a date to define the start of the validity period of the certificate.
-
Not valid after:
Select a date to define the end of the validity period of the certificate.
-
Sign Certificate:
You must click this button to sign the certificate. The certificate can be self-signed, or signed by the private key belonging to a trusted CA whose key pair is stored in the certificate store.
Use the Private Key tab to configure details of the private key. By default, private keys are stored locally (for example, in the API Gateway certificate store). They can also be provided by an OpenSSL engine, or stored on a Hardware Security Module (HSM) if required.
API Gateway supports PKCS#11-compatible HSM devices. For example, this includes Thales nShield Solo , SafeNet Luna SA, and so on.
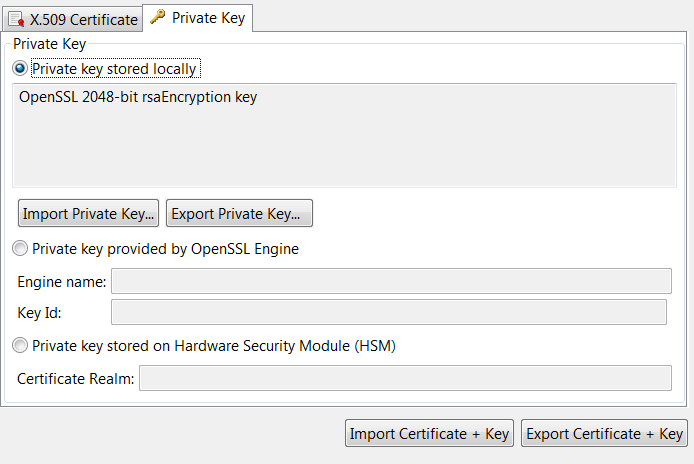
If the private key is stored in the API Gateway certificate store, , select Private key stored locally. The following options are available for keys stored locally:
-
Private key stored locally:
This read-only field displays details of the private key.
-
Import Private Key:
Click to import the subject's private key (usually from a PEM or DER-encoded file).
-
Export Private Key:
Click to export the subject's private key to a PEM or DER-encoded file.
If the private key that corresponds to the public key in the certificate is provided by an OpenSSL engine, select Private key provided by OpenSSL Engine.
Configure the following fields to associate a key provided by the OpenSSL engine with the current certificate:
-
Engine name:
Enter the name of the OpenSSL engine to use to interface to an HSM. All vendor implementations of the OpenSSL Engine API are identified by a unique name. See your vendor's OpenSSL engine implementation or HSM documentation to find out the name of the engine.
-
Key Id:
Enter the key ID used to uniquely identify a specific private key from all others stored on an HSM. When you complete this dialog, the private key is associated with the certificate that you are currently editing. Private keys are identified by their key ID by default.
If the private key that corresponds to the public key stored in the certificate resides on an external HSM, select Private key stored on Hardware Security Module (HSM), and enter the name of the Certificate Realm.
![[Note]](../common_oracle/images/admon/note.png) |
Note |
|---|---|
| To use the API Gateway's PKCS#11 engine to access objects in an external HSM, the corresponding HSM provider and certificate realms must also be configured. For more details, see the section called “Configure HSMs and certificate realms”. |
Certificate realms are abstractions of private keys and public key
certificates, which mean that policy developers do not need to enter HSM-specific configuration
such as slots and key labels. Instead, if a private key exists on an HSM, the developer can
configure the certificate to show that its private key uses a specific certificate realm,
which is simply an alias for a private key (for example, JMS Keys).
For example, on the host machine, an administrator could configure the JMS Keys
certificate realm, and create a keystore for the realm, which requires
specific knowledge about the HSM (for example, PIN, slot, and private key label). The certificate
realm is the alias name, while the keystore is the actual private keystore for the realm.
The keystoreadmin script enables you to perform the following tasks:
-
Register an HSM provider
-
List registered HSM providers
-
Create a certificate realm
-
List certificate realms
For example, if a policy developer is using JMS, and wants to indicate that private keys exist
on an HSM, they could indicate that the certificate is using the JMS Keys certificate
realm. On each instance using the configuration, it is the responsibility of the administrator to
create the JMS Keys certificate realm.
For more details, enter keystoreadmin in the following directory, and perform the
instructions at the command prompt:
When you enter keystoreadmin without arguments, this displays an interactive menu
with the following options:
| Option | Description | When to use |
|---|---|---|
1
|
Change group or instance
|
When registering HSMs or configuring certificate realms, you must choose the local group and instance to configure. |
2
|
List registered HSM providers
|
Display the HSMs that are currently registered. |
3
|
Register an HSM provider
|
Before creating certificate realms, you must first register the HSM. This option guides you through the steps. The HSM must be installed, configured, and active, and you must know the full path to the HSM device driver (PKCS#11). You give the HSM an alias (for example, LunaSA), which you use later when registering certificate realms. |
4
|
List Certificate Realms
|
List configured certificate realms and associated keystores. |
5
|
Create a Certificate Realm
|
Create a keystore and assign it to a certificate realm. |
You must first register an HSM provider as follows:
-
Open a command prompt in the API Gateway
bindirectory (for example,apigateway\Win32\bin). -
Enter the
keystoreadmincommand. -
Select option
3) Register an HSM provider. -
If prompted, select the appropriate API Gateway group or instance.
-
You are prompted for a provider alias name. The alias is local only. For example, if registering a LunaSA HSM, you might enter the
LunaSAalias. -
For convenience,
keystoreadminsearches for supported HSM drivers. If found, it shows the list of supported drivers. If none are found, this does not mean the driver does not exist. You must see your HSM documentation for the location of the drivers. For example:Choose from one of the following: 1) C:\LunaSA\cryptoki.dll o) Other q) Quit
-
If successful,
keystoreadminloads the driver and displays its details. For example:Registering HSM provider... Initializing HSM... Crypto Version: 2.20 Manufacter Id: SafeNet, Inc. Library Description: Chrystoki Library Version: 5.1 Device registered.
To create a certificate realm and associated keystore, perform the following steps:
-
Open a command prompt in the API Gateway
bindirectory (for example,apigateway\Win32\bin). -
Enter the
keystoreadmincommand. -
Select option
5) Create a Certificate Realm. -
You are prompted to enter a certificate realm name. This certificate realm name will be used in Policy Studio when configuring the private key of the corresponding X.509 certificate. The realm name is case sensitive (for example,
JMS Keys). -
The registered HSMs are listed. For example, select option
1) HSM. -
The command connects to the selected HSM, and a list of available slots is displayed. Select the slot containing the private key to use for the certificate realm (for example, select slot
1). -
You are prompted to input the PIN passphrase for the slot. The passphrase will not echo any output.
-
When you enter the correct PIN passphrase for the slot, this displays a list of private keys. Choose the key to use for the certificate realm. For example:
Choose from one of the following:

   1) server1_priv
   2) jms_priv
   q) Quit

Select option: 2
-
You are prompted for a file name for the keystore. For example:
Certificate realm filename [jms keys.ks]:
Successfully created the certificate realm: JMS Keys
Press any key to continue...
-
The keystore is output to the API Gateway instance directory. For example:
apigateway/groups/group-2/instance-1/conf/certrealms/jms keys.ks
|
Note |
|---|---|
| Each API Gateway instance must have its certificate realm configured. When finished creating certificate realms, you must restart the API Gateway instance for the changes to take effect. |
When the API Gateway is configured to use certificate realms, these realms are initialized on startup, and a connection to the corresponding HSM is established. This requires the PIN passphrase for the specific HSM slots. At startup, you can manually enter the required HSM slot PIN passphrase, or you can automate this instead.
When the API Gateway is configured to use an HSM, the API Gateway stops all processing, prompts for the HSM slot PIN passphrase, and waits indefinitely for input. For example:
INFO    07/Jan/2015:16:31:54 Initializing certificate realm 'JMS Keys'...
Enter passphrase for Certificate Realm, "JMS Keys":
The API Gateway does not reprompt if the PIN passphrase is incorrect. It logs the error and continues, while any services that use the certificate realm cannot use the HSM.
You can configure the API Gateway to start and initialize the HSM by invoking a command script on the operating system to obtain the HSM slot PIN passphrase. This enables the API Gateway for automatic startup without manually entering the PIN passphrase.
To configure an automatic PIN passphrase, perform the following steps:
-
Edit the API Gateway instance’s
vpkcs11.xmlconfiguration file. For example:apigateway/groups/group-2/instance-1/conf/vpkcs11.xml
-
Add a
PASSPHRASE_EXECcommand that contains the full path to the script that executes and obtains the passphrase. The script should write the passphrase to stdout, and should have the necessary operating system file and execute protection settings to prevent unauthorized access to the PIN passphrase. The following example shows avpkcs11.xmlfile that invokes thehsmpin.shto echo the passphrase:<?xml version="1.0" encoding="utf-8"?> <ConfigurationFragment provider="cryptov"> <Engine name="vpkcs11" defaultFor=""> <EngineCommand when="preInit" name="REALMS_DIR" value="$VINSTDIR/conf/certrealms" /> <EngineCommand when="preInit" name="PASSPHRASE_EXEC" value=""$VDISTDIR/hsmpin.sh"" /> </Engine> </ConfigurationFragment> -
The API Gateway provides the certificate realm as an argument to the script, so you can use the same script to initialize multiple realms. The following examples show scripts that write a PIN of
1234to stdout when initializing theJMS Keyscertificate realm:Example hsmpin.bat file on Windows
@echo off
IF [%1]==[] GOTO _END

:: Strip out the double quotes around arg
SET REALM=%1
SET REALM=%REALM:"=%

IF "%REALM%"=="JMS Keys" ECHO 1234
Example hsmpin.sh file on Linux/UNIX
#!/bin/sh
case $1 in
"JMS Keys")
    echo 1234
    ;;
esac
To configure public-private key pairs in the certificate store, select Certificates and Keys > Key Pairs. The Key Pairs window enables you to add, edit, or delete OpenSSH public-private key pairs, which are required for the Secure Shell (SSH) File Transfer Protocol (SFTP).
To add a public-private key pair, click Add on the right, and configure the following settings in the dialog:
-
Alias:
Enter a unique name for the key pair.
-
Algorithm:
Enter the algorithm used to generate the key pair. Defaults to
RSA. -
Load:
Click to select the public key or private key files to use. The Fingerprint field is auto-populated when you load a public key.
|
Note |
|---|---|
|
The keys must be OpenSSH keys. RSA keys are supported, but DSA keys are not supported. The keys must not be passphrase protected. |
You can use the ssh-keygen command provided on UNIX to manage OpenSSH
keys. For example:
-
The following command creates an OpenSSH key:
ssh-keygen -t rsa -
The following command converts an
ssh.comkey to an OpenSSH key:ssh-keygen -i -f ssh.com.key > open.ssh.key -
The following command removes a passphrase (enter the old passphrase, and enter nothing for the new passphrase):
ssh-keygen -p -
The following command outputs the key fingerprint:
ssh-keygen -lf ssh_host_rsa_key.pub
Edit a key pair
To edit a public-private key pair, select a key pair alias in the table, and click Edit on the right. For example, you can load a different public key and private key. Alternatively, double-click a key pair alias in the table to edit it.
Delete key pairs
You can delete a selected key pair from the certificate store by clicking Remove on the right. Alternatively, click Remove All.
To configure Pretty Good Privacy (PGP) key pairs in the certificate store, select Certificates and Keys > PGP Key Pairs. The PGP Key Pairs window enables you to add, edit, or delete PGP public-private key pairs.
To add a PGP public-private key pair, click the Add on the right, and configure the following settings in the dialog:
-
Alias:
Enter a unique name for the PGP key pair.
-
Load:
Click Load to select the public key and private key files to use.
|
Note |
|---|---|
|
The PGP keys added must not be passphrase protected. |
You can use the freely available GNU Privacy Guard (GnuPG) tool to manage PGP key files (available from http://www.gnupg.org/). For example:
-
The following command creates a PGP key:
gpg --gen-keyFor more details, see http://www.seas.upenn.edu/cets/answers/pgp_keys.html
-
The following command enables you to view the PGP key:
gpg -a --export -
The following command exports a public key to a file:
gpg --export -u 'UserName' -a -o public.key -
The following command exports a private key to a file:
gpg --export-secret-keys -u 'UserName' -a -o private.key -
The following command lists the private keys:
gpg --list-secret-keys
Edit a PGP key pair
To edit a PGP key pair, select a key pair alias in the table, and click Edit on the right. For example, you can load a different public key and private key. Alternatively, double-click a key pair alias in the table to edit it.
Delete PGP key pairs
You can delete a selected PGP key pair from the certificate store by clicking Remove on the right. Alternatively, click Remove All.
This section desribes global import and export options available when managing certificates and keys.
The following global configuration options apply to both the X.509 Certificate and Private Key tabs:
-
Import Certificate + Key:
Use this option to import a certificate and a key (for example, from a
.p12file). -
Export Certificate + Key:
Use this option to export a certificate and a key (for example, to a
.p12file).
Click OK when you have finished configuring the certificate and private key.
You can also export a certificate to a Java keystore. You can do this by clicking Keystore on the main Certificates window. Click the browse button at beside the Keystore field at the top right to open an existing keystore, or click New Keystore to create a new keystore. Choose the name and location of the keystore file, and enter a passphrase for this keystore when prompted. Click Export to Keystore, and select a certificate to export.
Similarly, you can import certificates and keys from a Java keystore into the certificate store. To do this, click Keystore on the main Certificates window. On the Keystore window, browse to the location of the keystore by clicking the browse button beside the Keystore field. The certificates/keys in the keystore are listed in the table. To import any of these keys to the certificate store, select the box next to the certificate or key to import, and click Import to Trusted certificate store. If the key is protected by a password, you are prompted for this password.
You can also use the Keystore window to view and remove existing entries in the keystore. You can also add keys to the keystore and to create a new keystore. Use the appropriate button to perform any of these tasks.
