Contents
The security sample policies demonstrate digital signature verification and cryptographic operations (encryption and decryption). This topic describes the sample policies, and explains how to run these samples.
The Signature Verification sample policy sends a digitally signed version of the
StockQuote request to the API Gateway. The message carries the signature
into the web service header. A sample certificate/key pair (Samples Test
Certificate) is used to sign the message and verify the signature. Signature
verification is used for authentication purposes, and therefore an HTTP 403 error code
is returned if a problem occurs.
The Signature Verification policy is as follows:
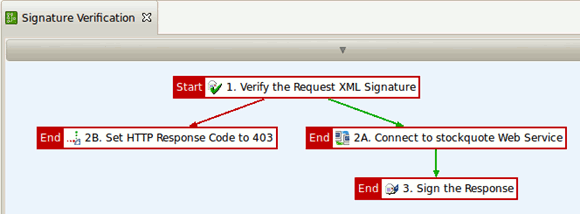 |
The Signature Verification policy performs the following tasks:
-
The signature contained in the request is verified. The signature must be located in a WS Security block.
-
If the verification is successful, the
StockQuotedemo service is invoked. -
The response body is signed and returned to the client.
-
If the verification fails, an HTTP 403 error code is returned to the client.
You can call the sample service using the send request (sr) command
or the API Gateway Explorer GUI:
Enter the following command:
sr -f INSTALL_DIR/samples/SamplePolicies/Security/SignatureVerification/Request.xml
http://localhost:8081/signatureverification
For more details, see the topic on Stress test with send request (sr).
Perform the following steps:
-
Specify the following URL in the Request Settings:
http://hostname:8081/signatureverification
-
Select
POSTas the Verb. -
Click the Close button.
-
Select File > Load, and browse to the following file as input for the request:
INSTALL_DIR/samples/SamplePolicies/Security/SignatureVerification/Request.xml
-
Click the Send Request button.
For more details, see the topic on Send a request with API Gateway Explorer.
This sample uses XML decryption on the request and applies encryption on the response. The sample policy includes a Main policy, which chains together the calls that decrypt the request, the invocation of the back-end service, and the encryption of the response.
The Main policy is as follows:
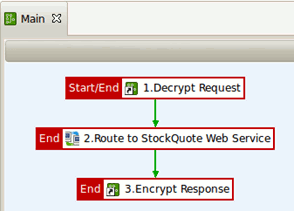 |
The Main policy performs the following tasks:
-
Decrypt Request is a policy shortcut, which invokes another policy that takes the inbound request and decrypts it.
-
The decrypted request is routed to the back-end service.
-
The Encrypt Response policy shortcut invokes a policy that encrypts the response from the back-end service.
The Decrypt policy is as follows:
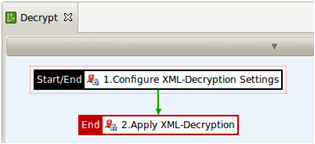 |
The Decrypt policy performs the following tasks:
-
The decryption settings are defined: what to decrypt and which key to use.
-
The XML decryption is executed based on the defined settings.
The Encrypt policy is as follows:
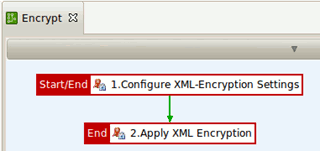 |
The Encrypt policy performs the following tasks:
-
The encryption settings are defined: what to encrypt, which symmetric key to use, which certificate to use, and how to encrypt (algorithm and where to place the encryption information).
-
The XML encryption is executed based on the defined settings.
You can call the sample service using the send request (sr) command
or the API Gateway Explorer GUI:
Enter the following command:
sr -f INSTALL_DIR/samples/SamplePolicies/Security/Encryption/Request.xml
http://HOSTNAME:8081/encryption
For more details, see the topic on Stress test with send request (sr).
Perform the following steps:
-
Specify the following URL in the Request Settings:
http://HOSTNAME:8081/encryption
-
Select
POSTas the Verb. -
Click the Close button.
-
Select File > Load, and browse to the following file as input for the request:
INSTALL_DIR/samples/SamplePolicies/Security/Encryption/Request.xml
-
Click the Send Request button.
For more details, see the topic on Send a request with API Gateway Explorer.
