Defining Business Unit Fulfillment Options
The fulfillment options that you define in the Setup Fulfillment component become the defaults for all order processing in the business unit. You can override many of these rules at various points during the fulfillment process.
|
Page Name |
Definition Name |
Usage |
|---|---|---|
|
OF_SETUP_INV |
Define basic fulfillment settings and defaults. |
|
|
OF_SETUP1_INV |
Define fulfillment engine defaults at the business unit level. |
|
|
INV_FUL_DFLT_BU |
Define fulfillment engine processing options for the business unit level. |
|
|
OF_SETUP5_INV |
Establish default parameters to set orders to the releasable state; including settings for soft-reserving stock, reservation rules, and backorder rules. |
|
|
OF_SETUP8_INV |
Define available to promise (ATP) settings plus selecting optional sources of supply and demand used to calculate available to promise quantities. |
|
|
OF_SETUP2_INV |
Define parameters and defaults for the Order Release process to release orders to picking. |
|
|
FPB_ROLENAME_INV, FPB_ROLE_IT_INV |
Create a route control profile for the Fixed Pick workflow. |
|
|
OF_SETUP3_INV |
Establish default electronic data collection options for the picking plan, bills of lading, and packing slips. |
|
|
OF_SETUP4_INV |
Establish default bar coding options for generating carton and item usage labels. |
|
|
OF_SETUP6_INV |
Define default shipping options. |
|
|
OF_SETUP7_INV |
Define default options for integration with a transportation management system. |
|
|
OF_SETUP9_INV |
Configure the ability to change fields on a sales order during the fulfillment process. |
|
|
OF_SETUP10_INV |
Use this page to setup delivery management and freight features for the PeopleSoft Inventory business unit. |
To define fulfillment for the inventory business unit, use the Setup Fulfillment (ORDER_FULF_SETUP) component.
Use the Setup Fulfillment page (OF_SETUP_INV) to define basic fulfillment settings and defaults.
Navigation:
This example illustrates the fields and controls on the Setup Fulfillment page. You can find definitions for the fields and controls later on this page.
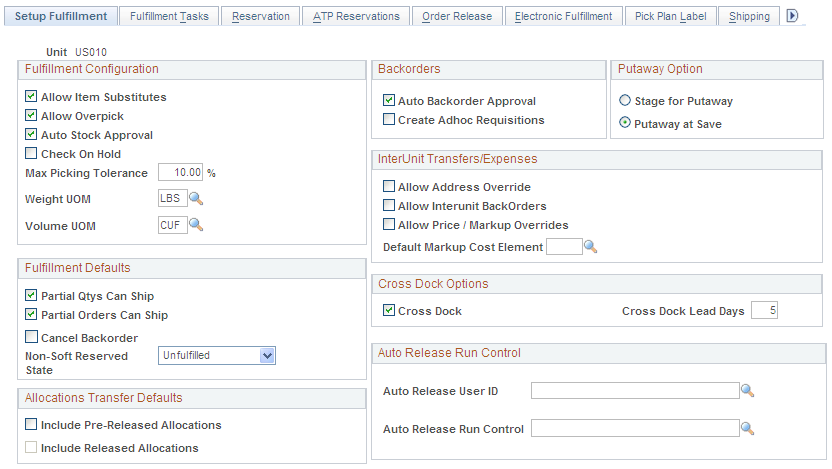
Fulfillment Configuration
Field or Control |
Description |
|---|---|
Auto Stock Approval (automatic stock approval) |
Select to enable automatic approval for all demand requests staged to the Demand table (IN_DEMAND). If you require tighter control of your stock approval processing, do not select this option. You must then approve all demand lines manually on the Approve Stock Request page before the Reserve Materials process (IN_FUL_RSV) or the Shortage Workbench can move them to the demand management tables for picking. |
Allow Overpick |
Select to enable overpicking (picking more than the requested quantity) in the business unit for material stock requests. |
Check On Hold |
Select to verify the on-hold status of a sales order or material stock request before allowing picking confirmation of the order line. If an order line is on hold, the Material Picking Feedback page and the electronic data collection Inventory Picking process (IN_FUL_PFB) prevent you from confirming it. |
Allow Item Substitutes |
Select to permit item substitution for material stock requests during picking. If no fulfillment setup options are defined on the Setup Item Fulfillment page for the requested item, this setting becomes the default for new material stock requests created using the Create/Update Stock Request component or the purchase order sourcing processes. |
Max Picking Tolerance (maximum picking tolerance) |
Indicate the percentage of overpicking allowed if you have selected the Allow Overpick check box. If the amount that you overpick on the Material Picking Feedback page or the Shipping/Issues − Picking Feedback page exceeds this percentage, PeopleSoft Inventory issues a warning. To generate a warning for any amount of overpicking, set the picking tolerance to 0. Note: The values that you define here appear by default on internal stock requests and interunit transfers created using the Create/Update Stock Request and Express Issue components. External orders and sales orders use the overpicking parameters established for the ship to customer. |
Weight UOM |
Select a unit of measure if you want the total weight of orders released for picking to appear on the Order Release Selection group box of the Order Release Request process page and the Picking Plan report. PeopleSoft Inventory uses this unit of measure (UOM) to obtain the sum of delivery IDs when doing freight calculations and to record the weight of items in a shipping container in the Packing Session component. This field must be populated if you create order-level reservation rules that compare the order weight. If you create a rule with the Order Weight value in the Field to Compare field and there is no Weight UOM on this page, then the reservation rule produces incorrect results. |
Volume UOM |
Select a UOM if you want the total volume of orders released for picking to appear on the Order Release Selection group box of the Order Release Request process page and the Picking Plan report generated by the Order Release process. PeopleSoft Inventory uses this UOM to obtain the sum of delivery IDs when doing freight calculations. This field must be populated if you create order-level reservation rules that compare the order volume. If you create a rule with the Order Volume value in the Field to Compare field and there is no Volume UOM on this page, then the reservation rule produces incorrect results. |
Fulfillment Defaults
Field or Control |
Description |
|---|---|
Partial Qtys Can Ship (partial quantities can ship) |
Select to permit the reservation and shipment of partial quantities of demand lines when there is insufficient stock available to fulfill the line. You can override this check box for a specific item on the Setup Item Fulfillment page or for a specific demand line in the Create/Update Stock Request and Maintain Stock Request components. If you enable the shipment of partial quantities, you must also select Partial Orders Can Ship. |
Cancel Backorder |
Select to prevent the automatic creation of backorders for partially fulfilled or short-shipped demand lines. You can override this check box for a specific item on the Setup Item Fulfillment page or for a specific demand line in the Create/Update Stock Request, Maintain Stock Request, and Shipping/Issues components. |
Partial Orders Can Ship |
Select to permit shipment of partial orders. If you do not select this check box, PeopleSoft Inventory does not ship stock requests until all order lines are reserved and picked. You can override this option for a specific order in the Create/Update Stock Request and Maintain Stock Request components. |
Non-Soft Reserved State |
Select the Unfulfilled or Releasable state to initially add a demand line for non-soft reserved items. If you select Releasable, then you must also select the Auto Stock Approval check box on this page. |
Note: The values in the Cancel Backorder, Partial Qtys Can Ship, and Partial Orders Can Ship fields that you select here become the default values for new orders created using the Create/Update Stock Request component, the Create Par Replenishment Requests process, and the purchase order sourcing processes. You can override any of these default values on the order line.
Also, keep in mind that the reservation and backorder rules override the check boxes for Partial Orders Can Ship, Partial Quantities Can Ship, and Cancel Backorder. The rules default from the Setup Item Fulfillment-Reservation / Backorder Rules page. If no default values are found on this page then the defaults come from the Setup Fulfillment-Reservation page.
See Understanding the Reservation, Backorder, and Shortage Processes.
Allocations Transfer Defaults
Define the default values for transferring allocated stock. The default values are used on the Transfers page (Inventory, Manage Inventory, Transfers) and the Inventory Transfer page (SCM Integrations, Create Transactions, Inventory, Process Storage Loc Transfers, Inventory Transfer).
Field or Control |
Description |
|---|---|
Include Pre-Released Allocations |
Select this check box to apply the default value of Y (yes) to the Include Pre-Released Allocations check box on the Transfers page and the Inventory Transfers page. This check box enables users to transfer allocated stock within the Inventory business unit, including:
|
Include Released Allocations |
Select this check box to apply the default value of Y (yes) to the Include Released Allocations check box on the Transfers page and the Inventory Transfers page. This check box enables users to transfer allocated stock within the Inventory business unit when the demand lines have already entered the picking stage and a pick batch ID has been assigned. This check box includes:
This check box is not available until you select the Allow Transfer of Released Allocations check box on the Inventory Definition - Business Unit Options page. |
For more information on the ability to transfer allocated stock within an Inventory business unit, see the "Making Stock Quantity Adjustments and Transfers Within the Business Unit" topic in this documentation.
See Understanding Stock Quantity Adjustments and Transfers in a Business Unit.
Backorders
Field or Control |
Description |
|---|---|
Auto Backorder Approval (automatic backorder approval) |
Select to enable the Reserve Materials process, online reservations, and the Shortage Workbench to process backorders without manual approval. This option creates reservations for the backordered demand when sufficient stock is available. If you do not select this option, the system creates backorder demand lines with a status of Backorder, and you must approve them manually on the Update Unreserved Orders page or the Shortage Workbench before making a reservation. |
Create Adhoc Requisitions |
Select to enable the Reserve Materials process and online reservations to create an ad hoc replenishment request when insufficient stock is available to fulfill the demand line. Ad hoc replenishment requests are also created by the Shortage Workbench if a previously fully reserved demand line is unreserved and the first backorder line is being created. Ad hoc replenishment requests can also be created by the Shipping/Issues component when short shipping a non-backorder demand line. Ad hoc replenishment requests are created only if a backorder is created. PeopleSoft Purchasing or a third-party purchasing application then processes the ad hoc replenishment request. If you do not select this check box, partially filled orders are backordered only. |
Putaway Option
Indicate when short-shipped stock should be put away. For both putaway options, stock is put away into the storage location from which it was originally picked. The option that you select here is also used when canceling an already picked and confirmed demand line.
Field or Control |
Description |
|---|---|
Stage for Putaway |
Select to stage the stock for putaway. You then use the Stockroom Feedback page to activate the Putaway check box and indicate where to put the stock away. |
Putaway at Save |
Select to put the stock away automatically upon saving the Cancel/Hold Stock Request component, Material Picking Feedback page, or Shipping/Issues component. |
InterUnit Transfers/Expenses
A transfer of stock between two inventory business units is known as an interunit transfer. This group box contains settings that impact the material stock requests with interunit transfers.
Field or Control |
Description |
|---|---|
Allow Address Override |
Select to enable users in this business unit to override the default shipping address on an intercompany transfer (a type of interunit transfer). This setting is used only for intercompany transfers. For all other orders, the shipping address can be changed. Select this check box when you have also selected the Inventory business unit settings for interunit transfers using the Installation Options - Inventory page and entered an intercompany stock request. |
Allow Interunit Backorders |
Select to create backorders for the remaining quantity of an interunit transfer that is only partially fulfilled. If you do not select this option, PeopleSoft Inventory fulfills only as much as is available for interunit requests; the remaining quantity must be requested from another business unit. Note: If the Allow Interunit Backorders option is not selected, you cannot add an interunit transfer in case no sufficient stock exists. For information about interunit par quantity setting, see Define Business Unit Item - Inventory: Shipping/Handling Page. |
Allow Price / Markup Overrides |
Select this check box to enable users to alter the transfer price and price markup percentage on a material stock request with the request type of interunit transfer. |
Default Markup Cost Element |
Enter a cost element with the cost category of Addl Trans (Additional Transfer Costs). When the Transfer Pricing Definition component does not contain a markup cost element, then the price markup amount is applied to this cost element. When the price markup percentage is overridden on the material stock request, this cost element is used to record the markup. |
Cross Dock Options
Field or Control |
Description |
|---|---|
Cross Dock |
Select to enable cross docking in the business unit. You can modify this default value for individual items on the Setup Item Fulfillment page. |
Field or Control |
Description |
|---|---|
Cross Dock Lead Days |
Identify the number of days to use when calculating open demand quantity for cross docked items. If the Use Closure Calendar check box is selected on the Setup Fulfillment- Reservation page, then the system takes closure dates into consideration when calculating open demand. For example, if the closure calendar specifies Saturday and Sunday as closed days, then these days are not counted as lead days when calculating open demand. You can modify this default value for individual items on the Setup Item Fulfillment page. |
Auto Release Run Control
The fields in this group box are the default setting for auto-processing requests when no default values are entered on the Auto Processing Options tab of the Setup Fulfillment-Fulfillment Task Options page. These business unit level defaults can be overridden by the user on an individual run control request.
Field or Control |
Description |
|---|---|
Auto Release User ID |
Select any user ID that has created a run control for the Order Release Request process page. |
Auto Release Run Control |
Select all run controls for the Order Release Request process page that have been set up by the user entered in the Auto Release User ID field above. To find the correct value for this field and the Auto ReleaseUser ID field, the system first looks for a value on:
|
Use the Setup Fulfillment-Fulfillment Tasks page (OF_SETUP1_INV) to define fulfillment engine defaults at the business unit level.
Navigation:
This example illustrates the fields and controls on the Setup Fulfillment-Fulfillment Tasks page. You can find definitions for the fields and controls later on this page.

This page defines default values to be used when the fulfillment engine processes fulfillment transaction requests created by the pages, processes, and application messages defined on the Setup Fulfillment-Fulfillment Task Options page which can be accessed by clicking the Fulfillment Task Options link on this page.
Field or Control |
Description |
|---|---|
Auto Schedule Processing |
Select to immediately process the fulfillment transaction requests from the Fulfillment Workbench and external interfaces. The Fulfillment Requests process launches when the requests are posted to the staging tables. |
Release Additional Locks |
Select to instruct the fulfillment engine to release any locks not identified by the first processing group of data determined at run time. |
Perform Validation |
Select to validate the inbound demand lines before moving them to the PeopleSoft Inventory demand tables for releasing to picking. This validation occurs when using the Shortage Workbench and fulfillment engine processes to reserve or ship from an unfulfilled state. If errors occur, you can correct them using the Correct Demand Errors component. Note: Oracle recommends using this option if demand is sent to PeopleSoft Inventory from a third-party system. |
Log Errors Option |
Defines what the system should do with transaction request errors when the fulfillment engine cannot process successfully. There are two options:
|
Use the Setup Fulfillment-Fulfillment Task Options page (INV_FUL_DFLT_BU) to define fulfillment engine processing options for the business unit level.
Navigation:
Select the Fulfillment Task Options link on the Setup Fulfillment-Fulfillment Tasks page.
Processing Options
The columns on this page are defined in the Utilizing the Fulfillment Engine topic.
See Setting Up the Fulfillment Engine Processing Options.
This example illustrates the fields and controls on the The Processing Options tab of the Setup Fulfillment-Fulfillment Task Options page (page 1 of 2). You can find definitions for the fields and controls later on this page.

This example illustrates the fields and controls on the The Processing Options tab of the Setup Fulfillment-Fulfillment Task Options page (page 2 of 2). You can find definitions for the fields and controls later on this page.
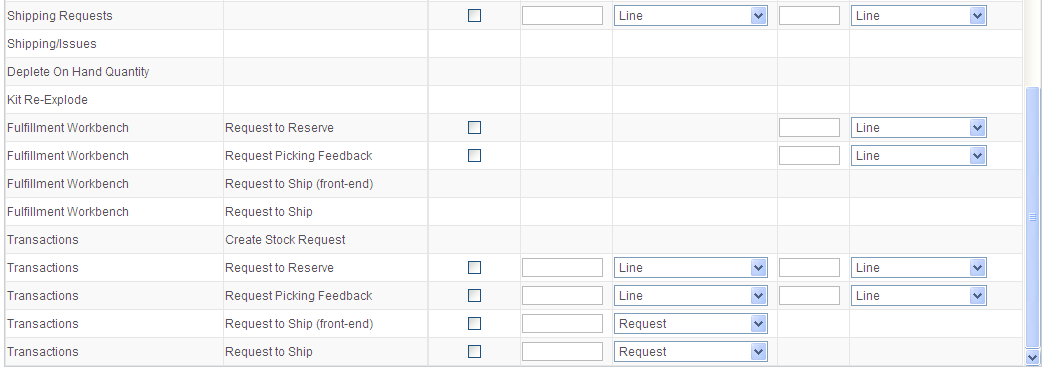
This page defines default values to be used when the fulfillment engine processes fulfillment transaction requests.
Field or Control |
Description |
|---|---|
Page/Process and Transaction Program |
Displays the type of interface that uses the processing options:
|
Passthrough Options
The columns on this page are defined in the Utilizing the Fulfillment Engine topic.
See Setting Up the Fulfillment Engine Processing Options.
This example illustrates the fields and controls on the The Passthrough Options tab of the Setup Fulfillment-Fulfillment Task Options page (1 of 2). You can find definitions for the fields and controls later on this page.
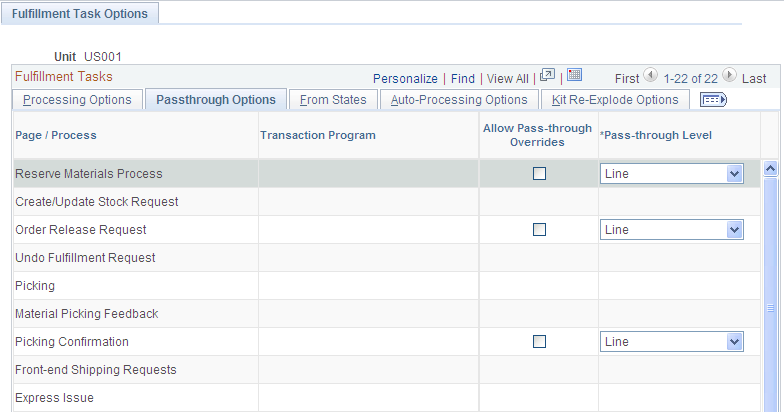
This example illustrates the fields and controls on the The Passthrough Options tab of the Setup Fulfillment-Fulfillment Task Options page (2 of 2). You can find definitions for the fields and controls later on this page.

From States
Select the From States tab.
This example illustrates the fields and controls on the The From States tab of the Setup Fulfillment-Fulfillment Task Options page (1 of 2). You can find definitions for the fields and controls later on this page.

This example illustrates the fields and controls on the The From States tab of the Setup Fulfillment-Fulfillment Task Options page (2 of 2). You can find definitions for the fields and controls later on this page.
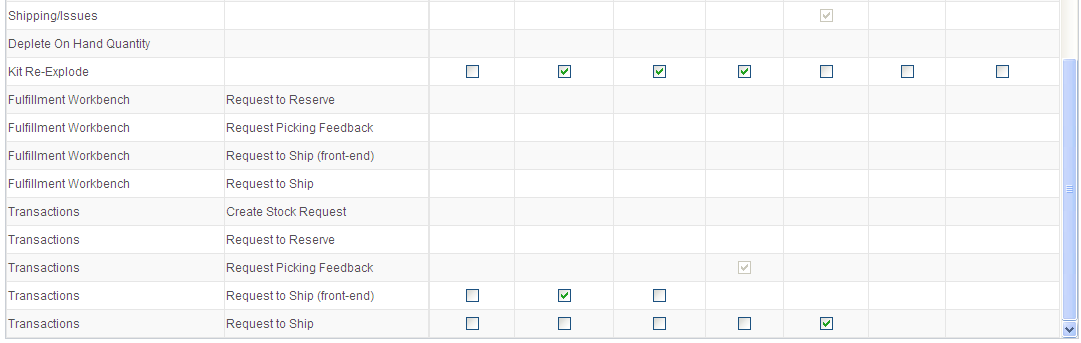
The From State identifies the fulfillment status of the orders that users can select for processing by the fulfillment engine. For example, if the From State of Unfulfilled is selected, then users can select unfulfilled orders for processing.
Field or Control |
Description |
|---|---|
Allow State Overrides |
Select to enable the user to select a different From State in the fulfillment transaction request. |
Select Unfulfilled,Select Releasable,Select Released,Select Confirmed Select Shipped, and Select Depleted |
Select the from state (or starting fulfillment status) of the orders to be moved to another status by the fulfillment engine. |
Note: The From States for the Fulfillment Workbench page are defined in the template ID for the workbench, not on the Setup Fulfillment- Fulfillment Engine Options page.
Auto Processing Options
The columns on this page are defined in the Utilizing the Fulfillment Engine topic
See Setting Up the Fulfillment Engine Processing Options.
This example illustrates the fields and controls on the The Auto-Processing Options tab of the Setup Fulfillment-Fulfillment Task Options page (1 of 2). You can find definitions for the fields and controls later on this page.
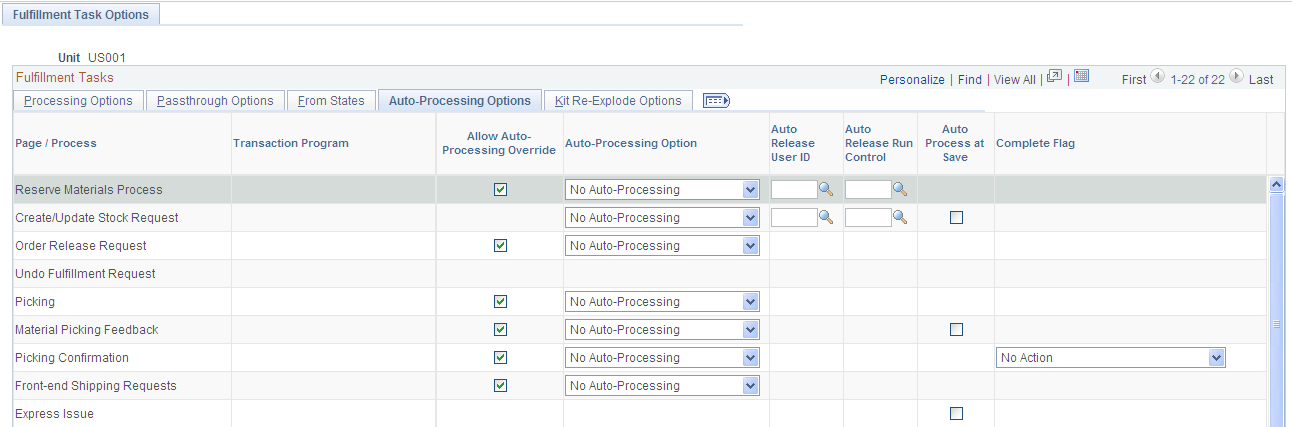
This example illustrates the fields and controls on the The Auto-Processing Options tab of the Setup Fulfillment-Fulfillment Task Options page (2 of 2). You can find definitions for the fields and controls later on this page.

Kit Re-Explode Options
Select the Kit Re-Explode Options tab.
This example illustrates the fields and controls on the The Kit Re-Explode Options tab of the Setup Fulfillment-Fulfillment Task Options page (1 of 2). You can find definitions for the fields and controls later on this page.

This example illustrates the fields and controls on the The Kit Re-Explode Options tab of the Setup Fulfillment-Fulfillment Task Options page (2 of 2). You can find definitions for the fields and controls later on this page.

The following fields are used on the Kit Re-Explode process.
Field or Control |
Description |
|---|---|
Allow Kit Re-Explode Overrides |
Select this check box to enable users defining a run control for the Kit Re-Explode process to change the execution mode and kit effective date. |
Execution Mode |
Choose the action to be performed by the Kit Re-Explode process. The options are:
|
Kit Effective Date |
Select the date of the component kit demand lines to be compared to the date range (effective date and obsolete date) on the Product Kit Summary page. The demand line dates are:
|
Use the Setup Fulfillment-Reservation page (OF_SETUP5_INV) to establish default parameters to set orders to the releasable state; including settings for soft-reserving stock, reservation rules, and backorder rules.
Navigation:
This example illustrates the fields and controls on the Setup Fulfillment-Reservation page. You can find definitions for the fields and controls later on this page.
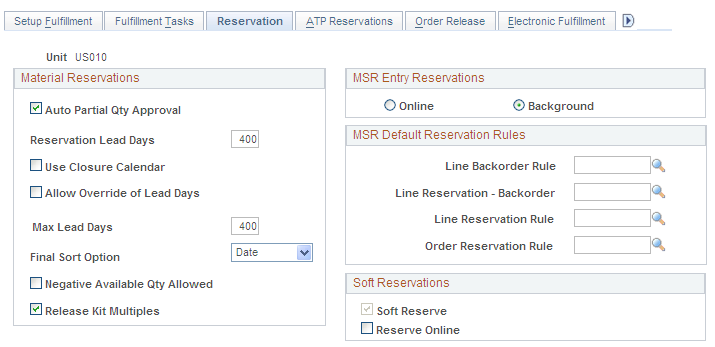
Material Reservations
Field or Control |
Description |
|---|---|
Auto Partial Qty Approval (automatic partial quantity approval) |
Select to enable the Order Release Request process (IN_FUL_RLS) to release partially fulfilled orders to picking without manual approval. If you require tighter control of the partial quantity fulfillment, do not use this option. (In that case, you must approve partial quantity requests manually using the Shortage Workbench before the demand line is set to the Released state.) |
Reservation Lead Days |
Indicate the number of days required to pick, pack, and ship the majority of the items in the business unit. The Reserve Materials process reserves the quantity for soft-reserved order lines that have a scheduled ship date between the current date and the date defined by the current date plus the number of reservation lead days. If the scheduled ship date of an order line for an ATP-reserved item falls within the number of reservation lead days and the full order quantity could not be promised earlier when the scheduled ship date was outside the number of reservation lead days but within the number of ATP lead days, the Reserve Materials process can partially promise the order line as long as the order permits partial quantities. |
Use Closure Calendar |
If you have defined a Closure Calendar page for this PeopleSoft Inventory business unit, select this check box to enable the system to take into account days that your warehouse is closed. When calculating the lead time period for reservations and the open demand period for cross docking, the system starts with the current date and determines the end of the period by adding the current date plus the number of lead days plus one day for every closed day, thereby skipping any closed days. For example, if the closure calendar specifies Saturday and Sunday as closed days, then these days are not counted as lead days when calculating the time period. To have the system calculate reservation lead time and open demand time based on the current date plus the lead days (without removing days that the business unit is closed), then clear this check box. |
Allow Override of Lead Days |
Select to enable the user to change or ignore the reservation lead days when running the Reserve Materials process. |
Max Lead Days |
Enter the maximum number of reservation lead days that can be entered on the Reserve Materials process when you select the Allow Override of Lead Days check box on this page. If you enter no value, the system assumes zero days. The override entries on the Reserve Materials Process page cannot exceed this maximum. Note: Consider the potential risk in allowing the override of the reservation lead days. When the Cancel Backorders check box is selected on the Setup Fulfillment page and there is not sufficient stock at reservation time, then the order lines are canceled, not backordered. Unintended results, such as cancelling orders, could occur if the user entering the parameters on the Reserve Materials process page overrides the lead days with a large number of days or if the user selects the Ignore Lead Days value from the Use Lead Days field. If you enter a number in the Maximum Lead Days field on this page, then the system issues an error message on the Reserve Materials process page when a user enters a number of lead days greater than the maximum lead days. |
Final Sort Option |
Select an option to be used in conjunction with the business unit's demand priority rules (established on the Priority Rule Definition page) to determine order line sequencing for reservation processing. Order lines are first sequenced using the inventory priority rules. Order lines matching the same inventory priority are sequenced using the Final Sort Option field. If no inventory priority rules exist, order lines are sequenced using only the value in the Final Sort Option field. Values are: Date: Sequences order lines according to this hierarchy:
Order No (order number): Sequences order lines using this hierarchy:
Priority: Sequences order lines using this hierarchy:
|
Negative Available Qty Allowed |
Select this check box to enable users to drive the available quantity negative using the Shortage Workbench. |
Release Kit Multiples |
Select to allow only complete product kits to be set to releasable status by the Reserve Materials process or online reservation processing. When processing product kits on a sales order or material stock request, there may be insufficient quantity of one or more of their required components to reserve all of the complete kits requested. This check box instructs the reservation processes to send only complete kits downstream to the releasable state. For example; suppose that product kit X consists of 2 units of item A and 1 unit of item B. The demand line requests a quantity of 10 product kit X. Available stock includes 22 units of item A and 4 units of item B. The system can reserve 20 units of item A and 4 units of item B, then 8 units of item A and 4 units of item B (4 complete kits) are set to releasable status and passed downstream for picking. For any quantities initially reserved or promised but could not be set to releasable, in this case, 12 units of item A, the system follows the backorder rules to determine if the items stay reserved or promised. On the backorder rules:
Note: Kit components with the Optional Ship flag set on their definition, are ignored, when calculating the multiples of kits that can be sent downstream to the releasable state. |
MSR Entry Reservations
This group box identifies whether the online reservations process or the Reserve Materials process is launched from the Create/Update Stock Request component in PeopleSoft Inventory or the order entry component in PeopleSoft Order Management. This setting is not applied to the online reservations process in PeopleSoft Maintenance Management; it is always online.
Select the Online option to launch the online reservations process from the Reserve or Save buttons.
Select the Background option to launch the Reserve Materials process from the Reserve or Save buttons.
On the order entry components, the Reserve button is used to launch reservations processing if you have not selected the Auto Process at Save check box on the Auto-Processing Options tab of the Setup Fulfillment-Fulfillment Task Options page. If the Auto Process at Save check box was selected, then the Reserve button is hidden and reservations processing is launched when you save the component.
MSR Default Reservation Rules
Reservation and backorder rules are used by the Reserve Materials process and online reservations to determine when the demand line of an order is ready to be moved downstream to the releasable state. These rules are not applied to work order demand lines from PeopleSoft Maintenance Management. Backorder rules are also used at shipping time to determine what to do with shortages that cannot be fulfilled. These rules can default to the demand line from the Setup Item Fulfillment-Reservation / Backorder Rules page (the item/business unit level). If the item/business unit level does not contain all the rules, then the system looks here for defaults (the business unit level). Using this page you can enter or change the necessary default rules.
During reservations, the rules are evaluated in the following order:
Line-level reservation rule. For backordered lines, the Line Reservation-Backorder rule is used instead.
Order-level reservation rule
Once a demand line has passed the set releasable criteria for the line-level reservation rule, the line must also pass the set releasable criteria for the order-level reservation rule.
Backorder rule at release
Once a demand line has passed the set releasable criteria of both the line-level reservation rule and the order-level reservation rule, the backorder rule at release determines how any unreserved quantities (shortages) are handled.
During shipping, the backorder rule at shipping is used to determine how to handle any shortages.
Note: If there are no reservation and backorder rules established for the demand line, then the system uses the Partial Qtys Can Ship, Cancel Backorder, and Partial Orders Can Ship check boxes to determine releases and backorders.
Field or Control |
Description |
|---|---|
Line Backorder Rule |
There are two parts to this rule:
|
Line Reservation Rule (line-level reservation rule) |
Defines the specific criteria that must be satisfied by this individual demand line before the demand line is moved to the releasable state. For example, a line reservation rule might be that the reserved quantity must equal or exceed 90 percent of the requested quantity on the line before it is set to the releasable state. |
Line Reservation-Backorder Rule |
Defines the specific criteria that must be satisfied by a backordered demand line before the demand line is moved to the releasable state. For example, a line reservation-backorder rule might be that the reserved quantity for an already backordered line must equal 100 percent of the requested quantity before it is set to the releasable state. If no line reservation-backorder rule exists, then the system used the line reservation rule for backordered demand lines. |
Order Reservation Rule (order-level reservation rule) |
Defines the specific criteria that must be satisfied by the entire order or grouping that this individual demand line is in, before the demand line is moved to the releasable state. For example, an order reservation rule might be that all the lines in an order must reserve 100 percent of their reserved quantity before the order can move downstream. |
See Understanding the Reservation, Backorder, and Shortage Processes.
Soft Reservations
Specify parameters that govern how the Reserve Materials process handles soft-reserved order processing at the business unit level. The settings and values that you define here become the defaults at the business unit-item level and can be modified for specific items on the Setup Item Fulfillment page.
Field or Control |
Description |
|---|---|
Soft Reserve |
Select to enable the Reserve Materials process to move item quantity from the business unit's quantity available to the business unit's quantity reserved so that future orders cannot consume the stock. If you do not enable soft reservations, stock is allocated to orders only at the time of order release (when the line is moved to the released state). You cannot change this option at either the business unit or the item level (on the Setup Item Fulfillment page) if there are any reserved quantities processing in the system. This includes any demand that has been lot allocated or processed by the Reserve Materials process but that has not yet been shipped and depleted. |
Reserve Online |
Select to require order lines to be soft-reserved manually using the Shortage Workbench. Performing soft reservations online enables you to manage situations of short supply by controlling how the available quantity of an item is distributed among order lines. The Reserve Materials process does not include items marked for online soft reservations. If you modify the Reserve Online option for business unit-item level defaulting purposes, be aware that the system ignores this setting for non-soft-reserved items. For example, you might disable soft reservations at the business unit level but select it for specific items. To perform online reservations for most of those items, select as the default the Reserve Online check box at the business unit level. |
Use the Setup Fulfillment- ATP Reservations page (OF_SETUP8_INV) to define available to promise (ATP) settings plus selecting optional sources of supply and demand used to calculate available to promise quantities.
Navigation:
This example illustrates the fields and controls on the Setup Fulfillment- ATP Reservations page. You can find definitions for the fields and controls later on this page.

Establish processing parameters that govern:
What optional sources of supply and demand are included in the Reserve Materials process, online reservations, Fulfillment Workbench, and Inventory Reservation EIP when calculating available to promise quantity for an ATP-reserved item.
The time frame for which the reservation processes can promise quantity to an order line.
The default values used in the Item/Product Availability inquiry for calculating ATP.
The sources of supply and demand used to calculate item availability in PeopleSoft Maintenance Management.
Field or Control |
Description |
|---|---|
ATP Lead Days (available to promise lead days) |
Set the number of days ATP lead days. The optimum value varies depending upon the reliability of the business unit's suppliers. When setting the number of ATP lead days, strive for a balance between the variability of your supply and your need to make fulfillment commitments to your customers. The longer the lead time, the more volatile the supply; that is, the more likely that expected receipt dates and receipt quantities are subject to change and affect your ability to fulfill orders as promised. The shorter the lead time, the less future supply is available to make commitments against.
The number of ATP lead days also determines the time frame in which the Order Entry Form component can promise order lines for ATP-reserved items:
Note: PeopleSoft recommends that the ATP lead days be greater than the reservation lead days. Note: The reservation lead days cannot be overridden when processing ATP items. ATP processing always uses the reservation lead days defined here. |
Optional Sources of Demand
Select the options in this group box to add additional sources of demand to the ATP calculation.
Field or Control |
Description |
|---|---|
Dependent Demand |
If PeopleSoft Manufacturing is installed, select this check box to include the demand for an item that is sold as part of an assembly in the demand side of the ATP calculation. Dependent demand is derived from the bills of material associated with production orders that are firm, released, or in process. Note: When dependent demand is included in the ATP calculations, it is treated as promised demand. |
Plan Transfer Demand |
If PeopleSoft Supply Planning is installed, select this check box to include planned transfers in the demand side of the ATP calculation. Define which planned transfers should be included based on the Approval, Status (planned, firm planned, or both), and Frozen fields in this row. |
Plan Production Demand |
If PeopleSoft Supply Planning is installed, select this check box to include planned production in the demand side of the ATP calculation. Define which planned production should be included based on the Approval, Status (planned, firm planned, or both), and Frozen fields in this row. |
Incl WIP in Starting Qty (include work-in-process in starting quantity) |
Select if item quantities in WIP storage locations should be considered available to promise in the ATP calculation; that is, if item quantities in WIP storage locations is available to fulfill finished good demand. This check box applies to both Dependent Demand and Planned Production Demand. |
Work Order Demand |
If PeopleSoft Maintenance Management is installed, select this check box to include work orders in the demand side of the ATP calculation. |
Note: Entered production orders will only have their supply considered for ATP calculations. Dependent demand will be ignored.
Optional Sources of Supply
Field or Control |
Description |
|---|---|
Approved PO Requisitions (approved purchase order requisitions) |
If PeopleSoft Purchasing is installed, select this check box to include approved purchase order requisitions in the supply side of the ATP calculation. |
Co-Products/By-Products |
If PeopleSoft Manufacturing or PeopleSoft Supply Planning are installed, select this check box to include co-products and by-products in the supply side of the ATP calculation. This includes both production and planned production as sources of supply.
|
Entered Status Production |
If PeopleSoft Manufacturing is installed, select this check box to include production orders in the Entered status in the supply side of the ATP calculation. |
Plan Purchase Orders |
If PeopleSoft Supply Planning is installed, select this check box to include planned purchase orders in the supply side of the ATP calculation. Define which planned purchase orders should be included based on the Approval, Status (planned, firm planned, or both), and Frozen fields in this row. |
Plan Transfer Supply |
If PeopleSoft Supply Planning is installed, select this check box to include planned transfer orders in the supply side of the ATP calculation. Define which planned transfers should be included based on the Approval, Status (planned, firm planned, or both), and Frozen fields in this row. |
Plan Production Supply |
If PeopleSoft Supply Planning is installed, select this check box to include planned production orders in the supply side of the ATP calculation. Define which planned production should be included based on the Approval, Status (planned, firm planned, or both), and Frozen fields in this row. |
Use the Setup Fulfillment-Order Release page (OF_SETUP2_INV) to define parameters and defaults for the Order Release process to release orders to picking.
Navigation:
This example illustrates the fields and controls on the Setup Fulfillment-Order Release page. You can find definitions for the fields and controls later on this page.
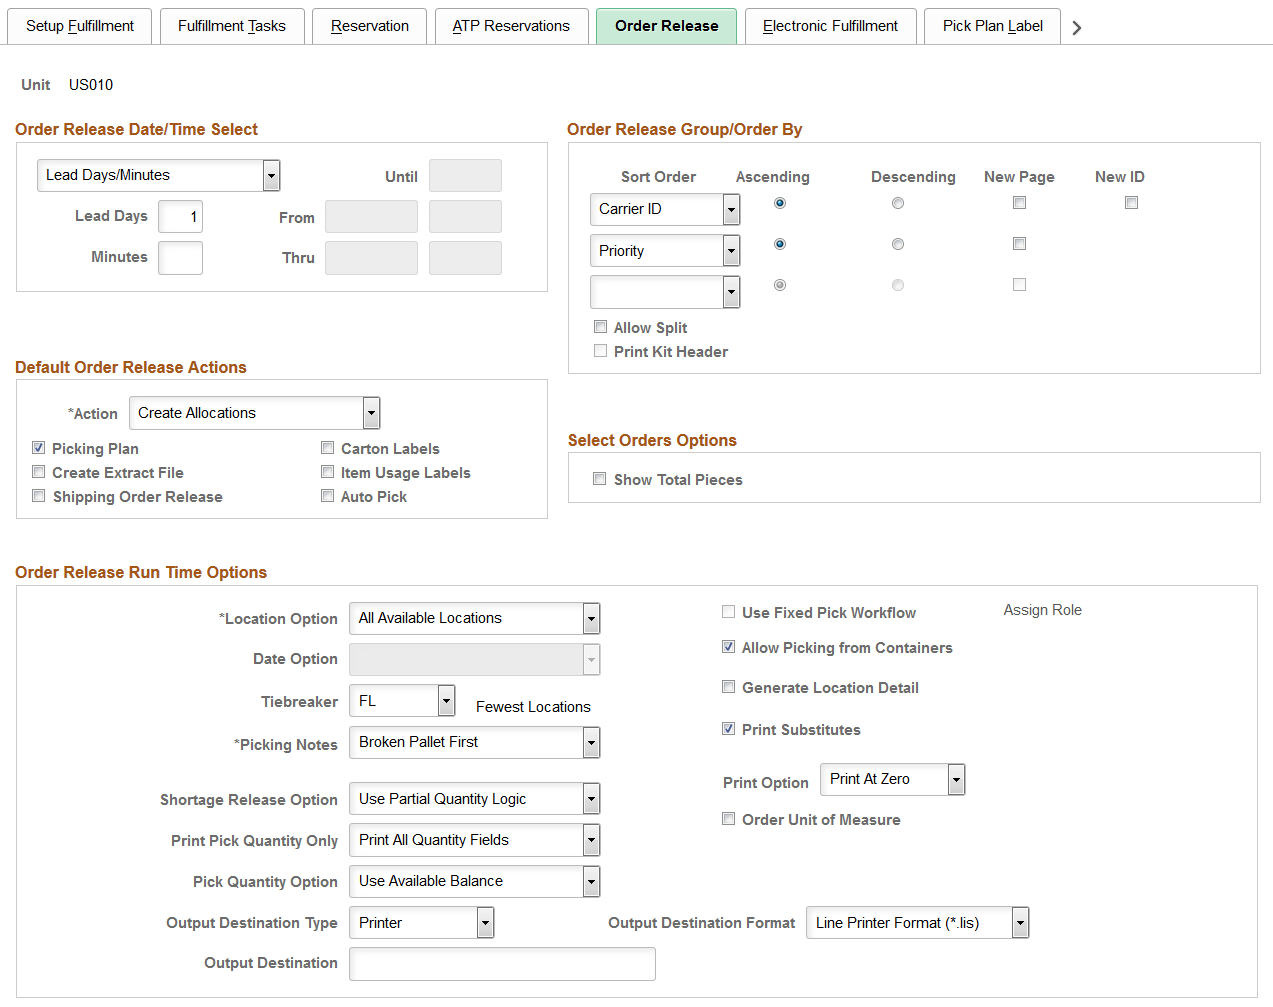
Order Release Date/Time Select
These selections becomes the default on the Order Release Request process page.
Field or Control |
Description |
|---|---|
Date/Time Range |
The order release process includes demand lines scheduled to ship within the specified From and Thru parameters. For example, you could release orders for picking that are scheduled to ship between 8 a.m. next Monday and 5 p.m. next Friday. |
Lead Days/Minutes |
The order release process includes demand lines scheduled to ship on or before today's date, plus the specified picking lead time entered in the Lead Days and Minutes fields. For example, you could release to picking orders scheduled to ship tomorrow at 3:00 p.m. by using the values 1 day, 180 minutes (if the current time is 12:00 p.m.). Note: If the business unit requires closure calendar validation for shipping activities as defined on the Closure Calendar page, and the calculated scheduled ship date falls on a defined closure date, the system adds one day for every closed day to the picking lead time to compare against the scheduled ship date. Times are not included in these calculations. |
Today/Until |
The order release process includes demand lines scheduled to ship today until the specified time. |
Order Release Group/Order By
Specify up to three sort levels for the order release and picking plan report. For each level, indicate whether the results should appear in Ascending or Descending order.
Field or Control |
Description |
|---|---|
New Page |
Select this check box to insert a page break at this sort level. |
New ID |
Select this check box to create a new pick plan ID at the first sort level |
Allow Split |
If using processing groups, this check box controls how the processing group is split. If you do not select this check box, then the processing group includes all demand lines within the selection criteria until there is a break in the first sort order key. If you do select this check box, then the processing group count is strictly maintained and a separate processing group is created for additional demand lines even though a break in the first sort key has not been reached. |
Print Kit Header |
Select this check box to include a product kit subheading on the picking plan report. When your demand lines contain kit components, the pick plan report generates a subheading with the product kit ID, description, and any other information common to all the kit component demand lines. The kit component demand lines are grouped below the kit heading and include the item's quantity and UOM to be applied per kit assembled or order (quantity per information); for example, 1 EA per ASY. In addition, if you have selected the Print All Quantity Fields value in the Print Pick Quantity Only field on this page, then the Kit Quantity Requested is printed in the kit header. This value is the total number of product kits requested on the order line. If you do not select this check box then the product kit ID and description are printed within the item's pick line. This check box is only available if you have selected Parent Product ID (product kit ID) for any of the three Sort Order fields. |
The selections here become the defaults on the Order Release Request process page.
Default Order Release Actions
This group box enables you to define parameters to default to the Order Release Request process page.
Field or Control |
Description |
|---|---|
Action |
Defines the action to be taken by the Order Release process. The options are:
|
Picking Plan |
Select to generate the Picking Plan (SQR) report. |
Carton Labels |
Select to create shipping carton labels automatically when run the Order Release process. These labels (which can be applied to each carton) enable you to provide shipping information for shipping personnel and carriers, build shipping containers, and provide customer-specific information identifying items within the cartons. Additional parameters for the shipping carton labels are defined on the Setup Fulfillment-Pick Plan Label page in this component. |
Create Extract File |
Select to create an extract file containing information generated by the Order Release process. This is an optional file that is sorted according to the options specified on the Order Release Group/Order By group box on this page or the Order Release Request process page. The file can be downloaded into an electronic data collection system that allows bar code-driven picking. |
Item Usage Labels |
Select to create item usage labels automatically when you print the picking plan. These labels aid in the tracking of material usage. Define file parameters on the Setup Fulfillment-Pick Plan Label page in this component. |
Shipping Order Release |
Select to generate the Shipping Order Release EIP. The sort selections available on this page do not control the sequence of the orders in the shipping order release message. Order data in the order release message sent to the third-party system is separated into logical orders based on breaks in the following sort sequence: business unit, demand source, source business unit, order number, customer ID, ship to ID, address sequence code, carrier ID, and ship via. If the address information for an order is modified before order release, the address fields are added to the sort sequence. |
Auto Pick |
Select this check box when using the action Create Allocations to automatically set the Confirm Flag to yes. If the confirmed flag is set to yes, then the line can advance to a confirmed, shipped, or depleted state without going through picking feedback. |
Select Orders Options
Field or Control |
Description |
|---|---|
Show Total Pieces |
Select to have the Order Release Selection group box of the Order Release Request page display the total number of pieces selected. |
Order Release Run Time Options
These options determine the manner in which the order release process suggests storage locations from which to pick stock. (You can override many of these rules for specific items on the Setup Item Fulfillment page.)
Field or Control |
Description |
|---|---|
Location Option |
Select a directed picking algorithm:
|
Date Option |
If you select Pick by Date in the Location Option field, select one of these options: Earliest Available Lot (FIFO): Pick from locations containing lots with the earliest creation dates. Earliest Expiration Date (FEFO): Pick from locations containing lots with the earliest expiration dates. Earliest Staged Date (FIFO): Pick from locations containing items with the earliest staged dates. Latest Staged Date (LIFO): Pick from locations containing items with the most recent staged dates. |
Tiebreaker |
If you select Container Option, Pick by Date, or All Available Locations in the Location Option field, specify a tiebreaker to be used when multiple storage locations qualify for picking: FL (fewest locations): Pick from the fewest locations possible, beginning with those containing the most available quantity. PC (pick to clear): Empty locations whenever possible, beginning with those containing the least available quantity. |
Picking Notes |
If you select the Picking Plan check box to generate the picking plan SQR report, then you can select a message to print at the top of each page of the Picking Plan report: Broken Pallet First: Instructs the picker to pick any broken pallets first. Largest Batch First: Instructs the picker to pick the largest batch first. None: No message prints. Smallest Batch First: Instructs the picker to pick the smallest batch first. |
Shortage Release Option |
Select a shortage release option for situations where there is not enough available stock to fulfill the planned release quantity. Shortage release options are:
|
Print Pick Quantity Only |
For each demand line, select to print all the quantity fields on the pick plan or just the pick quantity. |
Pick Quantity Option |
Select the pick quantity that should appear on the picking plan. Options are:
|
Output Destination Type |
Identify the type of output for your picking plan. Options are Email, File, Printer, Web, or Window. This option is used if you do not select the Order Release process from the PeopleSoft Process Scheduler page. |
Output Destination Format |
Identify the type of format for your picking plan. Options vary depending on the Output Destination Type chosen. This option is used if you do not select the Order Release process from the PeopleSoft Process Scheduler page. |
Output Destination |
Enter the directory into which you want to save the picking plan. This option is used if you do not select the Order Release process from the PeopleSoft Process Scheduler page. |
Use Fixed Pick Workflow |
Select if you are using the Fixed Pick Location algorithm and you want the picking plan to initiate the Fixed Pick workflow automatically whenever there is insufficient quantity in the fixed picking locations to fulfill an order. Click the Assign Role link to create a route control profile for the workflow. |
Allow Picking from Containers |
Select to pick from any type of storage container. This check box is automatically selected when you choose Container Option in the Location Option field; for all other values for the Location Options field selecting this check box is optional. |
Generate Location Detail |
If the Use External Warehouse Control option is active for the business unit on the Inventory Definition-Business Unit Options page, select to include storage location information when the Warehouse Management System (WMS) application sends order transactions for an allocated order release (push picking plan) to PeopleSoft Inventory. |
Print Substitutes |
Select this option to print substitutes on picking plan. |
Print Option |
Print option is displayed only when the Print Substitutes option is selected. The print options are Print All the Time, Print At Partial, and Print At Zero.
|
Order Unit of Measure |
Select if you are using either the Default Putaway Location or Fixed Pick Location value for the Location Option field and you want the picking plan to search for a picking location in which the stocking UOM matches the ordering UOM. |
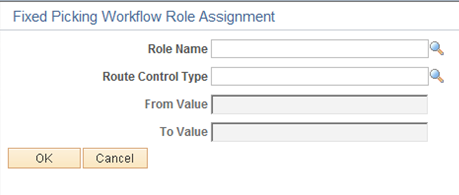
Use the Fixed Picking Workflow Role Assignment page (FPB_ROLENAME_INV, FPB_ROLE_IT_INV) to create a route control profile for the Fixed Pick workflow.
Navigation:
Click the Assign Role link on the Setup Fulfillment-Order Release page or the Setup Item Fulfillment page.
This example illustrates the fields and controls on the Fixed Picking Workflow Role Assignment page. You can find definitions for the fields and controls later on this page.
Field or Control |
Description |
|---|---|
Role Name |
Indicate who should be notified when the Fixed Pick workflow is activated. The role that you assign refers to a type of position—a supervisor or manager, for example—rather than an individual person. |
Route Control Type |
Specify the level of your organizational structure to which the workflow should be directed. You could, for example, indicate that the workflow affects supervisors at the business unit level. |
From Value and To Value |
Use to narrow the route control selection. For example, you could specify that the workflow affects only supervisors in a particular business unit. |
Use the Setup Fulfillment-Electronic Fulfillment page (OF_SETUP3_INV) to establish default electronic data collection options for the picking plan, bills of lading, and packing slips.
Navigation:
This example illustrates the fields and controls on the Setup Fulfillment- Electronic Fulfillment page. You can find definitions for the fields and controls later on this page.
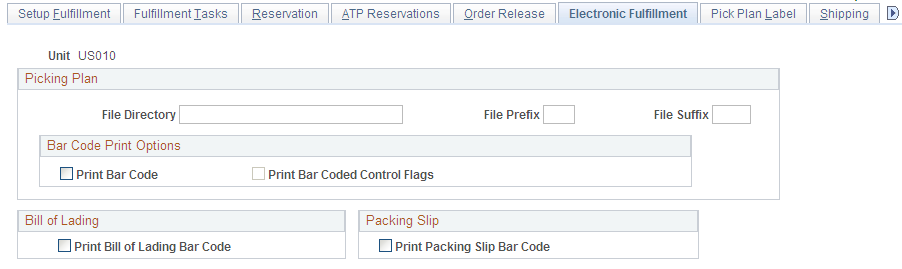
Picking Plan
Select the Create Extract File check box on the Setup Fulfillment-Order Release page to create an extract file from the Order Release process for downloading into an electronic data collection system.
Field or Control |
Description |
|---|---|
File Directory |
If you create an extract file, enter the directory into which you want to save the file. |
File Prefix and File Suffix |
The file prefix and suffix, combined with the Picking Extract File ID, create the picking extract file name. The file name has an xxxyyyyyzzzz format, where xxx is the file prefix, yyyyy is the Picking Extract File ID, and zzzz is the file suffix. For example, if the file prefix is PIK and the suffix is .PLN, the flat file generated by Picking Extract File ID 12345 is named PIK12345.PLN. |
Bar Code Print Options
Field or Control |
Description |
|---|---|
Print Bar Code |
Select to print Code 128-formatted bar codes on the Picking Plan report so that these bar codes can be scanned during the picking process. A bar code containing the pick batch line number and the five optional bar code scanning control flags prints next to the Pick Batch ID (located in the report's header) and on each detail line. |
Print Bar Coded Control Flags |
Select to attach an item's control flags to the bar code printed on each line of the Picking Plan report. These control flags enable the electronic data collection system to prompt for the lot ID, serial ID, staged date, or shipping serial ID immediately after the user scans the bar-coded line number field. For cases that do not require control flags (for example, when you are using a wedge to scan the pick batch ID or pick batch line number bar codes directly into the Inventory Picking page, you might prefer not to select this check box. The format for the bar code printed for each detail line is LSDAH:99999, where:
Note: PeopleSoft Inventory delivers printer settings for all SQR output to a generic line printer. However, when printing bar coded information on reports on a PCL printer (HP Laser Jet), you must first define the printer type accordingly. You may do this by changing the printer type settings delivered in SETENV.SQC from LINEPRINTER to HPLASERJET. |
Bill of Lading
Field or Control |
Description |
|---|---|
Print Bill of Lading Bar Code |
Select to print a bar code on the Bill of Lading report. A single bar code containing the business unit and bill of lading number prints to support the InterUnit Receipts electronic data collection transaction. |
Packing Slip
Field or Control |
Description |
|---|---|
Print Packing Slip Bar Code |
Select to print bar codes on the Packing Slip report. A bar code containing the business unit, interunit ID, interunit line, and destination business unit prints on each detail line of the report to support the InterUnit Receipts electronic data collection transaction. |
Note: PeopleSoft SCM applications do not support the printing of bar codes from processes running on OS390 servers. You should run your SQRs that print barcodes on a process scheduler server that is running on a non-OS390 operation system.
Use the Setup Fulfillment-Pick Plan Label page (OF_SETUP4_INV) to establish default bar coding options for generating carton and item usage labels.
Navigation:
This example illustrates the fields and controls on the Setup Fulfillment- Pick Plan Label page. You can find definitions for the fields and controls later on this page.
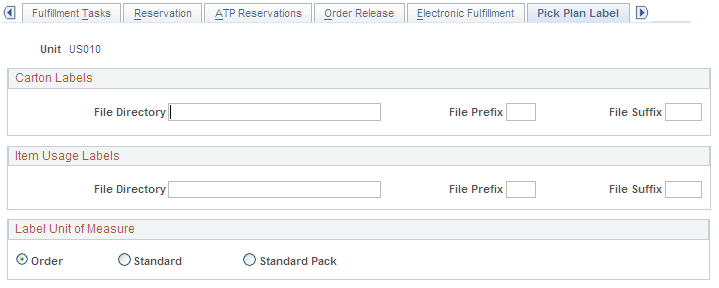
Carton Labels
Select the Carton Labels check box on the Setup Fulfillment-Order Release page to create shipping carton labels automatically from the Order Release process.
Field or Control |
Description |
|---|---|
File Directory |
Enter the file directory into which you want to save the shipping carton labels extract file. |
File Prefix and File Suffix |
Enter the file prefix and suffix, which combined with the last five digits of the process ID, create the default extract file name. If you want a period as part of the suffix, you must include it in the field. |
Item Usage Labels
Select the Item Usage Labels check box on the Setup Fulfillment-Order Release page to create item usage labels automatically from the Order Release process.
Field or Control |
Description |
|---|---|
File Directory |
Enter the file directory into which you want to save the item usage labels extract file. |
File Prefix and File Suffix |
Enter the file prefix and suffix, which combined with the last five digits of the process ID, create the default extract file name. If you want a period as part of the suffix, you must include it in the field. |
Label Unit of Measure
If you are generating carton labels or item usage labels, select a UOM (Order, Standard, or Standard Pack) to determine how many labels to print. The number of labels printed depends upon how you defined the units of measure when you set up the item.
Use the Setup Fulfillment-Shipping page (OF_SETUP6_INV) to define default shipping options.
Navigation:
This example illustrates the fields and controls on the Setup Fulfillment- Shipping page. You can find definitions for the fields and controls later on this page.

Shipping
Field or Control |
Description |
|---|---|
Ship Preparation Time [Min] (shipping preparation time in minutes) |
Enter the average amount of time required to prepare shipments. PeopleSoft Supply Planning uses this value to account for the time that it takes shippers in the business unit to pick and pack items when creating planned supply orders. This field is hidden if PeopleSoft Supply Planning is not installed. |
Route Close Time |
If the business unit uses transportation routes, indicate what time routes should close each day. This time becomes the default closing time on the Route Calendar page. This field is available only if you have selected the Use Routes check box on the Inventory Definition - Business Unit Options: Shipping Options page. |
Route Stop Increment |
Determine the intervals by which route stop numbers should increase when new stops are added on the Assign Route Stop page. This field is available only if you have selected the Use Routes check box on the Inventory Definition - Business Unit Options: Shipping Options page. |
Default Ship Location Option
Define the default ship location that can be used as the picking location instead of the directed picking algorithms by selecting the Default Shipment Location option in the Location Option field of the Setup Fulfillment-Order Release page. This option selected here is used as the default ship location if no business unit/item value is enter on the Setup Item Fulfillment-Shipping Options page.
Field or Control |
Description |
|---|---|
Default Ship Staging Location |
Use the ship staging location defined for the business unit defined on the Default Ship Staging Location page. |
Default Cross Docking Location |
Use the default cross docking location defined for the business unit on the Default Cross Dock Locations page. The system looks first for an owned location. If none is defined, then the system looks for a non-owned location. |
Default Putaway Location |
Use the default putaway location defined for the item and business unit combination on the Default Putaway Locations page. The system looks first for an owned putaway location. If none is defined, then the system looks for a non-owned putaway location. |
Default Fixed Picking Bin Loc (default fixed picking bin location) |
Use the fixed picking locations defined for the item and business unit combination on the Fixed Picking Locations page. The system selects the location with lowest pick order number. For example, it selects a location with the pick order number 1 before a location with the pick order number 2. |
Default Pegging Location |
Use the putaway location for incoming pegged supply defined by business unit and item ID on the Default Putaway Locations page. If no location is specified on the Default Putaway Locations page, then the system the Default Pegging Putaway Location Details page defined by business unit. The system looks first for an owned location. If none is defined, then the system looks for a non-owned location. |
Manually Entered Location |
Enter a default picking location in the Storage Loc fields. |
Note: Before choosing a default ship location, verify that the location is not suspended or on hold
Depletion
Field or Control |
Description |
|---|---|
Run Direct Invoicing |
Select to have the Deplete On Hand Quantity process automatically create a scheduled process to run the direct invoicing job in PeopleSoft Billing to create invoices for the shipped stock. Invoices are only created for sales order from PeopleSoft Order Management and interunit transfers. This check box also applies when the auto-processing option advances demand lines to the depleted state. Note: In order to launch direct invoicing from the Shipping/Issues component or the Express Issues page, you must also select the Auto Process at Save check box on the Fulfillment Engine Options page (business unit or SetID level). Selecting the Deplete On Hand Qty link or the Run Process link will not launch direct invoicing. |
Verify Ship Date/Time
Field or Control |
Description |
|---|---|
Verify Ship Date |
Select to verify the ship date on the Shipping/Issues component and the fulfillment engine shipping transactions. The system will not allow the shipment of a demand line that does not have a Scheduled Ship Date less than or equal to the current date. If the Ship Prior to Schedule Date check box is selected on the order, then the Earliest Ship Date field would also be evaluated. The order would not be allowed to ship unless the current date was the same or after the Earliest Ship Date. |
Verify Ship Time |
Select the verify the ship time as well as the ship date. This check box is only available if you have selected the Verify Ship Date check box. If this check box is selected then both the scheduled ship date and scheduled ship time are looked at when determining whether or not demand lines can ship. If the Ship Prior to Schedule Date check box is selected on the order, then both the Earliest Ship Date and Earliest Ship Time fields would be compared to the current date. |
Counter Sale Storage Location
If PeopleSoft Order Management is installed, define a Shipping Storage Location for the business unit. When sales associates are entering counter sales into the system, the shipping storage location populates as the material storage location from which to allocate, pick, and ship. The shipping storage location defined on this page (business unit level) is used if no business unit/item value is enter on the Setup Item Fulfillment-Shipping Options page.
Shipping Documents
PeopleSoft Inventory gives you the ability to print shipping documents at any time in the fulfillment cycle, including prior to shipment. This enables you to generate and review your shipping documents before the material actually leaves your premises. The following check boxes control the early printing of shipping reports.
See Generating Shipping Documents Before Shipment.
Field or Control |
Description |
|---|---|
Allow Printing Before Shipping |
Select this check box to enable users to print shipping documents before the demand lines are in the fulfillment states of Shipped or Depleted. |
Alert User if Shipment Changes |
Select this check box to have the system notify you when shipping documents printed early in the demand fulfillment cycle no longer match the demand line information at shipment time. The warning is generated during shipping from the Shipping/Issues component, the Front-End Shipping Request process page, and the Shipping Requests process page. Warnings are also generated from the Ship ID Maintenance Page when adding or removing demand lines, or when the user opens a ship id and clicks the Validate Shipment button. The warnings can be viewed on the Message Dashboard, a user's worklist, or sent as an email to the appropriate user. The inventory shipping document tracking table (IN_SHIP_DOC_TRK) collects the shipping information about a demand line that is printed early in the demand fulfillment cycle. This information is compared to the current shipping data at the time of shipment. |
Clear Tracking Info at Deplete |
Select this check box to purge the shipping information in the inventory shipping document tracking table (IN_SHIP_DOC_TRK) once the demand line have been depleted. This option maintains this table by deleting unnecessary information. |
Defer Depletions
Using the Defer Depletions feature, you can delay the billing and costing of inventory shipments until you have completed any non-system procedures, such as obtaining signed deliver receipts from your customer or other needed paperwork. See the "Shipping Inventory" topic, "Delaying the Billing and Costing of Inventory Shipments" section for a complete description of this feature. In this group box, you can define the business unit level options for the Defer Depletions feature.
Field or Control |
Description |
|---|---|
Defer Depletions Default |
The options are:
|
Allow Defer Depletion Override |
Select this check box to allow users to change the value in the Defer Depletions field on the demand lines. The user could override the Defer Depletions setting on several pages within the demand fulfillment cycle, including the; Material Picking Feedback page, Picking Confirmation process page, Shipping/Issues - Order Summary, Shipping Requests process page, Front-end Shipping Requests process page, Express Issue-Detail Override/Exceptions page, and on the header, group, and detail sections of the Fulfillment Workbench. The Defer Depletion field would also be available on the messages used by PeopleSoft Integration Broker for shipping. Clear this check box to prevent users from changing the default value in the demand line's Defer Depletions field. |
See Delaying the Billing and Costing of Inventory Shipments.
Use the Setup Fulfillment-Transportation Interface page (OF_SETUP7_INV) to define default options for integration with a transportation management system.
Navigation:
This example illustrates the fields and controls on the Setup Fulfillment- Transportation Interface page. You can find definitions for the fields and controls later on this page.
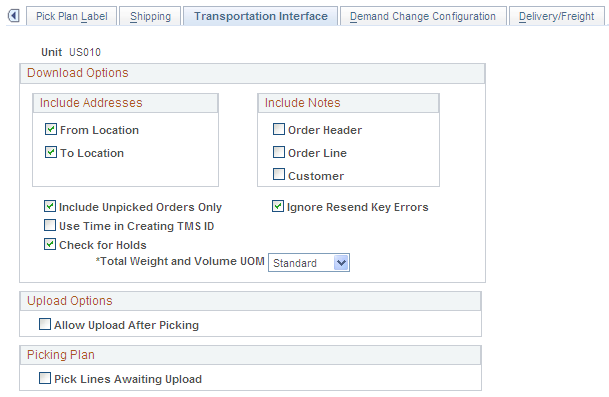
The Download Options group box determines the message structure when using the TMS_ORDER_RELEASE EIP.
The Upload Options group box determines the message rule when using the TMS_LOAD_NOTIFICATION EIP.
Field or Control |
Description |
|---|---|
Include Addresses |
Select these options if you want the from and to Location (of the order line) to be part of the download file from PeopleSoft Inventory to TMS. These are optional fields because the information may already be on the TMS. If these options are not selected, and the order line has an override address, the override address is sent to the TMS. |
Include Notes |
Select these options if you want the notes that are attached to a sales order (from PeopleSoft Order Management only) to be part of the download message. Any note with a note type of BOL (bill of lading) and Picking will be included in the download. Custom notes will override standard notes during the selection process. Select Order Header to include order header notes at the shipment header level. Select Order Line to include product notes, schedule notes, and line notes. Select Customer to include customer notes at the shipment header level. |
Include Unpicked Orders Only |
Select this option to download order lines that have been reserved, but not picked. |
Ignore Resend Key Errors |
Select this check box to have the system ignore errors that may occur during a resend due to a change in a primary field, such as the schedule date, the destination location, the carrier, and so on. |
Use Time in Creating TMS ID |
Select this option if the time of the order line should be considered when distinguishing between TMS IDs. For example, let's say that an order has two order lines on it: one with a time of 10:00 and the other with a time of 10:05. If this option is selected, the system creates two shipments. |
Check for Holds |
Select this option to prevent demand lines that have a status of Hold, from being sent to the TMS. |
Total Weight and Volume UOM (total weight and volume unit of measure) |
Select the option that determines how the business uses UOM as it relates to ordering, packing, and shipping. Select one of these options: Select Order if you want the message to send the UOM in which the order was ordered. Select Pack if you want the message to send the UOM that is defined in the Standard Pack Unit of Measure field on the Business Unit Item Definition-Inventory: Shipping/Handling page. Select Standard if you want the message to send the standard UOM, which is the lowest UOM. |
Allow Upload After Picking |
Select this option to indicate that the upload process can occur after the picking process. |
Pick Lines Awaiting Upload |
Select this option to indicate that the Order Release process will select lines that have been downloaded to the TMS and are waiting to be uploaded to PeopleSoft Inventory tables. Remember that the TMS ID is assigned during the download process; therefore, you can pick using the TMS ID. If demand lines have not been sent to the TMS, this value will not influence the Order Release selection process. You can override this option on the Order Release Request process page. |
Note: These fields work together when determining at which stage of the fulfillment process that you will download from PeopleSoft Inventory to the TMS, and upload from the TMS to PeopleSoft Inventory: Include Unpicked Orders Only, Allow Upload After Picking, and Pick Lines Awaiting Upload.
Use the Setup Fulfillment- Demand Change Configuration page (OF_SETUP9_INV) to configure the ability to change fields on a sales order during the fulfillment process.
Navigation:
During inventory fulfillment, any changes to sales order entered in PeopleSoft Order Management must conform to the Demand Change Configuration parameters. The Setup Fulfillment- Demand Change Configuration page enables the user to change some of the system-defined default values to control which fields are restricted and when they are restricted within the Inventory business unit.
Use the Setup Fulfillment-Delivery/Freight page (OF_SETUP10_INV) to use this page to setup delivery management and freight features for the PeopleSoft Inventory business unit.
Navigation:
This example illustrates the fields and controls on the Setup Fulfillment-Delivery/Freight page. You can find definitions for the fields and controls later on this page.
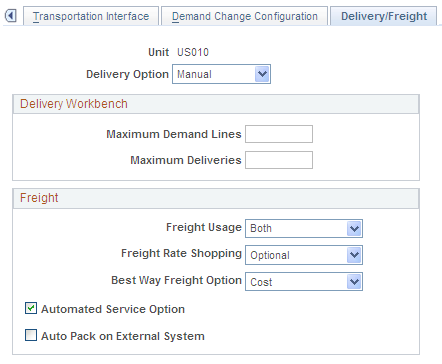
The delivery management and freight calculation features in PeopleSoft Inventory enable you to group items for shipment and apply freight charges. The freight feature applies only to sales orders and quotes from PeopleSoft Order Management. Use this page to enable delivery management for the Inventory business unit and to define options for the delivery and freight features within this Inventory business unit. For further information, see the "Setting Up Delivery Management and Freight Calculations" topic of the PeopleSoft Supply Chain Management Common Information .
See Understanding PeopleSoft Delivery Management and Freight Calculations.
Field or Control |
Description |
|---|---|
Delivery Option |
Use this option to determine if delivery IDs should be created when the ship ID is saved on the Shipping/Issues component or in the shipping processes. The options are:
|
Delivery Workbench group box
Use this group box to define the maximum number of rows that should be displayed on the Delivery Management Workbench pages. The rows are displayed as search results based on your search criteria. If your search criteria are too broad, then too many rows could be brought into the workbench, resulting in slow performance and unmanageable results.
Field or Control |
Description |
|---|---|
Maximum Demand Lines |
Enter the maximum number of demand line rows that can be displayed on the Delivery Management workbench pages. A blank field means there is no limit. |
Maximum Deliveries |
Enter the maximum number of delivery rows that can be displayed on the Delivery Management workbench pages. A blank field means there is no limit. |
Freight group box
Field or Control |
Description |
|---|---|
Freight Usage |
Select the type of freight calculation to be done in combination with the Carrier ID table's Freight supplier field. The options are:
The Freight Usage field is located both on this page (Setup Fulfillment-Delivery/Freight page) for inventory processes and on the Shipping and Returns page within the Order Management business unit definition for order management processes. |
Freight Rate Shopping |
(External third-party freight only) Identify whether the interfacing third-party freight provider allows rate shopping from the Delivery Management Workbench. Rate shopping enables a user to choose which freight carrier and freight charges to use on the delivery based on the choices retrieved from the external third-party freight provider. This method displays the Freight Results page for users to view, evaluate, and select the best freight carrier for their needs. Rate shopping can be performed from the Order Entry Form in PeopleSoft Order Management and from the Delivery Management Workbench in PeopleSoft Inventory. In addition, freight rate shopping can be performed for a quote. The option are:
The Freight Rate Shopping field is also located on the Shipping and Returns page of the Order Management business unit definition; however, the order management field only applies to rate shopping at order entry time (Order Entry Form component). The field on this page is used to determine rate shopping from the Delivery Management Workbench in PeopleSoft Inventory. |
Best Way Freight Option |
(External third-party freight only) Select a best way freight option to default to the Delivery Management Workbench in PeopleSoft Inventory. The system sends a best way request to the external third-party provider system. The best way option is only used if the carrier on the delivery is blank. The options are:
The Best Way Freight Option field is also located on the Shipping and Returns page of the Order Management business unit definition; however, the order management field only applies at order entry time (Order Entry Form component) and the Order Completion process. The field on this page defaults to the Delivery Management Workbench in PeopleSoft Inventory. |
Automated Service Option |
(External third-party freight only) Select this check box in order to send freight service definition information on the transaction requests between PeopleSoft and the external third-party freight system. A freight service definition provides a cross-reference between the combination of the PeopleSoft fields of Carrier ID, Ship Via, and Freight Type Code to the same information within the third-party freight system. The freight service definitions are created by the external third-party freight system and then entered on the Maintain Freight Services page in PeopleSoft. |
Auto Pack on External System |
(External third-party freight only) Select this check box to indicate that the third-party freight provider should automatically consolidate individual demand lines in a delivery into packages. The third-party system will return freight for the packages. Some third-party freight providers have functionality to automatically combine loose stock into packages based on packaging algorithms. This field can be used to tell the third-party system to use these routines to estimate how many packages and the weight and volume of these packages for freighting purposes. If the Auto-Pack External System check box is not selected then the third-party freight system would assume that each individual quantity in the shipping unit of measure is a packaging unit. This check box is also located on the Setup Item Fulfillment page. A value at the item-level override the value selected here. |