- Using B2C Service
- Add an HTML Answer in Design Mode
Add an HTML Answer in Design Mode
Design mode lets you create dynamic, well-formatted answers without previous HTML experience.
- Do one of the following:
From an open answer report, click New.
If your navigation set is configured to add answers from the file menu, click File and select Answer. See Configure the File Menu.
The New Answer editor displays.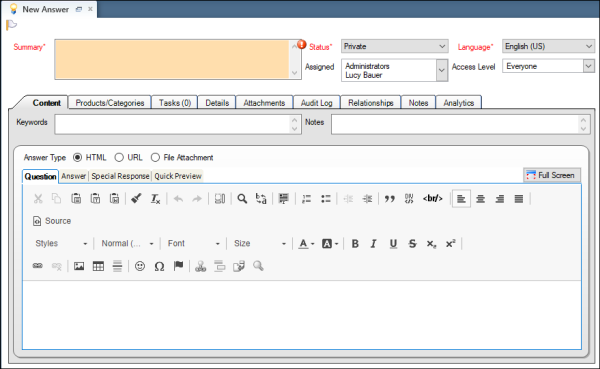 By default, the Content tab is active and the HTML answer types is selected.
 -
Enter the subject of the answer in the Summary field.
This field displays as the subject of the answer on the customer portal.
-
Use the HTML editor to add the question portion of the answer. By default, the Question
tab is active.
Options available on the toolbar let you do the following:
-
Cut, copy, and paste.
-
Search for text.
-
Undo and redo changes.
-
Format text with bullets or numbered lists.
-
Adjust indentation.
-
Center, left-justify, or right-justify text and images on the page.
-
Change the font using the system fonts, including the default font.
-
Change the font style, size, and attributes (highlighting, bold, italic, underline).
-
Apply specialized formatting, including super and subscripts.
-
Insert hyperlinks, images, tables, lines, special characters, and anchors. You can use the mouse to resize an image after inserting it.
Other options are also accessed through the toolbar.
HTML Editor Toolbar Icons
Icon Description Block Quote Click this icon to set off text as a block quote ( <blockquote>tag).Div Container Click this icon to create a DIV block ( <div>tag). You can insert new lines and line breaks between DIV containers.Line break Click this icon to insert a line break ( <br/>tag).Source Click this icon to switch between source and design mode. In source mode, most of the toolbar icons are unavailable. Link Click this icon to insert a hyperlink. See Insert a Hyperlink. Unlink Click this icon to remove a hyperlink. Image Click this icon to insert an image. You can use the mouse to resize an image after inserting it. See Insert an Image. Table Click this icon to insert a table. See Insert a Table. Horizontal Line Click this icon to insert a horizontal line. Smiley Click this icon to open the Insert a Smiley window, and then click an emoticon to insert at your cursor position. Special Character Click this icon to use special characters in your content. Anchor Click this icon to insert an anchor in the answer. See Insert an Anchor. Answer Link Click this icon to insert a cross-reference to an existing answer. See Insert an Answer Link. Conditional Section Click this icon to insert a section with certain visibility restrictions within the answer. See Insert a Conditional Section. Smart Merge Click this icon to merge similar answers using Smart Merge. See Merge Similar Answers. Search Knowledgebase Click this icon to search for an answer in the knowledge base and append the content with the current answer. See Append Answer Content. -
- Click the Answer tab to create your answer content.
-
To add a short version of your answer, click the Special
Response tab.
If you do not enter a special response, the content you created on the Answer tab is used.
-
Click the Quick Preview tab to preview your answer
content.
Customer portal themes do not display on the Quick Preview tab. You can also preview the answer and select assigned access levels to view answer visibility by clicking Preview on the ribbon.
- To use the HTML editor in undocked, full-screen mode, click Full Screen.
- To exit full-screen mode, click Exit Full Screen.
- Click Save.
Related Topics