Workflow Actions
Actions are specific tasks performed by a workflow instance based on the properties of a record. You can use actions in workflows to change fields on a record, add or remove buttons, create new records, send email, and more. After you create a state, you choose the actions you want to execute when the record is in that state. When a record enters a state in a workflow, the workflow instance executes the actions depending on their triggers.
Each action has its own set of parameters, depending on the action type. All actions contain the following elements:
-
Action properties. Properties common to most action types. See Action Properties.
-
Trigger. The trigger determines when an action executes. See Action Triggers.
-
Conditions. The condition determine the additional requirements that must be met for an action to execute. See Action Conditions.
The following screenshot shows two actions that have been added to a state. Both actions are set to execute on the Entry trigger, or when the record in the workflow enters that state. When the record enters the state, the Department field is set to Service and an email is sent to the supervisor of the sales rep.

For a list of all actions available in SuiteFlow, see Workflow Actions Overview.
More Information about Actions
After you create an action, you can move or copy it to another state, reorder the actions on the Actions subtab, inactivate the action, and create action groups.
If the Show Internal IDs preference is enabled on your account, you can see the internal IDs for workflow actions in the following locations:
-
Workflow Execution Logs
-
Workflow Context Panel
-
Workflow Action Group Window
You can use the workflow action IDs to quickly identify every executed action in context and troubleshoot workflows. For more information about the Show Internal IDs preference, see Setting the Show Internal IDs Preference.
Use the following table to get more information about working with actions in a workflow:
|
Task |
More information |
|---|---|
|
Creating, editing, and deleting actions |
|
|
Get more information about action triggers and conditions |
|
|
Get a list of all actions |
|
|
Scheduling an action |
|
|
Creating action groups |
|
|
Moving and copying actions |
|
|
Using actions to accomplish specific tasks |
Action Examples, including the following examples: |
Action Properties
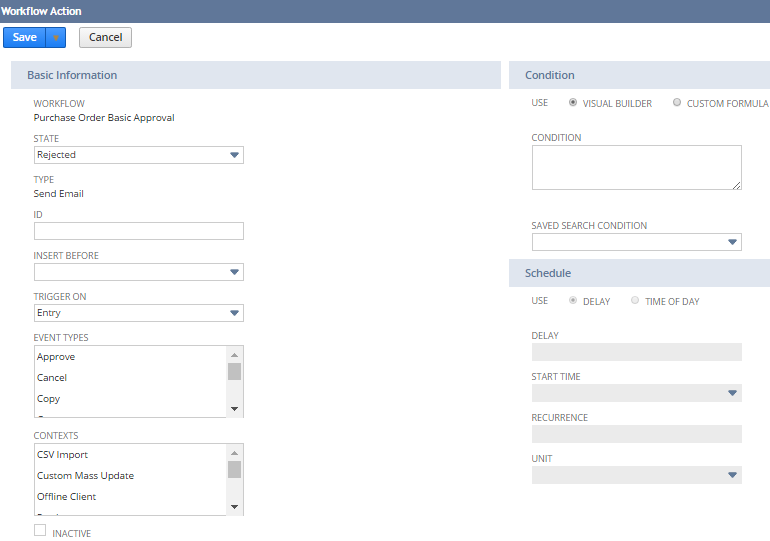
Each action type in SuiteFlow has its own specific parameters. For example, the Send Email action lets you define the sender and recipient. Most actions also have common properties you use to define how the action executes in the state where you create it.
The following screenshot shows the Send Email action properties:

For more information about each of these properties, see Creating an Action and Scheduling an Action.
Action Triggers
When a workflow instance is triggered, it always executes the actions of the current state and with the appropriate trigger(s), in order. When actions of the current state are executed, the workflow instance considers all transitions from the current state of the appropriate trigger(s), respecting their order. The first transition matching all its conditions is executed. Next, the workflow moves to the target state and continues executing actions of the target state in the same way. The workflow proceeds executing in this manner if possible. When no more relevant transitions exist, the execution session started by the original executing trigger is finished. If the workflow is in a state which has no transitions and the state is marked as Do Not Exit, the entire workflow instance is finished. Otherwise, the workflow is dormant until another trigger reactivates it.
There is no fixed order for the execution of triggers. The workflow definition and events happening on the record (load, view, save, etc.) determine when a trigger is executed.
SuiteFlow triggers are either server side or client side:
-
Client side triggers execute in the web client when a user edits the record.
Client side triggers execute in the following situations:
-
Before User Edit - when the record loads into the browser, before any changes are made to the form.
-
Before Field Edit - before a user completes changes to a field on a record form.
-
After Field Edit - after a user completes changes to a field on a record form.
-
After Field Sourcing - after all dependent field values on a record have been populated.
-
Before User Submit - after a user clicks Save on the record, before the Before Record Submit trigger executes.
-
-
Server side triggers execute in the following situations:
-
On Entry - when the record enters the state.
-
On Exit - when the record exits the state.
-
Before Load - before the record is loaded.
-
Before Submit - before the record is saved to the database.
-
After Submit - after the record is saved to the database.
-
Scheduled - when the scheduler executes the workflow based on its schedule definition. For more information, see Scheduling an Action.
-
Server side triggers can be further classified as follows:
-
Record based triggers - execute when something happens on the record - it loads, it is going to be saved, it was saved.
-
Workflow based triggers - execute when something happens on the workflow - a state is entered or exited.
-
Time based triggers - execute when the scheduled time is reached.
There are a few rules regarding the order or trigger execution:
-
When a record is going to be viewed by the user, It executes the Before Load trigger when loading the record.
-
When a record is going to be edited by the user, it first executes the Before Load trigger when loading the record, then, if the user saves the changes, it executes the Before Submit and After Submit triggers.
-
When a workflow moves from state A to state B, it first executes On Exit on state A, then it executes On Entry on trigger state B.
-
On Entry triggers do not execute on their own. They execute at the same time as the first ordered server trigger for a state, for example, the On Entry trigger executes when the workflow enters a state simultaneously with the Before Record Load trigger.
Action Conditions
Actions can execute based on a condition. If an action has a condition associated with it, the action executes only if the condition is met. You can create conditions using the Condition Builder or using custom formulas.
If you want to create multiple actions with the same set of conditions, you can use action groups. For more information, see Using Action Groups. For more information about conditions, see Workflow Conditions.
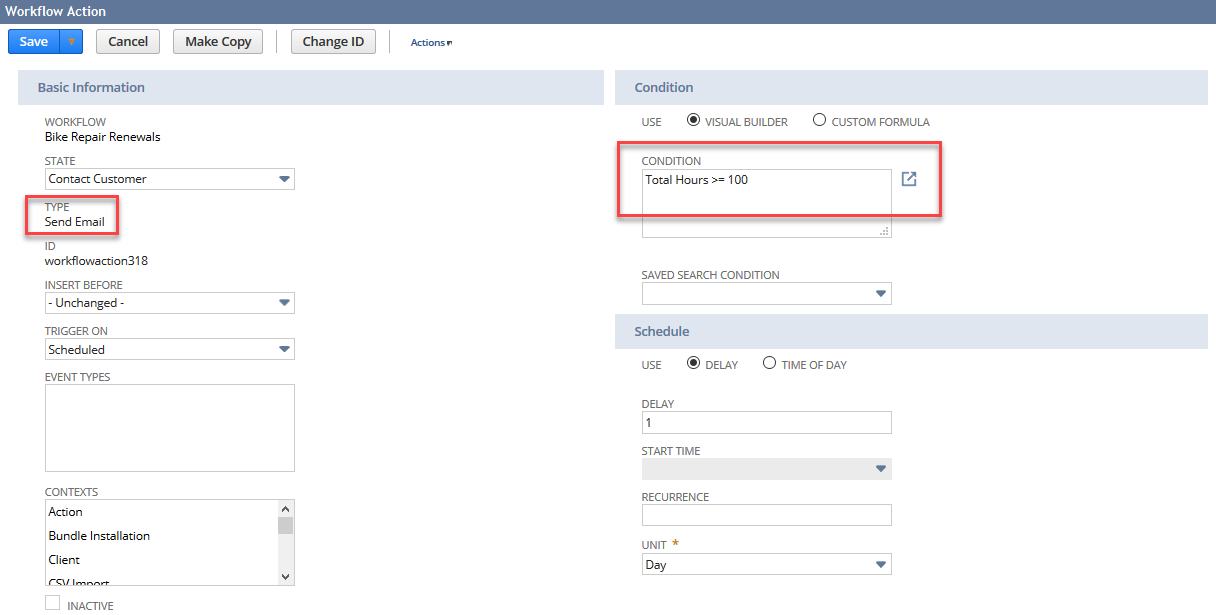
The following screenshot shows a Send Email action that will execute in one day from the time the record enters the state, if the Total Hours field on the record is equal to or greater than 100:

If an action executes on a client trigger, a custom formula must be in SuiteScript. If an action executes on a server trigger, a custom formula must be in SQL.