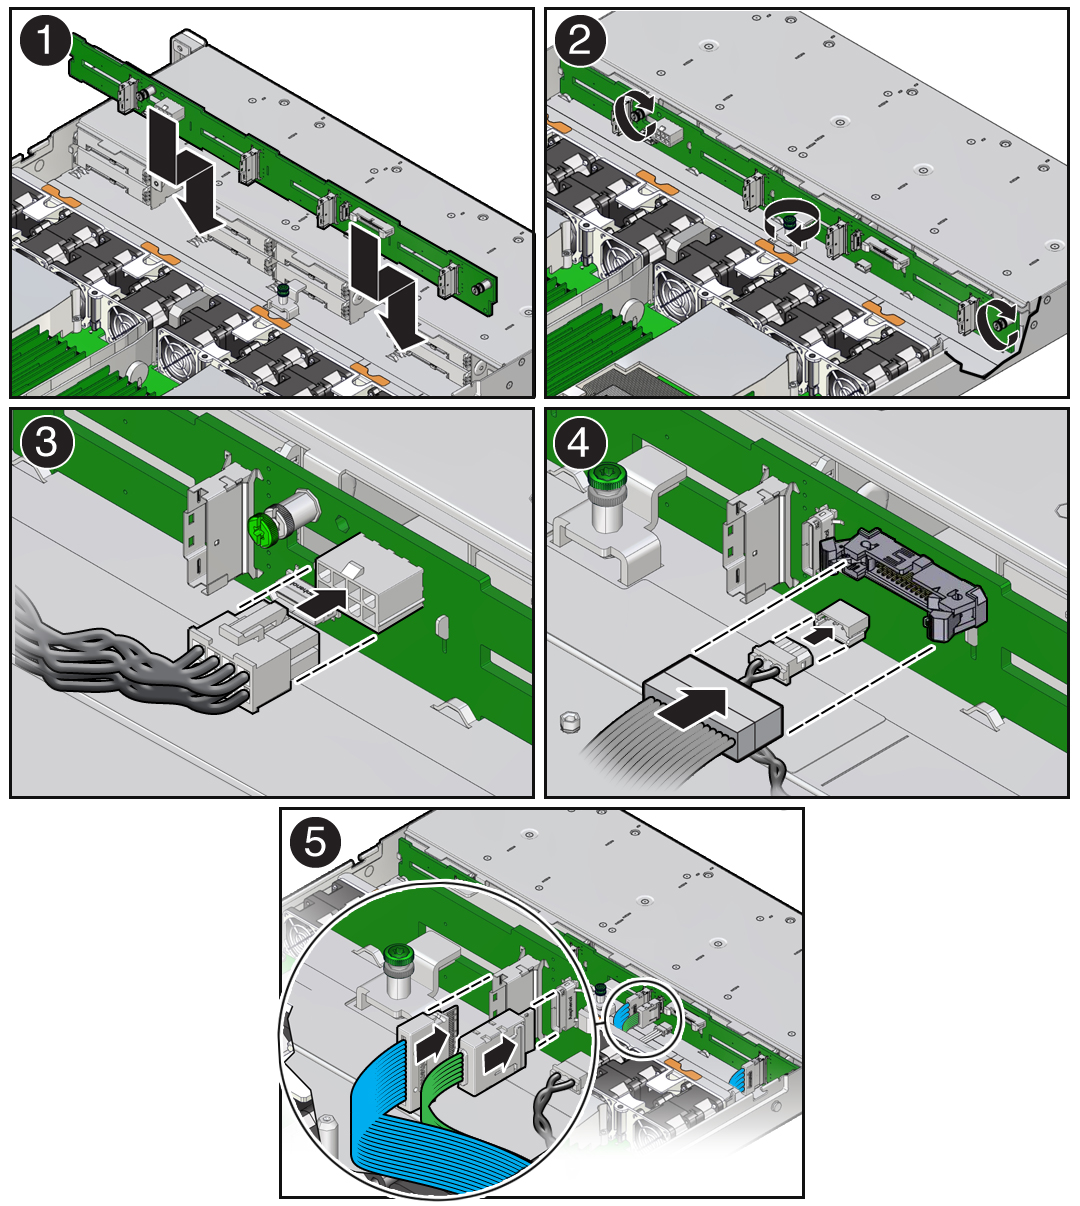
Install the Disk Backplane
-
Install the disk backplane into the server so that it engages the three metal
hooks and also sits behind the metal tab located on the right-side chassis wall
[1].

- Using a Torx T15 screwdriver, tighten the three storage drive backplane captive screws clockwise until the disk backplane is secure [2].
- Reconnect the disk backplane power cable to the disk backplane [3].
- Reconnect the disk backplane data cable and temperature sensor cable to the disk backplane [4].
- Reconnect the SAS cables to the disk backplane [5].
- Reinstall the super capacitor by pressing down on the capacitor to secure it to the reclosable fastener in the chassis.
- Reinstall all of the storage drives into the server.
-
Return the server to operation.
- Install the server top cover.
- Return the server to the normal rack position.
- Reconnect the power cords to the power supplies.
-
Connect the Oracle ILOM serial and graphics consoles to monitor the
boot process.
See Attaching Devices to the Server.
Note - By default, the Oracle ILOM serial console displays the primary console output. In the event of unexpected boot behavior, simultaneously connect both the Oracle ILOM serial and graphics consoles to monitor the boot process. -
Power on the server.
See Power On the Server.
- During the boot process, select the F2 key to enter the BIOS Setup Utility.
- Select the Boot tab.
- Confirm and set Boot Option #1 to ExadataLinux_1 or Oracle Linux (shim.efi).
- Select Save & Exit to exit the BIOS Setup Utility and reboot the server.
-
After the operating system (OS) has booted and waiting approximately
thirty (30) minutes, log in to the OS terminal and execute the
efibootmgr -v command.
Confirm that BootOrder begins with 0000 and Boot0000 is ExadataLinux_1.
For example:
      [root@ ~]# uptime
 14:29:15 up 31 min,  3 users,  load average: 0.44, 0.42, 0.48
[root@ ~]# efibootmgr -v
BootCurrent: 0012
Timeout: 1 seconds
BootOrder: 0000,0001,000B,000C,0006,0007,000F,0010
Boot0000* ExadataLinux_1    HD(2,GPT,********-****-****-****-*******
Boot0001* NET0:PXE IP4 Intel(R) I210 Gigabit  Network Connection
Boot0006* PCIE1:PXE IP4 Oracle dual 25Gb Ethernet Adapter or dual 10
Boot0007* PCIE1:PXE IP4 Oracle dual 25Gb Ethernet Adapter or dual 10
Boot000B* NET1:PXE IP4 Oracle Dual Port 10GBase-T Ethernet Controlle
Boot000C* NET2:PXE IP4 Oracle Dual Port 10GBase-T Ethernet Controlle
Boot000F* PCIE2:PXE IP4 Mellanox Network Adapter - **:**:**:**:**:**
Boot0010* PCIE2:PXE IP4 Mellanox Network Adapter - **:**:**:**:**:**
MirroredPercentageAbove4G: 0.00
MirrorMemoryBelow4GB: false
[root@ ~]#
Perform the following procedure if Boot0000 is not ExadataLinux_1.
-
Type the following commands in to the OS terminal:
# efibootmgr -c -d /dev/sda -p 2 -l '\EFI\REDHAT\SHIM.EFI' -L 'ExadataLinux_1'
# efibootmgr -o 0000
# efibootmgr -v
- Reboot the server and select the F2 key to enter the BIOS Setup Utility.
- Change the boot device order to ExadataLinux_1.
- Select Save & Exit to exit the BIOS Setup Utility and reboot the server.
-
Type the following commands in to the OS terminal:
Note - IMPORTANT: When the disk backplane is replaced, the key identity properties (KIP) of the backplane is programmed by Oracle ILOM to contain the same KIP as the other quorum member components. If you have removed other quorum member components, you might need to manually program the product serial number (PSN) into the new backplane. For more information, refer to FRU Key Identity Properties (KIP) Automated Update.