You use the targeting interface to create and edit user segments, content groups, and targeters. The chapters that follow this one give specific procedures for working with each type of item. This section provides an overview of the interface and describes key elements.
The following image shows the panels and other items that make up the targeting interface.
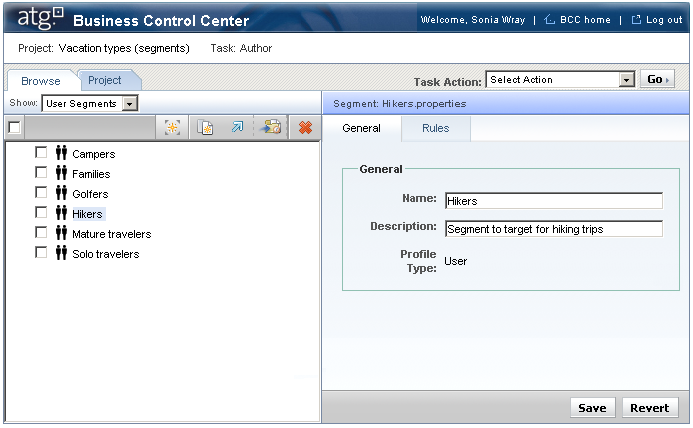
The Project title bar shows the name of the project being used to manage the creation or editing process. In this case, the project is called
Vacation types (segments). The name of the current task (in this example,Author) also appears. See Project Basics for more information.The Task Action menu contains options you can use to indicate that the current task is complete. When you have finished creating or editing all the items in the project, you use this menu to activate the next task in the project, typically Content Review.
The Browse tab displays a list of all existing items of the type indicated by the Show menu. In the illustration, six user segments appear, which represent all the segments that currently exist in the system. Important: The items in the Browse tab are not necessarily in the current project. However, any new item you create is automatically added to the project.
The Project tab shows all items that have been added to the current project. These are the items that will be deployed to the live site when the project is complete.
The icons in the Browse tab allow you to do the following:
Create a New item of the type that appears in the Show menu.
Duplicate the selected item(s). This action gives you a quick way to create several similar items. You create one, and then duplicate it as many times as needed, making appropriate changes to the duplicates. For items that have many complex rules, this technique can save time.
Move the selected item(s) to a different parent folder.
Add the selected item(s) to the current project (see Project Basics);
Delete the selected item(s).
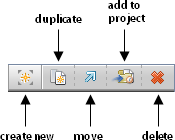
In all cases except Create New, you use the checkboxes in the Browse list to select the item or items to which you want the icon action to apply. Use the checkbox next to the icons to unselect all checked items.
The blue bar above the right pane shows the name of the current item, in this case a segment called
Hikers.properties.The General tab contains fields where you enter basic setup information for this item, such as a name and some descriptive text. The item whose information displays here is the one selected in the Browse tab -- the Hikers segment, in this example.
The Rules tab allows you to enter the detailed information that defines this item, for example the rules that make up the inclusion or exclusion criteria for a user segment. The Rules tab is described in detail later in this guide.
The Save and Revert buttons allow you to preserve or undo any changes you make to this item. Note: When you start creating a new item, a Create button appears instead of Save.
