JavaScript is required to for searching.
Skip Navigation Links
Exit Print View
Oracle ZFS Storage ZS3-ES

Installation Guide

search filter icon
search icon

Document Information

Using This Documentation

About This Documentation

Related Documentation

Feedback

Support and Accessibility

About the Installation Procedure

Installation Procedure Overview

About Server Features and Components

Server Components

Front Panel Status Indicators, Connectors, and Drives

Back Panel Status Indicators, Connectors, and PCIe Slots

Preparing for Server Installation

Shipping Inventory

Tools and Equipment Needed for Installation

ESD and Safety Precautions

Installing the Server Into a Rack

Installation Prerequisites

Rack Requirements

Safety Precautions When Rackmounting the Server

Rackmount Kit Contents

Stabilize the Rack for Installation

Install Mounting Brackets

Mark the Rackmount Location

Attach Tool-less Slide-Rail Assemblies

Install the Server Into the Slide-Rail Assemblies

Install the Cable Management Arm

Remove the Cable Management Arm

Verify Operation of Slide-Rails and CMA

Install Oracle Disk Shelves

Cabling the Server

Rear Cable Connections and Ports

Ethernet Ports

Connect Data Cables to the Server

Connect the Cluster Cables

Connect to Oracle DE2 Disk Shelves

Powering On and Initially Configuring the Server

Prerequisites

Clustering Guidelines

Power on the Oracle Disk Shelves and Servers

Configure the Primary Network Interface

Initial Configuration

Troubleshooting Installation Issues

Connecting to Oracle ILOM

Oracle ILOM Hardware and Interfaces

Network Defaults

Logging In to Oracle ILOM Using a Local Serial Connection

Logging In to Oracle ILOM Using a Remote Ethernet Connection

Troubleshooting the Service Processor Connection

Resetting the Service Processor Using Oracle ILOM

Reset the Service Processor From the Server Back Panel

Recover Root Account Password

Powering Down the Server

Graceful Server Power Down

Emergency Server Power Down Using the Power Button

Emergency Server Power Down Using the Oracle ILOM CLI

Emergency Server Power Down Using the Oracle ILOM Web Interface

Reset the Server

Use the Oracle ILOM Command-Line Interface to Reset the Server

Use the Oracle ILOM Web Interface to Reset the Server

Installation Troubleshooting

Technical Support Information Worksheet

Locating the System Serial Number

Getting Server Firmware and Software

Firmware and Software Updates

Firmware and Software Access Options

Download Firmware and Software Using My Oracle Support

Index

Remove the Cable Management Arm

Follow this procedure to remove the cable management arm (CMA).

Before You Begin

Before you begin this procedure, refer to CMA Componentsand identify CMA connectors A, B, C, and D. You should disconnect the CMA connectors in the reverse order in which you installed them, that is, disconnect connector D first, then C, then B, and finally A.


Note - References to “left” or “right” in this procedure assume that you are facing the back of the equipment rack.


Note - Throughout this procedure, after you disconnect any of the CMA four connectors, do not allow the CMA to hang under its own weight.


  1. To prevent the rack from tipping forward when the server is extended, extend all rack anti-tilt devices.

    Caution

    Caution - To reduce the risk of personal injury, stabilize the expansion rack cabinet and extend all anti-tilt devices before extending the server from the rack.


    For instructions for stabilizing the rack, see Stabilize the Rack for Installation.

  2. To make it easier to remove the CMA, extend the server approximately 13 cm (5 inches) out of the front of the rack.
  3. To remove the cables from the CMA, do the following:
    1. Disconnect all cables from the rear of the server.
    2. If applicable, remove any additional Velcro straps that were installed to bundle the cables.
    3. Unwrap the six Velcro straps that are securing the cables.
    4. Open the three cable covers to the fully opened position.
    5. Remove the cables from the CMA and set them aside.
  4. To disconnect connector D, perform the following steps:
    1. Press the green release tab (callout 1) on the slide-rail latching bracket toward the left and slide the connector D out of the left slide-rail [frames 1 and 2].

      Note - When you slide connector D out of the left slide-rail, the slide-rail latching bracket portion of the connector remains in place. You will disconnect it in the next step.


      Note - After you have disconnected connector D, you must not allow the CMA to hang under its own weight. Throughout the remainder of this procedure, the CMA must be supported until all the remaining connectors are disconnected and the CMA can be placed on a flat surface.


      Figure 19 Disconnecting Connector D
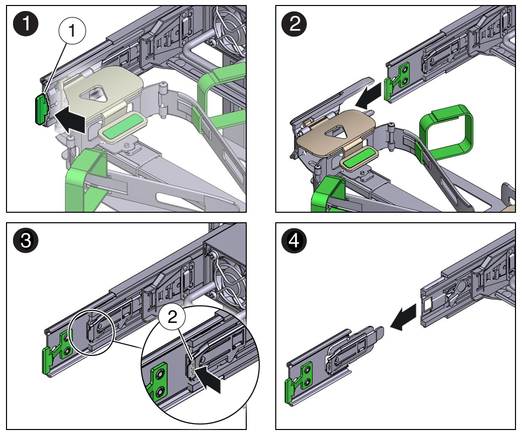
      image:Figure showing how to disconnect connector D.

      Figure Legend

      1 Connector D release tab (green)

      2 Slide-rail latching bracket release tab (labeled PUSH)

    2. Use your right hand to support the CMA and use your left thumb to push in (toward the left) on the connector D latching bracket release tab labeled PUSH (callout 2), and pull the latching bracket out of the left slide-rail and put it aside [frames 3 and 4].
  5. To disconnect connector C, perform the following steps:
    1. Place your left arm under the CMA to support it.
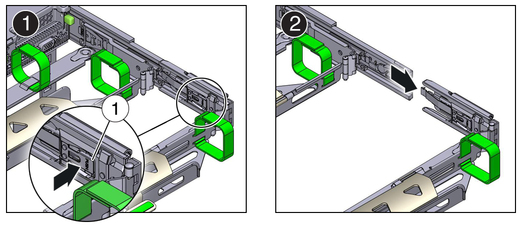
    2. Use your right thumb to push in (toward the right) on the connector C release tab labeled PUSH (callout 1), and pull connector C out of the right slide-rail [frame 1 and 2].

      Figure 20 Disconnecting Connector C

      image:Figure showing how to disconnect connector C.

      Figure Legend

      1 Connector C release tab (labeled PUSH)

  6. To disconnect connector B, perform the following steps:
    1. Place your right arm under the CMA to support it and grasp the rear end of connector B with your right hand.
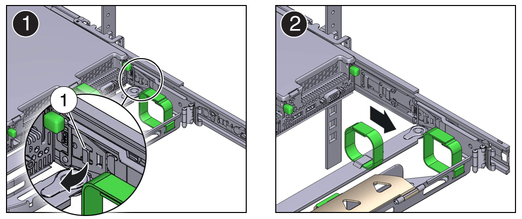
    2. Use your left thumb to pull the connector B release lever to the left away from the right slide-rail (callout 1) and use your right hand to pull the connector out of the slide-rail [frames 1 and 2].

      Figure 21 Disconnecting Connector B

      image:Figure showing how to disconnect connector B.

      Figure Legend

      1 Connector B release lever

  7. To disconnect connector A, perform the following steps:
    1. Place your left arm under the CMA to support it and grasp the rear end of connector A with your left hand.
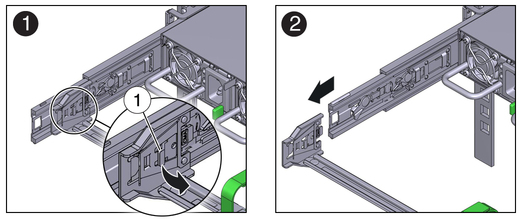
    2. Use your right thumb to pull the connector A release lever to the right away from the left slide-rail (callout 1), and use your left hand to pull the connector out of the slide-rail [frames 1 and 2].

      Figure 22 Disconnecting Connector A

      image:Figure showing how to disconnect connector A.

      Figure Legend

      1 Connector A release lever

  8. Remove the CMA from the rack and place it on a flat surface.
  9. Go to the front of the server and push it back into the rack.
Related Information

Install the Cable Management Arm