6 Managing Mobile Apps
This chapter documents Mobile App management, which includes topics such as understanding the Mobile App Catalog, how to add apps to the Secure Workspace, and how to alert users that app updates are available. It includes the following sections.
6.1 About the Secure Workspace App
System Administrators are tasked with configuring the Secure Workspace app and adding it to the Mobile App Catalog. To get started download the Oracle Secure Workspace app from eDelivery and unzip the package to a local directory. Patches are published on ARU. Instructions that document how to configure the Secure Workspace app are located in Chapter 10, "Customizing the Oracle Secure Workspace App." The default Secure Workspace app name is "Workspace," but the "Customizing" chapter documents how to change this name and make other changes, as well.
There can be only one Secure Workspace app instance defined in the catalog. To this one instance you will need to upload an iOS distribution and an Android distribution (assuming your organization supports both platforms). When you add the Secure Workspace app to the Mobile Applications Catalog, select the Secure Workspace App property on the Mobile Applications Catalog console page to indicate to the system that the app is the Secure Workspace App. For more information, see Section 6.3.3, "How to Add the Secure Workspace App to the Mobile Applications Catalog."
Note:
The Android Secure Workspace app includes an MDM agent for device management. The iOS Secure Workspace app does not include an MDM agent because Mobile Security Manager uses the native iOS MDM Agent for device management.6.2 About the Apps Bundled With the Secure Workspace
The Secure Workspace includes the following built-in apps that System Administrators can enable or disable as needed:
-
A secure web browser.
-
A mobile file manager for iOS devices. (An Android file manager is available from a third-party vendor.)
-
The app catalog.
Note:
Oracle Secure Mobile Mail Manager is a personal information manager (PIM) app that can be licensed as an add-on to the suite. The app is an OEM product from Nitrodesk/Symantec that offers e-mail, calendar, contacts, and notes functionality. For details contact your Oracle customer representative.Access to Workspace apps is managed with Mobile Security Policies (or policies for short). See Chapter 8, "Managing Mobile Security Policies" for more information.
This section includes the following topics:
6.2.1 About the Secure Web Browser
The Secure Workspace includes the Secure Web Browser to access corporate intranet resources securely. The Secure Browser ensures that all data (such as bookmarks, cookies, browsing history, and so on) are encrypted and stored within the Secure Workspace.
Secure Web Browser Configuration
You can define the following Secure Web Browser settings using policies:
-
Show or hide the Secure Web Browser in the Workspace
-
Allow or block downloading using the Secure Web Browser.
To configure these settings follow these steps.
-
Open the Mobile Security Policies page. To learn how, see Section 2.2.2, "Opening the Mobile Security Manager Console Pages."
-
Search for the policy to edit and open the Policy Management page.
-
Click Workspace > Application Settings.
-
Configure the settings:
-
To show the address bar in the Secure Browser, locate Browser and select Address Bar Enabled. Clear the option to hide the browser.
-
To allow file downloading using the Secure Web Browser, locate Browser and select Download Bar Enabled. Clear the option to disable file downloading.
-
To enter the path to the network file share, enter the URL in the File Manager Server-Based URL field.
-
Opening Protected URLs in the Secure Web Browser
You can configure the Secure Workspace to open protected URLs in the secure browser. (Or, in other words, block protected URLs from opening in an outside browser.) A protected URL is a web app that is protected behind the Mobile Security Access Server.
To configure this setting:
-
Open the Mobile Security Settings page. To learn how, see Section 11.2.2, "How to Open the Mobile Security Settings Page."
-
Click the Client Settings tab.
-
Select the Open URL in secure browser option. If you do not select this option, URLs will open in the device's default browser.
6.2.2 About the Mobile File Manager
The Mobile File Manager app for iOS allows users to navigate a network file share from the Secure Workspace and, depending on permissions, download files. The app uses WebDAV to communicate directly to any WebDAV compliant file share. The Mobile File Manager Server converts WebDAV to CIFS to communicate with CIFS shares like Microsoft file shares.
Note:
The Mobile File Manager app included with OMSS supports iOS only. For Android devices, a WebDAV client is available from a third-party vendor. For details, contact your Oracle customer service representative.To create a network file share, you or another admin can create a Shared Folder app on the Mobile Security Manager server that the Mobile File Manager app can connect to. For more information, see Section 6.3.5, "Adding Virtual Apps."
Mobile File Manager Configuration
You can define the following Mobile File Manager settings using policies:
-
Permission to use the Mobile File Manager app
-
Permission to download files and save them locally
-
The URL of the service that provides access to network file shares
To configure these settings follow these steps.
-
Open the Mobile Security Policies page. To learn how, see Section 2.2.2, "Opening the Mobile Security Manager Console Pages."
-
Search for the policy to edit and open the Policy Management page.
-
Click Workspace > Application Settings.
-
Configure the settings:
-
To give users full access to the Mobile File Manager app, locate File Manager and select Allow. Clear the option to restrict access.
-
To allow users to download files and save them locally, locate File Manager and select Download Allowed. Clear the option to restrict the user from downloading and saving files.
-
To enter the path to the network file share, enter the URL in the File Manager Server-Based URL field.
Figure 6-1 To configure the network file share, enter the URL in the File Manager server based URL field
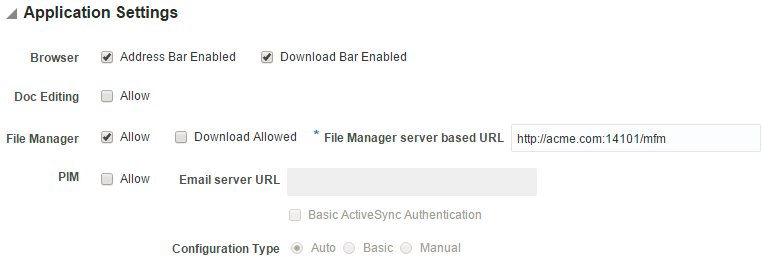
Description of ''Figure 6-1 To configure the network file share, enter the URL in the File Manager server based URL field''
-
Mobile File Manager Authentication Settings
Configure Mobile File Manager authentication settings on the Mobile Security Manager Settings page:
-
Open the Mobile Security Settings page. To learn how, see Section 11.2.2, "How to Open the Mobile Security Settings Page."
-
Click the Server Settings tab.
-
Configure the settings in the File Manager Settings section.
See Section 11.2.4.3, "Configuring Mobile File Manager Authentication Settings" for details.
6.2.3 About the Secure White Pages App
The Secure White Pages App is an iOS and Android mobile corporate directory app that interfaces with existing LDAP directories and can be containerized and deployed as part of the Secure Workspace. The White Pages app only supports OAM-based authentication and is only applicable for OAM deployments.
This app is tightly coupled with Oracle Access Management Mobile and Social. Even though Mobile and Social can be configured to use Active Directory directly, it performs a bind/compare for authentication. Kerberos is not supported.
6.2.3.1 Configure the Secure White Pages App
Before you begin - Verify that Oracle Access Management OAuth Services is enabled and that an Identity Domain is configured. See Configuring OAuth Services for more information.
-
In a browser window, open the Oracle Access Management console using the appropriate protocol (HTTP or HTTPS). For example:
https://hostname:policy-manager-port/access -
Click Federation, then click OAuth Service.
Choose Your configured OAuth Domain > Resource Servers > Your configured User Profile Service.
-
Expand Resource URIs at the bottom of the page.
-
Click the /users tab. Do not modify the service endpoint.
-
Expand entities.
-
Check if a relationship is present with End Point reports.
If present, verify that the settings match the following settings; if not, create a relationship with the following settings:
-
Name - people_reportees
-
Identity Directory Service Relation - reportee
-
End Point - reports
-
Source Entity URI - manager-uri
-
Destination Entity URI - report-uri
-
Verify LDAP attributes are present in scopes
-
In a browser window, open the Oracle Access Management console using the appropriate protocol (HTTP or HTTPS). For example:
https://hostname:policy-manager-port/access -
Click Federation, then click OAuth Service.
Choose Your configured OAuth Domain > Resource Servers > Your configured User Profile Service.
-
Expand Scopes.
-
Locate the table with the heading Identity Attributes of the selected scope UserProfile.users for URI /users. This table is populated with a list of attributes that can be accessed with the
UserProfile.usersscope. -
Verify that the following attributes are present and add them if they are not:
-
firstname
-
lastname
-
uid
-
mail
-
displayname
-
title
-
manager
-
mobile
-
telephone
-
postaladdress
-
jpegphoto
-
country
-
6.3 Managing the Mobile App Catalog
System Administrators use the Mobile App Catalog to manage the apps provisioned to devices and Workspaces. The Mobile App Catalog supports the following kinds of apps:
-
Native apps – You can either upload a mobile app binary to Mobile Security Manager, or reference an app store URL, such as the iTunes App Store for iOS devices, or Google Play for Android. If uploading a binary, you can upload both containerized and non-containerized apps.
-
Virtual apps – Includes Web apps and Shared Folder apps:
-
Web app – A shortcut to a Web URL such as an URL to a corporate portal.
-
Shared Folder – Shortcut to a network file share.
-
The Secure Workspace app is also available in the Mobile App Catalog. The Secure Workspace app is a special app that is used for MAM (mobile application management) functionality. You can only have one Secure Workspace app in the App Catalog. For more information, see Section 6.1, "About the Secure Workspace App."
This section includes the following topics:
6.3.1 Using the App Catalog
Open the App Catalog from the Mobile Security Manager console menu. (To learn how, follow the steps in Section 2.2.2, "Opening the Mobile Security Manager Console Pages" and choose Mobile App Catalog from the page menu.)
Figure 6-2 Opening the Mobile App Catalog in the Mobile Security Manager console
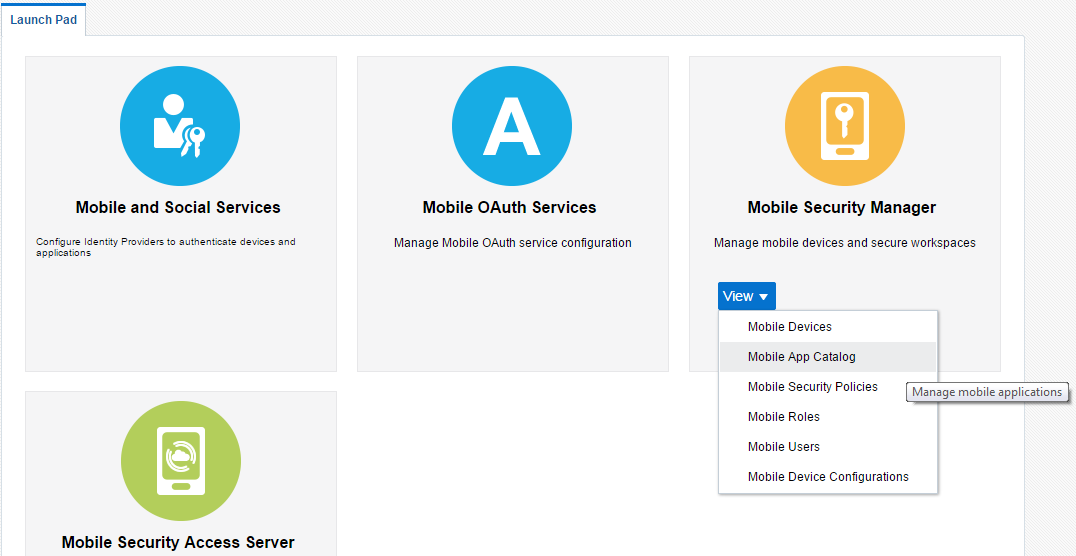
Description of ''Figure 6-2 Opening the Mobile App Catalog in the Mobile Security Manager console ''
The Mobile App Catalog homepage lists the apps currently in the catalog. The most recently updated/created apps are listed first. Use the Mobile Application Catalog page to:
-
View existing apps.
-
Upload new apps.
-
Update existing apps.
Figure 6-3 The Mobile App Catalog homepage
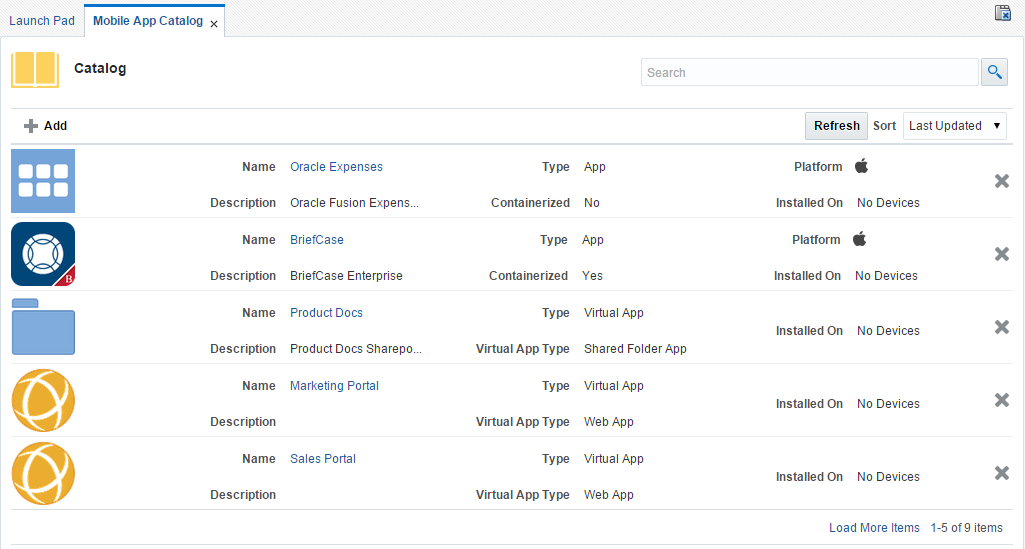
Description of ''Figure 6-3 The Mobile App Catalog homepage''
Note:
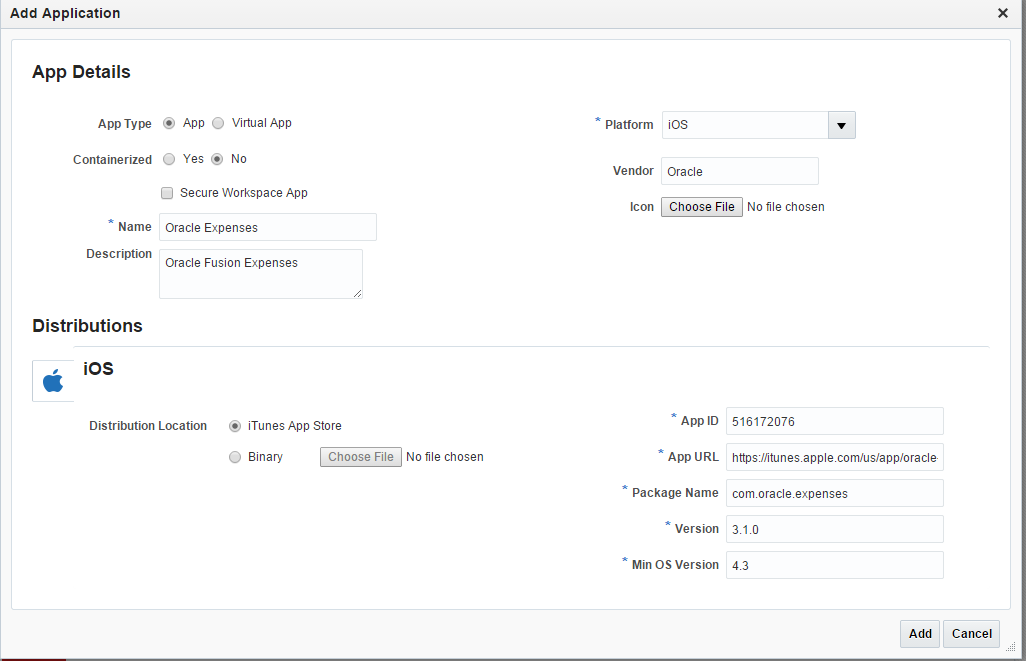
App entries in the App Catalog are logical app records that can be referenced in policies. Logical apps can have physical, platform-specific distributions. Figure 6-4 shows a logical app, Oracle Expenses, and a tabbed section that details the iOS and Android physical distributions. A logical app record can link to one app for iOS (for example "Expense Wizard 123") and a different app for Android ("Expense King Plus"). The names for the app do not need to be exactly the same across platforms.Figure 6-4 App detail view showing iOS physical distribution details
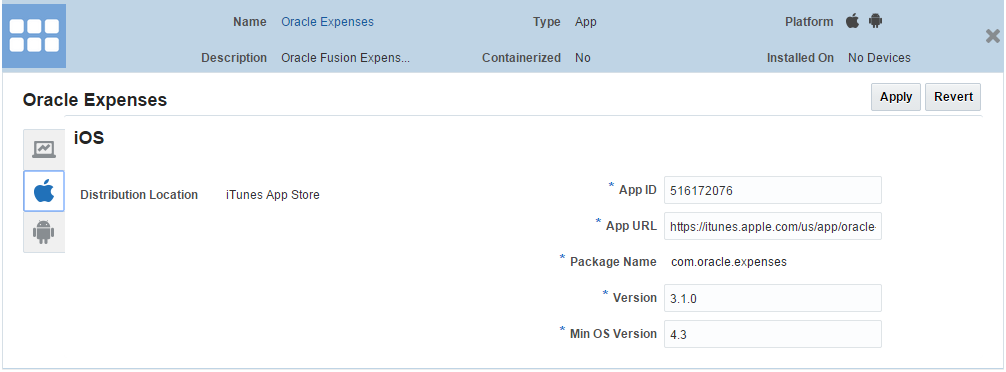
Description of ''Figure 6-4 App detail view showing iOS physical distribution details''
6.3.2 How to Search for an App in the Mobile App Catalog
Tip:
To learn how to search a Workspace for a list of installed apps, see Section 4.1.2.3, "View a List of Apps Installed on a Workspace."Follow these steps to find an app record in the Mobile App Catalog.
-
Open the Mobile App Catalog page in the Mobile Security Manager console. To learn how, see Section 2.2.2, "Opening the Mobile Security Manager Console Pages."
-
Search for the app by name. Search looks for apps that contain the search text in either the Name or the Description fields.
Apps that meet the search criteria are listed in the Search Results section of the page.
-
Use the Sort menu to sort search results. The following options are provided:
-
Last Updated - Sort search results chronologically based on the order that they were updated in the catalog.
-
Display Name - Sort search results alphabetically by display name.
-
-
Click a Name to open and close App Details.
6.3.3 How to Add the Secure Workspace App to the Mobile Applications Catalog
This section describes how to upload the Secure Workspace app to the App Catalog. See Section 6.1, "About the Secure Workspace App" for additional information.
-
Customize the iOS and/or Android distributions of the Secure Workspace app as needed, then finalize the app for uploading to the Mobile Applications Catalog. See Chapter 10, "Customizing the Oracle Secure Workspace App" for details.
-
Open the Mobile App Catalog page in the Mobile Security Manager console. To learn how, see Section 2.2.2, "Opening the Mobile Security Manager Console Pages."
-
Click Add.
The Add Application dialog opens.
Figure 6-5 Adding the Secure Workspace app in the Add Application dialog
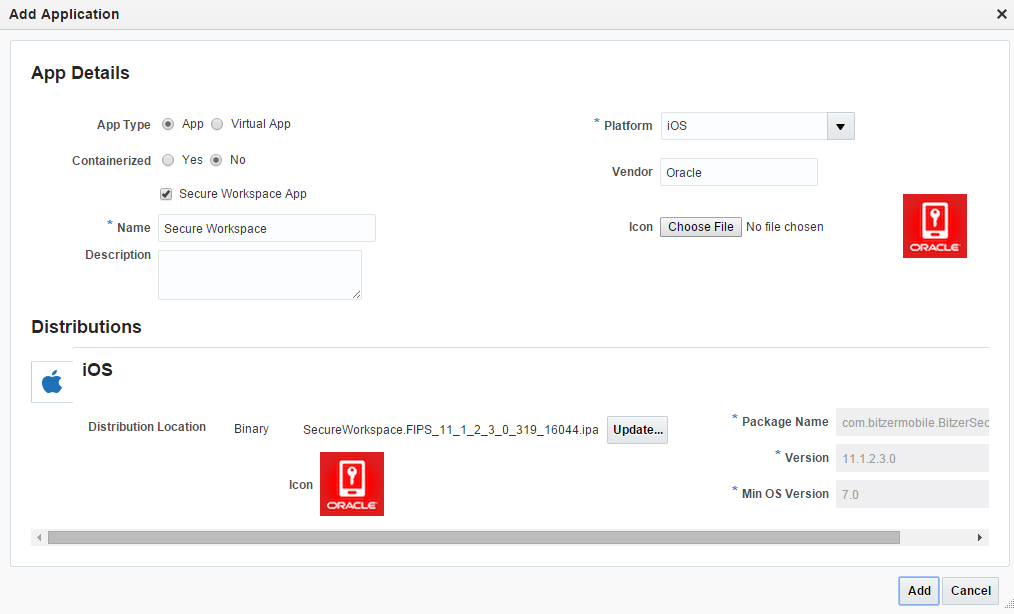
Description of ''Figure 6-5 Adding the Secure Workspace app in the Add Application dialog''
-
In the App Type field, choose App.
-
Complete the form as follows:
-
Containerized: No
-
Secure Workspace App: Checked (Selected)
-
Name: Secure Workspace
-
Description: The Secure Workspace App
-
Platform: Choose iOS or Android or All depending on your requirements
-
Vendor: Oracle
-
Icon: Optional field—if you do not upload an icon, the icon available in the binary is used. Upload an app icon that will display alongside the app name in the Mobile Security Manager console. Click Choose File and navigate to the icon file. The icon file should be in the PNG format. The recommended icon size in pixels is 114 x 114.
-
-
Click either the iOS or Android tab to configure the distribution. Configure the form as follows:
-
Distribution Location: Click Choose File to upload the app binary.
-
Package Name: The app's complete package name, for example:
com.oracle.secureworkspace. This read-only value is parsed from the uploaded binary file. -
Version: The version name or number that you want to assign to the app. This read-only value is parsed from the uploaded binary file.
-
Min OS Version: The minimum version of the mobile operating system software needed to run the app. This read-only value is parsed from the uploaded binary file.
If you are supporting both iOS and Android, repeat to configure the other distribution.
-
-
Click Add.
6.3.4 Adding Native Apps
Administrators can upload Android and iOS apps to the catalog containerized or uncontainerized. Containerization provides secure storage, policy enforcement, and enhanced security services for authentication and networking. Containerized apps are subject to OMSS security policies; uncontainerized apps are not. To learn how to containerize mobile apps, see Chapter 9, "Using the Oracle Mobile Security Suite Application Containerization Tool."
There are two ways to add a native app to the Catalog: you can upload an app binary, or you can reference an app on a vendor app store. Containerized apps must be uploaded to the Catalog as a binary.
Uploading a Native App as an App Binary
-
Open the Mobile App Catalog page in the Mobile Security Manager console. To learn how, see Section 2.2.2, "Opening the Mobile Security Manager Console Pages."
-
Click Add.
The Add Application dialog opens.
-
Complete the form as follows:
-
App Type: App
-
Containerized: Yes, if the app is containerized; otherwise, No.
-
Name: The name of the app. The name is referenced when assigning the app to policies.
-
Description: Optional app description.
-
Vendor: The name of the app vendor.
-
Icon: Click Choose File to upload an icon file if you want to use your icon (for example, if the app does not have an icon). By default, the icon bundled in the app is used.
-
Platform: Choose the platforms on which the app is supported. You can add additional platforms later on.
-
-
Upon selecting Platform, the Distributions section opens.
Click Browse to upload the app binary.
-
Click Add.
-
After the app upload completes and the app is successfully added to the catalog, the icon and other properties (Package Name, Version, Containerization Version, Min OS Version) are automatically populated. Note that the UI does not update right away after the app is uploaded. The UI fields are only updated after the app is successfully added to the catalog.
Figure 6-6 An app binary that has been added to the Catalog

Description of ''Figure 6-6 An app binary that has been added to the Catalog''
Adding a Reference to a Native App on an App Store
-
Open the Mobile App Catalog page in the Mobile Security Manager console. To learn how, see Section 2.2.2, "Opening the Mobile Security Manager Console Pages."
-
Click Add.
The Add Application dialog opens.
-
Complete the form as follows:
-
App Type: App
-
Containerized: No (App stores do not host containerized apps.)
-
Name: The name of the app. The name is referenced when assigning the app to policies.
-
Description: Optional app description.
-
Platform: Choose the platforms for which app distributions are available. You can add additional platforms later on.
-
Vendor: The name of the app vendor.
-
Icon: Click Choose File to upload an icon file if you want to use your icon. Otherwise the default App icon in MSM will be used.
-
-
Upon selecting Platform, the Distributions section opens.
(Optional) Click Browse to upload the app binary.
-
Enter the app properties (Package Name, Version, Containerization Version, Min OS Version) and click Add.
Figure 6-7 An app store app that has been added to the Catalog
Description of ''Figure 6-7 An app store app that has been added to the Catalog''
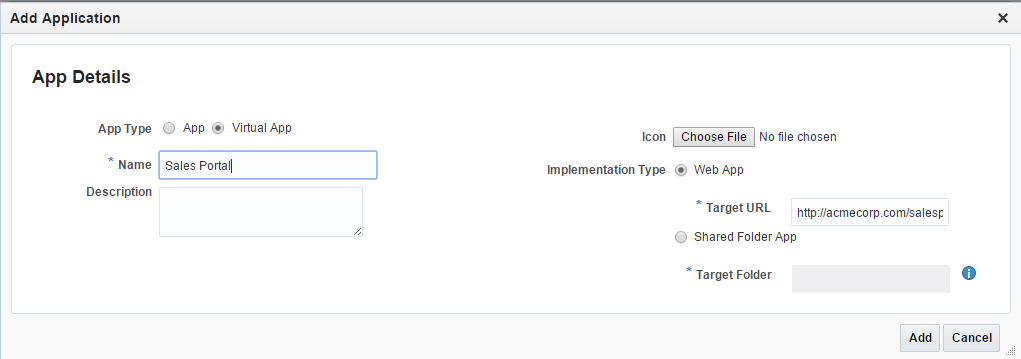
6.3.5 Adding Virtual Apps
A virtual app can be a web app that displays in a web browser, or a Shared Folder app that connects to a network file share. Virtual apps are subject to Mobile Security Policies because users access them using either the Secure Web browser or the Mobile File Manager.
Unlike device-native apps that run on the device, web apps are hosted on remote servers and use the web browser installed on the device to display the app. Web apps are popular because they can support multiple devices and platforms, and they can be updated at the server without having to distribute and install binaries across thousands of devices. When you add a web app to a device, you add a shortcut or alias to the Workspace or device home screen. When the user opens the app, the browser launches and the app displays.
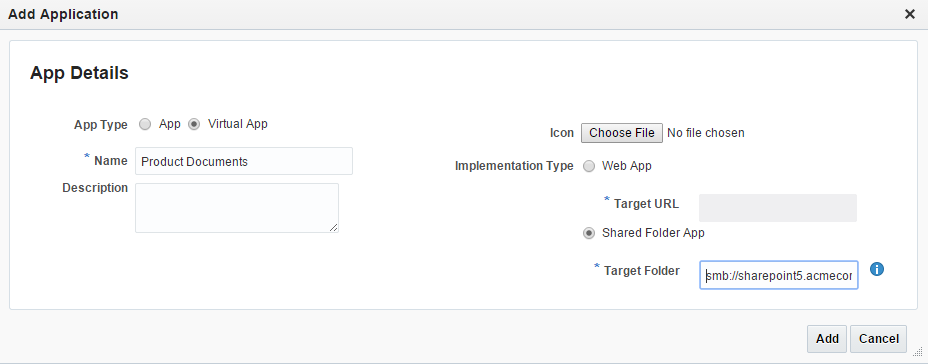
A Shared Folder virtual app is a network file share that users access using a file manager app. (Mobile file manager apps are discussed in Section 6.2.2, "About the Mobile File Manager.") Virtual apps can be added to policies, so by adding Shared Folder apps to policies, you can assign network file shares by role assignment.
This section describes how to add virtual apps to the catalog.
-
Open the Mobile App Catalog page in the Mobile Security Manager console. To learn how, see Section 2.2.2, "Opening the Mobile Security Manager Console Pages."
-
Click Add.
The Add Application dialog opens.
-
Complete the form as follows:
-
App Type: Virtual App
-
Name: The name of the virtual app. The name is referenced when assigning the app to policies.
-
Description: Optional app description.
-
Icon: Click Choose File to upload an icon file if you want to use your icon. Otherwise the default App icon in MSM will be used.
-
Implementation Type: Choose Web App.
-
Target URL: Enter the URL for the Web app.
-
-
Click Add.
-
Open the Mobile App Catalog page in the Mobile Security Manager console. To learn how, see Section 2.2.2, "Opening the Mobile Security Manager Console Pages."
-
Click Add.
The Add Application dialog opens.
-
Complete the form as follows:
-
App Type: Virtual App
-
Name: The name of the virtual app. The name is referenced when assigning the app to policies.
-
Description: Optional app description.
-
Icon: Click Choose File to upload an icon file if you want to use your icon. Otherwise the default App icon in MSM will be used.
-
Implementation Type: Choose Shared Folder.
-
Target URL: Enter the URL for the shared folder.
-
-
Click Add.
Figure 6-9 Adding a Shared Folder virtual app
Description of ''Figure 6-9 Adding a Shared Folder virtual app''
6.3.6 Understanding the Dynamic App Catalog
The Dynamic App Catalog is the custom list of apps available for each individual user. The list is determined by the Effective Policy for the user. The user can browse the dynamic catalog from the Workspace by tapping the catalog icon on the home page.
Figure 6-10 Tap the Catalog icon from the Workspace to view the dynamic catalog
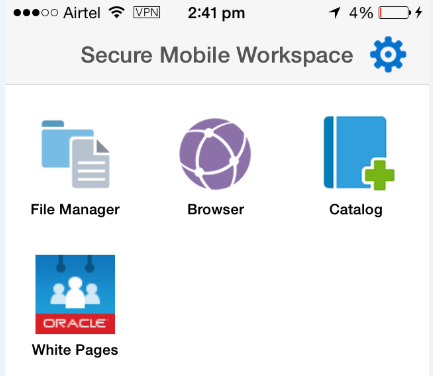
Description of ''Figure 6-10 Tap the Catalog icon from the Workspace to view the dynamic catalog''
Figure 6-11 The list of apps in this user's Dynamic App Catalog
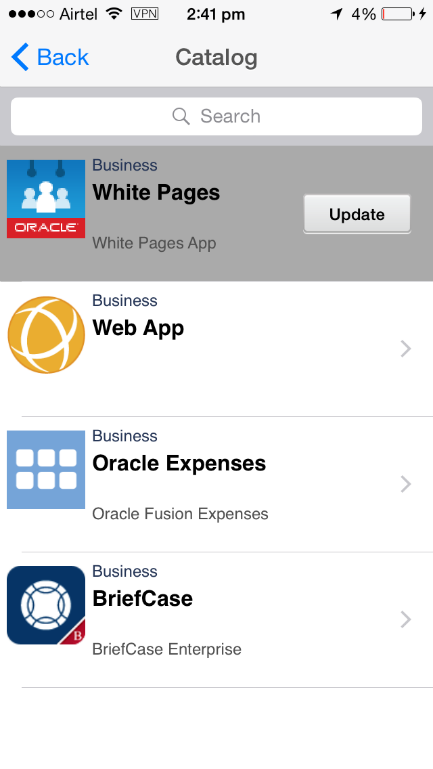
Description of ''Figure 6-11 The list of apps in this user's Dynamic App Catalog''
6.4 Recovering Secure Workspace and Containerized App Data
Workspace and containerized apps have a feature that allows containerized apps and their saved data to remain accessible after the Workspace has been deleted and then re-installed. This feature allows users who accidentally delete the Workspace and containerized apps to recover their data. This only occurs if the user re-registers the Workspace with the same credentials that were in place when the containerized apps were being used. If the user re-registers with new credentials, the containerized apps will be wiped. Once the Workspace and containerized apps have been wiped, they are no longer recoverable.
6.5 How to Perform Common Mobile App Catalog Tasks
This section describes how to complete common tasks in the Mobile App Catalog. It includes the following topics:
Note:
To learn how to assign apps to users by policy, see Chapter 8, "Managing Mobile Security Policies."6.5.1 How to Update or Remove an App in the Catalog
-
Open the Mobile App Catalog page in the Mobile Security Manager console. To learn how, see Section 2.2.2, "Opening the Mobile Security Manager Console Pages."
-
Search for the app. To learn how, see Section 6.3.2, "How to Search for an App in the Mobile App Catalog."
-
To update an app in the catalog:
-
Click the app name to show the App Details form.
-
Use the form to make your changes and click Apply.
For help understanding the App Details form click Help, or see "Mobile Applications Catalog Page Help" in the Help Reference for Oracle Mobile Security Suite Consoles.
-
To update one or both app binaries, click the iOS or Android tab, click Choose File, and navigate to the binary to be uploaded. After the binary uploads, click Apply. Repeat if updating the binaries for both mobile operating systems.
To remove an iOS binary and retain the Android version (or vice versa), click the App Details tab and update the Platform settings accordingly.
Similarly, to expand app support to cover both iOS and Android, open the Platform menu and select both iOS and Android.
To remove an app from the catalog:
-
Click the x icon on the right side of the app catalog record.
-
Click OK in the Remove App dialog.
Note that removing an app from the catalog will not delete the app from users' devices.
-
6.5.2 How to Alert the User That App Updates are Available
The Upgrade Alert setting is configured at the policy level. If this option is enabled, the app is highlighted in the Workspace to alert the user that an updated version of an installed app is available from the Mobile App Catalog. If the option is not selected, a badge on the catalog app indicates that an update is available, but the system does not alert the user otherwise.
To enable the Upgrade Alert setting, follow these steps:
-
Open the Mobile Security Policies page. To learn how, see Section 2.2.2, "Opening the Mobile Security Manager Console Pages."
-
Search for the policy to edit and open the Policy Management page.
-
Click Apps and Configuration > Apps.
-
Select Upgrade Alert to alert the user when an app is launched that an upgrade is available. If the option is not selected, a badge on the catalog app indicates that an update is available, but the system does not alert the user otherwise.
Figure 6-12 Select Upgrade Alert to alert the user that an app upgrade is available
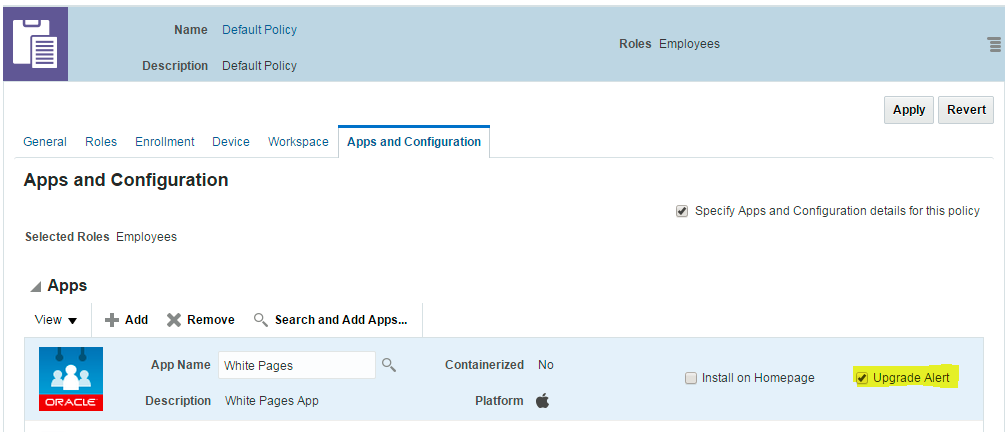
Description of ''Figure 6-12 Select Upgrade Alert to alert the user that an app upgrade is available''
6.5.3 How to Blacklist an App
Administrators can blacklist specific apps on managed devices only. The blacklist feature checks for device compliance and, depending on how the policy is enforced, the device is locked or wiped if blacklisted apps are found.
-
Open the Mobile Security Settings page. To learn how, see Section 11.2.2, "How to Open the Mobile Security Settings Page."
-
Click Blacklisted Apps on the menu bar. (If Blacklisted Apps is not visible, use the arrow buttons to scroll the menu bar to the right. Or, click
 to view additional menu items.)
 -
Click Add to add a row to the Blacklisted Apps table.
To remove an App from the Blacklisted Apps table, select the app and click Remove.
-
Type the name of the application package name that you are blacklisting, then click Apply.
6.5.4 How to Include the Mobile App Catalog on the Workspace Home Screen
The Mobile App Catalog app can be added to the Workspace home screen.
-
Open the Mobile Security Settings page. To learn how, see Section 11.2.2, "How to Open the Mobile Security Settings Page."
-
Click the Client Settings tab.
-
Select the Enable add App button option.