Setting up the import of data from Oracle Eloqua
You can seamlessly import contact, account, and activity data from Oracle Eloqua into Oracle Unity.
Setting up the import of data from Oracle Eloqua involves doing the following:
Learn more about correctly formatting source files and ingest jobs so that you can successfully import data:
-
Ensure source files are formatted correctly by reviewing CSV file standards for Oracle Unity and supported CSV parsers.
-
Review how to import empty or null data and the restrictions on empty/null data in the Oracle Unity data model.
Create the Eloqua source
To set up the data import, you will need to create an Eloqua source and the corresponding ingest job that will import Eloqua data.
-
Click the Oracle icon
 in the bottom-right corner to open the navigation menu.
- Select Sources.
- In the top-right corner, click Create source.
Step 1: Define source details
The job details section allows you to define the type of source and how it will display in Oracle Unity.
Enter the information for the source.
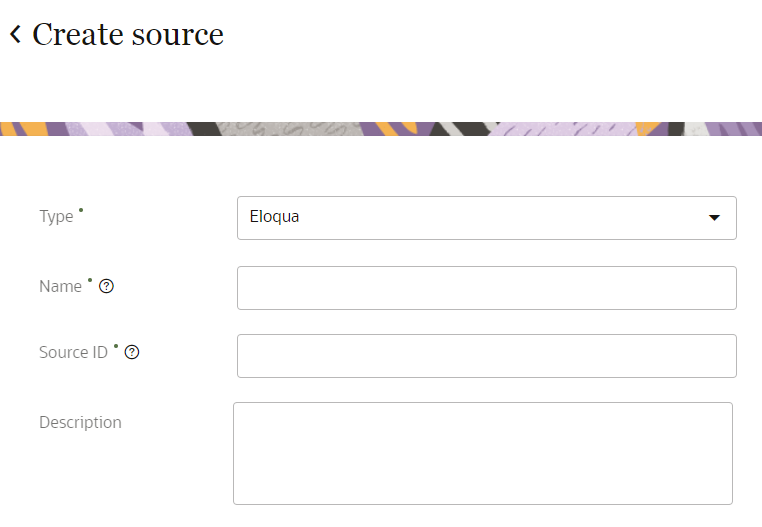
- Type: Use the drop-down list to select Eloqua.
- Name: Enter a name. The name must be 1 or more characters, up to a maximum of 50. Use only letters (a–z and A–Z), numbers (0–9), underscores (_), hyphens (-), and spaces. The first character cannot be a space.
-
Source ID: When Oracle Unity ingests data using this source, it uses this value for the Source ID attribute of each object. The Source ID is auto-populated from the source name you enter. You can't change this value after you create the source.
- Description: Enter a description. This field is optional, but it is highly recommended to add descriptions for any entity created. This helps all other users get additional context when using and navigating Oracle Unity. The description can have a maximum of 512 characters with no restrictions on characters used. You can use characters from all languages supported in the language settings.
Step 2: Configure authentication settings
Enter the information to allow Oracle Unity to access the required data.
- Company name: Enter the company name you use to log in to Eloqua.
- URL: Enter the base URL for your Eloqua instance. Learn more about Determining base URLs topic from the Eloqua Developer Help Center.
- Username: Enter the username to access the URL.
- Password: Enter the password to access the URL.
Once you enter all the details, click Verify connection to ensure that Oracle Unity can access the source.
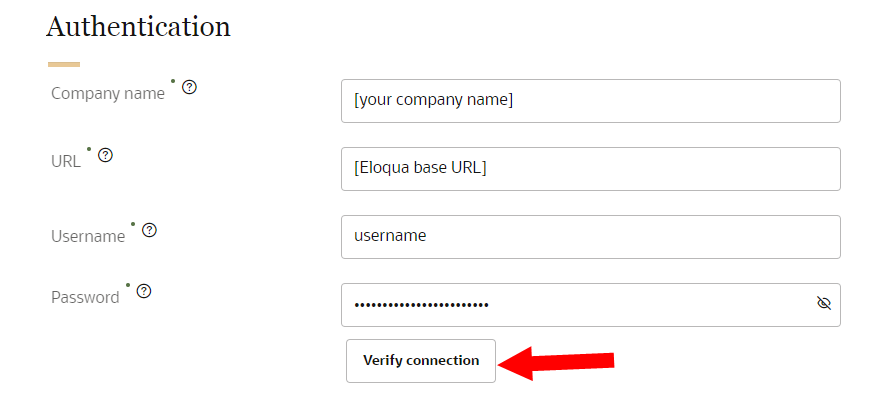
If there are connection issues, ensure the base URL entered and login credentials are correct.
Step 3: Save and publish the new source
When finished defining the source, scroll to the top of the page and click Save or Save and close.
Once you create the source, you will need to publish the changes.
After creating and publishing the Eloqua source, you can create the ingest job.
Create the Eloqua ingest jobs
You can import the following types of Eloqua data: Activities, Contacts, and Accounts. You will need to create a separate ingest job for each type of data by selecting the appropriate field mapping template.
To create the ingest job:
-
Click the Oracle icon in the bottom-right corner to open the navigation menu.
- Select Data feeds.
- In the top-right corner, click Create data feed, then select Ingest job.
The Create ingest job page is displayed.
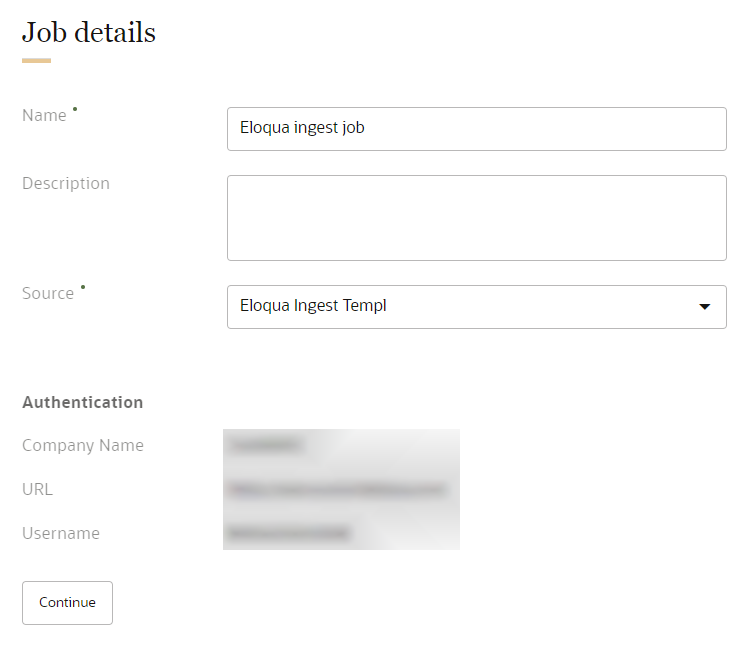
Step 1: Define job details
The job details section allows you to define how the ingest job will display in Oracle Unity.
To define the job details:
- Enter the details for the ingest job.
- Name: Enter a name. The name must be 1 or more characters, up to a maximum of 50. Use only letters (a–z and A–Z), numbers (0–9), underscores (_), hyphens (-), and spaces. The first character cannot be a space.
-
Job ID: The unique system identifier that is auto-populated from the job name you enter. You can't change this value after you create the job.
- Description: Enter a description. This field is optional, but it is highly recommended to add descriptions for any entity created. This helps all other users get additional context when using and navigating Oracle Unity. The description can have a maximum of 512 characters with no restrictions on characters used. You can use characters from all languages supported in the language settings.
- Source: Select the Eloqua source you created previously. Review the details and make sure they are accurate.
- Once you have confirmed that the details are correctly configured, click Continue.
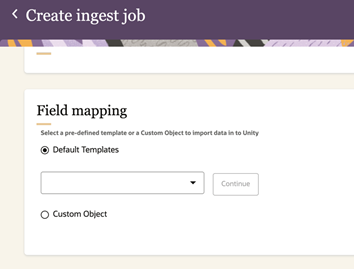
Step 2: Field mapping
You will be prompted to select between Default Templates and Custom Object.
-
By selecting Default Templates you can select one of the Eloqua field mapping templates to configure the ingest job: EloquaContacts, EloquaActivities, EloquaAccounts.
-
By selecting Custom Object you can select one of the custom object created by you in Eloqua.
Learn more about Activity data, Account data, and Contact data from the Oracle Eloqua Developer Help Center.
To complete automated field mapping:
- Choose either Default Templates or Custom Object.
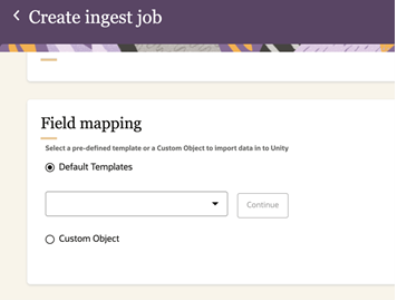
- Choose an option:
If Default Templates selected: Use the drop-down list to select an Eloqua field mapping Template
If Custom Object selected: Use the drop-down list to select an Eloqua Custom Object
- Click Continue.
- Make changes as needed by completing Step 3: Mapping source object fields to data model attributes.
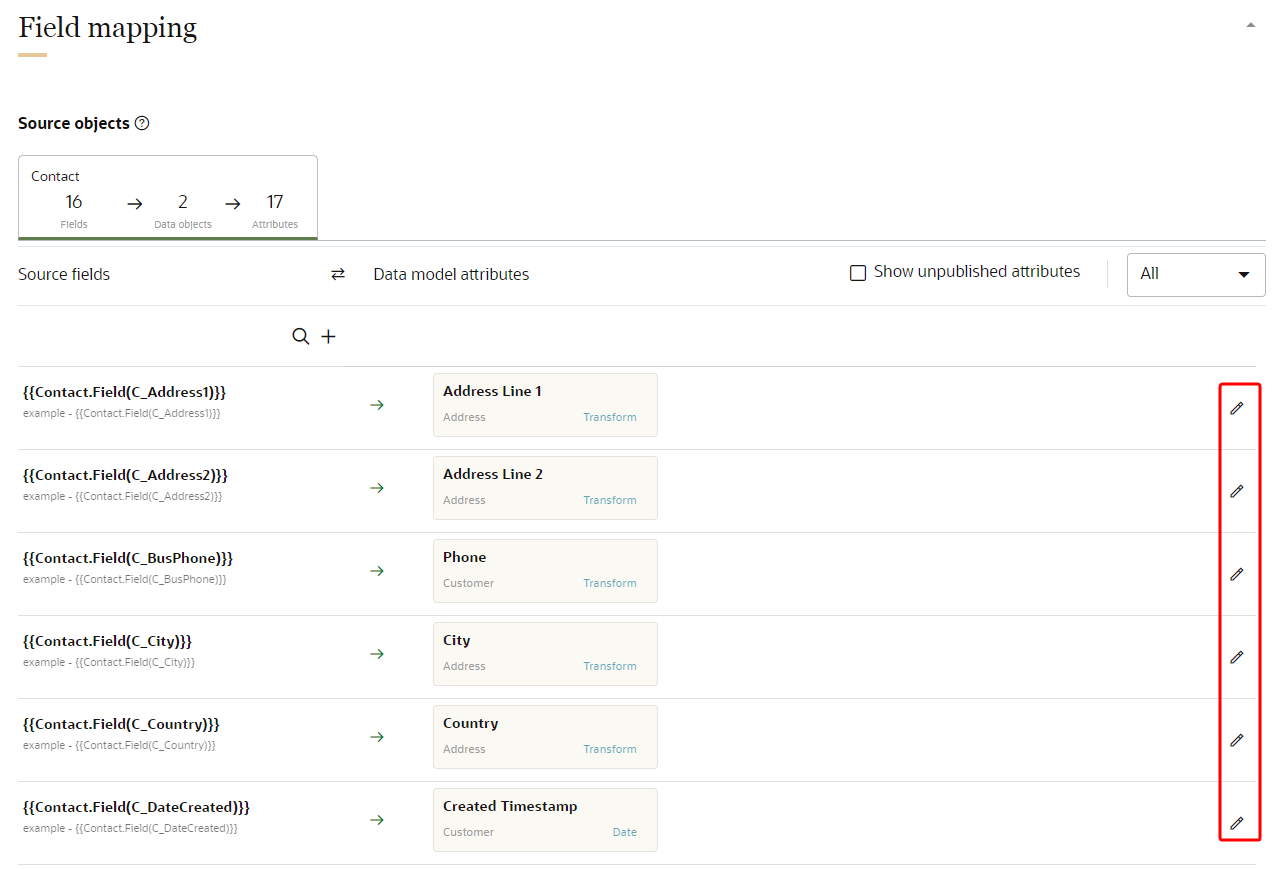
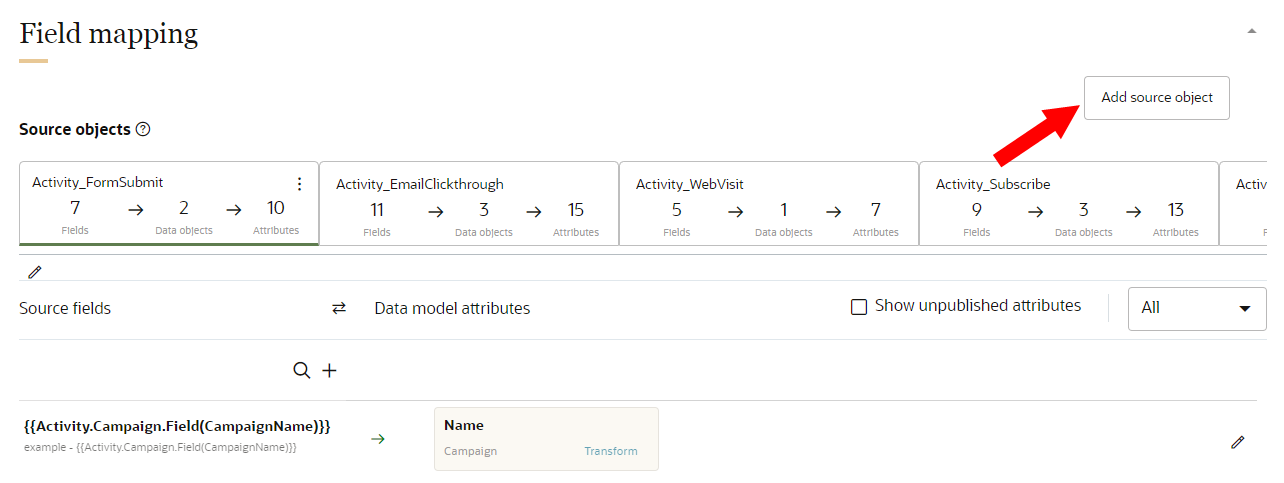
Step 3: Mapping source object fields to data model attributes
Note: You cannot access or search for hidden data objects and attributes for field mapping. Learn more about Hidden data model items in ingest jobs.
To map source object fields to data model attributes:
- Review the automated mapping for Source fields and Data model attributes. If needed, click Edit
 to make changes to the mapping.
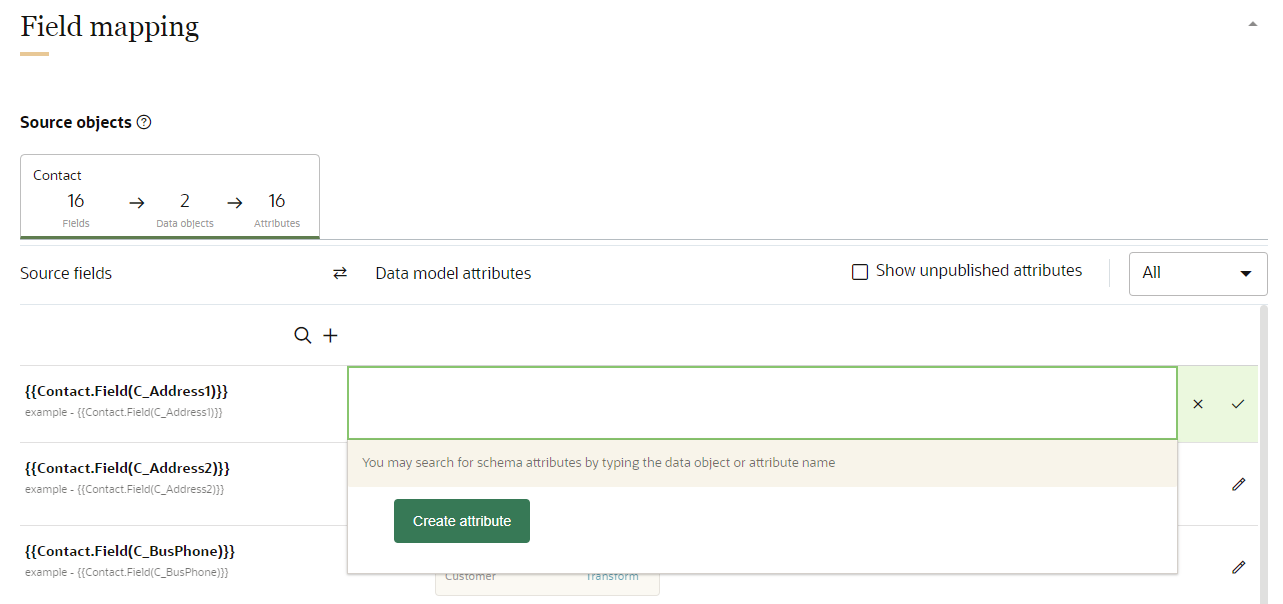
 - To add a data model attribute for a source field, use the search field to search by data object name, attribute name, or attribute description.
- If you need to add an attribute that is not currently part of the data model, click Create attribute. Attributes you create will need to be published before the ingest job runs. You can review attributes that need to be published by clicking the checkbox for Show unpublished attributes. Learn more about Creating attributes.
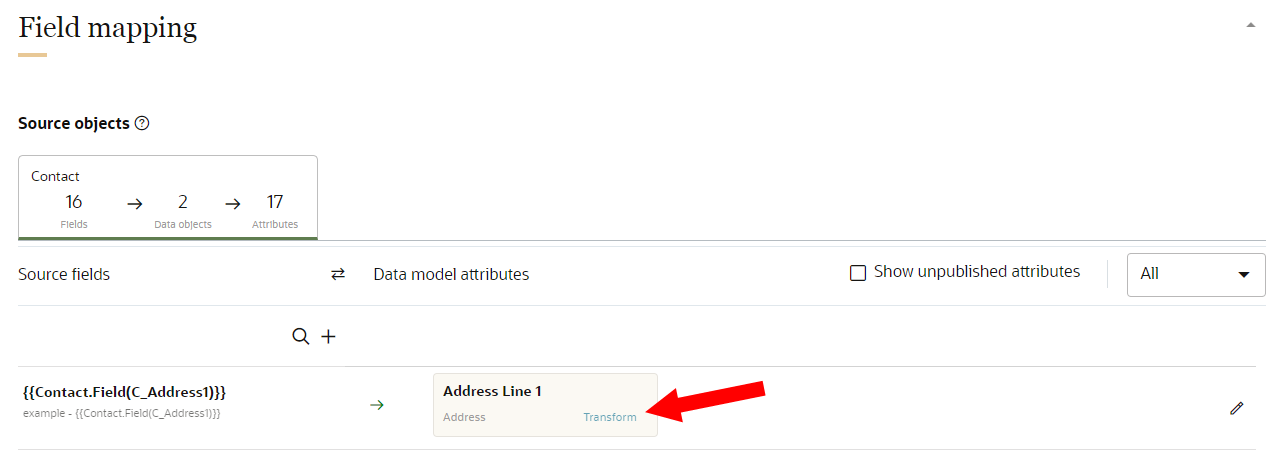
- To add the attribute, click the Checkmark
 .
. - To add a transformation on an attribute, click Transform.
- Concatenation transformation
- Date transformation
- Lookup/static transformation
- URL transformation
- Hash transformation
- Prefix-Suffix transformation
- Replace transformation
- Substring transformation
- Trim transformation
- If you selected the EloquaActivities template, you can click Add source object to add an additional activity type for field mapping. If you selected EloquaContacts or EloquaAccounts, you can't add additional source objects.

Learn more about the different transformations available:
Important notes about configuring field mapping
-
A single source field can be mapped to one or more data model attributes. Conversely, one or more source fields can be mapped to a single data model attribute. If you map multiple source fields to a single data model attribute, you want Oracle Unity to store multiple values in that one data model attribute. Because of this, you need to ensure you select the appropriate transformation, so that Oracle Unity can correctly combine those multiple values.
- A notification will display if not every data object used in a mapping has its source mapped to an incoming field. Mapping all source data object IDs ensures that duplicate data is removed before it is stored in the system. Review the Source data object IDs not mapped notification before completing field mapping. The notification will identify each unmapped data object with a color.
- A red circle indicates that the unmapped source data object ID (SourceXID attribute) will cause the ingest job to not import the data successfully, even if the ingest job successfully completes. This is because the Incoming records flag for the data object is set to No (insertOnly parameter set to false). Learn more about the Incoming records flag.
- A yellow circle indicates that the source data object ID (SourceXID attribute) is unmapped, but the ingest job will still successfully import the data. This is because the Incoming records flag for the data object is set to Yes (insertOnly parameter set to true). If the SourceXID attribute is not mapped, Oracle Unity will automatically add a unique identifier to the SourceXID attribute when the data is imported. Learn more about the Incoming records flag.

Example: You map the First name attribute from the Customer data object to the FirstName source field in the sample file. You must also map the corresponding SourceCustomerID attribute in the Customer data object to a source field in the sample file so that the data can be successfully imported. This is because the Incoming records flag for the Customer data object is set to No.
Example: You map the Order Total attribute from the Event data object to the OrderTotal source field in the sample file, but you don’t map the SourceEventID attribute to a source field. You will receive a warning the source data object ID is unmapped, but the ingest job will still be able to import the data successfully. This is because the Incoming records flag for the Event data object is set to Yes.
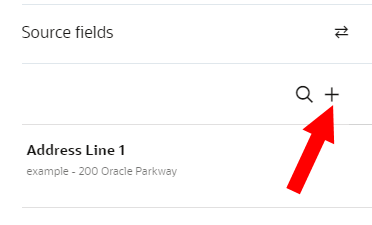
Step 4: Managing source fields
You can add additional source fields if you need to update the field mapping. To search through the existing list of source fields, click Find ![]() next to Source fields.
next to Source fields.
You can also edit and delete existing source fields if you need to update the name of the field or remove fields that you no longer need. Source fields you delete will also remove any field mappings you configured for that field.
To add additional source fields:
- Next to Source fields, click Add
 .
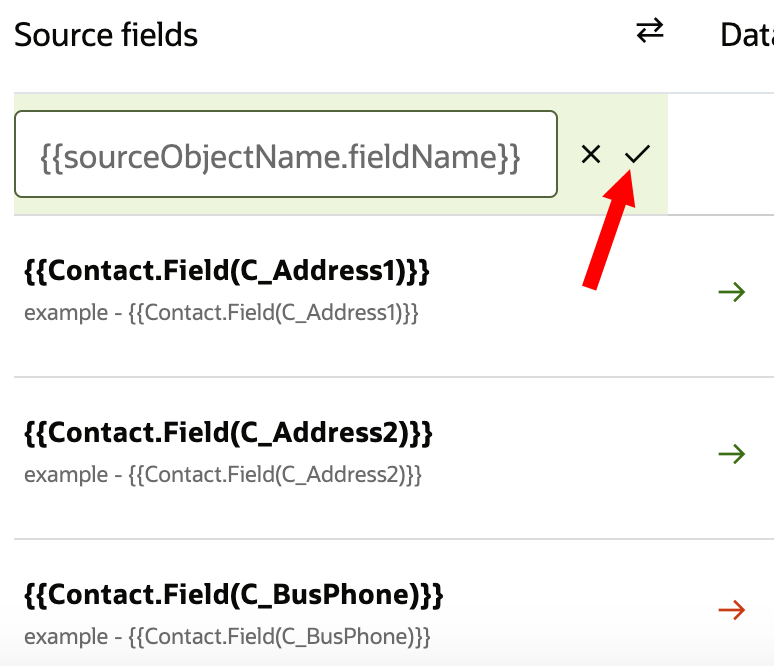
. - Enter the name of the source field. The format of the source field must be the following: {{sourceObjectName.fieldName}}.
- Click the Checkmark.
- Update the source field as needed by mapping it to data model attributes.
To edit source fields:
- Hover your mouse over the source field name you want to update and click Edit
 .
. - Enter the new source field name and click the checkmark .
To delete source fields:
- Hover your mouse over the source field name you want to remove and click Delete
 .
. - Review the confirmation message and click Yes.
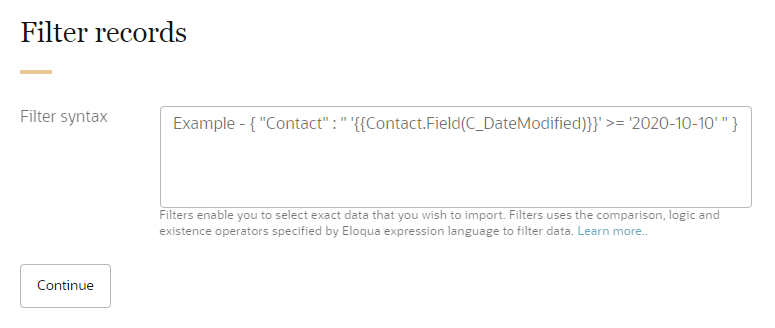
Step 5: Filter records
Optionally, you can limit the data that will be imported from Eloqua by entering filtering parameters in JSON. Learn more about Filtering from the Eloqua Developer Help Center.
Step 6: Schedule and notification settings
You will need to configure the schedule and notification settings for the ingest job.
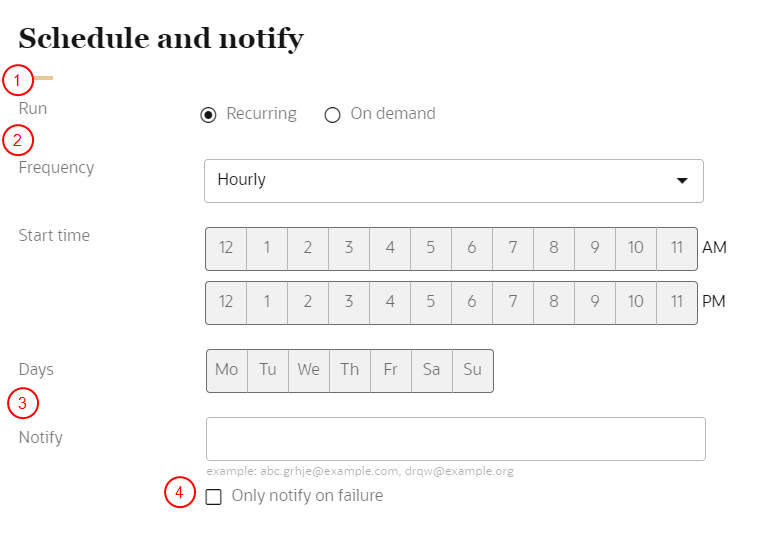
To schedule the ingest job and define the notification settings:
- Configure the schedule for the ingest job:
- Click Recurring to automatically run the job on a regular schedule.
- Click On demand to run the job as needed.
- If the job is recurring, select the Frequency, Start time, and Days it will run.
- In the field for Notify, enter the email addresses of people to be notified when the job runs. Separate multiple emails with a comma.
- If you only want a notification if the job fails, click the checkbox for Only notify on failure.
Step 7: Save and publish the ingest job
After saving the ingest job you will need to publish the changes before it can run.
To save and publish the ingest job:
- Scroll to the top of the page and click Save or Save and close.
- Follow the steps for Publishing changes.
When the publishing task is completed, the ingest job can run. Learn more about Managing ingest jobs.
After creating the first ingest job, you can then follow the same steps to create the remaining ingest jobs with the appropriate Eloqua field mapping templates.
Eloqua ingest jobs on the Jobs dashboard
After running an Eloqua ingest job from the Data feeds page, you can review metrics from the job on the Jobs dashboard.
Files read: The number of files read for processing.
Files with errors: The number of files that produced errors.
Rows read: The number of rows within the files read for processing.
Added/updated records: The number of records that were either added or updated during the job.
Failed records: The number of records that produced errors. Learn more about Reviewing failed records for ingest jobs.
Description: The description of the job.
Job type: The type of job.
Source: The name of the source used for the ingest job.
Started by: The name of the user that started the job.
Started: When the job run started.
Completed: When the job run completed.
Data objects populated: The data objects configured in the field mapping for the ingest job.
Learn more about Job details for ingest jobs.