
Approval Workflow Process
When a submitter adds, edits or deletes a business object (for example, an account) that belongs to an approval workflow group, the system checks whether approval workflow is activated for the approval workflow group. If the approval workflow is activated for the group, the system creates an approval workflow request. Every approval workflow request is uniquely identified in the system through the Approval Transaction ID.
The system identifies the approval workflow chain that must be used for approval depending on the pre-configured conditions or criteria. Based on the number of levels defined in the approval workflow chain, the request is sent to the approver at each level in the chain or hierarchy for approval. When the approver at the first level approves the request, a notification is sent to the approver at the second level for approval. This process continues till the approval is received from all levels in the hierarchy. Once the approvers at all levels approve the request, the changes are committed to the database.
However, if an approver at any level in the hierarchy rejects the request, a notification is sent to the submitter who has made the changes. The submitter then makes the required corrections based on the approver's comments and resubmits the changes for approval. In this case, the approval process starts once again from the beginning and not from the level at which the request was rejected.
The submitter also has the facility to modify the request before the approver at the first level in the hierarchy approves or rejects the request. Once the changes are made, the submitter submits the request for approval. The submitter also has the facility to cancel the request.
The following figure indicates the flow of the approval workflow process:
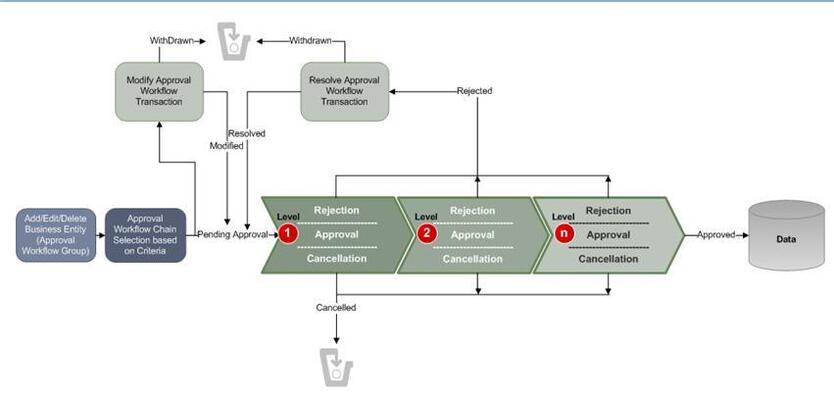
To implement the approval workflow process, you need to define the following:
For price list, price item and price assignment, the approval workflow configuration is shipped with ORMB. The following groups are available in the system:
-
C1PRODUCT - Contains the C1_PRICEITEM_BO business object
-
C1PRICELST - Contains the C1_F_ADDPLBO business object
-
C1PRICEASG - Contains the C1_PRICECOMP and C1_PRICEASGN_BO business objects
After creating the approval workflow chains, you need to link these groups to the corresponding approval workflow chains. To setup the approval workflow process for price assignment, you need to do the following:
| For Price Item |
|
| For Price List |
|
| For Price Assignments |
|
Similarly, for invoicing group, the approval workflow configuration is shipped with ORMB. The following groups are available in the system:
-
C1IGADD
-
C1IGUPD
After creating the approval workflow chains, you need to link these groups to the corresponding approval workflow chains, and activate the approval workflow for these groups by setting the following in the Approval Workflow Settings screen:
-
Set Active flag to Yes
-
Set Prevalidation flag to Yes