12 System Operations
Operating Background Jobs
Topics in this part: The following topics describe the functions available to operate the background ASYNC jobs.
-
Using the ASYNC Jobs (MBJC) describes the purpose of the background jobs, provides a brief overview of the each background ASYNC job, explains the steps to use to start and end the background ASYNC jobs, and shows you how to location the function.
-
Working with the CNTL_ASYNC Job shows you how to start and end the background ASYNC jobs, how to reorganize the data queues associated with the background ASYNC jobs, and how to change the status of the background ASYNC jobs.
-
Working with the BILL_ASYNC Job shows you how to display the Billing Header Data Queue, how to correct Billing ASYNC errors, how to change the status of the Billing ASYNC job, and describes the table updates that occur when records are processed by the BILL_ASYNC job.
-
Working with the EBO_ASYNC Job shows you how to display the Evaluate B/O Data Queue, how to correct EBO_ASYNC errors, how to change the status of the EBO_ASYNC job, and describes the table updates that occur when records are processed by the EBO_ASYNC job.
-
Working with the ORDR_ASYNC Job shows you how to display the Order Ship To Data Queue, how to correct ORDR_ASYNC errors, how to change the status of the ORDR_ASYNC job, and describes the table updates that occur when records are processed by the ORDR_ASYNC job.
-
Working with the OTHR_ASYNC Job shows you how to display the PO Header Data Queue, how to correct OTHR_ASYNC errors, how to change the status of the OTHR_ASYNC job, and describes the table updates that occur when records are processed by the OTHR_ASYNC job.
-
Purging Active Procedures (MACP)shows you how to display the Active Procedures for a user and how to delete stranded Active Procedure records for a user.
-
Working with Integration Layer Processes (IJCT) shows you how to work with the integration layer processes used for transmitting data between Order Management System and an external system.
Working With the CNTL_ASYNC Job
The controlling ASYNC job (CNTL_ASYNC) is used to start and end each of the background ASYNC jobs. When you start the CNTL_ASYNC job, all of the background ASYNC jobs start; when you end the CNTL_ASYNC job, all of the background ASYNC jobs end. You cannot start or end an individual background ASYNC job.
You should end the CNTL_ASYNC job each day, when your operations for the day are complete. When you end the CNTL_ASYNC job:
-
Records that were processed successfully for each background ASYNC job are deleted from the data queue tables.
-
An error list is produced for each background ASYNC job.
Ending the background ASYNC jobs allows you to delete unnecessary records from the system, and enables you to correct any processing errors in a timely manner.
In this topic:
Work with Background Jobs Screen
Purpose: This screen displays the current status of each background ASYNC job. This screen is used to start or end the ASYNC jobs, to display the records in the data queue associated with each job, or to reorganize the data queues.All of the options on this screen can be used with the Controlling ASYNC (CNTL_ASYNC) job.
How to display this screen: Enter MBJC in the Fast path field at the top of any menu or select Background Job Control from a menu.
| Field | Description |
|---|---|
|
Job name |
The name of the ASYNC job. The ASYNC jobs are:
Alphanumeric, 10 positions; optional. |
|
Description |
The description of the data queue associated with the ASYNC function. Alphanumeric, 40 positions; optional. |
|
Status |
The status of the ASYNC job. Valid status codes are:
Alphanumeric, 10 positions; display-only. |
|
Control |
A code indicating whether the ASYNC function is a controlling function. The controlling function is used to start, end, and reorganize the data queues for the ASYNC functions it controls. Currently, the CNTL_ASYNC function is the only controlling function. Valid codes are:
|
Note:
In order to perform certain options at the Work with Background Jobs screen, you need to have the Security administrator flag for the user selected. See User Configuration in the Administration Guide for more information.| Screen Option | Procedure |
|---|---|
|
Display the attributes of an ASYNC job |
Select Display for an ASYNC job to advance to the Display Asynchronous Job Screen (Displaying the CNTL_ASYNC Job). |
|
Start the background ASYNC jobs |
Select Start for the CNTL_ ASYNC job to start all of the ASYNC jobs. See Starting the Background ASYNC Jobs. |
|
End the background ASYNC jobs |
Select End for the CNTL_ ASYNC job to end all of the ASYNC jobs. See Ending the Background ASYNC Jobs. |
|
Reorganize the data queue for a background ASYNC job |
Select Reorganize queue for the CNTL_ ASYNC job to reorganize the data queues associated with each ASYNC job. See Reorganizing the ASYNC Job Data Queues. |
|
Display the data queue for an ASYNC job |
Select Display Data queue for an ASYNC job. Display Data queue cannot be used with the CNTL_ASYNC. |
|
Work with Drop Ship background jobs |
Select Drop Ship Jobs to advance to the Work with Drop Ship Background Jobs Screen. |
|
Work with integration layer jobs |
Select Integration Layer to advance to the Work with Integration Layer Process Screen. |
Display Asynchronous Job Screen (Displaying the CNTL_ASYNC Job)
Purpose: Use this screen to display descriptive information about an ASYNC job such as the CNTL_ASYNC job.How to display this screen: Select Display for a job at the Work with Background Jobs Screen.
| Field | Description |
|---|---|
|
Process name |
The name of the process for this ASYNC job. Listed as the Workstation for the ASYNC job at the screen in Purge Active Procedures Across Users (MACX). The data queues are:
Alphanumeric, 10 positions; display-only. |
|
Job name |
The name of the ASYNC job. The ASYNC jobs are:
Each ASYNC job is discussed separately in this part. Alphanumeric, 10 positions; optional. |
|
Description |
The description of the ASYNC job. Alphanumeric, 40 positions; display-only |
|
Start |
The date and time the ASYNC job was last started and the User ID of the person who started it. (Date): Numeric, 6 positions; display-only. (Time): Numeric, 6 positions; display-only. (User ID): Alphanumeric, 10 positions; display-only. |
|
End |
The date and time the ASYNC job was last ended and the User ID of the person who ended it. (Date): Numeric, 6 positions; display-only. (Time): Numeric, 6 positions; display-only. (User ID): Alphanumeric, 10 positions; display-only. |
|
Controlling job |
A flag indicating whether this function controls other ASYNC functions. The controlling ASYNC function starts and ends other ASYNC functions. Valid values are:
The CNTL_ASYNC job is the only controlling ASYNC job. |
|
System Option |
A flag indicating whether this function is a system function that cannot be deleted by the user. Valid values are:
|
|
Status |
The current status of the function. Valid status codes are:
Display-only. |
Starting the Background ASYNC Jobs
Purpose: The CNTL_ASYNC job is used to start and end all of the other background ASYNC jobs.The following background jobs must be active for the records in the data queues to be processed. If the background ASYNC job is not active, records will be held in the data queue until you start the background ASYNC jobs.
-
BILL_ASYNC
-
EBO_ASYNC
-
OTHR_ASYNC
Note:
The ORDR_ASYNC job updates system tables with order and demand information as orders are entered and maintained. As you enter or maintain orders, the system sends the records to the Order Processing data queue for processing. As soon as the Order Processing Data queue receives a record to process, the record is processed immediately, regardless of the status of the Order Processing ASYNC (ORDR_ASYNC) job. The ORDR_ASYNC job processes multiple orders simultaneously. While the Order Async job does not need to be active to process records, you should set the Order Async job to active to handle reorganization and cleanup of any transactions that did not process correctly.Starting the Background ASYNC jobs
You can start the background ASYNC jobs manually at the Work with Background Jobs Screen, or create a periodic process to schedule the ASYNC jobs to start at a specified time.When you start the background ASYNC jobs, the system removes any terminator records that may exist in the data queues. The system creates a terminator record in the data queues when you end the background async jobs to determine which records to process before the asyncs are brought down and which records to process when the asyncs are restarted. Multiple terminator records may exist in the data queues if you run the ENDASYN periodic function to end the asyncs when the asyncs are already inactive. Because you are now starting the background async jobs, the system no longer needs the terminator records to determine when to reprocess the records in the data queue and instead will process all records that may exist in the data queues.
Before you start the background ASYNC jobs: To start the background ASYNC jobs, the status of each job must be *INACTIVE and each job must not be running. You can use the Display Active Batch Jobs Screen menu option to verify that the jobs are not running.
To manually start the ASYNC jobs:
-
At the Work with Background Jobs Screen, review the status of the background jobs. The jobs must be started if the status is *INACTIVE.
-
Select Start for the CNTL_ASYNC job.
-
The status of the ASYNC jobs should be *ACTIVE.
Unable to start? The system verifies that the job is not currently in active status and is not actually running on any server. If the job is already in active status, or is actually running on a server, the screen displays an error message.
To resolve issues with the job’s status, use the JOBCLN periodic function.
To schedule the ASYNC jobs to start at a specified time:
Create a schedule for a periodic process that contains the STRASYN periodic function to start asyncs.
| Function | Description | Program | Summary |
|---|---|---|---|
|
STRASYN |
Start asyncs |
MSSTRASYNC |
If the asyncs are currently Inactive, this periodic function calls the Controlling Data Queue (CNTL_ASYNC) in Background Job Control (MBJC) and starts the background jobs. This periodic function performs the same updates as selecting Start for the CNTL_ASYNC to start the background jobs. |
For more information:
-
See Working with Periodic Processes (WPPR) for information on how to assign each function to a periodic process.
-
See Executing Periodic Processes (EPRO) for more information on scheduling a periodic process to run at a specified time.
-
See Using the JOBCLN Function to Resolve Job Status Across Servers for more information on how to reset the async jobs when they are out of sync.
Ending the Background ASYNC Jobs
Purpose: You can end the background ASYNC jobs manually at the Work with Background Jobs Screen, or create a periodic process to schedule the ASYNC jobs to end at a specified time.Use the CNTL_ASYNC job to end all of the other background ASYNC jobs. You should bring down the background jobs at the end of your processing day.
When you bring down the background ASYNC jobs:
-
If you manually end asyncs, a terminator record is sent to each data queue to identify the last record to be processed. Records sent to the data queue before the terminator record will be processed; records sent to the data queue after the terminator record was sent will be processed when the background ASYNC jobs are restarted.
-
If you use the ENDASYN periodic function to end asyncs, any records in the data queue will be processed when the background ASYNC jobs are restarted.
-
The data queues are reorganized. All completed records are deleted from the data queue tables. Records that have not been fully processed will be reloaded to the data queue when the background ASYNC jobs are restarted.
-
An error list prints for each background ASYNC job, listing the records that could not be fully processed and the reason for the error.
When the jobs end: The status of each background job will change from *ACTIVE to *INACTIVE. (You may see *ENDPEND or *REORG before you see *INACTIVE, depending upon how long it takes to end each job.)
Note:
You must end the background ASYNC jobs before the ASYNC subsystem is brought down. If you bring down the ASYNC subsystem while the background ASYNC jobs are running, the jobs will be ended but will remain in an *ACTIVE status. You will then need to run the JOBCLN periodic function to reset the status correctly. See Using the JOBCLN Function to Resolve Job Status Across Servers.
To manually end the ASYNC jobs:
-
Select End for the CNTL_ASYNC job at the Work with Background Jobs Screen.
-
The status of the ASYNC jobs changes to ENDING and then to INACTIVE.
-
When you end the ASYNC jobs, the Display Active Procedure window displays if there are any active procedures for the Order Entry/Maintenance, Purchase Order Maintenance, Receiving, or Confirmation functions. The system creates these records to prevent possible conflicts when users are engaged in these activities. See Display Active Procedure Window.
Unable to end? The system verifies that the job is not currently in inactive status and is actually running server. If the job is already in inactive status, or is not actually running on a server, the screen displays an error message.
To resolve issues with the job’s status, use the JOBCLN periodic function.
Display Active Procedure Window
This window opens when you end the ASYNC jobs if there are any active procedures for the Order Entry/Maintenance, Purchase Order Maintenance, Receiving, or Confirmation functions. The system creates these records to prevent possible conflicts when users are engaged in these activities.If a user is active in a function:
-
the user can exit the function before the ASYNC jobs end. Depending on the activity, the user might need to exit Order Management System and then reenter, if needed, to clear the active procedure record.
-
you can select Delete next to each active procedure record to delete the active procedure, or select Delete all to delete them all. Deleting the active procedure does not force the user out of the activity; there is no signal of the deletion to the user and the user can continue entering updates to the record. However, this allows more than one user to access the same record, such as an order or a customer and possibly overwrite each other’s updates.
If neither of these steps clears the active procedure record, you will need to purge the Active Procedures table. See Purging Active Procedures (MACP).
| Field | Description |
|---|---|
|
Job # |
The system job number assigned to the active procedure. Numeric, 6 positions; display-only |
|
Program description |
The description of the program associated with the Active Procedures record. Alphanumeric, 3 positions; display-only. |
|
User |
The User ID of the person engaged in the activity that created the Active Procedures record. Alphanumeric, 10 positions; display-only. |
|
Workstation |
The Workstation ID where the user is working. Alphanumeric, 10 positions, display-only. |
|
Start date |
The date when the Active Procedures record was created. This is the date the user entered the application. Numeric, 6 positions; display-only. |
|
Time |
The time when the Active Procedure record was created. This is the time the user entered the application. Numeric, 6 positions; display-only. |
To remove active procedures:
-
Have each person whose name appears in the window exit the application so that you can end the ASYNC jobs. It may be necessary to exit Order Management System temporarily to delete the active procedure record, or
-
Select Delete next to each active procedure record to delete the active procedure. Deleting the active procedure does not force the user out of the activity; there is no signal of the deletion to the user and the user can continue entering updates to the record. However, this allows more than one user to access the same record, such as an order or a customer and possibly overwrite each other’s updates.
-
Use Purging Active Procedures (MACP) to delete any stranded Active Procedure records, if necessary. You can also purge active procedures for interactive jobs that are older than a specified number of hours using the Delete Stranded Active Procedures (PFR0121) periodic function.
-
Select Refresh to refresh the Active Procedure Window to monitor whether the users have exited.
-
Select Exit to exit the window and return to the Work with Background Jobs Screen.
Deleting active procedure records: You can delete the Active Procedure records at this window by selecting Delete for each record in the window. Deleting the active procedure does not force the user out of the activity, such as order entry; there is no signal of the deletion to the user and the user can continue entering updates to the record. However, it is not recommended to delete Active Procedure records in this way, because it removes the safeguard against two users potentially accessing the same record, such as an order or customer, at the same time.
To schedule the ASYNC jobs to end at a specified time:
Create a schedule for a periodic process that contains the ENDASYN periodic function to end asyncs.
| Function | Description | Program | Summary |
|---|---|---|---|
|
ENDASYN |
End asyncs |
MSENDASYNC |
If the asyncs are currently Active, this periodic function calls the Controlling Data Queue (CNTL_ASYNC) in Background Job Control (MBJC) and ends the background jobs. This periodic function performs the same updates as selecting End for the controlling data queue to end the background jobs; however, any records in the data queue will be processed when the background ASYNC jobs are restarted. |
Note:
When you end the ASYNC jobs using the job scheduler, the system does not look for active procedures, and instead, ends the asyncs immediately.For more information:
-
See Working with Periodic Processes (WPPR) for information on how to assign each function to a periodic process.
-
See Executing Periodic Processes (EPRO) for more information on scheduling a periodic process to run at a specified time.
Reorganizing the ASYNC Job Data Queues
Purpose: The data queues associated with the ASYNC jobs are reorganized when the ASYNC jobs are ended. Use the Reorganize queue option as a recovery tool only when the ASYNC jobs end abnormally before the data queues have been reorganized. This option allows you to reorganize the data queues before the next ASYNC job end is processed.To determine if the data queues were reorganized: Display the data queue for an ASYNC job. If the entry date for a record is earlier than the date you last ended the ASYNC jobs, or if records are in a *BLANK status, the data queues were not reorganized. If you do not use the Reorganize queue option, the data queues will be reorganized the next time you end the ASYNC jobs.
When you use the Reorganize queue option, the system deletes completed records from the data queue tables associated with the ASYNC jobs. Records that have not been fully processed will be reloaded to the data queues when the background ASYNC jobs are restarted.
The Reorganize queue option is available only with the CNTL_ASYNC job. All of the ASYNC jobs must be in a *INACTIVE status, and there can be no Active Procedures records for Order Entry, Order Maintenance, Purchase Order Maintenance, Receiving, Confirmation, and PC Manifest functions.
Before you reorganize the data queues: Before you attempt to reorganize the data queues, you should make sure that the status of each ASYNC job is *INACTIVE.
How to reorganize the data queues: Select Reorganize queue for the CNTL_ASYNC job at the Work with Background Jobs Screen.
Active procedures window: A pop-up window opens if there are any users in the Order Entry/Maintenance, Purchase Order Maintenance, Receiving, Confirmation, or PC Manifesting functions. The data queues cannot be reorganized if there are any users in these functions. See Ending the Background ASYNC Jobs
For more information: See Troubleshooting the Async Jobs for more information on the steps you should take if you suspect the async jobs are not running correctly.
Troubleshooting the Async Jobs
Use the following steps if you suspect that the async jobs are not running correctly.
Determining the Status of the Async Jobs
Use the Display Active Batch Jobs Screen to determine if the async jobs are running across all Order Management System application servers.-
If the async job is listed on the Display Active Batch Jobs Screen, the job is running. Review the My Jobs field for the async job to determine if the status of the async job on the Job Management Screen is accurate. See Verifying the Status of the Async Jobs.
-
If the async job is not listed on the Display Active Batch Jobs screen, the job is not running, regardless of the status of the job on the Job Management Screen or the status of each async job on the Work with Background Jobs Screen. See Running the JOBCLN Periodic Function to Correct the Async Jobs for background on resetting the asyncs. Once the JOBCLN completes, you can restart the background async jobs; see Starting the Background ASYNC Jobs.
Verifying the Status of the Async Jobs
The batch jobs displayed on the Display Active Batch Jobs Screen are the jobs that are currently running across all Order Management System application servers. The My Jobs field on this screen indicates if the status of the batch job on the Job Management Screen is accurate. The table below indicates the action to take, based on the status of the async job on the Display Active Batch Jobs screen.
| Async Status in My Jobs Field: | Indicates: | Action to Take: |
|---|---|---|
|
RUN |
The async job is running and the status of the job on the Job Management Screen is accurate. |
Verify that the status of each of the async jobs that is running displays as *ACTIVE on the Work with Background Jobs Screen. What if the async job is active but no records are being processed? If this situation occurs, it is possible that the controlling async data queue table has been cleared. To correct, use the JOBCLN periodic function. |
|
MSG |
The async job is running, but the status on the Job Management Screen is not accurate. |
When the Async jobs in the Background Job Control (MBJC) menu option are active, the system checks the status of each async job on the Job Management screen. If the async job is active and the job status is not RUN, the next time the system checks the status of the async jobs, the system automatically updates the job status to RUN. 1. If an async job is listed on the Display Active Batch Jobs Screen and its My Jobs status is not RUN, wait a few minutes to see if the system will automatically update the status to RUN. 2. Once the status updates to RUN, verify that the status of the async jobs displays as *ACTIVE on the Work with Background Jobs Screen. If the async job does not auto-update to a RUN status, you will need to determine if an error occurred. See Reviewing the Async Job Log. Use the JOBCLN periodic function to correct the async jobs. See Running the JOBCLN Periodic Function to Correct the Async Jobs for more information. Note: Never try to end an actively running async job by manually ending it on the Job Management Screen. This does not actually end the async job. |
|
ERR |
The async job is running, but a user has manually ended the job on the Job Management Screen while its status was MSG. |
|
|
END |
The async job is running, but a user has manually ended the job on the Job Management Screen. |
|
|
*RMV* |
The async job is running, but a user has removed the job from the Job Management Screen. |
End the CNTL_ASYNC that submitted the job. See Ending the Background ASYNC Jobs for instructions. Once you end the CNTL_ASYNC, the system ends the async job and removes the async job from the Display Active Batch Jobs Screen since it is no longer running. You will need to restart the CNTL_ASYNC in order to resubmit the job and run it again. Note: Never remove an actively running async job from the Job Management Screen. If you do this, the system removes all traces of the job from the system, even though the job is still actively running. |
Running the JOBCLN Periodic Function to Correct the Async Jobs
Running the JOBCLN Periodic Function to Correct the Async JobsThe JOBCLN periodic function corrects the status of ASYNC jobs across all servers as follows.
Correcting the status of the BILL_ASYNC, EBO_ASYNC, OTHR_ASYNC, and ORDR_ASYNC:
-
Currently running? If one of these ASYNC jobs is currently running, the JOBCLN function does the following:
-
If the status is INACTIVE, change the status to ACTIVE; otherwise, do not change the status. Also, for the BILL_ASYNC job, make sure that there is an active procedure if the job is running.
-
If there are multiple Ending records for an async job, delete all but one.
-
If the job is in END, FIN, or MSG at Job Management (My Jobs) screen, change the status to RUN and update Job History (Display Job History (DJHY)).
-
-
Not currently running? Otherwise, if the ASYNC job is not currently running, the JOBCLN function does the following:
-
If the status is ACTIVE, change it to INACTIVE.
-
If there is an active procedure for the BILL_ASYNC job, delete it.
-
If the job is in RUN or MSG status, or any status except END at the Job Management screen, change the status to END and update Job History.
-
Correcting the status of the CNTL_ASYNC job:
-
Currently running? If the job is running, the JOBCLN periodic function does the following:
-
If the status is INACTIVE, update it to ACTIVE; otherwise, do not change status.
-
If the status is not in ENDING or REORG status, delete any Ending records for each of the ASYNC jobs.
-
If the status is END, FIN, or MSG at the Job Management screen, update the status to RUN and update Job History.
-
If the EBO_ASYNC or ORDR_ASYNC jobs are INACTIVE, start them.
-
If the BILL_ASYNC or OTHR_ASYNC are INACTIVE, do not change the status because each will start up automatically when data arrives in its queue.
-
-
Not currently running? If the CNTL_ASYNC is not currently running, the JOBCLN periodic function does the following:
-
If any other ASYNC job is ACTIVE, create an Ending record if one does not exist.
-
If any of the other ASYNC jobs are INACTIVE, delete any Ending records for those jobs.
-
If the CNTL_ASYNC status is ACTIVE or ENDING or JOBQ, change to INACTIVE.
-
If the status is REORG and the REORG Job is not currently running, change the status to INACTIVE.
-
If the status is RUN, FIN, MSG, or any other status at the Job Management screen, update the status to END and update Job History.
-
Reviewing the Async Job Log
If the async job remains in a MSG status without being auto-corrected by the system, you can also review the async job log to determine if an error occurred.Async Job Log
To review the async job log: Click the logFile link for the async job on the Job Management Screen to advance to the Log file screen. Note: If the logFile is not a link, the async job was submitted from a different application server; you must log on to the other application server to review the async job log.If an error occurred during async processing, the system writes an entry similar to the following in the async job log:
2009-04-18 22:09:10,161 ERROR [ JENASYS] execute(): status change to [MSG]:334547java.lang.RuntimeException: java.lang.RuntimeException: com.microsoft.sqlserver.jdbc.SQLServerException: The result set has no current row. (JenasysJob.java:297)
2009-04-18 22:09:10,177 ERROR [ JENASYS] run(): Job status change to [MSG]. In 'invokeHandler' EXCEPTION occured while calling processServiceRequest. java.lang.RuntimeException: com.microsoft.sqlserver.jdbc.SQLServerException: The result set has no current row. (JenasysJob.java:701)
If an error exists in the async job log, copy the error and the log so that the problem can be researched if needed.
If an error occurred for one async job: Use the JOBCLN periodic function. See Using the JOBCLN Function to Resolve Job Status Across Servers for more information.
Working With the BILL_ASYNC Jobs
Purpose: The BILLING ASYNC job updates system tables with sales and shipment information as orders are billed.
As orders are confirmed, items returned, or records are uploaded from the PC Manifest system, the system sends records to the Billing data queue for processing. If the Billing ASYNC (BILL_ASYNC) job is active, it processes the records immediately. If the job is inactive when the records arrive, the BILL_ASYNC job processes them when it becomes active again. Records for virtual stored value cards are given priority for processing, and all other records are processed afterward in the sequence in which they arrive at the data queue.
If there are any errors, processing for that order stops at the error point. The system begins processing for the next order record in sequence. You should correct any errors that exist as soon as possible so that your system tables update properly. See Working with BILL_ASYNC Status Messages.
You can review the status of each record in the data queue at any point at the Display Billing Header Data Queue Screen
To generate a shipment or return confirmation: Order Management System generates a shipment or return confirmation email or Outbound Email XML Message (CWEmailOut) when you:
-
process a shipment or return through billing if the Send Shipment Confirmation from Billing (L98) system control value is selected.
-
generate shipment confirmations or return confirmations using the Send Internet Order Ship Confirmations menu option; see Sending Internet Order Ship Confirmation (ESCF).
-
execute the ECSHCNF periodic function; see Working with Periodic Functions (WPER).
For more information see the Web Services Guide on My Oracle Support (ID 2149144.1).
For more information: See Troubleshooting the Async Jobs for more information on the steps you should take if you suspect the async jobs are not running correctly.
In this topic:
Related System Control Values
The following system control values affect the function of the BILL_ASYNC job.
| System Control Value | Description |
|---|---|
|
If this system control value is selected, the Override Async Start Date pop-up window opens when you start the CNTL_ASYNC job. In this window you can specify a date other than the system date to update billing transaction records and ensure a clean cutoff for billing. You must confirm your entry after completing the pop-up window. See Working with the CNTL_ASYNC Job. If this system control value is unselected, the system date is used for all billing transactions. Because Order Management System can be set up with multiple companies each with different settings, if any company has the system control value selected, the pop-up window is displayed. The override date that you enter at the window is used only for those companies that have the system control value selected; the system date is used for any company where the system control value is unselected. |
|
|
This system control value indicates how many instances of the BILL_ASYNC job to run when you start the CNTL_ASYNC job. You can choose to run more than one BILL_ASYNC job to increase the rate at which you process billing transactions. Because the background jobs run for all companies in Order Management System, the system checks the setting for this system control value in all companies, and uses the highest value (up to 9). A setting of 0 or 1 will cause the system to run one BILL_ASYNC job only. See Note: For better system performance, if you run more than one Billing Async job, you should also select Delay Billing Updates (K85) to defer updates. Unique job names: If the Number of Billing Async Jobs to Start (F08) is set to more than 1 and Delay Billing Updates (K85) is selected, each submitted BILL_ASYNC job is assigned a unique name. The first is always named BILL_ASYNC, the second is named BILL_ASYNC_02, and so on. |
|
|
If this system control value is selected, the Billing Async defers certain updates until you run the Delay Billing Update Process. If this system control value is unselected, the Billing Async completes all updates immediately. See Updates During Background Processing for more information on the billing updates that occur immediately and the updates that are processed by the Delay Billing Update Process. |
|
|
Hold Invoices for Multi-Recipient Orders (G07) |
This system control value defines whether the system holds invoices for multi-recipient orders until all of the pick slips for the order are confirmed. If this system control value is selected, the system determines if the pick slip being confirmed is the last pick slip that needs to be confirmed for the multi-recipient order. If the pick slip is the last pick slip that needs to be confirmed for the order, the system:
If the pick slip is not the last pick slip that needs to be confirmed for the order, the system:
|
|
If this system control value is selected, the system saves the billing and shipping addresses for each invoice during billing. The shipping address is used to calculate tax. |
|
|
If selected, billing creates records in the CC Deposit Transaction table and CC Deposit History table immediately after creating records in the Invoice Payment Method table. In addition:
|
Display Asynchronous Job Screen (Displaying the Billing ASYNC Job)
Purpose: Use this screen to display the job attributes for each background ASYNC job, including the Billing ASYNC job.
How to display this screen: Select Display for the BILL_ASYNC job at the Work with Background Jobs Screen.
| Field | Description |
|---|---|
|
Process name |
The name of the process for this ASYNC job. The name of the billing data queue is BILLDATAQ. Alphanumeric, 10 positions; display-only. |
|
Job name |
The name of the ASYNC job. Alphanumeric, 10 positions; display-only. |
|
Description |
The description of the ASYNC job. Alphanumeric, 40 positions; display-only. |
|
Start |
The date and time the ASYNC job was last started and the User ID of the person who started it. (Date): Numeric, 6 positions; display-only. (Time): Numeric, 6 positions; display-only. (User ID): Alphanumeric, 10 positions; display-only. |
|
End |
The date and time the ASYNC job was last ended and the User ID of the person who ended it. (Date): Numeric, 6 positions; display-only. (Time): Numeric, 6 positions; display-only. (User ID): Alphanumeric; 10 positions; display-only. |
|
Controlling job? |
A flag indicating whether this job controls other ASYNC functions. The controlling ASYNC job starts and ends other ASYNC functions. Valid values are:
The CNTL_ASYNC job is the only controlling ASYNC job. |
|
System Option? |
A flag indicating whether this job is a system function that cannot be deleted by the user. Valid values are:
|
|
Status |
The current status of the job. Valid status codes are:
Display-only. |
Display Billing Header Data Queue Screen
Purpose: This screen displays the records that were sent to the data queue for processing since the last time the ASYNC job was ended. Records are sent to the data queue when orders are confirmed or items are returned.Records for virtual stored value cards are given priority for processing, and all other records are processed afterward in the sequence in which they arrive at the data queue.
The status of each record, indicating if the record was processed or if any errors exist, displays.
How to display this screen: Select Display Data Queue for the BILL_ASYNC job at the Work with Background Jobs Screen.
| Field | Description |
|---|---|
|
Cmp (Company) |
The number of the company for which the transaction was processed. If you are running operations for more than one company, transactions for all companies are submitted to the same data queue. Numeric, 3 positions; display-only. |
|
Date |
The date when the transaction was submitted to the data queue for processing. Numeric, 6 positions (in user date format); display-only. |
|
Time |
The time when the transaction was submitted to the data queue for processing. Note: The number of seconds might exceed 59 if the ASYNC job processed 60 or more records in a minute. Numeric, 6 position (HH:MM:SS format); display-only. |
|
Job # |
The job number assigned to the transaction when it was submitted to the data queue. Numeric, 6 positions; display-only. |
|
B/A |
A code indicating whether the record represents a before image or an after image for the transaction. After records are written for all transactions; before records are written for orders that have been maintained. Valid codes are:
Alphanumeric, 1 position; display-only. |
|
Processed |
The status of the record. The record is either not processed, in process, in error, or processed. A status message displays for each step. Alphanumeric, 30 positions; display-only. |
|
Ordr ship to |
The order ship-to number for which the record is being processed. (Order #): Numeric, 8 positions; display-only. (Ship-to): Numeric, 3 positions; display-only. |
|
Trans |
A code identifying the function from which the transaction originated. Valid status codes are:
Alphanumeric, 2 positions, display-only. |
Working with BILL_ASYNC Status Messages
Purpose:You can review the status of each data queue record by displaying the data queue. You must correct the error before the billing transaction can be fully processed.
BILL_ASYNC status messages: This table lists the status messages that you may see when displaying the Billing Header Data Queue
| Message | Message ID | Error Reason/Action Required |
|---|---|---|
|
Processing has begun |
----- |
None. |
|
All updates complete |
----- |
None. The record was fully processed. |
|
Cust Bill To Change |
OA20931 |
A Bill To record does not exist for the customer in the Customer Bill To table. This error cannot be corrected by the user. |
|
Cust Ship To Change |
OA20937 |
A Ship To record does not exist for the customer in the Customer Ship To table. This error cannot be corrected by the user. |
|
Cust Sold To Change |
OA20939 |
A Sold To record does not exist for the customer in the Customer Sold To table. This error cannot be corrected by the user. |
|
Division Change |
OA22980 |
A Division record does not exist for the division under which the order was entered, and must be created. See Working with Divisions (WDIV). |
|
OHD in Use |
OA21782 |
The order is currently being maintained (the Order Header record is in use). The system will process the record when the Order Header record is no longer in use. |
|
OHD# Error |
OA21153 |
The Order Header record does not exist. This error cannot be corrected by the user. |
|
OST# Error |
OA21170 |
The Order Ship To record does not exist. This error cannot be corrected by the user. |
|
PCH in Use |
OA22373 |
The Pick Control record is in use. The system will process the record when the Pick Control record is no longer in use. |
|
Salesman Change |
OA21795 |
A Salesman record does not exist for the sales representative assigned to the order, and must be created. See Working with Sales Representatives (WSLS). |
|
Ship Via Change |
OA21696 |
A Ship Via record does not exist for the carrier being used to ship the order, and must be created. See Working with Ship Via Codes (WVIA). |
|
Source Change |
OA21695 |
A Division record does not exist for the division under which the order was entered, and must be created. See Working with Source Codes (WSRC). |
Updates During Background Processing
Purpose: The following tables list the field and table updates during the BILL_ASYNC procedure.Immediate Billing Updates
The following billing updates occur immediately during the BILL_ASYNC procedure.| Table | Updates |
|---|---|
|
CC Deposit Transaction |
Creates records if the Preload Deposits (L78) system control value is selected |
|
CC Deposit History |
Creates records if the Preload Deposits (L78) system control value is selected |
|
IL Outbound Trigger (MSILOU) |
Creates a record with a File/Key type of CAS for each shipment on an order whose order type matches the ChannelAdvisor Order Type (L90). See ChannelAdvisor Integration Overview, especially Sending Shipment Confirmations to ChannelAdvisor. |
|
Invoice Address (OEINAD) |
Creates a record for the shipping and billing address for each invoice if the Capture Addresses for Invoice (J24) system control value was selected |
|
Invoice Currency (MSINCU) |
Creates/updates records if the Multi Currency by Offer (E03) system control value or Track Invoice Currency (D68) system control value is selected |
|
Invoice Detail (OEINDT) |
Creates/updates records Note: The system bypasses the creation of an Invoice Detail record for a drop ship line when the order line status is X Closed OR the quantity shipped is equal to or greater than the quantity ordered. If this situation occurs, the system writes a message similar to the following in the Application Log: Drop ship line skipped/already billed: 555/00039520/001/00001. |
|
Invoice Detail Charge (INIDCP) |
Creates/updates records |
|
Invoice Detail Pay Method (CSINVP) |
Creates/updates records |
|
Invoice Header (OEINHD) |
Creates/updates records |
|
Invoice Pay Method (CSINVP) |
Creates/updates records |
|
Invoice Ship To (OEINSH) |
Creates/updates records |
|
Item Location (INILOC) |
Reduce quantity on-hand Reduce printed quantity |
|
Item Transaction History |
Creates/updates records |
|
Item Warehouse (INIWRE) |
Units sold, $ Sold Units returned, $ returned Reduce quantity on-hand |
|
Item Warehouse History (INIWRH) |
Units sold, $ sold Units returned, $ returned |
|
Order Broker Note: The system also sends a status update with a status of Fulfilled for a delivery order, or In transit for a ship-for-pickup order. See Order Broker Integration for an overview. |
Updates the Status to Complete. If no response is received, updates the Status to Resend Fulfilled (delivery order) or Resend Intransit (ship-for-pickup order). |
|
Order Detail (OEORDT) |
Updates status Adjusts quantities |
|
Order Line History |
Creates/updates records |
|
Order Payment Method (OEPAYM) |
Updates amounts billed and credit For a retail pickup or delivery order from the Order Broker, deactivates the payment method |
|
Order Ship To (OEORST) |
Updates order balance amounts |
|
Order Shipment Details |
Creates a record for a shipment if a tracking number is specified, and generates the order request message to Narvar if the Narvar Integration is enabled |
|
Refunds (CSRFND) |
Creates/updates records |
|
Reserved Order Line (FLRSOL) |
Updates/deletes records |
|
Stored Value Card (OESVCD) |
Create a record for each unit of a stored value card item billed on the order; see Billing a Stored Value Card |
|
Tickler (MSTKLR) |
Creates/updates records if the Use Workflow Management (H96) system control value is selected and billing activates a tickler rule |
Batch Billing Updates
If the Delay Billing Updates (K85) system control value is selected, the system delays the following billing updates until you run the Delay Billing Update Process; otherwise, these updates also occur immediately.
| Table | Updates |
|---|---|
|
Carton Contents |
Create carton contents records |
|
Customer Bill To (CSCBIL) |
# of invoices # of sales Sales LTD Sales YTD $ on order # of Credits |
|
Customer Membership (OECSMP) |
Create or deactivate customer loyalty memberships based on total sales dollars or customer class. See Loyalty Memberships for an overview. |
|
Customer Ship To Entity (OECHEP) |
Units and $ Sales LTD Units and $ Exchanges LTD Units and $ Returns LTD On Order $ |
|
Customer Ship To Item Class Entity (OEICEP) |
Units and $ Sales LTD Units and $ Exchanges LTD Units and $ Returns LTD |
|
Customer Ship To Order History (CSORH) |
# Sales LTD, $ Sales LTD # Exchanges LTD, $ Exchanges LTD # Returns LTD, $ Returns LTD On Order $ |
|
Customer Shipment History (FLCSHP) |
# of shipments, $ value Last shipment date |
|
Customer Sold To Entity (OECSEP) Foot 1 |
Units and $ Sales LTD Units and $ Exchanges LTD Units and $ Returns LTD On Order $ |
|
Customer Sold To Item Class (OECSIC) |
Units and $ Sales LTD Units and $ Returns LTD Units and $ Exchanges LTD |
|
Customer Sold To Order History (CSTOOH) |
# Sales LTD, $ Sales LTD, incremented for each recipient # Exchanges LTD, $ Exchanges LTD # Returns LTD, $ Returns LTD On Order $ $ Warranty Shipped $ Warranty Returned |
|
Division (MSDIV) |
# Sales Today, # Sales LTD, incremented for each recipient $ Sales Today, $ Sales LTD # Returns Today, # Returns LTD $ Returns Today, $ Returns LTD |
|
Division History (ACDIVH) |
# Sales, $ Sales # Returns, $ Returns |
|
Exchange Reason/Offer (CSXROF) |
# Exchange, $ Exchange |
|
Exchange Reason/Offer/Item (INEROI) |
# Exchange, $ Exchange |
|
Flexible Payment Option (FLFPOP) |
# of shipments, $ shipped # of returns, and $ returned |
|
Order Control Summary (MSORSU) |
# orders shipped, $ orders shipped, quantity shipped # invoices credited, $ invoices credited, quantity credited # orders exchanged, $ orders exchanged, quantity exchanged Note: The Order Async updates the orders entered, orders canceled, and orders soldout fields in the Order Control Summary table. The batch order control job updates the operation and merchandising fields in the Order Control Summary table; see Reviewing Operations Control Summary (FLSH). |
|
Order/Billing History (OEBHST) |
Qty Sold, $ Sold Total, # Sales Qty Exchanged, $ Exchanged Total, # Exchanged Qty Returned, $ Returned Total, # Returns |
|
Return Reason/Offer (CSRTNO) |
# Returns, $ Returns |
|
Return Reason/Offer/Item (INRROI) |
# Returns, $ Returns |
|
Salesman (MSSLMN) |
# Sales LTD, $ Sales LTD, incremented for each recipient # Exchanges LTD, $ Exchanges LTD # Returns LTD, $ Returns LTD |
|
Ship Via (MSSHPV) |
# of Packages TD, # of Packages LTD Freight Collected TD, Freight Collected LTD |
|
Ship Via History (VIAHST) |
# of Packages, Freight Collected |
|
SKU Price History (SKUPHT) |
# Sales, $ Sales |
|
Source (MSSRC) |
$ Sales, # Sales, incremented for each shipment $ Exchanges, # Exchanges $ Returns, # Returns Requests mailed (if the order type on the order matches the order type in the Order Type to Process as Catalog Request/Item Samples (E08) system control value) |
|
Tax Jurisdiction History (MSTXJH) |
Amount charged Amount credited |
|
User Define Exit Point |
Execute any user defined exit points that are called during Billing |
Footnote 1 Entity-level updates take place only if the Track Customer History at Entity Level (F89) system control value is selected.
Working With the EBO ASYNC Job
Purpose: The Evaluate Backorders ASYNC function updates the system tables with reservation and backorder information whenever the inventory level for a backordered item increases. Inventory levels for an item increase when you process inventory transactions, receive purchase orders, or transfer merchandise from suspense.
When the inventory transactions program runs, it sends records to the Evaluate Backorders data queue for processing if the inventory level for a backordered item is increased.
-
If the Evaluate Backorders ASYNC (EBO_ASYNC) function is active, it processes the records immediately.
-
If the EBO_ASYNC is not active when it receives the records, it processes them as soon as it becomes active again.
All records are processed in the sequence in which they arrive in the data queue.
Pick slip preparation: During the Evaluate Backorders process, the system performs pick slip preparation for each order updated:
-
The system REMOVES any pick slip preparation from the order.
-
Once the Evaluate Backorders async reserves stock for an order, the system EVALUATES the order to determine if it is eligible for pick slip preparation.
-
If the order is eligible for pick slip preparation after the changes to the order have been made, the system RE-APPLIES pick slip preparation to the order.
See Preparing Orders for Pick Slip Generation for processing details.
Errors: If any errors occur in processing a data queue record, the function stops processing at the error point and starts the next record in sequence. The records in error are listed on the Evaluate Backorders ASYNC Error Report, which prints when the ASYNC jobs end. EBO_ASYNC continues processing any record in error once the error is corrected.
You can view the status of each record in the data queue at the Display Evaluate B/O Data Queue Screen.
For more information: See Troubleshooting the Async Jobs for more information on the steps you should take if you suspect the async jobs are not running correctly.
In this topic:
Display Asynchronous Job Screen (Displaying the Evaluate Backorders ASYNC Job)
Purpose: Use this screen to display the job attributes for each background ASYNC job. This screen displays descriptive information about the ASYNC job.How to display this screen: Select Display for the EBO_ ASYNC job at the Work with Background Jobs Screen.
| Field | Description |
|---|---|
|
Process name |
The name of the process for this ASYNC job. The name of the evaluate backorders data queue is EVLBODATAQ. Alphanumeric, 10 positions; display-only. |
|
Job name |
The name of the ASYNC job. Alphanumeric, 10 positions; display-only. |
|
Description |
The description of the ASYNC job. Alphanumeric, 40 positions; display-only. |
|
Start |
The date and time the ASYNC job was last started and the User ID of the person who started it. (Date): Numeric, 6 positions; display-only. (Time): Numeric, 6 positions; display-only. User ID): Alphanumeric, 10 positions; display-only. |
|
End |
The date and time the ASYNC job was last ended and the User ID of the person who ended it. (Date): Numeric, 6 positions; display-only. (Time): Numeric, 6 positions; display-only. (User ID): Alphanumeric, 10 positions; display-only. |
|
Controlling job? |
A flag indicating whether this function controls other ASYNC functions. The controlling ASYNC function starts and ends other ASYNC functions. Valid values are: Selected - This is a controlling ASYNC function. Unselected - This is not a controlling ASYNC function. The CNTL_ASYNC job is the only controlling ASYNC job. |
|
System Option? |
A flag indicating whether this function is a system function that cannot be deleted by the user. Valid values are: Selected - This function cannot be deleted by the user. Unselected - This function can be deleted by the user. |
|
Status |
The current status of the job. Valid status codes are:
Display-only. |
Display Evaluate B/O Data Queue Screen
Purpose: This screen displays the records that have been sent to the data queue for processing since the last time the ASYNC function was ended. Records are sent to the data queue when the inventory level for an item is increased.The status of each record indicates if the record has been processed or if any errors exist.
Note:
If the Use Inventory Sharing Backorder Evaluation (I80) system control value is selected, there is a data queue record only for the shared company (the company where you actually track the inventory). See Inventory Sharing (A69) for an overview.How to display this screen: Select Display Data Queue for the EBO_ASYNC job on the Work with Background Jobs Screen.
| Field | Description |
|---|---|
|
Cmp (Company) |
The number of the company for which the transaction was processed. If you are running operations for more than one company, transactions for all companies are submitted to the same data queue. Note: If the Use Inventory Sharing Backorder Evaluation (I80) system control value is selected, there is a data queue record only for the shared company (the company where you actually track the inventory). See Inventory Sharing (A69) for an overview. Numeric, 3 positions; display-only. |
|
Date |
The date when the transaction was submitted to the data queue for processing. Numeric, 6 positions (in user date format); display-only. |
|
Time |
The time at which the transaction was submitted to the data queue for processing. Note: The number of seconds might exceed 59 if the ASYNC job processed 60 or more records in a minute. Numeric, 6 position (HH:MM:SS format); display-only. |
|
Job # |
The job number assigned to the transaction when it was submitted to the data queue. Numeric, 6 positions; display-only. |
|
Processed |
The status of the record. The record is either not processed, in process, in error, or processed. A status message displays for each step. Alphanumeric, 30 positions; display-only. |
|
Item |
The item number/SKU of the backordered item that can now be reserved. (Item#): Alphanumeric, 12 positions; display-only. (SKU): Alphanumeric, three 4-position fields; display-only. |
|
Whs |
The code of the warehouse where the backordered item can be reserved. Numeric, 3 positions; display-only. |
Evaluate B/O Background Job Error Listing
Purpose: This listing prints when the background ASYNC jobs are ended. The report lists the records that could not be processed and the reason for the error. The record will be processed when the error is corrected.
-
Order #: The order number for which the error occurred.
-
Ship to: The ship-to suffix of the order for which the error occurred.
-
Order date: The date when the order was entered.
-
User: The User ID of the operator who entered the order.
-
Update area: The message describing the reason for the error.
-
Error ID: The ID number assigned to the error.
Updates During Background Processing
Updates: Evaluate Backorders:
-
Updates backorder quantity, reserved quantity, and available quantity in item warehouse
-
Creates reserved order lines
Pick slip preparation: During the Evaluate Backorders process, the system performs pick slip preparation for each order updated:
-
The system REMOVES any pick slip preparation from the order.
-
Once the Evaluate Backorders async reserves stock for an order, the system EVALUATES the order to determine if it is eligible for pick slip preparation.
-
If the order is eligible for pick slip preparation after the changes to the order have been made, the system RE-APPLIES pick slip preparation to the order.
See Preparing Orders for Pick Slip Generation for processing details.
Working With the ORDR_ASYNC Job
Purpose: The Order Processing ASYNC job updates system tables with order and demand information as orders are entered and maintained.
As you enter or maintain orders, the system sends the records to the Order Processing data queue for processing. As soon as the Order Processing Data queue receives a record to process, the record is processed immediately, regardless of the status of the Order Processing ASYNC (ORDR_ASYNC) job. The ORDR_ASYNC job processes multiple orders simultaneously.
If there are any records that the job cannot update, it skips that record and continues.
You can review the status of each record in the data queue at any point by displaying the Display Order Ship To Data Queue Screen.
Quotes: The system does not send quotes to the Order Async until the quote is converted to an order; see Entering Pre-Order Quotes for an overview.
Related system control value: The Update Demand for Order Maintenance Transactions (C72) controls how this job processes updates.
Note:
While the Order Async job does not need to be active to process records, you should set the Order Async job to active to handle reorganization and cleanup of any transactions that did not process correctly.For more information: See Troubleshooting the Async Jobs for more information on the steps you should take if you suspect the async jobs are not running correctly.
In this topic:
Display Asynchronous Job Screen (Displaying the Order Processing ASYNC Job)
Purpose: Use this screen to display the job attributes for each background ASYNC job, including the Order Processing ASYNC job.How to display this screen: Select Display for an ASYNC job at the Work with Background Jobs Screen.
| Field | Description |
|---|---|
|
Process name |
The name of the process for this ASYNC job. The name of the order data queue is ORDERDATAQ. Alphanumeric, 10 positions; display-only. |
|
Job name |
The name of the ASYNC job. Alphanumeric, 10 positions; display-only. |
|
Description |
The description of the ASYNC job. Alphanumeric, 40 positions; display-only. |
|
Start |
The date and time the ASYNC job was last started and the User ID of the person who started it. (Date): Numeric, 6 positions; display-only. (Time): Numeric, 6 positions; display-only. (User ID): Alphanumeric; 10 positions; display-only. |
|
End |
The date and time the ASYNC job was last ended and the User ID of the person who ended it. (Date): Numeric, 6 positions; display-only. (Time): Numeric, 6 positions; display-only. (User ID): Alphanumeric; 10 positions; display-only. |
|
Controlling job |
A flag indicating whether this job controls other ASYNC functions. The controlling ASYNC job starts and ends other ASYNC functions. Valid values are:
The CNTL_ASYNC job is the only controlling ASYNC job. |
|
System Option |
A flag indicating whether this is a system job that cannot be deleted by the user. Valid values are:
|
|
Status |
The current status of the job. Valid status codes are:
Display-only. |
Display Order Ship To Data Queue Screen
Purpose: Use this screen to review the records that have arrived in the data queue for processing since the last time you ended the ASYNC jobs. Records arrive in the data queue for new orders that are entered and for existing orders that are maintained. The status of each record, indicating if the record has been processed or if any errors exist, displays.How to display this screen: Select Display Data Queue for the ORDR_ASYNC job at the Work with Background Jobs Screen.
| Field | Description |
|---|---|
|
Cmp (Company) |
The number of the company for which the transaction was processed. If you are running operations for more than one company, transactions for all companies are submitted to the same data queue. Numeric, 3 positions; display-only. |
|
Date |
The date when the transaction was submitted to the data queue for processing. Numeric, 6 positions (in user date format); display-only. |
|
Time |
The time when the transaction was submitted to the data queue for processing. Note: The number of seconds might exceed 59 if the ASYNC job processed 60 or more records in a minute. Numeric, 6 position (HH:MM:SS format); display-only. |
|
User |
The user ID of the user associated with the order transaction. Alphanumeric, 10 positions; display-only. |
|
B/A |
A code indicating whether the record represents a before image or an after image for the transaction. After records are written for all transactions; before records are written for orders that have been maintained. Valid codes are:
Alphanumeric, 1 position; display-only. |
|
Processed |
The status of the record. The record is either not processed, in process, in error, or processed. A status message displays for each step. Alphanumeric, 30 positions; display-only. |
|
Ordr # |
The order number of the record. (Order #): Numeric, 8 positions; display-only. |
|
Ordr ship to |
The order ship-to number of the record. (Ship to): Numeric, 3 positions, display-only. |
|
Trn |
A code identifying the job from which the transaction originated. Valid status codes are:
Alphanumeric, 2 positions, display-only. |
Updates During Background Processing
Purpose: The ORDR_ASYNC job updates system tables with order and demand information as orders are entered and maintained. As you enter or maintain orders, the system sends the records to the Order Processing data queue for processing. As soon as the Order Processing Data queue receives a record to process, the record is processed immediately, regardless of the status of the Order Processing ASYNC (ORDR_ASYNC) job. The ORDR_ASYNC job processes multiple orders simultaneously. While the Order Async job does not need to be active to process records, you should set the Order Async job to active to handle reorganization and cleanup of any transactions that did not process correctly.Related system control value: The Update Demand for Order Maintenance Transactions (C72) system control value controls whether totals update as a result of order maintenance as well as order entry.
Order count and demand updates for retail pickup and delivery orders: If the originating location on a retail pickup or delivery order is Order Management System, the system does not increase the order count that is displayed on the About Application Screen or perform any demand updates for the order.
Note:
The system identifies the originating location as Order Management System if the request_system_cd in the fulfillment response message matches the system code in the OROB System (K50) system control value and the request_location_cd in the fulfillment response message matches the location in the Originating Location to Pass to OROB (M32) system control value. In this situation, the system prefaces the E-commerce order number in the Order Header Extended table with ORIG#: 9999-001, where ORIG#: indicates the order was created as a result of OROB fulfillment assignment, 9999 is the order number, and 001 is the ship to number. See Retail Pickup (including Ship-for-Pickup) or Delivery Orders for more information.| Table | Updates |
|---|---|
|
Cancel Reason/Offer (CNCNRO) |
Date # canceled qty canceled units canceled Creates a record only if the cancel reason code is flagged not to reduce demand. |
|
CC Authorization Backorder (CCATBO) |
Create a record for authorization of a fully backordered order if the Preauthorize Backorders (D32) system control value is selected. |
|
Correspondence History (MSCOHS) |
Creates a record for each order confirmation email Outbound Email XML Message (CWEmailOut) generated if the Write Outbound Email to Email Repository (H99) system control value is selected. See the Suppress Order Confirmations for Orders in Error (K09) system control value for a discussion of when the ORDR_ASYNC background job generates order confirmations. For more information see the Web Services Guide on My Oracle Support (ID 2149144.1). |
|
Customer Membership (OECSMP) |
Create or deactivate customer loyalty memberships based on total order dollars or customer class. See Loyalty Memberships for an overview. |
|
Customer Sold To (OECSSL) |
Original and current mail type Original source Current source (if Update of Current Source Code in Customer File (D08) system control value is selected) |
|
Customer Sold To Entity (OECSEP) |
Last order date On order $ # orders LTD, $ orders LTD # cancels LTD, $ cancels LTD # soldouts LTD, $ soldouts LTD Last source Current mail type Original mail type Active since date Original source code Last source code Updated if the Track Customer History at Entity Level (F89) system control value is selected. |
|
Customer Sold to Item Class (OECSIC) |
# orders LTD, $ ordered LTD # units ordered LTD # units canceled LTD, $ canceled LTD # units soldout LTD, $ soldout LTD Last order date |
|
Customer Sold To Item Class Entity (OEICEP) |
Creates records and updates: # orders (not units) # orders LTD, $ orders LTD # cancels LTD, $ cancels LTD # soldouts LTD, $ soldouts LTD Last order date |
|
Customer Sold To Order History (CSTOOH) |
On order $ # orders LTD, $ orders LTD # soldouts LTD, $ soldouts LTD # canceled LTD, $ canceled LTD Last CC# Last expiration date Active since date Last order date Last order type Pay type Current source code Last order amount |
|
Flash Report (FLFLSH) |
See Reviewing Operations Control Summary (FLSH) for information on order totals tracked. |
|
Item/Sku/Offer (FCISOF) |
Start and end dates Quantity ordered, $ ordered |
|
Offer (MSOFFR) |
Date of first order |
|
Order Control Summary (MSORSU) |
# orders entered, $ orders entered, quantity ordered # orders cancelled, $ orders cancelled, quantity cancelled # orders soldout/closed, $ orders soldout, quantity soldout Note: The Billing Async updates the orders shipped, orders exchanged, and invoices credited fields. The batch order control job updates the operation and merchandising fields in the Order Control Summary table; see Reviewing Operations Control Summary (FLSH). |
|
Order Type/ User (OEOTYU) |
# Orders TD, LTD $ Value - TD, LTD # Receipts TD, LTD # Lines TD, LTD |
|
Order/Billing History (OEBHST) |
# orders, $ order total, qty ordered # soldout, $ soldout total, qty soldout # canceled, $ canceled, qty canceled |
|
Price override reason (OEPROR) |
# of overrides Total discount |
|
SKU (INSKU) |
Date of first order Date of last order |
|
SKU Price History (SKUPHT) |
# orders (actually updated with the total ordered quantity) $ orders |
|
Soldout Notifications (SONTFY) |
Creates records |
|
Source Code (MSSRC) |
$ ordered, soldout, canceled # of orders, soldouts, cancels Date of first order Date of last order Response percent |
|
Tickler |
Records created based on related configuration. See Workflow Management Overview and Setup for background. |
Note:
-
Entity-level updates take place only if the Track Customer History at Entity Level (F89)system control value is selected.
-
Order maintenance activity updates demand only if the Update Demand for Order Maintenance Transactions (C72) system control value is selected.
Working With the OTHR_ASYNC Job
The Other ASYNC function updates the system tables with purchase order information when purchase orders are entered, maintained, or received.
When purchase orders are entered, maintained, or received, records are sent to the Other data queue for processing. If the Other ASYNC (OTHR_ASYNC) function is active, the records will be processed immediately. If the function is not active when the records are sent, they will be processed as soon as the OTHR_ASYNC function becomes active again. All records are processed in the sequence in which they were sent to the data queue.
If any errors exist, processing for that record stops at the error point. The system begins processing the next record in sequence. The records in error are listed on the P/O Background Job Error Listing, which is printed when the ASYNC jobs are ended. OTHR_ASYNC will continue processing the record when the error has been corrected. You should correct any errors that exist as soon as possible so that your system tables are updated properly. See Working with OTHR_ASYNC Status Messages.
The status of each record in the data queue can be viewed at any point by displaying the Display PO Header Data Queue Screen.
For more information: See Troubleshooting the Async Jobs for more information on the steps you should take if you suspect the async jobs are not running correctly.
In this topic:
Display Asynchronous Job Screen (Displaying the Other ASYNC Job)
Purpose: Use this screen to display the job attributes for each background ASYNC job, including the OTHR_ASYNC job. This screen displays descriptive information about the ASYNC job.
How to display this screen: Select Display for the OTHR_ASYNC job at the Work with Background Jobs Screen
| Field | Description |
|---|---|
|
Process name |
The name of the process for this ASYNC job. The name of the OTHR_ASYNC data queue is OTHERDATAQ. Alphanumeric, 10 positions; display-only |
|
Job name |
The name of the ASYNC job. Alphanumeric, 10 positions; display-only |
|
Description |
The description of the ASYNC job. Alphanumeric, 40 positions; display-only. |
|
Start |
The date and time the ASYNC job was last started and the User ID of the person who started it. (Date): Numeric, 6 positions; display-only. (Time): Numeric, 6 positions; display-only. (User ID): Alphanumeric; 10 positions; display-only. |
|
End |
The date and time the ASYNC job was last ended and the User ID of the person who ended it. (Date): Numeric, 6 positions; display-only. (Time): Numeric, 6 positions; display-only. (User ID): Alphanumeric, 10 positions; display-only. |
|
Controlling job? |
A flag indicating whether this function controls other ASYNC functions. The controlling ASYNC function starts and ends other ASYNC functions. Valid values are:
The CNTL_ASYNC job is the only controlling ASYNC job. |
|
System Option? |
A flag indicating whether this function is a system function that cannot be deleted by the user. Valid values are: Selected - This function cannot be deleted by the user. Unselected - This function can be deleted by the user. |
|
Status |
The current status of the function. Valid status codes are:
Display-only |
Display PO Header Data Queue Screen
Purpose: This screen displays the records that have been sent to the data queue for processing since the last time the ASYNC function was ended. Records are sent to the data queue when the inventory level for an item is increased.
The status of each record, which indicates if the record has been processed or if any errors exist, displays.
How to display this screen: Select Display Data Queue for the OTHR_ASYNC job on the Display Asynchronous Job Screen (Displaying the Other ASYNC Job)
| Field | Description |
|---|---|
|
Cmp (Company) |
The number of the company for which the transaction was processed. If you are running operations for more than one company, transactions for all companies are submitted to the same data queue. Numeric, 3 positions; display-only. |
|
Date |
The date on which the transaction was submitted to the data queue for processing. Numeric, 6 positions (in user date format); display-only. |
|
Time |
The time at which the transaction was submitted to the data queue for processing. Note: The number of seconds might exceed 59 if the ASYNC job processed 60 or more records in a minute. Numeric, 6 position (HH:MM:SS format); display-only. |
|
User |
The User ID of the person who entered the transaction. Alphanumeric, 10 positions; display-only. |
|
B/A |
A code indicating whether the record represents a before image or an after image for the transaction. After records are written for all transactions; before records are written for order maintenance transactions. Valid codes are:
Alphanumeric, 1 position; display-only. |
|
Processed |
The status of the record. The record is either not processed, in process, in error, or processed. A status message displays for each step. Alphanumeric, 30 positions; display-only. |
|
PO# |
The number of the purchase order for which the record is being processed. Numeric, 7 positions; display-only. |
|
Trans |
A code that identifies the function where the transaction originated. Valid status codes are:
Alphanumeric, 2 positions, display-only. |
Working with OTHR_ASYNC Status Messages
Purpose: The status of each data queue record can be viewed by displaying the data queue. If an error exists, the message will print on the P/O Background Jobs Error Listing that is printed when the ASYNC jobs are ended. The error must be corrected before the transaction can be fully processed.
OTHR_ASYNC status messages: This table lists the status messages that you may see when displaying the PO Header Data Queue, or when reviewing the P/O Background Job Error Listing. The Error Reason/Action Required section of the table below is incomplete as of this writing.
| Message | Message ID | Error Reason/Action Required |
|---|---|---|
|
Processing has begun |
None. |
|
|
All updates complete |
None. The record was fully processed. |
|
|
Error updating buyers |
OA21759 |
|
|
Error updating Item/Warehouse |
OA21760 |
|
|
Error updating PO Dtl audit |
OA21915 |
|
|
Error updating PO Hdr audit |
OA21916 |
|
|
Error creating PO layering |
OA21897 |
|
|
Error changing PO layering |
OA21920 |
|
|
Error creating PO layering |
OA21918 |
|
|
Error deleting PO layering |
OA21919 |
|
|
Error updating SKU Offer |
OA21758 |
|
|
Error updating threshold value |
OA22968 |
|
|
Error updating vendor |
OA21732 |
|
|
Error updating vendor history |
OA21733 |
|
|
Error updating vendor items |
OA21766 |
P/O Background Job Error Listing
Purpose: This report prints when the background ASYNC jobs are ended. The report lists the records that could not be processed and the reason for the error. The record will be processed when the error is corrected.
See Working with OTHR_ASYNC Status Messages for a complete description of the error messages you may encounter and the steps necessary to correct the error.
Order #: The order number for which the error occurred.-
Ship to: The ship-to suffix of the order for which the error occurred.
-
Order date: The date on which the order was entered.
-
User: The User ID of the operator who entered the order.
-
Update area: The message describing the reason for the error. See Working with OTHR_ASYNC Status Messages.
-
Error ID: The ID number assigned to the error. See Working with OTHR_ASYNC Status Messages.
Updates During Background Processing
Purpose: The system performs the following field and table updates during the OTHR_ASYNC procedure:
| Function | Field |
|---|---|
|
Update the SKU/Offer table |
|
|
--- |
Threshold values include:
|
|
Update the Item/Warehouse table |
|
|
--- |
On order quantity |
|
Update PO Layering table |
|
|
PO Maintenance + PO Receipts |
Creates the record Open quantity |
|
PO Receipts |
Status Note: If you receive inventory into a pending putaway warehouse, the system keeps the PO layering record in an open status until the inventory is moved out of the pending putaway warehouse. See Pending Putaway Overview. |
|
--- |
Warehouse |
|
--- |
Due date |
|
Update the Vendor/Item table |
|
|
PO Receipts |
Shipments - LTD |
|
--- |
Elapsed days - LTD |
|
--- |
Late days - LTD |
|
--- |
Number of late shipments |
|
--- |
Defects - LTD |
|
--- |
Underships |
|
--- |
Overships |
|
--- |
Units received - LTD |
|
PO Maintenance |
Dollar value purchased - LTD |
|
--- |
Units purchased - LTD |
|
Update Vendor table |
|
|
--- |
Dollar value cancelled |
|
--- |
Dollar value held |
|
--- |
Dollar value open |
|
--- |
Number of POs - LTD |
|
--- |
Number of open POs |
|
Update Vendor History table |
|
|
--- |
Dollar value purchase orders |
|
--- |
Number of purchase orders |
|
Update the Buyer table |
|
|
--- |
Dollar value POs - LTD |
|
--- |
Number of purchase orders - LTD |
|
Update Vendor Extended table |
|
|
--- |
Dollar value on order |
|
Update IL Outbound Trigger Table |
|
|
PO Maintenance |
Creates ITW outbound trigger records when you create a purchase order or maintain an open purchase if the Include PO Updates (J93) system control value is selected. See Generic Inventory Download API for an overview and details. For more information see the Web Services Guide on https://support.oracle.com My Oracle Support (ID 2149144.1). |
Running Period End Processing
Topics in this part:
-
Working with Periodic Functions (WPER) describes working with the functions you can include in your periodic processing.
-
Working with Periodic Processes (WPPR) describes how to create, change, delete or display a periodic process.
-
Executing Periodic Processes (EPRO) describes how to set up and execute a periodic process.
-
Working with Periodic Process History (WPHS) presents the screens you use to review periodic process history.
-
Purge Periodic Process History (MPPR) describes how to purge periodic process history in a completed status for all Order Management System companies prior to a specified date.
-
Printing the Tax Jurisdiction Report (PTXJ) describes how to run this report and presents a sample.
-
Releasing Orders from Time Hold describes the RLSTIME periodic function.
-
Working with the Marketing Download Extract describes how to download order, customer, source code, and vendor information from Order Management System to the DMT system.
-
Using the Financial Data Interface describes how to extract information to the Financial Sales Download table.
Releasing Orders from Time Hold
Purpose: Use the Release Orders on Time Hold (RSLTME) function to release prepaid orders from hold automatically when the number of days to hold the order (in the Hold days field in the Pay Type table) has passed, and to release orders held for credit card authorization.
Prepaid orders: When this job runs, the system checks all open prepaid orders (pay category Cash/Check) to see if the hold days have expired. The system holds prepaid orders automatically for a certain number of days to ensure that the checks clear (you define the hold days in the Pay Type table). The system places these orders on TM hold (Time Hold), which is a system-level hold. Once the checks have cleared, these orders are eligible for pick slip preparation, unless they are on hold for some other reason. By running this program, you have the system release the eligible orders automatically, so you do not have to release them one-by-one.
See Working with Pay Types (WPAY) for information on setting up the Pay Type table.
Credit card orders: This job also evaluates orders placed on hold because of a declined credit card. You can specify a number of days to hold an order based on the response you receive from an authorization service; for example, if a credit card is declined because the customer is over a credit limit, it is unlikely that the customer's credit situation will change significantly in a single day. In this situation, you might set up this vendor response to hold such orders for five days before making these orders eligible for pick slip preparation and attempting authorization again.
Orders that are on hold because of a declined credit card have an order hold reason of AT (failed authorization). See Working with Credit Card Cancellations (WCCC) for a discussion on managing declined authorizations using Order Management System.
Pick slip preparation: When you release an order from hold, the system removes any pick slip preparation that has been applied to the order and then reevaluates the order for pick slip preparation; see Preparing Orders for Pick Slip Generation.
In this topic:
Define as periodic function: You must define RSLTME as a periodic function with Working with Periodic Functions (WPER).
Sample setup: Enter the following at the Create Periodic Function Screen:
-
Function: RLSTIME
-
Description: Release Orders on Time Hold
-
Company parameter: Y
-
Appl area: C/S
-
Program name: CSR0557
Add to DAILY periodic process: Next, at the Work with Periodic Functions Screen, select Functions to add this periodic function to your daily periodic process.
Released orders report: The system prints the Orders Released from Time Hold Report automatically when you execute the Daily Periodic Process, which includes the Release Orders from Time Hold job. If the order is still on user hold, the system displays the user hold reason on the report.
Order history for release: The system logs messages to the Order History table automatically for orders placed on and released from time hold. Select Order History in standard Order Inquiry to advance to the Display Order History screen. This information is also available in streamlined Order Inquiry by selecting History.
History messages: Two messages are logged for orders placed on Time Hold (TM type hold) or credit card hold (AT). The first message is logged automatically when the system places the order on hold.
The second message is logged automatically when the system releases the order after the hold days expire. This message contains:
-
the date the order was released from TM or AT hold (although it may remain on hold for other reasons)
-
the type of transaction, which is R for "release"
-
a transaction note, which identifies the type of activity performed
-
the dollar amount of the order
-
the user ID of the person who started the periodic process
Using the System Utilities
Topics in this part: The following topics describe the utilities available in the system that are typically used only by the System Administrator.
-
Working with Default Options (WDFT) describes how to work with predefined field or program defaults.
-
Consolidating Order Billing History (MOBH) describes how to consolidate order billing history.
-
Working with Inventory Resets describes the options available to reset inventory levels when they become out of synch.
-
Reset Allocation Quantities (MRPC) describes how to reset the printed quantities for orders.
-
Reset Reserve Quantity (MRQR) describes how to reset the reserved quantity of items in inventory.
-
Reset Back Order Quantity (MRBO) describes how to reset the backorder quantity of items in inventory.
-
Reset Item Warehouse Quantity On Hand (MRIW) describes how to reset the quantity on-hand for each Item Warehouse record based on the total quantities on-hand.
-
Reset SKU Open Order Quantity (MRSO) describes how to reset the fields in the SKU table based on the current open orders for the SKU.
-
Unlocking a Stranded Order or Batch (MULO) describes how to unlock an order or batch that became locked during processing or maintenance.
-
Resetting the Order Billing History Table (ROBH) describes how to reset the Order Billing History table based on the records in the Order Detail table.
-
Resetting Customer Sold To Amount On Order (RONO) describes how to reset the On order amount field in the Customer Sold To Order History file so that it matches the amount of any existing open orders for the customer.
-
Unlock Purchase Order (MUPO) describes how to reset locked purchase orders and reset the on-order quantities for Item Warehouse records.
-
Work with File Uploads (WUPL) describes how to upload a file to a specified table in the Order Management System database.
Working with Inventory Resets
Purpose: Use the following inventory options to reset quantities when inventory levels become out-of-sync due to system problems:
Note:
Do not run these resets when the Billing Async is active, or when you are running pick slip generation or performing inventory transaction processing. Also, do not run the Reserve Quantity Reset or Backorder Quantity Reset while creating or updating orders.
Working with File Imports
Purpose: Your options for uploading file data to Order Management System are:
-
File storage API: If the FILE_STORAGE_IMPORTS_ENABLED property is selected, you use the file storage API to import files for most types of imports, as well as deleting files that are no longer needed. See the Available File Uploads for details.
-
The file storage API stages uploaded file data in the FILE_STORAGE database table. Upload processes point to the FILE_STORAGE table when retrieving data to update target database tables. See File Storage API.
-
The file storage API also supports exporting files. See File Storage API.
-
Populate upload folder: If the FILE_STORAGE_IMPORTS_ENABLED property is not selected, you can use secure FTP to place upload files in a specified upload folder. Upload processes point to the specified upload folder when retrieving data from files to update target database tables.
-
Work with File Uploads (WUPL): Regardless of whether the FILE_STORAGE_IMPORTS_ENABLED property is selected, you can use this menu option to upload files. When you upload a file through this menu option, if the file contents need to first be placed in a staging database table before processing, the upload process populates the staging table with the file data. However, you cannot use this option for the Oracle Retail Merchandising Foundation Cloud Service (RMFCS) and Oracle Retail Pricing Cloud Service (RPCS) Integration.
Regardless of how the upload file contents are retrieved or staged, you then need to update the destination table in the Order Management System database with the uploaded data. The file layouts, edits, and periodic processes are the same, regardless of the method you use to upload the data.
In this topic:
File Upload Setup
Before you can use the file upload process, you must complete the required setup.
File Upload Properties
Order Management System uses the following properties to process a file upload.
| Property Name | Description |
|---|---|
|
FILE_STORAGE_IMPORTS_ENABLED Located in Working with Customer Properties (PROP). |
Defines whether to use the FILE_STORAGE table and the file storage API, rather than Work with File Uploads (WUPL), to upload files. See File Storage API for information. Note: If the file storage API is enabled for imports, you need to use Work with File Uploads (WUPL) for the Sales Associates, Stores, or USPS Zip Codes uploads. The file storage API is not enabled for these uploads. |
|
FILE_STORAGE_MAX_SIZE Located in Working with Customer Properties (PROP). |
The maximum size, in bytes, of a file that can be uploaded to the FILE_STORAGE table. Applies only if the FILE_STORAGE_IMPORTS_ENABLED property is set to true. If a file’s size exceeds this maximum, the API returns a 403 error and the upload fails. Uploaded files should be less than 1G in size, so this property should be set to 1073741824 or less. |
|
Located in Working with Admin Properties (CPRP). |
Defines the number of records to process in an upload file at a time. The default setting is 2500, indicating the system inserts records from the upload file into the Order Management System database in batches of 2500. If a record in a batch contains an error, the system does not insert any of the records in the batch into the Order Management System database and places the upload file in an error status. For troubleshooting purposes, you can decrease the UPLOAD_BATCH_SIZE and reprocess the file upload to help you determine which record contains the error. Example: In this example, the CWDIRECTCP_UPLOAD_BATCH_SIZE is 10. You process an upload file containing 30 records. In this situation, the system processes the upload file in 3 batches: the first batch contains records 1-10; the second batch contains records 11-20; and the third batch contains records 21-30. If a record in the second batch fails, the system does not process any of the records in the second batch, but does process all of the records in the first batch and third batch. |
|
CWDIRECTCP_UPLOAD_ DIRECTORY Located in Working with Admin Properties (CPRP). |
Defines the location on the Order Management System application server used for the upload file if the File Storage API is not in use. However, even if the file storage API is enabled for imports, the process still uses this folder to place files that have been uploaded prior to additional processing. Used for all the uploads listed under Available File Uploads, except for the Sales Associates, Stores, or USPS Zip Codes uploads. |
|
Located in Working with Customer Properties (PROP). |
Defines the location on the Order Management System application server used for the Sales Associates upload file, or for upload processing if the file storage API is enabled for imports. |
|
Located in Working with Customer Properties (PROP). |
Defines the location on the Order Management System application server used for the USPS Zip Codes upload file, or for upload processing if the file storage API is enabled for imports. |
|
STORE_FILE_PATH Located in Working with Customer Properties (PROP). |
Defines the location on the Order Management System application server used for the Stores upload file. |
File Upload Process
The file upload process includes the following steps:
-
Using the File Storage API or Processing File Uploads through Work with File Uploads (WUPL)
-
Processing staged data: Some uploads, such as Catalog Requests, initially populate an intermediate table in the database. For these uploads, you need to run an additional process to use the contents of the intermediate table to populate the destination table. Uploads that require the use of a staging table are described under Available File Uploads.
Populating the Upload File
The file upload requires you to identify the file containing the data to upload to the Order Management System database. You can create an upload file by:
-
creating your own text file, using a text editor or spreadsheet application, or
-
copying the sample file upload data, pasting the data into a text editor, and saving it with the file extension .txt, unless otherwise indicated. See Sample Upload Data.
Important:
In order to leave any field in an upload file blank, pass a space in an alphanumeric field and a 0 in a numeric field so that the file can be processed without errors. Leaving a field with no space or 0 is interpreted as null in the database and causes errors.
File Storage API
File storage for imports: If the FILE_STORAGE_IMPORTS_ENABLED property is selected, you can use the file storage API to:
-
upload files for import
-
obtain a list of files that have been uploaded, or that are in error
-
download a file, such as an error file (does not automatically delete the file)
-
delete files
Note:
Use of the file storage API is required for new installations of Order Management System 17.x and later.
File storage for exports: If the FILE_STORAGE_EXPORTS_ENABLED property is selected, you can use the file storage API to:
-
obtain a list of export files that have been generated
-
download an export file
-
delete files
Use of the FILE_STORAGE table: The FILE_STORAGE table stores data on import files and export files, as well as errors that occur during import or export processing. The web service requests files from, deletes files in, and puts files in this table.
Note:
When you view the database in Oracle SQL Developer, the FILE_STORAGE table is displayed under Tables, but is not displayed under Views.
Import processing example: To import Catalog Requests through the file storage API:
-
Create or obtain the Catalog Request file named IXCRIN.txt. See the Sample Catalog Requests Upload Data for sample contents.
-
Use the putFile web service request to place the IXCRIN.txt file data in the OMS-IMPORTS container of the FILE_STORAGE table.
-
Run the UPCATRQ Upload Catalog Request File (Program name PFR0134, Parameter IXCRIN) periodic function to use the contents of the FILE_STORAGE record to populate the Catalog Request Interface table (IXCRIN).
-
This deletes the record from the FILE_STORAGE table. Also, the system creates a file upload record, viewable at the Work with File Upload Screen.
-
Use the Work with Catalog Request Interface (WCRU) menu option to process the records in the Catalog Request Interface table; see Working with the Catalog Request Interface (WCRU).
When the uploaded file record is processed by the related import function, the record is deleted. It is not archived in the FILE_STORAGE folder or on the server.
Export processing example: To export marketing download data through the file storage API:
-
The system creates records in the Marketing Download Trigger table as a result of certain actions in Order Management System.
-
Run the MDEXTR Marketing Download Order and Customer Extract (CSX1041) periodic function to extract order and customer-related records in the Marketing Download Trigger table to the appropriate Marketing Download table.
-
Run the MDEXPRT Marketing Download Export (PFR0130) periodic function to extract the data in the Marketing Download tables to a pipe delimited text file that is included in a zip file, which is placed in the OMS-MARKETING container of the FILE_STORAGE table. The zip file has the same name as the text file, except for the .zip extension.
-
Use the getFiles web service request to determine the names of the zip files that are in the OMS-MARKETING container.
-
Use the getFile web service request to download one or more marketing download files from the FILE_STORAGE table.
-
Use the deleteFile web service request to delete the files from the FILE_STORAGE table once they are downloaded.
Web service requests: Requests supported by the file storage API and their purposes are:
-
getFile: Download an error or export file that has been generated by Order Management System.
-
deleteFile: Delete a file record, such as an error file or export file that has already been downloaded.
-
putFile: Upload an import file to Order Management System. The file format can be text (.TXT file extension) or compressed (.zip file extension, or the .MOMZIP file extension for the Oracle Retail Merchandising Foundation Cloud Service (RMFCS) and Oracle Retail Pricing Cloud Service (RPCS) Integration). If the file is compressed, Order Management System extracts the information from the zip file when processing the import. No other file extensions are supported.
Note:
If you are uploading a zip file, then it must contain a text file of the same name as the zip file, which be in the base level of the zip file, with no subfolders. For example, the EXAMPLE123.ZIP file contains a single EXAMPLE123.TXT file.
The file storage API returns an error if there is already an existing file in the table with the same name, regardless of whether the suffix is different. For example, the API returns an error if you attempt to upload a file named VENDORS.ZIP if there is currently a FILE_STORAGE record named VENDORS.TXT.
-
getFiles: Request a list of file records in the FILE_STORAGE table.
URL: The URL is http://server:port/SerenadeSeam/sxrs/SerenadeREST/FileStorage, where server:port identifies the application server where the RESTful service is located.
Every web service request needs to specify a container. The types of containers are:
-
OMS-IMPORTS: Contains import file records from the integrating system that can be processed by the appropriate Order Management System function. For example, use the putFile request to create an OMS-IMPORTS record so that Order Management System can import the data.
-
OMS-ERRORS: Contains error file records that resulted from a process through the file storage API. For example, use the getFiles request to retrieve a list of error files that have been created.
-
OMS-MARKETING: Contains zip file records, each containing a single text file of marketing download data. See Working with the Marketing Download Extract.
-
OMS-ECOMMERCE: Contains zip file records, each including a single text file of ecommerce-related data. The following options create records in this container:
-
Downloading E-Commerce Offer Files (EOFR): Contains the E-Commerce Product Web XML File (ProductWeb).
-
Working with Merge/Purge Sold-to Names (MMCS): Contains the E-Commerce Customer Merge Web XML File (CustomerMergeWeb).
-
E-Commerce Availability Web Request XML Message (AvailabilityWebRequest).
For more information see the Web Services Guide on My Oracle Support (ID 2149144.1).
-
-
OMS-POSLOG: Contains zip file records, each containing a single text file of POSLog data for Xlink generated through the POSLOGX periodic function.
-
OMS-SALES-AUDIT: Contains RTLOG zip file records that the SNDRTLG periodic function copied to file storage after sending the files to the Sales Audit module of Oracle Retail Merchandising Foundation Cloud Service. These files are retained in the FILE_STORAGE table in case you need to resend a file through the RCVRLG periodic function. See Data Flow from Order Management System to Sales Audit Module for an overview of the data flow, and see Transmitting the RTLOG File to Object Storage for information on how the records are written to the FILE_STORAGE table and used.
Web authorization required: All request messages also need to use a valid Storage web service user ID with a valid password. See Working with Web Service Authentication (WWSA).
File cleanup:
-
Import file records: The import process removes records from the OMS-IMPORTS container when populating the staging or destination database table.
-
Error records: The integrating system is responsible for deleting error records.
-
Export records: The integrating system is responsible for deleting export records, including the OMS-MARKETING, OMS-ECOMMERCE, OMS-POSLOG, and OMS-SALES-AUDIT containers.
Summary of file storage API responses: The response codes that might be returned to file storage requests include:
-
200 = The getFile or getFiles request was successful.
-
204 = The putFile or deleteFile request was successful.
-
401 = The request failed because the web service user and password were not correct.
-
403 = The putFile request included a file that exceeded the FILE_STORAGE_MAX_SIZE property, or that was empty.
-
404 = The request failed for other reasons.
-
409 = A putFile failed because a file with the same name already exists in the FILE_STORAGE table.
-
500 = Server error.
Maximum file size for uploads: The FILE_STORAGE_MAX_SIZE property defines the maximum file size that you can upload through the file storage API. This property should not be set larger than 1G.
Uploading multiple files: If the amount of data for a particular upload exceeds the maximum size defined in the FILE_STORAGE_MAX_SIZE property, you can break the data out into multiple files. To upload multiple files of the same type, append a unique sequence number, such as a date/time suffix, to the file name, preceded by an underscore. The date/time suffix indicates the sequence in which to upload the contents of each file.
Example: To upload more than one file containing vendor data, you can create and upload a file named VNDUPL_20180702010203.ZIP and another named VNDUPL_20180702010204.ZIP. When the vendor upload program runs, the contents of both files will be extracted and loaded into the Vendor Upload table. Each zip file must include a single file using the same name, but with the TXT extension.
Note:
When an upload uses multiple files, the file names MUST include a unique sequence number suffix, such as a date/time stamp, preceded by an underscore. If the file names do not follow this convention, the upload will fail, and no subsequent uploads for the same file type will succeed until the incorrectly named files are removed from the CWDIRECTCP_UPLOAD_ DIRECTORY.
Upload directories: If the file storage API is enabled for imports, files that are placed in the CWDIRECTCP_UPLOAD_ DIRECTORY, or the other directories that are used for the are not processed by the related function; however, you can still upload a file for processing through the Work with File Uploads (WUPL) option.
Even though the system does not retrieve import files from the upload directories such as the CWDIRECTCP_UPLOAD_ DIRECTORY, import functions still use these directories for certain processing steps.
Processing File Uploads through Work with File Uploads (WUPL)
Run or schedule a file upload periodic function (see Available File Uploads) or use the Work with File Upload Screen to upload a file to a specified table in the Order Management System database.
RMFCS integration: You cannot use the Work with File Upload Screen to upload a file for the Oracle Retail Merchandising Foundation Cloud Service (RMFCS) and Oracle Retail Pricing Cloud Service (RPCS) Integration. See Data Flow from RMFCS and RPCS to Order Management System for a process overview.
Completing the Work with File Upload Screen
-
Use the File Name field to select the file to upload.
-
Use the File Type field to specify the type of upload to perform.
-
Select Submit File Upload.
File Upload Process
The system:
-
clears all records from the target table in the Order Management System database. Note: The system performs this step for each file type except Retail Integration Items.
-
moves the upload file to the directory on the Order Management System application server defined in the CWDIRECTCP_UPLOAD_ DIRECTORY property.
-
uses a bulk insert to load the records in the upload file into the specified table in the Order Management System database. The CWDIRECTCP_UPLOAD_ BATCH_SIZE property defines the batch size used to process the records in the upload file. For example, if this setting is set to 2500, the system inserts records from the upload file into the Order Management System database in batches of 2500.
The Work with File Upload Screen displays the upload history record in the lower portion of the screen.
A Completed Status indicates all records in the file were processed successfully.
-
An Error status indicates a record in the upload batch failed to upload to the database successfully. In this situation, the system does not insert any record in the batch into the Order Management System database. The system places the file upload in an Error status and a description of the first error encountered is assigned to the upload history record so that you can correct the error. Select View Error to display a description of the error that occurred during processing. The error description provides the upload batch number that failed to process.
Important:
If you run the file upload process and an upload file does not exist to process, or if an error occurs during processing, the system will still clear the records in the associated Order Management System upload table. You must correct any errors and run the file upload process again the populate the associated Order Management System upload table.
Processing example: To import Catalog Requests through the file storage API:
-
Create or obtain the Catalog Request file named IXCRIN.txt. See the Sample Catalog Requests Upload Data for sample contents.
-
Use the Work with File Upload Screen to upload the IXCRIN.txt file.
-
This clears populates the Catalog Request Interface table (IXCRIN). Also, the system creates a file upload record, viewable at the Work with File Upload Screen.
-
Use the Work with Catalog Request Interface (WCRU) menu option to process the records in the Catalog Request Interface table; see Working with the Catalog Request Interface (WCRU).
Troubleshooting the File Upload
Logging: During the file upload process, the system writes messages to the Trace log if its logging level is set to Debug or lower.
Example of log entries for successful file upload:
11:39:18,270 DEBUG TRACE - Upload started for /domain/OMSFiles/File/Uploads/RIItemUpload50Records.txt
11:39:18,293 DEBUG TRACE - Upload completed for /domain/OMSFiles/File/Uploads/RIItemUpload50Records.txt
11:39:18,293 DEBUG TRACE - Upload file processing started for /domain/OMSFiles/File/Uploads/RIItemUpload50Records.txt
11:39:18,316 DEBUG TRACE - Upload file is RIItemUpload50Records.txt
11:39:18,434 DEBUG TRACE - Upload file processing ended for /domain/OMSFiles/File/Uploads/RIItemUpload50Records.txt
11:39:48,814 DEBUG TRACE - Upload started for /domain/OMSFiles/File/Uploads/RIItemUpload50Records.txt
11:39:48,826 DEBUG TRACE - Upload completed for /domain/OMSFiles/File/Uploads/RIItemUpload50Records.txt
11:39:48,826 DEBUG TRACE - Upload file processing started for /domain/OMSFiles/File/Uploads/RIItemUpload50Records.txt
11:39:48,840 DEBUG TRACE - Upload file is RIItemUpload50Records.txt
11:39:48,853 DEBUG TRACE - Upload path and file is /domain/OMSFiles/File/Uploads/RIItemUpload50Records.txt
11:39:48,865 DEBUG TRACE - 10 RIItemUpload50Records.txt upload records have been processed so far.
11:39:48,897 DEBUG TRACE - 20 RIItemUpload50Records.txt upload records have been processed so far.
11:39:48,905 DEBUG TRACE - 30 RIItemUpload50Records.txt upload records have been processed so far.
11:39:48,912 DEBUG TRACE - 40 RIItemUpload50Records.txt upload records have been processed so far.
11:39:48,916 DEBUG TRACE - 49 RIItemUpload50Records.txt total upload records were processed.
11:39:48,923 DEBUG TRACE - Upload file processing ended for /domain/OMSFiles/File/Uploads/RIItemUpload50Records.txtExample of log entries for failed file upload: If an error occurs during processing, the log indicates which batch did not process successfully. Notice in this example, the third batch of records did not process.
11:41:17,811 DEBUG TRACE - Upload started for /domain/OMSFiles/File/Uploads/RIItemUpload50Records.txt
11:41:17,820 DEBUG TRACE - Upload completed for /domain/OMSFiles/File/Uploads/RIItemUpload50Records.txt
11:41:17,820 DEBUG TRACE - Upload file processing started for /domain/OMSFiles/File/Uploads/RIItemUpload50Records.txt
11:41:17,833 DEBUG TRACE - Upload file is RIItemUpload50Records.txt
11:41:17,861 DEBUG TRACE - Upload file processing ended for /domain/OMSFiles/File/Uploads/RIItemUpload50Records.txt
11:41:44,814 DEBUG TRACE - Upload started for /domain/OMSFiles/File/Uploads/RIItemUpload50Records.txt
11:41:44,824 DEBUG TRACE - Upload completed for /domain/OMSFiles/File/Uploads/RIItemUpload50Records.txt
11:41:44,824 DEBUG TRACE - Upload file processing started for /domain/OMSFiles/File/Uploads/RIItemUpload50Records.txt
11:41:44,837 DEBUG TRACE - Upload file is RIItemUpload50Records.txt
11:41:44,847 DEBUG TRACE - Upload path and file is /domain/OMSFiles/File/Uploads/RIItemUpload50Records.txt
11:41:44,863 DEBUG TRACE - 10 RIItemUpload50Records.txt upload records have been processed so far.
11:41:44,871 DEBUG TRACE - 20 RIItemUpload50Records.txt upload records have been processed so far.
11:41:44,957 DEBUG TRACE - 49 RIItemUpload50Records.txt total upload records were processed.
11:41:44,977 DEBUG TRACE - Upload file processing ended for /domain/OMSFiles/File/Uploads/RIItemUpload50Records.txtError processing: If any record in an upload batch is in error, the system does not insert any record in the batch into the Order Management System database. The system places the upload batch in an error status and a description of the first error encountered is assigned to the associated upload history record so that you can correct the error. You can select View Error to display a description of the error that occurred during processing.
If you are unable to determine which record in the upload batch is in error, you can decrease the batch size defined for the CWDIRECTCP_UPLOAD_BATCH_SIZE setting in the CWDirectCP Properties file and reprocess the records in the batch to narrow down the record that is in error. For example, if you normally process a batch size of 2500 records, for troubleshooting purposes, you can temporarily change the batch size to 10 and reprocess. The system will process the records in the upload file in batches of 10 records and fail the upload batch that contains the error. In this example, only 10 records will exist in the batch to help you determine where the error occurred.
Note:
The system places the upload batch in an error status for the first error encountered. When you reprocess the upload file after correcting the error, the file may be placed in an error status again if another error is found during processing.
Error related to large batch size: An upload file is placed in an error status with the error message Stopped waiting for file to upload when a large file does not transfer from a user’s local machine to the Order Management System application server within 20 minutes. To correct this issue, upload the file in smaller sections to accommodate the slow upload speed or get a faster internet connection.
Other possible errors: A file upload might also fail because:
-
There is a blank line at the end of the file.
-
The file is not UTF-8 encoded.
Available File Uploads
Upload steps: You can upload records to the following tables in the Order Management System database. Use the processing steps listed below to upload the data in a text file and then process the file data to populate the target table.
Using file storage API: The steps listed below under To Process for each upload assume that the FILE_STORAGE_IMPORTS_ENABLED property is selected and that you have used the putFile web service method to upload the file. The file content is staged in the OMS-IMPORT container of the FILE_STORAGE table. See File Storage API for background. You will need to then run the periodic functions listed below for each upload in order to use the record in the FILE_STORAGE table to update to the target table.
Example: After you upload the PO Layering file record to the FILE_STORAGE table, run the UPPOLAY Upload PO Layering File (Program name PFR0134, Parameter POLAYR) periodic function to upload a PO Layering file named POLAYR.txt to the PO Layering table (POLAYR).
File storage not enabled? If the file storage API is not enabled, you can use SFTP to place the upload files in the appropriate upload directory. For most uploads, the directory is CWDIRECTCP_UPLOAD_ DIRECTORY, but exceptions are noted below. Once the file is placed in the upload directory, running the listed periodic function triggers the update to the related interface table or target table.
Example: fter you place the PO Layering file in the CWDIRECTCP_UPLOAD_DIRECTORY, run the UPPOLAY periodic function to upload the PO Layering file named POLAYR.txt to the PO Layering table (POLAYR).
Staging table? Some of the uploads listed below initially update a staging table, and require an additional step to use the staged data to update the target table. Others can update the target table directly from the contents of the uploaded file without the use of a staging table.
Periodic processes: Some of file uploads listed below require the use of two periodic functions for processing. For example, to run the Customer Price Group Exclusions upload, you need to first run the CPGIXUP periodic function, and then the CPGIXUP periodic function. You can set up a periodic process to run these two functions.
File Upload screen: Regardless of whether the file storage API is enabled for imports, you can accomplish file uploads from the Work with File Upload Screen for each of the uploads listed below, with the exception of the batch inventory overlay import. In most cases, the upload from this screen also executes the required periodic function to process the uploaded data.
See File Upload Process for instructions on using the File Storage process or the upload from the CWDIRECTCP_UPLOAD_ DIRECTORY.
| File Type | Order Management System Upload Table | To Process | Sample Upload Data |
|---|---|---|---|
|
ACS Tape |
ACS Tape table (CSACST) |
After using the putFile method to upload the file (File Storage API) or placing the file in the CWDIRECTCP_UPLOAD_DIRECTORY,, run the UPACSTP Upload ACS Tape File (Program name PFR0134, Parameter CSACST) periodic function to upload an ACS Tape file named CSACST to the ACS Tape table (CSACST). Note: This step is not necessary if you use the Work with File Upload Screen to upload the ACS Tape file. Update target table: After populating the ACS Tape table, you must use the Process Address Changes (PACS) menu option, selecting an Input File Type of ACS, to process the records in the ACS Tape table; see Loading Address Updates. |
|
|
Batch Inventory Overlay Upload |
N/A: updates the Item Location table directly |
After using the putFile method to upload the file (File Storage API) or placing the file in the CWDIRECTCP_UPLOAD_DIRECTORY, run the INVOVRL periodic function. Processing File Uploads through Work with File Uploads (WUPL) is not supported for the batch inventory overlay upload. For more information: See Batch Inventory Overlay Upload. For more information see the Web Services Guide on My Oracle Support (ID 2149144.1). |
See Batch Inventory Overlay Upload For more information see the Web Services Guide on My Oracle Support (ID 2149144.1). |
|
Catalog Requests |
Catalog Request Interface table (IXCRIN) |
After using the putFile method to upload the file (File Storage API) or placing the file in the CWDIRECTCP_UPLOAD_ DIRECTORY, run the UPCATRQ Upload Catalog Request File (Program name PFR0134, Parameter IXCRIN) periodic function to upload a Catalog Request file named IXCRIN to the Catalog Request Interface table (IXCRIN). Note: This step is not necessary if you use the Work with File Upload Screen to upload the Catalog Request file. Update target table: After populating the Catalog Request Interface table, you must use the Work with Catalog Request Interface (WCRU) menu option to process the records in the Catalog Request Interface table; see Working with the Catalog Request Interface (WCRU). |
|
|
Cust Price Group Exclusions |
Customer Price Group SKU Exclusion Upload Table (CUSTPGEUP) |
After using the putFile method to upload the file (File Storage API) or placing the file in the CWDIRECTCP_UPLOAD_ DIRECTORY, run the UPCSTPG Upload Customer Price Group Exclusion File (Program name PFR0134, Parameter CUSTPGEUP) periodic function to upload a Customer Price Group Exclusion file named CUSTPGEUP to the Customer Price Group SKU Exclusion Upload table (CUSTPGEUP). Note: This step is not necessary if you use the Work with File Upload Screen to upload the Customer Price Group Exclusion file. Update target table: After populating the Customer Price Group SKU Exclusion Upload table, use the CPGIXUP Customer Price Group SKU Exclusion Upload periodic function (Program name PFRCPGEXUP) to process the records in the upload table; see Customer Price Group SKU Exclusion Upload. |
|
|
MBS Tape |
MBS Tape table (CSMBST) |
After using the putFile method to upload the file (File Storage API) or placing the file in the CWDIRECTCP_UPLOAD_ DIRECTORY, run the UPMBSTP Upload MBS Tape file (Program name PFR0134, Parameter CSMBST) periodic function to upload an MBS Tape file named CSMBST to the MBS Tape table (CSMBST). Note: This step is not necessary if you use the Work with File Upload Screen to upload the MBS Tape file. Update target table: After populating the MBS Tape file table, use the Process Address Changes (PACS) menu option to process the records in the MBS Tape table; see Loading Address Updates. |
|
|
PO Layering |
PO Layering Table (POLAYR) |
After using the putFile method to upload the file (File Storage API) or placing the file in the CWDIRECTCP_UPLOAD_ DIRECTORY, run the UPPOLAY Upload PO Layering File (Program name PFR0134, Parameter POLAYR) periodic function to upload a PO Layering file named POLAYR.txt to the PO Layering table (POLAYR). Once the records are uploaded to the PO Layering table, the process uses the newly uploaded records to update the due date and backorder quantity for order lines on backorder. Note: When you run purchase order layering, the system clears the PO Layering table and rebuilds it based on the purchase order records that are uploaded to the table. In order to ensure accurate updates, you must upload the PO Layering table with ALL open purchase orders every time you perform an upload. Note: This step is not necessary if you use the Work with File Upload Screen to upload the PO Layering file. |
|
|
Price Codes |
After using the putFile method to upload the file (File Storage API) or placing the file in the CWDIRECTCP_UPLOAD_ DIRECTORY, run the UPPRCCD Upload Price Code File (Program name PFR0134, Parameter PRICECDUPLOAD) periodic function to upload a Price Code file named PRICECDUPLOAD to the Price Code Upload Table (PriceCdUpload). Note: This step is not necessary if you use the Work with File Upload Screen to upload the Price Code upload file. Update target table: You must run the PCUPLD Price Code Upload periodic function (Program name PFPRCCODUP) to process the records in the Price Code Upload table; see Price Code Upload. |
||
|
Promotions |
After using the putFile method to upload the file (File Storage API) or placing the file in the CWDIRECTCP_UPLOAD_ DIRECTORY, run the UPPROMO Upload Promotion Code File (Program name PFR0134, Parameter PRMUPLD) periodic function to upload a Promotion file named PRMUPLD to the Promotion Upload Table (PRMUPLD). Note: This step is not necessary if you use the Work with File Upload Screen to upload the Promotion upload file. Update target table: You must run the PRMOUPL Create or Delete Promotions periodic function (Program name PRMOUPL) or use the Work with Promotion Values (WPRO) menu option to process the records in the Promotion Upload table; see Promotion Upload. |
||
|
Retail Integration Items |
Note: You cannot use the UPRITEM Upload Retail Item File (Program name PFR0134, Parameter RIIUPP) periodic function or the Work with File Upload Screen to process imports from RMFCS, although completed RMFCS imports are listed at the Work with File Upload screen. See Oracle Retail Merchandising Foundation Cloud Service (RMFCS) and Oracle Retail Pricing Cloud Service (RPCS) Integration for background. |
After using the putFile method to upload the file (File Storage API) or placing the file in the CWDIRECTCP_UPLOAD_ DIRECTORY, run the UPRITEM Upload Retail Item File (Program name PFR0134, Parameter RIIUPP) periodic function to upload a Retail Integration Item file named RIIUPP to the RI Item Upload Table (RIIUPP). Note: This step is not necessary if you use the Work with File Upload Screen to upload the Retail Integration Item file. Update target table: After uploading the file, run the RIUPLD Retail Integration Item Upload periodic function (Program name PFR0084) or use the Work with Retail Integration Item Upload (RIIU) menu option to process the records in the RI Item Upload table; see Working with Retail Integration Item Upload (RIIU). Note: You cannot use the Work with File Upload Screen to process item information from Oracle Retail Merchandising Foundation Cloud Service (RMFCS). See Oracle Retail Merchandising Foundation Cloud Service (RMFCS) and Oracle Retail Pricing Cloud Service (RPCS) Integration for information on how to import item information from RMFCS. |
|
|
Sales Associates |
After using the putFile method to upload the file (File Storage API) or placing the file in the ASSOCIATE_FILE_PATH, run the SLSUPLD (Program name PFR0109) periodic function to update the target table; see Salesman Associate Upload. This step is not necessary if you use the Work with File Upload Screen to upload the Salesman Associate file to the ASSOCIATE_FILE_PATH. File name: The name of the file must start with SR and have a .TXT file extension; for example: SR00001.TXT and SR00002.TXT. If there are multiple eligible files, they are processed sequentially based on file name; SR00001 processes before SR00002. If you use the file storage API for imports, you can upload a zip file that contains a single text file with the same name, for example: SR00001.ZIP containing a text file named SR00001.TXT. See Salesman Associate Upload for more information. Note: The SLSUPLD periodic function uses the folder defined in the ASSOCIATE_FILE_PATH rather than the CWDIRECTCP_UPLOAD_ DIRECTORY. |
||
|
Set Components |
Set Component Upload Table (INSCUP) |
After using the putFile method to upload the file (File Storage API) or placing the file in the CWDIRECTCP_UPLOAD_ DIRECTORY, run the UPSETCM Upload Set Component File (Program name PFR0134, Parameter INSCUP) periodic function to upload a Set Component file named INSCUP to the Set Component Upload Table (INSCUP). Note: This step is not necessary if you use the Work with File Upload Screen to upload the Set Component file. Update target table: You must run the UPLSETS Set Component Upload periodic function (Program name PFR0095) or use the Work with Set Component Upload (WCUP) menu option to process the records in the Set Component Upload table; see Importing Set Components (WCUP). |
|
|
Source Codes |
Source Upload Table (IXSRCE) |
After using the putFile method to upload the file (File Storage API) or placing the file in the CWDIRECTCP_UPLOAD_ DIRECTORY, run the UPSRCCD Upload Source Code File (Program name PFR0134, Parameter IXSRCE) periodic function to upload a Source Code file named IXSRCE to the Source Upload Table (IXSRCE). Note: This step is not necessary if you use the Work with File Upload Screen to upload the Source Code file. Update target table: You must use the Work with Source Code Upload (WSRW) menu option to process the records in the Source Code Work table; see Generating Source Codes Using the Source Upload Table (WSRW). |
|
|
Stores |
File upload: Use the Work with File Upload Screen to upload the Store file to the STORE_FILE_PATH. The file name must begin with ST and have a .TXT file extension; see Store Upload. Update target table: Run the STRUPLD periodic function. This function uses the folder defined in the STORE_FILE_PATH rather than the CWDIRECTCP_UPLOAD_ DIRECTORY. Note: Uploading the Store file through the file storage API is not currently supported. |
||
|
USPS Zip Codes |
USPS Zip Codes Upload |
Use the putFile method to upload the file if you are using the File Storage API; otherwise, place the file in the CWDIRECTCP_ USPS_UPLOAD_ FILE and use the Work with File Upload Screen to upload the USPS Zip Codes file. Update target table: After uploading the file, use the Load USPS Zip Code File (LZPS) menu option to process the uploaded file. The file name must be ctystate.txt, and file name matching is case-sensitive. See Fields in the USPS Zip/City/State Table and Fields in the USPS Zip/City/State Table for background. |
|
|
Vendors |
Vendor Upload Table (VNDUPL) |
After using the putFile method to upload the file (File Storage API), or placing the file in the CWDIRECTCP_UPLOAD_ DIRECTORY, run the UPVENDR Upload Vendor File (Program name PFR0134, Parameter VNDUPL) periodic function to upload a Vendor file named VNDUPL to the Vendor Upload Table (VNDUPL). Note: This step is not necessary if you use the Work with File Upload Screen to upload the Vendor Upload file. Update target table: After uploading the file, run the VNDUPLD Vendor Upload periodic function (Program name PFR0086) or use Working with Vendor Upload (LVUP) to process the records in the Vendor Upload table. |
Purging Upload History
PURGEUP: Run the PURGEUH Purge Upload History Table (program name PFR0126) periodic function to purge Upload History records that are older than the number of days specified in the Parameter field. If the Parameter field is blank or 0, records must be 21 days old to be eligible for purge.
Sample Upload Data
You can use the sample upload data below as a starting point to creating your own upload file by copying the sample file upload data, pasting the data into a text editor, and saving it with the file extension .TXT, unless otherwise indicated.
Important:
In order to leave any field in an upload file blank, pass a space in the field so that the file can be processed without errors. Leaving a field with no space is interpreted as null in the database and causes errors.
Sample ACS Tape Upload Data
Use the sample data below to create an ACS Tape upload file. See ACS Tape for a setup summary, and Loading Address Updates for processing information.
200000145BXBKCCJ21263204414 200206F 038ANDERSON JEN S 1234 EXAMPLE CIR HALETHORPE MD21227S 123 MARY WAY CT LINTHICUM HEIGHTS MD21090-1754533453 MARY WAY CT XX0000 C
Sample Catalog Requests Upload Data
Use the sample data below to create a Catalog Requests upload file. See Catalog Requests for a setup summary, and Working with the Catalog Request Interface (WCRU) for processing information.
34 SAMPLE STREET|APT123|ADDRESS LINE 2|ADDRESS LINE 3|ADDRESS LINE 4|WESTBOROUGH|01581||MA|US|5085550100||thomasbrown@example.com|O1|R|COMPANY NAME|SOURCE7|7|1150417|207|5085550101||5085550102||MS.|MARY|M|JOHNSON||MARYJOHNSON@EXAMPLE.COM||5085550104|5085550105|5085550106|1|1|O1
Sample Customer Price Group Exclusions Upload Data
Sample MBS Tape Upload Data
Use the sample data below to create a Customer Price Group Exclusions upload file. See Cust Price Group Exclusions for a setup summary, and ../marketing/c_customer_price_group_sku_exclusion_upload.dita#customerpricegroupskuexclusionupload for processing information.
7|1|CPG|RF123SKU4567|ROSE XSML WMNS||
Use the sample data below to create an MBS Tape upload file. See MBS Tape for a setup summary, and Loading Address Updates for processing information.
JOHN SMITH 1 TEST DRIVE WESTBORO MA01581 B I 01581 B 1 TEST DRIVE WESTBORO MA 1 TEST DRIVE APT 2 WESTBORO MA01581 B 12879000|Sample PO Layering Upload Data
Use the sample data below to create a PO Layering upload file. See PO Layering for a setup summary, and Purchase Order Layering for processing information.
7|RF123SKU4567|ROSE XSML WMNS|4|53|1|1080915|20| |Ref#
Sample PCO Price Code Upload Record Type
Use the sample data below to create a Price Codes upload file. See Price Codes for a setup summary, and Price Code Upload for processing information.
Sample PCO Price Code Upload Record Type
7|1|PCO|U|1150416|1234567|PRICE CODE UPLOAD|1|1|5.00|0.00|0.00|0.00|0.00|0.00|ITEM|Y|1150401|1150501|||||0||||
Sample PCC Price Code Customer Upload Record Type
7|2|PCC|U|1150416|1234567||0|0|.00|.00|.00|.00|.00|.00|||0|0|||||55||||
Sample PCD Price Code Detail Upload Record Type
7|3|PCD|U|1150416|1234567||0|0|.00|.00|.00|.00|.00|.00|||0|0|SKU|RED||SOURCE7|0||||
Sample Promotions Upload Data
Use the sample data below to create a Promotions upload file. See Promotions for a setup summary, and Promotion Upload for processing information.
Sample PRM Order Promotion Upload Record
7|PRM|A|1|1150414||PUORDER|PUORDER PROMOTION DESCRIPTION|1150401|1150601|POPUP WINDOW MESSAGE 1|POPUP WINDOW MESSAGE 2|POPUP WINDOW MESSAGE 3|POPUP WINDOW MESSAGE 4|1|O|PROMOID|5.95||.00|||||1||OA|WEB|4|4|US||N|O||1|.00|10||||0|0|.00|.00|.00|||0|||.00|0|0|0|.00|.00|.00||||||.00|.00||||0||||||0|.00|5.00|.00
Sample PRM Freight Promotion Upload Record
7|PRM|A|2|1150414||PUFRT|PUFRT PROMOTION DESCRIPTION|1150401|1150601|POPUP WINDOW MESSAGE 1|POPUP WINDOW MESSAGE 2|POPUP WINDOW MESSAGE 3|POPUP WINDOW MESSAGE 4|2|F|PROMOID|6.95|Y|.00|||||1|Y||WEB|4|4|US||N|O||1|.00|10||||0|0|.00|.00|.00|||0|||.00|0|0|0|.00|.00|.00||||||.00|.00||||0||||||0|.00|.00|.00
Sample PRM Additional Freight Promotion Upload Record
7|PRM|A|3|1150414||PUADLFR|PUADLFR PROMOTION DESCRIPTION|1150401|1150601|POPUP WINDOW MESSAGE 1|POPUP WINDOW MESSAGE 2|POPUP WINDOW MESSAGE 3|POPUP WINDOW MESSAGE 4|3|A|PROMOID|5.00||.00|||||1|Y|A|WEB|4|4|US||N|O||1|.00|10||||0|0|.00|.00|.00|||0|||.00|0|0|0|.00|.00|.00||||||.00|.00||||0||||||0|.00|.00|.00
Sample PRM Item Category Promotion Upload Record
7|PRM|A|4|1150414||PUITMCT|PUITMCT PROMOTION DESCRIPTION|1150401|1150601|POPUP WINDOW MESSAGE 1|POPUP WINDOW MESSAGE 2|POPUP WINDOW MESSAGE 3|POPUP WINDOW MESSAGE 4|4|C|PROMOID|5.95||.00|||||1|||WEB|4|0|||N|O|O|1|10.00|10||||0|0|.00|.00|.00|||0|||.00|0|0|0|.00|.00|.00||||||.00|.00||||0||||||0|.00|.00|.00
Sample PRM Tiered Promotion Upload Record
7|PRM|A|5|1150414||PUTIERD|PUTIERD PROMOTION DESCRIPTION|1150401|1150601|POPUP WINDOW MESSAGE 1|POPUP WINDOW MESSAGE 2|POPUP WINDOW MESSAGE 3|POPUP WINDOW MESSAGE 4|5|T|PROMOID|0||.00|||||0||||0|0||||||1|.00|0||||0|0|.00|.00|.00|||0|||.00|0|0|0|.00|.00|.00||||||.00|.00||||0||||||0|.00|.00|.00
Sample PRM BOGO Promotion Upload Record
7|PRM|A|6|1150414||PUBOGO|PUBOGO PROMOTION DESCRIPTION|1150401|1150601|POPUP WINDOW MESSAGE 1|POPUP WINDOW MESSAGE 2|POPUP WINDOW MESSAGE 3|POPUP WINDOW MESSAGE 4|6|B|PROMOID|0.00||.00|||||0|||WEB|4|0|||N|O||1|.00|10||||0|0|.00|.00|.00|||0|||.00|0|0|0|.00|.00|.00||||||.00|.00||||0||||||0|.00|.00|.00
Sample PRM Delete Promotion Upload Record
7|PRM|D|7|1150414||PUDELTE|PUDELTE PROMOTION DESCRIPTION|1150401|1150601|POPUP WINDOW MESSAGE 1|POPUP WINDOW MESSAGE 2|POPUP WINDOW MESSAGE 3|POPUP WINDOW MESSAGE 4|7||PROMOID|5.00||.00|||||1|Y|N|WEB|4|4|US|SOURCE7|N|O|O|1|.00|10||||0|0|.00|.00|.00|||0|||.00|0|0|0|.00|.00|.00||||||.00|.00||||0||||||0|.00|.00|.00
Sample PRB BOGO Promotion Upload Record
7|PRB|A|8|1150414||BOGO1|PUBOGOB PROMOTION DESCRIPTION|0|0|||||0|||0.00||.00|||||0||||0|0||||||0|.00|0||SKU|RED|1|1|5.00|.00|.00|Y|N|0|||.00|0|0|0|.00|.00|.00||||||.00|.00||||0||||||0|.00|.00|.00
Sample PBP BOGO by Price Code Promotion Upload Record
7|PBP|A|9|1150414||BOGO1|PUBOGOP PROMOTION DESCRIPTION|0|0|||||0|||0.00||.00|||||0||||0|0||||||0|.00|0||||0|0|.00|.00|.00|||101|||50.00|1|101|1|5.00|.00|.00|N|Y|N|||.00|.00||||0||||||0|.00|.00|.00
Sample PMD Discount Promotion Upload Record
7|PMD|A|10|1150414||TG|TG TIER PROMOTION DESCRIPTION|0|0|||||0|||0.00||.00|||||0||||0|0||||||0|.00|0||||0|0|.00|.00|.00|||0|||.00|0|0|0|.00|.00|.00||||||0.00|.00|SKU|PINK||0||||||25.00|.00|.00|.00
Sample PRS Source Promotion Upload Record
7|PRS|A|11|1150414||OP|OPSORCS PROMOTION DESCRIPTION|0|0|||||0|||0.00||.00|||||0||||0|0||||||0|.00|0||||0|0|.00|.00|.00|||0|||.00|0|0|0|.00|.00|.00||||||0.00|.00|||SOURCE7|0||||||0|.00|.00|.00
Sample PRC Customer Promotion Upload Record
7|PRC|A|12|1150414||OP|OPCUSTC PROMOTION DESCRIPTION|0|0|||||0|||0.00||.00|||||0||||0|0||||||0|.00|0||||0|0|.00|.00|.00|||0|||.00|0|0|0|.00|.00|.00||||||0.00|.00||||55||||||0|.00|.00|.00
Sample PIC Item Category Promotion Upload Record
7|PIC|A|13|1150414||ITMCATP|PUITMC PROMO DESCRIPTION|0|0|||||0|||0.00||.00|||||0||||0|0||||||0|.00|0||||0|0|.00|.00|.00|||0|||.00|0|0|0|.00|.00|.00||||||0.00|.00||||0||DFLT||||0|.00|.00|.00
Sample PIE Item Exclusion Promotion Upload Record
7|PIE|A|14|1150414||ITMCATP|PUITMX PROMO DESCRIPTION|0|0|||||0|||0.00||.00|||||0||||0|0||||||0|.00|0||||0|0|.00|.00|.00|||0|||.00|0|0|0|.00|.00|.00||||||0.00|.00||||0||0||DFLT||0|.00|.00|.00
Sample Retail Integration Items Upload Data
Use the sample data below to create a Retail Integration Items upload file (RIIUPP or RIIUPP.TXT). See Retail Integration Items for a setup summary, and RI Item Upload Process for processing information.
RMFCS imports: See Oracle Retail Merchandising Foundation Cloud Service (RMFCS) and Oracle Retail Pricing Cloud Service (RPCS) Integration for information on importing data from RMFCS.
Sample 01 Item/SKU Item Upload Record
6|1150304|110000|01|A|1|IT|3009|RED S |U|0|0|Y|0|N|0| |0| | | |0|N|0|0|0|N| |0| | | | |0|Y|N|Mens Patterned Long-Sleeve| |N|N|N|0| | |0|11500|0|CLT| |0| | |0|0| |EA|1234|0|0|0| |0| |0|0|Red Small|N|0|0|29.99|0|0|0|0|0|0|0|0|N|0|N|100101|0|100101| | | |0|0|N| |0|0|0|0|0| |N| |0|0|N|0| | |N|0| | |N|29.99|0|0| |0| |1|S010101|02| | | | | | | | |0| | |0|0|N|0|0|0|0|N|0|0|0|N |N|0|0| | | | | | |N|N|0| | | |0|0| |0|0|0| |0|0|0|0|0|0| | | | | | |0| | | |0|0|0|0|0|0|0| | |0|0|0|0|0|0|0| |0| |0| |0| | | |0|0|0|0|0| | | | |0| | | | |Y|https://example.com/is/image/Fry/1001|https://example.com/is/image/Fry/1001|https://example.com/is/image/Fry/1001|https://example.com/is/image/Fry/1001|0
Sample 03 Item Offer Upload Record
7|1150421|84600|03|A|1|IT|RITEST1| | |0|0|0|0.0|0|0|0|0|0|0|0|0.0000|0|0|0|0.000|0|0|0.000|0|0|0|0|0|0|0|0|0|0|0|0|0|0|0|0|0|0|0|0|0|0|0|0|0|0|0|0|0|0|0|0|0|0|0.0000|0.0|0|0|0|0|0.00|0|0|0|0.00|0|0|0|0|0|0|0|0|0.000|0|0|0|0|0.000|0|0|0|0|0.0000|0.0000|0.0000|0.0000|0|0|0|0.00|0.00|0|0|0|0|0|0|0|0|0|0.00|0|0|0|0|0|0|0|0|0|0|0|0|0|0|0|0|0|0|7|16.99|15.00|Y|5.00|2|100|0.00|N|36.00|3.00|1.50|N|N|0.00|0|F|P|||||N|N|207|||0|0.00|0.00|0|0|0|0.00|0|0.00|0.00|0.00|0.00|0.00|0|0|0|0|0|0|0|0|0|0|0|0|0|0.00|0.00|0|0.00|0.00|0|0|0|0|0.00|0.00|0|0.00|0.00|0|0|0|0|0|0|0|0|0|0|0.0000|0.000|0|0|0|0|0|0|0|0|0|0|0|0|||||0
Sample 04 SKU Offer Upload Record
7|1150421|84600|04|A|1|IT|RITEST2|AQUA LRGE BABY||0|0|0|0.0|0|0|0|0|0|0|0|0.0000|0|0|0|0.000|0|0|0.000|0|0|0|0|0|0|0|0|0|0|0|0|0|0|0|0|0|0|0|0|0|0|0|0|0|0|0|0|0|0|0|0|0|0|0.0000|0.0|0|0|0|0|0.00|0|0|0|0.00|0|0|0|0|0|0|0|0|0.000|0|0|0|0|0.000|0|0|0|0|0.0000|0.0000|0.0000|0.0000|0|0|0|0.00|0.00|0|0|0|0|0|0|0|0|0|0.00|0|0|0|0|0|0|0|0|0|0|0|0|0|0|0|0|0|0|0|0.00|0.00|0|0.00|0|0|0.00|0|0.00|0.00|0.00|0|0|0.00|0|0|0|0|0|0|0|0|0|0|0|0|7|0.00|0.00|N|0|0|0.00|Y|0.00|0.00|0.00|0.00|0.00|0|N|N|||N|N|0|MO||0|0|0|0.00|0.00|0|0.00|0.00|0|0|0|0|0.00|0.00|0|0.00|0.00|0|0|0|0|0|0|0|0|0|0|0.0000|0.000|0|0|0|0|0|0|0|0|0|0|0|0|||||0
Sample 05 Item Price Upload Record
7|1150421|84600|05|A|1|IT|RITEST2| | |0|0|0|0.0|0|0|0|0|0|0|0|0.0000|0|0|0|0.000|0|0|0.000|0|0|0|0|0|0|0|0|0|0|0|0|0|0|0|0|0|0|0|0|0|0|0|0|0|0|0|0|0|0|0|0|0|0|0.0000|0.0|0|0|0|0|0.00|0|0|0|0.00|0|0|0|0|0|0|0|0|0.000|0|0|0|0|0.000|0|0|0|0|0.0000|0.0000|0.0000|0.0000|0|0|0|0.00|0.00|0|0|0|0|0|0|0|0|0|0.00|0|0|0|0|0|0|0|0|0|0|0|0|0|0|0|0|0|0|0|0.00|0.00|0|0.00|0|0|0.00|0|0.00|0.00|0.00|0|0|0.00|0|0|0|0|0|0|0|0|0|0|0|0|0|0.00|0.00|0|0|0|0.00|0|0.00|0.00|0.00|0.00|0.00|0|0|0|0|0|0|0|0|0|0|7|1150401|1|0.00|50.00|0|0.00|0.00| |0|0|0|0.00|0.00|0|0.00|0.00|0|0|0|0|0|0|0|0|0|0|0.0000|0.000|0|0|0|0|0|0|0|0|0|0|0|0|||||0
Sample 06 SKU Price Upload Record
7|1150421|84600|06|A|1|IT|RITEST2|AQUA LRGE BABY||0|0|0|0.0|0|0|0|0|0|0|0|0.0000|0|0|0|0.000|0|0|0.000|0|0|0|0|0|0|0|0|0|0|0|0|0|0|0|0|0|0|0|0|0|0|0|0|0|0|0|0|0|0|0|0|0|0|0.0000|0.0|0|0|0|0|0.00|0|0|0|0.00|0|0|0|0|0|0|0|0|0.000|0|0|0|0|0.000|0|0|0|0|0.0000|0.0000|0.0000|0.0000|0|0|0|0.00|0.00|0|0|0|0|0|0|0|0|0|0.00|0|0|0|0|0|0|0|0|0|0|0|0|0|0|0|0|0|0|0|0.00|0.00|0|0.00|0|0|0.00|0|0.00|0.00|0.00|0|0|0.00|0|0|0|0|0|0|0|0|0|0|0|0|0|0.00|0.00|0|0|0|0.00|0|0.00|0.00|0.00|0.00|0.00|0|0|0|0|0|0|0|0|0|0|0|0|0|0.00|0.00|0|0.00|0.00|0|7|1150401|1|0.00|45.00|0|0.00|0.00||0|0|0|0|0|0|0|0|0|0.0000|0.000|0|0|0|0|0|0|0|0|0|0|0|0|||||0
Sample 07 Vendor Item Upload Record
7|1150421|84600|07|A|1|IT|RITEST2|||0|0|0|0.0|0|0|0|0|0|0|0|0.0000|0|0|0|0.000|0|0|0.000|0|0|0|0|0|0|0|0|0|0|0|0|0|0|0|0|0|0|0|0|0|0|0|0|0|0|0|0|0|0|0|0|0|0|0.0000|0.0|0|0|0|0|0.00|0|0|0|0.00|0|0|0|0|0|0|0|0|0.000|0|0|0|0|0.000|0|0|0|0|0.0000|0.0000|0.0000|0.0000|0|0|0|0.00|0.00|0|0|0|0|0|0|0|0|0|0.00|0|0|0|0|0|0|0|0|0|0|0|0|0|0|0|0|0|0|0|0.00|0.00|0|0.00|0|0|0.00|0|0.00|0.00|0.00|0|0|0.00|0|0|0|0|0|0|0|0|0|0|0|0|0|0.00|0.00|0|0|0|0.00|0|0.00|0.00|0.00|0.00|0.00|0|0|0|0|0|0|0|0|0|0|0|0|0|0.00|0.00|0|0.00|0.00|0|0|0|0|0.00|0.00|0|0.00|0.00|0|7|7RIITEM1VI|10|7ITEM VENDOR ITEM|2|VENDOR ITEM MESSAGE 1|VENDOR ITEM MESSAGE 2|VENDOR ITEM MESSAGE 3|10|10.0000|1.350|10|45|10||0|0|0|0|0|0|0|0|||||0
Sample 08 Item UPC Upload Record
7|1150421|84600|08|A|1|IT|RITEST2|||0|0|0|0.0|0|0|0|0|0|0|0|0.0000|0|0|0|0.000|0|0|0.000|0|0|0|0|0|0|0|0|0|0|0|0|0|0|0|0|0|0|0|0|0|0|0|0|0|0|0|0|0|0|0|0|0|0|0.0000|0.0|0|0|0|0|0.00|0|0|0|0.00|0|0|0|0|0|0|0|0|0.000|0|0|0|0|0.000|0|0|0|0|0.0000|0.0000|0.0000|0.0000|0|0|0|0.00|0.00|0|0|0|0|0|0|0|0|0|0.00|0|0|0|0|0|0|0|0|0|0|0|0|0|0|0|0|0|0|0|0.00|0.00|0|0.00|0|0|0.00|0|0.00|0.00|0.00|0|0|0.00|0|0|0|0|0|0|0|0|0|0|0|0|0|0.00|0.00|0|0|0|0.00|0|0.00|0.00|0.00|0.00|0.00|0|0|0|0|0|0|0|0|0|0|0|0|0|0.00|0.00|0|0.00|0.00|0|0|0|0|0.00|0.00|0|0.00|0.00|0|0|0|0|0|0|0|0|0|0|0.0000|0.000|0|0|0|0|E8|65656565|7|0|0|0|0|0|||||0
Sample 09 Item Coordinate Upload Record
7|1150421|84600|09|A|1|IT|RITEST2| | |0|0|0|0.0|0|0|0|0|0|0|0|0.0000|0|0|0|0.000|0|0|0.000|0|0|0|0|0|0|0|0|0|0|0|0|0|0|0|0|0|0|0|0|0|0|0|0|0|0|0|0|0|0|0|0|0|0|0.0000|0.0|0|0|0|0|0.00|0|0|0|0.00|0|0|0|0|0|0|0|0|0.000|0|0|0|0|0.000|0|0|0|0|0.0000|0.0000|0.0000|0.0000|0|0|0|0.00|0.00|0|0|0|0|0|0|0|0|0|0.00|0|0|0|0|0|0|0|0|0|0|0|0|0|0|0|0|0|0|0|0.00|0.00|0|0.00|0|0|0.00|0|0.00|0.00|0.00|0|0|0.00|0|0|0|0|0|0|0|0|0|0|0|0|0|0.00|0.00|0|0|0|0.00|0|0.00|0.00|0.00|0.00|0.00|0|0|0|0|0|0|0|0|0|0|0|0|0|0.00|0.00|0|0.00|0.00|0|0|0|0|0.00|0.00|0|0.00|0.00|0|0|0|0|0|0|0|0|0|0|0.0000|0.000|0|0|0|0|0|0|0|COORDINATE1|O|coordinate1 message|AQUA LRGE BABY|0|||||0
Sample Sales Associates Upload Data
Use the sample data below to create a Sales Associates upload file. See Sales Associates for a setup summary, and Salesman Associate Upload for processing information.
5555555SALESMAN ASSOCIATE UPLOAD NAMENHOMESTORE SalesmanAssociateEmail@email.com
Sample Set Components Upload Data
Use the sample data below to create a Set Components upload file. See Set Components for a setup summary, and Importing Set Components (WCUP) for processing information.
Sample Type F: Kit and Kit Detail Upload Record
7|F|FINISHEDGOOD||||FINISHCOMP1||||1|0|0|0|0||0|
Sample Type S: Set and Set Detail Upload Record
7|S|SET||||SETCOMP1||||1|50.00|1|0|0||0|
Sample Type VG: Variable Set and Variable Set Group Upload Record
7|VG|VARIABLE||||VARIABLECMP1||||0|0|0|0|1|VARIABLE GROUP 1|2|
Sample Type VI: Variable Set Detail Upload Record
7|VI|VARIABLE||||VARIABLECMP2||||0|0|0|0|1||0|
Sample Source Codes Upload Data
Use the sample data below to create a Source Codes upload file. See Source Codes for a setup summary, and Generating Source Codes Using the Source Upload Table (WSRW) for processing information.
7|SOURCECD7|C|$O|H|D|K|SOURCECD7 SOURCE CODE DESCRIPT|500.00|.00|.00|CD|5.00|DR|N|12.00|5.00|25.00|5.00|1|10000|1150401|5000|7000|POP UP WINDOW MESSAGE 1 |POP UP WINDOW MESSAGE 2 |POP UP WINDOW MESSAGE 3 |POP UP WINDOW MESSAGE 4 |12345|1234567|12.00|12345|123|Y|N|Y|12.00|12.00|150.00|55.00|ALPHANUMERIC 30 POSITIONSUSER1|ALPHANUMERIC 30 POSITIONSUSER2|ALPHANUMERIC 30 POSITIONSUSER3|ALPHANUMERIC 30 POSITIONSUSER4|ALPHANUMERIC 30 POSITIONSUSER5|ALPHANUMERIC 30 POSITIONSUSER6|N|N|07| |007|01|01|123|RCCD|LSTSOURCE|FPOCD|N|CAT|CL|1150601| | |123.00|N|N|
Sample Stores Upload Data
Use the sample data below to create a Stores upload file. See Stores for a setup summary, and Store Upload for processing information.
STORE#777 THIS IS STORE#777 NAME/DESCRIPTION YSTORE#777 STREET ADDRESS LINE 1 STORE#777 STREET ADDRESS LINE 2 STORE#777 STREET ADDRESS LINE 3 STORE#777 STREET ADDRESS LINE 4CITY MA01468 USATELEPHONENUMBR
Sample USPS Zip Codes Upload Data
Use the sample data below to create a USPS Zip Codes upload file. See USPS Zip Codes for a setup summary, and Load USPS Zip Code File (LZPS) for processing information.
D00501V13916UHOLTSVILLE PYV13916HOLTSVILLE NA 353910NY103SUFFOLK
D00544V13916UHOLTSVILLE
Sample Vendors Upload Data
Use the sample data below to create a Vendors Upload file (VNDUPL). See Vendors for a setup summary, and Working with Vendor Upload (LVUP) for processing information.
007|7|A|EXAMPLE VENDOR |1234 SAMPLE STREET |SECOND ADDRESS LINE |THIRD ADDRESS LINE |FOURTH ADDRESS LINE |WESTBOROUGH |MA|01581 |US |JOHN SMITH |5085550100| |0|ROBERT JONES |1234 REMIT SAMPLE ST |SECOND ADDRESS LINE |THIRD ADDRESS LINE |FOURTH ADDRESS LINE |SPRINGFIELD |MA|01119 |US |Y|N|Y|P|0|0|N|N|N|N|N |0|.00|.00|.00| |0| |S| |V| |VENDOR@EXAMPLE.COM |REMIT@EXAMPLE.COM |USR1 |USR2 |USR3 | |Y
Setting Up Authorization Services
Topics in this part: The following topics describe the functions available to define the credit card authorization services that your company uses.
-
Using the Credit Card Authorization Interface describes how the credit card authorization interface works, provides a brief overview of the available processing options, and shows you how to locate the function. This topic also describes a recovery program that you can run to retransmit or receive an Authorization table.
-
Reset Authorizations (RSAA) describes how to reset records in the Credit Card Authorization Transaction table from a *SENT status to a *RDY status so that they can be resent to the authorization service.
-
Defining Authorization Services (WASV) shows you how to define the authorization services that your company uses.
-
Defining Authorization Service Countries shows you how to cross-reference your country codes to the country codes used by the service bureau. You can also indicate whether the service bureau performs address verification for the country.
-
Defining Vendor Paytype Codes shows you how to cross-reference your payment codes to the payment codes used by the service bureau.
-
Defining Vendor Response Codes shows you how to define the codes your service bureau uses to identify whether a credit card is approved or declined, and how to have the system place orders on hold based upon the vendor response code.
-
Defining Merchant ID Overrides describes how to set up merchant ID overrides for different entities within your company.
-
Defining Authorization Service Currencies describes how to set up cross references for your company's currency codes and the codes used by a service bureau.
-
Performing Online Credit Card Authorizations provides an overview on online credit card authorization and required setup.
-
Performing Batch Authorization (SATH) describes how to send credit cards up for batch authorization by the associated ship via.
-
Printing the Online Credit Card Authorization List (PATL) describes how to print the Online Authorization Listing.
-
Processing Authorizations and Deposits using an Integration Layer Process explains how to communicate with the service bureau to process authorizations and deposits via an integration layer process.
-
PayPal Direct Connection Integration provides an overview of the PayPal integration using a direct connection to PayPal, which allows you to use PayPal as a method of payment on web orders and send the deposit transaction directly to PayPal.
-
Processing Authorizations and Deposits Using Point-to-Point Communication explains how to communicate with the service bureau to process authorizations and deposits via a direct connection.
-
External Payment Service for information on a RESTful web service that provides an interface from Order Management System for sending credit card and stored value card transactions and receiving responses.
-
CyberSource Point-to-Point Integration for information on processing authorization and deposit transactions with Cybersource using point-to-point communication.
Using the Credit Card Authorization Interface
Purpose: The Credit Card Authorization Interface allows you to transmit and receive the information required to authorize your credit card orders and deposit amounts charged to the credit cards.
Note:
In this topic, the term service bureau will be used instead of authorization service since the interface is not limited to credit card authorizations.
In this topic:
For more information: See:
-
Reprocess Authorizations Screen (RPAA)
-
Retransmitting Authorizations
-
Receiving Authorizations
-
-
Reprocess Drop Ship Authorizations Screen (RPDS)
-
Retransmitting Authorizations
-
Receiving Authorizations
-
-
Working with Required Responses (WREQ)
-
Required Response Processing
-
Response Required Email
-
RESP.log
-
Work with Required Responses Screen
-
Reply To Message Screen
-
Required Response Setup
-
Notify Properties
-
Logging Properties
-
Available Service Bureaus
Order Management System integrates with the following service bureaus.
| Service Bureau | Transactions Processed |
|---|---|
|
Cybersource using Point-to-Point integration |
The integration also supports:
|
|
Oracle Retail Customer Engagement using Point-to-Point integration |
|
|
PayPal integration using a direct connection |
Deposit request for PayPal payment. Types of deposit are debit and credit. |
|
External payment service |
A RESTful service that provides an interface from Order Management System for credit card and stored value card transactions. Using this service, you can build a custom payment processor that maps to your payment provider. This payment service uses the integration layer to send and receive the request and response messages. When configuring the external payment service, leave the primary authorization service blank. Supported credit card transactions:
Supported stored value card transactions:
|
Authorization/Deposit Setup
Purpose: The setup required to communicate with a service bureau for authorization and deposit settlement is described below.
For more information: See:
-
Stored Value Card Overview and Setup for more information on the setup required to process a stored value card.
-
Processing Authorizations and Deposits using an Integration Layer Process for more information on processing transactions between Order Management System and a service bureau via an integration layer process.
-
Processing Authorizations and Deposits Using Point-to-Point Communication for more information on processing transactions between Order Management System and a service bureau via point-to-point communication. Specifically:
-
Customer Engagement Stored Value Card Integration for more information on the Oracle Retail Customer Engagement messages used to process stored value card transactions between Order Management System and the Oracle Retail Customer Engagement system using point-to-point communication.
-
CyberSource Point-to-Point Integration for more information on the Cybersource messages used to process token, authorization, authorization reversal, and deposit transactions between Order Management System and the Cybersource system using point-to-point communication.
-
-
External Payment Service for more information on using this RESTful web service to build a custom payment processor that maps to your payment provider.
System Control Values
| System Control Value | Description |
|---|---|
|
Defines whether you are using the interface to electronically transmit authorization and deposit information for your credit card orders to an authorization service. |
|
|
The setting of this system control value and the Invoice Consolidation Method (E29) system control value controls the number of authorizations processed for an order during batch authorization.
See Authorizations When Consolidating Invoices for more information. Note: In Order Management System 21.0 or higher, you cannot select the Consolidated Invoice system control value if it is not already selected. If the system control value is currently selected (set to Y) and you deselect it (change it to N or blank), you cannot then change it back to selected. The option to consolidate invoices will be removed at a later date. |
|
|
Defines whether the system performs online credit card authorization during order entry. See Performing Online Credit Card Authorizations for an overview and required setup. |
|
|
Determines the maximum number of times to attempt to authorize an order before flagging the order for cancellation. |
|
|
Specifies how to handle orders put on the same type of AVS hold a second time after you have released them. If you select this field, the system will not hold an order more than once for the same AVS response code if, for example, you need to reauthorize the order again because a backordered item is now available for shipment. |
|
|
Default Credit Card Authorization Number for Soft Declines (F93) |
Defines the authorization number the system defaults when a credit card authorization is declined but is under a specified dollar amount. |
|
Use Credit Card Vendor Response Entity Ship Via Dollar Limits (F94) |
Defines whether the system performs an edit against a credit card vendor response to determine if the dollar amount for the credit card authorization exceeds the dollar limit defined for the ship via on the order. |
|
Defines whether the credit card on the order is authorized for the entire dollar amount defined for the card or the shippable amount defined for the card when you perform online authorization during order entry. |
|
|
Defines the authorization number the system automatically applies to credit cards that require authorizations that are under one dollar. |
|
|
Defines whether the system processes online authorizations for $1.00 for the purpose of validating the card. During batch authorizations, the system authorizes the card for the shippable dollar amount and voids the online authorization for $1.00. |
Number Assignment Value
| Number Assignment | Description |
|---|---|
|
Transaction Sequence # |
Assigns the next available number to the credit card authorization. |
|
Batch Auth File Trace Number |
Assigns the next available number to the merchantFileTrace value in the Authorization Request XML Message (CWAuthorizationRequest) and Deposit Request XML Message (CWDepositRequest) sent to the service bureau. Order Management System updates the Reference ID field in the Integration Process Control table with this value. Note:
|
Service Bureau Settings
Use the Defining Authorization Services (WASV) menu option to:
-
define the service bureaus that you use, such as:
-
Authorization services, to authorize charges against a credit card or stored value card.
-
Authorization/Deposit services, to authorize card charges and receive deposit amounts.
-
Deposit services, to provide settlement for card payments.
-
-
identify the type of service the service bureau performs
-
define the parameters that identify your company to the service bureau
-
define the information necessary to connect, transmit, and receive data to and from the service, such as:
-
the method of communication: Integration Layer (via an integration layer process) or Payment Link (point-to-point)
-
if the communication type is Integration Layer, the integration process control job used to transmit data between Order Management System and the service bureau via an integration layer process
-
valid pay types
-
response codes (vendor responses, AVS responses, and CID responses)
-
currency codes
-
merchant IDs for individual entities within your company
-
whether the order originated as an internet order
-
Some of the information required to establish a service bureau on your system is provided by the service bureau. For example, each service bureau will assign you a unique password.
Authorization service country required for double-byte customer address: If the customer’s address uses a double-byte language, such as Chinese, you need to set up an authorization service country record to support address verification.
Communication Method
The Communication type field for the service bureau indicates how you send transactions between Order Management System and the service bureau.
-
Integration Layer = Transactions are sent between Order Management System and the service bureau using an integration layer process. Integration layer jobs provide the settings required to send transactions between Order Management System and the service bureau. See Integration Layer Jobs and Processing Authorizations and Deposits using an Integration Layer Process.
-
Payment Link = Transactions are processed between Order Management System and the service bureau using a point-to-point integration. Settings in the Interface Properties provide the point-to-point service that is executed and the settings used to connect to the service bureau. See Processing Authorizations and Deposits Using Point-to-Point Communication.
Leave the Primary authorization service field blank for each service bureau that you create.
Order Types
You define whether an order type is eligible for on-line authorizations and if the order type will display a window during order entry when a response is received from the service bureau, based on the On-line authorization field:
-
1 = the order type is eligible for on-line authorizations and the Select Authorization Response Option Window opens.
-
2 = the order type is eligible for on-line authorization and the Select Authorization Response Option Window does not open.
-
3 = the order type is not eligible for on-line authorization.
See Performing Online Credit Card Authorizations for more information on online authorizations.
Pay Types
Each credit card pay type eligible for authorization should have the service bureau set up as its authorization and deposit service. See dWorking with Pay Types (WPAY) for more information on setting up pay types.
Pick Slip Generation
If you wish to generate pick slips only for orders that contain pre-paid payment methods and/or credit cards that have received an authorization, you can create a pick slip generation template with the Preauthorized orders only field selected.
Integration Layer Jobs
The following integration layer jobs are used to send authorizations and deposits to a service bureau via an integration layer process. The system uses these integration layer jobs when the Communication type field for the service bureau is Integration Layer.
| Integration Layer Job | Description |
|---|---|
|
Online Authorization |
When active, the Online Authorization integration layer job generates an Authorization Request XML Message (CWAuthorizationRequest) in online format and sends the message to the service bureau. The service bureau sends an Authorization Response XML Message (CWAuthorizationResponse) back to the integration layer job. |
|
Batch Authorization |
When active, the Batch Authorization integration layer job generates an Authorization Request XML Message (CWAuthorizationRequest) in batch format and sends the message to the service bureau. The service bureau sends an Authorization Response XML Message (CWAuthorizationResponse) back to the integration layer job. |
|
Deposit |
When active, the Batch Authorization integration layer job generates a Deposit Request XML Message (CWDepositRequest) in batch format and sends the message to the service bureau. The service bureau sends a Deposit Response XML Message (CWDepositResponse) back to the integration layer job. |
For each integration layer process, make sure you define:
-
an outbound queue manager and queue (if using advanced queuing) to send the request to the service bureau.
-
an inbound queue manager and queue (if using advanced queuing) to receive the response from the service bureau.
For more information:
-
See Working with Integration Layer Processes (IJCT) for more information on setting up an integration layer process.
-
See Processing Authorizations and Deposits using an Integration Layer Process for more information on communicating with a service bureau via an integration layer job.
-
See Stored Value Card Overview and Setup for more information on the additional integration layer jobs required for a stored value card pay type.
Notify Properties
In order to respond to Order Management System jobs that may require user intervention to proceed, you must set up the notify properties in Working with Admin Properties (CPRP).
Why would a job require user intervention?
-
An error occurred during processing
-
The job is used to send transactions to another system and communication failures occur before the transmission completes
Which types of job require user intervention?
-
Stored Value Card (activation, balance inquiry or authorization reversal)
-
Authorization (batch only, for all card types)
-
Deposit
| Property Name | Description |
|---|---|
|
RESPONSE_RETRIES |
The number of times Order Management System looks for a response to a job that requires user intervention before using the default response in order to proceed with the job. For example, if this setting is 5, Order Management System will look for a user response five times, waiting 60 seconds between each time. |
|
RESPONSE_EMAILS |
The list of email addresses that receive the Response Required email when a job requires user intervention. Each email address entered must be separated by a semi-colon (;). For example: email1@add.com;email2@add.com. |
For more information: See Working with Required Responses (WREQ) for more information on the steps performed when a job requires user intervention.
How Credit Cards are Authorized
Purpose: The information required to authorize a credit card is transmitted to the service bureau:
-
in interactive mode at the time of order entry, order maintenance, or when you use the Batch Authorization menu option if you are using online credit card authorization. See Performing Online Credit Card Authorizations.
-
in batch mode when you generate pick slips if the Batch/online field for the authorization service is set to Batch or On-line or Batch. See Using Batch Authorization.
The service bureau processes the authorization requests and transmits the information back to your company.
-
If the credit card is authorized, the authorization date, authorization code, and the amount authorized for the order is updated to the Authorization History table, which can be viewed through standard Order Inquiry (select Payments, then select Pay Plan Summary for the pay type to display).
-
If the authorization is declined, the order is not authorized. Additionally, the order may be put on hold or flagged for cancellation. See Defining Vendor Response Codes.
Authorizations are required for all orders that are being paid by credit card.
Note:
A separate authorization is required for each card if the customer is using more than 1 credit card on an order.
Address verification: Some service bureaus also provide an address verification service to ensure that the billing address on the credit card is legitimate; see Address Verification Service (AVS) for more information on address verification.
Card security identification: Some service bureaus also provide card identification to help reduce fraud by verifying that the credit card is present at the point of sale and to ensure that the credit card data from the transaction matches the data stored by the authorization service for that card; see Credit Card Security Service (CID, CVV2, CVC2) for more information on credit card identification.
Card authentication: Some service bureaus also provide card authentication to help reduce fraud by verifying that the cardholder is authorized to use the credit card; see Credit Card Authentication Service for more information on credit card authentication.
Pay plans: An order using a deferred or installment billing pay plan does not typically require a full authorization at the time you generate pick slips. Such an order would require an authorization at the time you process the deposit instead. See Processing Auto Deposits (SDEP) for an overview of how authorizations for pay plan orders differ from those for regular (non-pay plan) orders.
Hierarchy for Placing the Credit Card On Hold
The credit card pay type may be placed on hold if the credit card is not approved, the AVS verification fails, or the credit card identification fails.
The system uses this hierarchy to determine if the credit card pay type should go on hold:
-
Vendor response has a hold reason defined: If the credit card charge is declined (not authorized), the credit card may be placed on hold (based on the value in the Hold reason field in the Vendor Response table). The order header is also placed on AT (declined credit card) hold. You must take the order header and credit card pay type off of hold through the Release Held Orders (ERHO) menu option and resend for authorization or cancel the order. In this situation, you can also generate an email to the customer if the Credit Card Decline Email Program (K53) specifies a value.
-
AVS response has a hold reason defined: If the credit card charge is approved (authorized) but the credit card fails the address verification check, the authorization may be placed on hold (based on the value in the Hold reason field in the Vendor Response table). The order header is also placed on AT (declined credit card) hold. You must contact the customer and obtain correct address information, then take the order header and credit card pay type off of hold through the Release Held Orders (ERHO) menu option and resend for authorization or cancel the order.
-
Card security identification response has a hold reason defined: If the credit card charge is approved (authorized) and passes the address verification check, but the credit card fails the card security identification check, the credit card pay type may be placed on hold (based on the value in the Hold reason field in the Vendor Response table). The order header is also placed on AT (declined credit card) hold. You must contact the customer to verify credit card ownership, then take the order header and credit card pay type off of hold through the Release Held Orders (ERHO) menu option and resend for authorization or cancel the order.
For more information: See Defining Vendor Response Codes and Establishing Cancel Reason Codes (WCNR).
Credit Card Authorization Reversal
Overview: When you process a cancellation associated with a credit card payment or deactivate a credit card payment, the system looks at the setting of the Send reversal field for the service bureau defined for the credit card pay type.
If the Send reversal field is selected, the system voids that authorization and reimburses the original authorization amount to the credit card.
You can also process credit card authorization reversals for eligible open Authorization History records by running the REVERSE Send Reversals for Expired Authorizations periodic function. Also, you can process stored value card reversals for closed or canceled orders that use the external payment service through a periodic function; see Stored Value Card Reversal Function for more information.
Credit Card Authorization Reversal Process
| # | Step |
|---|---|
|
1. |
You process a cancellation associated with a credit card payment or deactivate a credit card payment associated with a service bureau whose Send reversal field is selected. You can process a cancellation by:
You can deactivate a credit card payment by:
|
|
2. |
The system determines if the order is eligible for credit card authorization reversal. For an order to be eligible for credit card authorization reversal, the order must:
The system uses the Authorization time defined for the Authorization History record to determine the age of the authorization. You can review the authorization time on the Authorization History Details Window. Multiple payment methods: If the order contains one or more stored value card and/or credit card payments, the system performs authorization reversal for each eligible payment method. Authorizations in sent status: When you process a cancellation or deactivate a credit card payment and the authorization is in a S Sent, but not Received status, the system does NOT create a credit card authorization reversal for the payment even if you later receive an approved authorization response. Expired authorizations: If the original authorization for an order is expired and the order received a new authorization during batch authorization, the system will create an authorization reversal against the expired authorization when you process deposits. However, the service bureau will reject this authorization reversal since they have already expired the authorization and reimbursed the credit card. |
|
3. |
The system creates an authorization reversal for the original authorization amount, not the actual amount of the reversal. |
|
4. |
The system creates a record in the Auth History SVC Reversal table for the authorization amount to reimburse. Auth History SVC Reversal table:
|
|
5. |
The system creates an authorization reversal download trigger for the credit card reversal. You can view all download triggers in the IL Outbound Trigger table in the Working with Outbound Interface Transactions (WOIT) menu option. Each authorization reversal download trigger in the IL Outbound Trigger table contains a:
Note: If the credit card authorization reversal was created because the system received a REJECT response from Cybersource Decision Manager, the system does not create an authorization reversal download trigger and instead generates a Credit Card Authorization Reversal Request immediately as defined in step 8. |
|
6. |
The system looks at the Authorization service field defined for the credit card payment to determine the service bureau used to process the authorization reversal. |
|
7. |
The system looks for unprocessed AHR download triggers to process, based on the setting of the Use Activation / Reversal Batch Processing (I50) system control value.
The system:
|
|
8. |
For each authorization reversal download trigger, the system generates a Credit Card Authorization Reversal Request. If you are using the CyberSource Point-to-Point Integration, the system generates the CyberSource Authorization Reversal Request (ccAuthReversalService) XML Message. |
|
9. |
Order Management System processes the authorization reversal response accordingly. If you are using the CyberSource Point-to-Point Integration, the system receives the CyberSource Authorization Reversal Response (ccAuthReversalService) XML Message. |
What Happens When the Authorization Reversal is Approved?
An authorization reversal is approved if the Authorization Reversal Response contains an authorization number. In this case, the system:
-
Updates the associated record in the SVC Authorization Reversal table with an approval date, approval time, and reversal response.
-
Creates an order transaction history message indicating the authorization reversal was approved: Auth Reversal Has Been Approved.
-
Voids the authorization history record.
Note:
If the Authorization Reversal Response contains an amount, the system ignores the amount sent back and continues to use the amount from the Auth History SVC Reversal table.
You can review the credit card authorization reversal at the Display Authorization Reversals Screen. The approved reversal will have a Response and an Approval date and time.
What Happens When the Authorization Reversal is Declined?
An authorization reversal is declined if the Authorization Reversal Response does not contain an authorization number. In this case, the system creates an order transaction history message indicating the authorization reversal was declined: Reversal Has Been Rejected.
Display Authorization Reversals ScreenNote:
-
Except for the order transaction history message, there is no other indication that the credit card authorization reversal request was declined.
-
Because the cancellation or deactivation amount was not reimbursed to the card, the customer will not be able to use that amount on future purchases paid for against the card.
-
The response received from the service bureau does not display in the Response field on the Display Authorization Reversals Screen unless it is set up as a vendor response for the service bureau in Defining Authorization Services (WASV).
When Communication Failures Occur
Communication failures can occur if the connection between Order Management System and the service bureau is down, or the system times out before a response is received. If communication failures occur and you do not receive a response from the service bureau, the system:
-
Does not update the associated record in the SVC Authorization Reversal table.
-
Does not create an order transaction history message.
You cannot resent an authorization reversal request to the service bureau.
Using Batch Authorization
Purpose: Batch Authorization is used to authorize credit cards during pick slip generation. An authorization will be requested during pick slip generation if:
-
the order is being paid by credit card and the credit card does not have an authorization, and
-
the Batch/online field for the authorization service is set to Batch or Online or Batch.
Online authorization grace period: The system allows a 2 day grace period to receive a response from the service bureau if the status of an online authorization for an order is *RDY, *SENT, or *RCVD. To determine the grace period, the system takes the current date - the authorization sent date to determine the number of days. Once the 2 day grace period is passed, the system declines the transmission and you can resend the credit card for authorization during order maintenance or pick slip generation.
How the orders are authorized: The authorization information is captured in the CC Authorization Transaction (CCAT00) table as the orders are being allocated and the records are assigned a *RCVD status. The pick slip is placed in a pending status if an authorization is required.
Transmitting and Receiving Authorizations
After the orders are allocated, the data for the records in the CC Authorization Transaction table is transmitted to the service bureau.
-
If the Communication type field for the service bureau is Integration Layer, the system sends authorization transactions to the service bureau using the queues defined for the Authorization integration layer job. See Processing Authorizations and Deposits using an Integration Layer Process.
-
If the Communication type field for the service bureau is Payment Link, the system sends authorization transactions to the service bureau using a point-to-point integration. You must define communication settings in the Interface Properties. See Processing Authorizations and Deposits Using Point-to-Point Communication.
When are pick slips printed? Pick slips and pull sheets are printed after the authorizations are received from the authorization service.
CC Authorization Transaction table: When you send credit card information to the service bureau, the system also creates a record in the CC Authorization Transaction table.
| Field | Description |
|---|---|
|
Company |
The company where you placed the order. |
|
Vendor code |
The order number and ship to number that contains the credit card payment method requesting authorization. |
|
Order number |
The order number that contains the credit card payment method requesting authorization. |
|
Transaction type |
The type of transaction being sent to the service bureau. Valid values are:
|
|
Credit card number |
The credit card number defined for the credit card requesting authorization. Note: If you use credit card encryption, the system encrypts the credit card number in this file to provide additional security of credit card data. See the Data Security and Encryption Guide on My Oracle Support (1988467.1) for an overview. |
|
Status |
The status of the transaction. Valid values are:
|
|
Vendor response 1 |
The authorization response for the credit card. This field remains blank until an authorization response is received. |
|
Vendor response 2 |
The card security identification (CID, CVV2, CVC2) response for the credit card. This field remains blank. |
|
Auth code |
The code used to authorize the credit card. This field remains blank until an authorization response is received. |
|
Auth date |
The date the credit card was authorized. This field remains blank until an authorization response is received. |
|
Paytype |
The credit card pay type requesting authorization. |
|
Expire month |
The month the credit card is no longer valid. |
|
Expire year |
The year the credit card is no longer valid. |
|
AVS response |
The AVS response for the credit card. This field remains blank until an AVS response is received. An AVS response is not received unless the authorization service performs address verification. |
|
Auth. $ amt |
The dollar amount associated with the credit card requesting authorization. |
|
Hold reason |
The hold reason assigned to the credit card payment method; this is the hold reason defined for the authorization response, AVS response, or CID response, in that order. This field remains blank until an authorization response is received and is only updated if a hold reason code has been defined for the authorization response, AVS response, or CID response. |
|
Customer number |
The number of the customer associated with the credit card. This is the bill to customer if one is defined; otherwise this is the sold to customer. |
|
Last name |
The last name of the customer associated with the credit card. This is the bill to customer if one is defined; otherwise this is the sold to customer. |
|
First name |
The first name of the customer associated with the credit card. This is the bill to customer if one is defined; otherwise this is the sold to customer. |
|
Address line 1 |
Address line 1 for the customer associated with the credit card. This is the bill to customer if one is defined; otherwise this is the sold to customer. |
|
Address line 2 |
Address line 2 for the customer associated with the credit card. This is the bill to customer if one is defined; otherwise this is the sold to customer. |
|
Bill to city |
The city for the customer associated with the credit card. This is the bill to customer if one is defined; otherwise this is the sold to customer. |
|
Bill to state |
The state for the customer associated with the credit card. This is the bill to customer if one is defined; otherwise this is the sold to customer. |
|
Bill to zip |
The zip code for the customer associated with the credit card. This is the bill to customer if one is defined; otherwise this is the sold to customer. |
|
Bill to xtra zip |
The zip code + 4 for the customer associated with the credit card. This is the bill to customer if one is defined; otherwise this is the sold to customer. |
|
Bill to country |
The country for the customer associated with the credit card. This is the bill to customer if one is defined; otherwise this is the sold to customer. |
|
Telephone number |
The telephone number for the customer associated with the credit card. This is the bill to customer if one is defined; otherwise this is the sold to customer. |
|
Telephone type |
Indicates whether the telephone number is the customer’s day number or evening number. |
|
Trans. date |
The date the transaction is sent to the authorization service. |
|
Tran. time |
The time the transaction is sent to the authorization service. |
|
OPM seq number |
The sequence number associated with the credit card payment method. |
|
Auh seq number |
The sequence number associated with the authorization. |
|
Auth service code |
A code to identify the authorization service. |
|
Currency code |
A code for the currency associated with the amount requesting authorization. Remains blank for the local currency. |
Determining the amount to authorize: When the Batch Authorization method is used, only the amount that is being shipped, that has not yet received an authorization, is authorized.
Additionally, if the credit card amount to authorize is less than $1.00 and you have defined an authorization number in the Authorization Number for Authorizations Under $1.00 (I08) system control value, the system does not send the credit card to the service bureau for authorization and instead assigns the authorization number from the system control value to the credit card. If an authorization number is not defined in this system control value, the system sends the credit card to the service bureau for authorization, regardless of the amount that requires authorization.
Note:
You must obtain an authorization for each credit card used on an order for the pick slip to be printed.
If multiple pick slips are printed for the order, you can authorize the shipment amount of each pick slip separately, or you can request one authorization for the total order amount being shipped.
Multiple payment types: When there are multiple payment types on an order, the system will apply the amounts associated with each payment type in ascending order by payment sequence code. You define the payment sequence for each order when you enter it.
If an order is being paid by Visa and Mastercard, the Order Entry operator must indicate which credit card is to be used first, and the dollar amount to charge to that card.
Example:
If you specify that $50 is to be charged to Visa first, and the remainder of the order is to be charged to Mastercard, the first $50 will be applied to Visa.
The system authorizes only the amount that can be shipped. If only $40 is being shipped, an authorization request for $40 will be sent for the Visa card. If an additional $40 is shipped the following week, two authorizations will be requested: the remaining $10 for Visa and $30 for Mastercard.
If the Visa card is approved and the Mastercard is declined, the second shipment will not occur. The full shipment amount must be approved for the shipment to occur. The system will retain the authorization code, date, and amount for the Visa card. The authorization will be good for the number of days you specify in the Reauthorization days field in the Payment Type table.
Multiple pick slips: The Pick Slip Generation program will print pick slips for authorized credit card orders. If an authorization is received for only a portion of the amount being shipped, the pick slip will not be printed.
If the order is being shipped in more than one carton, a separate pick slip will be printed for each carton. When multiple pick slips are generated for an order, you can do one of the following:
-
You can request a separate authorization for the shipment amount associated with each pick slip.
-
You can use the Consolidate invoices feature, which allows you to obtain one authorization for the total amount being shipped, regardless of the number of pick slips printed for the order.
Separate authorizations: When you obtain a separate authorization for each pick slip, an authorization will be obtained for the amount being shipped in each carton.
Example: Order# 345 has a shipment amount of $100. Three pick slips are printed for the order because three cartons are required to ship the merchandise. A separate authorization will be obtained for each pick slip as follows:
| Carton # | Shipment Amount | Authorization Code |
|---|---|---|
|
1 |
$25 |
56D |
|
2 |
$40 |
68H |
|
3 |
$35 |
90B |
An Authorization History record will be created for each authorization received.
Note:
It is possible to receive an authorization for cartons 1 and 2, and a decline for carton 3 if the customer does not have enough available credit to authorize all three cartons.
When the order is billed, the system will attempt to match the invoice amount to the authorization. If carton 3 is billed first, the system will search the Authorization History table for a $35 authorization for the order. The deposit amount will be updated and the $35 authorization record will be exhausted.
If the system cannot find a match for the deposit in the Authorization History table, it will use the first available authorization code for the order. In the above example, the system would have used the authorization obtained for carton 1.
You will incur a separate transaction fee for each authorization and deposit processed for the order.
Consolidating invoices: When you use the Consolidated Invoice (B49) feature, the system will obtain one authorization and will create one deposit record for the total amount being shipped, regardless of the number of pick slips that are printed for an order. The full amount of the shipment must be authorized when this method is used.
Example: Order # 745 has a shipment amount of $100. Three pick slips are printed for the order because three cartons are required to ship the merchandise.
| Carton | Shipment Amount |
|---|---|
|
1 |
$25 |
|
2 |
$40 |
|
3 |
$35 |
One authorization will be obtained for the entire order. If the customer has an available balance of only $40, nothing will be shipped. All three pick slips associated with the order will be deleted from the Pick Control table.
This method allows you to limit the number of authorization and deposit transactions required for the order, and reduces your transaction fees to the service bureau.
If all pick slips for the order are billed on the same day, the authorization amount will match the deposit amount and no additional authorizations will be required at settlement.
If all pick slips for the order are not billed on the same day, the authorization amount will not match the deposit amount and the order will be re-authorized at settlement with each deposit.
Important:
In Order Management System 21.0 or higher, you cannot select the Consolidated Invoice system control value if it is not already selected. If the system control value is currently selected (set to Y) and you deselect it (change it to N or blank), you cannot then change it back to selected. The option to consolidate invoices will be removed at a later date.
Voiding pick slips: If you void a pick slip, the credit card is still authorized. The authorization does not expire until the number of days you specify in the Reauthorization days field in the Payment Type table have elapsed.
If the authorization is valid when the order is reallocated, the system will use the existing authorization. The authorization amount may not match the shipment amount when the deposit request is processed. If this occurs, the service bureau will reauthorize the order for the correct amount prior to accepting the deposit.
Prior authorization amount? If there has been a prior authorization on the order and the order total increases, an authorization is required for the difference between the original authorization and the new order total or shippable total. For example, an the order was originally authorized for $50.00, and you add an order line for $20; an additional authorization for $20.00 is required.
Note that if any portion of the prior authorization amount was already deposited, the deposited amount is excluded from the amount that is considered already authorized. For example, an order line for $20.00 was shipped and the amount deposited. If you then add an item for $15.00 to the order, an additional authorization for $15.00 is required.
Authorization history: Once a response is received from the service bureau, the system creates a record in the Authorization History table. You can review authorization history on the Display Authorization History Screen and Authorization History Details Window.
| Field | Description |
|---|---|
|
Company |
The company where you placed the order. |
|
Order number |
The order number that contains the credit card payment method requesting authorization. |
|
Sequence number |
The next available number from the Transaction sequence # number assignment value. |
|
Status |
|
|
Amount authorized |
The dollar amount associated with the credit card that has been authorized. |
|
Amount deposited |
The dollar amount associated with the credit card that has been deposited. This field should be blank. |
|
Auth date |
The date the credit card was authorized. |
|
Sent date |
The date you sent the credit card information to the service bureau for authorization. |
|
Auth number |
The number used to authorize the credit card. |
|
Vendor response |
The authorization response for the credit card from the service bureau. The system looks at the Credit Card Vendor Response table to find a match to the vendor response code from the authorization service. |
|
Vendor response 2 |
The card security identification response for this credit card from the service bureau. The system looks at the Credit Card Vendor Response table to find a match to the card security response code from the service bureau. If the card security response is associated with a hold reason, the system places the order on AT hold and places the credit card payment method on hold. |
|
AVS response |
The address verification response for this credit card from the service bureau. The system looks at the Credit Card Vendor Response table to find a match to the AVS response code from the service bureau. If the AVS response is associated with a hold reason, the system places the order on AT hold and places the credit card payment method on hold. |
Approved Authorizations
When credit card charges are approved (authorized):
-
pick slips print (because the items can be shipped)
-
the status of the records in the Authorization table is set to *RCVD
-
the system updates the Authorization History table with the authorization code, authorization date, and amount authorized
-
the order appears on the “Authorized” version of the Credit Card Authorization Listing
Declined Authorizations
When credit card charges are declined:
-
no pick slips print
-
the system removes any pick slip preparation from the order and reevaluates the order for pick slip preparation since the items cannot ship
-
the order appears on the “Declined” version of the Credit Card Authorization Listing
-
the system updates the Authorization History table with the decline code and reason.
Optionally, you can also set up a vendor response code so that any of the following can take place:
-
the order is held (with or without a Hold until date, which indicates when the order is eligible for release through the Time Release Held Orders periodic function)
-
the order is flagged for cancellation
You can define the number of times to attempt authorization for each vendor response. Also, you can use the Maximum Number of Retries on Credit Card Orders (E74) system control value to specify the total number of authorization attempts for an order across all vendor responses.
If there is a problem with the transmission or if the service bureau cannot process the authorization, pick control records for the credit card orders requiring authorization will remain in a pending status. Pick slips will not print for these orders until an authorization is received. It is possible to allocate several hundred credit card orders during Pick Slip Generation without printing any pick slips for them.
See Working with Credit Card Cancellations (WCCC) for information on how to cancel credit card orders based on declined authorization.
Address Verification Service (AVS)
Address verification services help to reduce the fraudulent use of credit cards by verifying that the billing address on the credit card is legitimate.
To use this feature, select Address verification in the Authorization Service table, define each possible response in the Vendor Response table, and define the hold codes in the Order Hold Reason table (for AVS responses that require the order to be held). See Defining Authorization Services (WASV), and Defining Vendor Response Codes. Also, see Establishing Cancel Reason Codes (WCNR).
Note:
Address verification processing is not available for international transactions.
If the credit card charge is approved (authorized) but the order fails the address verification check, the order may be placed on hold (based on the value in the Hold reason field in the Vendor Response table). If so, the system removes pick slip preparation from the order. You must contact the customer and obtain correct address information, then take the order off of hold through the Release Held Orders function.
Entity dollar limits: Additionally, you can set up the following instructions for an AVS response code for each entity in your company:
-
Whether a dollar limit is applied to the ship via on the order. If the authorization amount is less than the ship via dollar limit, the system releases the order from any AVS hold. If the authorization is greater than the ship via dollar limit, the system places the order on hold using the hold reason defined for the ship via dollar limit. See Entity ship via dollar limits for additional processing logic.
-
Whether a dollar limit is applied to the item class associated with an item on the order. If the authorization amount is less than the item class dollar limit, the system releases the order from any AVS hold. If the authorization is greater than the item class dollar limit, the system places the order on hold using the hold reason defined for the item class dollar limit. See Entity item class dollar limits for additional processing logic.
-
Whether a dollar limit is applied to the postal code defined for the bill to or sold to customer on the order. If the authorization amount is less than the postal code dollar limit, the system releases the order from any AVS hold. If the authorization is greater than the postal code dollar limit, the system places the order on hold using the hold reason defined for the postal code dollar limit. See Entity postal code dollar limits for additional processing logic.
AVS hold bypass: The Credit Card Authorization AVS Hold Exemption/Bypass (E61) system control value specifies how to handle orders put on the same type of AVS hold a second time after you have released them. If you select this field, the system will not hold an order more than once for the same AVS response code if, for example, you need to reauthorize the order again because a backordered item is now available for shipment.
Unrecognized responses: Additionally, the system puts an order on AVS hold if the service bureau returns a response code that you have not defined. The order appears on the Credit Card Authorization Listing (not the Address Verification Response List) as a declined order, but with no description. You will need to use the Release Held Orders (ERHO) menu option once you have resolved the question.
Reviewing the AVS response: The AVS response received for the authorization is stored in the AVS response field in the Authorization History table. You can review the AVS response on the Display Authorization History Screen and Authorization History Details Window.
Authorization service country required for double-byte customer address: If the customer’s address uses a double-byte language, such as Chinese, you need to set up an authorization service country record to support address verification.
Address Verification Response List
The Address Verification Response List, which prints when you receive the Authorization table, identifies the service bureau, order number, billing batch number, transmission date, customer name and address, customer number, credit card number, credit card expiration date, authorization number, amount authorized, and AVS response. Refer to this report when you contact the customer to correct the address problem.
Credit Card Security Service (CID, CVV2, CVC2)
Credit card security services (CID, CVV2, CVC2) helps to reduce the fraudulent use of credit cards by verifying that the credit card is present at the point of sale and to ensure that the credit card security value from the transaction matches the security value stored by the service bureau for that card.
The credit card identification service uses the card security value provided by the customer to determine if the credit card is present at the point of sale or if the card is possibly a fraud.
-
American Express: The card security value, or CID (card identification number), is a 4-digit number imprinted, not embossed, on an American Express credit card. The card security value displays above and to the right of the imprinted credit card number on the front of the card.
-
Discover: The card security value, or CID (card identification number), is a 3-digit number in reverse indent printing located on the signature panel on the reverse side of the credit card following the account number.
-
VISA: The card security value, or CVV2 (card verification value), is a 3-digit number in reverse indent printing located on the signature panel on the reverse side of the credit card following the account number.
-
MasterCard: The card security value, or CVC2 (card validation code), is a 3-digit number in reverse indent printing located on the signature panel on the reverse side of the credit card following the account number.
Example: An example of where the card security value is located on Visa, Discover, Mastercard, and American Express credit cards is displayed below

To perform card security identification, enter a number in the Card security value field and a valid number in the Card security presence field when you take the customer’s credit card information.
The Card security presence field indicates to the service bureau whether a card security value is present on the credit card.
-
1 (Value present) = the card security value is present on the credit card. You enter the card security value in the Card security value field for the credit card payment method.
-
2 (Value illegible) = the card security value is present on the credit card, but is illegible. In this transaction, the card security value is blank.
-
9 (No value) = the card security value is not present on the credit card. In this transaction, the card security value is blank.
Note:
The system removes the card security value from an order when the order is accepted, even if an approved online authorization has not been received on the order; no message is written to Order History. Card security processing is not available during batch authorization or deposit processing.
If you do not wish to use credit card security identification, leave the Card security value and Card security presence fields blank for the credit card payment method.
E-Commerce orders: If the card security value and card security presence are passed for an e-commerce order, the system clears the values and does not pass them to the order. See Generic Order Interface (Order API).
For more information see the Web Services Guide on My Oracle Support (ID 2149144.1).
Card security hold: If the credit card charge is approved (authorized) but the order fails the credit card security identification check, the order may be placed on hold (based on the value in the Hold reason field in the Vendor Response table). If so, the system removes pick slip preparation from the order. You must contact the customer to confirm credit card ownership, then take the order off of hold through the Release Held Orders (ERHO) menu option. See Hierarchy for Placing the Credit Card On Hold.
Reviewing the card security response: The card security identification response received for the authorization is stored in the Vendor response 2 field in the Authorization History table. You can review the card security identification response on the Display Authorization History Screen and Authorization History Details Window.
Possible card security identification responses are:
-
M (match) = The card security value indicated on the card matches the card security value in the secured database.
-
N (no match) = The card security value indicated on the card does not match the card security value in the secured database. You should be cautious in processing credit cards with a card security response of N; the transaction is possibly a fraud.
-
P (not processed) = The card security value was not processed due to communication errors.
-
S (should be on card) = The card security value should be present on the card (this response applies to card security presence 9).
-
I (invalid) = The card security value is invalid. Do not process credit cards with a card security response of I; the transaction is possibly a fraud.
-
U (Unsupported by issuer) = The issuer of the credit card does not support card security identification.
Note:
The card security identification response is separate from the authorization response. It is possible to receive an approved authorization, but a no match on the card security data. Once you accept an order, the system removes the Card security value and Card security presence from the order payment method record.
Set-up: To use this feature, define each possible response in the Vendor Response table, and define the hold codes in the Order Hold Reason table (for card security identification responses that require the order to be held). See Defining Authorization Services (WASV) and Defining Vendor Response Codes. Also, see Establishing Cancel Reason Codes (WCNR).
Credit Card Authentication Service
Credit card authentication services help to reduce fraud and chargeback volume on card not present transactions by requiring the cardholder to enter a card authentication password on the web storefront. The authentication password is sent to an authentication service, such as Visa’s Verified by Visa program or MasterCard’s SecureCode program, to verify the cardholder’s identify and ownership of the credit card during the online purchase.
Which credit cards? Authentication processing is available for the following credit cards:
-
Visa, using the Verified by Visa (CAVV) program.
-
MasterCard, using the SecureCode (AAV) program.
Credit card authentication process:
| # | Step |
|---|---|
|
1. |
At the payment screen on a web storefront, the customer is prompted to enter a card authentication password.  |
|
2. |
The web storefront sends the card authentication password to the authentication service. |
|
3. |
The authentication service validates the password and sends back an electronic commerce indicator (ECI) and an authentication verification value.
|
|
4. |
The web storefront sends the order to Order Management System in the Inbound Order XML Message (CWORDERIN). For more information see the Web Services Guide on My Oracle Support (ID 2149144.1). |
|
5. |
Order Management System creates the order and:
|
|
6. |
During authorization and deposit processing, Order Management System sends the e-commerce indicator and authentication value associated with the credit card to the service bureau in the Authorization Request XML Message (CWAuthorizationRequest) and Deposit Request XML Message (CWDepositRequest). |
|
|
Authentication verification value format: In order for the service bureau to process the authentication value correctly, the authentication verification value returned from the web storefront must be in the correct format. Order Management System will not format the authentication verification value it receives from the web storefront. |
|
7. |
The service bureau sends an authentication response back to Order Management System in the Authorization Response XML Message (CWAuthorizationResponse) and Deposit Response XML Message (CWDepositResponse). However, the response is not stored in any Order Management System table. |
Credit card authentication process:

Transmitting and Receiving Deposits
Purpose: After you obtain an authorization for a credit card charge, you can ship the order to the customer and charge the credit card for the shipment. At this point, you use Processing Auto Deposits (SDEP) to transmit the deposit information to a deposit service for settlement.
Reauthorizing Expired Authorizations
Overview: Use the REAUTH periodic function to submit authorization requests for expired authorizations:
Selecting Expired Authorizations and Amounts for Reauthorization
The REAUTH periodic function generates authorization requests for eligible payment methods on eligible orders, determined as described below.
Eligible order payment methods and statuses:
-
The order must include one or more order lines in Printed status, and the pick slips must be eligible to be voided. Eligible pick slip statuses and codes are:
-
Open (blank code)
-
Manifest submission (M)
-
Carryover (O)
-
Packed (P)
-
Reprinted (R)
-
Suspended (S)
Open order lines submitted to Order Broker are eligible, as well as open drop ship lines.
-
Ship for pickup orders are eligible if the Payment at POS for Ship for Pickup Orders (L60) system control value is not selected.
-
Store pickup orders are eligible if the Payment at POS for Store Pickup (M16) system control value is not selected.
-
Orders that are already on hold are eligible.
-
The pay type is a credit card or gift card, but not PayPal.
-
The authorization history status is Authorized (A) or Authorized, not used (O).
Calculating authorization age: Authorizations are eligible for reauthorization if:
-
The Reauthorization days specified for the pay type is greater than 0, and,
-
The authorization date and time, based on the Auth expires date and Auth time that are displayed at the Authorization History Details Window, has passed the number of Reauthorization days specified for the pay type. If there are multiple authorization records for a payment method, they are each evaluated.
Note:
It is possible that an order with multiple authorizations might have one or more expired authorizations as well as one or more current authorizations. The REAUTH periodic function attempts to reauthorize only the expired authorizations on an order.
Orders and payment methods that are not eligible for reauthorization include:
-
Retail pickup or delivery orders.
-
PayPal payment methods.
Determining the amount remaining to be authorized: The amount remaining to be authorized is the Amount submitted minus the Amount deposited, as displayed at the Authorization History Details Window. The amount is not reduced if, for example, one of the orders lines has sold out.
Note:
Contact Center in Modern View does not indicate whether an authorization has expired.
REAUTH Processing
For each eligible order, payment method, and authorization, as described above, the REAUTH function:
-
Sets the status of the current authorization to Void.
-
Generates a new authorization request message for the amount to be authorized, as described above.
Less than $1.00? The function does not attempt to reauthorize authorizations for less than $1.00, if an Authorization Number for Authorizations Under $1.00 (I08) is specified. In this case, the payment is updated as if it is reauthorized, using the authorization number specified in the system control value.
Soft decline? When the reauthorization is declined, but the Default Credit Card Authorization Number for Soft Declines (F93) system control value specifies a default authorization number and the authorization amount that requires authorization is greater than $1.00 and is less than the pay type dollar limit that you have set up for the credit card pay type on the order, the decline is treated as a soft decline. See the description of the system control value for more information.
Note:
REAUTH processing does not include all of the standard checks that take place during regular authorization. For example, the following information is not evaluated during REAUTH:
-
The number of authorization attempts.
-
The number of days between authorization attempts.
-
Dollar limit holds.
-
Any additional cancel reasons.
-
The Maximum Number of Retries on Credit Card Orders (E74) system control value.
The REAUTH job submits an active procedure. See Purge Active Procedures Across Users (MACX) for more information.
The REAUTH job:
-
Generates the Credit Card Authorization Listing.
-
Generates Credit Card Decline Notification Sample and Contents for declined authorizations.
If the Reauthorization is Successful
When the authorization request is successful, the REAUTH periodic function:
-
Write an Order Payment History record such as Reauth for expired auth $12.34. See the Display Order Payment History Screen.
-
Creates a new Authorization History record indicating that the record was authorized. See the Display Authorization History Screen.
If the Reauthorization is Declined
When the authorization is declined, the REAUTH periodic function:
-
Write an Order Payment History record such as Reauth declined for expired auth $12.34. See the Display Order Payment History Screen.
-
Writes an Order Transaction History message such as SYS-HLD - DECLINED CREDIT CARD REAUTHORI, where DECLINED CREDIT CARD REAUTHORI is from the hold reason code description.
-
Writes an Authorization History record indicating that reauthorization was declined. See the Display Authorization History Screen.
-
Applies the AR system hold reason (Declined Credit Card Reauthorization) to the order header, if it is not already there.
-
If this is an originating order sent to and it is associated with a fulfilling order, puts the fulfilling order on AU system hold. See Reauthorization and Under Review Hold Scenarios for Orders Fulfilled through Order Broker for more information.
-
Voids any pending pick slips that are in the statuses listed under Selecting Expired Authorizations and Amounts for Reauthorization.
-
Creates a tickler if configured through Working with Tickler Events (WTEV).
-
If the Generic Pick Out API is in use, generates a trigger for a CWPickout message indicating that the pick slip was voided.
-
Sends an order update message to Order Broker indicating that the Under Review flag is selected for the request ID(s) requiring the reauthorization. See Order Broker Integration.
For more information see the Web Services Guide on My Oracle Support (ID 2149144.1).
Note:
Drop ship pick slips or purchase orders, including those fulfilled through supplier direct fulfillment in Order Broker, are not updated when the reauthorization fails. You need to monitor these orders separately.
Required Configuration for the REAUTH Periodic Function
The REAUTH periodic function should not be assigned to a periodic process named REAUTH_JOB; otherwise, the REAUTH function will not run successfully. Also, the job runs in the PICKGEN queue.
The Perform Reauthorization for Expired Authorizations (M61) system control value must be selected for the REAUTH periodic function to process updates.
When to schedule the REAUTH periodic function:
-
Schedule this function to run either before or after shipping. It should not run at the same time as shipping. Oracle recommends scheduling the REAUTH job to run prior to the start of shipping so that any orders pending fulfillment that have an expired authorization can get a new authorization. This scheduling prevents shipping any orders without valid authorizations if the reauthorizations have failed.
-
Schedule the REVERSE periodic function before the REAUTH periodic function. If there is a pending reversal on an expired card, it is sent to the end processor before getting a new authorization so that payment is not held up.
For more information: See Reauthorization and Under Review Hold Scenarios for Orders Fulfilled through Order Broker.
Defining Authorization Services (WASV)
Purpose: Use the Work with Authorization Services menu option to:
-
define the service bureaus that you use, such as:
-
Authorization services, to authorize charges against a credit card or stored value card.
-
Authorization/Deposit services, to authorize card charges and receive deposit amounts.
-
Deposit services, to provide settlement for card payments.
-
-
identify the type of service the service bureau performs
-
define the parameters that identify your company to the service bureau
-
define the information necessary to connect, transmit, and receive data to and from the service, such as:
-
country codes
-
valid pay types
-
response codes (vendor responses, AVS responses, and CID responses)
-
currency codes
-
merchant IDs for individual entities within your company
-
whether the order originated as an internet order
-
Some of the information required to establish a service bureau on your system is provided by the service bureau. For example, each service bureau will assign you a unique password.
You can use the same service bureau to process your authorizations and deposits, or you can use one service for authorizations and another for deposits.
Important:
Use the Payment Configurations option in Modern View to configure or work with any payment processing through EFTConnect. You would use Work with Authorization Services in Classic View only for other authorization services, such as for stored value cards (gift cards). You cannot create, change, or delete an authorization service that uses EFTConnect through the Work with Authorization Services option in Classic View.
In this topic:
Deferred/Installment Pay Plans
Deferred or installment pay plans allow you to process deposits against orders at various intervals after you bill the order shipment. For example, you could offer “no payment for 60 days” or “four easy payments” to your customers.
In order to set up deferred or installment pay plans, you must have the Deferred and Installment Billing (F51) system control value must be selected. See Deferred/Installment Billing Overview for more information on deferred and installment pay plans and how to set them up in Order Management System.
Identifying Internet Orders
An internet order is determined in one of two ways:
-
If using the E-Commerce Interface the system loads an I in the Internet field on the order header when the order is created in Order Management System.
-
An order is considered an internet order if the order type on the order matches the E-Commerce Order Type (G42) system control value.
-
Mail = Mail order.
-
Phone = Telephone order.
-
Internet = Web order.
To determine where the order originated, the system:
-
looks at the value in the Internet order field in the Order Header table. If this field is set to I, the order is a web order.
-
determines if the order type for the order matches the E-Commerce Order Type (G42) system control value. If the order type matches, the order is a web order.
-
looks at the Forecasting order category field in the Order Type table. If this value is 1, the order is a mail order. If this value is 2, the order is a phone order.
Work with Authorization Services Screen
How to display this screen: Enter WASV in the Fast path field at the top of any menu screen or select Work with Authorization Services from a menu.
| Field | Description |
|---|---|
|
Code |
The code to identify the service bureau. Enter a full or partial code and select OK to display service codes in alphanumeric order, starting with your entry. Alphanumeric, 3 positions; optional. |
|
Application |
The type of activity performed by the service bureau. Valid values are:
Optional. |
|
Description |
The name of the service bureau. Alphanumeric, 30 positions; optional. |
|
Merchant |
The account number assigned by the service bureau to identify transmissions to/from your company. This is the default ID number; you can also specify separate ID numbers for each entity in your company, and/or to use for orders using deferred or installment billing. Alphanumeric, 20 positions; optional. |
| Screen Option | Procedure |
|---|---|
|
Change an authorization service record |
Select Change for a service to advance to the Change Authorization Services Screen. At this screen you can change any information except the Service code. See the First Create Authorization Services Screen for field descriptions. Important: You cannot use this option to change an existing authorization service using EFTConnect. Use the Payment Configurations option in Modern View instead. |
|
Delete an authorization service record |
Select Delete for a service to delete it. Important: You cannot use this option to delete an existing authorization service using EFTConnect. Use the Payment Configurations option in Modern View instead. |
|
Display an authorization service record |
Select Display for a service to advance to the Display Authorization Services Screen. You cannot change any information at this screen. See the First Create Authorization Services Screen for field descriptions. |
|
Work with country codes |
Select Country for a service to add, change or delete the country codes recognized by the service bureau; see Defining Authorization Service Countries. |
|
Work with vendor paytype codes |
Select Paytypes for a service to add, change, delete or display the pay type codes recognized by the authorization service. See Defining Vendor Paytype Codes. |
|
Work with vendor responses |
Select Responses for a service to add, change, display or delete the response codes you receive from the service and the actions to take for each. See Defining Vendor Response Codes. |
|
Work with merchant ID overrides based on entity |
Select Merchant ID Override for a service to add, change, or delete merchant ID overrides by entity. See Defining Merchant ID Overrides. |
|
Work with currency codes |
Select Currency for a service to add, change, or delete cross-references between the currency codes used in your company and by the authorization service. See Defining Authorization Service Currencies. |
|
Work with external authorization service settings |
Select External Service to advance to the Work with External Authorization Service Screen. External Authorization Service Access (B25) authority is required. See External Payment Service for background. |
|
Create an authorization service |
Select Create to advance to the First Create Authorization Services Screen. Important: You cannot use this option to create an existing authorization service using EFTConnect. Use the Payment Configurations option in Modern View instead. |
First Create Authorization Services Screen
Purpose: Use this screen to define a service bureau on your system. The Authorization Service record contains information that identifies your company to the service bureau and the parameters that you must include in the transmission to the service bureau.
Each service bureau requires its own information. Not all fields are applicable for each service.
Important:
You cannot use this screen to create a new authorization service using EFTConnect. Use the Payment Configurations option in Modern View instead.
How to display this screen: Select Create at the Work with Authorization Services Screen.
| Field | Description |
|---|---|
|
The code to identify the service bureau. Foreign credit cards: In order to process foreign credit cards separately at billing, you must define a deposit service with a code of PRE, and then define PRE as the deposit service in the Pay Type table. See Processing Auto Deposits (SDEP) for more information on setting up a different process for foreign credit cards. Point-to-Point communication: If you are using point-to-point communication, the Service code must be a specific value for the integration:
Alphanumeric, 3 positions. Create screen: required. Change screen: display-only. |
|
|
The type of activity performed by the service bureau. Valid values are:
Note: PayPal should have the Application type set to Auth/Deposit. Required. |
|
|
The account number assigned by the service bureau to identify transmissions to/from your company. This ID is a default. You can also identify merchant IDs to use for depositing deferred or installment pay plans (as opposed to regular deposits) below. Similarly, you can set up overrides for different entities in your company, including deferred or installment overrides. See Defining Merchant ID Overrides. Note: You can enter upper and lower case letters in this field. Alphanumeric, 20 positions; optional. |
|
|
A description that identifies your company's product line or the type of service performed. Alphanumeric, 20 positions; optional. |
|
|
Deferred merchant ID |
The account number assigned by the service to identify transmission of deferred pay plan transactions for deposit. See Deferred/Installment Billing Overview for more information on deferred and installment billing, and see Processing Auto Deposits (SDEP) for more information on processing deposits. You can also set up overrides for different entities in your company, including deferred or installment overrides. See Defining Merchant ID Overrides. Alphanumeric, 20 positions; optional. |
|
Installment merchant ID |
The account number assigned by the service to identify transmission of installment pay plan transactions for deposit. See Deferred/Installment Billing Overview, and see Processing Auto Deposits (SDEP). You can also set up overrides for different entities in your company, including deferred or installment overrides. See Defining Merchant ID Overrides. Alphanumeric, 20 positions; optional. |
|
The service bureau assigns values to the following fields: |
|
|
Signon |
A code required to sign on to the service bureau. Case-sensitive. Alphanumeric, 10 positions; optional. |
|
Receiving code |
A code that identifies your company to the service bureau. Alphanumeric, 10 positions; optional. |
|
Password |
A password required by the service bureau. Case-sensitive. Alphanumeric, 10 positions; optional. |
|
Start up information |
Startup text that identifies your company to the service bureau. Alphanumeric, 10 positions; optional. |
|
A code required to sign on to the service bureau. Separate fields allow you to define a presenter’s ID for both batch authorization and deposit transactions; if you use the same port number for both batch authorization and deposit transactions, define the presenter’s ID in the first field. Alphanumeric, 10 positions; optional. |
|
|
PID password Auth / Deposit |
A password required to sign on to the service bureau. Separate fields allow you to define a PID password for both batch authorization and deposit transactions; if you use the same port number for both batch authorization and deposit transactions, define the PID password in the first field. Alphanumeric, 10 positions; optional. |
|
A code required to sign on to the service bureau. Separate fields allow you to define a submitter’s ID for both batch authorization and deposit transactions; if you use the same port number for both batch authorization and deposit transactions, define the submitter’s ID in the first field. Alphanumeric, 10 positions; optional. |
|
|
SID password Auth / Deposit |
A password required to sign on to the service bureau. Separate fields allow you to define a SID password for both batch authorization and deposit transactions; if you use the same port number for both batch authorization and deposit transactions, define the SID password in the first field. Alphanumeric, 10 positions; optional. |
|
Sub code |
A code required to sign on to the service bureau. Alphanumeric, 10 positions; optional. |
|
Exclude from FPO (Exclude from flexible payment option) |
Indicates whether to exclude orders associated with this service bureau from a deferred or installment pay plan. If an order includes any pay type whose authorization service has this field selected, the order is not eligible for a pay plan. Valid values are:
See Deferred/Installment Billing Overview for information on how the system determines whether an order is eligible for a pay plan in order entry. |
|
Defines whether any unused portion of an authorization should be voided at deposit time for:
Valid values are:
See Void Unused Authorization After Initial Deposit for processing details. Important: Your end payment processor must support split shipments for you to set this flag to N. Stored value card pay types when not using the External Payment Service: The setting of the Retain Unused Stored Value Card Authorization After Deposit (J21) system control value defines whether the system automatically voids a partially deposited stored value card authorization when the External Payment Service is not in use. See Stored Value Card Deposits for processing details. |
|
|
Defines whether the service bureau supports authorization reversals for credit card and stored value card payments. Valid values are:
Regardless of the setting of this field, you can still perform stored value card authorization reversals when the card is deactivated; see Stored Value Card Authorization Reversal. Supported integrations: Reversal is supported for: |
|
|
Indicates whether to resubmit failed authorization and deposit requests for credit cards through the External Payment Service. When the request is for authorization and deposit of a failed deposit request: CyberSource: The subsequentAuthReason in the authorization and deposit request is set to 1 if the Supports Auth Resubmission flag is selected; otherwise it is set to 3. Note: If the credit card number changes since the initial deposit request, then the subsequentAuthReason is set to 3, since it is not considered a subsequent authorization and deposit request. External Payment Service: The subsequentAuthReason is set to RESUBMIT; otherwise, if the Supports Auth Resubmission flag is not selected, the subsequentAuthReason is set to REAUTH. Important: Select this flag only if your payment processor supports merchant-initiated resubmission of failed deposits. For more information: See Subsequent Authorization Requests through the External Payment Service for background. |
Second Create Authorization Service Screen
Important:
You cannot use this screen to create a new existing authorization service using EFTConnect. Use the Payment Configurations option in Modern View instead.
How to display this screen: Select OK at the First Create Authorization Services Screen.
| Field | Description |
|---|---|
|
The method by which the data is transmitted to the service bureau. Valid value is Communication. Optional. |
|
|
A code that indicates whether transactions are transmitted to/received from the service bureau immediately (online) as each order is entered, or whether groups of transactions are transmitted to/received from the service bureau at predefined times during the day (in batch). Valid values are:
Optional. |
|
|
Active production system |
Indicates whether you are processing in a live environment (production) or in a testing environment. Valid values are:
|
|
Installment billing? |
Indicates if the service bureau supports installment billing of credit cards. Installment billing plans are typically established for high cost items. Note: This field is informational only and is not used to set up an installment pay plan in Order Management System. Valid values are:
|
|
Indicates whether a response from the service bureau is received immediately for each authorization transaction. Valid values are:
|
|
|
Immediate deposit |
Indicates whether the service bureau sends a detailed response to Order Management System. Valid values are:
|
|
Keep history information? |
Indicates whether transactions sent to the service bureau will be kept online. Typically, this feature is used in test environments. Valid values are:
|
|
Selected for deposit |
Indicates whether the service bureau is included in the next deposit run. By default, all service bureaus are selected for deposit; however, you can remove a service bureau from the next deposit run at the Select Auth Service for Deposit Screen in Processing Auto Deposits (SDEP). Once you submit the deposit run, the system reselects all service bureaus for the next deposit run. Valid values are:
Display-only. |
|
Address verification |
Indicates whether you will be using the Address Verification Service provided by the service bureau to verify the customer's address and credit card number. Valid values are:
|
|
Decline days |
The number of days to hold a declined credit card charge on the system before sending it for an authorization again. This field is not implemented. See Defining Vendor Response Codes for setup information. Numeric, 3 positions; optional. |
|
Industry format code |
A code that is assigned by the service bureau to identify your company type. Use this field to enter your DBA number. Alphanumeric, 5 positions; optional. |
|
The primary service bureau that the service bureau uses for its transmission setup. Orders sent to this service bureau are redirected to the primary service bureau defined in this field. If this field is left blank, the data created for this service bureau will be used. Point-to-Point integration processing: Leave this field blank if you are transmitting transactions to the service bureau via point-to-point communication. See Processing Authorizations and Deposits Using Point-to-Point Communication. Alphanumeric, 3 positions; optional. |
|
|
Deposit phone # |
The telephone number associated with the deposit service bureau. Informational only. Numeric, 11 positions; optional. |
|
Authorization phone # |
The telephone number associated with the authorization service bureau. Informational only. Numeric, 11 positions; optional. |
|
Indicates the method of communication used to transmit transactions between Order Management System and the service bureau. The only valid value is Payment Link, in which the system sends transactions to the service bureau using a point-to-point integration. You must define communication settings in Working with Customer Properties (PROP). The system also uses the Activation and Authorization Reversal integration layer jobs to process stored value card triggers. See Processing Authorizations and Deposits Using Point-to-Point Communication. Optional. |
|
|
Indicates the multiple to apply to the Response time to determine how long to wait for a response after a connection when you are using the External Payment Service. For example, if the Response check frequency is 6 and the Response time is 10,000, the system waits 60,000 milliseconds (60 seconds or 1 minute) for a response after connection. Note: If the total response interval is exceeded for an authorization record, the record goes into *RCVD status with a response type of SU, and is then removed from the Credit Card Authorization Transaction table (CCAT00). To avoid potential timeout issues, Oracle recommends that you set the Response Time high enough for the authorization service to prevent issues that could potentially occur if the authorization process times out while processing multiple authorizations for an order. Numeric, 3 positions; optional. |
|
|
Test mode? |
Indicates whether you are transmitting in test mode. Valid values are:
This field is not implemented. |
|
Indicates the number of milliseconds to wait for a connection to the service bureau when you are using the External Payment Service. For example, set this field to 10,000 milliseconds to wait 10 seconds for a connection. Numeric, 5 positions; optional. |
|
|
Merchant division |
Assigned by the authorization service. Numeric, 5 positions; optional. |
|
Authorization service provider |
This field is not implemented. Alphanumeric, 10 positions; optional. |
|
The following API fields are used by the PayPal direct connection integration. |
|
|
The user name, provided by the service bureau, used to establish a direct connection to the service bureau. PayPal: Used to establish a connection to the PayPal system when using the PayPal Direct Connection Integration. You can also define API credential information at the entity level using the Create Merchant ID by Entity Screen. Alphanumeric, 64 positions; optional. |
|
|
The password, provided by the service bureau, used to establish a direct connection to the service bureau. PayPal: Used to establish a connection to the PayPal system when using the PayPal Direct Connection Integration. You can also define API credential information at the entity level using the Create Merchant ID by Entity Screen. Alphanumeric, 64 positions; optional. |
|
|
The encrypted signature, provided by the service bureau, used to establish a direct connection to the service bureau. PayPal: Used to establish a connection to the PayPal system when using the PayPal Direct Connection Integration. You can also define API credential information at the entity level using the Create Merchant ID by Entity Screen. Alphanumeric, 128 positions; optional. |
|
|
Note: This field is available only for the CyberSource integration (if the Service Code is set to CYB). Indicates the value to pass as the reconciliationID in a debit deposit, credit deposit, or authorization and deposit request to CyberSource. Available settings are:
For more information see the Web Services Guide on https://support.oracle.com My Oracle Support (ID 2149144.1). If the reconciliationID in the request message does not specify an invoice number or alternate order number, then CyberSource assigns a reconciliationID as a reference number for the transaction, and passes it in the response message. Note:
For more information: See the CyberSource Message Layouts for more information on when the reconciliationID is passed, and see CyberSource Point-to-Point Integration for an overview. |
Instructions:
-
At the First Create Authorization Services Screen, enter the Service Code, Application, Merchant ID, Charge description and any other information required by the service bureau.
-
Select OK to advance to the Second Create Authorization Service Screen.
-
Continue entering all necessary information to set up the service bureau on your system.
Work with External Authorization Service Screen
Purpose: Use this screen to work with settings required by the External Payment Service.
For more information: See External Payment Service for background, and see External Payment Service Setup for additional setup information.
How to display this screen: Select External Service for an authorization service at the Work with Authorization Services Screen. External Authorization Service Access (B25) authority is required.
For more information: See the External Payment Layer RESTful Service reference on My Oracle Support for more information on updating these settings.
Note:
All fields are required, with the exception of the External Service flag.
| Field | Description |
|---|---|
|
External Service |
Select this field to specify whether to generate request messages using the External Payment Service. |
|
External URL Prefix |
The prefix that forms the beginning of the URL where messages are sent. Must begin with HTTPS. The message type defines the suffix that is appended to the prefix to create the entire URL. For example, for a credit card authorization request, the entire URL might be https://remote.auth.com:1234/authorization, where remote.auth.com is the remote server, 1234 is the port, and authorization identifies an authorization request. The following endpoints are supported:
Alphanumeric, 600 positions; required if the External Service flag is selected. |
|
Message Version |
Indicates which message version is supported:
Tags that are included in version 2.0 provide support for subsequent authorization requests through the External Payment Service. See Subsequent Authorization Requests through the External Payment Service for a discussion. |
|
Authentication User |
The user ID for authentication of the messages to the external service. Alphanumeric, 256 positions; required if the External Service flag is selected. |
|
Authentication Password |
The password for authentication of the messages to the external service. Must be at least 6 positions long, include both numbers and letters, include a special character, and cannot end with a number. Alphanumeric, 256 positions; required if the External Service flag is selected. |
Defining Authorization Service Countries
Purpose: Each service bureau that your company uses may assign its own country codes to the various credit card payment methods. These country codes may differ from the country codes your company uses.
The Authorization Service Country function is used to cross reference the country codes your company uses with the country codes the authorization and deposit service uses. By cross referencing the country codes:
-
You can use your country codes when entering orders.
-
The country code the service bureau uses can be included in the Authorization and Deposit transactions that are transmitted to the service bureau.
-
When you create the country cross-reference, you can also indicate whether the service bureau performs address verification for the country.
Note:
Use this option if you are sending transactions to the service bureau using a point-to-point integration.
Cybersource point-to-point integration: The CyberSource Point-to-Point Integration sends the authorization service country in the transactions sent to Cybersource. However, regardless of the setting of the AVS flag for the authorization service country, Cybersource always performs address verification.
Authorization service country required for double-byte customer address: If the customer’s address uses a double-byte language, such as Chinese, you need to set up an authorization service country record to support address verification.
In this topic:
Work with Authorization Service Country Screen
Purpose: This screen displays the country cross references currently defined for the service bureau. Use this screen to create, change, or delete the country cross reference information.
The country codes your company uses are defined in the Country table; the country codes the service bureau uses are provided by the service bureau.
How to display this screen: At the Work with Authorization Service Country Screen, select Country for the service bureau.
| Field | Description |
|---|---|
|
Authorization service |
The code and description of the service bureau for which you are defining a country cross reference. Code: Alphanumeric, 3 positions; display-only. Description: Alphanumeric, 30 positions; display-only. |
|
Country |
A code you use to identify a country. Country codes are defined in and validated against the Country table; see Setting Up the Country Table (WCTY). Alphanumeric, 3 positions; optional. |
|
Authorization Service Country |
The code the service bureau uses to identify a country. Vendor country codes are provided by the service bureau. Alphanumeric, 3 positions; optional. |
|
AVS |
Defines whether the service bureau performs address verification for the country. N = The service bureau does not perform address verification for the country. Y = The service bureau performs address verification for the country. Alphanumeric, 1 position; display-only. |
| Option | Procedure |
|---|---|
|
Create a country cross reference |
Select Create to advance to the Create Authorization Service Country Screen. |
|
Change a country cross reference |
Select Change for the country cross reference to advance to the Change Authorization Service Country screen. At this screen you can change the Authorization service country and the Address verification setting. See the Create Authorization Service Country Screen for field descriptions. |
|
Delete a country cross reference |
Select Delete for the country cross reference to delete it. |
Create Authorization Service Country Screen
Purpose: Use this screen to cross reference the country codes your company uses with the codes the service bureau uses. For example, your company may use country code USA to identify the United States of America, whereas the service bureau may use country code US.
The country codes your company uses are defined in the Country table; the country codes the service bureau uses are provided by the service bureau.
How to display this screen: Select Create at the Work with Authorization Service Country Screen.
| Field | Description |
|---|---|
|
Authorization service |
The code and description of the service bureau for which you are defining a country cross reference. Code: Alphanumeric, 3 positions; display-only. Description: Alphanumeric, 30 positions; display-only. |
|
Country |
A code you use to identify a country. Country codes are defined in and validated against the Country table; see Setting Up the Country Table (WCTY). Alphanumeric, 3 positions. Create screen: required. Change screen: display-only. |
|
Authorization service country |
The code the service bureau uses to identify a country. Vendor country codes are provided by the service bureau. Alphanumeric, 3 positions; required. |
|
Address verification |
Defines whether the service bureau performs address verification for the country. Unselected = The service bureau does not perform address verification for the country. Selected = The service bureau performs address verification for the country. |
Defining Vendor Paytype Codes
Purpose: Each service bureau that your company uses may assign its own paytype codes to the various credit card payment methods. These paytype codes may differ from the paytype codes your company uses. For example, the service bureau may use paytype code 01 to represent payment by Visa, whereas, your company may use paytype code 04 to identify payment by Visa.
The Vendor Paytype Codes function is used to cross reference the paytype codes your company uses with the paytype codes the authorization service uses. By cross referencing the paytype codes:
-
you can use your paytype codes when entering orders
-
the paytype code the service bureau uses can be included in the Authorization and Deposit transactions that are transmitted to the service bureau.
In this topic:
Work with Paytype Cross Reference Screen
Purpose: This screen displays the pay type cross references currently defined for the service bureau. Use this screen to create, change, delete, or display the pay type cross reference information.
The pay type codes your company uses are defined in the Pay Type table; the pay type codes the service bureau uses are provided by the service bureau.
How to display this screen: At the Work with Authorization Services Screen, select Paytypes for the service bureau.
| Field | Description |
|---|---|
|
Pay type |
A code you use to identify a method of payment on an order. Pay type codes are defined in the Pay Type table; see Working with Pay Types (WPAY). Numeric, 2 positions; optional. |
|
Vendor pay code |
The code the authorization service uses to identify a method of payment. Vendor pay type codes are provided by the service bureau. Alphanumeric, 5 positions; optional. |
|
Authorization Merchant # |
The merchant number to use when sending authorization requests for this pay type code to the service bureau for approval. The merchant number is assigned to your company by the service bureau. Alphanumeric, 10 positions; optional. |
|
Deposit merchant # (Deposit merchant number) |
The merchant number to use when sending deposit requests for this pay type code to the service bureau for settlement. The merchant number is assigned to your company by the service bureau. Alphanumeric, 10 positions; optional. |
| Option | Procedure |
|---|---|
|
Create a paytype cross reference |
Select Create to advance to the Create CC Paytype Cross Reference Screen for the service bureau. |
|
Change a paytype cross reference |
Select Change for the pay type cross reference you want to change to advance to the Change Paytype Cross Reference Screen. At this screen you can change any information except the Authorization service and the Pay type code. See the Create CC Paytype Cross Reference Screen for field descriptions. |
|
Delete a paytype cross reference |
Select Delete for the pay type cross reference you want to delete. |
|
Display a paytype cross reference |
Select Display for the pay type cross reference you want to display to advance to the Display CC Paytype Cross Reference Screen. You cannot change any information at this screen. See the Create CC Paytype Cross Reference Screen for field descriptions. |
Create CC Paytype Cross Reference Screen
Purpose: Use this screen to cross reference the pay type codes your company uses with the codes the service bureau uses. For example, your company may use pay type code 4 to identify payment by Visa, whereas the service bureau may use pay type code 1.
The pay type codes your company uses are defined in the Pay Type table; the pay type codes the service bureau uses are provided by the service bureau.
How to display this screen: Select Create at the Work with Paytype Cross Reference Screen.
| Field | Description |
|---|---|
|
Pay type |
The code you use to identify a method of payment on an order. Pay type codes are defined in the Pay Type table; see Working with Pay Types (WPAY). Numeric, 2 positions. Create screen: required. Change screen: display-only. |
|
Vendor paytype/code |
The code the service bureau uses to identify a method of payment. Vendor pay type codes are provided by the service bureau. Alphanumeric, 5 positions; required. |
|
Authorization merchant # |
The merchant number to use when sending authorization requests for this pay type code to the service bureau for approval. The merchant number is assigned to your company by the service bureau. Alphanumeric, 10 positions; optional. |
|
Deposit merchant # |
The merchant number to use when sending deposit requests for this pay type code to the service bureau for settlement. The merchant number is assigned to your company by the service bureau. Alphanumeric, 10 positions; optional. |
Instructions:
-
Enter the pay type code you company uses to identify the payment method in the Pay type field.
-
Enter the corresponding pay type code the service bureau uses to identify the payment method in the Vendor pay code.
-
Optionally, enter the authorization and deposit merchant numbers assigned to your company by the service bureau in the Authorization Merchant # and the Deposit merchant # (Deposit merchant number) fields.
-
Your entries are cleared from the screen and a message similar to the following displays: CC Vendor Paytype Cross Reference (NAB - 5) created.
Defining Vendor Response Codes
Vendor response codes identify the reasons that the service bureau approves (authorizes) or declines a credit card charge or deposit. The codes are assigned to each transaction by the service bureau when approving or declining the request.
AVS response: You can also set up vendor response codes for AVS response if the service bureau provides an address verification service (AVS). AVS verification ensures that the billing address on the credit card is legitimate. See Address Verification Service (AVS).
Card security identification response: You can also set up vendor response codes for card security identification response (CID, CVV2, CVC2) if the service bureau provides a credit card security identification service. Card security identification helps reduce fraud by verifying that the credit card is present at the point of sale and to ensure that the credit card data from the transaction matches the data stored by the service bureau for that card. See Credit Card Security Service (CID, CVV2, CVC2).
You should define each code for each service bureau you work with.
The system allows you to set up the following instructions for vendor response codes:
-
how many times to attempt authorization for this response
-
whether to put the order on hold and, if so, for how long
-
whether to flag the order for cancellation
Online credit card authorizations: If you are sending credit cards for authorization during order entry/maintenance (the On-line Authorizations (B89) system control value is selected), the system displays additional fields where you can enter a message indicating whether the credit card was approved or declined and if any action should be taken, such as asking the customer to repeat the credit card number or requesting a different credit card for authorization. If you define a message, the system displays the Select Authorization Response Option Window in order entry/maintenance when a response is received from the service bureau. This window displays the pop up window messages you defined for this vendor response. See Performing Online Credit Card Authorizations for an overview on online authorizations and the required setup.
Credit card decline email: If you specify a program in the Credit Card Decline Email Program (K53) system control value, the batch authorization process in pick slip generation generates an email to the customer when an order is placed on hold due to a credit card decline. See that system control value for more information.
In this topic:
Defining Vendor Response Codes
Entity Setup
Additionally, you can set up the following instructions for a vendor response code for each entity in your company:
-
Whether a dollar limit is applied to the ship via on the order. If the authorization amount is less than the ship via dollar limit, the system releases the order from any AVS hold. If the authorization amount is greater than the ship via dollar limit, the system places the order on hold using the hold reason defined for the ship via dollar limit. See Entity ship via dollar limits.
-
Whether a dollar limit to force an authorization is applied to a specific pay type. See Entity pay type dollar limits.
-
Whether a dollar limit is applied to the item class associated with an item on the order that requires authorization. If the authorization amount is less than the item class dollar limit, the system releases the order from any AVS hold. If the authorization is greater than the item class dollar limit, the system places the order on hold using the hold reason defined for the item class dollar limit. See Entity item class dollar limits.
-
Whether a dollar limit is applied to the postal code for the bill to or sold to customer on the order. If the authorization amount is less than the postal code dollar limit, the system releases the order from any AVS hold. If the authorization amount is greater than the postal code dollar limit, the system places the order on hold using the hold reason defined for the postal code dollar limit. See Entity postal code dollar limits.
Online authorization: If you are performing online authorization, the system does not evaluate the order for entity pay type dollar limit or entity ship via dollar limit; however, the system will evaluate the order for item class dollar limit and postal code dollar limit.
Entity dollar limit hierarchy: The system uses the following hierarchy when evaluating whether the order meets an entity dollar limit.
-
Evaluate the order for Entity pay type dollar limits.
-
If the order does not qualify for entity pay type dollar limits, evaluate the order for Entity ship via dollar limits.
-
If the order does not qualify for entity ship via dollar limits, evaluate the order for Entity item class dollar limits.
-
If the order does not qualify for entity item class dollar limits, evaluate the order for Entity postal code dollar limits.
If an order qualifies for more than one of the entity dollar limits, the system holds/releases the order using the last entity dollar limit that qualifies. For example, if the order qualifies for both entity ship via dollar limit and entity postal code dollar limit, the system holds or releases the order based on the entity postal code dollar limit setup.
Entity ship via dollar limits
You can set up a ship via dollar limit for an AVS response for each entity in your company. You can use the ship via dollar limit to reduce the amount of fraud. For example, a credit card may receive an AVS response of “all address matching,” but you may want to perform an additional check against the ship via assigned to the order and the dollar amount that requires authorization.
-
If the authorization amount is less than the ship via dollar limit, the system releases the order from any AVS hold.
-
If the authorization amount is greater than the ship via dollar limit and the sold to customer and ship to customer are different, the system places the order on hold using the hold reason defined for the ship via dollar limit.
The system checks the following information to determine if an order should go on hold due to a ship via dollar limit:
-
the service bureau code
-
the AVS response code received from the service bureau
-
the Entity associated with the order
-
the Ship via code on the order header
-
the $ limit to hold on the order
-
the sold to customer and ship to customer are different
-
The Use Credit Card Vendor Response Entity Ship Via Dollar Limits (F94) system control value is selected. If this system control value is not selected, the system does not perform an edit against the ship via dollar limit for an AVS response to determine if an order should go on hold.
The system does not evaluate the order for ship via dollar limit if:
-
The order does not pass authorization, regardless of whether the ship to customer is different than the sold to customer.
-
You are performing online authorization.
Entity ship via dollar limit summary:
| AVS response | Entity $ limit | Auth amount less than entity $ limit | Auth amount greater than or equal to entity $ limit |
|---|---|---|---|
|
hold reason |
no hold reason |
The system releases the order from AVS hold. Order transaction history message: AVS HLD Release - Entity Via $Limit. |
The system places the order on hold, using the hold reason defined for the AVS response. Order transaction history message: SYS HLD - Declined Credit Card. |
|
no hold reason |
hold reason |
The system does not place the order on hold. |
The system places the order on hold, using the hold reason defined for the entity ship via dollar limit. Order transaction history message: SYS HLD - Declined Credit Card. |
|
no hold reason |
no hold reason |
The system does not place the order on hold. |
The system does not place the order on hold. |
|
hold reason |
hold reason |
The system releases the order from AVS hold. Order transaction history message: AVS HLD Release - Entity Via $Limit. |
The system places the order on hold, using the hold reason defined for the entity ship via dollar limit. Order transaction history message: SYS HLD - Declined Credit Card. |
Ship via dollar limit example: The following is an example of how to set up a ship via dollar limit for an AVS response code.
| AVS Response | Description | Hold Reason Code |
|---|---|---|
|
I3 |
All Address Matching |
None |
The following is an example of how to set pu ship via dollar limit hold values:
| AVS Response | Entity | Ship Via | $ Limit | Hold Reason Code |
|---|---|---|---|---|
|
I3 |
555 |
1 |
$50.00 |
J3 |
|
I3 |
555 |
2 |
$75.00 |
J4 |
|
I3 |
555 |
3 |
$150.00 |
J5 |
Using the example, if an order passed AVS because it received an AVS response of I3, all address matching, the system would then perform an edit against the ship via dollar limit defined for the response.
If a ship via dollar limit was defined for the entity associated with the order, the ship via defined on the order, and the dollar amount on the order that required authorization was greater than the dollar limit defined for the AVS response, the order would then be placed on hold, using the hold reason code defined for the ship via dollar limit.
Using the example, the system would assign the hold reason code J3 to an order if the order was associated with entity 555, ship via code 1, and the dollar amount that required authorization was greater than $50.00.
Entity pay type dollar limits
You can set up a pay type dollar limit for a vendor response for each entity in your company. You can use the pay type dollar limit to force authorizations that have been declined.
Example: If a credit card received a vendor response of "credit card exceeds limit", you may want to force the authorization through anyway if the dollar amount that requires authorization is less than $50.00.
If you set up a pay type dollar limit, the order receives a forced authorization if:
-
the credit card on the order is declined, and
-
the dollar amount that requires authorization is greater than $1.00 and is less than the pay type dollar limit you have set up for the credit card pay type on the order. Note: If you wish to force authorizations for credit cards requiring authorizations less than $1.00, enter an authorization number in the Authorization Number for Authorizations Under $1.00 (I08) system control value.
In this situation, the order receives a forced authorization, and the system writes the Default Credit Card Authorization Number for Soft Declines (F93) to the Authorization number field on the Authorization History record. The system processes the authorization through Order Management System, as if the number that defaulted from the system control value was an actual authorization number. The order will be processed through pick slip generation and the system will produce pick slips for the order. The system also writes an order transaction history message indicating the authorization was forced.
If the Default Credit Card Authorization Number for Soft Declines (F93) system control value is blank, the order is placed on hold, using the vendor response hold reason code. If the hold reason code for the vendor response is blank, or a hold reason code has not been defined for the vendor response, the order is not placed on hold, and is processed through pick slip generation.
Note:
The system may still place the order on hold if it fails AVS authorization.
The system checks the following information to determine if an order should receive a forced authorization after it has been declined:
-
the service bureau code
-
the Vendor response code received from the service bureau
-
the Entity associated with the order
-
the credit card Pay type on the order that requires authorization
The system does not evaluate the order for pay type dollar limit if you are performing online authorization.
Note:
The system performs an edit against the pay type dollar limit defined for a vendor response before the number of authorization attempts logic. If the order passes the pay type dollar limit edit, the system does not perform the number of attempts edit against the order.
Entity pay type dollar limit summary:
| Vendor response | Auth amount less than entity $ limit to force auth | Auth amount greater than or equal to entity $ limit to force auth |
|---|---|---|
|
hold reason |
The system does not place the order on hold. Order transaction history message: System Forced CC Auth - Auth# 999999. |
The system places the order on hold, using the hold reason defined for the vendor response. Order transaction history message: SYS HLD - Declined Credit Card. |
Pay type dollar limit example: This example shows how to set up a pay type dollar limit for a vendor response code.
| Vendor Response | Description | Hold Reason Code |
|---|---|---|
|
Vendor Response Value: |
||
|
42 |
Declined, card over limit |
H4 |
| Vendor Response | Entity | Pay Type | Dollar Limit |
|---|---|---|---|
|
Pay Type Dollar Limit Values: |
|||
|
42 |
555 |
4 VISA |
$50.00 |
|
42 |
555 |
5 MASTERCARD |
$75.00 |
Using the example, if an order did not pass authorization because it received a vendor response of 42, declined card over limit, the system would then perform an edit against the pay type dollar limit defined for the response.
If a pay type dollar limit was defined for the entity associated with the order, the pay type defined on the order, and the dollar amount on the order that required authorization was less than the dollar limit defined for the vendor response, the order would receive a forced authorization, using the Default Credit Card Authorization Number for Soft Declines (F93).
Using the example, an order would receive a forced authorization if the pay type on the order was VISA and the dollar amount for the VISA card was under $50.00.
Entity item class dollar limits
You can set up an item class dollar limit for an AVS response for each entity in your company. You can use the item class dollar limit to reduce the amount of fraud. For example, a credit card may receive an AVS response of “all address matching”, but you may want to perform an additional check against the item class (such as high-theft items) assigned to one or more of the items on the order and the dollar amount that requires authorization.
-
If the authorization amount is less than the item class dollar limit, the system releases the order from any AVS hold.
-
If the authorization is greater than the item class dollar limit, the system places the order on hold using the hold reason defined for the item class dollar limit.
The system checks the following information to determine if an order should go on hold due to an item class dollar limit:
-
the service bureau code
-
the AVS response code received from the service bureau
-
the Entity associated with the order
-
the $ limit to hold on the order
-
the item class assigned to one or more of the items on the order requesting authorization
Note:
-
The item(s) assigned to the item class must be requesting authorization. For example, if the item assigned to the item class is on backorder, the other items on the order requesting authorization will not qualify for the item class dollar limit.
-
If more than one item class on the order qualifies for an item class dollar limit, the system uses the item class associated with the lowest order number. For example, if order line 1 is associated with item class PNT and order line 3 is associated with item class ELC and both qualify, the system uses the item class dollar limit defined for item class PNT.
The system does not evaluate the order for item class dollar limit if the order does not pass authorization.
Entity item class dollar limit summary:
| AVS response | Entity $ limit | Auth amount less than entity $ limit | Auth amount greater than or equal to entity $ limit |
|---|---|---|---|
|
hold reason |
no hold reason |
The system releases the order from AVS hold. Order transaction history message: AVS HLD Release - Item Class $Limit. |
The system places the order on hold, using the hold reason defined for the AVS response. Order transaction history message: SYS HLD - Declined Credit Card. |
|
no hold reason |
hold reason |
The system does not place the order on hold. |
The system places the order on hold, using the hold reason defined for the entity item class dollar limit. Order transaction history message: SYS HLD - Declined Credit Card. |
|
no hold reason |
no hold reason |
The system does not place the order on hold. |
The system does not place the order on hold. |
|
hold reason |
hold reason |
The system releases the order from AVS hold. Order transaction history message: AVS HLD Release - Item Class $Limit. |
The system places the order on hold, using the hold reason defined for the entity item class dollar limit. Order transaction history message: SYS HLD - Declined Credit Card. |
Item class dollar limit example: The following is an example of how to set up an item class dollar limit for an AVS response code.
| AVS Response | Description | Hold Reason Code |
|---|---|---|
|
I3 |
All Address Matching |
None |
Item class dollar limit to hold example:
| AVS Response | Entity | Item Class | Dollar Limit | Hold Reason Code |
|---|---|---|---|---|
|
I3 |
555 |
ELC |
$50.00 |
C1 |
|
I3 |
555 |
PNT |
$75.00 |
C2 |
|
I3 |
555 |
ZBA |
$150.00 |
C3 |
Using the example, if an order passed AVS because it received an AVS response of I3, all address matching, the system would then perform an edit against the item class dollar limit defined for the response.
If an item class dollar limit was defined for the entity associated with the order, the item class assigned to at least one of the items on the order requiring authorization, and the dollar amount on the order that required authorization is equal to or greater than the dollar limit defined for the AVS response, the order would then be placed on hold, using the hold reason code defined for the item class dollar limit.
Using the example, the system would assign the hold reason code C1 to an order if the order was associated with entity 555, item class ELC, and the dollar amount that required authorization was equal to or greater than $50.00.
Entity postal code dollar limits
You can set up a postal code dollar limit for an AVS response for each entity in your company. You can use the postal code dollar limit to reduce the amount of fraud. For example, a credit card may receive an AVS response of “All Address Match”, but you may want to perform an additional check against the postal code assigned to the bill to or sold to customer on the order and the dollar amount that requires authorization.
-
If the authorization amount is less than the postal code dollar limit, the system releases the order from any AVS hold.
-
If the authorization amount is greater than the postal code dollar limit, the system places the order on hold using the hold reason defined for the postal code dollar limit.
The system checks the following information to determine if an order should go on hold due to a postal code dollar limit:
-
the service bureau code
-
the AVS response code received from the service bureau
-
the Entity associated with the order
-
the postal code for the bill to customer on the order; if a bill to customer is not defined, the system validates the postal code for the sold to customer on the order
-
the $ limit to hold on the order
The system does not place the order on postal code dollar limit hold if the order does not pass authorization.
Entity postal code dollar limit summary:
| AVS response | Entity $ limit | Auth amount less than entity $ limit | Auth amount greater than or equal to entity $ limit |
|---|---|---|---|
|
hold reason |
no hold reason |
The system releases the order from AVS hold. Order transaction history message: AVS HLD Release - Postal Code $Limit. |
The system places the order on hold, using the hold reason defined for the AVS response. Order transaction history message: SYS HLD - Declined Credit Card. |
|
no hold reason |
hold reason |
The system does not place the order on hold. |
The system places the order on hold, using the hold reason defined for the entity postal code dollar limit. Order transaction history message: SYS HLD - Declined Credit Card. |
|
no hold reason |
no hold reason |
The system does not place the order on hold. |
The system does not place the order on hold. |
|
hold reason |
hold reason |
The system releases the order from AVS hold. Order transaction history message: AVS HLD Release - Postal Code $Limit. |
The system places the order on hold, using the hold reason defined for the entity postal code dollar limit. Order transaction history message: SYS HLD - Declined Credit Card. |
Postal code dollar limit example: The following is an example of how to set up a postal code dollar limit for an AVS response code.
| AVS Response | Description | Hold Reason Code |
|---|---|---|
|
I3 |
All Address Matching |
None |
Postal code dollar limit to hold example:
| AVS Response | Entity | Postal code | Dollar Limit | Hold Reason Code |
|---|---|---|---|---|
|
I3 |
555 |
01468 |
$50.00 |
P1 |
|
I3 |
555 |
01701 |
$75.00 |
P2 |
|
I3 |
555 |
02053 |
$150.00 |
P3 |
Using the example, if an order passed AVS because it received an AVS response of I3, all address matching, the system would then perform an edit against the postal code dollar limit defined for the response.
If a postal code dollar limit was defined for the entity associated with the order, the postal code assigned to the sold to, and the dollar amount on the order that required authorization is equal to or greater than the dollar limit defined for the AVS response, the order would then be placed on hold, using the hold reason code defined for the postal code dollar limit.
Using the example, the system would assign the hold reason code P1 to an order if the order was associated with entity 555, postal code 01468, and the dollar amount that required authorization was equal to or greater than $50.00.
Vendor Response Setup Examples
Examples of different vendor responses, and how you might set them up on the system for credit card authorization before shipment, are:
Stolen credit card:
-
do not reattempt authorization
-
put the order on CF (credit card fraud) hold
-
flag the order for cancellation
Over credit limit:
-
put the order on hold for 5 days before reattempting authorization
-
flag the order for cancellation after a number of declined authorizations
Transmission error:
-
do not put the order on hold; reattempt authorization immediately
Address verification failed:
-
do not reattempt authorization
-
put the order on AV (address verification) hold
Card security value should be on the credit card:
-
do not reattempt authorization
-
put the order on CF (credit card fraud) hold
Note:
A pick slip will not print if the authorization is declined or if the order is on hold.
Determining the maximum number of declines: The system counts the number of declines for each different vendor response code separately. For example, if an authorization is declined twice for a transmission error, and is then declined for exceeding a credit limit, the counter starts again at 1 the first time you receive the new vendor response code.
The Maximum Number of Retries on Credit Card Orders (E74) system control value specifies the maximum number of all declines (with any vendor response that represents a decline) an order can accumulate before being flagged for cancellation. This value overrides the limit you specify for an individual vendor response. Be sure to set this system control value high enough that you do not inadvertently flag on order for cancellation when it still might be eligible for authorization.
Releasing held orders: The Release Orders on Time Hold periodic function evaluates held credit card orders for release based on their hold dates. See Releasing Orders from Time Hold.
You can also use the Release Held Orders (ERHO) menu option to release orders one at a time..
Canceling orders: You can use the Working with Credit Card Cancellations (WCCC) menu option to cancel all orders flagged for cancellation automatically. You can also set up this function as part of your periodic process.
About Deposits
Response codes may be used both for credit card authorizations and deposit authorizations. Typically, you would need to authorize a deposit because the order is using deferred or installment billing, and so you would not have a current authorization for the amount of the deposit you are processing.
The system does not perform the same types of actions against the order for a deposit authorization as it does for other authorizations. Specifically, the system does not reference the following fields (defined at the Create Vendor Response Screen) when processing an authorization for a deposit:
-
Hold reason
-
of authorization attempts
-
of days between attempts
-
Cancel reason
-
Letter type
Similarly, the Maximum Number of Retries on Credit Card Orders (E74) system control value does not play a role in authorizing deposits.
Force deposit: You can set a vendor response code to “force deposit” in your company when you receive this response code from the deposit service. To do so, select the Force deposit for FPO flag for the response code. Forcing deposit means that you process all of the same updates in your company as if you had received an approval for the authorization.
Regular (non-payment plan) deposits are always forced.
Note:
You must make your own arrangements with the service bureau regarding how to deal with unconfirmed or rejected deposit transactions.
The system checks the setting of this "force deposit" flag only when:
-
you process a deposit for a deferred or installment pay plan
-
the service bureau supports force deposit
-
the authorization is declined (that is, the response code is not 100)
-
the system submitted the transaction with an action code of B (obtain both an authorization and deposit) rather than D (deposit only)
If you don't force: When a payment plan deposit fails authorization and is not forced, the deposit appears on the Unconfirmed Deposits Listing Report. You can use Resubmitting Rejected Deposits (SRDP) to work with these deposits. Additionally, the order is placed on hold, and any orders that match the sold to customer and/or the credit card number are placed on hold as well.
More information:
Work with Vendor Response Screen
Purpose: This screen displays the response codes currently defined for the service bureau. Use this screen to add, delete, or change a response code for the service bureau.
You must create a vendor response code for each code used by the service bureau. If the system receives a vendor response code it does not recognize, it puts the order on AVS hold; see Using the Credit Card Authorization Interface.
How to display this screen: Select Responses for the service bureau at the Work with Authorization Services Screen
| Field | Description |
|---|---|
|
Response code |
The code assigned by the service bureau that identifies whether the credit card was authorized or declined, and the reason for the authorization or decline. Alphanumeric, 10 positions; optional. |
|
Description |
The description of the response code. Alphanumeric, up to 40 positions; optional. |
| Option | Procedure |
|---|---|
|
Change a vendor response code |
Select Change for a response code to advance to the Change Vendor Response Screen. At this screen you can change any information except the Authorization service code and the Response code. See the Create Vendor Response Screen for field descriptions. |
|
Delete a vendor response code |
Select Delete for a response code to delete it. |
|
Display a vendor response code |
Select Display for a response code to advance to the Display Vendor Response Screen. You cannot change any information at this screen. See the Create Vendor Response Screen for field descriptions. |
|
Work with ship via dollar limits and pay type dollar limits for a vendor response code |
Select Response/Entity Details for a response code to advance to the Work with Ship Via $ Limit to Hold Screen. |
|
Create a vendor response code |
Select Create to advance to the Create Vendor Response Screen. |
Create Vendor Response Screen
Purpose: Use this screen to define the response codes that the service bureau uses to indicate the disposition of the authorization, and how the system should then handle the order.
How to display this screen: Select Create at the Work with Vendor Response Screen
| Field | Description |
|---|---|
|
Response code |
The code assigned by the service bureau to identify whether the credit card was authorized or declined, and the reason for the authorization or decline. You should define each code used by the service bureau on the system. If the service bureau returns a response that the system does not recognize, the order appears on the Credit Card Authorization Listing as DECLINED (no description will appear) and is put on AVS hold; you must release the order through the Release Held Orders menu option, described in Selecting Held Orders (ERHO). Deposits: See About Deposits for an example of how response codes may be used during deposits processing. Note: The INSUFFICIENT_FUNDS response code for the RLT authorization service (WASV) must be assigned a hold reason code of SV. Alphanumeric, 10 positions. Create screen: required. Change screen: display-only. |
|
ORCE response |
The code assigned by the Oracle Retail Customer Engagement service bureau to identify whether the stored value card transaction was approved or declined. Use this field to map a response from Oracle Retail Customer Engagement to a vendor response code. This field displays only if the Authorization service code for the service bureau is RLT. See Customer Engagement Stored Value Card Integration. Alphanumeric, 60 positions. Create screen: optional. Change screen: display-only. |
|
Description 1 |
The description of the response code. You can use the description provided by the service bureau or you can use your own description. Both lines of the description appear on the Credit Card Authorization Listing. You can also review it in standard order inquiry at the Authorization History Details Window. Deposits: The first line only of the response code description displays on the Display Deposit History Detail Screen in standard order inquiry when the service bureau uses this response code for a deposit authorization. Alphanumeric, 100 positions; required. |
|
Description 2 |
An additional description for the response code. Alphanumeric, 100 positions; optional. |
|
Hold reason |
The hold code to use for orders receiving this response. This a paytype-level hold; the order will be put on AT hold. The hold reason you enter here displays on the Credit Card Order Cancellation List when you process cancellations, so you can use this field as a description of the vendor response for that report. No pick slip prints if the order is placed on hold. If you assign a Hold date to the order (by completing the # of days between attempts field) you can release the order through the Release Orders on Time Hold periodic function. If not, you must use the Release Held Orders or Manual Credit Card Authorization function to release the order. Leave the Hold field blank if orders with this response code should not be placed on hold. Hold reason codes are defined in and validated against the Order Hold Reason table; see Establishing Order Hold Reason Codes (WOHR). Deposits: The system does not reference this field when processing an authorization for a deposit. See About Deposits. Alphanumeric, 2 positions; optional. |
|
# authorization attempts (Number of authorization attempts) |
The number of times to attempt to authorize an order before flagging it for cancellation. This field defines the number of attempts for this response code only; if the vendor returns a different response code, the count begins again at one. Enter 1 in this field if you want to flag an order for cancellation immediately. If this value is set to more than one, the system will continue to resubmit the order for authorization until the value is reached, provided the order is not held. The Maximum Number of Retries on Credit Card Orders (E74) system control value overrides this limit if it is lower than the maximum specified for a given response code. This system control value will also override the limit for a response code if the combined total authorization attempts for all responses on an order meets the maximum defined in the System Control table. Leave this field blank if you want to the system to continue to attempt authorization indefinitely (however, the system control value described above will override a blank value). Deposits: The system does not reference this field when processing an authorization for a deposit. See About Deposits. Online credit card authorization: The system does not reference this field when processing an online credit card authorizations. Numeric, 2 positions; optional. |
|
# of days between attempts |
The number of days to add to the current date when calculating a Hold until date for an order. Example: If the current date is 7/15, and this field is set to 5, the system assigns a Hold until date of 7/20. If you leave this field blank and:
The Release Orders on Time Hold periodic function releases an order from hold once the Hold date is reached. See Releasing Orders from Time Hold. Deposits: The system does not reference this field when processing an authorization for a deposit. See About Deposits. Online credit card authorization: The system does not reference this field when processing an online credit card authorization. Numeric, 2 positions; optional. |
|
Cancel reason |
The cancel reason to use when an order has reached the # authorization attempts (Number of authorization attempts), or in the number in the system control value (whichever is lower). As part of this process, the order is flagged for cancellation; you use the Working with Credit Card Cancellations (WCCC) option to cancel such orders. You can also set this function up as part of your periodic processing. If an order becomes eligible for cancellation because its total number of authorization attempts meet the maximum defined in the System Control table, the system uses the cancellation code associated with the most recently received vendor response. Cancel reason codes are defined in and validated against the Cancel Reason Code table; see Establishing Cancel Reason Codes (WCNR). Deposits: The system does not reference this field when processing an authorization for a deposit. See About Deposits. Online credit card authorization: The system does not reference this field when processing an online credit card authorization. Numeric, 2 positions; optional (required if you enter a value in the # authorization attempts field). |
|
Force deposit for FPO |
Indicates whether to process all the usual updates for a deposit when you receive this response code from the service bureau, even though this response code actually represents a decline. Selected = force deposit Unselected (default) = Do not force deposit About Deposits |
|
Pop up window messages (online authorization messages) |
Four additional fields where you can enter a message indicating whether the credit card is approved or declined and if any action should be taken, such as asking the customer to repeat the credit card number or requesting a different credit card for authorization. Note: These fields only display if the On-line Authorizations (B89) system control value is selected and the Batch/online field for the service bureau is set to I (online authorization only) or C (online and batch authorization). If you are sending credit cards for authorization during order entry (the On-line Authorizations (B89) system control value is selected), the system displays the Select Authorization Response Option Window in order entry when a response is received from the service bureau. This window displays the pop up window messages you defined for this vendor response. See Performing Online Credit Card Authorizations for an overview on online authorizations and the required setup. Alphanumeric, four 40-positions fields; optional. |
Select Entity for Vendor Response Details Screen
Purpose: Use this screen to define more information for a vendor response for each entity in your company. At this screen you can:
-
define a ship via dollar limit for an AVS response code to perform an additional edit against the authorization amount if the ship via on the order matches a ship via dollar limit and the sold to customer and ship to customer are different.
-
define a pay type dollar limit to force an authorization for a declined vendor response code.
-
define an item class dollar limit for an AVS response code to perform an additional edit against the authorization amount if one or more item(s) on the order requiring authorization has an item class that matches an item class dollar limit.
-
define a postal code dollar limit for an AVS response code to perform an additional edit against the authorization amount if the postal code for the sold to on the order matches a postal code dollar limit.
How to display this screen: On the Work with Vendor Response Screen screen, select Response/Entity Details for a vendor response
| Field | Description |
|---|---|
|
Authorization service |
The code and description to identify the service bureau for which you are working with vendor response details. This is the service bureau you selected at the Work with Authorization Services Screen. Authorization code: Alphanumeric, 3 positions; display-only. Authorization description: Alphanumeric, 30 positions; display-only. |
|
Response code |
The code and description assigned by the service bureau that identifies whether the credit card was authorized or declined, and the reason for the authorization or decline. This is the vendor response you selected on the Work with Vendor Response Screen. For ship via dollar limit, postal code dollar limit, and item class dollar limit, this must be an AVS response code. Pay type dollar limit applies to a vendor response code. Vendor response code: Alphanumeric, 10 positions; display-only. Vendor response description: Alphanumeric, 40 positions; display-only. |
|
Entity |
A code for the entity for which you wish to create vendor response details. An entity is a component of the sales reporting hierarchy. An entity can represent the business units in your company, for example, mail order, retail, wholesale). A list of all the valid entity records set up for the company you are currently in displays. Entity codes are defined in and validated against the Entity table. See Working with Entities (WENT). Numeric, 3 positions; optional. |
|
Description |
A description of the entity. Alphanumeric, 25 positions; optional. |
| Screen Option | Procedure |
|---|---|
|
Define ship via dollar limits for a specific entity |
Select Ship Via $ Limit for an entity to advance to the Work with Ship Via $ Limit to Hold Screen. |
|
Define pay type dollar limits for a specific entity |
Select Pay Type $ Limit for an entity to advance to the Work with Pay Type $ Limit to Force Authorization Screen. |
|
Define item class dollar limits for a specific entity |
Select Item Class $ Limit for an entity to advance to the Work with Item Class $ Limit to Hold Screen. |
|
Define postal code dollar limits for a specific entity |
Select Postal Code $ Limit for an entity to advance to the Work with Postal Code $ Limit to Hold Screen. |
Work with Ship Via $ Limit to Hold Screen
Purpose: Use this screen to create and maintain ship via dollar limits for a specific entity, AVS response, and service bureau.
Ship via dollar limit defines whether a dollar limit is applied to the ship via on the order.
-
If the authorization amount is less than the ship via dollar limit, the system releases the order from any AVS hold.
-
If the authorization amount is greater than the ship via dollar limit, the system places the order on hold using the hold reason defined for the ship via dollar limit.
You might use this if you want to keep a careful check for stolen credit cards. For example, you can place an order on hold if the order is associated with a Federal Express ship via and the dollar amount required for authorization is greater than $200.00.
See Entity ship via dollar limits for more information on the processing the system performs.
Note:
If you are performing online authorization, the system does not validate entity ship via dollar limit.
How to display this screen: Select Ship Via $ Limit for an entity on the Work with Vendor Response Screen
| Field | Description |
|---|---|
|
Authorization service |
The code and description of the service bureau for which you are working with ship via dollar limits. This is the service bureau you selected on the Work with Authorization Services Screen. Authorization code: Alphanumeric, 3 positions; display-only. Authorization description: Alphanumeric, 30 positions; display-only. |
|
Response code |
The code and description assigned by the service bureau that identifies whether the credit card passed address verification. This is the AVS response you selected on the Work with Vendor Response Screen. Response code: Alphanumeric, 10 positions; display-only. Response description: Alphanumeric, 40 positions; display-only. |
|
Entity |
The code and description of the entity you selected on the Select Entity for Vendor Response Details Screen. Entity code: Numeric, 3 positions; display-only. Entity description: Alphanumeric, 25 positions; display-only. |
|
Ship Via |
A code for the carrier you use to ship merchandise. Ship via codes are defined in and validated against the Ship Via table using Working with Ship Via Codes (WVIA). Numeric, 2 positions; optional. |
|
$ Limit to Hold |
The dollar limit that defines when the system places the order on hold. The system places an order on hold when the order meets the service bureau/AVS response code/entity/ship via code combination and the dollar amount the requires authorization is greater than the amount defined for the ship via dollar limit. The system assigns the hold reason code defined for the ship via dollar limit to the order. Conversely, if you do not define a hold reason, the system does not place an order on hold if the order does not pass AVS authorization, but is under the ship via dollar amount specified. Numeric, 13 positions with a 2-place decimal; optional. |
|
Hold Reason |
The hold reason code to assign to orders whose authorization amount is greater than the ship via dollar limit. Alphanumeric, 2 positions; optional. |
|
Description |
A description of the hold reason code. Alphanumeric, 50 positions; optional. |
| Screen Option | Procedure |
|---|---|
|
Change a ship via dollar limit |
Select Change for a ship via dollar limit to hold to advance to the Change Ship Via $ Limit to Hold Screen. At this screen you can change the ship via, dollar limit, and hold reason code. See the Create Ship Via $ Limit to Hold Screen for field descriptions. |
|
Delete a ship via dollar limit |
Select Delete for a ship via dollar limit to hold to delete it. |
|
Display a ship via dollar limit |
Select Display for a ship via dollar limit to hold to advance to the Display Ship Via $ Limit to Hold Screen. You cannot change any information at this screen. See the Create Ship Via $ Limit to Hold Screen for field descriptions. |
|
Create a ship via dollar limit |
Select Create to advance to Create Ship Via $ Limit to Hold Screen. |
Create Ship Via $ Limit to Hold Screen
Purpose: Use this screen to create a ship via dollar limit.
How to display this screen: Select Create on the Work with Ship Via $ Limit to Hold Screen.
| Field | Description |
|---|---|
|
Authorization service |
The code and description of the service bureau for which you are creating a ship via dollar limit. This is the service bureau you selected on the Work with Authorization Services Screen. Authorization code: Alphanumeric, 3 positions; display-only. Authorization description: Alphanumeric, 30 positions; display-only. |
|
Response code |
The code and description of the AVS response code assigned by the service bureau that identifies whether the credit card pass address verification. This is the AVS response you selected on the Work with Vendor Response Screen. Response code: Alphanumeric, 10 positions; display-only. Response description: Alphanumeric, 40 positions; display-only. |
|
Entity |
The code and description of the entity you selected on the Work with Vendor Response Screen. Entity code: Numeric, 3 positions; display-only. Entity description: Alphanumeric, 25 positions; display-only. |
|
Ship via |
A code for the carrier you use to ship merchandise. An error message indicates if you try to create a ship via dollar limit for a ship via that already has a dollar limit defined for this AVS response code and entity: Duplicate record exists. Ship via codes are defined in and validated against the Ship Via table using Working with Ship Via Codes (WVIA). Numeric, 2 positions; optional. |
|
$ limit to hold |
The dollar limit that defines when the system places the order on hold. The system places an order on hold when the order meets the service bureau/AVS response code/entity/ship via code combination and the dollar amount that requires authorization is greater than the amount defined for the ship via dollar limit. The system assigns the hold reason code defined for the ship via dollar limit to the order. Conversely, if you do not define a dollar limit, the system does not place an order on hold if the order does not pass AVS authorization, but is under the ship via dollar amount specified. An error message indicates if you try to enter a dollar limit that is less than $1.00: Ship Via $ Limit cannot be less than One. Numeric, 13 positions with a 2-place decimal; optional. |
|
Hold reason |
A code for the hold reason the system assigns to the order when the authorization amount is greater than the ship via dollar limit. This is a paytype level hold; the order will be put on AT hold. The hold reason you enter here displays on the Credit Card Order Cancellation List when you process cancellations. No pick slip prints if the order is on hold. Hold reason codes are defined in and validated against the Order Hold Reason table; see Establishing Order Hold Reason Codes (WOHR). Alphanumeric, 2 positions; optional. |
Work with Pay Type $ Limit to Force Authorization Screen
Purpose: Use this screen to create and maintain pay type dollar limits.
Pay type dollar limit defines whether a dollar limit to force an authorization is applied to a specific pay type.
See Entity pay type dollar limits for more information on the processing the system performs.
Note:
If you are performing online authorization, the system does not validate entity pay type dollar limit.
How to display this screen: On the Work with Vendor Response Screen, select Pay Type $ Limit for an entity.
| Field | Description |
|---|---|
|
Authorization service |
The code and description of the service bureau for which you are working with pay type dollar limits for a vendor response. This is the service bureau you selected on the Work with Authorization Services Screen. Authorization code: Alphanumeric, 3 positions; display-only. Authorization description: Alphanumeric, 30 positions; display-only. |
|
Response code |
The code and description of the vendor response assigned by the service bureau that identifies whether the credit card was authorized or declined, and the reason for the authorization or decline. This is the vendor response you selected on the Work with Vendor Response Screen. Response code: Alphanumeric, 10 positions; display-only. Response description: Alphanumeric, 40 positions; display-only. |
|
Entity |
The code and description of the entity you selected on the Select Entity for Vendor Response Details Screen. Entity code: Numeric, 3 positions; display-only. Entity description: Alphanumeric, 25 positions; display-only. |
|
Pay type |
A code used to identify a method of payment on an order. Pay type codes are defined in and validated against the Pay Type table. Numeric, 2 positions; optional. |
|
Description |
A description of the pay type. Alphanumeric, 30 positions; display-only. |
|
Dollar limit to force authorization |
The dollar limit that indicates whether the order is eligible for a forced authorization. If the dollar amount for the credit card is greater than $1.00 but less than the dollar amount defined, the system forces an authorization. Note: If you wish to force authorizations for credit cards requiring authorizations less than $1.00, enter an authorization number in the Authorization Number for Authorizations Under $1.00 (I08) system control value. Numeric, 13 positions with a 2-place decimal; optional. |
| Screen Option | Procedure |
|---|---|
|
Change a pay type dollar limit |
Select Change for a pay type dollar limit to advance to the Change Pay Type $ Limit to Force Authorization Screen. You can change the pay type code or dollar amount on this screen. See the Create Pay Type $ Limit to Force Authorization Screen for field descriptions. |
|
Delete a pay type dollar limit |
Select Delete for a pay type dollar limit to delete it. |
|
Display a pay type dollar limit |
Select Display for a pay type dollar limit to advance to the Display Pay Type $ Limit to Force Authorization Screen. You cannot change any information at this screen. See the Create Pay Type $ Limit to Force Authorization Screen for field descriptions. |
|
Create a pay type dollar limit |
Select Create to advance to the Create Pay Type $ Limit to Force Authorization Screen. |
Create Pay Type $ Limit to Force Authorization Screen
Purpose: Use this screen to create a pay type dollar limit.
How to display this screen: Select Create on the Work with Pay Type $ Limit to Force Authorization Screen.
| Field | Description |
|---|---|
|
Authorization service |
The code and description of the service bureau for which you are creating a pay type dollar limit for a vendor response. This is the service bureau you selected on the Work with Authorization Services Screen. Authorization code: Alphanumeric, 3 positions; display-only. Authorization description: Alphanumeric, 30 positions; display-only. |
|
Response code |
The code and description of the response assigned by the service bureau that identifies whether the credit card was authorized or declined, and the reason for the authorization or decline. This is the vendor response you selected on the Work with Vendor Response Screen. Response code: Alphanumeric, 10 positions; display-only. Response description: Alphanumeric, 40 positions; display-only. |
|
Entity |
The code and description of the entity you selected on the Select Entity for Vendor Response Details Screen. Entity code: Numeric, 3 positions; display-only. Entity description: Alphanumeric, 25 positions; display-only. |
|
Pay type |
A code used to identify a method of payment on an order. Pay type codes are defined in and validated against the Pay Type table; see Working with Pay Types (WPAY). An error message indicates if you try to create a pay type dollar limit for a pay type that already has a pay type dollar limit defined for this vendor response and entity: Duplicate record exists. An error message indicates if you enter a pay type other than a credit card pay type: Pay Type entered must be a credit card. Numeric, 2 positions; required. |
|
$ limit to authorization |
The dollar amount that you wish to use to force a credit card authorization. If the dollar amount defined for the credit card is greater than $1.00 but less than the amount you define, the system forces the credit card authorization. If the dollar amount defined for the credit card is equal to or greater than the amount you define, the system does not authorize the credit card. An error message indicates if you enter a dollar amount that is less than $1.00: Pay Type $ Limit cannot be less than One Dollar ($1.00). Note: If you wish to force authorizations for credit cards requiring authorizations less than $1.00, enter an authorization number in the Authorization Number for Authorizations Under $1.00 (I08) system control value. Numeric, 13 positions with a 2-place decimal; required. |
Work with Item Class $ Limit to Hold Screen
Purpose: Use this screen to create and maintain item class dollar limits.
Item class dollar limit defines whether a dollar limit is applied to the item class associated with an item on the order that requires authorization.
-
If the authorization amount is less than the item class dollar limit, the system releases the order from any AVS hold.
-
If the authorization is greater than the item class dollar limit, the system places the order on hold using the hold reason defined for the item class dollar limit.
You might use this if you want to keep a careful check for stolen credit cards. For example, you can place an order on hold if at least one of the items on the order requesting authorization is assigned to item class PNT (high-fraud items) and the dollar amount required for authorization is greater than $200.00.
See Entity item class dollar limits for more information on the processing the system performs.
How to display this screen: Select Item Class $ Limit for an entity on the Work with Vendor Response Screen.
| Field | Description |
|---|---|
|
Authorization service |
The code and description to identify the service bureau for which you are working with item class dollar limits. This is the service bureau you selected on the Work with Authorization Services Screen. Authorization code: Alphanumeric, 3 positions; display-only. Authorization description: Alphanumeric, 30 positions; display-only. |
|
Response code |
The code and description assigned by the service bureau that identifies whether the credit card passed address verification. This is the AVS response you selected at the Work with Vendor Response Screen. Response code: Alphanumeric, 10 positions; display-only. Response description: Alphanumeric, 40 positions; display-only. |
|
Entity |
The code and description of the entity you selected on the Select Entity for Vendor Response Details Screen. Entity code: Numeric, 3 positions; display-only. Entity description: Alphanumeric, 25 positions; display-only. |
|
Item class |
A code for an item class used to group like items together. Item class codes are defined in and validated against the Item Class table. Alphanumeric, 3 positions; optional. |
|
$ Limit To Hold |
The dollar limit that defines when the system places the order on hold. The system places an order on hold when the order meets the service bureau/AVS response code/entity/item class combination and the dollar amount that requires authorization is greater than the amount defined for the item class dollar limit. The system assigns the hold reason code defined for the item class dollar limit to the order. Conversely, if you do not define a hold reason, the system does not place an order on hold if the order does not pass AVS authorization, but is under the item class dollar amount specified. Numeric, 13 positions with a 2-place decimal; optional. |
|
Hold Reason/Description |
The code and description of the hold reason to assign to orders whose authorization amount is greater than the item class dollar limit. Code: Alphanumeric, 2 positions; optional. Description: Alphanumeric, 50 positions; display-only. |
| Screen Option | Procedure |
|---|---|
|
Create an item class dollar limit |
Select Create to advance to the Create Item Class $ Limit to Hold Screen. |
|
Change an item class dollar limit |
Select Change for an item class dollar limit to hold to advance to the Change Item Class $ Limit to Hold Screen. |
|
Delete an item class dollar limit |
Select Delete for an item class dollar limit to hold to delete it. |
|
Display an item class dollar limit |
Select Display for an item class dollar limit to hold to advance to the Display Item Class $ Limit to Hold Screen. |
Create Item Class $ Limit to Hold Screen
Purpose: Use this screen to create an item class dollar limit.
How to display this screen: Select Create at the Work with Item Class $ Limit to Hold Screen.
| Field | Description |
|---|---|
|
Authorization service |
The code and description of the service bureau for which you are creating an AVS response item class dollar limit. This is the service bureau you selected at the Work with Authorization Services Screen. Authorization code: Alphanumeric, 3 positions; display-only. Authorization description: Alphanumeric, 30 positions; display-only. |
|
Response code |
The code and description of the AVS response code assigned by the service bureau that identifies whether the credit card passed address verification. This is the AVS response you selected at the Work with Vendor Response Screen. Response code: Alphanumeric, 10 positions; display-only. Response description: Alphanumeric, 40 positions; display-only. |
|
Entity |
The code and description of the entity you selected at the Select Entity for Vendor Response Details Screen. Entity code: Numeric, 3 positions; display-only. Entity description: Alphanumeric, 25 positions; display-only. |
|
Item class |
A code for an item class used to group like items together. Item class codes are defined in and validated against the Item Class table. An error message indicates if you try to create an item class dollar limit for an item class that already has a dollar limit defined for the vendor response code and entity: Duplicate record exists. Alphanumeric, 3 positions. Create screen: required. Change screen: display-only. |
|
$ limit to hold |
The dollar limit that defines when the system places the order on hold. The system places an order on hold when the order meets the service bureau/AVS response code/entity/item class combination and the dollar amount that requires authorization is greater than the amount defined for the item class dollar limit. The system assigns the hold reason code defined for the item class dollar limit to the order. Conversely, if you do not define a hold reason, the system does not place an order on hold if the order does not pass AVS authorization, but is under the item class dollar amount specified. An error message indicates if you try to enter a dollar limit that is less than $1.00: Item Class $ Limit cannot be less than $1.00. Numeric, 13 positions with a 2-place decimal; required. |
|
Hold reason |
A code for the hold reason the system assigns to the order when the order meets the item class dollar limit hold requirements. This is a paytype level hold; the order will be put on AT hold. The hold reason you enter here displays on the Credit Card Order Cancellation List when you process cancellations. No pick slip prints if the order is on hold. Hold reason codes are defined in and validated against the Order Hold Reason table; see Establishing Order Hold Reason Codes (WOHR). Alphanumeric, 2 positions; optional. |
Change Item Class $ Limit to Hold Screen
To change: At the Work with Item Class $ Limit to Hold Screen, select Change for an item class dollar limit to hold to advance to the Change Item Class $ Limit to Hold screen. At this screen, you can change the $ limit to hold and hold reason code.
See Create Item Class $ Limit to Hold Screen for a description of the fields on this screen.
Display Item Class $ Limit to Hold Screen
To display: At the Work with Item Class $ Limit to Hold Screen, select Display for an item class dollar limit to hold to advance to the Display Item Class $ Limit to Hold screen. You cannot change any fields on this screen.
See Create Item Class $ Limit to Hold Screen for a description of the fields on this screen.
Work with Postal Code $ Limit to Hold Screen
Purpose: Use this screen to create and maintain postal code dollar limits.
Postal code dollar limit defines whether a dollar limit is applied to the postal code for the sold to customer on the order.
-
If the authorization amount is less than the postal code dollar limit, the system releases the order from any AVS hold.
-
If the authorization amount is greater than the postal code dollar limit, the system places the order on hold using the hold reason defined for the postal code dollar limit.
You might use this if you want to keep a careful check for stolen credit cards. For example, you can place an order on hold if the order is associated with a high-crime delivery area and the dollar amount required for authorization is greater than $200.00.
See Entity postal code dollar limits for an example and additional processing logic.
How to display this screen: Select Postal Code $ Limit for an entity at the Select Entity for Vendor Response Details Screen.
| Field | Description |
|---|---|
|
Authorization service |
The code and description of the service bureau for which you are working with postal code dollar limits. This is the service bureau you selected on the Work with Authorization Services Screen. Authorization code: Alphanumeric, 3 positions; display-only. Authorization description: Alphanumeric, 30 positions; display-only. |
|
Response code |
The code and description assigned by the service bureau that identifies whether the credit card passed address verification. This is the vendor response you selected at the Work with Vendor Response Screen. Response code: Alphanumeric, 10 positions; display-only. Response description: Alphanumeric, 40 positions; display-only. |
|
Entity |
The code and description of the entity you selected on the Select Entity for Vendor Response Details Screen. Entity code: Numeric, 3 positions; display-only. Entity description: Alphanumeric, 25 positions; display-only. |
|
Postal code |
A code for a postal code or zip code representing a delivery area. Alphanumeric, 10 positions; optional. |
|
$ Limit To Hold |
The dollar limit that defines when the system places the order on hold. The system places an order on hold when the order meets the service bureau/AVS response code/entity/postal code combination and the dollar amount that requires authorization is greater than the amount defined for the postal code dollar limit. The system assigns the hold reason code defined for the postal code dollar limit to the order. Conversely, if you do not define a hold reason, the system does not place an order on hold if the order does not pass AVS authorization, but is under the postal code dollar amount specified. Numeric, 13 positions with a 2-place decimal; optional. |
|
Hold Reason/Description |
The code and description of the hold reason to assign to orders whose authorization amount is greater than the postal code dollar limit. Code: Alphanumeric, 2 positions; optional. Description: Alphanumeric, 50 positions; display-only. |
| Screen Option | Procedure |
|---|---|
|
Create a postal code dollar limit to hold |
Select Create to advance to the Create Postal Code $ Limit to Hold Screen. |
|
Change a postal code dollar limit to hold |
Select Change for a postal code dollar limit to hold to advance to the Change Postal Code $ Limit to Hold Screen. |
|
Delete a postal code dollar limit to hold |
Select Delete for a postal code dollar limit to hold to delete it. |
|
Display a postal code dollar limit to hold |
Select Display for a postal code dollar limit to hold to advance to the Display Postal Code $ Limit to Hold Screen. |
Create Postal Code $ Limit to Hold Screen
Purpose: Use this screen to create a postal code dollar limit.
How to display this screen: Select Create at the Work with Postal Code $ Limit to Hold Screen.
| Field | Description |
|---|---|
|
Authorization service |
The code and description of the service bureau for which you are creating an AVS response postal code dollar limit. This is the service bureau you selected at the Work with Authorization Services Screen. Authorization code: Alphanumeric, 3 positions; display-only. Authorization description: Alphanumeric, 30 positions; display-only. |
|
Response code |
The code and description of the AVS response assigned by the service bureau that identifies whether the credit card passed address verification. This is the AVS response you selected at the Work with Vendor Response Screen. Response code: Alphanumeric, 10 positions; display-only. Response description: Alphanumeric, 40 positions; display-only. |
|
Entity |
The code and description of the entity you selected at the Select Entity for Vendor Response Details Screen. Entity code: Numeric, 3 positions; display-only. Entity description: Alphanumeric, 25 positions; display-only. |
|
Postal code |
A code for a postal code or zip code representing a delivery area. Postal codes are defined in and validated against the Zip/City/State table. An error message indicates if you try to create a postal code dollar limit for a postal code that already has a dollar limit defined for the AVS response and entity: Duplicate record exists. Alphanumeric, 5 positions. Create screen: required. Change screen: display-only. |
|
$ limit to hold |
The dollar limit that defines when the system places the order on hold. The system places an order on hold when the order meets the service bureau/AVS response code/entity/postal code combination and the dollar amount that requires authorization is greater than the amount defined for the postal code dollar limit. The system assigns the hold reason code defined for the postal code dollar limit to the order. Conversely, if you do not define a hold reason, the system does not place an order on hold if the order does not pass AVS authorization, but is under the postal code dollar amount specified. An error message indicates if you try to enter a dollar limit that is less than $1.00: Postal Code $ Limit cannot be less than $1.00. Numeric, 13 positions with a 2-place decimal; required. |
|
Hold reason |
A code for the hold reason the system assigns to the order when the authorization amount is greater than the postal code dollar limit. This is a paytype level hold; the order will be put on AT hold. The hold reason you enter here displays on the Credit Card Order Cancellation List when you process cancellations. No pick slip prints if the order is on hold. Hold reason codes are defined in and validated against the Order Hold Reason table; see Establishing Order Hold Reason Codes (WOHR). Alphanumeric, 2 positions; optional. |
Change Postal Code $ Limit to Hold Screen
To change: At the Work with Postal Code $ Limit to Hold Screen, select Change for a postal code dollar limit to hold to advance to the Change Postal Code $ Limit to Hold screen. At this screen, you can change the $ limit to hold and hold reason code.
See Create Postal Code $ Limit to Hold Screen for a description of the fields on this screen.
Display Postal Code $ Limit to Hold Screen
To display: At the Work with Postal Code $ Limit to Hold Screen, select Display for a postal code dollar limit to hold to advance to the Display Item Class $ Limit to Hold screen. You cannot change any fields on this screen.
See Create Postal Code $ Limit to Hold Screen for a description of the fields on this screen.
Defining Merchant ID Overrides
Purpose: Use merchant ID overrides to set up overrides for the different entities in your company.
When used: You use the merchant ID, which the service bureau assigns, to identify your company when you transmit information to the service bureau. Although you can set up a default ID for your company, you may need to set up overrides for each separate entity under which you perform authorizations and deposits.
Access to screens: The screens you use to work with merchant ID overrides are available through the Work with Authorization Services Screen.
Source code points to entity: The system determines the entity for a customer order based on the source code on the order header. When you create a source code you must specify a division, and when you create a division you must specify an entity. In this way, the source code on the order header indicates which merchant ID override to use for transactions related to the order.
Deferred/installment pay plans: If you use deferred or installment billing, you would also use these screens to set up merchant ID overrides for transactions related to these orders. See Deferred/Installment Billing Overview for more information on pay plans.
PayPal Direct Connection integration: If you use the PayPal Direct Connection Integration, you would also use these screens to set up overrides for the API credential information used to establish a direct connection to the PayPal system during deposit processing. See PayPal Direct Connection Integration.
In this topic:
For more information:
Work with Merchant ID Overrides Screen
How to display this screen: Select Merchant ID Override for an authorization service at the Work with Authorization Services Screen.
| Field | Description |
|---|---|
|
Authorization service |
The service code representing the authorization service you selected at the Work with Authorization Services Screen. Alphanumeric, 3 positions; display-only. |
|
Entity |
The code representing an entity with a unique merchant ID. Numeric, 3 positions; optional. |
|
Merchant ID |
An account number assigned by the service bureau to identify transmissions to/from a particular entity in your company. The default merchant ID, used for regular (as opposed to pay plan) transactions displays. To review the deferred or installment merchant IDs, select Change or Display for the entity. Alphanumeric, 20 positions; optional. |
| Screen Option | Procedure |
|---|---|
|
Create a new merchant ID override |
Select Create to advance to the Create Merchant ID by Entity Screen. |
|
Change a merchant ID override |
Select Change for a merchant ID override to advance to the Change Merchant ID Override Screen. At this screen, you can change the merchant ID fields and API fields. See the Create Merchant ID by Entity Screen for field descriptions. |
|
Delete a merchant ID override |
Select Delete for a merchant ID override to delete it. |
|
Display a merchant ID override |
Select Display for a merchant ID override to advance to the Display Merchant ID Override Screen. You cannot change any information at this screen. See the Create Merchant ID by Entity Screen for field descriptions. |
Create Merchant ID by Entity Screen
Purpose: Use this screen to create a new merchant ID override for orders associated with a specific entity in your company.
How to display this screen: Select Create at the Work with Merchant ID Overrides Screen.
| Field | Description |
|---|---|
|
Entity |
Enter the entity associated with the merchant ID. Entities are defined in and validated against the Entity table; see DWorking with Entities (WENT). Numeric, 3 positions. Create screen: required. Change screen: display-only. |
|
Merchant ID |
Enter the merchant ID to use when transmitting information to an authorization or deposit service for orders associated with this entity (based on the division associated with the source code on the order header). This is the merchant ID to use for regular, as opposed to pay plan, transactions. Note: You can enter upper and lower case letters in this field. Alphanumeric, 20 positions; required. |
|
Deferred merchant ID |
Enter the merchant ID to use when transmitting transactions to a service bureau for orders that are associated with this entity, and which are using a deferred billing pay plan. Deferred and installment pay plans are available only if the Deferred and Installment Billing (F51) system control value is selected. See Deferred/Installment Billing Overview. Note: You can enter upper and lower case letters in this field. Alphanumeric, 20 position; optional. |
|
Installment merchant ID |
Enter the merchant ID to use when transmitting transactions to a service bureau for orders that are associated with this entity, and which are using an installment plan. Deferred and installment pay plans are available only if the Deferred and Installment Billing (F51)Deferred and Installment Billing (F51) system control value is selected. See Deferred/Installment Billing Overview. Note: You can enter upper and lower case letters in this field. Alphanumeric, 20 positions; optional. |
|
The following fields are used to establish a connection to the PayPal system when using the PayPal Direct Connection Integration. |
|
|
API User name |
The user name, provided by PayPal, used to establish a direct connection to the PayPal system during deposit processing. Note: You can enter upper and lower case letters in this field. Alphanumeric, 64 positions; optional. |
|
API Password |
The password, provided by PayPal, used to establish a direct connection to the PayPal system during deposit processing. Note: You can enter upper and lower case letters in this field. Alphanumeric, 64 positions; optional. |
|
API Signature |
The encrypted signature, provided by PayPal, used to establish a direct connection to the PayPal system during deposit processing. Note: You can enter upper and lower case letters in this field. Alphanumeric, 128 positions; optional. |
Defining Authorization Service Currencies
Purpose: Use the Work with Authorization Currency function to set up cross references between the currency codes you use in Order Management System and the service bureau's codes. The system uses these cross references to determine which currency code to pass to the service bureau when authorizing credit cards and processing deposits.
In this topic:
Work with Authorization Service Currency Screen
How to display this screen: Select Currency for the authorization service at the Work with Authorization Services Screen.
| Field | Description |
|---|---|
|
Authorization service |
The service to use the cross references. The service you selected at the Work with Authorization Services Screen displays. Code: alphanumeric, 3 positions; display-only. Description: alphanumeric, 30 positions; display-only. |
|
Currency |
The code identifying a type of currency in Order Management System. Currency codes are defined in and validated against the Currency table; see Working with Currency (WCUR). Alphanumeric, 3 positions; optional. |
|
Authorization Service Currency |
The related currency code used by the authorization service. Alphanumeric, 3 positions; optional. |
| Select Option | Procedure |
|---|---|
|
Change an authorization service currency code cross reference |
Select Change for a currency code to advance to the Change Authorization Service Currency Screen. At this screen you can change only the authorization service currency code. See the Create Authorization Service Currency Screen for field descriptions. |
|
Delete an authorization service currency code |
Select Delete for a currency code to delete it. |
|
Display an authorization service currency code cross reference |
Select Display for a currency code to advance to the Display Authorization Service Currency Screen. You cannot change any information at this screen. See the Create Authorization Service Currency Screen for field descriptions. |
|
Create an authorization service currency code cross reference |
Select Create to advance to the Create Authorization Service Currency Screen. |
Create Authorization Service Currency Screen
Purpose: Use this screen to define an equivalency between a currency code in your company and a currency code used by the service bureau.
How to display this screen: Select Create at the Work with Authorization Service Currency Screen.
| Field | Description |
|---|---|
|
Authorization service |
The service bureau to use the cross references. The service bureau you selected at the Work with Authorization Services Screen displays. Code: alphanumeric, 3 positions; display-only. Description: alphanumeric, 30 positions; display-only. |
|
Currency |
The code identifying a type of currency in your company. Currency codes are defined in and validated against the Currency table; see Working with Currency (WCUR). Alphanumeric, 3 positions. Create screen: optional. Change screen: display-only. |
|
Authorization service currency |
The related currency code used by the service bureau. Alphanumeric, 3 positions; optional. |
Performing Online Credit Card Authorizations
Overview: Online credit card authorization allows you to send and receive the information required to authorize a credit card when the order is placed instead of when the pick slip is generated for the order.
Quotes: If the Online Authorization field for a quote order type is selected, the system performs online authorization during quote entry; see Entering Pre-Order Quotes for an overview.
In this topic: This topic provides an overview of the online credit card authorization process and the required setup.
Receiving a Credit Card Authorization During Order Entry
The system performs online authorization when you select Accept to accept an order after determining if the order should go on hold due to the credit card payment method. Note that online authorization can still take place if the order is on hold for another reason, provided the order is eligible.
Generic order interface: If you receive orders through the Generic Order Interface (Order API), the system performs online authorization after determining if the order should go on hold and performing credit card tokenization; see Performing Online Credit Card Authorization on Web Orders.
For more information see the Web Services Guide on My Oracle Support (ID 2149144.1).
Batch order entry: If you are using batch order entry, the system performs online authorization when you accept a batch at the Work with Error Orders Batches Screen or Select Customer Sold To For Order Screen.
Order maintenance: The system performs online authorization when you select Auth On-Line for a credit card payment on the Enter Payment Methods Screen.
When you convert a quote to an order in order maintenance, the system will perform online authorization for eligible payment methods only if the Authorize Full Amount During Order Entry (G99) system control value is selected; see Converting Quotes to Orders.
-
the On-line Authorizations (B89) system control value must be selected.
-
the order type defined for the order must be eligible for online authorizations (the On-line authorization field is set to Window (on-line eligible and display window) or Without Window (on-line eligible and do not display window).
-
the order must have a credit card, stored value card, or debit (Switch) card payment method.
-
the order must be in an open or suspended status. Note: You can authorize a credit card payment during order maintenance when the order is on hold; regardless of whether the payment is authorized, the order remains on hold.
-
the arrival date on the order cannot be greater than the current date.
Express bill orders: When you enter a credit card payment method on an express bill order, you must manually authorize the card or the order must be eligible for online authorization. However, since you cannot enter the Authorization Request ID at this screen, Oracle recommends that you instead use the Add Authorization option from the Order Summary page in Modern View to apply a manual authorization.
See Online Credit Card Authorization Setup for more information on setting up the required values for online authorization.
2. The system determines the amount to authorize.
What Credit Card Amount is Sent for Authorization?
-
If the Online Auth Verification Only (I96) system control value is selected, the system processes online authorizations for $1.00 for the purpose of validating the card. During batch authorizations, the system authorizes the card for the shippable dollar amount and voids the online authorization for $1.00.
-
If the Online Auth Verification Only (I96) system control value is unselected, the system looks at the setting of the Authorize Full Amount During Order Entry (G99) system control value to determine the amount sent for authorization.
The Authorize Full Amount During Order Entry (G99) system control value determines if the credit card is authorized for the full order amount or for the shippable amount on the order.
| Authorize full amount... | Authorize shippable amount... |
|---|---|
|
The system sends the entire dollar amount defined for the credit card for authorization. If the credit card is the only payment method... The amount to authorize is the order total. The order total is the sum of all charges on the order, including: merchandise, freight, additional freight, tax, handling, additional charges, GST and PST. |
The system sends the dollar amount associated with what is shippable on the order, across all ship to customers, for authorization. If the credit card is the only payment method... This shippable dollar amount includes:
Note: The system sends the total freight and total additional freight for authorization, regardless of whether you are prorating freight charges (the Prorate Freight Charges (D39) system control value is selected). |
|
If the credit card is the catch-all payment method... The amount to authorize is the remaining dollar amount not associated with another payment method on the order. The system subtracts the amount applied to any other payment methods from the order total. order total - dollar amount associated with other payment methods = amount to authorize for this credit card |
If the credit card is the catch-all payment method... The amount to authorize is the remaining shippable dollar amount not associated with another payment method on the order. The system subtracts the amount applied to any other payment methods from the shippable dollar amount. shippable dollar amount - dollar amount associated with other payment methods = amount to authorize for this credit card Excluded from authorizations:
|
Excluded from authorizations:
-
order lines with a future arrival date
-
order lines on backorder, canceled, closed, or sold out
-
reserved order lines that are coordinate grouped with an order line on backorder or with an order line with a future arrival date
Regardless of whether you are authorizing the full amount or the shippable amount...
Included in authorizations:
-
express bill order lines
-
drop ship order lines
-
non-inventory order lines
Deferred Billing
If the credit card on the order is associated with a deferred pay plan, the system:
-
sends an authorization for $1.00 if the Authorize full amount field for the pay plan is unselected.
-
sends an authorization for the dollar amount available for authorization if the Authorize full amount field for the pay plan is selected.
Installment Billing
If the credit card on the order is associated with an installment pay plan, the system:
-
sends an authorization for the first installment amount if the Authorize full amount field for the pay plan is unselected.
-
sends an authorization for the dollar amount available for authorization if the Authorize full amount field for the pay plan is selected.
If more than one credit card is sent for authorization:
The system sends for authorization the credit card defined with a dollar amount, then sends the catch-all credit card for authorization.
Credit cards requiring authorizations less than $1.00: If the credit card amount to authorize is less than $1.00 and you have defined an authorization number in the Authorization Number for Authorizations Under $1.00 (I08) system control value, the system does not send the credit card to the service bureau for authorization and instead assigns the authorization number from the system control value to the credit card. If an authorization number is not defined in this system control value, the system sends the credit card to the service bureau for authorization, regardless of the amount that requires authorization.
3. The system sends the authorization amount to the service bureau. If there is an amount to authorize for the credit card, the system sends an authorization request in online format to the service bureau.
See Processing Authorizations and Deposits using an Integration Layer Process for more information on communicating with a service bureau via an integration layer process and see Processing Authorizations and Deposits Using Point-to-Point Communication for more information on communicating with a service bureau directly.
4. The service bureau sends back a response. The service bureau sends an authorization response to Order Management System.
There are 3 types of responses you can receive from the service bureau.
-
R = an authorization response is received, such as declined or approved
-
T = the program timed out before an authorization response was received
-
U = an undefined response
Additionally, if an authorization response is received, the service bureau sends back an authorization response code, AVS response code (if performing address verification), CID response code (if performing credit card identification verification), authorization code, and date.
Vendor response settings: If a pop up window message has been defined for the vendor response received, the system displays the Select Authorization Response Option Window. Also, if a hold reason code has been defined for the vendor response received, the system places the order on hold.
Oracle Retail Customer Engagement stored value cards: When using the Customer Engagement Stored Value Card Integration, if the Oracle Retail Customer Engagement stored value card is the only payment on the order and the amount authorized for the card is less than the order total, Order Management System updates the amount for the card with the amount authorized and displays the message Insufficient balance on card - please add another payment. In order to accept the order, you must add another payment to the order to cover the amount of the order that is not covered by the Oracle Retail Customer Engagement stored value card. Example: If the order total is 500.00 and the amount authorized for the Oracle Retail Customer Engagement stored value card is 236.20, the system updates the amount for the card to 236.20 and requires another form of payment to cover the remaining 289.55 balance on the order.
Hierarchy for Placing the Credit Card On Hold
The credit card pay type may be placed on hold if the credit card is not approved, the AVS verification fails, or the CID verification fails.
The system uses this hierarchy to determine if the credit card pay type should go on hold:
-
Authorization response has a hold reason defined: If the credit card charge is declined (not authorized), the credit card may be placed on hold (based on the value in the Hold reason field in the Vendor Response table). The order header is also placed on AT (declined credit card) hold. You must take the order header and credit card pay type off of hold through the Release Held Orders (ERHO) menu option and resend for authorization or cancel the order.
-
AVS response has a hold reason defined: If the credit card charge is approved (authorized) but the credit card fails the address verification check, the authorization may be placed on hold (based on the value in the Hold reason field in the Vendor Response table). The order header is also placed on AT (declined credit card) hold. You must contact the customer and obtain correct address information, then take the order header and credit card pay type off of hold through the Release Held Orders (ERHO) menu option and resend for authorization or cancel the order.
-
Card security identification response has a hold reason defined: If the credit card charge is approved (authorized) and passes the address verification check, but the credit card fails the credit card security identification check, the credit card pay type may be placed on hold (based on the value in the Hold reason field in the Vendor Response table). The order header is also placed on AT (declined credit card) hold. You must contact the customer to verify credit card ownership, then take the order header and credit card pay type off of hold through the Release Held Orders (ERHO) menu option and resend for authorization or cancel the order.
For more information: See Defining Vendor Response Codes and Establishing Cancel Reason Codes (WCNR).
What Happens When a Credit Card is Approved?
When a credit card is approved during order entry, the system:
- Select Authorization Response Option Window
-
places the order on hold if a hold reason code has been defined for the vendor response. Typically, if an authorization is approved, the order is not placed on hold. However, if the credit card is approved but fails address verification or card identification verification, you may want to place the order on hold.
-
once you accept the order, you return to the Select Customer Sold To For Order Screen, or the Customer Selection Screen if you are a CTI user.
-
processes any end-of-order updates and sends the order to the Order Async.
-
creates a record in the On-Line Authorization table indicating the order number, that the credit card has been approved, the dollar amount authorized, the transaction sequence number, and the authorization number. The status for this authorization is *UPDT, indicating the online authorization has completed.
-
creates a record in the Authorization History table indicating the credit card has been approved, the authorization number, the date the credit card was authorized, and the dollar amount authorized. If you reject an order after the credit card has been approved, the system removes the record in the Authorization History table. You can review authorization history at the Display Authorization History Screen.
-
creates a record in the Void Authorization table indicating the order number and the dollar amount eligible for void. If you reject an order after the credit card has been approved, the system removes the record from the Void Authorization table.
AVS response: If the credit card charge is approved (authorized) but the order fails the address verification check and receives an AVS response that has a hold reason code, the system:
-
places the order on AT hold.
-
places the credit card payment method on the order on AV (AVS) hold.
-
creates an order transaction history message indicating the credit card was declined: SYS HLD - DECLINED CREDIT CARD.
-
updates the record in the On-Line Authorization table indicating the credit card failed AVS. The OLA AVS result field is updated with the AVS response received from the service bureau. You can review the response at the Authorization History Details Window.
-
updates the record in the Authorization History table indicating the credit card failed AVS. The AUH status field is updated to O (authorized but not used) and the AVS response field is updated with the AVS response received from the service bureau. You can review the status of the credit card and the AVS response at the Authorization History Details Window.
You must contact the customer and obtain correct address information, then take the order off of hold through the Release Held Orders function and resend for authorization.
If the authorization has not yet expired and the transaction passes AVS, the system updates the credit card authorization record from an O (authorized but not used) status to an A (approved) status. If the authorization has expired, the system updates the credit card authorization record from an O (authorized but not used) status to a D (declined) status and resends the credit card for authorization and address verification.
Note:
The system only performs address verification if the Address verification field for the service bureau is selected; see Address Verification Service (AVS).
Card security identification response: If the credit card charge is approved (authorized) but the order fails the credit card security check and receives a card security identification response (CID, CVV2, CVC2) that has a hold reason code, the system:
-
places the order on AT hold.
-
places the credit card payment method on the order on CF (credit card fraud) hold.
-
creates an order transaction history message indicating the credit card was declined: SYS HLD - DECLINED CREDIT CARD.
-
updates the record in the On-Line Authorization table indicating the credit card failed card security. The OLA vendor response 2 field is updated with the card security response received from the service bureau. You can review the response at the Authorization History Details Window.
-
updates the record in the Authorization History table indicating the credit card failed card security. The AUH status field is updated to O (authorized but not used) and the Vendor response 2 field is updated with the card security response received from the service bureau. You can review the status of the credit card and the card security response at the Authorization History Details Window.
You must contact the customer to verify credit card ownership, then take the order off of hold through the Release Held Orders (ERHO) menu option and resend for authorization.
If the authorization has not yet expired and the transaction passes card security identification, the system updates the credit card authorization record from an O (authorized but not used) status to an A (approved) status. If the authorization has expired, the system updates the credit card authorization record from an O (authorized but not used) status to a D (declined) status and resends the credit card for authorization and card security identification.
Note:
The system only performs credit card security identification if the card security presence and optionally card security value are included in the authorization transaction passed to the service bureau; see Credit Card Security Service (CID, CVV2, CVC2).
Voiding an online authorization: After receiving an online authorization, if you change the price of an item in Order Maintenance, the stem voids the authorization. Because the authorization is voided, the system sends the order for batch authorization during pick slip generation.
What Happens When a Credit Card is Declined?
When a credit card is declined during order entry, the system:
-
displays the Select Authorization Response Option Window if a vendor response pop up window message has been defined, the On-line authorization field for the order type is set to Window (on-line eligible and display window), and a Response time is defined for the service bureau. The message should indicate the credit card has been declined and any action you should take to correct the decline or inform the customer. From this window, you can accept the order or return to the order to make any corrections.
-
places the order on hold: If a hold reason code is defined for the vendor response, the system assigns this hold reason code to the order payment method and places the order header on AT (Declined Credit Card) hold. If the response received is not defined for the service bureau, the system places the order payment method on AV (Invalid Response Code) hold.
-
once you accept the order you return to the Select Customer Sold To For Order Screen, or the Customer Selection Screen if you are a CTI user.
-
processes any end-of-order updates and sends the order to the Order Async.
-
creates a record in the On-Line Authorization table indicating the order number, that the credit card has been declined, the dollar amount submitted for authorization, and the transaction sequence number. The status of this authorization is *UPDT, indicating the online authorization has been completed.
-
creates a record in the Authorization History table indicating the credit card has been declined, the reason why the credit card was declined, the date the credit card was declined, and the dollar amount submitted for authorization. If you reject the order after the credit card has been declined, the system removes the record from the Authorization History table. You can review authorization history at the Display Authorization History Screen.
You can send the credit card up for authorization again during order maintenance, using the Performing Batch Authorization (SATH) menu option, or during pick slip generation if the Batch/on-line field for the service bureau contains a C (on-line and batch authorizations).
When Communication Failures Occur
Communication failures can occur if the system times out before a response is received. If communication failures occur and you do not receive a response from the service bureau, the system:
-
does not display the Select Authorization Response Option Window since a vendor response was not received.
-
accepts the order and returns you to the Select Customer Sold To For Order Screen, or the Customer Selection Screen if you are a CTI user.
-
processes any end-of-order updates and sends the order to the Order Async.
-
creates a record in the On-Line Authorization table. The status of this authorization is:
-
RDY, indicating online authorization has not been performed.
-
SENT, indicating the online authorization transmission failed after the credit card was sent to the service bureau for authorization.
-
RCVD, indicating the online authorization transmission failed after a response was received from the service bureau, but final updates could not be completed. This may occur if the Online Authorization integration job became inactive. The authorization does not complete processing until the job is active. Once the Online Authorization integration job is active, the system updates the status of the authorization to *UPDT.
-
creates a record in the Authorization History table indicating the credit card is waiting for authorization, the date the credit card was sent for authorization, and the dollar amount waiting for authorization.
The amount of time the system waits for an authorization is defined in the Response time field for the service bureau.
Grace period: The system allows a 2 day grace period to receive a response from the service bureau if the status of the authorization is *RDY, *SENT, or *RCVD. To determine the grace period, the system takes the current date - the authorization sent date to determine the number of days. Once the 2 day grace period is passed, the system declines the transmission. You will need to resend the credit card for authorization during order maintenance or pick slip generation.
What Happens When an Undefined Response is Returned?
When an undefined response is returned, the system:
-
does not display the Select Authorization Response Option Window since this vendor response has not been defined for the service bureau.
-
places the order on AVS hold.
-
accepts the order and returns you to the Select Customer Sold To For Order Screen, or the Customer Selection Screen if you are a CTI user.
-
processes any end-of-order updates and sends the order to the Order Async.
-
creates a record in the On-Line Authorization table indicating the order number, that the credit card is waiting for authorization, the dollar amount waiting for authorization, and the transaction sequence number. The status of this authorization is *RDY, indicating online authorization has not been performed.
-
creates a record in the Authorization History table indicating the credit card is waiting for authorization, the date the credit card was sent for authorization, and the dollar amount waiting for authorization.
You can resend the order for authorization during order maintenance, using the Performing Batch Authorization (SATH) menu option, or during pick slip generation if the Batch/on-line field for the service bureau contains a C (on-line and batch authorizations).
Select Authorization Response Option Window
Use this window to review the response received from the service bureau and any messages defined for this vendor response.
Once you review the message, you can accept the order or return to the order to make any corrections or reject the order.
Typically, a vendor response pop up window message is defined for a vendor response indicating a declined authorization, declined address verification, or declined card identification verification.
How to display this screen: This window displays when you select Accept to accept an order in order entry if:
-
the dollar amount defined for the credit card payment method on the order was sent up for authorization and received a response, and
-
the On-line authorization field for the order type on the order is set to Window (on-line eligible and display window), and
-
a Response time is defined for the service bureau, and
-
the Pop up window messages field for the vendor response returned by the service bureau contains text.
Note:
The Pop up window messages # 1 field must contain text in order to display this window. If you define text in the Pop up window messages # 2 - # 4 fields and not in the Pop up window messages # 1 field, this window will not display.
This window displays for each credit card payment method on the order that is sent up for authorization and meets the criteria above.
What message displays? You can receive a response from the service bureau for the authorization, address verification (AVS), and credit card security identification (CID, CVV2, CVC2). If you receive a response for the authorization, AVS verification, and card security identification, the system uses the following hierarchy to determine the pop up window message that displays in the Select Authorization Response Option window:
-
Authorization response has a message defined: the message associated with the authorization response displays in the Select Authorization Response Option window.
-
AVS response has a message defined: if the authorization response does not have a message defined, the message associated with the AVS response displays in the Select Authorization Option window.
-
Card security identification response has a message defined: if the authorization response and AVS response do not have a message defined, the message associated with the card security response displays in the Select Authorization Option window.
Batch order entry: This window does not display if you are performing online credit card authorization during batch order entry.
Order maintenance: The Select Authorization Response Option window displays if you are performing online credit card authorization during order maintenance. You can authorize a credit card during order maintenance by selecting On-line Auth for a credit card payment method.
CyberSource Decision Manager Fraud Scoring: When the service bureau associated with the online authorization transaction is CyberSource and you are using CyberSource Decision Manager Fraud Scoring:
-
If the response code received from CyberSource is 400 Fraud Score Exceeds Threshold or 480 Review Fraud Scoring, the system places the order on FS Fraud Scoring Hold so that the order can be reviewed for possible fraud.
-
If the response code received from CyberSource is 481 Rejected by Decision Manager, the system deactivates the payment method on the order and requires you to enter another form of payment before you can accept the order.
See CyberSource Decision Manager Fraud Scoring for more information.
| Field | Description |
|---|---|
|
Order # |
The order number containing the credit card payment method that received this authorization response. Numeric, 8 positions; display-only. |
|
Pay type |
The description of the credit card payment method that received the authorization response containing this message text. Alphanumeric, 30 positions; display-only. |
|
Credit card # |
The credit card number defined for the credit card payment method used on the order. If you use credit card tokenization, this number may be a token rather than the actual credit card number. Masking: If you do not have authority to the Display Full Credit Card Number (B14) secured feature, the credit card number displays in the format specified at the Credit Card Number Layout Screen for the associated pay type. For example, ************1111 may display instead of the entire credit card number. See Credit Card Number Format for an overview. See the Data Security and Encryption Guide on My Oracle Support (1988467.1) for more information. Alphanumeric, 20 positions; display-only. |
|
Exp date (credit card expiration date) |
The date this credit card is no longer valid. Numeric, 4 positions (MMYY format); display-only. |
|
Auth amt |
The amount sent for authorization for this credit card. If this credit card was the catch all payment method on the order or the only payment method on the order, this field is blank. Numeric, 13 positions with a 2-place decimal; display-only. |
|
Vendor response pop up window messages # 1 - # 4 |
The message text from the Pop up window messages # 1 - # 4 fields for the vendor response you received from the service bureau. This message text should indicate whether the credit card has been approved or declined and any action that you should take to correct any problems and inform the customer. Alphanumeric, four 40-position fields; display-only. |
| Screen Option | Procedure |
|---|---|
|
Accept the order |
Select Accept Order. The system returns you to the Select Customer Sold To For Order Screen or the Customer Selection Screen if the operator placing the order is a CTI user, and processes the order through the Order Async. Note: If the response code received from CyberSource is 481 Rejected by Decision Manager, the system returns you to the Work with Order/Recap Screen or the Enter Payment Method Screen where you can add another form of payment; see CyberSource Decision Manager Fraud Scoring. |
|
Return to the order to make any corrections or reject the order |
Select Edit Order. The system returns you to the Work with Order/Recap Screen or the Enter Payment Method Screen where you can make any corrections or reject the order. |
Resending Credit Cards for Authorization
If you did not receive a response from the service bureau during order entry or the credit card was declined in order entry, you can resend the credit card for authorization:
-
selecting On-line Auth for the credit card at the Enter Payment Methods Screen in Order Maintenance in order maintenance. The system sends the credit card for authorization, waits for a response as in order entry, and displays the Select Authorization Response Option Window if pop up window message text was defined for the vendor response.
-
using the Performing Batch Authorization (SATH) menu option. This menu option allows you to send credit cards associated with a selected ship via for authorization.
-
during pick slip generation if the Batch/on-line field for the service bureau contains a C (on-line and batch authorizations).
Pick Slip Generation
You can generate pick slips for orders that contain pre-paid payment methods, such as cash or check, and/or credit cards that have received an approved authorization by selecting the Preauthorized orders only field in the pick generation template.
If you try to generate pick slips for orders that contain credit cards that have not been authorized with the Preauthorized orders only field selected and the Use Auto Authorization Interface (C14) system control value selected, the system will not send the credit cards up for authorization and will not generate pick slips.
Note:
If you generate pick slips for preauthorized orders only and records exist in the Authorization History table in an S (sent) status, the system updates the records to a D (decline) status. The next time you generate pick slips with the Preauthorized orders only field unselected, the system sends orders associated with records in the Authorization History table in a D status up for authorization.
Receiving authorizations during pick slip generation: If the credit card has not yet received an approved authorization, you can resend the credit card for authorization during pick slip generation if the Preauthorized orders only field in the pick generation template is unselected and the Batch/on-line field for the service bureau is set to C (batch and on-line authorization). See Authorizations During Pick Slip Generation for more information on receiving authorizations during pick slip generation.
Credit Card Authorization List
The Online Credit Card Authorization Listing is a report you can use to review credit cards that have been authorized, declined, or sent for authorization for a specific date range.
You can generate this report by:
-
defining selection criteria at the and selecting Accept.
-
sending credit cards for authorization using the Performing Batch Authorization (SATH) menu option.
Note:
The system generates a similar report when you authorize credit cards during pick slip generation; see Online Credit Card Authorization Listing.
Transmitting and Receiving Deposits
After you obtain an authorization for a credit card charge, you can generate a pick slip for the order, ship the order to the customer, and charge the credit card for the shipment. At this point, you use Processing Auto Deposits (SDEP) to transmit the deposit information to a deposit service for settlement.
Online Authorization Process

Online Credit Card Authorization Setup
Purpose: Before you can receive online credit card authorizations in your company, you must perform the necessary setup. Information requiring creation and setup includes:
-
Service Bureau Settings, including response codes and currency codes
-
Order Types eligible for online credit card authorization
-
credit card Pay Types
- Pick Slip Generation
System Control Values
| System Control Value | Description |
|---|---|
|
On-line Authorizations (B89) |
Select this field to indicate you will be performing online credit card authorizations. If this field is unselected, you will not be able to authorize credit cards in order entry or order maintenance. |
|
Authorize Full Amount During Order Entry (G99) |
Select this field to indicate you will send an order up for authorization for the full order amount. Deselect this field to indicate you will send an order up for authorization for the shippable order amount. |
|
Online Auth Verification Only (I96) |
Select this field to indicate you want the system to process online authorizations for $1.00 for the purpose of validating the card. During batch authorizations, the system authorizes the card for the shippable dollar amount and voids the online authorization for $1.00. If this field is unselected, the system looks at the Authorize Full Amount During Order Entry (G99) system control value to determine the amount sent for authorization. |
See Authorization/Deposit Setup for additional system control values related to authorization
Number Assignment Value
The number assignment Transaction Sequence # assigns the next available number to the credit card authorization.
Service Bureau Settings
-
When you are setting up a service bureau to support online authorization, please note these required settings:
-
Industry code: enter your DBA number.
-
Batch/on-line: set to I (on-line) to perform only online credit card authorizations; set to C (on-line or batch) to perform both online credit card authorizations and batch credit card authorizations.
-
Response time: set the number of seconds the system waits to receive a response from the service bureau before continuing to process the order.
-
Pay type cross reference (Paytypes at the Work with Authorization Services Screen): Create a cross-reference for each pay type code for which you wish to receive online credit card authorization, using the vendor pay code information supplied by the service bureau.
-
Currency cross reference (Currency at the Work with Authorization Services Screen): Create a cross-reference for each currency code you will use on orders receiving online credit card authorizations, using the vendor currency code information supplied by the service bureau.
-
Vendor responses (Responses at the Work with Authorization Services Screen): Optionally, you can define Vendor response pop up window messages. The messages display in a pop up window in order entry when a credit card that was sent up for authorization is declined. You can enter up to four 40-position lines of message text. Set up vendor responses for authorizations, AVS (if you are performing address verification), and CID (if you are performing credit card identification).
Order Types
You define whether an order type is eligible for online authorizations and if the order type will display a window during order entry when a response is received from the service bureau, based on the On-line authorization field:
-
Window indicates the order type is eligible for online authorizations and the Select Authorization Response Option Window displays.
-
Without Window indicates the order type is eligible for online authorization and the Select Authorization Response Option Window does not display.
-
Not Eligible indicates the order type is not eligible for online authorization.
Online authorization for web orders: In order to perform online authorization when Order Management System receives the web order through the Generic Order Interface (Order API), the Online Authorization setting for the order type on the web order must be set to Without Window.
For more information see the Web Services Guide on My Oracle Support (ID 2149144.1).
Pay Types
Each credit card pay type eligible for online authorization should have the service bureau set up as its authorization and deposit service. See Working with Pay Types (WPAY) for more information on setting up pay types.
Pick Slip Generation
If you wish to generate pick slips only for orders that contain pre-paid payment methods and/or credit cards that have received an authorization, you can create a pick slip generation template with the Preauthorized orders only field selected.
Processing Authorizations and Deposits using an Integration Layer Process
Overview: Processing authorizations and deposits using an integration layer process allows you to send an Authorization Request XML Message (CWAuthorizationRequest) or Deposit Request XML Message (CWDepositRequest) to the service bureau via an integration layer process in Working with Integration Layer Processes (IJCT).
Note:
Order Management System does not currently support any base integration using an integration layer job and the Authorization Request XML Message (CWAuthorizationRequest) or Deposit Request XML Message (CWDepositRequest). Please contact your Order Management System representative if you wish to create a custom integration using these messages.
In this topic:
Authorization and Deposit XML Messages
Authorization Request XML Message (CWAuthorizationRequest)
")
The Authorization Request XML message is used to send the following information to the an external system when the Communication type field for the service bureau is Integration Layer:
-
authorizations (online and batch) for credit cards, stored value cards transactions, and debit (Switch) cards
-
register token for credit cards (see Credit Card Tokenization in the Data Security and Encryption Guide) For more information see the Web Services Guide on https://support.oracle.com My Oracle Support (ID 2149144.1).
-
stored value card activations (see Activating a Stored Value Card for additional information)
-
stored value card balance inquiries (see Stored Value Card Balance Inquiry (MSVB) for additional information)
-
stored value card authorization reversals (see Stored Value Card Authorization Reversal for additional information)
The Mode attribute in this message indicates if the request is in online format or batch format.
-
Online format: An Authorization Request message in online format sends one message to the service bureau for processing. This one message contains all of the information required to process an online transaction.
-
Batch format: An Authorization Request message in batch format sends multiple message types to the service bureau for processing. These messages contain the information required to process a batch of transactions.
Note:
The Order Management System does not currently support any base integration using an integration layer job and the Authorization Request XML Message (CWAuthorizationRequest). Please contact your Order Management System representative if you wish to create a custom integration using this message.
| Attribute Name | Type | Length | Comments |
|---|---|---|---|
|
Message |
Online format: This element and its attributes is included in the Online message. Batch format: This element and its attributes display in the Header, Detail, Summary, Footer, Send, and Receive type messages. |
||
|
source |
alpha |
25 |
Identifies the source of the XML message. RDC indicates the message is from Order Management System. |
|
target |
alpha |
25 |
Identifies the target of the message. |
|
type |
alpha |
25 |
Identifies the type of information in the message. CWAuthorizationRequest indicates the message contains a card authorization request. |
|
resp_qmgr |
alpha |
48 |
Informational only. |
|
resp_q |
alpha |
48 |
Informational only. |
|
CWAuthorizationRequest |
Online format: This element and its attributes is included in the Online message. Batch format: This element and its attributes display in the Header, Detail, Summary, Footer, Send, and Receive type messages. |
||
|
mode |
alpha |
10 |
Indicates the mode of communication. Online indicates online format. Batch indicates batch format. |
|
type |
alpha |
10 |
Online format: This tag is not included in the Online message. Batch format: Indicates the type of message in the batch. Valid values: Header Detail Summary Footer Send Receive |
|
Service |
Online format: This element and its attributes is included in the Online message. Batch format: This element and its attributes display in the Header, Detail, Summary, Footer, Send, and Receive type messages. |
||
|
serviceID |
alpha |
3 |
Authorization service code. This is the ASV Auth service code field in the Authorization Service table. |
|
Merchant |
Online format: This element and its attributes is included in the Online message. Batch format: This element and its attributes display in the Header, Detail, Summary, Footer, Send, and Receive type messages. |
||
|
companyID |
numeric |
3 |
The company from where the authorization request was sent. This is the CMP Company field in the Authorization Service table. |
|
merchantID |
alpha |
20 |
The account number assigned by the service bureau to identify transmissions. The system uses the following hierarchy to determine the merchant ID number to send to the service bureau:
|
|
merchantSubID |
alpha |
10 |
The sub code required to sign on to the service bureau. This is the ASV Sub code field in the Authorization Service table. |
|
merchantName |
alpha |
20 |
The name of the service bureau. This is the ASV Charge description field in the Authorization Service table. |
|
merchantDivision |
numeric |
5 |
The merchant division defined by the service bureau. This is the ASE Merchant division field in the Authorization Service Ext table. |
|
chargeDescription |
alpha |
20 |
The name of the service bureau. This is the ASV Charge description field in the Authorization Service table. |
|
receivingCode |
alpha |
10 |
A code that identifies your company to the service bureau. This is the ASV Receiving code field in the Authorization Service table. |
|
startupInfo |
alpha |
10 |
Startup text that identifies your company to the service bureau. This is the ASV Start up info field in the Authorization Service table. |
|
signon |
alpha |
10 |
A code required to sign on to the service bureau. This is the ASV Signon field in the Authorization Service table. |
|
password |
alpha |
10 |
A password required by the service bureau. This is the ASV Password field in the Authorization Service table. |
|
presentersID |
alpha |
10 |
A code required to sign on to the service bureau. This is the ASV Presenter’s ID field in the Authorization Service table. |
|
pidPassword |
alpha |
10 |
A password required to sign on to the service bureau. This is the ASV PID password field in the Authorization Service table. |
|
submittersID |
alpha |
10 |
A code required to sign on to the service bureau. This is the ASV Submitter’s ID field in the Authorization Service table. |
|
sidPassword |
alpha |
10 |
A password required to sign on the service bureau. This is the ASV SID password field in the Authorization Service table. |
|
industryFormatCode |
alpha |
5 |
A code that is assigned by the authorization service to identify your company type (DBA number). This is the ASV Industry format code field in the Authorization Service table. |
|
addressVerfication Flag |
alpha |
3 |
Indicates whether the service bureau performs address verification to verify the customer’s address and card number. YES indicates the service bureau performs address verification. The system includes the bill to name and address in the authorization request. NO indicates the service bureau does not perform address verification. The system does not include the bill to name and address in the authorization request. This is the ASV Address verification field in the Authorization Service table. |
|
JCLstatements Not currently implemented. |
|||
|
count |
numeric |
2 |
From the Authorization Service JCL table. |
|
JCLstatement Not currently implemented. |
|||
|
id |
alpha |
2 |
From the JCL Seq # field and JCL Statement field in the Authorization Service JCL table. |
|
AuthRequest |
Online format: This element and its attributes is included in the Online message. Batch format: This element and its attributes is included in the Detail type message. |
||
|
companyID |
alpha |
3 |
The company from where the authorization request was sent. Online format: From the Company field in the On Line Authorization table. Batch format: From the CMP Company field in the CC Authorization Trans table. |
|
createDate |
numeric |
8 |
The date (in MMDDYYYY format) the authorization request was sent to the service bureau. |
|
orderType |
alpha |
8 |
Indicates the type of order, for example phone order or mail order, where the card requiring authorization is located. Mail = Mail order. Phone = Telephone order. Internet = Web order. Order Management System:
Determines if the order type for the order matches the E-Commerce Order Type (G42) system control value. If the order type matches, the order is a web order.
|
|
transactionType |
alpha |
10 |
Indicates if the transaction is a debit or credit. Debit indicates card sale. Credit indicates card credit/return. |
|
storeLocation |
alpha |
10 |
This is a future-use value. |
|
terminalID |
numeric |
15 |
Online format: From the OLA terminal # field in the On Line Authorization table; informational only. Batch format: This attribute does not display for batch authorizations. |
|
merchantReference |
numeric |
20 |
A unique number made up of the Order Management System company code + order number + order payment method sequence number + authorization sequence number. For stored value card activations, this is the company code + order number; the payment method sequence number and authorization sequence number are zero-filled. For stored value card balance inquiries, this is the company code + local workstation job number. Online format: From the Company, Order#, OPM Seq #, OLA Seq # fields in the OnLine Authorization table. Batch format: From the CMP Company, Order #, OPM Seq #, and AUH Seq # fields in the CC Authorization Trans table. |
|
transactionSeq Number |
numeric |
15 |
Online format: The online authorization transaction sequence number. From the OLA Trans seq # field in the OnLine Authorization table. Batch format: 000000000000000 defaults for batch transactions. |
|
orderID |
numeric |
8 |
The order number where the credit card payment method that requires authorization is located. Online format: From the Order # field in the OnLine Authorization table. Batch format: From the Order # field in the CC Authorization Trans table. For stored value card activations, from the Order # field in the Stored Value Card table. For stored value card reversals, from the Order # field in the Auth History SVC Reversal table. |
|
paymentID |
numeric |
2 |
The order payment method sequence number for this credit card payment method on the order. Online format: From the OPM Seq # field in the OnLine Authorization table. Batch format: From the OPM Seq # field in the CC Authorization Trans table. |
|
authID |
numeric |
3 |
The authorization sequence number for the credit card authorization request. Online format: From the OLA Seq # field in the OnLine Authorization table. Batch format: From the AUH Seq # field in the CC Authorization table. |
|
payCategory |
numeric |
15 |
A description of the pay category associated with the credit card authorization request. Credit card displays, indicating the credit card is associated with the credit card pay category. This is the description associated with the Pay category field defined for the credit card pay type in the Pay Type table. |
|
vendorPayment Method |
alpha |
5 |
The vendor paytype code associated with the credit card authorization request; this is the code the authorization service uses to identify a method of payment. SV displays for stored value card activations and reversals. From the CPC vendor paytype/code field defined for the credit card pay type in the CC Paytype Cross Ref table. |
|
cardType |
alpha |
10 |
Indicates the type of card being processed. Valid values: Credit card Stored Value Card Debit card |
|
actionCode |
alpha |
10 |
Indicates the action to take against the card being processed. Valid values: Activation = Stored value card activation. Balance = Stored value card balance inquiry. Authorization = Credit card, debit card, or stored value card authorization. Reversal = Stored value card authorization reversal. ReqToken = Register token; see Credit Card Tokenization in the Data Security and Encryption Guide on My Oracle Support (1988467.1). |
|
startDate |
numeric |
4 |
The start date of the debit card being processed, in MMYY format. From the Start date field in the Order Payment Method table. |
|
issueNumber |
alpha |
2 |
The card issue number of the debit card being processed. From the OPM card issue # field in the Order Payment Method table. |
|
ccAccountNumber |
alpha |
20 |
The card number for the credit card payment method requesting authorization. From the OPM credit card number field defined for the credit card payment in the Order Payment Method table. If you use credit card encryption, the system decrypts the credit card number before sending it to the service bureau. See the Data Security and Encryption Guide on My Oracle Support (1988467.1) for an overview. If you use credit card tokenization, the setting of the tokenized tag defines whether the number in the ccAccountNumber tag is the actual credit card number or a token provided by an external tokenization service. |
|
expirationDate |
numeric |
4 |
The date the card requesting authorization expires. From the OPM expiration date field defined for the card in the Order Payment Method table. |
|
authAmountText |
numeric |
10.2 |
The transaction amount, including decimals. Note: Stored value cards are only allowed in US currency. In addition, stored value card balance inquiries, do not pass an amount. Online format: From the OLA auth amt field in the OnLine Authorization table. Batch format: From the Auth $ amt field in the CC Authorization Trans table. |
|
authAmount |
numeric |
10 |
The transaction amount, with implied decimals. Note: Stored value cards are only allowed in US currency. In addition, stored value card balance inquiries, do not pass an amount. Online format: From the OLA auth amt field in the OnLine Authorization table. Batch format: From the Auth $ amt field in the CC Authorization Trans table. For stored value card activations, from the Issue amount field in the Stored Value Card table. For stored value card reversals, from the Reversal amount field in the Auth History SVC Reversal table. |
|
currencyCode |
alpha |
3 |
The currency code used by the service bureau to define a currency. From the CUR currency code field in the Auth Service Currency table. |
|
CIDNumber |
numeric |
4 |
Credit Cards The card identification number defined for the card. Visa: If the number is 3 positions, the number is left-justified and blank filled. Diners Club: If the number is 3 positions, the system sends a leading space. Discover: If the number is 3 positions, the number is left-justified and blank filled. MasterCard: If the number is 3 positions, the number is left-justified and blank filled. American Express: If the number is 3 positions, the system sends a leading zero. From the OPM card security value field defined for the credit card payment method in the Order Payment Method table. Note: The card identification number is only available for online authorizations; once an order is accepted, the system removes the card identification number from the order, even if the order has not received an approved online authorization. Stored Value Cards The ID number assigned to the stored value card. Included only if an ID number is assigned to the card and a CID number does not exist. For activations, from the SVC ID # field in the Stored Value Card table. For authorizations, from the OPM SVC ID Storage field defined for the stored value card payment in the Order Payment Method table. |
|
CIDIndicator |
alpha |
1 |
The card identification indicator defined for the card, indicating if a CID number has been defined. Valid values: 1 = CID number is present on card. 2 = CID number is present on card, but is illegible. 9 = CID number is not present on card. From the OPM card security presence field defined for the credit card payment method in the Order Payment Method table. |
|
issuingBank |
alpha |
10 |
From the Issuing bank field defined for the payment method in the Order Payment Method table; this is a future-use value. |
|
checkAccountNumber |
alpha |
20 |
From the OPM Checking account field defined for the payment method in the Order Payment Method table; this is a future-use value. |
|
checkNumber |
numeric |
9 |
From the OPM Check number field defined for the payment method in the Order Payment Method table; this is a future-use value. |
|
routingNumber |
numeric |
9 |
From the OPM Routing number field defined for the payment method in the Order Payment Method table; this is a future-use value. |
|
ecommerceIndicator |
alpha |
3 |
Represents either:
From the Ecomm Indic field in the Order Payment Method table. If this value is blank, from the E-Commerce indicator (Future use status 1) field in the Order Header table. |
|
authentication_value |
alpha |
40 |
A code received from an authentication service, such as Visa’s Verified by Visa program or MasterCard’s SecureCode program, indicating whether the card authentication password the cardholder provided was approved for the credit card. See Credit Card Authentication Service for more information. Updates the Authentication value field in the Order Payment Method table. |
|
Note: The system includes the following bill to information only if the Address verification field for the authorization service is selected. |
|||
|
firstName |
alpha |
15 |
The first name of the bill to customer defined for the card requesting authorization. This is the:
|
|
initial |
alpha |
1 |
The middle initial of the bill to customer defined for the card requesting authorization. This is the:
|
|
lastName |
alpha |
25 |
The last name of the bill to customer defined for the card requesting authorization. This is the:
|
|
companyName |
alpha |
30 |
The company name of the bill to customer defined for the card requesting authorization. This is the:
|
|
suffix |
alpha |
3 |
The suffix of the bill to customer defined for the card requesting authorization. This is the:
|
|
addressLine1 |
alpha |
32 |
The street address of the bill to customer defined for the card requesting authorization. This is the:
|
|
addressLine2 |
alpha |
32 |
The second address line of the bill to customer defined for the card requesting authorization. This is the:
|
|
addressLine3 |
alpha |
32 |
The third address line of the bill to customer defined for the card requesting authorization. This is the:
|
|
addressLine4 |
alpha |
32 |
The fourth address line of the bill to customer defined for the card requesting authorization. This is the:
|
|
apartment |
alpha |
10 |
The apartment for the address of the bill to customer defined for the card requesting authorization. This is the:
|
|
city |
alpha |
25 |
The city for the address of the bill to customer defined for the card requesting authorization. This is the:
|
|
state |
alpha |
2 |
The state for the address of the bill to customer defined for the card requesting authorization. This is the:
|
|
zip |
alpha |
10 |
The zip code for the address of the bill to customer defined for the card requesting authorization. This is the:
|
|
country |
alpha |
3 |
The country code for the address of the bill to customer defined for the card requesting authorization. This is the:
|
|
phoneType |
alpha |
12 |
Indicates the type of phone number (such as work or home) for the bill to customer defined for the card requesting authorization. This is a description of the:
|
|
phoneNumber |
alpha |
14 |
The phone number of the bill to customer defined for the card requesting authorization. This is the:
|
|
shiptoFirstName |
alpha |
15 |
The first name of the ship to customer on the order. This is the:
|
|
shiptoInitial |
alpha |
1 |
The middle initial of the ship to customer on the order. This is the:
|
|
shiptoLastName |
alpha |
25 |
The last name of the ship to customer on the order. This is the:
|
|
shiptoCompanyName |
alpha |
30 |
The company of the ship to customer on the order. This is the:
|
|
shiptoSuffix |
alpha |
3 |
The suffix code of the ship to customer on the order. This is the:
|
|
shiptoAddressLine1 |
alpha |
32 |
The street address of the ship to customer on the order. This is the:
|
|
shiptoAddressLine2 |
alpha |
32 |
The second address line of the ship to customer on the order. This is the:
|
|
shiptoAddressLine3 |
alpha |
32 |
The third address line of the ship to customer on the order. This is the:
|
|
shiptoAddressLine4 |
alpha |
32 |
The fourth address line of the ship to customer on the order. This is the:
|
|
shiptoApartment |
alpha |
10 |
The apartment for the address of the ship to customer on the order. This is the:
|
|
shiptoCity |
alpha |
25 |
The city for the address of the ship to customer on the order. This is the:
|
|
shiptoState |
alpha |
2 |
The state for the address of the ship to customer on the order. This is the:
|
|
shiptoZip |
alpha |
10 |
The postal code for the address of the ship to customer on the order. This is the:
|
|
shiptoCountry |
alpha |
3 |
The country code for the address of the ship to customer on the order. This is the:
|
|
shiptoPhoneType |
alpha |
12 |
Indicates the type of phone number (such as work or home) for the ship to customer on the order. This is a description of the:
|
|
shiptoPhoneNumber |
alpha |
14 |
The phone number of the ship to customer on the order. This is the:
|
|
shiptoEmail |
alpha |
50 |
The e-mail address of the ship to customer on the order. This is the:
|
|
tcVersion |
numeric |
5 |
Not currently implemented. |
|
dateOfBirth |
numeric |
8 |
Not currently implemented. |
|
socialSecurityNbr |
numeric |
9 |
Not currently implemented. |
|
shippingCost |
numeric |
8 |
Not currently implemented. |
|
orderCreateTime |
numeric |
6 |
Not currently implemented. |
|
itemClass |
alpha |
3 |
Not currently implemented. |
|
lastOrderDate |
numeric |
8 |
Not currently implemented. |
|
activeSinceDate |
numeric |
8 |
The date when the customer first placed an order, in MMDDYYYY format. This is the COH active since date field in the Customer Sold To Ord Hist table. |
|
|
alpha |
50 |
The email address of the bill to customer defined for the credit card requesting authorization. This is the CST email address field defined for the sold to customer on the order in the Customer Sold To table. |
|
authCode |
alpha |
16 |
The authorization number used to authorize the card. This is the Auth # field defined for the stored value card pay type on the order in the Authorization History table. This field is populated only when performing a stored value card authorization reversal; see Stored Value Card Authorization Reversal. |
|
tokenized |
alpha |
1 |
Defines whether the number in the ccAccountNumber is the actual credit card number or a token received from the authorization service during the credit card tokenization process. Valid values: Y = The number in the ccAccountNumber is a token. N = The number in the ccAccountNumber is the actual credit card number. The authorization service will attempt to replace the credit card number with a token and return the token in the Authorization Response XML Message (CWAuthorizationResponse). From the Tokenized field in the Order Payment Method table. The system includes the tokenized tag only if the pay type is eligible for tokenization. To be eligible for tokenization the Request token field for the authorization service defined for the pay type must be selected and the Pay category for the pay type must be Credit Card with the Card type set to C Credit Card. Available in: 2.0 (Order Management System version 5.0). |
|
BatchInfo |
Online format: This element and its attributes is not included in the Online message. Batch format: This element and its attributes is included in the Summary, Footer, Send, and Receive type messages. |
||
|
fileType |
alpha |
4 |
Indicates the type of information in the request. Valid values: AUTH = Authorization request. BILL = Deposit. SVCA = Stored value card activation request. SVCB = Stored value card balance inquiry request. SVCR = Stored value card authorization reversal request. |
|
merchantFileTrace |
alpha |
16 |
The next available number from the Batch Auth File Trace Number number assignment value. Note: The Batch Auth File Trace Number cannot be greater than 3 positions. |
|
createDate |
numeric |
8 |
The date (in MMDDYYYY format) the authorization request was sent to the service bureau. |
|
debitAmount |
numeric |
11.2 |
The net sales amount for this batch of requests, with implied decimals. Included for the summary and footer batch messages. |
|
debitCount |
numeric |
9 |
The total count of sales records for this batch of authorization requests. Included for the summary and footer batch messages. |
|
creditAmount |
numeric |
11.2 |
The net refund amount for this batch of authorization requests, with implied decimals. Included for the summary and footer batch messages. |
|
creditCount |
numeric |
9 |
The total count of refund records for this batch of authorization requests. Included for the summary and footer batch messages. |
|
totalAmount |
numeric |
11.2 |
The total amount for this batch of authorization requests, with implied decimals. Included for the summary and footer batch messages. |
|
totalCount |
numeric |
9 |
The total count for this batch of authorization requests. Included for the summary and footer batch messages. |
|
testProductionFlag |
alpha |
4 |
Indicates whether the authorization request is processed in a live (production) environment or in a testing environment. TEST = testing environment. PROD = production environment. This is the ASE Test mode field from the Authorization Service table. |
Authorization Response XML Message (CWAuthorizationResponse)
") For each
Authorization Request Message sent to the service bureau, the service
bureau sends an Authorization
For each
Authorization Request Message sent to the service bureau, the service
bureau sends an Authorization
Response XML message to Order Management System.
The Mode attribute in this message indicates if the request is in online format or batch format.
-
Online format: An Authorization Response message in online format sends one message to Order Management System for processing. This one message contains all of the information required to process an online authorization response.
-
Batch format: An Authorization Response message in batch format sends multiple message types to Order Management System for processing. These messages contain the information required to process a batch of authorization responses. A separate detail type message is received for each authorization response in the batch.
| Attribute Name | Type | Length | Comments |
|---|---|---|---|
|
Message |
Online format: This element and its attributes is included in the Online message. Batch format: This element and its attributes is included in the send, receive, detail, and footer type messages. |
||
|
source |
alpha |
25 |
Identifies the source of the XML message. |
|
target |
alpha |
25 |
Identifies the target of the XML message. OROMS indicates the XML message is sent to Order Management System. |
|
type |
alpha |
25 |
Identifies the type of information in the XML message. CWAuthorizationResponse indicates the message contains a response from the service bureau. |
|
CWAuthorizationResponse |
Online format: This element and its attributes is included in the Online message. Batch format: This element and its attributes is included in the send, receive, detail, and footer type messages. |
||
|
mode |
alpha |
10 |
Indicates the mode of communication. Batch = Batch authorizations response. Online = Online authorizations response. |
|
type |
alpha |
10 |
Indicates the type of message in the batch. Online format: Detail displays. Batch format: Valid values: Header Detail Footer Send Receive |
|
action |
alpha |
10 |
Indicates if the authorization was successful. Complete Error Failed Receiving Response Rejected Sent Returned NotFound |
|
AuthResponse |
Online format: This element and its attributes is included in the Online message. Batch format: This element and its attributes is included in the detail type message. |
||
|
companyID |
alpha |
3 |
The company from where the authorization request was sent. Order Management System updates the CMP Company field in the Authorization History table. |
|
merchantID |
alpha |
20 |
The account number assigned by the service bureau to identify transmissions. The system uses the following hierarchy to determine the merchant ID number to send to the service bureau: • Merchant # from the CC Paytype Cross Ref table. • Merchant ID override from the Merchant ID Override table. • Merchant ID from the Authorization Service table. |
|
merchantReference |
alpha |
20 |
A unique number made up of the Order Management System company code + order number + order payment method sequence number + authorization sequence number. The system uses this number to match the response to the appropriate transaction. For stored value card activations, the order payment method sequence number and authorization sequence number are always zero. Order Management System updates the CMP Company field, Order # field, OPM Seq # field, and AUH Seq # field in the Authorization History table. |
|
orderID |
numeric |
8 |
The order number where the credit card payment method that requires authorization is located. Order Management System updates the Order # field in the Authorization History table. |
|
paymentID |
numeric |
2 |
The order payment method sequence number for this credit card payment method on the order. Order Management System updates the OPM Seq # field in the Authorization History table. |
|
authID |
numeric |
3 |
The order payment method sequence number for the credit card authorization request. Order Management System updates the AUH Seq # field in the Authorization History table. For stored value card activations, updates the Activation date in the Stored Value Card table. |
|
ccAccountNumber |
alpha |
20 |
The card account number for the credit card payment method requesting authorization. This is the OPM credit card number field in the Order Payment Method table. If you use credit card encryption, the system encrypts the credit card number in the Order Management System database to provide additional security of credit card data. See the Data Security and Encryption Guide on My Oracle Support (1988467.1) for an overview. If you use credit card tokenization, the setting of the tokenized tag defines whether the number in the ccAccountNumber tag is the actual credit card number or a token provided by the authorization service. |
|
authNumber |
alpha |
7 |
The authorization number for the card. For stored value card reversals, if the VendorResponse1 tag is 100, the system loads a dummy authorization number in this field. Order Management System updates the AUH auth # field in the Authorization History table. |
|
authAmount |
numeric |
10.2 |
The authorized amount on the card, including decimals. Note: Stored value cards are only allowed in US currency. Order Management System updates the AUH amount authorized field in the Authorization History table. |
|
authDate |
numeric |
8 |
The date the credit card was authorized, in MMDDYYYY format. Order Management System updates the AUH auth date field in the Authorization History table. |
|
vendorResponse1 |
alpha |
10 |
The response for the credit card. Order Management System updates the AUH vendor response field in the Authorization History table. For stored value card activations, updates the Response code in the Stored Value Card table. |
|
vendorResponse2 |
alpha |
10 |
The credit card identification response for the credit card. Order Management System updates the AUH vendor response 2 field in the Authorization History table. |
|
avsResponse |
alpha |
10 |
The address verification response for the credit card. Order Management System updates the AUH AVS response field in the Authorization History table. |
|
fraudIndicator |
alpha |
1 |
Indicates whether the customer is a possible fraud. |
|
fraudScore |
alpha |
1 |
Future use value. |
|
actionCode |
alpha |
10 |
Indicates the type of transaction. Valid values: Activation = Stored value card activation. Balance = Stored value card balance inquiry. Authorization = Credit card, debit card, or stored value card authorization. Reversal = Stored value card authorization reversal. |
|
currentBalance |
numeric |
12 |
The current balance on the stored value card. Right justified, zero filled, with 2 implied decimals. |
|
previousBalance |
alpha |
12 |
The previous balance on the stored value card. Right justified, zero filled, with 2 implied decimals. |
|
authentication Response |
alpha |
10 |
The authentication response for the authentication verification value associated with the credit card. The authentication verification value is received from an authentication service, such as Visa’s Verified by Visa program or MasterCard’s SecureCode program, indicating whether the card authentication password the cardholder provided was approved for the credit card. See Credit Card Authentication Service for more information. This response is not stored in Order Management System. |
|
transactionID |
numeric |
16 |
A unique transaction ID assigned by the service bureau for the transaction. Updates the Transaction ID in the Authorization History table. Available in: 2.0 (release 2.5 of Order Management System). |
|
tokenized |
alpha |
1 |
Defines whether the number in the ccAccountNumber tag is the actual credit card number or a token. See Credit Card Tokenization in the Data Security and Encryption Guide on My Oracle Support (1988467.1). Valid values: Y = The number in the ccAccountNumber tag is a token. N or blank = The number in the ccAccountNumber tag is the actual credit card number. Updates the Tokenized field in the Order Payment Method table. Available in: 3.0 (release 5.0 of Order Management System). |
|
BatchInfo |
Online format: This element and its attributes is not included in the Online message. Batch format: This element and its attributes is included in the send, receive, and footer type messages. |
||
|
fileType |
alpha |
4 |
Indicates the type of response. Valid values: MERC RESP AUTH BILL |
|
merchantFileTrace |
numeric |
3 |
Order Management System updates the ILC Reference ID field in the Integration Process Cntl table. |
|
rejectReason |
alpha |
60 |
Order Management System updates the ILC reference comment field in the Integration Process Cntl table. Included only if the authorization was declined by the service bureau. |
Deposit Request XML Message (CWDepositRequest)
")
The Deposit Request XML message is used to send deposit requests to an external system when the Communication type field for the service bureau is Integration Layer.
Note:
Order Management System does not currently support any base integration using an integration layer job and the Deposit Request XML Message (CWDepositRequest). Please contact your Order Management System representative if you wish to create a custom integration using this message.
| Attribute Name | Type | Length | Comments |
|---|---|---|---|
|
Message |
This element and its attributes displays for the header, detail, summary, footer, send, and receive type messages. |
||
|
source |
alpha |
25 |
Identifies the source of the XML message. RDC indicates the XML message is from Order Management System. |
|
target |
alpha |
25 |
Identifies the target of the XML message. |
|
type |
alpha |
25 |
Identifies the type of information in the XML message. CWDepositRequest indicates the message contains a deposit request. |
|
resp_qmgr |
alpha |
48 |
Informational only. |
|
resp_q |
alpha |
48 |
Informational only |
|
CWDepositRequest |
This elements and its attributes displays for the header, detail, summary, footer, send, and receive batch messages. |
||
|
mode |
alpha |
10 |
Indicates the mode of communication. Batch indicates batch deposits. |
|
type |
alpha |
10 |
Indicates the type of message in the batch. Valid values: Header Detail Summary Footer Send Receive |
|
Service |
This element and its attributes displays for the header, detail, summary, footer, send, and receive batch messages. |
||
|
serviceID |
alpha |
3 |
Deposit service code. This is the ASV Auth service code field in the Authorization Service table. |
|
Merchant |
This element and its attributes displays for the header, detail, summary, footer, send, and receive batch messages. |
||
|
companyID |
numeric |
3 |
The company from where the deposit request was sent. This is the CMP Company field in the Authorization Service table. |
|
merchantID |
alpha |
20 |
The account number assigned by the service bureau to identify transmissions. The system uses the following hierarchy to determine the merchant ID number to send to the service bureau:
|
|
merchantSubID |
alpha |
10 |
The sub code required to sign on to the service bureau. This is the ASV Sub code field in the Authorization Service table. |
|
merchantName |
alpha |
20 |
The name of the service bureau. This is the ASV Charge description field in the Authorization Service table. |
|
merchantDivision |
numeric |
5 |
The merchant division defined by the service bureau. This is the ASE Merchant division field in the Authorization Service Ext table. |
|
chargeDescription |
alpha |
20 |
The name of the service bureau. This is the ASV Charge description field in the Authorization Service table. |
|
receivingCode |
alpha |
10 |
A code that identifies your company to the service bureau. This is the ASV Receiving code field in the Authorization Service table. |
|
startupInfo |
alpha |
10 |
Startup text that identifies your company to the service bureau. This is the ASV Start up info field in the Authorization Service table. |
|
signon |
alpha |
10 |
A code required to sign on to the service bureau. This is the ASV Signon field in the Authorization Service table. |
|
password |
alpha |
10 |
A password required by the service bureau. This is the ASV Password field in the Authorization Service table. |
|
presentersID |
alpha |
10 |
A code required to sign on to the service bureau. This is the ASV Presenter’s ID field in the Authorization Service table. |
|
pidPassword |
alpha |
10 |
A password required to sign on to the service bureau. This is the ASV PID password field in the Authorization Service table. |
|
submittersID |
alpha |
10 |
A code required to sign on to the service bureau. This is the ASV Submitter’s ID field in the Authorization Service table. |
|
sidPassword |
alpha |
10 |
A password required to sign on the service bureau. This is the ASV SID password field in the Authorization Service table. |
|
industryFormatCode |
alpha |
5 |
A code that is assigned by the service bureau to identify your company type (DBA number). This is the ASV Industry format code field in the Authorization Service table. |
|
addressVerificationFlag |
alpha |
3 |
Indicates whether the service bureau performs address verification to verify the customer’s address and card number. YES = The service bureau performs address verification. The system includes the bill to name and address in the deposit request. NO = The service bureau does not perform address verification. The system does not include the bill to name and address in the authorization request. This is the ASV Address verification field in the Authorization Service table. |
|
DepositRequest |
This element and its attributes displays for the detail batch messages. |
||
|
companyID |
alpha |
3 |
The company from where the deposit request was sent. This is the CMP Company field in the CC Deposit Transaction table. |
|
createDate |
numeric |
8 |
The date (in MMDDYYYY format) the deposit request was sent to the service bureau. |
|
orderType |
alpha |
8 |
Indicates the type of order, for example phone order or mail order, where the card requiring deposit is located. Mail = Mail order. Phone = Telephone order. Internet = Web order. Order Management System:
|
|
transactionType |
alpha |
10 |
Indicates whether the request is for a deposit or credit. Purchase = deposit. Return = credit/return. Conditional = authorize and deposit Note: Conditional deposit is not supported for stored value cards. |
|
merchantReference |
alpha |
20 |
A unique number made up of the Order Management System company code + order number + order payment method sequence number + authorization sequence number. This is the CMP Company field, Order # field, OPM Seq # field in the CC Deposit Transaction table and the AUH Seq # field in the Authorization History table. |
|
orderID |
numeric |
8 |
The order number where the credit card payment method that requires deposit is located. This is the Order # field in the CC Deposit Transaction table. |
|
InvoiceID |
numeric |
7.0 |
The invoice number associated with the credit card payment method. This is the Invoice # field from the CC Deposit Transaction table. |
|
paymentID |
numeric |
2 |
The order payment method sequence number for this credit card payment method on the order. This is the OPM Seq # field from the CC Deposit Transaction table. |
|
payCategory |
numeric |
15 |
A description of the pay category associated with the deposit request. Credit card displays, indicating the card is associated with the credit card pay category. This is the description associated with the Pay category field defined for the credit card pay type in the Pay Type table. |
|
vendorPaymentMethod |
alpha |
5 |
The vendor paytype code associated with the deposit request; this is the code the deposit service uses to identify a method of payment. This is the CPC vendor paytype/code field defined for the credit card pay type in the CC Paytype Cross Ref table. |
|
ccAccountNumber |
alpha |
16 |
The card number for the credit card payment method requesting deposit. If you use credit card tokenization, this number may be a token rather than the actual credit card number. This is the Credit card # field defined for the credit card payment in the CC Deposit Transaction table. If you use credit card encryption, the system decrypts the credit card number before sending it to the service bureau. See Credit Card Tokenization in the Data Security and Encryption Guide on My Oracle Support (1988467.1) for an overview. |
|
expirationDate |
numeric |
4 |
The date the card requesting deposit expires. This is the OPM expiration date field defined for the card in the Order Payment Method table. |
|
depositAmountText |
numeric |
10.2 |
The amount on the card requiring deposit, including decimals. This is the Total $ amt field defined for the card in the CC Deposit Transaction table. |
|
depositAmount |
numeric |
10 |
The amount on the card requiring deposit, with implied decimals. This is the Total $ amt field defined for the card in the CC Deposit Transaction table. |
|
authID |
numeric |
3 |
The order payment method sequence number for the deposit request. If the authID is blank (indicating the record was never authorized), the system sends an action code of B (authorize and deposit). This is the Auth code field from the CC Deposit Transaction table. |
|
authDate |
numeric |
8 |
The date the card was deposited, in MMDDYYYY format. This is the Auth date field in the CC Deposit Transaction table. |
|
merchandiseDollars |
numeric |
10.2 |
The merchandise dollar amount requiring deposit. This is the Merchandise $ amt field defined for the card in the CC Deposit Transaction table. |
|
freightDollars |
numeric |
10.2 |
The freight dollar amount requiring deposit. This is the Freight $ amt field defined for the card in the CC Deposit Transaction table. |
|
additionalFreightDollars |
numeric |
10.2 |
The additional freight dollar amount requiring deposit. This is the Add freight $ field defined for the card in the CC Deposit Transaction table. |
|
totalTaxDollars |
numeric |
10.2 |
The total tax dollar amount requiring deposit. This is the Total tax $ amt field defined for the card in the CC Deposit Transaction table. |
|
gstTaxDollars |
numeric |
10.2 |
The GST tax dollar amount requiring deposit. This is the GST tax $ amt field defined for the card in the CC Deposit Transaction table. |
|
pstTaxDollars |
numeric |
10.2 |
The PST tax dollar amount requiring deposit. This is the PST tax $ amt field defined for the card in the CC Deposit Transaction table. |
|
additionalTaxDollars |
numeric |
10.2 |
The additional tax dollar amount requiring deposit. This is the Add tax $ amt field defined for the card in the CC Deposit Transaction table. |
|
handlingDollars |
numeric |
10.2 |
The handling dollar amount requiring deposit. This is the Handling $ amt field defined for the card in the CC Deposit Transaction table. |
|
currencyCode |
alpha |
3 |
The currency code used by the deposit service to define a currency. This is the CUR currency code field in the CC Deposit Transaction table. |
|
CIDNumber |
numeric |
4 |
Credit Cards The card identification number defined for the card. See Credit Card Security Service (CID, CVV2, CVC2). This is the OPM card security value field defined for the credit card payment method in the Order Payment Method table. Note: The card identification number is only available for online authorizations; once an order is accepted, the system removes the card identification number from the order, even if the order has not received an approved online authorization. Stored Value Cards The ID number assigned to the stored value card. Included only if an ID number is assigned to the card and a CID number does not exist. From the OPM SVC ID Storage field defined for the stored value card payment in the Order Payment Method table. |
|
CIDIndicator |
alpha |
1 |
The card identification indicator defined for the card, indicating if a CID number has been defined. Valid values: 1 = CID number is present on card. 2 = CID number is present on card, but is illegible. 9 = CID number is not present on card. This is the OPM card security presence field defined for the credit card payment method in the Order Payment Method table. |
|
issuingBank |
alpha |
10 |
This is the Issuing bank field defined for the payment method in the Order Payment Method table. |
|
checkAccountNumber |
alpha |
20 |
This is the OPM Checking account field defined for the payment method in the Order Payment Method table. |
|
checkNumber |
numeric |
9 |
This is the OPM Check number field defined for the payment method in the Order Payment Method table. |
|
routingNumber |
numeric |
9 |
This is the OPM Routing number field defined for the payment method in the Order Payment Method table. |
|
startDate |
numeric |
4 |
The start date of the debit card being processed, in MMYY format. This is the Start date field in the Order Payment Method table. |
|
issueNumber |
alpha |
2 |
The card issue number of the debit card being processed. This is the OPM card issue # field in the Order Payment Method table. |
|
Note: The system includes the following bill to information only if the Address verification field for the authorization service is selected. |
|||
|
firstName |
alpha |
15 |
The first name of the bill to customer defined for the card requesting deposit. This is the:
|
|
lastName |
alpha |
25 |
The last name of the bill to customer defined for the card requesting deposit. This is the:
|
|
addressLine1 |
alpha |
32 |
The street address of the bill to customer defined for the card requesting deposit. This is the:
|
|
addressLine2 |
alpha |
32 |
The second address line of the bill to customer defined for the card requesting deposit. This is the:
|
|
city |
alpha |
25 |
The city for the address of the bill to customer defined for the card requesting deposit. This is the:
|
|
state |
alpha |
2 |
The state for the address of the bill to customer defined for the card requesting deposit. This is the:
|
|
zip |
alpha |
10 |
The zip code for the address of the bill to customer defined for the card requesting deposit. This is the:
|
|
country |
alpha |
3 |
The country code for the address of the bill to customer defined for the card requesting deposit. This is the:
|
|
ecommerceIndicator |
alpha |
3 |
Represents either:
From the Ecomm Indic field in the Order Payment Method table. If this value is blank, from the E-commerce indicator (Future use sts 1 field) in the Order Header table. |
|
authenticationValue |
alpha |
40 |
A code received from an authentication service, such as Visa’s Verified by Visa program or MasterCard’s SecureCode program, indicating whether the card authentication password the cardholder entered on the web storefront was approved for the credit card. See Credit Card Authentication Service for more information. From the Authentication value field in the Order Payment Method table. |
|
discountQualified |
alpha |
3 |
Not currently implemented. |
|
authDateExpired |
alpha |
3 |
Indicates if the authorization date for the deposit has expired. YES = The authorization date for the deposit has expired. The system sends the service bureau an action code of B (authorize and deposit) and when a response is received, updates the Authorization History record with the new authorization number. NO = The authorization date for the deposit has not expired. The system uses the following calculation to determine if an authorization has expired: authorization date + reauthorization days = authorization expiration date This is based on the AUH Auth date field in the Authorization History table and the PAY Reauth days field in the Pay Type table. |
|
avsResponse |
alpha |
10 |
The AVS response received on the original authorization associated with the deposit. This is the AUH AVS response field in the Authorization History table. |
|
installmentMessage |
alpha |
18 |
The installment message defined for the flexible payment option deposit. The message contains the following:
For installment pay plans, the entire message is 18 positions. For deferred pay plans, the entire message is 14 positions. The system removes any space between the merchant ID and the installment description, for example: INSTALLMSG101OF02. |
|
purchaseOrder |
alpha |
15 |
The purchase order number associated with the deposit request. This is the Purchase order # field defined for the order in the Order Ship To table. |
|
reversalAmountText |
numeric |
10.2 |
The amount on the stored value card requiring authorization reversal, including decimals. This is the difference between the authorization amount and the deposit amount. For example, if the original authorization amount was $50.00 and the deposit amount is $30.00, the reversal amount is $20.00. Note: Stored value cards are only allowed in US currency. This field is populated only when the Perform Authorization Reversal during Deposit Processing (J20) system control value is selected and the authorization amount is greater than the deposit amount; see Stored Value Card Authorization Reversal. |
|
reversalAmount |
numeric |
10 |
The amount on the stored value card requiring authorization reversal, with implied decimals. This is the difference between the authorization amount and the deposit amount. For example, if the original authorization amount was $50.00 and the deposit amount is $30.00, the reversal amount is $20.00. Note: Stored value cards are only allowed in US currency. This field is populated only when the Perform Authorization Reversal during Deposit Processing (J20) system control value is selected and the authorization amount is greater than the deposit amount; see Stored Value Card Authorization Reversal. |
|
transactionID |
numeric |
30 |
The transaction ID for the authorization associated with the deposit request. From the Transaction ID field in the Authorization History table. |
|
tokenized |
alpha |
1 |
Defines whether the number in the ccAccountNumber is the actual credit card number or a token received from the authorization service during the credit card tokenization process. Valid values: Y = The number in the ccAccountNumber is a token. N = The number in the ccAccountNumber is the actual credit card number. From the Tokenized field in the Order Payment Method table. The system includes the tokenized tag only if the pay type is eligible for tokenization. Available in: 3.0 (Order Management System version 5.0). |
|
JCLstatements Not currently implemented. |
|||
|
count |
numeric |
2 |
From the Authorization Service JCL table. |
|
JCLstatement Not currently implemented. |
|||
|
id |
alpha |
2 |
From the JCL Seq # field and JCL Statement field in the Authorization Service JCL table. |
|
BatchInfo |
This element and its attributes displays for the header, summary, footer, send, and receive batch messages. |
||
|
fileType |
alpha |
4 |
Indicates whether the request is for a authorization and deposit or deposit. BILL indicates card deposit request. AUTH indicates card authorization and deposit request. |
|
merchantFileTrace |
alpha |
16 |
The next available number from the Batch Auth File Trace Number number assignment value. Note: The Batch Auth File Trace Number cannot be greater than 3 positions. |
|
createDate |
numeric |
8 |
The date (in MMDDYYYY format) the deposit request was sent to the service bureau. |
|
debitAmount |
numeric |
11.2 |
The net sales amount for this batch of deposit requests, with implied decimals. |
|
debitCount |
numeric |
9 |
The total count of sales records for this batch of deposit requests. |
|
creditAmount |
numeric |
11.2 |
The net refund amount for this batch of deposit requests, with implied decimals. |
|
creditCount |
numeric |
9 |
The total count of refund records for this batch of deposit requests. |
|
totalAmount |
numeric |
11.2 |
The total amount for this batch of deposit requests, with implied decimals. |
|
totalCount |
numeric |
9 |
The total count for this batch of deposit requests. |
|
testProductionFlag |
alpha |
4 |
Indicates whether the deposit request is processed in a live (production) environment or in a testing environment. TEST = Testing environment. PROD = Production environment. This is the ASE Test mode field from the Authorization Service table. |
Deposit Response XML Message (CWDepositResponse)
")
For each Deposit Request Message sent to the service bureau, the service bureau sends a Deposit Response XML message to Order Management System.
The Type attribute in the authorization response message identifies the type of message you are viewing in the batch (Send, Receive, Detail, Footer). A separate Detail type message is received for each deposit response in the batch.
| Attribute Name | Type | Length | Comments |
|---|---|---|---|
|
Message |
This element and its attributes displays for the send, receive, detail, and footer batch messages. |
||
|
source |
alpha |
25 |
Identifies the source of the XML message. |
|
target |
alpha |
25 |
Identifies the target of the XML message. OROMS indicates the XML message is sent to Order Management System. |
|
type |
alpha |
25 |
Identifies the type of information in the XML message. CWDepositResponse indicates the XML message contains a deposit response. |
|
resp_qmgr |
alpha |
48 |
Informational only. |
|
resp_q |
alpha |
48 |
Informational only. |
|
CWDepositResponse |
This element and its attributes displays for the send, receive, detail, and footer batch messages. |
||
|
mode |
alpha |
10 |
Indicates the mode of communication. Batch indicates batch deposits. |
|
type |
alpha |
10 |
Indicates the type of message in the batch. Valid values: Header Send Receive Detail Footer |
|
action |
alpha |
10 |
Indicates if the deposit was successful. Complete Confirm Error Failed Receiving Response Rejected Sent Returned NotFound |
|
DepositResponse |
This element and its attributes displays for the detail batch message. |
||
|
companyID |
numeric |
3 |
The company from where the deposit request was sent. Order Management System updates the Company field in the CC Deposit History table. |
|
merchantID |
alpha |
20 |
The account number assigned by the service bureau to identify transmissions. Order Management System updates the Merchant ID field defined for the deposit service in the CC Deposit History table. |
|
merchantReference |
alpha |
20 |
A unique number made up of the Order Management System company code + order number + order payment method sequence number + authorization sequence number. The system compares the merchantReference against the Alpha order # field in the CC Deposit Transaction table to match a received deposit with a sent deposit record. Order Management System updates the Company field, Order # field, OPM seq # field, and Seq # field in the CC Deposit History table. |
|
orderID |
numeric |
8 |
The order number where the credit card payment method that requires deposit is located. Order Management System updates the Order # field in the CC Deposit History table. |
|
invoiceID |
numeric |
7 |
The invoice number associated with the credit card payment method. Order Management System updates the Invoice # field in the CC Deposit History table. |
|
paymentID |
numeric |
2 |
The order payment method sequence number for this credit card payment method on the order. Order Management System updates the OPM Seq # field in the CC Deposit History table. |
|
ccAccountNumber |
alpha |
16 |
The card number for the credit card payment method requesting deposit. If you use credit card tokenization, this number may be a token rather than the actual credit card number. Order Management System updates the Credit card # field in the CC Deposit History table. If you use credit card encryption, the system encrypts the credit card number in the Order Management System database to provide additional security of credit card data. See Credit Card Tokenization in the Data Security and Encryption Guide on My Oracle Support (1988467.1) for an overview. |
|
authNumber |
alpha |
10 |
The authorization code for the deposit. If the authorization number returned is NOTDEP or notdep, the system rejects the deposit. Order Management System updates the Authorization code field in the CC Deposit History table. |
|
AuthAmount |
numeric |
10 |
The authorized deposit amount on the card, with implied decimals. Order Management System updates the Deposit amount field in the CC Deposit History table. |
|
authDate |
numeric |
8 |
The date the deposit was authorized, in MMDDYYYY format. Order Management System updates the Deposit date field in the CC Deposit History table. |
|
vendorResponse1 |
alpha |
10 |
The deposit response for the card. Order Management System updates the Response code field in the CC Deposit History table. |
|
vendorResponse2 |
alpha |
10 |
The card identification response for the card. |
|
avsResponse |
alpha |
10 |
The address verification response for the credit card. |
|
fraudIndicator |
alpha |
1 |
Indicates whether the customer is a possible fraud. This is a future-use value. |
|
fraudScore |
alpha |
1 |
This is a future-use value. |
|
depositFlag |
alpha |
3 |
Indicates if the deposit was successful, based on the response code received back from the service bureau and an authorization number of NOTDEP. YES = The deposit was approved by the service bureau (the VendorResponse1 is 100 approved). NO = The deposit was rejected by the service bureau. |
|
authenticationResponse |
alpha |
10 |
The authentication response for the authentication verification value associated with the credit card. The authentication verification value is received from an authentication service, such as Visa’s Verified by Visa program or MasterCard’s SecureCode program, indicating whether the card authentication password the cardholder provided was approved for the credit card. See Credit Card Authentication Service for more information. Not stored in Order Management System. |
|
BatchInfo |
This element and its attributes displays for the send, receive, and footer batch messages. |
||
|
fileType |
alpha |
4 |
Indicates the type of response. Valid values: MERC RESP AUTH BILL |
|
merchantFileTrace |
integer |
3 |
Order Management System updates the ILC Reference ID field in the Integration Process Cntl table. |
|
rejectReason |
alpha |
60 |
Order Management System updates the ILC reference comment field in the Integration Process Cntl table. Included only if the deposit was declined by the service bureau. |
PayPal Direct Connection Integration
Purpose: The PayPal Direct Connection integration enables you to use PayPal as a method of payment on web orders.
-
The web storefront sends the PayPal payment on the order directly to PayPal for authorization. The order must receive an approved authorization on the web storefront before it is sent to Order Management System for processing.
-
During pick slip generation, Order Management System verifies that the amount required to generate the pick slip is covered by the authorization received for the PayPal payment during web storefront processing. If the amount is not covered, the system places the order on Credit Card Decline hold and the PayPal payment on PayPal Decline hold.
-
During deposit processing, Order Management System sends the deposit transaction directly to PayPal for confirmation and settlement.
-
When an order is canceled or the PayPal payment method deactivated, Order Management System sends an authorization reversal request to PayPal.
PayPal is an e-commerce business that allows you to perform payment and money transfers securely over the Internet. PayPal’s service builds on the existing financial infrastructure of bank accounts and credit cards and utilizes fraud prevention systems to create a safe, global, real-time payment solution.
Note:
PayPal is a registered trademarkThe Order Management System PayPal Direct Connection integration allows you to use PayPal as a form of payment on web orders and send the deposit transactions directly to PayPal.
Note:
Because the PayPal Direct Connection Integration does not send authorization transactions between Order Management System and PayPal, web orders containing a PayPal payment must receive an approved authorization on the web storefront before being sent to Order Management System for processing. In addition, you can only use PayPal as a form of payment on web orders. The Order Management System PayPal Direct Connection integration does not support PayPal as a form of payment on non-web orders.
In this topic: This topic provides an overview of the PayPal Direct Connection integration and the required setup.
PayPal Direct Connection Integration Process
PayPal Direct Connection integration illustration:

Processing Orders Containing a PayPal Payment
When a customer places an order on the web storefront and pays for the order using a PayPal account:
-
The web storefront sends an authorization request for the PayPal payment directly to PayPal.
-
PayPal validates the PayPal account number that is passed in the authorization request and sends PayPal confirmation information back to the web storefront.
-
The web storefront completes the order and sends the order to Order Management System in the Inbound Order XML Message (CWORDERIN).
Web orders containing a PayPal payment that has been authorized by PayPal contain the following information in the Inbound Order XML Message (CWORDERIN). The authorization for the PayPal payment is sent to Order Management System as a manual authorization.
For more information see the Web Services Guide on My Oracle Support (ID 2149144.1).
-
Regular order information
-
PayPal pay type passed in the payment_type field
-
PayPal transaction ID passed in the cc_number field
-
Approved PayPal payment:
-
auth_amount
-
auth_number (this is the first 16 positions of the PayPal transaction ID)
-
auth_date (this is the date the PayPal payment was authorized with PayPal)
-
Validating a Web Order that Contains a PayPal Payment
Because the PayPal Direct Connection Integration does not send authorization transactions between Order Management System and PayPal, web orders containing a PayPal payment must receive an approved authorization on the web storefront before being sent to Order Management System for processing.
If Order Management System receives a web order that contains a PayPal payment that has not yet received an approved authorization, the system will accept the order; however, the PayPal payment will fail batch authorization and you will not be able to generate a pick slip for the order. See Processing Authorizations for a PayPal Order.
Maintaining a PayPal Order
When you advance to an order in order maintenance that contains a pay type with PPL (PayPal) defined as the authorization service and deposit service, the system displays the PayPal Warning Window indicating that you should not make any changes to the order that would increase the order total. When you generate a pick slip for an order that contains a PayPal payment, the system validates that the amount required to generate the pick slip does not exceed 15% or $75.00 of the initial authorization amount that was received from PayPal during web storefront processing.
Examples:
-
If the authorization received from PayPal during web storefront processing is $100.00, you can increase the order total up to $115.00 ($100.00 + 15% = $115.00) and still process the order without any problems. However, once you exceed $115.00, the PayPal payment will fail batch authorization and the system will not generate a pick slip or perform drop ship processing for the order.
-
If the authorization received from PayPal during web storefront processing is $600.00, you can increase the order total up to $675.00 and still process the order without any problems. However, once you exceed $675.00, the PayPal payment will fail batch authorization and the system will not generate a pick slip or perform drop ship processing for the order. Note: The system does not allow you to increase the order total by 15% ($600.00 + 15% = $690.00) because it would exceed $75.00 of the initial authorization amount that was received from PayPal during web storefront processing.
Reversals? The system submits a reversal to PayPal if:
-
The entire order is canceled or sold out, or;
-
The payment method is deactivated before any transactions are billed.
The system does not submit a reversal to PayPal for a partial amount, such as when:
-
A single item on a multi-line order is canceled or sold out.
-
A single unit on an order line is canceled or sold out.
-
Any items remaining on the order are canceled after a shipment has taken place.
Also, the reversal is not submitted if any of the order lines have been submitted to Order Broker for fulfillment.
For more information: See Stored Value Card Authorization Reversal.
Applying Refunds Across Multiple Capture Transaction IDs
PayPal cannot process a refund that exceeds the amount of the initial deposit. For example, if an order includes two deposits of $25.00, PayPal requires that any single refund processed not exceed $25.00.
In order to be able to reconcile refunds against the initial deposits, Order Management System stores the TRANSACTIONID provided by PayPal for each deposit as the Capture Transaction ID in the Credit Card Deposit History table for each successful deposit with PayPal, so that each refund amount applies to a deposit amount.
Example: You process an order in two shipments:
-
Shipment 1: $50.00
-
Shipment 2: $40.00
During deposit processing, the capture transaction ID for each shipment is stored in the Credit Card Deposit History table. This ID is not displayed on any screen.
If you then need to process one or more refunds against the order, Order Management System uses the capture transaction IDs to reconcile the refund amounts. It uses the capture transaction ID that matches the refund amount, if any; otherwise, it uses the capture transaction ID for the lowest total shipment that exceeds the refund amount. For example:
-
If the refund amount is $40.00: Use the capture transaction ID for shipment 2, because the amount matches this shipment.
-
If the refund amount is $50:00: Use the capture transaction ID for shipment 1, because the amount matches this shipment.
-
If the refund amount is $45:00: Use the capture transaction ID for shipment 1 (because $45.00 is more than the amount for shipment 2).
-
If the refund amount is $25.00: Use the capture transaction ID for shipment 1 (because $25.00 does not match the amount of either deposit).
-
If the refund amount is more than $50.00: Split the refund across both capture transaction IDs.
Sometimes multiple capture transaction ID are used for a refund deposit, because no single transaction is large enough to cover the refund. In these cases, the Display Order Payment History Screen indicates the number of deposits used for the total refund amount. For example, if you process a refund totaling $60.00 for an order with the two shipments, one for $50.00 and another for $25.00, the Display Order Payment History screen indicates:
-
Partial Deposit confirmed $50.00-
-
Partial Deposit confirmed $10.00-
-
Deposit split into 2 separate deposits.
-
Deposit confirmed $60.00-
Note:
These messages are not displayed at the Payment Method Details panel in Contact Center (Modern View Order Summary), although the purchase and deposit amounts are displayed.
In this situation, there is also an Order Transaction History message written, for example: Refund for inv# 1234 exceeds PayPal limit. Note that the message may be truncated based on the size of the invoice number.
Multiple refunds? Order Management System tracks the total returned amount for PayPal payment methods in order to ensure that subsequent refunds do not result in overusing any individual deposit amounts. For example, if there was a deposit for $50.00 and a deposit of $10.00, and there is already a refund amount of $40.00 applied to the first deposit, leaving $10.00 unrefunded, a subsequent refund of $15.00 would be split across the two deposits.
If the deposit fails: When the deposit is not initially processed successfully and you use Resubmitting Rejected Deposits (SRDP) instead, no capture transaction ID is recorded, so a refund cannot be applied to the deposit.
Note:
Deposits processed before update 20.0 will not have a capture transaction ID, so the process described above does not apply to these deposits.
Processing Authorizations for a PayPal Order
The system calls authorization processing when you generate a pick slip or perform drop ship processing for an order that contains a pay type with PPL (PayPal) defined as the authorization service. During authorization processing for an order that contains a PayPal pay type, the system validates that the required authorization amount is covered by the initial authorization received for the PayPal payment during web storefront processing.
Note:
Orders containing a PayPal payment should have received an authorization from PayPal on the web storefront before the order was received into Order Management System. The system does not send a PayPal payment to PayPal for authorization during pick slip generation or drop ship processing.
PayPal Authorization Processing
The system performs the following steps during PayPal authorization processing.
| # | Step |
|---|---|
|
1. |
The system determines if a manual authorization exists for the PayPal payment on the order. |
|
|
|
|
|
|
|
2. |
If this is the first time authorization processing was called for the PayPal payment on the order, the system:
|
Order history record for manual authorization: The system creates an order history record for the authorization that was received from PayPal on the web storefront. For example:
| Date | Type | Transaction Note | Amount | User |
|---|---|---|---|---|
|
7/28/09 |
AUTH |
MANUAL AUTH# DETECTED - O-AUTH_CODE |
100.00 |
AUTH |
Authorization history record for manual authorization: The system creates an approved authorization history record for the authorization that was received from PayPal on the web storefront. For example:
| Status | Auth # | Auth Date | Auth Expires | Amt Submitted | Amt Available |
|---|---|---|---|---|---|
|
Authorized |
O-AUTH_CODE |
7/28/09 |
8/26/09 |
100.00 |
100.00 |
| # | Step |
|---|---|
|
3. |
The system determines if the initial authorization has expired. The system uses the following calculation to determine the expiration date: authorization date from Authorization History table + Reauthorization days from Pay Type table = authorization expiration date For example, if the initial authorization date is 7/01/09 and the Reauthorization days is 29, the initial authorization expires on 7/29/09 (7/01/09 + 29 = 7/29/09). If the initial authorization has expired, the system declines the authorization. See Declined PayPal Authorizations for the updates that the system performs. |
|
4. |
The system determines if the amount of the authorization request exceeds the manual authorization. The system allows the authorization request amount to be 15%, or up to $75.00, over the initial authorization amount. For example:
If the authorization request amount exceeds the initial authorization by 15% or $75.00, the system declines the authorization. See Declined PayPal Authorizations for the updates that the system performs. Orders that Contain a Catch-All Credit Card Pay Type If the order contains a catch-all credit card pay type in addition to the PayPal pay type, instead of declining the PayPal authorization, the system adds the amount that exceeds the manual authorization to the catch-all credit card pay type on the order. In this situation, the system approves the PayPal authorization for the manual authorization amount and applies the amount not covered by the manual authorization to the catch-all credit card. For example, if the manual authorization for the PayPal pay type is $100.00 and the order total is $124.00, the system approves the PayPal authorization request for $100.00 and applies $24.00 towards the catch-all credit card on the order. |
|
5. |
If the amount of the authorization request is covered by the manual authorization or exceeds the manual authorization but is within the 15% or $75.00 allowance, the system approves the authorization. If the approved authorization amount exceeds the manual authorization, the system creates a new authorization history record for the extra amount. This record indicates:
See Approved PayPal Authorizations for the updates that the system performs. |
Approved PayPal Authorizations
If the authorization received for the PayPal payment during web storefront processing covers the amount in the authorization request, the system:
-
Generates a pick slip or performs drop ship processing for the order.
-
Decreases the Amount available for the initial authorization history record by the authorization request amount. For example, if the initial authorization amount received on the web storefront is $100.00, and the authorization request amount is $28.00, the remaining amount available on the initial authorization is $72.00.
-
If the authorization request amount exceeds the manual authorization received for the PayPal payment, but is within the 15% or $75.00 allowance, the system creates a new authorization history record for the extra amount.
Updated authorization history record for manual authorization:
| Status | Auth # | Auth Date | Auth Expires | Amt Submitted | Amt Available |
|---|---|---|---|---|---|
|
Authorized |
O-AUTH_CODE |
7/28/09 |
8/26/09 |
100.00 |
72.00 |
New authorization history record for the amount not covered by the manual authorization but within the 15% or $75.00 allowance:
| Status | Auth # | Auth Date | Auth Expires | Amt Submitted | Amt Available |
|---|---|---|---|---|---|
|
Authorized |
O-AUTH_CODE |
7/28/09 |
8/26/09 |
12.00 |
.00 |
Example: Approved PayPal Authorization
A customer places an order on the web storefront and uses PayPal as the form of payment. The order total is $100.00 and PayPal authorizes the payment for $100.00. The web storefront sends the order to Order Management System with a manual authorization for the PayPal payment:
-
cc_name = PAYPAL
-
cc_number = O-CC_NUMBER (this is the PayPal transaction ID)
-
auth_amount = 100.00
-
auth_number = O-AUTH_CODE (this is the first 16 positions of the PayPal transaction ID)
-
auth_date = 06262009
Order Management System receives and processes the order. Based on the Reauthorization days defined for the PayPal pay type, the PayPal payment does not expire until 29 days from the authorization date.
You generate a pick slip for the entire order. The authorization amount required to generate a pick slip for the order is $100.00. Because the unused authorization amount of $100.00 covers the amount required to generate a pick slip for the order, the system:
-
Generates the pick slip.
-
Creates an order history record:
| Date | Type | Transaction Note | Amount | User |
|---|---|---|---|---|
|
6/26/09 |
AUTH |
MANUAL AUTH# DETECTED - O-AUTH_CODE |
100.00 |
AUTH |
-
Creates an authorization history record for the PayPal payment on the order.
| Status | Auth # | Auth Date | Auth Expires | Amt Submitted | Amt Available |
|---|---|---|---|---|---|
|
Authorized |
O-AUTH_CODE |
6/26/09 |
7/25/09 |
100.00 |
.00 |
Example: Multiple Approved PayPal Authorizations
A customer places an order on the web storefront and uses PayPal as the form of payment. The order total is $100.00 and PayPal approves the payment for $100.00. The web storefront sends the order to Order Management System with a manual authorization for the PayPal payment:
-
cc_name = PAYPAL
-
cc_number = O-AUTH_CODE (this is the PayPal transaction ID)
-
auth_amount = 100.00
-
auth_number = O-AUTH_CODE (this is the first 16 positions of the PayPal transaction ID)
-
auth_date = 06262009
Order Management System receives and processes the order. Based on the Reauthorization days defined for the PayPal pay type, the PayPal payment does not expire until 29 days from the authorization date.
You generate a pick slip for part of the order. The authorization amount required to generate a pick slip for the order is $42.00. Because the unused authorization amount of $100.00 covers the amount required to generate a pick slip for the order, the system:
-
Generates the pick slip.
-
Creates an order history record:
| Date | Type | Transaction Note | Amount | User |
|---|---|---|---|---|
|
6/26/09 |
AUTH |
MANUAL AUTH# DETECTED - O-AUTH_CODE |
100.00 |
AUTH |
Creates an authorization history record.
| Status | Auth # | Auth Date | Auth Expires | Amt Submitted | Amt Available |
|---|---|---|---|---|---|
|
Authorized |
O-AUTH_CODE |
6/26/09 |
7/25/09 |
100.00 |
58.00 |
You generate a pick slip for the remainder of the order. The authorization amount required to generate a pick slip for the order is $58.00. Because the unused authorization amount of $58.00 covers the amount required to generate a pick slip for the order, the system:
-
Generates the pick slip.
-
Updates the authorization history record.
| Status | Auth # | Auth Date | Auth Expires | Amt Submitted | Amt Available |
|---|---|---|---|---|---|
|
Authorized |
O-AUTH_CODE |
6/26/09 |
7/25/09 |
58.00 |
0.00 |
Example: Approved PayPal Authorization for Amount Within Allowed 15%
A customer places an order on the web storefront and uses PayPal as the form of payment. The order total is $100.00 and PayPal approves the payment for $100.00. The web storefront sends the order to Order Management System with a manual authorization for the PayPal payment:
-
cc_name = PAYPAL
-
cc_number = O-AUTH_CODE (this is the PayPal transaction ID)
-
auth_amount = 100.00
-
auth_number = O-AUTH_CODE (this is the first 16 positions of the PayPal transaction ID)
-
auth_date = 06262009
Order Management System receives and processes the order. Based on the Reauthorization days defined for the PayPal pay type, the PayPal payment does not expire until 29 days from the authorization date.
You maintain the order and as a result the order total increases to $110.50.
You generate a pick slip for the entire order. The authorization amount required to generate a pick slip for the order is $110.50. Because the required authorization amount is within 15% of the unused authorization amount of $100.00, the system:
-
Generates the pick slip.
-
Creates an order history record:
| Date | Type | Transaction Note | Amount | User |
|---|---|---|---|---|
|
6/27/09 |
AUTH |
MANUAL AUTH# DETECTED - O-AUTH_CODE |
100.00 |
AUTH |
Creates authorization history records:
-
One authorization history record for the original authorization amount received from PayPal on the web storefront.
-
One authorization history record for the amount that was over the original authorization amount, but within 15% of the original authorization amount.
| Status | Auth # | Auth Date | Auth Expires | Amt Submitted | Amt Available |
|---|---|---|---|---|---|
|
Authorized |
O-AUTH_CODE |
6/26/09 |
7/25/09 |
100.00 |
0.00 |
|
Authorized |
O-AUTH_CODE |
6/26/09 |
7/25/09 |
10.50 |
0.00 |
Example: Approved PayPal Authorization and Credit Card Authorization
Declined PayPal Authorizations
If the authorization received for the PayPal payment during web storefront processing does not cover the authorization request amount, the system places the order on hold and does not generate a pick slip or perform drop ship processing for the order.
The system declines the PayPal authorization for the following reasons:
-
A manual authorization does not exist for the PayPal payment, or
-
The initial authorization received from PayPal on the web storefront has expired, or
-
The authorization request amount exceeds 15% of the initial authorization amount received from PayPal on the web storefront, or
-
The authorization request amount exceeds $75.00 of the initial authorization amount received from PayPal on the web storefront.
If the authorization received for the PayPal payment during web storefront processing cannot cover the authorization request amount, or a manual authorization for the PayPal payment does not exist, the system:
-
Does not generate a pick slip or perform drop ship processing for the order.
-
If the authorization was declined because the initial authorization has expired, the system updates the Amount available for the initial authorization history record to zero. For example:
| Status | Auth # | Auth Date | Auth Expires | Amt Submitted | Amt Available |
|---|---|---|---|---|---|
|
Authorized |
O-AUTH_CODE |
6/26/09 |
7/25/09 EXPIRED |
100.00 |
.00 |
-
If the authorization was declined because the initial authorization amount cannot cover the authorization request amount, the system does not update the initial authorization history record. For example:
| Status | Auth # | Auth Date | Auth Expires | Amt Submitted | Amt Available |
|---|---|---|---|---|---|
|
Authorized |
O-AUTH_CODE |
7/27/09 |
8/25/09 |
100.00 |
100.00 |
-
Creates an authorization history record for the declined authorization amount. For example:
| Status | Vendor Response | Auth # | Auth Date | Auth Expires | Amt Submitted | Amt Available |
|---|---|---|---|---|---|---|
|
Declined |
PPLDECLINE |
|
7/27/09 |
8/25/09 |
39.00 |
.00 |
-
Places the order on Declined Credit Card (AT) hold and the PayPal payment on the hold reason defined for the PPLDECLINE response code (typically PP PayPal Decline). Note:
-
If the PPLDECLINE response code has not been set up for the PPL service bureau, the system places the order on AV hold.
-
If the PPLDECLINE response code exists, but a hold reason is not defined for the response code, the system does not place the order on hold, but does not generate a pick slip for the order since the initial authorization for the PayPal payment is not valid.
-
Creates order history records indicating the authorization was declined and the order as put on hold. For example:
| Date | Type | Transaction Note | Amount | User |
|---|---|---|---|---|
|
7/27/09 |
PICKGEN |
ORDER FLAGGED FOR CREDITCARD CANCELLATIO |
|
USER |
|
7/27/09 |
HOLD |
SYS HLD - DECLINED CREDIT CARD |
39.00 |
USER |
Correcting PayPal authorization declines: If Order Management System declines the PayPal authorization request, you will need to correct the error by either:
-
Maintaining the order and reducing the order total so that it does not exceed 15% or $75.00 of the initial authorization amount received from PayPal on the web storefront.
-
Calling the customer on the order to ask for an additional form of payment to cover the amount that exceeds the initial authorization amount received from PayPal on the web storefront.
-
Canceling the order.
Note:
Before you run pick slip generation or perform drop ship processing for the order again, make sure to remove the order from hold.
Example: Declined PayPal Authorization for Amount Over 15%
A customer places an order on the web storefront and uses PayPal as the form of payment. The order total is $100.00 and PayPal approves the payment for $100.00. The web storefront sends the order to Order Management System with a manual authorization for the PayPal payment:
-
cc_name = PAYPAL
-
cc_number = O-AUTH_CODE (this is the PayPal transaction ID)
-
auth_amount = 100.00
-
auth_number = O-AUTH_CODE (this is the first 16 positions of the PayPal transaction ID)
-
auth_date = 06262009
Order Management System receives and processes the order. Based on the Reauthorization days defined for the PayPal pay type, the PayPal payment does not expire until 29 days from the current date.
You maintain the order and as a result the order total increases to $122.50.
You generate a pick slip for the entire order. The authorization amount required to generate a pick slip for the order is $122.50. Because the unused authorization amount of $100.00 does not cover the amount required to generate a pick slip for the order, and the amount required exceeds 15% of the unused authorization, the system:
-
Does not generate a pick slip.
-
Declines the PayPal authorization.
-
Places the order on Credit Card Decline (AT) hold and the PayPal payment on the hold reason defined for the PPLDECLINE response code.
-
Creates order history records, indicating the PayPal authorization was declined:
| Date | Type | Transaction Note | Amount | User |
|---|---|---|---|---|
|
6/26/09 |
AUTH |
MANUAL AUTH# DETECTED - O-42693038SP2401 |
100.00 |
AUTH |
|
6/26/09 |
PICK GEN |
ORDER FLAGGED FOR CREDITCARD CANCELLATIO |
|
USER |
|
6/26/09 |
HOLD |
SYS HLD - DECLINED CREDIT CARD |
22.50 |
USER |
Creates authorization history records for the PayPal payment on the order, indicating the authorization was declined.
| Status | Auth # | Auth Date | Auth Expires | Amt Submitted | Amt Available |
|---|---|---|---|---|---|
|
Authorized |
O-AUTH_CODE |
6/26/09 |
7/25/09 |
100.00 |
100.00 |
|
Declined |
|
6/26/09 |
7/25/09 |
22.50 |
0.00 |
The system allows you to generate a pick slip for the order if:
-
You maintain the order and decrease the amount so that it does not exceed 15% of the unused PayPal authorization ($115.00), or
-
You maintain the order and apply the amount that exceeds 15% of the unused PayPal authorization towards another form of payment.
Example: Declined PayPal Authorization for Amount Over $75.00
A customer places an order on the web storefront and uses PayPal as the form of payment. The order total is $600.00 and PayPal approves the payment for $600.00. The web storefront sends the order to Order Management System with a manual authorization for the PayPal payment:
-
cc_name = PAYPAL
-
cc_number = O-AUTH_CODE (this is the PayPal transaction ID)
-
auth_amount = 600.00
-
auth_number = O-AUTH_CODE (this is the first 16 positions of the PayPal transaction ID)
-
auth_date = 06262009
Order Management System receives and processes the order. Based on the Reauthorization days defined for the PayPal pay type, the PayPal payment does not expire until 29 days from the current date.
You maintain the order and as a result the order total increases to $680.00.
You generate a pick slip for the entire order. The authorization amount required to generate a pick slip for the order is $680.00. While $680.00 is within 15% of the unused PayPal authorization, it is greater than $75.00 of the unused authorization. Because the authorization amount required to generate a pick slip for the order ($680.00) is greater than $75.00 of the unused PayPal authorization ($600.00), the system:
-
Does not generate a pick slip.
-
Declines the PayPal authorization.
-
Places the order on Credit Card Decline (AT) hold and the PayPal payment on the hold reason defined for the PPLDECLINE response code.
-
Creates order history records, indicating the PayPal authorization was declined:
| Date | Type | Transaction Note | Amount | User |
|---|---|---|---|---|
|
6/26/09 |
AUTH |
MANUAL AUTH# DETECTED - O-42693038SP2401 |
600.00 |
AUTH |
|
6/26/09 |
PICK GEN |
ORDER FLAGGED FOR CREDITCARD CANCELLATIO |
|
USER |
|
6/26/09 |
HOLD |
SYS HLD - DECLINED CREDIT CARD |
80.00 |
USER |
Creates authorization history records for the PayPal payment on the order, indicating the authorization was declined.
| Status | Auth # | Auth Date | Auth Expires | Amt Submitted | Amt Available |
|---|---|---|---|---|---|
|
Authorized |
O-AUTH_CODE |
6/26/09 |
7/25/09 |
600.00 |
600.00 |
|
Declined |
|
6/26/09 |
7/25/09 |
80.00 |
0.00 |
The system allows you to generate a pick slip for the order if:
-
You maintain the order and decrease the amount so that it does not exceed $75.00 of the unused PayPal authorization ($675.00), or
-
You maintain the order and apply the amount that exceeds $75.00 of the unused PayPal authorization towards another form of payment.
Example: Initial PayPal Authorization Expired
A customer places an order on the web storefront and uses PayPal as the form of payment. The order total is $100.00. Due to communication problems, the web storefront cannot send the PayPal payment to PayPal for approval. The web storefront sends the order to Order Management System without a manual authorization for the PayPal payment:
-
cc_name = PAYPAL
-
cc_number = O-AUTH_CODE (this is the PayPal transaction ID)
Order Management System receives and processes the order.
You generate a pick slip for the entire order. The authorization amount required to generate a pick slip for the order is $100.00. Because a manual authorization does not exist for the PayPal payment on the order, the system:
-
Does not generate a pick slip.
-
Declines the PayPal authorization.
-
Places the order on Credit Card Decline (AT) hold and the PayPal payment on the hold reason defined for the PPLDECLINE response code.
-
Creates order history records, indicating the PayPal authorization was declined:
| Date | Type | Transaction Note | Amount | User |
|---|---|---|---|---|
|
6/26/09 |
PICK GEN |
ORDER FLAGGED FOR CREDITCARD CANCELLATIO |
|
USER |
|
6/26/09 |
HOLD |
SYS HLD - DECLINED CREDIT CARD |
100.00 |
USER |
Creates an authorization history record for the PayPal payment on the order, indicating the authorization was declined.
| Status | Auth # | Auth Date | Auth Expires | Amt Submitted | Amt Available |
|---|---|---|---|---|---|
|
Declined |
|
6/26/09 |
7/25/09 |
100.00 |
0.00 |
Processing Deposits for a PayPal Order
When you process deposits for an order that contains a pay type with PPL (PayPal) defined as the deposit service, the system sends the deposit transaction directly to PayPal via PayPal SOAP API architecture.
PayPal Deposit Processing
The system performs the following steps during PayPal deposit processing.
| # | Step |
|---|---|
|
1. |
Determines if the deposit is for a debit or credit transaction.
|
|
2. |
PayPal processes the deposit and sends the response back to Order Management System.
|
|
3. |
Order Management System receives the response and processes the deposit. |
Approved PayPal Deposits
If the deposit for the PayPal payment was approved, the system:
-
For debit transactions, updates the authorization history record with the deposit amount. For example:
| Status | Auth # | Auth Date | Auth Expires | Amt Submit | Amt Avail | Amt Dep |
|---|---|---|---|---|---|---|
|
Authorized |
O-AUTH_CODE |
7/28/09 |
8/26/09 |
100.00 |
.00 |
28.00 |
-
Creates a deposit history record for the deposit transaction.
For debit transactions:
| Inv# | Type | Date | Amt | Status | Response | Action |
|---|---|---|---|---|---|---|
|
467 |
*PURCH |
7/28/09 |
28.00 |
CONFIRMED |
*PROCESSED |
Deposit |
For credit transactions:
| Inv# | Type | Date | Amt | Status | Response | Action |
|---|---|---|---|---|---|---|
|
479 |
*RETURN |
7/30/09 |
20.00- |
CONFIRMED |
*PROCESSED |
Return |
-
For debit transactions:
-
Updates the Authentication value field in the Order Payment Method table with the transaction ID returned in the PayPal DoCapture Response. However, if a transaction ID is already defined in the Authentication value field, the system replaces the transaction ID only if the deposit amount for the current deposit transaction is equal to or greater than the deposit amount for the previous deposit transaction. For example, If you process two deposit transactions for a PayPal order: the first deposit for $25.00 and the second deposit for $40.00, when you process the second deposit, the system updates the transaction ID defined in the Authentication value field with the transaction ID returned for the second deposit since the second deposit amount ($40.00) is greater than the first deposit amount ($25.00).
-
During deposit processing, updates the Credit Card Deposit History table with the transaction ID for each successful deposit, storing it as the capture transaction ID. The system then uses this capture transaction ID to tie refunds, if generated, to individual deposits; see Applying Refunds Across Multiple Capture Transaction IDs for more information. This ID is not displayed on any screen.
Example: Approved PayPal Deposit Across Multiple Authorizations
The PayPal payment on an order has the following authorization history records:
| Status | Auth # | Auth Date | Auth Expires | Amt Submit | Amt Avail | Amt Deposit |
|---|---|---|---|---|---|---|
|
Authorized |
O-AUTH_CODE |
7/28/09 |
8/26/09 |
100.00 |
.00 |
.00 |
|
Authorized |
O-AUTH_CODE |
7/28/09 |
8/26/09 |
12.00 |
.00 |
.00 |
You submit a debit deposit transaction for the PayPal payment for $112.00. Order Management System sends the deposit transaction to PayPal in the PayPal DoCapture Request and receives the approved response in the PayPal DoCapture Response.
Order Management System:
-
Updates the authorization history records with the deposit amount of $112.00.
| Status | Auth # | Auth Date | Auth Expires | Amt Submit | Amt Avail | Amt Deposit |
|---|---|---|---|---|---|---|
|
Authorized |
O-AUTH_CODE |
7/28/09 |
8/26/09 |
100.00 |
.00 |
100.00 |
|
Authorized |
O-AUTH_CODE |
7/28/09 |
8/26/09 |
12.00 |
.00 |
12.00 |
-
Creates a deposit history record for the deposit transaction.
| Inv# | Type | Date | Amt | Status | Response | Action |
|---|---|---|---|---|---|---|
|
469 |
*PURCH |
7/28/09 |
112.00 |
CONFIRMED |
*PROCESSED |
Deposit |
-
Updates the Authentication value field in the Order Payment Method table with the transaction ID returned in the PayPal DoCapture Response.
Example: Approved PayPal Deposit Across Multiple Deposits; Authentication Value Updated
The PayPal payment on an order has the following authorization history record:
| Status | Auth # | Auth Date | Auth Expires | Amt Submit | Amt Avail | Amt Deposit |
|---|---|---|---|---|---|---|
|
Authorized |
O-AUTH_CODE |
7/28/09 |
8/26/09 |
100.00 |
.00 |
.00 |
You submit a debit deposit transaction for the PayPal payment for $28.00. Order Management System sends the deposit transaction to PayPal in the PayPal DoCapture Request and receives the approved response in the PayPal DoCapture Response.
Order Management System:
-
Updates the authorization history record with the deposit amount of $28.00.
| Status | Auth # | Auth Date | Auth Expires | Amt Submit | Amt Avail | Amt Deposit |
|---|---|---|---|---|---|---|
|
Authorized |
O-AUTH_CODE |
7/28/09 |
8/26/09 |
100.00 |
.00 |
28.00 |
-
Creates a deposit history record for the deposit transaction.
| Inv# | Type | Date | Amt | Status | Response | Action |
|---|---|---|---|---|---|---|
|
469 |
*PURCH |
7/28/09 |
28.00 |
CONFIRMED |
*PROCESSED |
Deposit |
-
Updates the Authentication value field in the Order Payment Method table with the transaction ID returned in the PayPal DoCapture Response.
-
You submit a second debit deposit transaction for the PayPal payment for $28.00. Order Management System sends the deposit transaction to PayPal in the PayPal DoCapture Request and receives the approved response in the PayPal DoCapture Response.
Order Management System:
-
Updates the authorization history record with the deposit amount of $28.00.
| Status | Auth # | Auth Date | Auth Expires | Amt Submit | Amt Avail | Amt Deposit |
|---|---|---|---|---|---|---|
|
Authorized |
O-AUTH_CODE |
7/28/09 |
8/26/09 |
100.00 |
.00 |
56.00 |
-
Creates a deposit history record for the deposit transaction.
| Inv# | Type | Date | Amt | Status | Response | Action |
|---|---|---|---|---|---|---|
|
469 |
*PURCH |
7/28/09 |
28.00 |
CONFIRMED |
*PROCESSED |
Deposit |
|
470 |
*PURCH |
7/28/09 |
28.00 |
CONFIRMED |
*PROCESSED |
Deposit |
-
Updates the Authentication value field in the Order Payment Method table with the transaction ID returned in the PayPal DoCapture Response. The system performs this update because the deposit amount for the current deposit transaction ($28.00) is equal to the deposit amount for the previous deposit transaction.
-
You submit a third debit deposit transaction for the PayPal payment for $44.00. Order Management System sends the deposit transaction to PayPal in the PayPal DoCapture Request and receives the approved response in the PayPal DoCapture Response.
Order Management System:
-
Updates the authorization history record with the deposit amount of $44.00.
| Status | Auth # | Auth Date | Auth Expires | Amt Submit | Amt Avail | Amt Deposit |
|---|---|---|---|---|---|---|
|
Authorized |
O-AUTH_CODE |
7/28/09 |
8/26/09 |
100.00 |
.00 |
44.00 |
-
Creates a deposit history record for the deposit transaction.
| Inv# | Type | Date | Amt | Status | Response | Action |
|---|---|---|---|---|---|---|
|
469 |
*PURCH |
7/28/09 |
28.00 |
CONFIRMED |
*PROCESSED |
Deposit |
|
470 |
*PURCH |
7/29/09 |
28.00 |
CONFIRMED |
*PROCESSED |
Deposit |
|
471 |
*PURCH |
7/30/09 |
44.00 |
CONFIRMED |
*PROCESSED |
Deposit |
-
Updates the Authentication value field in the Order Payment Method table with the transaction ID returned in the PayPal DoCapture Response. The system performs this update because the deposit amount for the current deposit transaction ($44.00) is greater than the deposit amount for the previous deposit transaction ($28.00).
Example: Approved PayPal Deposit Across Multiple Deposits; Authentication Value Not Updated
The PayPal payment on an order has the following authorization history record:
| Status | Auth # | Auth Date | Auth Expires | Amt Submit | Amt Avail | Amt Deposit |
|---|---|---|---|---|---|---|
|
Authorized |
O-AUTH_CODE |
7/28/09 |
8/26/09 |
100.00 |
.00 |
.00 |
You submit a debit deposit transaction for the PayPal payment for $56.00. Order Management System sends the deposit transaction to PayPal in the PayPal DoCapture Request and receives the approved response in the PayPal DoCapture Response.
Order Management System:
-
Updates the authorization history record with the deposit amount of $56.00.
| Status | Auth # | Auth Date | Auth Expires | Amt Submit | Amt Avail | Amt Deposit |
|---|---|---|---|---|---|---|
|
Authorized |
O-AUTH_CODE |
7/28/09 |
8/26/09 |
100.00 |
.00 |
56.00 |
-
Creates a deposit history record for the deposit transaction.
| Inv# | Type | Date | Amt | Status | Response | Action |
|---|---|---|---|---|---|---|
|
472 |
*PURCH |
7/28/09 |
56.00 |
CONFIRMED |
*PROCESSED |
Deposit |
-
Updates the Authentication value field in the Order Payment Method table with the transaction ID returned in the PayPal DoCapture Response.
-
You submit a second debit deposit transaction for the PayPal payment for $44.00. Order Management System sends the deposit transaction to PayPal in the PayPal DoCapture Request and receives the approved response in the PayPal DoCapture Response.
Order Management System:
-
Updates the authorization history record with the deposit amount of $44.00.
| Status | Auth # | Auth Date | Auth Expires | Amt Submit | Amt Avail | Amt Deposit |
|---|---|---|---|---|---|---|
|
Authorized |
O-AUTH_CODE |
7/28/09 |
8/26/09 |
100.00 |
.00 |
44.00 |
-
Creates a deposit history record for the deposit transaction.
| Inv# | Type | Date | Amt | Status | Response | Action |
|---|---|---|---|---|---|---|
|
472 |
*PURCH |
7/28/09 |
56.00 |
CONFIRMED |
*PROCESSED |
Deposit |
|
473 |
*PURCH |
7/28/09 |
44.00 |
CONFIRMED |
*PROCESSED |
Deposit |
-
Does not update the Authentication value field in the Order Payment Method table with the transaction ID returned in the PayPal DoCapture Response. The system does not update this field because the deposit amount for the current deposit transaction ($44.00) is less than the deposit amount for the previous deposit transaction ($56.00).
Example: Approved PayPal Deposit and Catch-All Credit Card Deposit
The PayPal pay type on an order has the following authorization history record:
| Status | Auth # | Auth Date | Auth Expires | Amt Submit | Amt Avail | Amt Deposit |
|---|---|---|---|---|---|---|
|
Authorized |
O-AUTH_CODE |
7/28/09 |
8/26/09 |
100.00 |
.00 |
.00 |
The catch-all credit card pay type on the order has the following authorization history record:
| Status | Auth # | Auth Date | Auth Expires | Amt Submit | Amt Avail | Amt Deposit |
|---|---|---|---|---|---|---|
|
Authorized |
AUTH_# |
7/28/09 |
8/26/09 |
24.00 |
.00 |
.00 |
You submit a debit deposit transaction for the order for $124.00. Order Management System:
-
Sends the deposit transaction for the credit card to the service bureau for deposit processing.
-
Sends the deposit transaction to PayPal in the PayPal DoCapture Request and receives the approved response in the PayPal DoCapture Response.
Order Management System:
-
Updates the authorization history records with the deposit amount of $124.00.
PayPal pay type:
| Status | Auth # | Auth Date | Auth Expires | Amt Submit | Amt Avail | Amt Deposit |
|---|---|---|---|---|---|---|
|
Authorized |
O-AUTH_CODE |
7/28/09 |
8/26/09 |
100.00 |
.00 |
124.00 |
Catch-all Credit Card pay type:
| Status | Auth # | Auth Date | Auth Expires | Amt Submit | Amt Avail | Amt Deposit |
|---|---|---|---|---|---|---|
|
Authorized |
AUTH_# |
7/28/09 |
8/26/09 |
24.00 |
.00 |
24.00 |
-
Creates a deposit history record for the deposit transaction.
| Inv# | Type | Date | Amt | Status | Response | Action | Ser |
|---|---|---|---|---|---|---|---|
|
475 |
*PURCH |
7/28/09 |
100.00 |
CONFIRMED |
*PROCESSED |
Deposit |
PPL |
|
475 |
*PURCH |
7/28/09 |
24.00 |
CONFIRMED |
100 |
Deposit |
PMT |
-
Updates the Authentication value field in the Order Payment Method table with the transaction ID returned in the PayPal DoCapture Response.
Example: Approved PayPal Credit Deposit
The PayPal payment on an order has the following authorization history records:
| Status | Auth # | Auth Date | Auth Expires | Amt Submit | Amt Avail | Amt Deposit |
|---|---|---|---|---|---|---|
|
Authorized |
O-AUTH_CODE |
7/30/09 |
8/28/09 |
100.00 |
.00 |
100.00 |
|
Authorized |
O-AUTH_CODE |
7/30/09 |
8/28/09 |
14.19 |
.00 |
14.19 |
A debit deposit history record exists for the order:
| Inv# | Type | Date | Amt | Status | Response | Action |
|---|---|---|---|---|---|---|
|
480 |
*PURCH |
7/30/09 |
114.20 |
CONFIRMED |
*PROCESSED |
Deposit |
The customer returns part of the order for a credit of $22.00.
You submit a credit deposit transaction for the PayPal payment for $22.00. Order Management System sends the deposit transaction to PayPal in the PayPal RefundTransaction Request and receives the approved response in the PayPal RefundTransaction Response.
Order Management System creates a deposit history record for the credit deposit transaction.
| Inv# | Type | Date | Amt | Status | Response | Action |
|---|---|---|---|---|---|---|
|
481 |
*PURCH |
7/30/09 |
22.00- |
CONFIRMED |
*PROCESSED |
Return |
Failed PayPal Deposits
The deposit transaction will be rejected if:
-
Communication failures occur between Order Management System and PayPal.
-
A duplicate deposit transaction already exists on the PayPal system.
-
For debit deposit transactions:
-
The debit amount is greater than the associated authorization amount.
-
The transaction ID defined for the deposit does not match the associated authorization transaction.
-
-
For credit deposit transactions:
-
The transaction ID defined for the deposit does not match the associated debit deposit transaction.
-
The credit amount is greater than the deposit amount.
-
For example, the PayPal payment on an order receives an authorization for $100.00.
On 6/24, the system ships part of the order for $40.00.
On 6/30, the system ships the rest of the order for $60.00.
On 7/15, the system processes a return for the order for $75.00.
Because the return amount of $75.00 is greater than each deposit amount, PayPal fails the return deposit.
Correcting failed deposits: You can use the Submit Rejected Deposits (SRDP) menu option to cancel or resend failed deposits.
Purchase Deposit Transactions
Deposits for a debit (*PURCH) transaction use the PayPal DoCapture method to process the settlement. The system uses the API credentials (API User name, API Password, and API Signature) defined for the PPL service bureau as the credentials used to establish a direct connection to the PayPal system during deposit processing.
PayPal DoCapture Request
Order Management System sends the purchase deposit transaction to PayPal in the PayPal DoCapture Request transaction.
| Parameter | Description |
|---|---|
|
METHOD |
DoCapture. Transactions sent to PayPal for a purchase deposit use the PayPal DoCapture API. |
|
AUTHORIZATION ID |
The transaction ID from the Credit card # field in the Order Payment Method table. Note: If you Use Credit Card Encryption (I97), the system decrypts the value defined in the Credit card # field before sending it to PayPal. |
|
AMT |
The amount of the deposit transaction. PayPal will accept an amount that is up to 15% or $75.00 more than the original authorization amount. Note: This amount cannot exceed $10,000. |
|
CURRENCYCODE |
The PayPal currency code, from the ASC Currency code field in the Auth Service Currency table that corresponds to the Currency in the Order Header Extended table.
See the Work with Authorization Service Currency Screen to cross-reference the Order Management System currency code to the PayPal currency code. |
|
COMPLETETYPE |
NotComplete. This value indicates that there may be additional captures. |
|
INVNUM |
The company number and invoice number. Also includes the ecommerce order number if the Append Ecommerce Order # to PayPal Invoice ID (M40) system control value is selected. The company number and invoice number include leading zeros. Example: 006-0000467-EC12345, where 006 is the company number, 0000467 is the invoice number, and EC12345 is the ecommerce order number. |
|
NOTE |
The charge description from the Charge description field in the Authorization Service table, followed by the order number. A plus sign (+) displays for each space. Example: PAYPAL+DIRECT+COMMUNICATION+1845, where PAYPAL DIRECT COMMUNICATION is the charge description and 1845 is the order number. |
PayPal DoCapture Response
Order Management System receives the purchase deposit response transaction from PayPal in the PayPal DoCapture Response transaction.
| Parameter | Description |
|---|---|
|
AUTHORIZATION ID |
The transaction ID from the Credit card # field in the Order Payment Method table. |
|
TRANSACTIONID |
The unique transaction ID assigned by PayPal to the deposit confirmation. Updates the Authentication value field in the Order Payment Method table. However, if a transaction ID is already defined in the Authentication value field, the system replaces the transaction ID only if the deposit amount for the current deposit transaction is equal to or greater than the deposit amount for the previous deposit transaction. Example: If you process two deposit transactions for a PayPal order: the first deposit for $25.00 and the second deposit for $40.00, when you process the second deposit, the system updates the transaction ID defined in the Authentication value field with the transaction ID returned for the second deposit since the second deposit amount ($40.00) is greater than the first deposit amount ($25.00). Capture transaction ID: During deposit processing, the system updates the Credit Card Deposit History table with this transaction ID for each successful deposit, storing it as the capture transaction ID. The system then uses this capture transaction ID to tie refunds, if generated, to individual deposits; see Applying Refunds Across Multiple Capture Transaction IDs for more information. This ID is not displayed on any screen. |
|
PARENT TRANSACTIONID |
|
|
PAYMENTTYPE |
Indicates whether the payment is instant or delayed. |
|
ORDERTIME |
The date and time when the payment was processed by PayPal. Example: 2009-07-24T17:23:15Z |
|
AMT |
The final amount charged, including any shipping and taxes from the Merchant Profile. |
|
FEEAMT |
The PayPal fee amount charged for the transaction. |
|
SETTLEAMT |
The amount deposited in the merchant’s PayPal account if there is a currency conversion. |
|
EXCHANGERATE |
The exchange rate if a currency conversion occurred. |
|
PAYMENTSTATUS |
Order Management System considers a deposit successful if the following status is received:
The system considers any other response a rejected deposit. Updates the Response field in the Deposit History table. |
Return Deposit Transactions
Deposits for a credit (*RETURN) transaction use the PayPal RefundTransaction method to process the settlement. The system uses the API credentials (API User name, API Password, and API Signature) defined for the PPL service bureau as the credentials used to establish a direct connection to the PayPal system during deposit processing.
PayPal RefundTransaction Request
Order Management System sends the return deposit request transaction to PayPal in the PayPal RefundTransaction Request transaction.
| Parameter | Description |
|---|---|
|
METHOD |
RefundTransaction. Transactions sent to PayPal for a return deposit use the PayPal RefundTransaction API. |
|
TRANSACTIONID |
The transaction ID from the Authentication value field in the Order Payment Method table for the record associated with the first non-deactivated PayPal pay type. This ID is also stored in the Credit Card Deposit History table as the capture transaction ID. The system uses this value to match a purchase deposit to the return deposit. When a refund is applied across multiple transactions, the system uses the capture transaction IDs to reconcile the refund amounts and submits each refund amount separately based on the originating capture transaction ID. See Applying Refunds Across Multiple Capture Transaction IDs for a discussion. If a transaction ID does not exist in the Authentication value, the system sends a blank Authorization ID field to PayPal. Because PayPal cannot match a purchase deposit to the return deposit, the system places the return deposit in a failed status. |
|
REFUNDTYPE |
The type of refund to make. Set to Partial. |
|
AMT |
The amount of the deposit (refund) transaction. Return Amount PayPal does not accept returns for an amount that is greater than the original deposit amount. For example, the PayPal payment on an order receives an authorization for $100.00.
Because the return amount of $75.00 is greater than each deposit amount, PayPal fails the return deposit. |
|
NOTE |
The charge description from the Charge description field in the Authorization Service table, followed by the order number. A plus sign (+) displays for each space. Example: PAYPAL+DIRECT+COMMUNICATION+1845, where PAYPAL DIRECT COMMUNICATION is the charge description and 1845 is the order number. |
PayPal RefundTransaction Response
Order Management System receives the return deposit response transaction from PayPal in the PayPal RefundTransaction Response transaction.
| Parameter | Description |
|---|---|
|
REFUND TRANSACTIONID |
The unique transaction ID assigned by PayPal to the deposit confirmation. |
|
NETREFUNDAMT |
The amount subtracted from the PayPal balance of the original recipient of payment to make this refund. |
|
FEEREFUNDAMT |
The transaction fee refunded to the original recipient of payment. |
|
GROSSREFUND AMT |
The amount of money refunded to the original payer. |
PayPal Authorization Reversals
Authorization reversals use the PayPal DoVoid method to request the reversal. The system uses the API credentials (API User name, API Password, and API Signature) defined for the PPL service bureau as the credentials used to establish a direct connection to the PayPal system when processing a stored value card authorization trigger record (File/Key = AHR).
Sent when? The system creates authorization reversal triggers only if the Send reversal flag is selected for PayPal in Defining Authorization Services (WASV). Also, the system sends a DoVoid request for a reversal only if:
-
The entire order is canceled or sold out, or;
-
The payment method is deactivated before any transactions are billed.
The system does not submit a reversal to PayPal for a partial amount, such as when:
-
A single item on a multi-line order is canceled or sold out.
-
A single unit on an order line is canceled or sold out.
-
Any items remaining on the order are canceled after a shipment has taken place.
For more information: See:
-
Stored Value Card Authorization Reversal for background.
-
Working with Outbound Interface Transactions (WOIT) for information on creating and processing outbound interface triggers.
-
Defining Authorization Services (WASV) for information on setting up PayPal as an authorization service.
PayPal DoVoid Transaction Request
Order Management System sends the DoVoid request to PayPal to request an authorization reversal.
The DoVoid request specifies the stored value card number for the Order Payment Method as the AUTHORIZATIONID.
PayPal DoVoid Transaction Response
The DoVoid response confirms that the DoVoid request was successful and echoes the AUTHORIZATIONID.
PayPal Direct Connection Integration Restrictions
The Order Management System PayPal Direct Connection does not support the following.
-
Online or batch authorization processing in Order Management System. Web orders containing a PayPal payment must receive an approved authorization from PayPal on the web storefront before being sent to Order Management System for processing.
-
Additions to orders that contain a PayPal pay type in Order Maintenance that would exceed 15% or $75.00 of the initial authorization received for the PayPal payment. For example, if the authorization received for the PayPal payment is $100.00, you can apply up to $115.00 towards the PayPal authorization ($100.00 + 15% = $115.00).
-
Orders that contain multiple ship to customers.
-
Gift card payments.
-
Alias items.
-
Promotions applied to web orders in Order Management System. Final order amounts must be passed from the web storefront.
-
Authorization reversals are supported only for the full amount of the authorization when the entire order is canceled or sold out, when the payment method is deactivated.
-
Exchanges and returns performed through order entry are not recommended when the pay type on the order is PayPal; however, the system does not prevent either activity.
-
Exchanges are not supported if there is a charge on the exchanged item. In this scenario, you must create a separate order for the new charge with a different customer payment.
-
Returns/Refunds using the PayPal payment cannot be greater than the original deposit amount.
PayPal Direct Connection Integration Troubleshooting
If you have problems connecting to PayPal during deposit processing, use the following steps to help troubleshoot the issue.
PayPal service set up correctly? Verify that you have performed the required setup for the PayPal Direct Connection integration; see PayPal Direct Connection Integration Setup.
PayPal Log
When you process deposits for an order containing a PayPal pay type, the system sends the deposit transaction directly to PayPal and logs the transactional information in the PayPal log.
Information in log: The PayPal log includes a copy of the deposit information sent between Order Management System and PayPal. In addition, any errors that may occur during deposit transaction processing are captured in the log.
You can use this log to confirm that communication between Order Management System and PayPal is working correctly, to isolate communication problems, or the recover information.
Sample log information:
Successful deposit process generates IFO level messages, such as the following:
11:56:55,831 INFO PAYPAL - [Settlement] Transmitted deposit(*PURCH) Processed : AMT=20.94&INVNUM=I23-1754&NOTE=PAYPAL+1754&AUTHORIZATIONID=AUTH_ID&COMPLETETYPE=NotComplete&METHOD=DoCapture
Failure deposit process and errors during processing generates ERROR level messages, such as the following:
11:56:55,831 ERROR PAYPAL - [Settlement] Transmitted deposit(*PURCH) Failure : AMT=20.94=123-1234=PAYPAL+1754=AUTH_ID=NotComplete=DoCapture
11:57:06,581 ERROR PAYPAL - [Settlement] Timestamp : 2009-05-08T15:52:55Z
11:57:08,737 ERROR PAYPAL - [Settlement] CorrelationId : CORR_ID
11:57:10,284 ERROR PAYPAL - [Settlement] Error code : 10002
11:57:11,972 ERROR PAYPAL - [Settlement] Short message : Security error
11:57:15,018 ERROR PAYPAL - [Settlement] Long message : Security header is not valid
11:57:17,300 ERROR PAYPAL - [Settlement] Severity code : Error
11:57:20,297 INFO PAYPAL - [Settlement] Transmitted deposit(*RETURN)Failure : AMT=68.00=123-123456=PAYPALID+7042982=AUTH_ID=NotComplete=RefundTransactionThe time elapsed to receive a response is indicated in a DEBUG level message, such as the following:
12:19:13,481 DEBUG PAYPAL - message: [Settlement] Got response, elapsed time = 2 seconds
Errors reading the authorization service or authorization service extended generates ERROR level messages, such as the following:
11:31:04,471 ERROR PAYPAL - [Settlement] Defaults set. Do not process in PayPal 'live' environment
11:31:31,841 ERROR PAYPAL - [Settlement] Exception(s) encountered during Initialization. No Deposit processing performed.
PayPal Direct Connection Integration Setup
Purpose: Before you can use the PayPal - Direct Connection integration, you must perform the necessary setup.
If you are upgrading from 5.0: In 5.0, the PayPal credentials are stored in the System Properties (PPOP) menu option. When you upgrade from version 5.0, the PayPal credentials are stored in the Work with Authentication Services (WASV) menu option in the API user name, API password, and API signature fields. You will need to redefine your PayPal credentials as part of the upgrade process.
Type of PayPal integration: The PayPal Direct Connection integration uses PayPal’s Express Checkout to send deposit transactions between PayPal and Order Management System. Communication protocol is provided through the PayPal SOAP API Architecture, which uses a signed SOAP request over HTTPS. The PayPal API jar file, provided by PayPal and included with Order Management System, handles communication between PayPal and Order Management System.
In order to use the PayPal Direct Connection integration, your web storefront must support a direct connection to PayPal to perform authorizations.
Related system control value: In addition to the setup described below, you can use the Append Ecommerce Order # to PayPal Invoice ID (M40) to define whether to include the ecommerce order number in the INVNUM set to PayPal.
Creating the PayPal Decline Order Hold Reason
Use the Establishing Order Hold Reason Codes (WOHR) menu option to create the PP (PayPal Decline) order hold reason code. The system assigns this reason to the PayPal pay type on the order when it is declined during PayPal authorization processing at pick slip generation time.
At the Create Order Hold Reason Screen, enter the following information:
| Field | Description |
|---|---|
|
Reason |
Enter PP. |
|
Description |
Enter PAYPAL DECLINE. |
Creating the PPL (PayPal) Service Bureau
Use the Defining Authorization Services (WASV) menu option to create the PPL service bureau.
Multiple PayPal accounts: If you use multiple PayPal accounts, for example, each of your entities uses an individual PayPal account, you can:
-
Create a separate service bureau for each of your PayPal accounts (for example, PP1, PP2, etc.). In this situation, you can define unique API credentials to establish a connection to the PayPal system for each of your PayPal accounts at the Second Create Authorization Service Screen. You must create a separate PayPal pay type for each of your accounts; see Creating a PayPal Pay Type.
-
Use the Work with Merchant ID Overrides Screen to set up overrides for the different entities in your company. In this situation, you can define unique API credentials to establish a connection to the PayPal system for each of your PayPal accounts at the Create Merchant ID by Entity Screen. You can create one PayPal pay type for all of your accounts; see Creating a PayPal Pay Type.
-
Use the Work with Authorization Service Currency Screen to set up a cross-reference between the Order Management System currency code and the PayPal currency code. When sending the PayPal DoCapture Request to PayPal, the system populates the CURRENCYCODE in the request with the ASC Currency code in the Auth Service Currency table that corresponds to the Currency in the Order Header Extended table.
-
If the Currency in the Order Header Extended table is blank, the system uses the currency code defined in the Local Currency Code (A55) system control value to determine which ASC Currency code in the Auth Service Currency table to use.
-
If a cross reference is not defined in Authorization Service Currency for the selected currency code, the system leaves the CURRENCYCODE in the PayPal DoCapture Request blank; PayPal treats a blank CURRENCYCODE as USD currency.
-
At the First Create Authorization Services Screen, enter the following information:
| Field | Description |
|---|---|
|
Service code |
Enter the name of the PayPal account; for example PPL. |
|
Application |
Select Auth/Deposit. |
|
Charge description |
Enter PAYPAL DIRECT CONNECTION. |
At the Second Create Authorization Service Screen, enter the following information:
| Field | Description |
|---|---|
|
Media type |
Select Communication. |
|
Batch/Online |
Select Batch. |
|
Active production system? |
Select this field to send transactions to PayPal. |
|
Primary authorization service |
Enter PPL. |
|
Test mode? |
Select this field if you are sending transactions to PayPal’s test “sandbox” environment. Deselect this field if you are sending transactions to PayPal’s production “live” environment. |
|
The following fields are used to establish a connection to the PayPal system when using the PayPal Direct Connection Integration. You can also define API credential information at the entity level using the Create Merchant ID by Entity Screen. |
|
|
API User name |
Enter the user name, provided by PayPal, used to establish a direct connection to the PayPal system during deposit processing. |
|
API Password |
Enter the password, provided by PayPal, used to establish a direct connection to the PayPal system during deposit processing. |
|
API Signature |
Enter the encrypted signature, provided by PayPal, used to establish a direct connection to the PayPal system during deposit processing. |
At the Create Vendor Response Screen, enter the following information:
| Field | Description |
|---|---|
|
Response code |
Enter PPLDECLINE. |
|
Description 1 |
Enter PAYPAL DECLINE. |
|
Hold reason |
Enter PP. If you do not enter PP as the hold reason, the system places the PayPal payment on AV hold. |
Creating a PayPal Pay Type
Use the Work with Pay Types (WPAY) menu option to create the PayPal pay type, making sure to define the following information.
| Field | Description |
|---|---|
|
Pay category |
Enter Credit Card (pay category 2). |
|
Card type |
Enter Credit (card type C). |
|
Authorization service |
Enter the name of the PayPal Direct Connection service bureau, for example, PPL. |
|
Deposit service |
Enter the name of the PayPal Direct Connection service bureau, for example, PPL. |
|
Reauthorization days |
Enter the number of days before PayPal payments expire. Make sure the number of days you enter matches the number of days defined in the PayPal system. Typically, PayPal payments are good for 29 days. |
|
Send reversal |
Select this field to enable sending reversals to PayPal when the value of the entire authorization amount is canceled or deactivated. See Stored Value Card Authorization Reversal for background. |
Credit card number format: In addition to creating the PayPal pay type, create a credit card number format if you do not want the full PayPal account number to display on Order Management System screens. If you do not have authority to the Display Full Credit Card Number (B14) secured feature, the PayPal account number displays in the format specified at the Credit Card Number Layout Screen for the associated pay type. For example, ************1111 may display instead of the entire PayPal account number. See Credit Card Number Format for an overview.
Processing Authorizations and Deposits Using Point-to-Point Communication
Purpose: Processing authorizations and deposits using point-to-point communication, allows you to post transactions directly to the service bureau in the format required by the service bureau.
Available Point-to-Point Integrations
| Integration | See: |
|---|---|
|
Oracle Retail Customer Engagement Stored Value Card integration: Allows you to process the stored value card transactions between Order Management System and Oracle Retail Customer Engagement in Oracle Retail Customer Engagement’s message format. |
Customer Engagement Stored Value Card Integration for an overview and more information on the Oracle Retail Customer Engagement messages used to process stored value card transactions between Order Management System and the Oracle Retail Customer Engagement system using point-to-point communication. |
|
Cybersource integration: Allows you to process token, authorization, authorization reversal, and deposit transactions between Order Management System and Cybersource in Cybersource’s message format. |
CyberSource Point-to-Point Integration for an overview and more information on the Cybersource messages used to process token, authorization, authorization reversal, and deposit transactions between Order Management System and the Cybersource system using point-to-point communication. |
For more information: See:
-
Stored Value Card Integration for more information on how to process stored value card transactions.
-
Processing Authorizations and Deposits using an Integration Layer Process for more information on processing authorizations and deposits using an integration layer process.
-
Using the Credit Card Authorization Interface for more information on authorization processing in Order Management System.
-
Processing Auto Deposits (SDEP) for more information on deposit processing in Order Management System.
External Payment Service
External payment service is a RESTful web service that provides an interface from Order Management System for sending credit card and stored value card transactions and receiving responses. Using this service, you can build a custom payment processor that maps to your payment provider.
This payment service needs to be configured to use the integration layer component of Order Management System, as this component controls payment service processing.

Supported credit card transactions:
-
authorization request
-
deposit request
-
return request
-
reversal request
-
token request
Supported stored value card transactions:
-
activation request
-
authorization request
-
balance inquiry
-
deposit request
-
generation request
-
recharge request
-
return request
-
reversal request
For more information: For background on credit card and stored value card authorization, see:
In this topic:
External Payment Service Setup
The required setup for the External Payment Service is described below, and includes:
Additional security requirements: For additional security-related setup requirements, including implementation of OAuth, see the External Payment Service Technical Reference Paper on My Oracle Support (2149144.1).
Secured Feature
The External Authorization Service Access (B25) secured feature controls access to the Work with External Authorization Service Screen, where you can work with required settings for the External Payment Service. These settings are described briefly below under External Service Settings
Authentication
Use OAuth to authenticate the External Payment Service. See the Oracle Retail Omnichannel Web Service Authentication Guide on My Oracle Support (2728265.1) for more information.
Authorization Service Settings
Use Defining Authorization Services (WASV) to create a service bureau for the External Payment Service.
Settings for External Payment Service: The following table lists some of the required settings, in addition to the basic settings required for all service bureaus and any optional settings, to support the External Payment Service.
| Fields at the first Create/Change/Display Authorization Services screen include: | Description |
|---|---|
|
Typically set to EXT or EXC, but can be set to anything. |
|
|
Select Auth/Deposit. |
|
|
Select this field to void any unused portion of a credit card or stored value card authorization at deposit time. Note: The Retain Unused Stored Value Card Authorization After Deposit (J21) system control value does not control stored value card deposit updates for the External Payment Layer. |
|
|
Select this field to perform a credit card authorization reversal when you process a cancellation associated with a credit card payment or deactivate a credit card payment. |
|
|
Fields at the second Create/Change/Display Authorization Services screen: |
|
|
Select Communication. |
|
|
Select Online or Batch. |
|
|
Must be selected. |
|
|
Should be blank |
|
|
Payment Link must be selected, to indicate messages sent the external payment layer are processed directly. |
|
|
Indicates the multiple to apply to the Response time to determine how long to wait for a response after a connection when you are using the External Payment Service. For example, if the Response check frequency is 6 and the Response time is 10,000, the system waits 60,000 milliseconds (60 seconds or 1 minute) for a response after connection. Note: If the total response interval is exceeded for an authorization record, the record goes into *RCVD status with a response type of SU, and is then removed from the Credit Card Authorization Transaction table (CCAT00). |
|
|
Indicates the number of milliseconds to wait for a connection to the service bureau when you are using the External Payment Service. For example, set this field to 10,000 milliseconds to wait 10 seconds for a connection. Note: Order Management System does not wait the entire response time if it is not necessary. To avoid potential timeout issues, Oracle recommends that you set the Response Time high enough for the authorization service to prevent issues that could potentially occur if the authorization process times out while processing multiple authorizations for an order. |
|
|
Country codes |
If needed, define a cross reference between your country code and the country code used by the service bureau. Note: This option also indicates whether a service bureau performs address verification processing for the country. |
|
Currency codes |
If needed, define a cross reference between your currency code and the currency code used by the service bureau; see Defining Authorization Service Currencies. |
|
Merchant ID Override |
If needed, define a merchant ID override for the different entities in your company; see Defining Merchant ID Overrides. |
|
Paytype codes |
If needed, define a cross reference between your pay type code and the pay type code used by the service bureau; see Defining Vendor Paytype Codes. |
|
Response codes |
Define the reasons that the service bureau approves (authorizes) or declines a transaction. The codes are assigned to each transaction by the service bureau when approving or declining the request; see Defining Vendor Response Codes. A response code of SU, indicating service unavailable, must be created. When there is a REJECT or ERROR response, the order goes on AT hold and the authorization is updated as declined when:
If no reason code is passed, a response code of SU is applied. |
External Service Settings
The additional External Service Settings at the Work with External Authorization Service Screen are accessible only to users with External Authorization Service Access (B25) authority.
All fields on the screen are required, with the exception of the External Service flag.
Tracking changes to external service settings: Changes that users make to external service settings are tracked in the User Audit table, and listed on the User Authority Change report. See Tracking User, Authority, and Password Updates for more information.
For more information: See the External Payment Layer RESTful Service technical reference on My Oracle Support for more information on updating these settings.
| Setting | Notes |
|---|---|
|
External Service |
Select this field to have request messages generated for the External Payment Service. |
|
External URL Prefix |
The prefix that forms the beginning of the URL where messages are sent. Must begin with https. The message type defines the endpoint suffix that is appended to the prefix, creating the entire URL. For example, for a credit card authorization request, the entire URL might be https://remote.auth.com:1234/authorization, where remote.auth.com is the remote server, 1234 is the port, and authorization identifies an authorization request. The following endpoints are supported:
|
|
Message Version |
Indicates which message version is supported:
Tags that are included in version 2.0 provide support for subsequent authorization requests through the External Payment Service. See Subsequent Authorization Requests through the External Payment Service for a discussion, and see Defining Authorization Services (WASV) for information on setting the Message Version. |
|
Authentication User |
The user ID for authentication of the messages to the external service. |
|
Authentication Password |
The password for authentication of the messages to the external service. Must be at least 6 positions long, include both numbers and letters, include a special character, and cannot end with a number. |
Work with Pay Types (WPAY)
Use Working with Pay Types (WPAY) to assign the authorization and deposit service to each credit card or stored value card pay type that uses the External Payment Service.
Work with Order Types (WOTY)
In order to perform online authorization on web orders, the Online Authorization setting for the order type on the web order must be set to Without Window. See Establishing Order Types (WOTY) for more information on setting up an order type.
Credit Card Authorization Reversal
The External Payment Service supports credit card authorization reversal. See Credit Card Authorization Reversal for an overview and processing details.
For the service bureau in Defining Authorization Services (WASV), select the Send reversal field to indicate the service bureau supports credit card authorization reversal if credit card authorization reversals need to be supported.
System control value for authorization reversal: Use Activation / Reversal Batch Processing (I50). See that system control value for more information.
Stored Value Card Reversal Function
You can use a periodic function, described below, to submit stored value card reversal requests for closed or canceled orders.
REVXAHP (Program name = PFREVXAHP): Reverse Partial Auth for External Payment Service: Generates SVC reversal request messages for the External Payment Service within the specified company, provided that:
-
A company is specified.
-
The parameter specified for the function is a valid stored value card pay type code for the company.
-
The pay type is assigned to an authorization service configured as the External Payment Service.
-
The pay type does not match the Default Auth Code for CC Netting (M25) system control value.
For more information: See Stored Value Card Reversal with the External Payment Service for details, and see Stored Value Card Authorization Reversal for an overview of the authorization reversal process.
Subsequent Authorization Requests through the External Payment Service
About subsequent authorizations: Order Management System sends information through the External Payment Service indicating whether a transaction was initiated by the merchant, or by the customer. For example, when the customer initially places the order, this is a transaction initiated by the customer; an example of a merchant-initiated transaction is a subsequent authorization that is acquired by Order Management System when the initial authorization is expired.
Message version: Additional tags are available in version 2.0 of the messages to support passing information identifying a subsequent authorization that was not initiated by the customer. You need to have a version 2.0 selected for the External Payment Service to use the new tags. See External Service Settings for more information.
Term definitions:
-
Merchant-Initiated Transactions (MIT): An authorization that the system initiates without the customer’s active participation.
-
Cardholder-Initiated Transactions (CIT): An authorization that uses payment information provided by the customer.
-
Credentials on File (COF): The cardholder payment information that is stored by the system.
Types of subsequent authorizations: Brief descriptions of subsequent authorization types for credit cards include:
-
Resubmission of a failed deposit: When the Supports Auth Resubmission flag is selected for the authorization service in Defining Authorization Services (WASV) and a previous deposit request for the credit card failed. A subsequent authorization and deposit request is generated, with the subsequentAuth tag set to Y and the subsequentAuthReason set to RESUBMIT. However, if the Supports Auth Resubmission flag is not selected, the subsequentAuthReason is set to REAUTH.
-
Split shipment: When the order is not fulfilled in a single shipment. In this case, the request for the subsequent authorization includes a subsequentAuthReason set to REAUTH and passes the existing ci_transaction_id as the subsequentAuthTransactionID.
-
Deferred or installment billing: When the order uses deferred or installment billing. The pay type’s Notify of installments setting indicates whether to send the subsequentAuthReason set to INSTALLMENT or REAUTH. See Deferred/Installment Billing Overview for background.
-
Customer membership orders: When you generate orders for a customer membership that has been authorized. Authorization can take place either through the order originating the customer membership, or through a generated membership order. The CIT Transaction ID (customer-initiated transaction ID) and the original authorization amount for the credit card are stored on the customer membership, although this information is not displayed on any screen. For more information, see Subsequent Authorizations through the External Payment Service for Membership Orders.
Details on the tags in the authorization request message supporting subsequent authorization requests: See Subsequent Authorization Tags.
Sample External Payment Service Transactions
Overview: The sample request and response messages included in this help topic are:
Sample Messages
Activation Request and Response (Stored Value Card)
Note:
When the stored value card is a virtual card (the ccPassCode is set to V), the card is activated through a recharge request. See Recharge Request and Response (Stored Value Card).
Activation Request
{
"typeDescription":"ActivateRequest",
"requestType":"GiftCard",
"cardNumber":"CARD_NUMBER",
"emailAddress":"first.last@example.com",
"merchantId":"",
"compCurrency":"USD",
"vendCurrency":"",
"vendPaymentMethod":"",
"ecommerceIndicator":"false",
"useTokenization":"Y",
"billToAuthServiceCountry":"US",
"cca":{
"ccNbrAsBlob":{
"buf":[
],
"len":0,
"origLen":0
},
"vendorResp":"",
"vendorResp2":" ",
"authNbr":" ",
"authDate":0,
"alphaOrderNbr":"00001234",
"merchantName":" ",
"authMerchantNbr":" ",
"oasisPayType":0,
"oasisPayCode":" ",
"oasisPayTypeCode":" ",
"companyDivision":" ",
"expireMonth":0,
"expireYear":0,
"AVSResp":" ",
"chargeDesc":"SVC",
"authAmt":25,
"custNbr":20110,
"custLastName":"LAST",
"custFirstName":"FIRST",
"addrLine1":"123 EXAMPLE ST",
"addrLine2":" ",
"billtoCity":"CHICAGO",
"billtoState":"IL",
"billtoZip":"60625",
"billtoExtraZip":" ",
"billtoCountry":"US",
"phoneNbr":0,
"phoneType":" ",
"ccPassCode":"P",
"ordNbr":12093,
"opmSeqNbr":0,
"auhSeqNbr":0,
"authService":"EXG",
"currCode":" ",
"lastModifiedPgm":" ",
"selected":false
},
"orderPaymentMethod":{
"ccNbr":[
],
"ccNbrAsBlob":{
"buf":[
],
"len":0,
"origLen":0
},
"selected":false
},
"authorizationService":{
"id":{
"cmp":787,
"authService":"EXG"
},
"application":"ATDP",
"batchOnline":"C",
"mediaType":"C",
"activeProductionSys":"N",
"addrVerification":"N",
"declineDays":0,
"selectForDeposit":"Y",
"immediateDeposit":"N",
"immediateResp":"N",
"industryFormat":" ",
"installmentBilling":"N",
"keepHist":"N",
"chgDesc":"EXT GC",
"merchantId":" ",
"password":" ",
"receivingCode":" ",
"signon":" ",
"startUpInfo":" ",
"subCode":" ",
"fileSeqNbr":0,
"presenterId":" ",
"PIDPassword":" ",
"submitterId":" ",
"SIDPassword":" ",
"presenterIdDep":" ",
"PIDPasswordDep":" ",
"submitterIdDep":" ",
"SIDPasswordDep":" ",
"APIUsername":" ",
"APIPassword":" ",
"APISignature":" ",
"selected":false
},
"authorizationServiceExt":{
"id":{
"cmp":787,
"authService":"EXG"
},
"authPhoneNbr":0,
"depositPhoneNbr":0,
"communicationType":"P",
"respCheckFreq":5,
"testMode":"N",
"authSrvProvider":" ",
"merchDiv":0,
"providerNetworkAddr":" ",
"portNbr":0,
"respTime":90000,
"deferredMerchId":" ",
"installmentMerchId":" ",
"excludeFromFlexPay":"N",
"onLineILPProc":" ",
"batchILPProc":" ",
"depositILPProc":" ",
"svcActivationProc":" ",
"svcBalInqProc":" ",
"primaryAuthSrv":"",
"requestToken":"N",
"voidAuth":"N",
"allowReversal":"N",
"allowsResubmit":false,
"overrideReconciliationId":" ",
"selected":false
}Activation Response
{
"status":"ACCEPT",
"reasonCode":"77"
}Authorization Request and Response
Authorization Request
{
"typeDescription":"AuthorizationRequest",
"requestType":"CreditCard",
"cardNumber":"CARD_NUMBER",
"emailAddress":"first.last@example.com",
"merchantId":"",
"compCurrency":"USD",
"vendCurrency":"",
"vendPaymentMethod":"",
"ecommerceIndicator":"false",
"useTokenization":"Y",
"billToAuthServiceCountry":"US",
"subsequentAuth":"N",
"subsequentAuthTransactionID":"",
"subsequentAuthReason":"",
"subsequentAuthOriginalAmount":"",
"subsequentAuthStoreCredential":"",
"cca":{
"ccNbrAsBlob":{
"buf":[
],
"len":0,
"origLen":0
},
"vendorResp":"",
"vendorResp2":"",
"authNbr":"",
"authDate":0,
"alphaOrderNbr":"00001234",
"expireMonth":12,
"expireYear":21,
"AVSResp":"",
"chargeDesc":"",
"authAmt":48.04,
"custNbr":20110,
"custLastName":"LAST",
"custFirstName":"FIRST",
"addrLine1":"123 EXAMPLE ST",
"addrLine2":" ",
"billtoCity":"CHICAGO",
"billtoState":"IL",
"billtoZip":"60625",
"billtoExtraZip":" ",
"billtoCountry":"US",
"phoneNbr":0,
"ordNbr":12091,
"opmSeqNbr":1,
"auhSeqNbr":1,
"authService":"EXC",
"currCode":"",
"lastModifiedPgm":" ",
"selected":false
},
"orderPaymentMethod":{
"id":{
"cmp":787,
"ordNbr":12091,
"seqNbr":1
},
"id_1":302185,
"amtToChg":0,
"amtAuth":0,
"amtBilled":0,
"amtCollected":0,
"amtCredited":0,
"authDate":0,
"authNbr":" ",
"manualAuthAmt":0,
"cashApplDate":0,
"cashCtrlNbr":0,
"chgSeq":3,
"expirationDate":1221,
"giftCertificateCpnNbr":0,
"payCategory":"2",
"cardSecurityVal":0,
"deferBill":"N",
"holdUntilDate":0,
"issuingBank":" ",
"nbrDaysForDeferral":0,
"fixDateForDeferral":0,
"nbrOfInstallments":0,
"installmentInterval":0,
"fixInstallmentBillDay":0,
"fpoExpirationDate":0,
"suppressDeposit":" ",
"suppressRefund":" ",
"checkingAct":" ",
"authVal":" ",
"ecommIndicator":" ",
"checkIntefaceDownload":0,
"cardStartDate":0,
"checkNbr":0,
"routingNbr":0,
"pinStorage":0,
"cardSecurityPresence":" ",
"cardIssueNbr":" ",
"payType":9,
"holdRsn":"CW",
"fpoPmtCode":" ",
"ccNbr":[
],
"ccNbrAsBlob":{
"buf":[
],
"len":0,
"origLen":0
},
"ccLast4":"1111",
"tokenized":" ",
"verifiedToken":" ",
"bin":" ",
"lastModifiedPgm":"OrderPaymentMethodDAL.updateHoldReason",
"ciTransactionId":" ",
"ccNumberChange":" ",
"originalAmountAuthorized":0,
"selected":false
},
"authorizationService":{
"id":{
"cmp":787,
"authService":"EXC"
},
"application":"ATDP",
"batchOnline":"C",
"mediaType":"C",
"activeProductionSys":"N",
"addrVerification":"N",
"declineDays":0,
"selectForDeposit":"Y",
"immediateDeposit":"N",
"immediateResp":"N",
"industryFormat":" ",
"installmentBilling":"N",
"keepHist":"N",
"chgDesc":"EXT CC",
"merchantId":" ",
"password":" ",
"receivingCode":" ",
"signon":" ",
"startUpInfo":" ",
"subCode":" ",
"fileSeqNbr":0,
"presenterId":" ",
"PIDPassword":" ",
"submitterId":" ",
"SIDPassword":" ",
"presenterIdDep":" ",
"PIDPasswordDep":" ",
"submitterIdDep":" ",
"SIDPasswordDep":" ",
"APIUsername":" ",
"APIPassword":" ",
"APISignature":" ",
"selected":false
},
"authorizationServiceExt":{
"id":{
"cmp":787,
"authService":"EXC"
},
"authPhoneNbr":0,
"depositPhoneNbr":0,
"communicationType":"P",
"respCheckFreq":1,
"testMode":"N",
"authSrvProvider":" ",
"merchDiv":0,
"providerNetworkAddr":" ",
"portNbr":0,
"respTime":9000,
"deferredMerchId":" ",
"installmentMerchId":" ",
"excludeFromFlexPay":"N",
"onLineILPProc":" ",
"batchILPProc":" ",
"depositILPProc":" ",
"svcActivationProc":" ",
"svcBalInqProc":" ",
"primaryAuthSrv":"",
"requestToken":"N",
"voidAuth":"N",
"allowReversal":"N",
"allowsResubmit":false,
"overrideReconciliationId":" ",
"selected":false
},
"authorizationHistory":{
"id":{
"cmp":787,
"ordNbr":12091,
"ordPayMethodSeqNbr":1,
"seqNbr":1,
"selected":false
},
"authSts":"S",
"authAmt":48.04,
"depositAmt":0,
"authDate":0,
"sentDate":1210521,
"authNbr":" ",
"vendorResp":" ",
"vendorResp2":" ",
"AVSResp":" ",
"transactionId":" ",
"authTime":0,
"lastModifiedPgm":" ",
"captureSequence":0,
"captureCount":0,
"totalDeposited":0,
"captureVendorResp":" ",
"selected":false
}
}Authorization Response
{
"transactionId":"1234567890",
"approvedAmount":48.04,
"status":"ACCEPT",
"reasonCode":"100",
"authorizationCode":"123456789",
"ciTransactionId":"1234567890"
}Balance Request and Response (Stored Value Card)
Balance Request
"typeDescription":"BalanceRequest",
"requestType":"GiftCard",
"cardNumber":"CARD_NUMBER",
"emailAddress":"first.last@example.com",
"merchantId":"",
"compCurrency":"USD",
"vendCurrency":"",
"vendPaymentMethod":"",
"ecommerceIndicator":"false",
"useTokenization":"Y",
"billToAuthServiceCountry":"",
"cca":{
"ccNbrAsBlob":{
"buf":[
],
"len":0,
"origLen":0
},
"alphaOrderNbr":"00001234",
"oasisPayCode":"010",
"authAmt":0,
"phoneNbr":0,
"phoneType":"",
"ccPassCode":"",
"ordNbr":0,
"opmSeqNbr":0,
"auhSeqNbr":0,
"lastModifiedPgm":"",
"selected":false
},
"orderPaymentMethod":{
"ccNbr":[
],
"ccNbrAsBlob":{
"buf":[
],
"len":0,
"origLen":0
},
"selected":false
},
"authorizationService":{
"id":{
"cmp":787,
"authService":"EXG"
},
"application":"ATDP",
"batchOnline":"C",
"mediaType":"C",
"activeProductionSys":"N",
"addrVerification":"N",
"declineDays":0,
"selectForDeposit":"Y",
"immediateDeposit":"N",
"immediateResp":"N",
"industryFormat":" ",
"installmentBilling":"N",
"keepHist":"N",
"chgDesc":"EXT GC",
"merchantId":" ",
"password":" ",
"receivingCode":" ",
"signon":" ",
"startUpInfo":" ",
"subCode":" ",
"fileSeqNbr":0,
"presenterId":" ",
"PIDPassword":" ",
"submitterId":" ",
"SIDPassword":" ",
"presenterIdDep":" ",
"PIDPasswordDep":" ",
"submitterIdDep":" ",
"SIDPasswordDep":" ",
"APIUsername":" ",
"APIPassword":" ",
"APISignature":" ",
"selected":false
},
"authorizationServiceExt":{
"id":{
"cmp":787,
"authService":"EXG"
},
"authPhoneNbr":0,
"depositPhoneNbr":0,
"communicationType":"P",
"respCheckFreq":5,
"testMode":"N",
"authSrvProvider":" ",
"merchDiv":0,
"providerNetworkAddr":" ",
"portNbr":0,
"respTime":90000,
"deferredMerchId":" ",
"installmentMerchId":" ",
"excludeFromFlexPay":"N",
"onLineILPProc":" ",
"batchILPProc":" ",
"depositILPProc":" ",
"svcActivationProc":" ",
"svcBalInqProc":" ",
"primaryAuthSrv":"",
"requestToken":"N",
"voidAuth":"N",
"allowReversal":"N",
"allowsResubmit":false,
"overrideReconciliationId":" ",
"selected":false
}
}Balance Response
{
"balance":100.00,
"status":"ACCEPT",
"reasonCode":"100",
}Deposit Request and Response
Deposit Request
{
"typeDescription":"DepositRequest",
"requestType":"CreditCard",
"cardNumber":"CARD_NUMBER",
"emailAddress":"first.last@example.com",
"merchantId":"",
"compCurrency":"USD",
"vendCurrency":"",
"vendPaymentMethod":"",
"ecommerceIndicator":"false",
"useTokenization":"Y",
"requestAuth":"N",
"billToAuthServiceCountry":"",
"multipleCaptureSequence":1,
"finalCapture":"Y",
"ccd":{
"id":{
"cmp":787,
"ordNbr":12091,
"invNbr":32257,
"ordPayMethodSeqNbr":1,
"selected":false
},
"transType":"*PURCH",
"ccNbrAsBlob":{
"buf":[
],
"len":0,
"origLen":0
},
"transStatus":"*RDY",
"vendorResp":" ",
"vendorResp2":" ",
"authNbr":"1234567890",
"authDate":1210521,
"alphaOrderNbr":"00001234",
"merchantName":" ",
"oasisPayType":0,
"oasisPayCode":" ",
"companyDivision":" ",
"expireMonth":12,
"expireYear":21,
"AVSResp":" ",
"custLastName":"LAST",
"custFirstName":"FIRST",
"addrLine1":"123 EXAMPLE ST",
"addrLine2":" ",
"billtoCity":"CHICAGO",
"billtoState":"IL",
"billtoZip":"60625",
"billtoExtraZip":" ",
"billtoCountry":" ",
"transDate":1210521,
"transTime":193613,
"longInvoiceNbr":0,
"merchDollars":0,
"freightDollars":0,
"addlFreightDollars":0,
"totalTaxDollars":0,
"GSTTaxDollars":0,
"PSTTaxDollars":0,
"addlTaxDollars":0,
"handlingDollars":0,
"totalDollars":48.04,
"depositMerchantNbr":" ",
"flexPaymentType":" ",
"authService":"EXC",
"payType":9,
"currCode":" ",
"selected":false
},
"orderPaymentMethod":{
"id":{
"cmp":787,
"ordNbr":12091,
"seqNbr":1
},
"id_1":302185,
"amtToChg":0,
"amtAuth":48.04,
"amtBilled":48.04,
"amtCollected":48.04,
"amtCredited":0,
"authDate":0,
"authNbr":" ",
"manualAuthAmt":0,
"cashApplDate":0,
"cashCtrlNbr":0,
"chgSeq":3,
"expirationDate":1221,
"giftCertificateCpnNbr":0,
"payCategory":"2",
"cardSecurityVal":0,
"deferBill":"N",
"holdUntilDate":0,
"issuingBank":" ",
"nbrDaysForDeferral":0,
"fixDateForDeferral":0,
"nbrOfInstallments":0,
"installmentInterval":0,
"fixInstallmentBillDay":0,
"fpoExpirationDate":0,
"suppressDeposit":" ",
"suppressRefund":" ",
"checkingAct":" ",
"authVal":" ",
"ecommIndicator":" ",
"checkIntefaceDownload":0,
"cardStartDate":0,
"checkNbr":0,
"routingNbr":0,
"pinStorage":0,
"cardSecurityPresence":" ",
"cardIssueNbr":" ",
"payType":9,
"holdRsn":"CW",
"fpoPmtCode":" ",
"ccNbr":[
],
"ccNbrAsBlob":{
"buf":[
],
"len":0,
"origLen":0
},
"ccLast4":"1111",
"tokenized":" ",
"verifiedToken":" ",
"bin":" ",
"lastModifiedPgm":"FLR0270",
"ciTransactionId":"1234567890",
"ccNumberChange":" ",
"originalAmountAuthorized":48.04,
"selected":false
},
"authorizationService":{
"id":{
"cmp":787,
"authService":"EXC"
},
"application":"ATDP",
"batchOnline":"C",
"mediaType":"C",
"activeProductionSys":"N",
"addrVerification":"N",
"declineDays":0,
"selectForDeposit":"Y",
"immediateDeposit":"N",
"immediateResp":"N",
"industryFormat":" ",
"installmentBilling":"N",
"keepHist":"N",
"chgDesc":"EXT CC",
"merchantId":" ",
"password":" ",
"receivingCode":" ",
"signon":" ",
"startUpInfo":" ",
"subCode":" ",
"fileSeqNbr":0,
"presenterId":" ",
"PIDPassword":" ",
"submitterId":" ",
"SIDPassword":" ",
"presenterIdDep":" ",
"PIDPasswordDep":" ",
"submitterIdDep":" ",
"SIDPasswordDep":" ",
"APIUsername":" ",
"APIPassword":" ",
"APISignature":" ",
"selected":false
},
"authorizationServiceExt":{
"id":{
"cmp":787,
"authService":"EXC"
},
"authPhoneNbr":0,
"depositPhoneNbr":0,
"communicationType":"P",
"respCheckFreq":1,
"testMode":"N",
"authSrvProvider":" ",
"merchDiv":0,
"providerNetworkAddr":" ",
"portNbr":0,
"respTime":9000,
"deferredMerchId":" ",
"installmentMerchId":" ",
"excludeFromFlexPay":"N",
"onLineILPProc":" ",
"batchILPProc":" ",
"depositILPProc":" ",
"svcActivationProc":" ",
"svcBalInqProc":" ",
"primaryAuthSrv":"",
"requestToken":"N",
"voidAuth":"N",
"allowReversal":"N",
"allowsResubmit":false,
"overrideReconciliationId":" ",
"selected":false
},
"authorizationHistory":{
"id":{
"cmp":787,
"ordNbr":12091,
"ordPayMethodSeqNbr":1,
"seqNbr":1,
"selected":false
},
"authSts":"A",
"authAmt":48.04,
"depositAmt":48.04,
"authDate":1210521,
"sentDate":1210521,
"authNbr":"1234567890",
"vendorResp":"100",
"vendorResp2":" ",
"AVSResp":" ",
"transactionId":"1234567890",
"authTime":192858,
"lastModifiedPgm":"AuthBO.changePreAuthPicksToPostAuth(2)",
"captureSequence":0,
"captureCount":0,
"totalDeposited":0,
"captureVendorResp":" ",
"selected":false
}
}Deposit Response
{
"status":"ACCEPT",
"reasonCode":"100",
"errorResponse":""
}Generate Request and Response (Stored Value Card)
Generate Request
{
"typeDescription":"GenerateRequest",
"requestType":"GiftCard",
"emailAddress":"first.last@example.com",
"merchantId":"",
"compCurrency":"USD",
"vendCurrency":"",
"vendPaymentMethod":"",
"ecommerceIndicator":"false",
"useTokenization":"Y",
"billToAuthServiceCountry":"",
"cca":{
"ccNbrAsBlob":{
"buf":[
],
"len":0,
"origLen":0
},
"authAmt":0,
"phoneNbr":0,
"phoneType":"",
"ccPassCode":"",
"ordNbr":0,
"opmSeqNbr":0,
"auhSeqNbr":0,
"lastModifiedPgm":"",
"selected":false
},
"orderPaymentMethod":{
"ccNbr":[
],
"ccNbrAsBlob":{
"buf":[
],
"len":0,
"origLen":0
},
"selected":false
},
"authorizationService":{
"id":{
"cmp":787,
"authService":"EXG"
},
"application":"ATDP",
"batchOnline":"C",
"mediaType":"C",
"activeProductionSys":"N",
"addrVerification":"N",
"declineDays":0,
"selectForDeposit":"Y",
"immediateDeposit":"N",
"immediateResp":"N",
"industryFormat":" ",
"installmentBilling":"N",
"keepHist":"N",
"chgDesc":"EXT GC",
"merchantId":" ",
"password":"",
"receivingCode":" ",
"signon":" ",
"startUpInfo":" ",
"subCode":" ",
"fileSeqNbr":0,
"presenterId":" ",
"PIDPassword":"",
"submitterId":" ",
"SIDPassword":"",
"presenterIdDep":" ",
"PIDPasswordDep":"",
"submitterIdDep":" ",
"SIDPasswordDep":"",
"APIUsername":"",
"APIPassword":"",
"APISignature":" ",
"selected":false
},
"authorizationServiceExt":{
"id":{
"cmp":787,
"authService":"EXG"
},
"authPhoneNbr":0,
"depositPhoneNbr":0,
"communicationType":"P",
"respCheckFreq":5,
"testMode":"N",
"authSrvProvider":" ",
"merchDiv":0,
"providerNetworkAddr":" ",
"portNbr":0,
"respTime":90000,
"deferredMerchId":" ",
"installmentMerchId":" ",
"excludeFromFlexPay":"N",
"onLineILPProc":" ",
"batchILPProc":" ",
"depositILPProc":" ",
"svcActivationProc":" ",
"svcBalInqProc":" ",
"primaryAuthSrv":"",
"requestToken":"N",
"voidAuth":"N",
"allowReversal":"N",
"allowsResubmit":false,
"overrideReconciliationId":" ",
"selected":false
}
}Generate Response
{
"cardNumber":"CARDNUMBER",
"status":"ACCEPT",
"reasonCode":"100",
"authenticationData":"1234",
"errorResponse":""
}Recharge Request and Response (Stored Value Card)
Recharge Request
{
"typeDescription":"RechargeRequest",
"requestType":"GiftCard",
"cardNumber":"CARD_NUMBER",
"authenticationData":"1234",
"emailAddress":"first.last@example.com",
"merchantId":"",
"compCurrency":"USD",
"vendCurrency":"",
"vendPaymentMethod":"",
"ecommerceIndicator":"false",
"useTokenization":"Y",
"billToAuthServiceCountry":"US",
"cca":{
"ccNbrAsBlob":{
"buf":[
],
"len":0,
"origLen":0
},
"vendorResp":"",
"vendorResp2":" ",
"authNbr":" ",
"authDate":0,
"alphaOrderNbr":"00001234",
"merchantName":" ",
"authMerchantNbr":" ",
"oasisPayType":0,
"oasisPayCode":" ",
"oasisPayTypeCode":" ",
"companyDivision":" ",
"expireMonth":0,
"expireYear":0,
"AVSResp":"4654",
"chargeDesc":"SVC",
"authAmt":25,
"custNbr":20110,
"custLastName":"LAST",
"custFirstName":"FIRST",
"addrLine1":"123 EXAMPLE ST",
"addrLine2":"",
"billtoCity":"CHICAGO",
"billtoState":"IL",
"billtoZip":"60625",
"billtoExtraZip":"",
"billtoCountry":"US",
"phoneNbr":0,
"phoneType":" ",
"ccPassCode":"V",
"ordNbr":12089,
"opmSeqNbr":0,
"auhSeqNbr":0,
"authService":"EXG",
"currCode":" ",
"lastModifiedPgm":" ",
"selected":false
},
"orderPaymentMethod":{
"ccNbr":[
],
"ccNbrAsBlob":{
"buf":[
],
"len":0,
"origLen":0
},
"selected":false
},
"authorizationService":{
"id":{
"cmp":787,
"authService":"EXG"
},
"application":"ATDP",
"batchOnline":"C",
"mediaType":"C",
"activeProductionSys":"N",
"addrVerification":"N",
"declineDays":0,
"selectForDeposit":"Y",
"immediateDeposit":"N",
"immediateResp":"N",
"industryFormat":" ",
"installmentBilling":"N",
"keepHist":"N",
"chgDesc":"EXT GC",
"merchantId":" ",
"password":"",
"receivingCode":" ",
"signon":" ",
"startUpInfo":" ",
"subCode":" ",
"fileSeqNbr":0,
"presenterId":" ",
"PIDPassword":"",
"submitterId":" ",
"SIDPassword":"",
"presenterIdDep":" ",
"PIDPasswordDep":"",
"submitterIdDep":" ",
"SIDPasswordDep":"",
"APIUsername":"",
"APIPassword":"",
"APISignature":" ",
"selected":false
},
"authorizationServiceExt":{
"id":{
"cmp":787,
"authService":"EXG"
},
"authPhoneNbr":0,
"depositPhoneNbr":0,
"communicationType":"P",
"respCheckFreq":5,
"testMode":"N",
"authSrvProvider":" ",
"merchDiv":0,
"providerNetworkAddr":" ",
"portNbr":0,
"respTime":90000,
"deferredMerchId":" ",
"installmentMerchId":" ",
"excludeFromFlexPay":"N",
"onLineILPProc":" ",
"batchILPProc":" ",
"depositILPProc":" ",
"svcActivationProc":" ",
"svcBalInqProc":" ",
"primaryAuthSrv":"",
"requestToken":"N",
"voidAuth":"N",
"allowReversal":"N",
"allowsResubmit":false,
"overrideReconciliationId":" ",
"selected":false
}
}Recharge Response
{
"transactionId":"TRANSID",
"approvedAmount":100.00,
"status":"ACCEPT",
"reasonCode":"100",
"errorResponse":""
}Return Request and Response
Return Request
{
"typeDescription": "ReturnRequest",
"requestType": "CreditCard",
"cardNumber":"CARD_NUMBER",
"emailAddress":"first.last@example.com",
"merchantId": "",
"compCurrency": "USD",
"vendCurrency": "",
"vendPaymentMethod": "",
"ecommerceIndicator": "false",
"useTokenization": "Y",
"billToAuthServiceCountry": "",
"ccd": {
"id": {
"cmp": 787,
"ordNbr": 12091,
"invNbr": 32258,
"ordPayMethodSeqNbr": 1,
"selected": false
},
"transType": "*RETURN",
"ccNbrAsBlob": {
"buf": [],
"len": 0,
"origLen": 0
},
"transStatus": "*RDY",
"vendorResp": " ",
"vendorResp2": " ",
"authNbr": " ",
"authDate": 0,
"alphaOrderNbr": "00001234",
"merchantName": " ",
"oasisPayType": 0,
"oasisPayCode": " ",
"companyDivision": " ",
"expireMonth": 12,
"expireYear": 21,
"AVSResp": " ",
"custLastName":"LAST",
"custFirstName":"FIRST",
"addrLine1":"123 EXAMPLE ST",
"addrLine2":" ",
"billtoCity":"CHICAGO",
"billtoState":"IL",
"billtoZip":"60625",
"billtoExtraZip":" ",
"billtoCountry":"US",
"transDate": 1210521,
"transTime": 200620,
"longInvoiceNbr": 0,
"merchDollars": 0,
"freightDollars": 0,
"addlFreightDollars": 0,
"totalTaxDollars": 0,
"GSTTaxDollars": 0,
"PSTTaxDollars": 0,
"addlTaxDollars": 0,
"handlingDollars": 0,
"totalDollars": 35,
"depositMerchantNbr": " ",
"flexPaymentType": " ",
"authService": "EXC",
"payType": 9,
"currCode": " ",
"selected": false
},
"orderPaymentMethod": {
"id": {
"cmp": 787,
"ordNbr": 12091,
"seqNbr": 1
},
"id_1": 302185,
"amtToChg": 0,
"amtAuth": 48.04,
"amtBilled": 48.04,
"amtCollected": 48.04,
"amtCredited": 35,
"authDate": 0,
"authNbr": " ",
"manualAuthAmt": 0,
"cashApplDate": 0,
"cashCtrlNbr": 0,
"chgSeq": 3,
"expirationDate": 1221,
"giftCertificateCpnNbr": 0,
"payCategory": "2",
"cardSecurityVal": 0,
"deferBill": "N",
"holdUntilDate": 0,
"issuingBank": " ",
"nbrDaysForDeferral": 0,
"fixDateForDeferral": 0,
"nbrOfInstallments": 0,
"installmentInterval": 0,
"fixInstallmentBillDay": 0,
"fpoExpirationDate": 0,
"suppressDeposit": " ",
"suppressRefund": " ",
"checkingAct": " ",
"authVal": " ",
"ecommIndicator": " ",
"checkIntefaceDownload": 0,
"cardStartDate": 0,
"checkNbr": 0,
"routingNbr": 0,
"pinStorage": 0,
"cardSecurityPresence": " ",
"cardIssueNbr": " ",
"payType": 9,
"holdRsn": "CW",
"fpoPmtCode": " ",
"ccNbr": [],
"ccNbrAsBlob": {
"buf": [],
"len": 0,
"origLen": 0
},
"ccLast4": "1111",
"tokenized": " ",
"verifiedToken": " ",
"bin": " ",
"lastModifiedPgm": "FLR0270",
"ciTransactionId": "1234567890",
"ccNumberChange": " ",
"originalAmountAuthorized": 48.04,
"selected": false
},
"authorizationService": {
"id": {
"cmp": 787,
"authService": "EXC"
},
"application": "ATDP",
"batchOnline": "C",
"mediaType": "C",
"activeProductionSys": "N",
"addrVerification": "N",
"declineDays": 0,
"selectForDeposit": "Y",
"immediateDeposit": "N",
"immediateResp": "N",
"industryFormat": " ",
"installmentBilling": "N",
"keepHist": "N",
"chgDesc": "EXT CC",
"merchantId": " ",
"password":"CHANGEDBYLOGGER",
"receivingCode": " ",
"signon": " ",
"startUpInfo": " ",
"subCode": " ",
"fileSeqNbr": 0,
"presenterId": " ",
"PIDPassword":" ",
"submitterId": " ",
"SIDPassword":" ",
"presenterIdDep": " ",
"PIDPasswordDep":" ",
"submitterIdDep": " ",
"SIDPasswordDep":" ",
"APIUsername":" ",
"APIPassword":" ",
"APISignature": " ",
"selected": false
},
"authorizationServiceExt": {
"id": {
"cmp": 787,
"authService": "EXC"
},
"authPhoneNbr": 0,
"depositPhoneNbr": 0,
"communicationType": "P",
"respCheckFreq": 1,
"testMode": "N",
"authSrvProvider": " ",
"merchDiv": 0,
"providerNetworkAddr": " ",
"portNbr": 0,
"respTime": 9000,
"deferredMerchId": " ",
"installmentMerchId": " ",
"excludeFromFlexPay": "N",
"onLineILPProc": " ",
"batchILPProc": " ",
"depositILPProc": " ",
"svcActivationProc": " ",
"svcBalInqProc": " ",
"primaryAuthSrv": "",
"requestToken": "N",
"voidAuth": "N",
"allowReversal": "N",
"allowsResubmit": false,
"overrideReconciliationId": " ",
"selected": false
}
}Return Response
{
"status":"ACCEPT",
"reasonCode":"100",
"errorResponse":""
}
Reversal Request and Response (Stored Value Card)
Reversal Request
{
"typeDescription": "ReversalRequest",
"requestType": "GiftCard",
"cardNumber":"CARD_NUMBER",
"emailAddress":"first.last@example.com",
"merchantId": "",
"compCurrency": "USD",
"vendCurrency": "",
"vendPaymentMethod": "",
"ecommerceIndicator": "true",
"useTokenization": "Y",
"billToAuthServiceCountry": "US",
"cca": {
"ccNbrAsBlob": {
"buf": [],
"len": 0,
"origLen": 0
},
"vendorResp": "",
"vendorResp2": " ",
"authNbr": "1234567890",
"authDate": 1210407,
"alphaOrderNbr": "00001234",
"merchantName": " ",
"authMerchantNbr": " ",
"oasisPayType": 0,
"oasisPayCode": " ",
"oasisPayTypeCode": " ",
"companyDivision": " ",
"expireMonth": 0,
"expireYear": 0,
"AVSResp": " ",
"chargeDesc": "SVC",
"authAmt": 12,
"custNbr": 20110,
"custLastName":"LAST",
"custFirstName":"FIRST",
"addrLine1":"123 EXAMPLE ST",
"addrLine2":" ",
"billtoCity":"CHICAGO",
"billtoState":"IL",
"billtoZip":"60625",
"billtoExtraZip":" ",
"billtoCountry":"US",
"phoneNbr": 0,
"phoneType": " ",
"ccPassCode": " ",
"ordNbr": 11775,
"opmSeqNbr": 1,
"auhSeqNbr": 1,
"authService": "EXG",
"currCode": " ",
"lastModifiedPgm": " ",
"selected": false
},
"orderPaymentMethod": {
"id": {
"cmp": 787,
"ordNbr": 11775,
"seqNbr": 1
},
"id_1": 301686,
"amtToChg": 0,
"amtAuth": 12,
"amtBilled": 22,
"amtCollected": 22,
"amtCredited": 0,
"authDate": 0,
"authNbr": " ",
"manualAuthAmt": 0,
"cashApplDate": 0,
"cashCtrlNbr": 0,
"chgSeq": 2,
"expirationDate": 1222,
"giftCertificateCpnNbr": 0,
"payCategory": "2",
"cardSecurityVal": 0,
"deferBill": "N",
"holdUntilDate": 0,
"issuingBank": " ",
"nbrDaysForDeferral": 0,
"fixDateForDeferral": 0,
"nbrOfInstallments": 0,
"installmentInterval": 0,
"fixInstallmentBillDay": 0,
"fpoExpirationDate": 0,
"suppressDeposit": " ",
"suppressRefund": " ",
"checkingAct": " ",
"authVal": " ",
"ecommIndicator": " ",
"checkIntefaceDownload": 0,
"cardStartDate": 0,
"checkNbr": 0,
"routingNbr": 0,
"pinStorage": 0,
"cardSecurityPresence": " ",
"cardIssueNbr": " ",
"payType": 10,
"holdRsn": "CW",
"fpoPmtCode": " ",
"ccNbr": [],
"ccNbrAsBlob": {
"buf": [],
"len": 0,
"origLen": 0
},
"ccLast4": "1111",
"tokenized": " ",
"verifiedToken": " ",
"bin": " ",
"lastModifiedPgm": "FLR0270",
"ciTransactionId": " ",
"ccNumberChange": " ",
"originalAmountAuthorized": 0,
"selected": false
},
"authorizationService": {
"id": {
"cmp": 787,
"authService": "EXG"
},
"application": "ATDP",
"batchOnline": "C",
"mediaType": "C",
"activeProductionSys": "N",
"addrVerification": "N",
"declineDays": 0,
"selectForDeposit": "Y",
"immediateDeposit": "N",
"immediateResp": "N",
"industryFormat": " ",
"installmentBilling": "N",
"keepHist": "N",
"chgDesc": "EXT GC",
"merchantId": " ",
"password":" ",
"receivingCode": " ",
"signon": " ",
"startUpInfo": " ",
"subCode": " ",
"fileSeqNbr": 0,
"presenterId": " ",
"PIDPassword":" ",
"submitterId": " ",
"SIDPassword":" ",
"presenterIdDep": " ",
"PIDPasswordDep":" ",
"submitterIdDep": " ",
"SIDPasswordDep":" ",
"APIUsername":" ",
"APIPassword":" ",
"APISignature": " ",
"selected": false
},
"authorizationServiceExt": {
"id": {
"cmp": 787,
"authService": "EXG"
},
"authPhoneNbr": 0,
"depositPhoneNbr": 0,
"communicationType": "P",
"respCheckFreq": 5,
"testMode": "N",
"authSrvProvider": " ",
"merchDiv": 0,
"providerNetworkAddr": " ",
"portNbr": 0,
"respTime": 90000,
"deferredMerchId": " ",
"installmentMerchId": " ",
"excludeFromFlexPay": "N",
"onLineILPProc": " ",
"batchILPProc": " ",
"depositILPProc": " ",
"svcActivationProc": " ",
"svcBalInqProc": " ",
"primaryAuthSrv": "",
"requestToken": "N",
"voidAuth": "N",
"allowReversal": "N",
"allowsResubmit": false,
"overrideReconciliationId": " ",
"selected": false
},
"authorizationHistory": {
"id": {
"cmp": 787,
"ordNbr": 11775,
"ordPayMethodSeqNbr": 1,
"seqNbr": 1,
"selected": false
},
"authSts": "V",
"authAmt": 12,
"depositAmt": 0,
"authDate": 1210407,
"sentDate": 1210407,
"authNbr": "1234567890",
"vendorResp": "100",
"vendorResp2": " ",
"AVSResp": " ",
"transactionId": "1234567890",
"authTime": 145918,
"lastModifiedPgm": "ExternalServiceBO.createAuthReversal",
"totalDeposited": 0,
"captureVendorResp": " ",
"selected": false
}
}Reversal Response
{
"status":"ACCEPT",
"reasonCode":"100"
}Request Message Contents
The information included in External Payment Service request messages is described below.
Note:
All tags listed below were included in the initial version 1.0 of these messages, unless a later message version is indicated.
| Tag | Description |
|---|---|
|
typeDescription |
Indicates the type of request. Credit card: Supported credit card request types are:
Stored value card: Supported stored value card request types are:
|
|
requestType |
Indicates whether the request is related to a credit card or a stored value card. Supported request types are:
|
|
cardNumber |
The credit card number, stored value card number, or token number, if any, related to the request. |
|
authenticationData |
The PIN, if any, assigned to a stored value card, or the CVV number for a credit card. |
|
emailAddress |
The email address for the customer. Not included for a stored value card generate request. |
|
merchantId |
The Merchant ID specified for the service bureau. Blank if no Merchant ID is specified. |
|
compCurrency |
The Currency code defined in the Local Currency Code (A55) system control value. |
|
vendCurrency |
The Authorization service currency specified for the Currency, as set up through the Work with Authorization Currency screen. May include trailing blanks. |
|
vendPaymentMethod |
The Vendor Pay Code specified for the pay type, as set up through the Work with Pay Type Cross Reference screen. |
|
ecommerceIndicator |
Indicates whether the order was placed on a web storefront. Valid values are:
From the Ecomm Indic field in the Order Payment Method table. |
|
useTokenization |
Set to Y if tokenization is enabled; otherwise, set to N. Based on the setting of the Use Credit Card Tokenization (L18) system control value. |
|
requestAuth |
Indicates whether authorization is required for a stored value card or credit card deposit request, where Y indicates an authorization + deposit, while N indicates deposit only; otherwise, not used. |
|
billToAuthServiceCountry |
The authorization service country, as set up through Defining Authorization Service Countries. |
|
Subsequent Authorization Tags |
The following tags are available in version 2.0 of the message (Update 20.0 of Order Management System) and are included for the subsequent authorizations listed under Subsequent Authorization Requests through the External Payment Service. See Defining Authorization Services (WASV) for information on setting the Message Version. |
|
ciTransactionId |
The customer-initiated transaction ID, if known. This transaction ID could be from the CWOrderIn message that originated the order, or from the ciTransactionId passed in the authorization response message. See Subsequent Authorization Requests through the External Payment Service for a discussion. Available in: Version 2.0 of the message (Update 20.0 of Order Management System). |
|
subsequentAuth |
Set to Y if this is a subsequent authorization request for a credit card, and the ci_transaction_id is stored on the Order Payment Method record. See the discussion of the subsequentAuthTransactionID, below, for more information. Set to N if this is the first authorization request for the credit card. This might occur if the order was initially created without the authorization, or if the credit card number was changed. If the ci_transaction_id is passed for a stored value (gift) card through the external payment service:
Since the CI Transaction ID is not normally required for a stored value card, if you are using this ID for another purpose, use caution and make sure your specific uses are supported. See Subsequent Authorization Requests through the External Payment Service for a discussion. Available in: Version 2.0 of the message (Update 20.0 of Order Management System). |
|
subsequentAuthTransactionID |
The ci_transaction_id identifying the authorization. Passed when this is a subsequent authorization either from a previous message through the External Payment Service, through the ci_transaction_id received in the Inbound Order XML Message (CWORDERIN), or from the customer membership if this is a generated membership order. Otherwise, not passed. For more information see the Web Services Guide on My Oracle Support (ID 2149144.1). See Subsequent Authorization Requests through the External Payment Service for a discussion. Available in: Version 2.0 of the message (Update 20.0 of Order Management System). |
|
subsequentAuthReason |
Passed only for a subsequent authorization request. Possible reasons: RESUBMIT: You need to obtain an authorization for a customer-initiated purpose. This situation can occur when the original authorization was declined for insufficient funds and the goods or services have already been delivered to the customer. This reason is passed only if the Supports Auth Resubmission flag is selected for the authorization service; otherwise, the reason passed is REAUTH. INSTALLMENT: This is a delayed charge related to deferred or installment billing. Used only if the pay type has Notify of installments selected; otherwise, this tag is set to REAUTH. REAUTH: One of the following is true:
Note: Even if the order uses deferred and installment billing and Notify of installments is selected, the reason passed is still REAUTH if an authorization is required for other reasons, such as adding new items or the original authorization expiring. See Subsequent Authorization Requests through the External Payment Service for a discussion. Available in: Version 2.0 of the message (Update 20.0 of Order Management System). |
|
subsequentAuthOriginalAmount |
The amount of the original approved authorization. This is the authorization amount from the oldest Auth History record, or from the customer membership if this is for a generated membership order. Passed only when the ci_transaction_id is stored on the Order Payment Method, either in a previous message through the External Payment Service, through the ci_transaction_id received in the Inbound Order XML Message (CWORDERIN). For more information see the Web Services Guide on My Oracle Support (ID 2149144.1). See Subsequent Authorization Requests through the External Payment Service for a discussion. Available in: Version 2.0 of the message (Update 20.0 of Order Management System). |
|
subsequentAuthStoreCredential |
Set to Y if the authorization credentials are stored. Passed when this is a subsequent authorization and the ci_transaction_id is stored on the Order Payment Method, either in a previous message through the External Payment Service, through the ci_transaction_id received in the Inbound Order XML Message (CWORDERIN). For more information see the Web Services Guide on My Oracle Support (ID 2149144.1). See Subsequent Authorization Requests through the External Payment Service for a discussion. Available in: Version 2.0 of the message (Update 20.0 of Order Management System). |
|
The following tags are always passed in a deposit request for both credit cards and stored value cards if the message version is 2.0. |
|
|
multipleCaptureSequence |
Indicates the sequence number of the deposit based on the number of deposits against the authorization. Set to:
See Multiple Capture Sequence and Final Capture Sent to External Payment Service and Void Unused Authorization After Initial Deposit for a discussion and examples. Available in: Version 2.0 of the message (Update 20.0 of Order Management System). |
|
finalCapture |
Indicates whether this is the final capture against the authorization. Set to:
See Multiple Capture Sequence and Final Capture Sent to External Payment Service and Void Unused Authorization After Initial Deposit for a discussion and examples. Available in:Version 2.0 of the message (Update 20.0 of Order Management System). |
|
cca: Included for:
|
|
|
ccd: Included for credit card and stored value card deposit and return requests. The fields in the ccd container are primarily from the CC_Deposit_Transaction table. Not all of these fields are used. |
|
|
The tags included in the cca or ccd container are described below. Because these containers contain many of the same tags, the listing is combined. The listing indicates tags that are included in only the cca or ccd container. |
|
|
cmp |
The code identifying the company originating a deposit or return request. Included in the ccd container. |
|
ordNbr |
The order number related to a credit card authorization, deposit, return, reversal, or token request, and a stored value card activation, authorization, deposit, generation, recharge, return, or reversal request. |
|
invNbr |
The invoice number related to a shipment or return related to a deposit or return request. Included in the ccd container. |
|
ordPayMethodSeqNbr |
The unique sequence number identifying the stored value card or credit card used on the order. Used for stored value card and credit card deposit and return requests. Included in the ccd container. |
|
ccNbrAsBlob |
Added automatically. Not mapped. |
|
LRAid |
May be included only in the ccd container for a credit card deposit request, but left blank. Not currently implemented. |
|
selected |
Set to false. Included in the ccd container. |
|
transType |
Set to:
Otherwise, not included. |
|
creditCardNbr |
Always blank. |
|
transStatus |
Set to RDY for:
Otherwise, not included. |
|
vendorResp |
Not currently implemented. |
|
vendorResp2 |
Not currently implemented. |
|
authNbr |
The authorization number related to a credit card or stored value card deposit or reversal request. |
|
authDate |
The authorization date for a credit card or stored value card deposit or reversal request. |
|
alphaOrderNbr |
The Web Order number, if any, from the E-commerce order number from the Order Header Extended table. |
|
merchantName |
Not currently implemented. |
|
authMerchantNbr |
Not currently implemented. |
|
oasisPayType |
Not currently implemented. |
|
oasisPayCode |
Not currently implemented. |
|
oasisPayTypeCode |
Not currently implemented. |
|
companyDivision |
Not currently implemented. |
|
expireMonth |
From the first two positions of the Expiration date. The month when the credit card is no longer active. If the month is a single position, the preceding 0 is trimmed. For example, if the expire month is February, it is passed as 2 rather than as 02. |
|
expireYear |
From the second two positions of the Expiration date. The year when the credit card is no longer active. |
|
AVSResp |
From the AVS response. A code representing the address verification response for the credit card authorization if AVS is used. If AVS is not used, this field is blank. The AVS response code is from the AVS response field in the Authorization History table. |
|
chargeDesc |
Set to SVC for a credit card reversal, and for a stored value card activation request, recharge request, or reversal request; otherwise, not used. Included in the cca container. |
|
authAmt |
The authorization amount requested for a credit card authorization request or reversal request, and for a stored value card activation request, recharge request, or reversal request; otherwise, not used. Included in the cca container. |
|
reauthCode |
May be included in the cca container. Not currently implemented. |
|
mailPhoneOther |
May be included in the cca container. Not currently implemented. |
|
oasisHoldRsn |
May be included in the cca container. Not currently implemented. |
|
vendHoldRsn |
May be included in the cca container. Not currently implemented. |
|
termPayCode |
May be included in the cca container. Not currently implemented. |
|
custNbr |
The customer number for a stored value card activation, authorization, recharge, or reversal request, and for a credit card authorization, reversal, or token request. Included in the cca container. |
|
custLastName |
The sold-to customer’s last name. Always included in the cca or ccd container. |
|
custFirstName |
The sold-to customer’s first name. Always included in the cca or ccd container. |
|
addrLine1 |
The first line of the sold-to customer’s address. Always included in the cca or ccd container. |
|
addrLine2 |
The second line of the sold-to customer’s address. Always included in the cca or ccd container. |
|
billtoCity |
The city of the sold-to customer’s address. Always included in the cca or ccd container. |
|
billtoState |
The state or province of the sold-to customer’s address. Always included in the cca or ccd container. |
|
billtoZip |
The zip or postal code of the sold-to customer’s address. Always included in the cca or ccd container. |
|
billtoExtraZip |
The additional positions of the zip or postal code of the sold-to customer’s address. |
|
billtoCountry |
The sold-to customer’s country code. Always included in the cca or ccd container. |
|
phoneNbr |
Not currently implemented. Included in the cca container. |
|
phoneType |
Included in the cca container. |
|
transDate |
The date of the transaction. |
|
transTime |
The time of the transaction. |
|
ccPassCode |
Set to P in a stored value card activation request, and set to V in a stored value card recharge request. (When the stored value card is a virtual card (the ccPassCode is set to V), the card is activated through a recharge request rather than an activation request.) Otherwise, not used. Included in the cca container. |
|
opmSeqNbr |
A unique sequence number to identify the payment method on the order. Populated for a stored value card authorization or reversal request, and for a credit card authorization, reversal, or token request. Included in the cca container. |
|
auhSeqNbr |
A unique sequence number to identify the authorization on the order. Populated for a stored value card activation, authorization, balance, recharge, or reversal request, and for a credit card authorization or token request. Included in the cca container. |
|
longInvoiceNbr |
The invoice number. Populated for a stored value card deposit or return request, and for a credit card deposit or return request. Included in the ccd container. |
|
merchDollars |
The total merchandise value. Populated for a stored value card deposit or return request, and for a credit card deposit or return request. Included in the ccd container. |
|
freightDollars |
The total freight value. Populated for a stored value card deposit or return request, and for a credit card deposit or return request. Included in the ccd container. |
|
addlFreightDollars |
The total additional freight value. Populated for a stored value card deposit or return request, and for a credit card deposit or return request. Included in the ccd container. |
|
totalTaxDollars |
The total tax value. Populated for a stored value card deposit or return request, and for a credit card deposit or return request. Included in the ccd container. |
|
GSTTaxDollars |
The total GST value. Populated for a stored value card deposit or return request, and for a credit card deposit or return request. Included in the ccd container. |
|
PSTTaxDollars |
The total PST value. Populated for a stored value card deposit or return request, and for a credit card deposit or return request. Included in the ccd container. |
|
addlTaxDollars |
The total additional tax value. Populated for a stored value card deposit or return request, and for a credit card deposit or return request. Included in the ccd container. |
|
handlingDollars |
The total handling value. Populated for a stored value card deposit or return request, and for a credit card deposit or return request. Included in the ccd container. |
|
totalDollars |
The total value of the deposit or return. Populated for a stored value card deposit or return request, and for a credit card deposit or return request. Included in the ccd container. |
|
depositMerchantNbr |
The account number assigned by the service bureau to identify transmissions to and from your company. Populated for a stored value card deposit or return request, and for a credit card deposit or return request. Included in the ccd container. |
|
flexPaymentType |
Identifies whether a deposit is for an installment or deferred billing. Included in the ccd container. |
|
authService |
The 3-position alphanumeric code to identify the service bureau. |
|
payType |
From the Pay type. The pay type code associated with this order. Pay type codes are defined in and validated against the Pay Type table. See Working with Pay Types (WPAY). |
|
currCode |
The code identifying the currency used on the order, if different from the default. |
|
lastModifiedPgm |
Not currently implemented. |
|
selected |
Set to false. |
|
orderPaymentMethod Each tag is described briefly below. Details on order payment methods are available for review in order inquiry. See Reviewing Payment Methods for more information. |
|
|
id |
Includes identifying information about the service bureau. |
|
cmp |
The company where the service bureau was created. |
|
ordNbr |
The order associated with the order payment method. |
|
seqNbr |
An internal sequence number to identify the order payment record. |
|
LRAId |
May be included. Not currently implemented. |
|
creditCardNbr |
Always blank. |
|
selected |
Set to false. |
|
amtToChg |
From the Amount to charge. The total value charged to the payment method. If no value is specified, then this payment type serves as a “catch-all,” meaning any amount not assigned to another payment method applies to this one. |
|
amtAuth |
From the Amount authorized. The amount authorized for the credit card payment. |
|
amtBilled |
From the Amount billed. For credit card payments, this is the total amount billed to the credit card. The system updates this amount as soon as the card is billed even before you process deposits. If you are using deferred or installment billing, the total amount to charge the card displays, even if the total amount has not yet been billed. |
|
amtCollected |
From the Amount collected. An amount is collected when a shipment is billed using a credit card payment type. Note: This field is updated before you process deposits, and the update occurs regardless of whether the credit card uses a deferred or installment payment plan or is set up for immediate deposit. |
|
amtCredited |
From the Amount credited. The amount from this payment type that the customer has received as credit or refund, represented by the creation of a refund in the Refund table. This information is updated when the refund is processed. |
|
authDate |
From the Authorization date. The month, day, and year that your credit card authorization service confirmed or authorized the customer's credit card for the order, or you manually authorized the credit card. |
|
authNbr |
From the Authorization number. The number you used when you manually authorized the credit card, or the authorization service assigned when authorizing the credit card. The number can be overridden for manual or authorization service updates, and clears when the order is purged. For orders using a payment plan, the system retains the original authorization number from pick slip generation, even after you receive a full authorization for deposit. |
|
manualAuthAmt |
Not implemented in these messages. |
|
cashApplDate |
Not implemented in these messages. |
|
cashCtrlNbr |
Not implemented in these messages. |
|
chgSeq |
From the Charge sequence setting. A number that designates the order in which a payment method is used. |
|
expirationDate |
From the Expiration date. The date the credit card is no longer active. The expiration date may be zero, depending on the setting of the Require expiration date flag for the pay type. For example, a stored value card credit card type typically does not require an expiration date. If the month is a single position, the preceding 0 is trimmed. For example, if the expiration month and year are 0224, the expiration date is passed as 224. |
|
giftCertificateCpnNbr |
Not implemented in these messages. |
|
payCategory |
Set to 2. |
|
cardSecurityVal |
The card security value, if any. See Credit Card Security Service (CID, CVV2, CVC2) for a discussion. |
|
deferBill |
Set to Y if the payment method is flagged for deferred billing; otherwise, set to N. |
|
holdUntilDate |
From the Hold until date. The date when the order is eligible for release through the Release Orders on Time Hold Periodic Function. You can assign a number of days for the system to add when calculating the hold date to each response code you receive from an authorization service. See Defining Vendor Response Codes for more information on setting up vendor responses for authorization services, and releasing orders from time hold. |
|
issuingBank |
Not implemented in these messages. |
|
nbrDaysForDeferral |
From the # days for deferral. The number of days the payment is deferred. This field is used with deferred payment plans only. |
|
fixDateForReferral |
From the Fix date for deferral. The day of the month when payment for this order is due. This field is used with deferred payment plans only. |
|
nbrOfInstallments |
From the # of installments. The number of installments for this order. This field is used with installment payment plans only. |
|
fixInstallmentBillDay |
From the Fixed installment date. The day of the month when each installment is due. This field is used with installment payment plans only. |
|
fpoExpirationDate |
From the Expiration date. The date when this payment plan expires. |
|
suppressDeposit |
From the Suppress deposit setting. Indicates whether the system will include this invoice payment method when you run Processing Auto Deposits (SDEP). |
|
suppressRefund |
From the Suppress refund setting. Indicates whether the system will ever generate a refund for this payment method. A selected setting indicates that system will never generate a refund to the customer for this payment method; instead, any refund will be created in a cancel pending status, and canceled when you process refunds. |
|
checkingAct |
Not implemented in these messages. |
|
authVal |
Not implemented in these messages. |
|
ecommIndicator |
Not implemented in these messages. |
|
checkInterfaceDownload |
Not implemented. |
|
cardStartDate |
From the Start date. The first date when the card is effective. The Require start date flag for the pay type controls whether the start date is required or optional. |
|
checkNbr |
Not implemented in these messages. |
|
routingNbr |
Not implemented in these messages. |
|
pinStorage |
Not implemented in these messages. |
|
cardSecurityPresence |
From the Card security presence setting. Indicates to the authorization service whether a card security value (CID, CVV, CVC) is present on the credit card. If a card security presence exists for the credit card payment method, the authorization service performs card security identification. |
|
cardIssueNbr |
From the Issue #. An incremental issue number, assigned by some banks when they replace a card because it is lost or stolen. |
|
payType |
From the Pay type. The pay type code associated with this order. Pay type codes are defined in and validated against the Pay Type table. See Working with Pay Types (WPAY). |
|
holdRsn |
Not implemented in these messages. |
|
fpoPmtCode |
From the Pay plan code. The payment plan code and description associated with the pay type on this order. Payment plan codes are defined in and validated against the Flexible Payment Options table. See Working with Flexible Payment Options (WFPO). |
|
ccLast4 |
From the CC Last 4. The last four positions of the credit card number. From the CC Last 4 field in the Order Payment Method table. If you use credit card encryption, the system does not encrypt the value in this field. |
|
tokenized |
Set to Y if the credit card is tokenized; otherwise, blank. |
|
verifiedToken |
Not currently implemented. |
|
bin |
The first six digits of the actual credit card number in order to perform Level II and III Discounting on the card during deposit processing. Updates the Bin field in the Order Payment Method table if the credit card number is replaced with a token otherwise, the system does not store the bin number. If this value is not passed and the credit card number is replaced with a token, the system updates the Bin with the first 6 positions of the credit card number. |
|
lastModifiedPgm |
The program that most recently updated the Order Payment Method record. |
|
selected |
Set to false. |
|
authorizationService |
This container provides information on the service bureau. Each tag is described briefly below. See Defining Authorization Services (WASV) for more information. |
|
id |
Includes identifying information about the service bureau. |
|
cmp |
The company where the service bureau was created. |
|
authService |
The 3-position alphanumeric code to identify the service bureau. |
|
LRAId |
May be included. Not currently implemented. |
|
selected |
Set to false. |
|
application |
From the Application setting. The type of activity performed by the service bureau. Valid values are:
|
|
batchOnline |
From the Batch/Online setting. A code that indicates whether transactions are transmitted to/received from the service bureau immediately (online) as each order is entered, or whether groups of transactions are transmitted to/received from the service bureau at predefined times during the day (in batch). Possible settings are:
|
|
mediaType |
The method by which the data is transmitted to the service bureau. Set to C (communication). |
|
activeProductionSys |
Indicates whether you are processing in a live environment (production) or in a testing environment. Valid values are:
|
|
addrVerification |
From the Address verification setting. Indicates whether you will be using the Address Verification Service provided by the service bureau to verify the customer's address and credit card number. Valid values are:
|
|
declineDays |
Not currently implemented. |
|
selectForDeposit |
From the Selected for deposit setting. Indicates whether the service bureau is included in the next deposit run. By default, all service bureaus are selected for deposit; however, you can remove a service bureau from the next deposit run at the Select Auth Service for Deposit Screen in Processing Auto Deposits (SDEP). Once you submit the deposit run, the system reselects all service bureaus for the next deposit run. Possible values are:
|
|
immediateDeposit |
From the Immediate deposit setting. Indicates whether the service bureau sends a detailed response to Order Management System. Valid values are:
|
|
immediateResp |
From the Immediate response setting. Indicates whether a response from the service bureau is received immediately for each authorization transaction. Valid values are:
|
|
industryFormat |
From the Industry format code. A code that is assigned by the service bureau to identify your company type. |
|
installmentBilling |
From the Installment billing? setting. Indicates if the service bureau supports installment billing of credit cards. Installment billing plans are typically established for high cost items. Note: This field is informational only and is not used to set up an installment pay plan in Order Management System. Valid values are:
|
|
keepHist |
From the Keep history information? setting. Indicates whether transactions sent to the service bureau will be kept online. Typically, this feature is used in test environments. Valid values are:
|
|
chgDesc |
From the Charge description. A description that identifies your company's product line or the type of service performed. |
|
merchantId |
From the Merchant ID or from a merchant ID override. The account number assigned by the service bureau to identify transmissions to/from your company. See Defining Merchant ID Overrides for more information. |
|
password |
From the Password. |
|
receivingCode |
From the Receiving code. A code that identifies your company to the service bureau. |
|
signon |
From the Signon. A code required to sign on to the service bureau. |
|
startUpInfo |
From the Start up information. Startup text that identifies your company to the service bureau. |
|
subCode |
From the Sub code. A code required to sign on to the service bureau. |
|
fileSeqNbr |
Not currently implemented. |
|
presenterId |
From the Presenter’s ID. A code required to sign on to the service bureau. |
|
PIDPassword |
From the PID password. A password required to sign on to the service bureau. |
|
SubmitOrder |
From the Submitter’s ID. A code required to sign on to the service bureau. |
|
SIDPassword |
From the SID Password. A password required to sign on to the service bureau. |
|
presenterIdDep |
From the Presenter’s ID / Deposit (field after the auth ID). A code required to sign on to the service bureau. |
|
PIDPasswordDep |
From the PID password / Deposit (field the auth ID) A code required to sign on to the service bureau. |
|
submitterIdDep |
From the Submitter’s ID / Deposit (field after the auth ID). A code required to sign on to the service bureau. |
|
SIDPasswordDep |
From the SID password / Deposit (field after the auth ID). A password required to sign on to the service bureau. |
|
APIUsername |
From the API User name. The user name, provided by the service bureau, used to establish a direct connection to the service bureau. |
|
APIPassword |
From the API Password. The password, provided by the service bureau, used to establish a direct connection to the service bureau. |
|
APISignature |
From the API Signature. The encrypted signature, provided by the service bureau, used to establish a direct connection to the service bureau. |
|
selected |
Set to false. |
|
authorizationServiceExt |
This container provides additional information on the service bureau. Each tag is described briefly below. See Defining Authorization Services (WASV) for more information. |
|
id |
Includes identifying information about the service bureau. |
|
cmp |
The company where the service bureau was created. |
|
authService |
The 3-position alphanumeric code to identify the service bureau. |
|
LRAId |
May be included. Not currently implemented. |
|
selected |
Set to false. |
|
authPhoneNbr |
The Authorization phone # defined for the service. Informational. |
|
depositPhoneNbr |
The Deposit phone # defined for the service. Informational. |
|
communicationType |
From the Communication type. Should be set to P (Payment Link). |
|
respCheckFreq |
From the Response check frequency. Indicates the number of seconds to wait between checking for a response from the authorization service. The system will continue to check at this interval for a total of 20 minutes. |
|
testMode |
Not currently implemented. |
|
authSrvProvider |
From the Authorization service provider. Not currently implemented. |
|
merchDiv |
From the Merchant division. Assigned by the authorization service. |
|
providerNetworkAddr |
Not currently implemented. |
|
portNbr |
Not currently implemented. |
|
respTime |
From the Response time. Indicates the number of seconds to wait for an authorization response if you are performing online credit card authorization. |
|
deferredMerchId |
From the Deferred merchant ID. The account number assigned by the service to identify transmission of deferred pay plan transactions for deposit. See Deferred/Installment Billing Overview for more information on deferred and installment billing, and see Processing Auto Deposits (SDEP) for more information on processing deposits. You can also set up overrides for different entities in your company, including deferred or installment overrides. See Defining Merchant ID Overrides. |
|
installmentMerchId |
From the Installment merchant ID. The account number assigned by the service to identify transmission of installment pay plan transactions for deposit. See Deferred/Installment Billing Overview, and see Processing Auto Deposits (SDEP). You can also set up overrides for different entities in your company, including deferred or installment overrides. See Defining Merchant ID Overrides. |
|
excludeFromFlexPay |
From the Exclude from FPO setting. Indicates whether to exclude orders associated with this service bureau from a deferred or installment pay plan. If an order includes any pay type whose authorization service has this field selected, the order is not eligible for a pay plan. Valid values are:
See Deferred/Installment Billing Overview for information on how the system determines whether an order is eligible for a pay plan in order entry. |
|
onLineILPProc |
From the Online authorization setting. The name of the integration layer process used to transmit the online version of the Authorization Request XML Message (CWAuthorizationRequest) to the service bureau. Enterable only if you are using online credit card authorization. Defined in and validated against the Integration Process Control table. See Processing Authorizations and Deposits using an Integration Layer Process for an overview and required setup. |
|
batchILPProc |
From the Batch authorization setting. The name of the integration layer process used to transmit batch version of the Authorization Request XML Message (CWAuthorizationRequest) to the service bureau. Integration Layer process codes are defined in and validated against the Integration Process Control table. If you enter a value that is not valid, an error message indicates: Integration layer process not found. See Processing Authorizations and Deposits using an Integration Layer Process for an overview and required setup. |
|
depositILPProc |
From the Deposit setting. The name of the integration layer process used to transmit the Deposit Request XML Message (CWDepositRequest) to the service bureau. Integration Layer process codes are defined in and validated against the Integration Process Control table. See Processing Authorizations and Deposits using an Integration Layer Process for an overview and required setup. |
|
svcActivationProc |
From the SVC activation setting. The name of the integration layer process used to transmit the Authorization Request XML Message (CWAuthorizationRequest) for a stored value card activation to the service bureau. Integration Layer process codes are defined in and validated against the Integration Process Control table. |
|
svcBalInqProc |
From the SVC balance inquiry setting. The name of the integration layer process used to transmit the Authorization Request XML Message (CWAuthorizationRequest) for a stored value card balance inquiry to the service bureau. Integration Layer process codes are defined in and validated against the Integration Process Control table. |
|
primaryAuthSrv |
From the Primary authorization service. Should be set to .IL. |
|
requestToken |
From the Request token setting. Defines whether the service bureau uses credit card tokenization to replace the credit card number on a credit card payment with a token. Possible values are:
See Credit Card Tokenization in the Data Security and Encryption Guide on My Oracle Support (1988467.1) for an overview and processing details. |
|
voidAuth |
From the Void auth at deposit setting. Defines whether any unused portion of an authorization for a credit card pay type should be voided at deposit time. Possible values are:
See Void Unused Authorization After Initial Deposit for processing details. Stored value card pay types: The setting of the Retain Unused Stored Value Card Authorization After Deposit (J21) system control value defines whether the system automatically voids a partially deposited stored value card authorization. See Stored Value Card Deposits for processing details. |
|
allowReversal |
From the Send reversal setting. Defines whether the service bureau supports authorization reversals for credit card payments. Possible values are:
Regardless of the setting of this field, you can still perform stored value card authorization reversals; see Stored Value Card Authorization Reversal. |
|
allowsResubmit |
Indicates whether the Supports Auth Resubmission flag is selected for the authorization service. Possible values are:
|
|
overrideReconciliatoinId |
Not currently implemented for the External Payment Service. |
|
LRAId |
May be included. Not currently implemented. |
|
selected |
Set to false. |
|
authorizationHistory |
Each tag is described briefly below. Details on authorization history are available in order inquiry. See the Display Authorization History Screen and the Authorization History Details Window for more information. No authorization record exists for:
|
|
id |
Includes additional information identifying the authorization history. |
|
cmp |
The company associated with the order. |
|
ordNbr |
The order associated with the authorization history. |
|
seqNbr |
An internal sequence number to identify the authorization history record. |
|
ordPayMethodSeqNbr |
An internal sequence number to identify the order payment method. |
|
LRAId |
May be included. Not currently implemented. |
|
selected |
Set to false. |
|
authSts |
The status of the authorization as updated by the system. Valid values are:
|
|
authAmt |
The amount the service bureau authorized to be charged on the credit card. |
|
depositAmt |
The amount deposited to the bank for the charge. |
|
authDate |
The date the authorization service approved the amount to be charged. |
|
sentDate |
The date you transmitted the authorization to the authorization service. |
|
authNbr |
A number for the authorization transaction assigned by the authorization service. |
|
vendorResp |
A code representing the response of the authorization service. The vendor response code is from the Vendor response 1 field in the Authorization History table. |
|
vendorResp2 |
An additional code representing the response of the authorization service. The vendor response code is from the Vendor response 2 field in the Authorization History table. |
|
AVSResp |
A code representing the address verification response for the credit card authorization if AVS is used. The AVS response code is from the AVS response field in the Authorization History table. |
|
transactionId |
The transaction ID, or reference number, associated with the authorization transaction for the credit card payment. |
|
authTime |
The time the authorization service approved the amount to be charged. |
|
lastModifiedPgm |
The last program that updated the authorization history record. |
|
selected |
Set to false. |
|
captureSequence |
The current sequence number for the order payment authorization request id for a deposit. Set to 1 if this is the first deposit for the order, and incremented by 1 for each subsequent deposit. |
|
captureCount |
The total number of deposits made for the order payment method. |
|
totalDeposited |
The total amount deposited for an authorization. |
|
captureVendorResp |
The response code received when a deposit is rejected. This field is used identify resubmissions. |
Response Message Contents
The information included in External Payment Service response messages is described below. Tags that are required for individual request types are indicated.
Note:
All tags listed below were included in the initial version 1.0 of these messages, unless a later message version is indicated.
| Tag | Description |
|---|---|
|
|
|
cardNumber |
The card number returned to a successful stored value card generate request. Required for a stored value card generate request. |
|
transactionId |
The transaction ID returned to a successful stored value card activation request, authorization request, or recharge request, or a successful credit card authorization request or deposit request. If only a transactionId is returned to a stored value card authorization request, it is used as the Authorization Code. If both the transactionId and authorizationCode are returned, they are used as the Transaction Id and the Authorization Code, respectively. Either the transactionId or the authorizationCode is required for a stored value card balance inquiry. Required to successfully active or recharge a stored value card. If the response does not include the transactionId, then the card is not activated, even if the status passed in the response is ACCEPT, although the reason code is updated. Required for deposit requests if the requestAuth in the request was set to Y, indicating an authorization + deposit. |
|
status |
Set to ACCEPT in a successful stored value card or credit card response; set to REJECT if the request has been rejected; otherwise, set to ERROR. See the transactionId, above, for more discussion on when the status is ACCEPT but there is no transactionId for a stored value card activation or recharge request. Reject or error response? When the status passed is REJECT or ERROR, the order goes on hold, and the authorization status is declined, and the record is cleared from the Credit Card Authorization Transaction table (CCAT00) if:
Required for all request types. |
|
balance |
The current balance of the stored value card. Returned only to a stored value card balance inquiry, and required. |
|
reasonCode |
The reason code returned from the external service. Mapped through vendor response codes for the authorization service; see Defining Vendor Response Codes for more information. Note: When configuring a response code that indicates a reject from the External Payment Service, you need to define a Hold Reason of AT so that a rejected order goes on hold. A response code of SU indicates that the service is unavailable. Required for all request types. |
|
approvedAmount |
The approved amount returned to a successful stored value card authorization or recharge request, or to a credit card authorization request. If this is a subsequent transaction, this amount updates the current authorization amount for the order if:
See Subsequent Authorization Requests through the External Payment Service for background. Required for a stored value card recharge request or authorization request. For a REJECT/ERROR response, pass 0.00. Otherwise, not used. |
|
authenticationData |
The authentication data returned to a successful stored value card generate response. Optional. |
|
authorizationCode |
The authorization code returned to a credit card authorization request or deposit request. Required for credit card authorization requests. Required for deposit requests if the requestAuth in the request was set to Y, indicating an authorization + deposit. Optional for stored value card authorization requests; if not returned for a stored value card authorization request, the transactionId is used as the authorization code. |
|
cvnResponseCode |
The CVN response code returned to a credit card authorization request. Optional. |
|
avsCode |
The address verification response code returned to a credit card authorization request. Optional. |
|
requestAuth |
Returns the requestAuth setting from the stored value card or credit card deposit request. Required for credit card deposit requests. A Y setting indicates an authorization + deposit, while an N setting indicates a deposit only. |
|
token |
Indicates the token in response to a token request, or if the credit card authorization request or deposit request useTokenization selected. Optional for credit card authorization requests or deposit requests; required for token requests. |
|
errorResponse |
Indicates the error, if any, returned from the external service. Errors are written to the TRACE.log file. If an error response of DEPOSIT_GREATER_THAN_AUTH is returned to a deposit request, along with a status of ERROR, then deposit requests will be generated for the authorization amounts of each individual authorization. For more information: See Multiple Capture Sequence and Final Capture Sent to External Payment Service for an example of when this error might be returned for a stored value card. |
|
ciTransactionId |
The customer-initiated transaction ID. Should be passed only for a successful message. Updates the order payment method and authorization history only if the version message specified for the External Payment Service is 2.0 or higher, there is not already a customer-initiated transaction ID, and this is a credit card, and the response indicates a successful authorization. See Subsequent Authorization Requests through the External Payment Service for a discussion. Available in: Version 2.0 of the message (Update 20.0 of Order Management System). |
CyberSource Point-to-Point Integration
CyberSource Point-to-Point integration allows you to process authorization and deposit transactions between Order Management System and CyberSource using point-to-point communication. Authorization and deposit processing remains the same in Order Management System; however, instead of using integration layer jobs to process the transactions and send the transactions to the service bureau via the queues defined for the integration layer job, Order Management System communicates with CyberSource via web services using the CyberSource Simple Order API Client for Java to send the transactions directly to the CyberSource system for processing.
The CyberSource integration supports the following transactions for credit cards and debit (switch) cards:
| OROMS Transaction | CyberSource Transaction | See: |
|---|---|---|
|
token request |
paySubscriptionCreate |
Credit Card Tokenization in the Data Security and Encryption Guide on My Oracle Support (1988467.1) For more information see the Web Services Guide on https://support.oracle.com My Oracle Support (ID 2149144.1). |
|
authorization request:
|
ccAuthService |
Performing Online Credit Card Authorizations and Using Batch Authorization |
|
deposit request:
|
ccCaptureService ccCreditService |
|
|
authorization reversal request |
ccAuthReversalService |
The integration also supports:
| Process | See: |
|---|---|
|
level II and level III processing |
|
|
multicurrency |
|
|
card identification (CSV/CSP) for online transactions |
|
|
Verified by Visa and MasterCard Secure Code programs |
|
|
full address verification (AVS) |
|
|
deferred and installment billing |
|
|
Decision Manager |
Supported version: The CyberSource Point-to-Point integration in Order Management System 19.2 or higher uses version 1.161 of the CyberSource Transaction XSD.
In this topic:
-
-
CyberSource Token Request (paySubscriptionCreate) XML Message
-
CyberSource Token Response (paySubscriptionCreate) XML Message
-
CyberSource Authorization Request (ccAuthService) XML Message
-
CyberSource Authorization Response (ccAuthService) XML Message
-
CyberSource Token and Authorization Request (paySubscriptionCreate and ccAuthService) XML Message
-
CyberSource Token and Authorization Response (paySubscriptionCreate and ccAuthService) XML Message
-
CyberSource Debit Deposit Request (ccCaptureService) XML Message
-
CyberSource Debit Deposit Response (ccCaptureService) XML Message
-
CyberSource Credit Deposit Request (ccCreditService) XML Message
-
CyberSource Credit Deposit Response (ccCreditService) XML Message
-
CyberSource Authorization and Deposit Request (ccAuthService and ccCaptureService) XML Message
-
CyberSource Authorization and Deposit Response (ccAuthService and ccCaptureService) XML Message
-
CyberSource Authorization Reversal Request (ccAuthReversalService) XML Message
-
CyberSource Authorization Reversal Response (ccAuthReversalService) XML Message
-
CyberSource Point-to-Point Integration Setup
Before you can use the CyberSource Point-to-Point integration, you must complete the required setup.
For more information:See the CyberSource Simple Order API Client Developer Guide for more setup information, including recommendations on logging levels.
Service Bureau Settings
Use Defining Authorization Services (WASV) to create a service bureau for the CyberSource service that you will use to process authorizations and deposits via point-to-point communication.
CyberSource Setup using Point-to-Point
| Setting | Requirement |
|---|---|
|
Service code |
Must be CYB. |
|
Application |
Enter Auth/Deposit. |
|
Merchant ID |
Supplied by CyberSource. |
|
Charge description |
Enter CYBERSOURCE. |
|
Request token |
Select this field to perform credit card tokenization; otherwise, leave unselected. |
|
Void auth at deposit |
Select this field to void any unused portion of an authorization at deposit time; see Void Unused Authorization After Initial Deposit for processing details. |
|
Send reversal |
Select this field to perform a credit card authorization reversal when you process a cancellation associated with a credit card payment or deactivate a credit card payment; see Credit Card Authorization Reversal for processing details. |
|
Integration layer processes |
Leave these fields blank. |
|
Media type |
Enter Communication. |
|
Batch/online |
Enter Online or Batch. |
|
Immediate response |
Must be selected. |
|
Immediate deposit |
Leave unselected. |
|
Primary authorization service |
Should be blank. |
|
Communication type |
Enter Payment Link to indicate messages sent to and from CyberSource are processed directly. |
|
Response time |
Defines the timeout property passed to CyberSource; this is the number of seconds Order Management System waits for a response from CyberSource. The recommended setting is 30 seconds. Note: Order Management System does not wait the entire response time if it is not necessary. |
|
Test mode? |
Not used for the CyberSource integration; the CYB_PAY_LINK_SERVICE_SEND_TO_PRODUCTION setting in Working with Customer Properties (PROP) defines whether transactions are sent to the CyberSource TEST server or PRODUCTION server. |
|
Override Reconciliation Id |
Indicates whether to pass the invoice number or alternate order ID as the reconciliationID in a debit deposit, credit deposit, or authorization and deposit request to CyberSource, or not to pass either of these fields. |
|
Country codes |
Define a cross reference between your country code and the country code used by CyberSource. Note: This option also indicates whether a service bureau performs address verification processing for the country; however, regardless of the AVS setting, CyberSource always performs address verification. |
|
Currency codes |
Define a cross reference between your currency code and the currency code used by the service bureau; see Defining Authorization Service Currencies. |
|
Merchant ID Override |
Define a merchant ID override for the different entities in your company; see Defining Merchant ID Overrides. |
|
Paytype codes |
Define a cross reference between your pay type code and the pay type code used by the service bureau; see Defining Vendor Paytype Codes. |
|
Response codes |
Define the reasons that the service bureau approves (authorizes) or declines a transaction. The codes are assigned to each transaction by the service bureau when approving or declining the request; see Defining Vendor Response Codes. |
CyberSource Interface Properties
The Order Management System integration with CyberSource uses the CyberSource Simple Order API Client for Java as the communication protocol. The following properties are required to communicate with CyberSource.
| Property | Description |
|---|---|
|
CYB_PAY_LINK_SERVICE_KEY_DIRECTORY |
The location of the encrypted security key file used by the web service API program to validate and secure transactions from Order Management System. Note: When defining the location, use a single forward slash. Example: /domain/conf/OMSFiles/Integrations/Cybersource/Key/, where domain is the WebLogic domain directory for Order Management System. |
|
CYB_PAY_LINK_SERVICE_LOG_DIRECTORY |
The location of the log written by the web service API program. Use this log to review the transactions processed between Order Management System and CyberSource. Data security:For data security, Order Management System masks credit card information in this log. Note: When defining the location, use a single forward slash. Example: /domain/conf/OMSFiles/Integrations/Cybersource/Log/, where domain is the WebLogic domain directory for Order Management System. |
| Property | Description |
|---|---|
|
CYB_PAY_LINK_SERVICE |
The name of the external system. Set this to CyberSource. |
|
CYB_PAY_LINK_SERVICE_ENABLE_LOG |
Defines whether the web service logs request and response messages. true = Order Management System writes request and response messages to the CyberSource log. false = Order Management System does not write request and response messages to the CyberSource log. Data security: Set this value to false unless you are troubleshooting the Order Management System integration with CyberSource. Once you are done troubleshooting, delete any log files that are created. |
|
CYB_PAY_LINK_SERVICE_SEND_TO_PRODUCTION |
Defines whether transactions are sent to the CyberSource TEST server or PRODUCTION server. true = Order Management System sends transactions to the CyberSource PRODUCTION server. false = Order Management System sends transactions to the CyberSource TEST server. |
|
CyberSource Decision Manager Fraud Scoring Settings |
Decision Manager Fraud Scoring uses the following settings. |
|
CYB_PAY_LINK_DECISION_MANAGER_ENABLED |
Defines whether CyberSource Decision Manager Fraud Scoring processing is enabled in the Order Management System Point-to-Point integration with CyberSource. false = the Order Management System Point-to-Point integration with CyberSource does not support Decision Manager processing in CyberSource. Order Management System sends all authorization transactions to CyberSource with the decisionManager_enabled tag set to false, indicating Decision Manager processing should not occur. However, you can use CyberSource’s Decision Manager for authorization transactions you process on your web storefront. true = the Order Management System Point-to-Point integration with CyberSource supports Decision Manager processing in CyberSource. Order Management System sends all authorization transactions to CyberSource with the decisionManager_enabled tag set to true, indicating Decision Manager processing should occur. See CyberSource Point-to-Point Decision Manager Process for more details. |
|
CYB_PAY_LINK_DECISION_MANAGER_MERCHANT_ID_OVERRIDE |
The merchant ID provided by CyberSource to use during Decision Manager Fraud Scoring processing. Used as the portfolio merchant ID in the URL, and the child merchant ID is e passed as report parameter. If this setting is blank, the system uses the following hierarchy to determine the merchant ID to use:
|
|
CYB_PAY_LINK_DECISION_MANAGER_KEY |
A key, generated in CyberSource Decision Manager, that is used to authenticate the CyberSource Decision Manager Update periodic function (CYBDMUP). |
|
CYB_PAY_LINK_DECISION_MANAGER_SECRET_KEY |
A key, generated in CyberSource Decision Manager, that is used to authenticate the CyberSource Decision Manager Update periodic function (CYBDMUP). |
|
CYB_PAY_LINK_DECISION_MANAGER_SEND_TO_PRODUCTION |
Defines whether transactions are sent to the CyberSource Decision Manager TEST server or PRODUCTION server. true = Order Management System sends transactions to the CyberSource Decision Manager PRODUCTION server. false = Order Management System sends transactions to the CyberSource Decision Manager TEST server. |
Work with Pay Types (WPAY)
Use Working with Pay Types (WPAY) to define the CYB authorization and deposit service for each CyberSource pay type.
Work with Order Types (WOTY)
In order to perform online authorization on web orders, the Online Authorization setting for the order type on the web order must be set to Without Window. See Establishing Order Types (WOTY) for more information on setting up an order type.
Security Key
In order for the web service to work, you must generate a security key on the CyberSource Business Center web site. This file must be placed in the directory on the Order Management System application server that is defined in the CYB_PAY_LINK_SERVICE_KEY_DIRECTORY property.
See Appendix A - Generating and Verify Security Keys in the CyberSource Simple Order API for Java Developers Guide for instructions on how to generate a key.
Decision Manager Fraud Scoring
If you have set the CYB_PAY_LINK_DECISION_MANAGER_ENABLED to true, you must complete the following setup for fraud scoring.
Order hold reasons for fraud scoring:
| Hold Code | Assigned When |
|---|---|
|
FC Fraud Cancellation Hold |
The CyberSource Decision Manager Update Process retrieves order information from Decision Manager for orders that were marked as review during the CyberSource Decision Manager Review Process. If the new decision assigned to the order is REJECT, indicating a user in Decision Manager reviewed the order and rejected the order, Order Management System:
|
|
FS Fraud Scoring Hold |
The online authorization transaction sent to CyberSource for the credit card payment on the order was evaluated by CyberSource Decision Manager Fraud Scoring and, based on the Decision Manager Order Profile settings, requires review for possible fraud. |
Note:
These order hold reasons are delivered with the system in Establishing Order Hold Reason Codes (WOHR); see Introducing Order Hold Reason Codes for an overview.
Vendor response codes for fraud scoring: Define the reasons that the CyberSource service bureau declines a transaction due to fraud scoring; see Defining Vendor Response Codes.
| Reason Code | Description |
|---|---|
|
400 |
Fraud Score Exceeds Threshold. Enter hold reason FS Fraud Scoring Hold to place the order on hold when an online authorization transaction receives this vendor response code from CyberSource. |
|
480 |
Review Fraud Scoring. Enter hold reason FS Fraud Scoring Hold to place the order on hold when an online authorization transaction receives this vendor response code from CyberSource. |
|
481 |
Rejected by Decision Manager. Enter hold reason FS Fraud Scoring Hold to place a web order on hold when an online authorization transaction receives this vendor response code from CyberSource. Define a pop-up window message to display on the Select Authorization Response Option Window. Note: If the reason code returned from CyberSource is 481, the system deactivates the payment method on the order and requires you to enter another form of payment before you can accept the order. |
| System Control Value | Description |
|---|---|
|
Enter the cancel reason code the system assigns to an order that is automatically canceled due to the fraud scoring results from CyberSource Decision Manager. Cancel reason codes are defined in and validated against the Cancel Reason Code table; see Establishing Cancel Reason Codes (WCNR). |
|
|
Defines the product classification Order Management System sends to CyberSource during CyberSource Decision Manager Fraud Scoring.
Note: It is your responsibility to set up the item class description or item category description to match the correct value required by CyberSource Decision Manager. |
System control values for fraud scoring:
Product classification for fraud scoring: Based on the setting of the Product Classification for Fraud Scoring (M15) system control value, set up the item class description or item category description to match the correct value required by CyberSource Decision Manager.
Product codes used by CyberSource services are:
-
adult_content: Adult content.
-
coupon: Coupon applied to the entire order.
-
default: Product classification has not been defined for the product.
-
electronic_good: Electronic product other than software.
-
electronic_software: Software distributed electronically rather than on disks or other media.
-
handling_only: Fee that you charge the customer to cover administrative selling costs.
-
service: Service that you perform for the customer.
-
shipping_and_handling: The shipping portion is the charge for shipping the product to the customer. The handling portion is the fee you charge the customer to cover your administrative selling costs.
-
shipping_only: Charge for transporting tangible personal property from your location to the customer. You must maintain documentation that clearly establishes the location where the title to the property passed from you to the customer.
-
subscription: Subscription to a web site or other content.
Ship via service level for fraud scoring: Use the Create Ship Via (2 of 2) Screen to define a Decision Manager Level field for each ship via. Order Management System maps the Service Level for the ship via to the shipTo ShippingMethod in the CyberSource Authorization Request (ccAuthService) XML Message when the CyberSource Decision Manager Fraud Scoring is enabled. Valid values are:
-
sameday: Courier or same day service.
-
oneday: Next day or overnight service.
-
twoday: Two day service.
-
threeday: Three day service.
-
lowcost: Lowest cost service
-
pickup: Store pickup
-
other: Other shipping method.
-
none: No shipping method because product is a service or subscription.
When a ShippingMethod is defined for a ship to in the ccAuthService message, the shipping address is not automatically added to the Decision Manager negative list. You can add a shipping address to the negative list using the Transaction Marking Tool; see Marking Order Data During Order Review in the Case Management section of the Decision Manager User Guide.
Note:
To use a custom value, create a Decision Manager custom rule with the shipping method order element.
CyberSource Decision Manager Update periodic function: Use the Work with Periodic Function (WPER) menu option to create the CYBDMUP CyberSource Decision Mgr Upd periodic function (program name PFCYBDMUP). Assign this periodic function to a periodic process. Schedule this periodic process to run during the time period when users in Decision Manager are releasing orders from hold; for example, you might wish to run this every hour during business hours.
Note:
The CYBDMUP CyberSource Decision Mgr Upd periodic function retrieves information on orders that have been evaluated by the fraud scoring process and managed in Decision Manager using the CyberSource Decision Manager On Demand Conversion Report. The CyberSource Decision Manager On Demand Conversion Report is available in the CyberSource test environment for 2 weeks and is available in the CyberSource production environment for 18 months.
Decision Manager setup in CyberSource: In addition to the setup required in Order Management System to use CyberSource Decision Manager, you must complete setup in the CyberSource Business Center, including creating a custom report for conversion detail, for example:
-
Select the Create Report option.
-
Name the report ConversionDetailReport.
-
Select a file format of XML.
-
Select the Conversion Detail Report as the report type.
-
Select a recurring report subscription with a subscription frequency of daily.
-
Set the subscription start time and time zone.
-
Under Advanced Report Features, select all.
The exact steps and options may vary. Contact your CyberSource representative for more information on the setup required in the CyberSource Business Center to use the Decision Manager application.
Credit Card Authorization Reversal
The Order Management System integration with CyberSource supports credit card authorization reversal. See Credit Card Authorization Reversal for an overview and processing details. The setup required for credit card authorization reversal is as follows.
For the CYB service bureau in Defining Authorization Services (WASV), select the Send reversal field to indicate the CyberSource service bureau supports credit card authorization reversal.
System control value for authorization reversal:
| System Control Value | Description |
|---|---|
|
Must be unselected. If unselected, you must start the SVC_REVSL integration layer job to monitor for new authorization reversal triggers to process immediately. |
Credit Card Tokenization
The Order Management System integration with CyberSource supports credit card tokenization using a 19 digit token. See Credit Card Tokenization in the Data Security and Encryption Guide on My Oracle Support (1988467.1) for an overview and processing details. The setup required for credit card tokenization is as follows.
Note:
-
The CyberSource integration with Order Management System supports a 19 digit token. Contact CyberSource Customer Support to have your account configured for 19 digit tokens instead of 22 digit values for the subscription ID. The size of the subscription ID affects all customer profiles you create.
-
A CyberSource token (subscription ID) never expires, and is removed from the CyberSource system only when deleted by the merchant. Although the token itself never expires, the card information associated with it, such as credit card expiration date, may, requiring an update.
For the CYB service bureau in Defining Authorization Services (WASV), select the Request token field to indicate the CyberSource service bureau supports credit card tokenization. You can select this field only if the Use Credit Card Tokenization (L18) system control value is selected.
System control values for credit card tokenization:
| System Control Value | Description |
|---|---|
|
Select this system control value to replace the credit card number in the Order Management System database with a token provided by CyberSource. In addition, the number will be encrypted if you have credit card encryption enabled. |
|
|
Select this system control value to require a token for a credit card number. This ensures that credit card numbers are never stored in the Order Management System database and follows full PCI compliance and maximum security of sensitive data. If the Credit Card Tokenization Process is unable to replace the card number with a token, the system:
Deselect this system control value to allow the system to accept a credit card number that has not been replaced with a token. The credit card number will be replaced by a token during authorization processing or when you use Work with Batch Tokenization (WBTK). Note: If you change the setting of this system control value, you must stop and restart the ORDER_IN integration layer job before your change takes effect for orders received through the Generic Order Interface (Order API). For more information see the Web Services Guide on https://support.oracle.com My Oracle Support (ID 2149144.1). |
CyberSource Point-to-Point Tokenization Process
Order Management System performs the following steps when you perform tokenization using point-to-point communication with CyberSource.
Note:
CyberSource refers to a token as a customer profile which has a submitter’s ID or token. You can configure your account in CyberSource to perform preauthorization and fraud checking based on the payment method for the new customer profile.
For more information: See Credit Card Tokenization in the Data Security and Encryption Guide on My Oracle Support (1988467.1) for an overview on tokenization and processing details.
| # | Step |
|---|---|
|
1. |
Order Management System looks at the Communication type field for the CYB service bureau to determine how transactions are processed between Order Management System and the CyberSource service bureau. For the CyberSource integration with Order Management System, the setting is Payment Link indicating Point-to-Point communication. The system sends token transactions directly to the CyberSource service bureau. |
|
2. |
If the Communication type field for the service bureau is Payment Link, Order Management System creates the CyberSource Token Request (paySubscriptionCreate) XML Message. Note: Order Management System removes any non-standard keyboard characters from the XML message before sending it to CyberSource. The system also writes the token request message to the Trace Log if its Logging Level is set to DEBUG. Order Management System masks the card number in the log based on the setting of the Display Partial Credit Card Number in Logs (J16) system control value.
|
|
3. |
Order Management System uses the settings in the CyberSource Interface Properties to send the CyberSource Token Request (paySubscriptionCreate) XML Message directly to the CyberSource service bureau. Communication failure: The system tries to connect to CyberSource 3 times before flagging a transaction with a 150 General System Failure response code. If a transaction fails, any subsequent transactions will continue to process. If the CYB_PAY_LINK_SERVICE_ENABLE_LOG property setting is set to true, the system writes the token request message to the CyberSource web service log defined in the CYB_PAY_LINK_SERVICE_LOG_DIRECTORY. Order Management System masks the information in this log. |
|
4. |
Once Order Management System sends the token request to CyberSource, the system waits for a response to the token request using the number of seconds defined in the Response time field for the CYB service bureau. |
|
5. |
The CyberSource service bureau receives the CyberSource Token Request (paySubscriptionCreate) XML Message, processes the request, and sends the CyberSource Token Response (paySubscriptionCreate) XML Message back to Order Management System. |
|
6. |
Order Management System receives the CyberSource Token Response (paySubscriptionCreate) XML Message and processes the response. If the CYB_PAY_LINK_SERVICE_ENABLE_LOG property setting is set to true, the system writes the token response to the CyberSource web service log defined in the CYB_PAY_LINK_SERVICE_LOG_DIRECTORY. Order Management System masks the information in this log. The system writes the token response to the Trace Log if its Logging Level is set to DEBUG. Order Management System masks the card number in the log based on the setting of the Display Partial Credit Card Number in Logs (J16) system control value.
|
|
7. |
See the Security document for the updates that take place in Order Management System, depending on whether the tokenization transaction was approved or declined by the service bureau. |
CyberSource Point-to-Point Authorization Process
Order Management System performs the following steps when you process authorizations using point-to-point communication with CyberSource.
Request token? If you do not use credit card tokenization with CyberSource, the system sends a CyberSource Authorization Request (ccAuthService) XML Message to CyberSource.
If you use credit card tokenization with CyberSource and:
-
The credit card number for the payment requesting authorization has already been replaced with a token, the system sends a CyberSource Authorization Request (ccAuthService) XML Message to CyberSource.
-
The credit card number for the payment requesting authorization has not been replaced with a token, the system sends a CyberSource Token and Authorization Request (paySubscriptionCreate and ccAuthService) XML Message to CyberSource.
Perform fraud scoring? If the CYB_PAY_LINK_DECISION_MANAGER_ENABLED property setting is true, the system sends online authorization transactions to CyberSource with the decisionManager_enabled tag set to true, indicating Decision Manager processing should occur. See CyberSource Decision Manager Fraud Scoring for processing details.
Manual authorizations: CyberSource supports manual authorizations only if the manual authorization contains an authorization number, authorization date, authorization amount, and a valid authorization request ID (transaction ID) from CyberSource. If the manual authorization is not associated with a valid transaction ID from CyberSource, CyberSource will reject the deposit transaction because it is not associated with a valid authorization from CyberSource.
To define a manual authorization for a credit card payment that uses CyberSource as its service bureau:
-
Orders received through the Generic Order Interface (Order API) must contain an auth_number, v, auth_amount and a transaction_id that was obtained from CyberSource.
-
Orders entered in Order Management System should go out to CyberSource for authorization before deposit processing. You can perform authorization during order entry, order maintenance or pick slip generation.
For more information see the Web Services Guide on https://support.oracle.com My Oracle Support (ID 2149144.1).
For more information: See:
-
Performing Online Credit Card Authorizations for an overview on online authorizations and processing details.
-
Using Batch Authorization for an overview on batch authorizations and processing details.
-
Credit Card Tokenization in the Data Security and Encryption Guide on My Oracle Support (1988467.1) for an overview on tokenization and processing details
| # | Step |
|---|---|
|
1. |
Order Management System looks at the Communication type field for the CYB service bureau to determine how transactions are processed between Order Management System and the CyberSource service bureau. For the CyberSource integration with Order Management System, the setting is Payment Link indicating Point-to-Point communication. The system sends authorization transactions directly to the CyberSource service bureau. |
|
2. |
If the Communication type field for the service bureau is Payment Link, Order Management System creates the authorization request. Credit Card Tokenization?
Decision Manager Fraud Scoring? If the CYB_PAY_LINK_DECISION_MANAGER_ENABLED property is true and you are processing an online authorization transaction, the system sends the online authorization transaction to CyberSource with the decisionManager_enabled tag set to true, indicating Decision Manager processing should occur. See CyberSource Decision Manager Fraud Scoring for processing details. Note: Order Management System removes any non-standard keyboard characters from the XML message before sending it to CyberSource. |
|
3. |
The system writes the authorization request message to the Trace Log if its Logging Level is set to DEBUG. Order Management System masks the card number in the log based on the setting of the Display Partial Credit Card Number in Logs (J16) system control value.
|
|
4. |
Order Management System uses the settings in Working with Customer Properties (PROP) to send the authorization request directly to the CyberSource service bureau. Communication failure: The system tries to connect to CyberSource 3 times before flagging a transaction with a 150 General System Failure response code. If a transaction fails, any subsequent transactions will continue to process. If the CYB_PAY_LINK_SERVICE_ENABLE_LOG property is set to true, the system writes the authorization request message to the CyberSource web service log defined in the CYB_PAY_LINK_SERVICE_LOG_DIRECTORY. Order Management System masks the information in this log. |
|
5. |
Once Order Management System sends the authorization request to CyberSource, the system waits for a response to the authorization request using the number of seconds defined in the Response time field for the CYB service bureau. |
|
6. |
The CyberSource service bureau receives the authorization request, processes the request, and sends the authorization response back to Order Management System.
|
|
7. |
Order Management System receives the authorization response and processes the response: If the CYB_PAY_LINK_SERVICE_ENABLE_LOG setting in the property is set to true, the system writes the authorization response to the CyberSource web service log defined in the CYB_PAY_LINK_SERVICE_LOG_DIRECTORY. Order Management System masks the information in this log. The system writes the authorization response to the Trace Log if its Logging Level is set to DEBUG. Order Management System masks the card number in the log based on the setting of the Display Partial Credit Card Number in Logs (J16) system control value.
|
|
8. |
See: Online authorizations: What Happens When a Credit Card is Approved? and What Happens When a Credit Card is Declined? for the updates that take place in Order Management System, depending on whether the online authorization transaction was approved or declined by the service bureau. Decision Manager Fraud Scoring: CyberSource Decision Manager Fraud Scoring for the updates that take place in Order Management System, depending on the fraud score assigned to the online authorization transaction. Batch authorizations: Approved Authorizations and Declined Authorizations for the updates the take placed in Order Management System, depending on whether the batch authorization transaction was approved or declined by the service bureau. Tokenization: Credit Card Tokenization in the Data Security and Encryption Guide on My Oracle Support (1988467.1) for the updates that take place in Order Management System, depending on whether a token is returned in the authorization transaction. Placing the credit card on hold: The credit card pay type may be placed on hold if the credit card is not approved, the AVS verification fails, or if the credit card identification fails. See Hierarchy for Placing the Credit Card On Hold for more information on the hierarchy the system uses to determine if the credit card pay type should go on hold. |
CyberSource Decision Manager Fraud Scoring
Decision Manager is a service provided by CyberSource that allows you to use pre-defined and custom business rules to automatically identify orders that require further screening for fraud.
Based on the Decision Manager business rules, the order and payment information included in the authorization transaction, and the reply data received from the credit card authorization, Decision Manager determines which orders:
-
have a low risk for fraud and can be immediately processed,
-
have a higher probability for fraud and should be placed on hold for further review,
-
are likely fraudulent and should be canceled.
Authorization transactions that are placed on hold for further review are assigned to a case management work queue where a user can review the transaction and decide whether to accept or reject it.
For more information: Contact your CyberSource representative for the following documentation:
-
Decision Manager Planning Guide for more information on how to implement Decision Manager to suit your business requirements and the complex processing that occurs in Decision Manager when evaluating an order for fraud.
-
Decision Manager User Guide for more information on how to configure your Decision Manager Account in the Business Center and how to use Decision Manager for case management tasks.
-
Decision Manager Reporting Guide for more information on the reports that are generated when you use Decision Manager services.
CyberSource Decision Manager Process
The CYB_PAY_LINK_DECISION_MANAGER_ENABLED property defines whether CyberSource Decision Manager Fraud Scoring processing is enabled in the Order Management System Point-to-Point integration with CyberSource.
-
If this setting is false, the Order Management System Point-to-Point integration with CyberSource does not support Decision Manager processing in CyberSource. Order Management System sends all authorization transactions to CyberSource with the decisionManager_enabled tag set to false, indicating Decision Manager processing should not occur. However, you can use CyberSource’s Decision Manager for authorization transactions you process on your web storefront.
-
If this setting is true, the Order Management System Point-to-Point integration with CyberSource supports Decision Manager processing in CyberSource. Order Management System sends all online authorization transactions to CyberSource with the decisionManager_enabled tag set to true, indicating Decision Manager processing should occur.
If the decisionManager_enabled tag in an online authorization request is set to true, Order Management System performs additional processing during the CyberSource Point-to-Point Authorization Process.
Note:
-
Decision Manager Fraud Scoring occurs during online authorization processing only and does not occur for any batch authorization transaction.
-
CyberSource performs Decision Manager Fraud Scoring after the online authorization transaction and any additional processing such as address verification is approved; if the online authorization transaction or additional processing is not approved, CyberSource does not perform Decision Manager Fraud Scoring against the order.
-
The Decision Manager response and reason code are not stored in Order Management System.
-
The Decision Manager Fraud Scoring process below describes fraud scoring for online transactions that occur during interactive order entry or when a web order is received into Order Management System. For web orders that receive an online authorization transaction before being sent to Order Management System:
-
If the web authorization transaction was approved by Decision Manager, the order is received into Order Management System with no additional processing.
-
If the web authorization transaction was marked as REVIEW by Decision Manager, the order is received into Order Management System with the FS Fraud Scoring hold reason code so that the order can be placed in a Held status.
-
If the web authorization transaction was marked as REJECT by Decision Manager, the order is not sent to Order Management System.
-
| # | Step |
|---|---|
|
1. |
When Order Management System creates the online authorization request to send to CyberSource, if Decision Manager is enabled, the system includes additional information in the CyberSource Authorization Request (ccAuthService) XML Message:
|
|
2. |
If the online authorization transaction is approved, the system uses the Decision Manager settings in Working with Customer Properties (PROP) to connect to the CyberSource Decision Manager application. |
|
3. |
Decision Manager uses the information in the CyberSource Authorization Request (ccAuthService) XML Message, the reply data received from the credit card authorization, and any additional processing to evaluate the order for fraud scoring. Decision Manager automatically accepts an order unless a business rule causes the order to be rejected or marked for review.
Orders that receive a REVIEW decision are assigned to a case management work queue where a user can review the order and decide whether to accept or reject it. |
|
4. |
CyberSource sends the CyberSource Authorization Response (ccAuthService) XML Message back to Order Management System, including the results of the Decision Manager fraud score. The replyMessage decision setting in the response indicates whether the online authorization transaction was approved or declined by Decision Manager:
|
|
|
If the decision was REVIEW or REJECT, the replyMessage reasonCode provides additional information for the decision.
|
|
|
The response includes additional information related to Decision Manager in the afsReply, such as the total fraud score calculated for the order, the risk associated with the customer’s email domain, information that affected the score of the order, and whether the customer has a high order velocity. |
|
|
Note: The ccAuthReply reasonCode provides the reason the authorization transaction was approved or rejected by the authorization service; see CyberSource Point-to-Point Authorization Process for more information on the processing that occurs when an credit card authorization is approved or declined by CyberSource. |
|
5. |
Order Management System receives the online authorization response and processes the response.
|
CyberSource Decision Manager Review Process
When an online authorization transaction is marked as REVIEW by Decision Manager, Order Management System:
-
places the order on hold using the hold reason defined for the REVIEW vendor response (response code 480). Typically, you would define hold reason FS Fraud Scoring hold for vendor response 480.
-
creates an order transaction history message indicating the order was placed on FS Fraud Scoring Hold; for example:
| Type | Transaction Note | Amount | User |
|---|---|---|---|
|
HOLD |
SYS HLD - Fraud Scoring Hold |
120.00 |
your admin user |
Orders that receive a REVIEW decision are assigned to a case management work queue in Decision Manager. A user must log in to Decision Manager to review the order and decide whether to accept or reject it.
CyberSource Decision Manager Update Process
At scheduled intervals, run the CYBDMUP CyberSource Decision Manager Update periodic function to retrieve information on orders that have been evaluated by the fraud scoring process and managed in Decision Manager since the last time the periodic function was run.
Note:
Run this periodic function by company. Decision Manager returns information for all Order Management System orders across companies; however, Order Management System only processes the orders in the current company.
The periodic function:
-
uses the CYB_PAY_LINK_SERVICE_SEND_TO_PRODUCTION property to determine whether to connect to the test or production server.
-
uses the CYB_PAY_LINK_DECISION_MANAGER_KEY and CYB_PAY_LINK_DECISION_MANAGER_SECRET_KEY properties to connect to Decision Manager.
-
requests order information in the Decision Manager On Demand Conversion Report based on the merchant ID defined in the CYB_PAY_LINK_DECISION_MANAGER_MERCHANT_ID_OVERRIDE property. If this setting is blank, the system uses the following hierarchy to determine the merchant ID to use:
-
Merchant # field in the CC Paytype Cross Ref table
-
Merchant ID field in the Merchant ID Override table
-
Merchant ID field in the Authorization Services table
-
Identifying orders: Order Management System uses the RequestID returned from Decision Manager and the TransactionID in the Authorization History table to match the order information returned from Decision Manager to an order in Order Management System. The system processes responses from Decision Manager only for the company where you executed the periodic function.
Log: You can review the information sent to CyberSource and the response received from CyberSource in the TRACE log if its logging level is set to DEBUG; for example:
The CyberSource Decision Manager Update process sends the request Information to CyberSource.
The CyberSource Decision Manager Update process receives the information from CyberSource, for example: "originalDecision":"REVIEW","newDecision":"ACCEPT".
If new decision is ACCEPT: If a user in Decision Manager accepted the order, Order Management System:
-
releases the order from the FS Fraud Scoring hold.
-
creates an order transaction history message indicating the order was released from hold; for example:
| Type | Transaction Note | Amount | User |
|---|---|---|---|
|
RELEASE |
Removed Fraud Scoring hold |
|
your admin user |
-
creates one or more order messages for any notes or reviewer comments made on the order in Decision Manager; for example:
| Messages | User | |
|---|---|---|
|
APPROVED BY ABC | ISSUER VERIFIED NAME AND ADDRESS |
Nowhere |
your admin user |
If new decision is REJECT: If a user in Decision Manager rejected the order, Order Management System:
-
cancels the entire order using the cancel reason code defined in the Fraud Score Cancel Reason Code (M14)v system control value.
-
If the cancel reason code reduces demand, the order status and line status update to Closed and the quantity ordered is decreased by the quantity cancelled; 0 displays if the entire line was cancelled. The quantity cancelled is not updated.
-
If the cancel reason code does not reduce demand, the order status and line status update to Cancelled if the entire order is cancelled; otherwise, the order status and line status update to Closed if part of the order has shipped or was soldout. The quantity ordered is not updated and the quantity cancelled is updated with the cancel quantity.
-
-
creates an order transaction history message indicating the order was cancelled; for example:
| Type | Transaction Note | Amount | User |
|---|---|---|---|
|
MAINT |
System generated cancel processed |
|
your admin user |
|
CANCEL |
Cancelled by Fraud Scoring |
|
your admin user |
-
creates one or more order messages for any notes or reviewer comments made on the order in Decision Manager; for example:
| Messages | User | |
|---|---|---|
|
REJECTED BY ABC | FRAUD |
Nowhere |
your admin user |
-
If the Send reversal field is selected for the CYB service bureau, performs a Credit Card Authorization Reversal against the credit card payment.
-
If the entire order cannot be cancelled, for example a pick exists for one or more items on the order, the system places the order on FC Fraud Cancellation hold and creates an order transaction history message indicating the order was placed on fraud scoring cancellation hold; for example:
| Type | Transaction Note | Amount | User |
|---|---|---|---|
|
HOLD |
Apply Fraud Scoring Cancellation hold |
|
your admin user |
Note:
If order information is not returned from CyberSource, the order remains on FS Fraud Scoring hold.
Required report: To support Decision Manager processing and updates through the CYBDMUP periodic function, create a custom report in the CyberSource Decision Manager Portal with the following attributes:
-
Report Name: ConversionDetailReport
-
File Format: XML
-
Report Type: Conversion Detail Report
-
Frequency: Recurring report subscription
-
Subscription Frequency: Daily
-
Subscription Start Time: 12:00 AM
-
Subscription Time Zone: Select your time zone
-
Advanced Report Features: Check ‘Select All’
CyberSource Decision Manager Reject Process
When an online authorization transaction is marked as REJECT by Decision Manager, Order Management System:
-
deactivates the credit card payment, setting the To charge amount to .01,
-
If the Send reversal field is selected for the CYB service bureau, performs a Credit Card Authorization Reversal against the deactivated credit card payment,
-
creates an order transaction history message indicating the order was rejected by Decision Manager; for example:
| Type | Transaction Note | Amount | User |
|---|---|---|---|
|
SYSTEM UPDATE |
FRAUD SCORE - REJECTED BY DECISION MANAG |
120.00 |
your admin user |
-
during interactive order entry, displays the Select Authorization Response Option window. The message at this window should indicate the order has been rejected by Decision Manager. Regardless of whether you select Accept Order or Edit Order on this window, the system returns you to the order and requires you to add another form of payment before you can accept the order. Note: The system displays the Select Authorization Response Option window even if a vendor response pop up window message has not been defined and the Online authorization field for the order type is not set to Window (online eligible and display window).
-
during web order processing, places the order on hold using the hold reason defined for the REJECT vendor response (response code 481) since the credit card payment on the order has been deactivated. Typically, you would define hold reason FS Fraud Scoring hold for vendor response 481. You need to add another form of payment before you can release the order from hold. If you try to release the order from hold in Release Held Orders (ERHO) without adding another form of payment, the system displays an error message: No payment methods have been defined for this order.
CyberSource Point-to-Point Deposit Process
Order Management System performs the following steps when you process deposits for CyberSource using point-to-point communication.
Type of deposit?
-
If the deposit is a debit to the credit card, Order Management System sends a CyberSource Debit Deposit Request (ccCaptureService) XML Message to CyberSource.
-
If the deposit is a credit to the credit card, Order Management System sends a CyberSource Credit Deposit Request (ccCreditService) XML Message to CyberSource.
-
If the deposit is a debit to the credit card and the deposit amount is greater than the authorization amount, the authorization has expired, or the deposit is for an installment amount, Order Management System sends a CyberSource Authorization and Deposit Request (ccAuthService and ccCaptureService) XML Message to CyberSource.
-
Request token? If you use credit card tokenization with CyberSource and:
-
The credit card number for the payment requesting deposit has already been replaced with a token, the system includes the token in the request sent to CyberSource.
-
The credit card number for the payment requesting deposit has not been replaced with a token, the system includes customer and card information in the request sent to CyberSource.
Manual authorizations: CyberSource supports manual authorizations only if the manual authorization contains an authorization number, authorization date, authorization amount, and a valid authorization request ID (transaction ID) from CyberSource. If the manual authorization is not associated with a valid transaction ID from CyberSource, CyberSource will reject the deposit transaction because it is not associated with a valid authorization from CyberSource.
To define a manual authorization for a credit card payment that uses CyberSource as its service bureau:
-
Orders received through the Generic Order Interface (Order API) must contain an auth_number, auth_date, auth_amount and a transaction_id that was obtained from CyberSource.
-
Orders entered in Order Management System should go out to CyberSource for authorization before deposit processing. You can perform authorization during order entry, order maintenance or pick slip generation.
For more information see the Web Services Guide on https://support.oracle.com My Oracle Support (ID 2149144.1).
For more information: See Processing Auto Deposits (SDEP) for an overview on deposits and processing details.
| # | Step |
|---|---|
|
1. |
Order Management System looks at the Communication type field for the CYB service bureau to determine how transactions are processed between Order Management System and the service bureau. F For the CyberSource integration with Order Management System, the setting is Payment Link indication Point-to-Point communication. The system sends online authorization transactions directly to the CyberSource service bureau. |
|
2. |
If the Communication type field for the service bureau is Payment Link, Order Management System creates the deposit request:
Note: Order Management System removes any non-standard keyboard characters from the XML message before sending it to CyberSource. The system writes the deposit request message to the Trace Log if its Logging Level is set to DEBUG. Order Management System masks the card number in the log based on the setting of the Display Partial Credit Card Number in Logs (J16) system control value.
|
|
3. |
Order Management System uses the settings in the CyberSource Interface Properties to send the deposit request directly to the CyberSource service bureau. Communication failure: The system tries to connect to CyberSource 3 times before flagging a transaction with a 150 General System Failure response code. If a transaction fails, any subsequent transactions will continue to process. If the CYB_PAY_LINK_SERVICE_ENABLE_LOG property is set to true, the system writes the deposit request message to the CyberSource web service log defined in the CYB_PAY_LINK_SERVICE_LOG_DIRECTORY. Order Management System masks the information in this log. |
|
4. |
Once Order Management System sends the deposit request to CyberSource, the system waits for a response to the deposit request using the number of seconds defined in the Response time field for the CYB service bureau. |
|
5. |
The CyberSource service bureau receives the deposit request, processes the request, and sends the deposit response back to Order Management System.
|
|
6. |
Order Management System receives the deposit response and processes the response:
If the CYB_PAY_LINK_SERVICE_ENABLE_LOG property is set to true, the system writes the deposit response to the CyberSource web service log defined in the CYB_PAY_LINK_SERVICE_LOG_DIRECTORY. Order Management System masks the information in this log. The system writes the deposit response to the Trace Log if its Logging Level is set to DEBUG. Order Management System masks the card number in the log based on the setting of the Display Partial Credit Card Number in Logs (J16) system control value.
|
Rejected deposits: If a deposit is rejected, you can review the reason for the decline or contact CyberSource to identify why the deposit transaction was declined, and either manually confirm the deposit or resubmit it if the decline is for a reason that may pass in subsequent processing.
If a response is not received: If a deposit response is not received within the maximum wait time, Order Management System creates a record in the Request for Response table; see Working with Required Responses (WREQ) for processing details.
Retrieving responses from CyberSource: If a deposit response was not received within the maximum wait time, or if a communication failure occurred during transaction processing, you can use the receive deposits option on the Auto Deposit Screen to send a deposit request to CyberSource, requesting CyberSource to queue the deposit response so that Order Management System can retrieve it.
CyberSource Point-to-Point Authorization Reversal Process
Order Management System performs the following steps when you perform authorization reversal using point-to-point communication with CyberSource.For more information: See Credit Card Authorization Reversal for an overview on credit card authorization reversal and processing details.
| # | Step |
|---|---|
|
1. |
Order Management System looks at the Communication type field for the CYB service bureau to determine how transactions are processed between Order Management System and the CyberSource service bureau. For the CyberSource integration with Order Management System, the setting is Payment Link indicating Point-to-Point communication. The system sends authorization reversal transactions directly to the CyberSource service bureau. |
|
2. |
If the Communication type field for the service bureau is Payment Link, Order Management System creates the CyberSource Authorization Reversal Request (ccAuthReversalService) XML Message. Note: Order Management System removes any non-standard keyboard characters from the XML message before sending it to CyberSource. The system also writes the authorization reversal request message to the Trace Log if its Logging Level is set to DEBUG. Order Management System masks the card number in the log based on the setting of the Display Partial Credit Card Number in Logs (J16) system control value.
|
|
3. |
Order Management System uses the settings in the CyberSource Interface Properties to send the CyberSource Authorization Reversal Request (ccAuthReversalService) XML Message directly to the CyberSource service bureau. Communication failure: The system tries to connect to CyberSource 3 times before flagging a transaction with a 150 General System Failure response code. If a transaction fails, any subsequent transactions will continue to process. If the CYB_PAY_LINK_SERVICE_ENABLE_LOG property is set to true, the system writes the authorization reversal request message to the CyberSource web service log defined in the CYB_PAY_LINK_SERVICE_LOG_DIRECTORY. Order Management System masks the information in this log. |
|
4. |
Once Order Management System sends the authorization reversal request to CyberSource, the system waits for a response to the authorization reversal request using the number of seconds defined in the Response time field for the CYB service bureau. |
|
5. |
The CyberSource service bureau receives the CyberSource Authorization Reversal Request (ccAuthReversalService) XML Message, processes the request, and sends the CyberSource Authorization Reversal Response (ccAuthReversalService) XML Message back to Order Management System. |
|
6. |
Order Management System receives the CyberSource Authorization Reversal Response (ccAuthReversalService) XML Message and processes the response. If the CYB_PAY_LINK_SERVICE_ENABLE_LOG property is set to true, the system writes the authorization reversal response to the CyberSource web service log defined in the CYB_PAY_LINK_SERVICE_LOG_DIRECTORY. Order Management System masks the information in this log. The system writes the token response to the Trace Log if its Logging Level is set to DEBUG. Order Management System masks the card number in the log based on the setting of the Display Partial Credit Card Number in Logs (J16) system control value.
|
|
7. |
See What Happens When the Authorization Reversal is Approved? and What Happens When the Authorization Reversal is Declined? for the updates that take place in Order Management System, depending on whether the authorization reversal transaction was approved or declined by the service bureau. |
Subsequent Authorization Requests to CyberSource
About subsequent authorizations: Order Management System sends CyberSource information indicating whether a transaction was initiated by the merchant, or by the customer. For example, when the customer initially places the order, this is a transaction initiated by the customer; if Order Management System submits a new deposit request for the payment method on the order because the initial request failed, this is a transaction initiated by the merchant.
CyberSource requires Order Management System to pass information identifying a subsequent authorization that was not initiated by the customer.
Term definitions:
-
Merchant-Initiated Transactions (MIT): An authorization that the system initiates without the customer’s active participation.
-
Cardholder-Initiated Transactions (CIT): An authorization that uses payment information provided by the customer.
-
Credentials on File (COF): The cardholder payment information that is stored by the system. The credit card can be either tokenized or non-tokenized.
-
Which messages? The following messages include information about subsequent authorizations for order payment methods submitted to CyberSource:
-
CyberSource Authorization Request (ccAuthService) XML Message
-
CyberSource Token and Authorization Request (paySubscriptionCreate and ccAuthService) XML Message
-
CyberSource Authorization and Deposit Request (ccAuthService and ccCaptureService) XML Message
Types of subsequent authorizations: Brief descriptions of subsequent authorization types include:
-
Resubmission of a failed deposit: When the Supports Auth Resubmission flag is selected for CyberSource in Defining Authorization Services (WASV) and a previous deposit request failed. A subsequent authorization and deposit request is generated, with the subsequentAuth tag set to true and the subsequentAuthReason set to 1; otherwise, this tag is set to 3.
-
Split shipment: When the order is not fulfilled in a single shipment. In this case, the request for the subsequent authorization includes a subsequentAuthReason set to 3 and passes the existing ci_transaction_id as the subsequentAuthTransactionID.
-
Deferred or installment billing: When the order uses deferred or installment billing. In this case, the Notify of installments flag for the pay type indicates whether to send a commerceIndicator set to install in the ccAuthService element for the authorization and deposit request, or to include subsequent authorization tags similar to other types of subsequent authorizations, as described below.
For more information: See Deferred/Installment Billing Overview.
-
Customer membership orders: When you generate orders for a customer membership that has been authorized. Authorization can take place either through the order originating the customer membership, or through a generated membership order. The CIT Transaction ID (customer-initiated transaction ID) and the original authorization amount for the credit card are stored on the customer membership, although this information is not displayed on any screen.
For more information: See Subsequent Authorizations to CyberSource for Membership Orders.
Details on the information passed to CyberSource: The information that might be passed related to subsequent authorizations includes the following.
| Tag | Usage: | Not Passed When: |
|---|---|---|
|
subsequentAuthFirst |
Set to true if this is the first authorization request for the payment method, and not a merchant-initiated transaction. A first authorization can be:
|
If this is a subsequent authorization request, this tag is not passed. A subsequent request can be:
|
|
subsequentAuth |
Set to true if this is a subsequent authorization request (the subsequentAuthFirst was not passed), and
|
|
|
subsequentAuth Reason |
If subsequentAuth is set to true:
|
|
|
subsequentAuth TransactionID |
The ci_transaction_id identifying the authorization. Passed when this is a subsequent authorization (the subsequentAuthFirst was not passed), and the ci_transaction_id is stored on the Order Payment Method, either through the paymentNetworkTransactionID from a previous message from CyberSource, through the ci_transaction_id received in the Inbound Order XML Message (CWORDERIN),, or from the customer membership if this is a generated membership order. This transaction ID is cleared from the Order Payment Method if you change the credit card number. For more information see the Web Services Guide on https://support.oracle.com My Oracle Support (ID 2149144.1). |
|
|
subsequentAuth StoredCredential |
Set to true if the authorization credentials are stored. Passed when this is a subsequent authorization (the subsequentAuthFirst was not passed), and the ci_transaction_id is stored on the Order Payment Method, either through the paymentNetworkTransactionID from a previous message from CyberSource, or through the ci_transaction_id received in the Inbound Order XML Message (CWORDERIN). For more information see the Web Services Guide on https://support.oracle.com My Oracle Support (ID 2149144.1). |
|
|
subsequentAuth OriginalAmount |
The amount of the original approved authorization. Passed when this is a subsequent authorization (the subsequentAuthFirst was not passed), and the ci_transaction_id is stored on the Order Payment Method, either through the paymentNetworkTransactionID from a previous message from CyberSource, or through the ci_transaction_id received in the Inbound Order XML Message (CWORDERIN). For more information see the Web Services Guide on https://support.oracle.com My Oracle Support (ID 2149144.1).
|
|
Sample CyberSource Transactions
-
CyberSource Token (paySubscriptionCreate) Transaction: Sample Messages
-
CyberSource Authorization (ccAuthService) Transaction without Decision Manager: Sample Messages
-
CyberSource Authorization (ccAuthService) Transaction with Decision Manager: Sample Messages
-
CyberSource Debit Deposit (ccCaptureService) Transaction: Sample Messages
-
CyberSource Credit Deposit (ccCreditService) Transaction: Sample Messages
-
CyberSource Authorization Reversal (ccAuthReversalService) Transaction: Sample Messages
CyberSource Token (paySubscriptionCreate) Transaction: Sample Messages
A sample of a CyberSource Token (paySubscriptionCreate) transaction is presented below.
<requestMessage xmlns="urn:schemas-cybersource-com:transaction-data-1.57">
<merchantID xmlns="urn:schemas-cybersource-com:transaction-data-1.57">merchID </merchantID>
<merchantReferenceCode>CMPORDER_NBR </merchantReferenceCode>
<billTo>
<firstName>FIRST </firstName>
<lastName>LAST </lastName>
<street1>STREET1 </street1>
<city>CITY </city>
<state>MA </state>
<postalCode>POSTAL </postalCode>
<country>US </country>
<email>null@cybersource.com </email>
</billTo>
<purchaseTotals>
<currency>USD </currency>
</purchaseTotals>
<card>
<accountNumber>***** REMOVED ***** </accountNumber>
<expirationMonth>12 </expirationMonth>
<expirationYear>2012 </expirationYear>
<cardType>001 </cardType>
</card>
<recurringSubscriptionInfo>
<frequency>on-demand </frequency>
</recurringSubscriptionInfo>
<decisionManager>
<enabled>false </enabled>
</decisionManager>
<paySubscriptionCreateService run="true" />
</requestMessage>Request: See CyberSource Token Request (paySubscriptionCreate) XML Message for mapping details.
<c:replyMessage xmlns:c="urn:schemas-cybersource-com:transaction-data-1.57">
<c:merchantReferenceCode>CMPORDER_NBR </c:merchantReferenceCode>
<c:requestID>REQUEST_ID </c:requestID>
<c:decision>ACCEPT </c:decision>
<c:reasonCode>100 </c:reasonCode>
<c:requestToken>REQUEST_TOKEN </c:requestToken>
<c:purchaseTotals>
<c:currency>USD </c:currency>
</c:purchaseTotals>
<c:ccAuthReply>
<c:reasonCode>100 </c:reasonCode>
<c:amount>0.00 </c:amount>
<c:authorizationCode>AUTH_CODE </c:authorizationCode>
<c:avsCode>X </c:avsCode>
<c:avsCodeRaw>I1 </c:avsCodeRaw>
<c:authorizedDateTime>2011-06-30T19:44:12Z </c:authorizedDateTime>
<c:processorResponse>100 </c:processorResponse>
<c:reconciliationID>RECONCILIATIONID </c:reconciliationID>
<c:paymentNetworkTransactionID>TRANSACTIONID </c:paymentNetworkTransactionID>
</c:ccAuthReply>
<c:paySubscriptionCreateReply>
<c:reasonCode>100 </c:reasonCode>
<c:subscriptionID>SUBSCRIPTION_ID </c:subscriptionID>
</c:paySubscriptionCreateReply>
</c:replyMessage>CyberSource Authorization (ccAuthService) Transaction without Decision Manager: Sample Messages
A sample of a CyberSource Authorization (ccAuthService) transaction when Decision Manager is not enabled is presented below. This transaction uses the token, rather than the actual credit card number, to authorize a credit card payment.
Request: See CyberSource Authorization Request (ccAuthService) XML Message for mapping details.
<requestMessage xmlns="urn:schemas-cybersource-com:transaction-data-1.57">
<merchantID xmlns="urn:schemas-cybersource-com:transaction-data-1.57">merchID </merchantID>
<merchantReferenceCode>CMPORDER_NBR </merchantReferenceCode>
<purchaseTotals>
<currency>USD </currency>
<grandTotalAmount>10.87 </grandTotalAmount>
</purchaseTotals>
<recurringSubscriptionInfo>
<subscriptionID>SUBSCRIPTION_ID </subscriptionID>
<frequency>on-demand </frequency>
</recurringSubscriptionInfo>
<decisionManager>
<enabled>false </enabled>
</decisionManager>
<ccAuthService run="true">
<commerceIndicator>moto </commerceIndicator>
</ccAuthService>
</requestMessage>Response: See CyberSource Authorization Response (ccAuthService) XML Message for mapping details.
<c:replyMessage <xmlns:c="urn:schemas-cybersource-com:transaction-data-1.57">
<c:merchantReferenceCode>CMPORDER_NBR </c:merchantReferenceCode>
<c:requestID>REQUEST_ID </c:requestID>
<c:decision>ACCEPT </c:decision>
<c:reasonCode>100 </c:reasonCode>
<c:requestToken>REQUEST_TOKEN </c:requestToken>
<c:purchaseTotals>
<c:currency>USD </c:currency>
</c:purchaseTotals>
<c:ccAuthReply>
<c:reasonCode>100 </c:reasonCode>
<c:amount>10.87 </c:amount>
<c:authorizationCode>AUTH_CODE </c:authorizationCode>
<c:avsCode>X </c:avsCode>
<c:avsCodeRaw>I1 </c:avsCodeRaw>
<c:authorizedDateTime>2011-07-01T14:10:04Z </c:authorizedDateTime>
<c:processorResponse>100 </c:processorResponse>
<c:reconciliationID>RECONCILIATIONID </c:reconciliationID>
<c:paymentNetworkTransactionID>TRANSACTIONID </c:paymentNetworkTransactionID>
<c:ownerMerchantID>merchID </c:ownerMerchantID>
</c:ccAuthReply>
</c:replyMessage>CyberSource Authorization (ccAuthService) Transaction with Decision Manager: Sample Messages
A sample of a CyberSource Authorization (ccAuthService) transaction when Decision Manager is enabled is presented below. This transaction uses the token, rather than the actual credit card number, to authorize a credit card payment.
Request: See CyberSource Authorization Request (ccAuthService) XML Message for mapping details.
<requestMessage xmlns="urn:schemas-cybersource-com:transaction-data-1.57">
<merchantID xmlns="urn:schemas-cybersource-com:transaction-data-1.57">merchID </merchantID>
<merchantReferenceCode>CMPORDER_NBR </merchantReferenceCode>
<clientLibrary xmlns="urn:schemas-cybersource-com:transaction-data-1.57">Java XML </clientLibrary>
<clientLibraryVersion xmlns="urn:schemas-cybersource-com:transaction-data-1.57">5.0.2 </clientLibraryVersion>
<clientEnvironment xmlns="urn:schemas-cybersource-com:transaction-data-1.57">Windows NT (unknown)/6.2/Sun Microsystems Inc./1.6.0_30 </clientEnvironment>
<billTo>
<firstName>FIRST </firstName>
<lastName>LAST </lastName>
<street1>STREET1 </street1>
<city>CITY </city>
<state>MA </state>
<postalCode>POSTAL </postalCode>
<country>US </country>
<email>EMAIL_ADDR </email>
<customerID>CSTID </customerID>
</billTo>
<shipTo>
<firstName>FIRST </firstName>
<lastName>LAST </lastName>
<street1>STREET1 </street1>
<city>CITY </city>
<state>MA </state>
<postalCode>POSTAL </postalCode>
<country>US </country>
<phoneNumber>PHONE </phoneNumber>
<shippingMethod>lowcost </shippingMethod>
</shipTo>
<item id="0">
<unitPrice>13.50 </unitPrice>
<quantity>1 </quantity>
<productCode>default </productCode>
<productName>ITEM DESCRIPTION </productName>
<productSKU>ITEM </productSKU>
</item>
<purchaseTotals>
<currency>USD </currency>
<grandTotalAmount>16.67 </grandTotalAmount>
</purchaseTotals>
<recurringSubscriptionInfo>
<subscriptionID>SUBSCRIPTION_ID </subscriptionID>
<frequency>on-demand </frequency>
</recurringSubscriptionInfo>
<decisionManager>
<enabled>true </enabled>
</decisionManager>
<ccAuthService run="true">
<commerceIndicator>moto </commerceIndicator>
</ccAuthService>
<businessRules>
<ignoreAVSResult>true </ignoreAVSResult>
<ignoreCVResult>true </ignoreCVResult>
</businessRules>
<subsequentAuthFirst>true </subsequentAuthFirst>
</requestMessage>Response: See Response: See CyberSource Authorization Response (ccAuthService) XML Message for mapping details. for mapping details.
<c:replyMessage xmlns:c="urn:schemas-cybersource-com:transaction-data-1.57">
<c:merchantReferenceCode>CMPORDER_NBR </c:merchantReferenceCode>
<c:requestID>REQUEST_ID </c:requestID>
<c:decision>REVIEW </c:decision>
<c:reasonCode>480 </c:reasonCode>
<c:requestToken>REQUEST_TOKEN </c:requestToken>
<c:purchaseTotals>
<c:currency>USD </c:currency>
</c:purchaseTotals>
<c:ccAuthReply>
<c:reasonCode>100 </c:reasonCode>
<c:amount>16.67 </c:amount>
<c:authorizationCode>AUTH_CODE </c:authorizationCode>
<c:avsCode>X </c:avsCode>
<c:avsCodeRaw>I1 </c:avsCodeRaw>
<c:authorizedDateTime>2014-05-01T14:17:41Z </c:authorizedDateTime>
<c:processorResponse>100 </c:processorResponse>
<c:reconciliationID>RECONCILIATIONID </c:reconciliationID>
<c:paymentNetworkTransactionID>TRANSACTIONID </c:paymentNetworkTransactionID>
<c:ownerMerchantID>merchID </c:ownerMerchantID>
</c:ccAuthReply>
<c:afsReply
<c:reasonCode>100 </c:reasonCode>
<c:afsResult>62 </c:afsResult>
<c:hostSeverity>1 </c:hostSeverity>
<c:consumerLocalTime>10:17:39 </c:consumerLocalTime>
<c:afsFactorCode>H^R </c:afsFactorCode>
<c:velocityInfoCode>VEL-ADDR^VEL-NAME </c:velocityInfoCode>
<c:scoreModelUsed>xxxxxxx </c:scoreModelUsed>
<c:binCountry>xx </c:binCountry>
<c:cardAccountType>Coxxxxxxxxx </c:cardAccountType>
<c:cardScheme>Vixxxxxxxit </c:cardScheme>
<c:cardIssuer>JPMOxxxxxxxxxxxxxxxxxN.A. </c:cardIssuer>
</c:afsReply>
<c:decisionReply>
<c:casePriority>x </c:casePriority>
<c:activeProfileReply/>
</c:decisionReply>
</c:replyMessage>CyberSource Token and Authorization (paySubscriptionCreate and ccAuthService) Transaction: Sample Messages
A sample of a CyberSource Token and Authorization (paySubscriptionCreate and ccAuthService) transaction is presented below. This transaction sends the actual credit card number, rather than a token, to authorize a credit card payment. CyberSource replaces the credit card number with a token during the authorization process.
Request: See CyberSource Token and Authorization Request (paySubscriptionCreate and ccAuthService) XML Message for mapping details.
<requestMessage xmlns="urn:schemas-cybersource-com:transaction-data-1.57">
<merchantID xmlns="urn:schemas-cybersource-com:transaction-data-1.57">merchID </merchantID>
<merchantReferenceCode>CMPORDER_NBR </merchantReferenceCode>
<billTo>
<firstName>FIRST </firstName>
<lastName>LAST </lastName>
<street1>STREET1 </street1>
<city>CITY </city>
<state>MA </state>
<postalCode>POSTAL </postalCode>
<country>US </country>
<email>null@cybersource.com </email>
</billTo>
<purchaseTotals>
<currency>USD </currency>
<grandTotalAmount>10.87 </grandTotalAmount>
</purchaseTotals>
<card>
<accountNumber>***** REMOVED ***** </accountNumber>
<expirationMonth>12 </expirationMonth>
<expirationYear>2012 </expirationYear>
<cardType>001 </cardType>
</card>
<recurringSubscriptionInfo>
<frequency>on-demand </frequency>
</recurringSubscriptionInfo>
<decisionManager>
<enabled>false </enabled>
</decisionManager>
<ccAuthService run="true">
<commerceIndicator>moto </commerceIndicator>
</ccAuthService>
<paySubscriptionCreateService run="true" />
<subsequentAuthFirst>true </subsequentAuthFirst>
</requestMessage>Response: See CyberSource Token and Authorization Response (paySubscriptionCreate and ccAuthService) XML Message for mapping details.
<c:replyMessage xmlns:c="urn:schemas-cybersource-com:transaction-data-1.57">
<c:merchantReferenceCode>CMPORDER_NBR </c:merchantReferenceCode>
<c:requestID>REQUEST_ID </c:requestID>
<c:decision>ACCEPT </c:decision>
<c:reasonCode>100 </c:reasonCode>
<c:requestToken>REQUEST_TOKEN </c:requestToken>
<c:purchaseTotals>
<c:currency>USD </c:currency>
</c:purchaseTotals>
<c:ccAuthReply>
<c:reasonCode>100 </c:reasonCode>
<c:amount>10.87 </c:amount>
<c:authorizationCode>AUTH_CODE </c:authorizationCode>
<c:avsCode>X </c:avsCode>
<c:avsCodeRaw>I1 </c:avsCodeRaw>
<c:authorizedDateTime>2011-07-01T14:55:04Z </c:authorizedDateTime>
<c:processorResponse>100 </c:processorResponse>
<c:reconciliationID>RECONCILIATIONID </c:reconciliationID>
<c:paymentNetworkTransactionID>TRANSACTIONID </c:paymentNetworkTransactionID>
</c:ccAuthReply>
<c:paySubscriptionCreateReply>
<c:reasonCode>100 </c:reasonCode>
<c:subscriptionID>SUBSCRIPTION_ID </c:subscriptionID>
</c:paySubscriptionCreateReply>
</c:replyMessage>CyberSource Debit Deposit (ccCaptureService) Transaction: Sample Messages
A sample of a CyberSource Debit Deposit (ccCaptureService) transaction is presented below.
<requestMessage xmlns="urn:schemas-cybersource-com:transaction-data-1.57">
<merchantID xmlns="urn:schemas-cybersource-com:transaction-data-1.57">merchID </merchantID>
<merchantReferenceCode>CMPORDER_NBR </merchantReferenceCode>
<invoiceHeader>
<userPO>USER_PO </userPO>
</invoiceHeader>
<item id="0">
<unitPrice>10.35 </unitPrice>
<taxAmount>0.5175 </taxAmount>
</item>
<purchaseTotals>
<currency>USD </currency>
<grandTotalAmount>10.87 </grandTotalAmount>
</purchaseTotals>
<ccCaptureService run="true">
<authRequestID>AUTH_REQ_ID </authRequestID>
<reconciliationID>RECONCILIATIONID </reconciliationID>
</ccCaptureService>
</requestMessage>Response: See CyberSource Debit Deposit Response (ccCaptureService) XML Message for mapping details.
<c:replyMessage xmlns:c="urn:schemas-cybersource-com:transaction-data-1.57">
<c:merchantReferenceCode>CMPORDER_NBR </c:merchantReferenceCode>
<c:requestID>REQUEST_ID </c:requestID>
<c:decision>ACCEPT </c:decision>
<c:reasonCode>100 </c:reasonCode>
<c:requestToken>REQUEST_TOKEN </c:requestToken>
<c:purchaseTotals>
<c:currency>USD </c:currency>
</c:purchaseTotals>
<c:ccCaptureReply>
<c:reasonCode>100 </c:reasonCode>
<c:requestDateTime>2011-07-01T17:46:49Z </c:requestDateTime>
<c:amount>10.87 </c:amount>
<c:reconciliationID>RECONCILIATIONID </c:reconciliationID>
<c:paymentNetworkTransactionID>TRANSACTIONID </c:paymentNetworkTransactionID>
</c:ccCaptureReply>
</c:replyMessage>CyberSource Credit Deposit (ccCreditService) Transaction: Sample Messages
A sample of a CyberSource Credit Deposit (ccCreditService) transaction is presented below.
Request: See CyberSource Credit Deposit Request (ccCreditService) XML Message for mapping details.
<requestMessage xmlns="urn:schemas-cybersource-com:transaction-data-1.57">
<merchantID xmlns="urn:schemas-cybersource-com:transaction-data-1.57">merchID </merchantID>
<merchantReferenceCode>CMPORDER_NBR </merchantReferenceCode>
<invoiceHeader>
<userPO>USER_PO </userPO>
</invoiceHeader>
<billTo>
<firstName>FIRST </firstName>
<lastName>LAST </lastName>
<street1>STREET1 </street1>
<city>CITY </city>
<state>MA </state>
<postalCode>POSTAL </postalCode>
<country>US </country>
<email>null@cybersource.com </email>
</billTo>
<item id="0">
<unitPrice>10.35 </unitPrice>
<quantity>1 </quantity>
<productCode>ITEM </productCode>
<productName>REGULAR ITEM - BACK IN BUSINESS </productName>
<productSKU />
<taxAmount>0.5175 </taxAmount>
<unitOfMeasure>EA </unitOfMeasure>
<taxRate>0.0500 </taxRate>
<totalAmount>10.35 </totalAmount>
<discountAmount>39.65 </discountAmount>
<commodityCode>0 </commodityCode>
</item>
<purchaseTotals>
<currency>USD </currency>
<discountAmount>39.65 </discountAmount>
<grandTotalAmount>10.87 </grandTotalAmount>
<freightAmount>0.00 </freightAmount>
</purchaseTotals>
<recurringSubscriptionInfo>
<subscriptionID>SUBSCRIPTION_ID </subscriptionID>
<frequency>on-demand </frequency>
</recurringSubscriptionInfo>
<ccCreditService run="true">
<purchasingLevel>3 </purchasingLevel>
</ccCreditService>
</requestMessage>Response: See CyberSource Credit Deposit Response (ccCreditService) XML Message for mapping details.
<c:replyMessage xmlns:c="urn:schemas-cybersource-com:transaction-data-1.57">
<c:merchantReferenceCode>CMPORDER_NBR </c:merchantReferenceCode>
<c:requestID>REQUEST_ID </c:requestID>
<c:decision>ACCEPT </c:decision>
<c:reasonCode>100 </c:reasonCode>
<c:requestToken>REQUEST_TOKEN </c:requestToken>
<c:purchaseTotals>
<c:currency>USD </c:currency>
</c:purchaseTotals>
<c:ccCreditReply>
<c:reasonCode>100 </c:reasonCode>
<c:requestDateTime>2011-07-01T20:14:15Z </c:requestDateTime>
<c:amount>10.87 </c:amount>
<c:reconciliationID>RECONCILIATIONID </c:reconciliationID>
<c:purchasingLevel3Enabled>Y </c:purchasingLevel3Enabled>
<c:ownerMerchantID>merchID </c:ownerMerchantID>
</c:ccCreditReply>
</c:replyMessage>CyberSource Authorization and Deposit (ccAuthService and ccCaptureService) Transaction: Sample Messages
A sample of a CyberSource Authorization and Deposit (ccAuthService and ccCaptureService) transaction is presented below.
Request: See CyberSource Authorization and Deposit Request (ccAuthService and ccCaptureService) XML Message for mapping details.
<requestMessage xmlns="urn:schemas-cybersource-com:transaction-data-1.57">
<merchantID xmlns="urn:schemas-cybersource-com:transaction-data-1.57">merchID </merchantID>
<merchantReferenceCode>CMPORDER_NBR </merchantReferenceCode>
<invoiceHeader>
<userPO>USER_PO </userPO>
</invoiceHeader>
<item id="0">
<unitPrice>10.35 </unitPrice>
<quantity>4 </quantity>
<productCode>ITEM </productCode>
<productName>REGULAR ITEM - BACK IN BUSINESS </productName>
<productSKU />
<taxAmount>2.07 </taxAmount>
<unitOfMeasure>EA </unitOfMeasure>
<taxRate>0.0500 </taxRate>
<totalAmount>41.40 </totalAmount>
<discountAmount>158.60 </discountAmount>
<commodityCode>0 </commodityCode>
</item>
<item id="1">
<unitPrice>10.35 </unitPrice>
<quantity>1 </quantity>
<productCode>ITEM </productCode>
<productName>REGULAR ITEM - BACK IN BUSINESS </productName>
<productSKU />
<taxAmount>0.5175 </taxAmount>
<unitOfMeasure>EA </unitOfMeasure>
<taxRate>0.0500 </taxRate>
<totalAmount>10.35 </totalAmount>
<discountAmount>39.65 </discountAmount>
<commodityCode>0 </commodityCode>
</item>
<purchaseTotals>
<currency>USD </currency>
<discountAmount>198.25 </discountAmount>
<grandTotalAmount>27.17 </grandTotalAmount>
<freightAmount>0.00 </freightAmount>
</purchaseTotals>
<recurringSubscriptionInfo>
<subscriptionID>SUBSCRIPTION_ID </subscriptionID>
<frequency>on-demand </frequency>
</recurringSubscriptionInfo>
<decisionManager>
<enabled>false </enabled>
</decisionManager>
<ccAuthService run="true">
<commerceIndicator>moto </commerceIndicator> <reconciliationID>RECONCILIATIONID </reconciliationID>
</ccAuthService>
<ccCaptureService run="true">
<purchasingLevel>3 </purchasingLevel>
<reconciliationID>RECONCILIATIONID </reconciliationID>
</ccCaptureService>
<subsequentAuth>true </subsequentAuth>
<subsequentAuthOriginalAmount>8.14 </subsequentAuthOriginalAmount>
<subsequentAuthReason>3 </subsequentAuthReason>
<subsequentAuthTransactionID>TRANSACTIONID </subsequentAuthTransactionID>
<subsequentAuthStoredCredential>true </subsequentAuthStoredCredential>
</requestMessage>Response: See CyberSource Authorization and Deposit Response (ccAuthService and ccCaptureService) XML Message for mapping details.
<c:replyMessage xmlns:c="urn:schemas-cybersource-com:transaction-data-1.57">
<c:merchantReferenceCode>CMPORDER_NBR </c:merchantReferenceCode>
<c:requestID>REQUEST_ID </c:requestID>
<c:decision>ACCEPT </c:decision>
<c:reasonCode>100 </c:reasonCode>
<c:requestToken>REQUEST_TOKEN </c:requestToken>
<c:purchaseTotals>
<c:currency>USD </c:currency>
</c:purchaseTotals>
<c:ccAuthReply>
<c:reasonCode>100 </c:reasonCode>
<c:amount>27.17 </c:amount>
<c:authorizationCode>AUTH_CODE </c:authorizationCode>
<c:avsCode>X </c:avsCode>
<c:avsCodeRaw>I1 </c:avsCodeRaw>
<c:authorizedDateTime>2011-07-05T12:58:27Z </c:authorizedDateTime>
<c:processorResponse>100 </c:processorResponse>
<c:reconciliationID>RECONCILIATIONID </c:reconciliationID>
<c:paymentNetworkTransactionID>TRANSACTIONID </c:paymentNetworkTransactionID>
<c:ownerMerchantID>merchID </c:ownerMerchantID>
</c:ccAuthReply>
<c:ccCaptureReply>
<c:reasonCode>100 </c:reasonCode>
<c:requestDateTime>2011-07-05T12:58:27Z </c:requestDateTime>
<c:amount>27.17 </c:amount>
<c:reconciliationID>RECONCILIATIONID </c:reconciliationID>
<c:purchasingLevel3Enabled>Y </c:purchasingLevel3Enabled>
</c:ccCaptureReply>
</c:replyMessage>CyberSource Authorization Reversal (ccAuthReversalService) Transaction: Sample Messages
A sample of a CyberSource Authorization Reversal (ccAuthReversalService) transaction is presented below.
Request: See CyberSource Authorization Reversal Request (ccAuthReversalService) XML Message for mapping details.
<requestMessage xmlns="urn:schemas-cybersource-com:transaction-data-1.57">
<merchantID xmlns="urn:schemas-cybersource-com:transaction-data-1.57">merchID </merchantID>
<merchantReferenceCode>CMPORDER_NBR </merchantReferenceCode>
<purchaseTotals>
<currency>USD </currency>
<grandTotalAmount>25.57 </grandTotalAmount>
</purchaseTotals>
<ccAuthReversalService run="true">
<authRequestID>AUTH_REQ_ID </authRequestID>
</ccAuthReversalService>
</requestMessage>Response: See CyberSource Authorization Reversal Response (ccAuthReversalService) XML Message for mapping details.
<c:replyMessage xmlns:c="urn:schemas-cybersource-com:transaction-data-1.57">
<c:merchantReferenceCode>CMPORDER_NBR </c:merchantReferenceCode>
<c:requestID>REQUEST_ID </c:requestID>
<c:decision>ACCEPT </c:decision>
<c:reasonCode>100 </c:reasonCode>
<c:requestToken>REQUEST_TOKEN </c:requestToken>
<c:purchaseTotals>
<c:currency>USD </c:currency>
</c:purchaseTotals>
<c:ccAuthReversalReply>
<c:reasonCode>100 </c:reasonCode>
<c:amount>25.57 </c:amount>
<c:processorResponse>100 </c:processorResponse>
<c:requestDateTime>2011-07-05T13:31:28Z </c:requestDateTime>
</c:ccAuthReversalReply>
</c:replyMessage>CyberSource Message Layouts
-
CyberSource Token Request (paySubscriptionCreate) XML Message
-
CyberSource Token Response (paySubscriptionCreate) XML Message
-
CyberSource Authorization Request (ccAuthService) XML Message
-
CyberSource Authorization Response (ccAuthService) XML Message
-
CyberSource Token and Authorization Request (paySubscriptionCreate and ccAuthService) XML Message
-
CyberSource Token and Authorization Response (paySubscriptionCreate and ccAuthService) XML Message
-
CyberSource Debit Deposit Request (ccCaptureService) XML Message
-
CyberSource Debit Deposit Response (ccCaptureService) XML Message
-
CyberSource Credit Deposit Request (ccCreditService) XML Message
-
CyberSource Credit Deposit Response (ccCreditService) XML Message
-
CyberSource Authorization and Deposit Request (ccAuthService and ccCaptureService) XML Message
-
CyberSource Authorization and Deposit Response (ccAuthService and ccCaptureService) XML Message
-
CyberSource Authorization Reversal Request (ccAuthReversalService) XML Message
-
CyberSource Authorization Reversal Response (ccAuthReversalService) XML Message
CyberSource Token Request (paySubscriptionCreate) XML Message
The CyberSource Token Request (paySubscriptionCreate) XML message is used to request a token from CyberSource. See Credit Card Tokenization in the Data Security and Encryption Guide on My Oracle Support (1988467.1) for processing details.
Note:
CyberSource refers to a token as a customer profile which has a submitter’s ID or token.
Sample transaction: See CyberSource Token (paySubscriptionCreate) Transaction: Sample Messages.
Special characters:.Certain special characters cannot be passed in an attribute of an XML message except through the use of replacement text strings. Order Management System replaces the following special characters with the text strings listed below.
| Special Character | Description | Replacement Text String |
|---|---|---|
|
’ |
single quote |
' |
|
" |
double quote |
" |
|
> |
greater than |
> |
|
< |
less than |
< |
|
& |
ampersand |
& |
Order Management System also removes any non-standard keyboard characters from the XML message before sending it to CyberSource.
| Attribute Name | Comments |
|---|---|
|
requestMessage |
|
|
merchantID |
|
|
merchantReferenceCode |
The company code + order number. If the request is not associated with an order, the order number is zero-filled. From the Company and Order # fields in the Order Payment Method table. |
|
billTo |
CyberSource performs address verification against the bill to name and address included in the Token Request. |
|
firstName |
The bill to customer’s first name. From the:
|
|
lastName |
The bill to customer’s last name. From the:
Note: If a last name is not passed, CyberSource fails the transaction. |
|
street1 |
The street address on the bill to customer’s address, followed by the text APT and the apartment or suite number defined for the bill to customer’s address. For example: 123 MAIN ST APT 2B. From the:
|
|
street2 |
The second address line on the bill to customer’s address. From the:
|
|
city |
The city on the bill to address. From the:
|
|
state |
The state code on the bill to customer’s address. From the:
|
|
postalCode |
The zip code on the bill to customer’s address. If the country code is US, the 9-digit zip code is in 99999-9999 format. If the country code is CA, the 6-digit zip code is in A1B 2C3. If the country code is JP, the 7-digit zip code is in 999-9999 format. If the country code is GB, the 6-digit zip code is in AB12CD format. From the:
|
|
country |
The country code on the bill to customer’s address. The system uses the Work with Authorization Service Country Screen to cross-reference the Order Management System country code in the Customer Bill To table or Customer Sold To table to the CyberSource country code. From the Auth Service Country field in the Auth Service Country table. |
|
|
The bill to customer’s email address. If an email address is not defined for the bill to customer, null@Cybersource.com defaults. From the CST email address field in the Customer Sold To table. |
|
purchaseTotals |
|
|
currency |
The currency on the order. The system uses the Work with Authorization Service Currency Screen to cross-reference the Order Management System currency code to the CyberSource currency code. From the ASC Currency code field in the Auth Service Currency table. |
|
card |
CyberSource validates the credit card information included in the Token Request. |
|
accountNumber |
The card number to replace with a token. If you use credit card encryption, the system decrypts the credit card number before sending it to CyberSource; see the Data Security and Encryption Guide on My Oracle Support (1988467.1). From the OPM credit card number field in the Order Payment Method table. |
|
expirationMonth |
The month when the card expires, in MM format. From the first 2 positions of the OPM expiration date field in the Order Payment Method table. |
|
expirationYear |
The year when the card expires, in YYYY format. From the last 2 positions of the OPM expiration date field in the Order Payment Method table. |
|
cardType |
The vendor paytype code defined for the credit card pay type. This is the code CyberSource uses to identify the method of payment. From the CPC vendor paytype/code field in the CC Paytype Cross Ref table. |
|
cvIndicator |
The card identification indictor defined for the card, indicating if a CID number has been defined. Valid values:
Included only for online transactions. |
|
cvNumber |
The card identification number defined for the card.
Note: The card identification number is available only for online transactions; once an order is accepted, the system removes the card identification number from the order. |
|
issueNumber |
The card issue number defined for the card being processed. From the OPM card issue # field in the Order Payment Method table. |
|
startMonth |
The start month defined for the card being processed, in MM format. From the first 2 positions of the Start date field in the Order Payment Method table. |
|
startYear |
The start year defined for the card being processed, in YYYY format. From the last 2 positions of the Start date field in the Order Payment Method table. |
|
decisionManager |
|
|
enabled |
false defaults. |
|
recurringSubscriptionInfo |
|
|
frequency |
on-demand defaults. |
|
paySubscriptionCreate Service_run |
true defaults, indicating the message is for a token request. |
CyberSource Token Response (paySubscriptionCreate) XML Message
The CyberSource Token Response (paySubscriptionCreate) XML message contains the response from CyberSource for the CyberSource Token Request (paySubscriptionCreate) XML Message.
Sample transaction: See CyberSource Token (paySubscriptionCreate) Transaction: Sample Messages.
The elements and attributes of the CyberSource Token Response (paySubscriptionCreate) XML message that are used by Order Management System are described below. See the CyberSource Credit_Cards_SO_API.pdf document for more information on the additional values in this message.
| Attribute Name | Comments |
|---|---|
|
replyMessage |
The response returned by CyberSource indicates whether the token request was accepted or rejected. If the transaction was accepted, CyberSource returns a token in the requestToken tag. |
|
merchantReferenceCode |
The company code + order number, used to match the response to the request. If the request is not associated with an order, the order number is zero-filled. Corresponds to the Company and Order # fields in the Order Payment Method table. |
|
requestID |
A code assigned by CyberSource to match this response to subsequent transactions. |
|
decision |
ACCEPT indicates CyberSource approved the transaction. ERROR indicates an error occurred while CyberSource was processing the transaction. REJECT indicates CyberSource rejected the transaction. |
|
reasonCode |
The reason the transaction was approved or rejected by CyberSource. 100 indicates the transaction was successful. 151 indicates the request was received by CyberSource but there was a server timeout. If you receive this reason, do not resend the request until you have reviewed the transaction status in the CyberSource Business Center. See the documentation for your CyberSource client (SDK) for information about how to handle retries in the case of system errors. 152 indicates the request was received by CyberSource but a service did not finish running in time. If you receive this reason, do not resend the request until you have reviewed the transaction status in the CyberSource Business Center. See the documentation for your CyberSource client (SDK) for information about how to handle retries in the case of system errors. Corresponds to the Response Code field in the CC Vendor Response table. See Reason Codes for the Simple Order API in the CyberSource Credit_Cards_SO_API.pdf document for a complete list of valid reason codes. |
|
requestToken |
The credit card number requesting tokenization, encrypted. Updates the OPM credit card number field in the Order Payment Method table. |
|
purchaseTotals |
|
|
currency |
The currency on the order. The system uses the Work with Authorization Service Currency Screen to cross-reference the Order Management System currency code to the CyberSource currency code. Corresponds to the ASC Currency code field in the Auth Service Currency table. |
|
ccAuthReply |
CyberSource returns authorization information in the Token Response; however, Order Management System ignores this information. |
|
reasonCode |
The reason the transaction was approved or rejected by CyberSource. 100 indicates the transaction was successful. Corresponds to the Response Code field in the CC Vendor Response table. 151 indicates the request was received by CyberSource but there was a server timeout. If you receive this reason, do not resend the request until you have reviewed the transaction status in the CyberSource Business Center. See the documentation for your CyberSource client (SDK) for information about how to handle retries in the case of system errors. 152 indicates the request was received by CyberSource but a service did not finish running in time. If you receive this reason, do not resend the request until you have reviewed the transaction status in the CyberSource Business Center. See the documentation for your CyberSource client (SDK) for information about how to handle retries in the case of system errors. Corresponds to the Response Code field in the CC Vendor Response table. See Reason Codes for the Simple Order API in the CyberSource Credit_Cards_SO_API.pdf document for a complete list of valid reason codes. |
|
amount |
0.00 defaults for token transactions. |
|
authorizationCode |
The authorization code assigned to the transaction. |
|
avsCode |
The AVS code assigned to the transaction. |
|
avsCodeRaw |
The AVS code assigned to the transaction. |
|
cvCode |
The card identification response for the credit card. |
|
authorizedDateTime |
The date and time when the transaction was processed, in YYYY-MM-DDTHH:MM:SSZ format. |
|
processorResponse |
The response code from the bank. Informational only. |
|
reconciliationID |
A code assigned by CyberSource as a reference number for the transaction. |
|
paySubscriptionCreateReply |
|
|
reasonCode |
The reason the transaction was approved or rejected by CyberSource. 100 indicates the transaction was successful. Corresponds to the Response Code field in the CC Vendor Response table. 151 indicates the request was received by CyberSource but there was a server timeout. If you receive this reason, do not resend the request until you have reviewed the transaction status in the CyberSource Business Center. See the documentation for your CyberSource client (SDK) for information about how to handle retries in the case of system errors. 152 indicates the request was received by CyberSource but a service did not finish running in time. If you receive this reason, do not resend the request until you have reviewed the transaction status in the CyberSource Business Center. See the documentation for your CyberSource client (SDK) for information about how to handle retries in the case of system errors. Corresponds to the Response Code field in the CC Vendor Response table. See Reason Codes for the Simple Order API in the CyberSource Credit_Cards_SO_API.pdf document for a complete list of valid reason codes. |
|
subscriptionID |
The token assigned to the credit card payment. CyberSource uses this code to reference the customer profile information in the CyberSource database. |
CyberSource Authorization Request (ccAuthService) XML Message
The CyberSource Authorization Request XML message is used to authorize a credit card payment.
Sample transaction: See:
-
CyberSource Authorization (ccAuthService) Transaction without Decision Manager: Sample Messages
-
CyberSource Authorization (ccAuthService) Transaction with Decision Manager: Sample Messages
Special characters: Certain special characters cannot be passed in an attribute of an XML message except through the use of replacement text strings. Order Management System replaces the following special characters with the text strings listed below.
| Special Character | Description | Replacement Text String |
|---|---|---|
|
’ |
single quote |
' |
|
" |
double quote |
" |
|
greater than |
> |
|
|
< |
less than |
< |
|
& |
ampersand |
& |
Order Management System also removes any non-standard keyboard characters from the XML message before sending it to CyberSource.
The elements and attributes of the ccAuthService Request XML message that are used by Order Management System are described below. See the CyberSource Credit_Cards_SO_API.pdf document for more information on the additional values in this message.
| Attribute Name | Comments |
|---|---|
|
requestMessage |
|
|
merchantID |
The account number assigned by CyberSource to identify transmissions. From the:
|
|
merchantReferenceCode |
The company code + order number + order payment method sequence number. From the Company, Order # and OPM Seq # fields in the Order Payment Method table. |
|
Subsequent authorization tags: See Subsequent Authorization Requests to CyberSource for more information on the following tags. |
|
|
subsequentAuthFirst |
Set to true if this is the first authorization request for the payment method, and not a merchant-initiated transaction. A first authentication can be:
Not passed when: If this is a subsequent authorization request, this tag is not passed. A subsequent request can be:
See Subsequent Authorization Requests to CyberSource for more information. |
|
subsequentAuth |
Set to true if this is a subsequent authorization request (the subsequentAuthFirst was not passed), and
Not passed when:
See Subsequent Authorization Requests to CyberSource for more information. |
|
subsequentAuthReason |
Set to 3 if subsequentAuth is set to true and:
Not passed when:
|
|
subsequentAuthTransactionID |
The ci_transaction_id identifying the authorization. Passed when this is a subsequent authorization (the subsequentAuthFirst was not passed), and the ci_transaction_id is stored on the Order Payment Method, either through the paymentNetworkTransactionID from a previous message from CyberSource, through the ci_transaction_id received in the Inbound Order XML Message (CWORDERIN), or from the customer membership if this is a generated membership order. For more information see the Web Services Guide on https://support.oracle.com My Oracle Support (ID 2149144.1).This transaction ID is cleared from the Order Payment Method if you change the credit card number. Not passed when:
See Subsequent Authorization Requests to CyberSource for more information. |
|
subsequentAuthStoredCredential |
Set to true if the authorization credentials are stored. Passed when this is a subsequent authorization (the subsequentAuthFirst was not passed), and the ci_transaction_id is stored on the Order Payment Method, either through the paymentNetworkTransactionID from a previous message from CyberSource, through the ci_transaction_id received in the Inbound Order XML Message (CWORDERIN), or from the customer membership if this is for a generated membership order. For more information see the Web Services Guide on https://support.oracle.com My Oracle Support (ID 2149144.1).Not passed when:
See Subsequent Authorization Requests to CyberSource for more information. |
|
subsequentAuthOriginalAmount |
The amount of the original approved authorization. This is the authorization amount from the oldest Auth History record. Passed when this is a subsequent authorization (the subsequentAuthFirst was not passed), and the ci_transaction_id is stored on the Order Payment Method, either through the paymentNetworkTransactionID from a previous message from CyberSource, through the ci_transaction_id received in the Inbound Order XML Message (CWORDERIN), or from the customer membership if this is for a generated membership order. For more information see the Web Services Guide on https://support.oracle.com My Oracle Support (ID 2149144.1).Not passed when:
See Subsequent Authorization Requests to CyberSource for more information. |
|
billTo |
Included if:
|
|
firstName |
The bill to customer’s first name. From the:
|
|
lastName |
The bill to customer’s last name. From the:
Note: If a last name is not passed, CyberSource fails the transaction. |
|
street1 |
The street address on the bill to customer’s address, followed by the text APT and the apartment or suite number defined for the bill to customer’s address. For example: 123 MAIN ST APT 2B. From the:
|
|
street2 |
The second address line on the bill to customer’s address. From the:
|
|
city |
The city on the bill to address. From the:
|
|
state |
The state code on the bill to customer’s address. From the:
|
|
postalCode |
The zip code on the bill to customer’s address. If the country code is US, the 9-digit zip code is in 99999-9999 format. If the country code is CA, the 6-digit zip code is in A1B 2C3. If the country code is JP, the 7-digit zip code is in 999-9999 format. If the country code is GB, the 6-digit zip code is in AB12CD format. From the:
|
|
country |
The country code on the bill to customer’s address. The system uses the Work with Authorization Service Country Screen to cross-reference the Order Management System country code in the Customer Bill To table or Customer Sold To table to the CyberSource country code. From the Auth Service Country field in the Auth Service Country table. |
|
phoneNumber |
The bill to customer’s day phone number. From the:
|
|
|
The bill to customer’s email address. If an email address is not defined for the bill to customer, null@Cybersource.com defaults. From the CST email address field in the Customer Sold To table. |
|
customerID |
The Order Management System sold to customer number. From the CST Customer # field in the Customer Sold To table. |
|
customerPassword |
The customer’s account password, used for merchant velocity use only and it not stored, displayed, or returned. Note: This field is not currently implemented in the Order Management System integration with CyberSource. |
|
personalID |
Personal identifier, supported only for CyberSource Latin American Processing. Note: This field is not currently implemented in the Order Management System integration with CyberSource. |
|
shipTo |
Included if the CYB_PAY_LINK_DECISION_MANAGER_ENABLED property is set to true. The shipTo is different from the billTo if the customer specified an alternate shipping address on the order:
|
|
firstName |
The ship to customer’s first name. From the:
|
|
lastName |
The ship to customer’s last name. From the:
Note: If a last name is not passed, CyberSource fails the transaction. |
|
street1 |
The street address on the ship to customer’s address, followed by the text APT and the apartment or suite number defined for the ship to customer’s address. For example: 123 MAIN ST APT 2B. From the:
|
|
street2 |
The second address line on the ship to customer’s address. From the:
|
|
city |
The city on the ship to address. From the:
|
|
state |
The state code on the ship to customer’s address. From the:
|
|
postalCode |
The zip code on the ship to customer’s address. If the country code is US, the 9-digit zip code is in 99999-9999 format. If the country code is CA, the 6-digit zip code is in A1B 2C3. If the country code is JP, the 7-digit zip code is in 999-9999 format. If the country code is GB, the 6-digit zip code is in AB12CD format. From the:
|
|
country |
The country code on the ship to customer’s address. The system uses the Work with Authorization Service Country Screen to cross-reference the Order Management System country code in the Customer Ship To table or Customer Sold To table to the CyberSource country code. From the Auth Service Country field in the Auth Service Country table. |
|
phoneNumber |
The ship to customer’s day phone number. From the:
|
|
shippingMethod |
The service level defined for the ship to customer’s zip code. Service levels defined in CyberSource Decision Manager are:
Note: To use a custom value, create a Decision Manager custom rule with the shipping method order element. From the Decision Manager Service Level field in the Ship Via table. |
|
item |
Included if the CYB_PAY_LINK_DECISION_MANAGER_ENABLED property is set to true. |
|
id |
The number of items on the order, starting with 0. For example, if two items are on the order, the first item would be set to 0 and the second item would be set to 1. |
|
unitPrice |
The unit selling price of the product. From the ODT Price field in the Order Detail table. |
|
quantity |
The quantity of the product being purchased. From the ODT qty reserved field in the Order Detail table. |
|
productCode |
The type of product. Product codes used by CyberSource services are:
The setting of the Product Classification for Fraud Scoring (M15) system control value determines whether Order Management System sends the item’s item class description or item category description to CyberSource.
|
|
productName |
The name of the product. If the item is a non-SKUed item, this is the item description. If the item is a SKUed item, this is a concatenation of the item description + SKU description. From the Description field in the Item table + the Description field in the SKU table. |
|
productSKU |
Merchant’s product identifier code. If the item is a non-SKUed item, this is the item number. If the item is a SKUed item, this is a concatenation of the item number + SKU code. From the ITM Number field and SKU Code field in the SKU table. |
|
purchaseTotals |
|
|
currency |
The currency on the order. The system uses the Work with Authorization Service Currency Screen to cross-reference the Order Management System currency code to the CyberSource currency code. From the ASC Currency code field in the Auth Service Currency table. |
|
grandTotalAmount |
The amount to authorize, including decimals, in the currency defined on the order. Online transactions: From the OLA auth amt field in the Online Authorization table. Batch transactions: From the Auth $ amt field in the CC Authorization Trans table. |
|
recurringSubscriptionInfo |
Included only if the credit card number has been replaced with a token provided by CyberSource. |
|
subscriptionID |
The token for the credit card payment. If you use credit card encryption, the system decrypts the credit card number before sending it to CyberSource; see the Data Security and Encryption Guide on My Oracle Support (1988467.1). From the OPM credit card number field in the Order Payment Method table. |
|
frequency |
on-demand defaults. |
|
card |
Included if you send the credit card number and not a token provided by CyberSource. |
|
accountNumber |
The card number to authorize and replace with a token. If you use credit card encryption, the system decrypts the credit card number before sending it to CyberSource; see the Data Security and Encryption Guide on My Oracle Support (1988467.1). From the OPM credit card number field in the Order Payment Method table. |
|
expirationMonth |
The month when the card expires, in MM format. From the first 2 positions of the OPM expiration date field in the Order Payment Method table. |
|
expirationYear |
The year when the card expires, in YYYY format. From the last 2 positions of the OPM expiration date field in the Order Payment Method table. |
|
cardType |
The vendor paytype code defined for the credit card pay type. This is the code CyberSource uses to identify the method of payment. From the CPC vendor paytype/code field in the CC Paytype Cross Ref table. |
|
cvIndicator |
The card identification indicator defined for the card, indicating if a CID number has been defined. Valid values:
Included only for online transactions. |
|
cvNumber |
The card identification number defined for the card.
Note: The card identification number is available only for online transactions; once an order is accepted, the system removes the card identification number from the order. |
|
issueNumber |
The card issue number defined for the card being processed. From the OPM card issue # field in the Order Payment Method table. |
|
startMonth |
The start month defined for the card being processed, in MM format. From the first 2 positions of the Start date field in the Order Payment Method table. |
|
startYear |
The start year defined for the card being processed, in YYYY format. From the last 2 positions of the Start date field in the Order Payment Method table. |
|
merchantDefinedData |
The merchantDefinedData fields can be used to store many types of information that may be unique to your business. Note: The merchantDefinedData fields are not currently implemented in the Order Management System integration with CyberSource. Contact your Order Management System representative if you would like to implement these fields in the Order Management System integration with CyberSource. See Potential Uses for Merchant-Defined Data Fields in the CyberSource Decision Manager Developer Guide for examples of the type of information that can be captured in these fields. |
|
merchantDefinedData_mddField_1 tomerchantDefinedData_mddField_100 |
Optional fields that you can use to store information. The value appears in the Case Management Details window in the Business Center. Merchant defined fields cannot be used to capture personally identifying information. These fields can only be used if you are referencing target API version 1.75 or higher. |
|
decisionManager |
|
|
enabled |
|
|
profile |
Allows you to specify the name of a different profile to use to evaluate orders. Note: This field is not currently implemented in the Order Management System integration with CyberSource. |
|
ccAuthService |
|
|
ccAuthService_run |
true defaults. |
|
commerceIndicator |
internet defaults if the E-Commerce indicator (Future use status 1) field in the Order Header table is set to I or the order type for the order matches the order type defined in the E-Commerce Order Type (G42) system control value; otherwise, moto defaults. |
|
cavv |
A code received from an authentication service, such as Visa’s Verified by Visa program or MasterCard’s SecureCode program, indicating whether the card authentication password the cardholder provided was approved for the credit card. See Credit Card Authentication Service for more information. From the Authentication value field in the Order Payment Method table. |
|
eciRaw |
A code received from an authentication service, such as Visa’s Verified by Visa program or MasterCard’s SecureCode program, indicating whether the card authentication password the cardholder provided was approved for the credit card. See Credit Card Authentication Service for more information. From the Authentication value field in the Order Payment Method table. |
|
businessRules |
|
|
ignoreAVSResult |
true defaults. |
|
ignoreCVResult |
true defaults. |
CyberSource Authorization Response (ccAuthService) XML Message
The CyberSource Authorization Response XML message contains the response from CyberSource for the CyberSource Authorization Request (ccAuthService) XML Message.
Sample transaction: See:
-
CyberSource Authorization (ccAuthService) Transaction without Decision Manager: Sample Messages
-
CyberSource Authorization (ccAuthService) Transaction with Decision Manager: Sample Messages
The elements and attributes of the ccAuthService Response XML message that are used by Order Management System are described below. See the CyberSource Credit_Cards_SO_API.pdf document for more information on the additional values in this message.
| Attribute Name | Comments |
|---|---|
|
replyMessage |
|
|
merchantReferenceCode |
The company code + order number + order payment method sequence number, used to match the response to the correct request. Corresponds to the Company, Order # and OPM Seq # fields in the Order Payment Method table. |
|
requestID |
The unique transaction ID assigned by CyberSource for the transaction. Updates the Transaction ID field in the Authorization History table, and saved in the Invoice Payment Method table at billing. |
|
decision |
The overall decision for the entire request from Decision Manager. ACCEPT indicates CyberSource approved the transaction. REVIEW indicates CyberSource Decision Manager marked the order for review for further analysis. The credit card authorization remains approved and valid, but the order may or may not be processed at a later time. See CyberSource Decision Manager Review Process for more information. ERROR indicates an error occurred while CyberSource was processing the transaction. REJECT indicates CyberSource Decision Manager rejected the transaction. Order Management System deactivates the credit card payment and requires you to add another form of payment before you can accept the order. See CyberSource Decision Manager Review Process for more information. |
|
reasonCode |
The reason the transaction was approved or rejected by Decision Manager. Corresponds to the Response Code field in the CC Vendor Response table. 100 indicates the transaction was successful. 151 indicates the request was received by CyberSource but there was a server timeout. If you receive this reason, do not resend the request until you have reviewed the transaction status in the CyberSource Business Center. See the documentation for your CyberSource client (SDK) for information about how to handle retries in the case of system errors. 152 indicates the request was received by CyberSource but a service did not finish running in time. If you receive this reason, do not resend the request until you have reviewed the transaction status in the CyberSource Business Center. See the documentation for your CyberSource client (SDK) for information about how to handle retries in the case of system errors. 400 indicates the fraud score exceeds your threshold. 480 indicates the order is marked for review by Decision Manager. 481 indicates the order is rejected by Decision Manager. See the CyberSource documentation for a complete list of valid reason codes. |
|
requestToken |
The token assigned to the credit card associated with the authorization transaction, encrypted. |
|
purchaseTotals |
|
|
currency |
The currency on the order. The system uses the Work with Authorization Service Currency Screen to cross-reference the Order Management System currency code to the CyberSource currency code. Corresponds to the ASC Currency code field in the Auth Service Currency table. |
|
ccAuthReply |
|
|
reasonCode |
The reason the authorization transaction was approved or rejected by the authorization service. Corresponds to the Response Code field in the CC Vendor Response table and updates the AUH vendor response field in the Authorization History table. 100 indicates the transaction was successful. Corresponds to the Response Code field in the CC Vendor Response table. 151 indicates the request was received by CyberSource but there was a server timeout. If you receive this reason, do not resend the request until you have reviewed the transaction status in the CyberSource Business Center. See the documentation for your CyberSource client (SDK) for information about how to handle retries in the case of system errors. 152 indicates the request was received by CyberSource but a service did not finish running in time. If you receive this reason, do not resend the request until you have reviewed the transaction status in the CyberSource Business Center. See the documentation for your CyberSource client (SDK) for information about how to handle retries in the case of system errors. Corresponds to the Response Code field in the CC Vendor Response table. See the CyberSource documentation for a complete list of valid reason codes. |
|
amount |
The amount authorized by CyberSource, including decimals, in the currency defined on the order. If the authorization is for a customer membership order, the original authorization amount is also saved for the customer membership if it was not already populated. Updates th e AUH amount authorized field in the Authorization History table. |
|
authorizationCode |
The authorization number provided by CyberSource. Updates the AUH auth # field in the Authorization History table. |
|
avsCode |
The address verification response for the credit card. Updates the AUH AVS response field in the Authorization History table. |
|
avsCodeRaw |
The address verification response for the credit card, from the processor. |
|
cvCode |
The card identification response for the credit card. Updates the AUH Vendor Response 2 field in the Authorization History table. |
|
authorizedDateTime |
The date and time the credit card was authorized, in YYYY-MM-DDTHH:MM:SSZ format. Updates the AUH auth date field in the Authorization History table. |
|
processorResponse |
The response code from the bank. Informational only. |
|
reconciliationID |
A code assigned by CyberSource as a reference number for the transaction. |
|
paymentNetworkTransactionID |
The customer-initiated transaction ID obtained when authorizing the credit card. Included only when the credit card has not previously been authorized. A customer-initiated transaction ID is required for a credit card payment method only when tokenization is not enabled for CyberSource. This ID can also be updated with the ci_transaction_id in the Inbound Order XML Message (CWORDERIN). It is stored for the Order Payment Method, and not updated once populated unless you change the credit card number. For more information see the Web Services Guide on https://support.oracle.com My Oracle Support (ID 2149144.1).If the authorization is for a customer membership order, the ID is also saved for the customer membership if it was not already populated. |
|
ownerMerchantID |
The account number assigned by CyberSource to identify transmissions. Corresponds to the:
|
|
afsReply |
CyberSource Advanced Fraud Screen reply. Informational only; these fields are not implemented in the Order Management System integration with CyberSource. Included if the CYB_PAY_LINK_DECISION_MANAGER_ENABLED setting in the CyberSource Interface Properties is set to true. |
|
reasonCode |
Numeric value corresponding to the result of the Advanced Fraud Screen request. |
|
afsResult |
Total score calculated for the order. |
|
hostSeverity |
The risk associated with the customer’s email domain. From 0-5, where 0 represents an undetermined risk and 5 represents the highest risk. |
|
consumerLocalTime |
Customer’s local time in HH:MM:SS format. Calculated from the request time and the customer’s billing address. |
|
afsFactorCode |
Information that affected the score of the order. This field can contain one or more codes, separated by carets (^), for example: B^Y. See Risk Factor Codes in the CyberSource Decision Manager Developer Guide for a list of factor codes used by CyberSource. |
|
addressInfoCode |
Indicates a mismatch between the customer’s billing and shipping addresses. This field can contain one or more codes, separated by carets (^). See Address Information Codes in the CyberSource Decision Manager Developer Guide for a list of address info codes used by CyberSource. |
|
internetInfoCode |
Indicates a problem with the customer’s email address, IP address, or billing address. This field can contain one or more codes, separated by carets (^). See Information Codes in the CyberSource Decision Manager Developer Guide for a list of possible values. |
|
suspiciousInfoCode |
Indicates that the customer provided potentially suspicious information. This field can contain one or more codes, separated by carets (^), for example: INTL-BIN^RISK-T. See Suspicious Data Information Codes in the CyberSource Decision Manager Developer Guide for a list of suspicious info codes used by CyberSource. |
|
velocityInfoCode |
Indicates that the customer has a high order velocity (purchase frequency). This field can contain one or more codes, separated by carets (^), for example: VELV-SA^VELI-CC^VELSIP. |
|
scoreModelUsed |
Name of the score model used for the transaction. |
|
binCountry |
Two-digit country code associated with the BIN of the customer’s card used for the payment. |
|
cardAccountType |
Type of payment card account, such as credit card, debit card, or prepaid card account type. |
|
cardScheme |
Subtype of card account.
|
|
cardIssuer |
Name of the bank or entity that issued the card account. |
|
decisionReply |
CyberSource Decision Manager reply. Informational only; these fields are not implemented in the Order Management System integration with CyberSource. |
|
activeProfileReply_ destinationQueue |
When verbose mode is enabled, name of the queue where orders that are not automatically accepted are sent. |
|
activeProfileReply_name |
When verbose mode is enabled, name of the active profile chosen by the profile selector. If no profile selector exists, the default active profile is chosen. |
|
activeProfileReply_ rulesTriggered_ ruleResultItem_#_ decision |
When verbose mode is enabled, summarizes the result for the rule specified according to the setting that you chose in the Profile Editor. This field contains one of the following values:
|
|
activeProfileReply_ rulesTriggered_ ruleResultItem_#_ evaluation |
When verbose mode is enabled, raw evaluation result of the rule specified by the number #. This field contains one of the following values:
error occurred. |
|
activeProfileReply_ rulesTriggered_ ruleResultItem_#_name |
When verbose mode is enabled, description of the rule as it appears in the Profile Editor. |
|
activeProfileReply_ selectedBy |
When verbose mode is enabled, name of the profile selector rule that chooses the profile to use for the transaction. If no profile selector exists, the value is Default Active Profile. |
|
casePriority |
You receive this field only if you subscribe to the Enhanced Case Management service. The priority level ranges from 1 (highest) – 5 (lowest); the default value is 3. If you do not assign a priority to your rules or to your profiles, the default value is given to the order. |
|
velocityInfoCode |
List of information codes triggered by the order. These information codes were generated when you created the order and product velocity rules and are returned so that you can associate them with the rules. |
CyberSource Token and Authorization Request (paySubscriptionCreate and ccAuthService) XML Message
The CyberSource ccAuthService Request XML message is used to authorize a credit card payment and to also request a token in the same transaction.
Sample transaction: See CyberSource Token and Authorization (paySubscriptionCreate and ccAuthService) Transaction: Sample Messages.
Special characters: Certain special characters cannot be passed in an attribute of an XML message except through the use of replacement text strings. Order Management System replaces the following special characters with the text strings listed below.
| Special Character | Description | Replacement Text String |
|---|---|---|
|
’ |
single quote |
' |
|
" |
double quote |
" |
|
> |
greater than |
> |
|
< |
less than |
< |
|
& |
ampersand |
& |
Order Management System also removes any non-standard keyboard characters from the XML message before sending it to CyberSource.
The elements and attributes of the ccAuthService Request XML message that are used by Order Management System are described below. See the CyberSource Credit_Cards_SO_API.pdf document for more information on the additional values in this message.
| Attribute Name | Comments |
|---|---|
|
requestMessage |
|
|
merchantID |
The account number assigned by CyberSource to identify transmissions. From the:
|
|
merchantReferenceCode |
The company code + order number + order payment method sequence number. From the Company, Order # and OPM Seq # fields in the Order Payment Method table. |
|
Subsequent authorization tags: See Subsequent Authorization Requests to CyberSource for more information on the following tags. |
|
|
subsequentAuthFirst |
Set to true if this is the first authorization request for the payment method, and not a merchant-initiated transaction. A first authentication can be:
Not passed when: If this is a subsequent authorization request, this tag is not passed. A subsequent request can be:
See Subsequent Authorization Requests to CyberSource for more information. |
|
subsequentAuth |
Set to true if this is a subsequent authorization request (the subsequentAuthFirst was not passed), and
Not passed when:
See Subsequent Authorization Requests to CyberSource for more information. |
|
subsequentAuthReason |
Set to 3 when subsequentAuth is set to true and:
Not passed when this is not a subsequent authorization request. |
|
subsequentAuthTransactionID |
The ci_transaction_id identifying the authorization. Passed when this is a subsequent authorization (the subsequentAuthFirst was not passed), and the ci_transaction_id is stored on the Order Payment Method, either through the paymentNetworkTransactionID from a previous message from CyberSource, through the ci_transaction_id received in the Inbound Order XML Message (CWORDERIN), or from the customer membership if this is a generated membership order. For more information see the Web Services Guide on https://support.oracle.com My Oracle Support (ID 2149144.1).This transaction ID is cleared from the Order Payment Method if you change the credit card number. Not passed when:
See Subsequent Authorization Requests to CyberSource for more information. |
|
subsequentAuthStoredCredential |
Set to true if the authorization credentials are stored. Passed when this is a subsequent authorization (the subsequentAuthFirst was not passed), and the ci_transaction_id is stored on the Order Payment Method, either through the paymentNetworkTransactionID from a previous message from CyberSource, through the ci_transaction_id received in the Inbound Order XML Message (CWORDERIN), or from the customer membership if this is a generated membership order. For more information see the Web Services Guide on https://support.oracle.com My Oracle Support (ID 2149144.1).Not passed when:
See Subsequent Authorization Requests to CyberSource for more information. |
|
subsequentAuthOriginalAmount |
The amount of the original approved authorization. This is the authorization amount from the oldest Auth History record. Passed when this is a subsequent authorization (the subsequentAuthFirst was not passed), and the ci_transaction_id is stored on the Order Payment Method, either through the paymentNetworkTransactionID from a previous message from CyberSource, through the ci_transaction_id received in the Inbound Order XML Message (CWORDERIN), or from the customer membership if this is for a generated membership order. For more information see the Web Services Guide on https://support.oracle.com My Oracle Support (ID 2149144.1).Not passed when: This is not a subsequent authorization request, or The credit card information is not tokenized, and there is no ci_transaction_id stored on the Order Payment Method record. See Subsequent Authorization Requests to CyberSource for more information. |
|
billTo |
|
|
firstName |
The bill to customer’s first name. From the:
|
|
lastName |
The bill to customer’s last name. From the:
Note: If a last name is not passed, CyberSource fails the transaction. |
|
street1 |
The street address on the bill to customer’s address, followed by the text APT and the apartment or suite number defined for the bill to customer’s address. For example: 123 MAIN ST APT 2B. From the:
|
|
street2 |
The second address line on the bill to customer’s address. From the:
|
|
city |
The city on the bill to address. From the:
|
|
state |
The state code on the bill to customer’s address. From the:
|
|
postalCode |
The zip code on the bill to customer’s address. If the country code is US, the 9-digit zip code is in 99999-9999 format. If the country code is CA, the 6-digit zip code is in A1B 2C3. If the country code is JP, the 7-digit zip code is in 999-9999 format. If the country code is GB, the 6-digit zip code is in AB12CD format. From the:
|
|
country |
The country code on the bill to customer’s address. The system uses the Work with Authorization Service Country Screen to cross-reference the Order Management System country code in the Customer Bill To table or Customer Sold To table to the CyberSource country code. From the Auth Service Country field in the Auth Service Country table. |
|
|
The bill to customer’s email address. If an email address is not defined for the bill to customer, null@Cybersource.com defaults. From the CST email address field in the Customer Sold To table. |
|
purchaseTotals |
|
|
currency |
The currency on the order. The system uses the Work with Authorization Service Currency Screen to cross-reference the Order Management System currency code to the CyberSource currency code. From the ASC Currency code field in the Auth Service Currency table. |
|
grandTotalAmount |
The amount to authorize, including decimals, in the currency defined on the order. Online transactions: From the OLA auth amt field in the Online Authorization table. Batch transactions: From the Auth $ amt field in the CC Authorization Trans table. |
|
card |
|
|
accountNumber |
The card number to authorized and replace with a token. If you use credit card encryption, the system decrypts the credit card number before sending it to CyberSource; see the Data Security and Encryption Guide on My Oracle Support (1988467.1). From the OPM credit card number field in the Order Payment Method table. |
|
expirationMonth |
The month when the card expires, in MM format. From the first 2 positions of the OPM expiration date field in the Order Payment Method table. |
|
expirationYear |
The year when the card expires, in YYYY format. From the last 2 positions of the OPM expiration date field in the Order Payment Method table. |
|
cardType |
The vendor paytype code defined for the credit card pay type. This is the code CyberSource uses to identify the method of payment. From the CPC vendor paytype/code field in the CC Paytype Cross Ref table. |
|
cvIndicator |
The card identification indictor defined for the card, indicating if a CID number has been defined. Valid values:
Included only for online transactions. |
|
cvNumber |
The card identification number defined for the card.
Note: The card identification number is available only for online transactions; once an order is accepted, the system removes the card identification number from the order. |
|
issueNumber |
The card issue number defined for the card being processed. From the OPM card issue # field in the Order Payment Method table. |
|
startMonth |
The start month defined for the card being processed, in MM format. From the first 2 positions of the Start date field in the Order Payment Method table. |
|
startYear |
The start year defined for the card being processed, in YYYY format. From the last 2 positions of the Start date field in the Order Payment Method table. |
|
ccAuthService_run |
true defaults. |
|
recurringSubscriptionInfo |
|
|
frequency |
on-demand defaults. |
|
decisionManager |
|
|
enabled |
false defaults. |
|
ccAuthService |
|
|
ccAuthService_run |
true defaults. |
|
commerceIndicator |
internet defaults if the E-Commerce indicator (Future use status 1) field in the Order Header table is set to I or the order type for the order matches the order type defined in the E-Commerce Order Type (G42) system control value; otherwise, moto defaults. |
|
cavv |
A code received from an authentication service, such as Visa’s Verified by Visa program or MasterCard’s SecureCode program, indicating whether the card authentication password the cardholder provided was approved for the credit card. See Credit Card Authentication Service for more information. From the Authentication value field in the Order Payment Method table. |
|
eciRaw |
A code received from an authentication service, such as Visa’s Verified by Visa program or MasterCard’s SecureCode program, indicating whether the card authentication password the cardholder provided was approved for the credit card. See Credit Card Authentication Service for more information. From the Authentication value field in the Order Payment Method table. |
|
paySubscriptionCreate Service_run |
true defaults. |
|
businessRules |
|
|
ignoreAVSResult |
true defaults. |
|
ignoreCVResult |
true defaults. |
CyberSource Token and Authorization Response (paySubscriptionCreate and ccAuthService) XML Message
The CyberSource ccAuthService Response XML message contains the response from CyberSource for the CyberSource Token and Authorization Request (paySubscriptionCreate and ccAuthService) XML Message.
Sample transaction: See CyberSource Token and Authorization (paySubscriptionCreate and ccAuthService) Transaction: Sample Messages.
The elements and attributes of the ccAuthService Response XML message that are used by Order Management System are described below. See the CyberSource Credit_Cards_SO_API.pdf document for more information on the additional values in this message.
| Attribute Name | Comments |
|---|---|
|
replyMessage |
|
|
merchantReferenceCode |
The order number + order payment method sequence number, used to match the response to the correct request. Corresponds to the Order # and OPM Seq # fields in the Order Payment Method table. |
|
requestID |
The unique transaction ID assigned by CyberSource for the transaction. Updates the Transaction ID field in the Authorization History table. |
|
decision |
ACCEPT indicates CyberSource approved the transaction. ERROR indicates an error occurred while CyberSource was processing the transaction. REJECT indicates CyberSource rejected the transaction. |
|
reasonCode |
The reason the transaction was approved or rejected by CyberSource. 100 indicates the transaction was successful. Corresponds to the Response Code field in the CC Vendor Response table and updates the AUH vendor response field in the Authorization History table. 151 indicates the request was received by CyberSource but there was a server timeout. If you receive this reason, do not resend the request until you have reviewed the transaction status in the CyberSource Business Center. See the documentation for your CyberSource client (SDK) for information about how to handle retries in the case of system errors. 152 indicates the request was received by CyberSource but a service did not finish running in time. If you receive this reason, do not resend the request until you have reviewed the transaction status in the CyberSource Business Center. See the documentation for your CyberSource client (SDK) for information about how to handle retries in the case of system errors. Corresponds to the Response Code field in the CC Vendor Response table. See Reason Codes for the Simple Order API in the CyberSource Credit_Cards_SO_API.pdf document for a complete list of valid reason codes. |
|
requestToken |
The token assigned to the credit card associated with the authorization transaction, encrypted. |
|
purchaseTotals |
|
|
currency |
The currency on the order. The system uses the Work with Authorization Service Currency Screen to cross-reference the Order Management System currency code to the CyberSource currency code. Corresponds to the ASC Currency code field in the Auth Service Currency table. |
|
ccAuthReply |
|
|
reasonCode |
The reason the transaction was approved or rejected by CyberSource. 100 indicates the transaction was successful. Corresponds to the Response Code field in the CC Vendor Response table. 151 indicates the request was received by CyberSource but there was a server timeout. If you receive this reason, do not resend the request until you have reviewed the transaction status in the CyberSource Business Center. See the documentation for your CyberSource client (SDK) for information about how to handle retries in the case of system errors. 152 indicates the request was received by CyberSource but a service did not finish running in time. If you receive this reason, do not resend the request until you have reviewed the transaction status in the CyberSource Business Center. See the documentation for your CyberSource client (SDK) for information about how to handle retries in the case of system errors. Corresponds to the Response Code field in the CC Vendor Response table. See Reason Codes for the Simple Order API in the CyberSource Credit_Cards_SO_API.pdf document for a complete list of valid reason codes. |
|
amount |
The amount authorized by CyberSource, including decimals, in the currency defined on the order. If the authorization is for a customer membership order, the original authorization amount is also saved for the customer membership if it was not already populated. Updates the AUH amount authorized field in the Authorization History table. |
|
authorizationCode |
The authorization number provided by CyberSource. Updates the AUH auth # field in the Authorization History table. |
|
avsCode |
The address verification response for the credit card. Updates the AUH AVS response field in the Authorization History table. |
|
avsCodeRaw |
The address verification response for the credit card, from the processor. |
|
cvCode |
The card identification response for the credit card. Updates the AUH Vendor Response 2 field in the Authorization History table. |
|
authorizedDateTime |
The date and time the credit card was authorized, in YYYY-MM-DDTHH:MM:SSZ format. Updates the AUH auth date field in the Authorization History table. |
|
processorResponse |
The response code from the bank. Informational only. |
|
reconciliationID |
A code assigned by CyberSource as a reference number for the transaction. |
|
paymentNetworkTransactionID |
The customer-initiated transaction ID obtained when authorizing the credit card. Included only when the credit card has not previously been authorized. A customer-initiated transaction ID is required for a credit card payment method only when tokenization is not enabled for CyberSource; however, if the ID is passed, it is stored regardless of whether tokenization is enabled. This ID can also be updated with the ci_transaction_id in the Inbound Order XML Message (CWORDERIN). It is stored for the Order Payment Method, and not updated once populated unless you change the credit card number. For more information see the Web Services Guide on https://support.oracle.com My Oracle Support (ID 2149144.1).If the authorization is for a customer membership order, the ID is also saved for the customer membership if it was not already populated. |
|
paySubscriptionCreateReply |
|
|
reasonCode |
The reason the transaction was approved or rejected by CyberSource. 100 indicates the transaction was successful. Corresponds to the Response Code field in the CC Vendor Response table. 151 indicates the request was received by CyberSource but there was a server timeout. If you receive this reason, do not resend the request until you have reviewed the transaction status in the CyberSource Business Center. See the documentation for your CyberSource client (SDK) for information about how to handle retries in the case of system errors. 152 indicates the request was received by CyberSource but a service did not finish running in time. If you receive this reason, do not resend the request until you have reviewed the transaction status in the CyberSource Business Center. See the documentation for your CyberSource client (SDK) for information about how to handle retries in the case of system errors. Corresponds to the Response Code field in the CC Vendor Response table. See Reason Codes for the Simple Order API in the CyberSource Credit_Cards_SO_API.pdf document for a complete list of valid reason codes. |
|
subscriptionID |
The token assigned to the credit card payment. CyberSource uses this code to reference the customer profile information in the CyberSource database. Updates the OPM credit card number field in the Order Payment Method table. |
CyberSource Debit Deposit Request (ccCaptureService) XML Message
The CyberSource Debit Deposit Request XML message is used to deposit a debit invoice whose amount is equal to or less than the authorization amount.
Sample transaction: See CyberSource Debit Deposit (ccCaptureService) Transaction: Sample Messages.
Special characters: Certain special characters cannot be passed in an attribute of an XML message except through the use of replacement text strings. Order Management System replaces the following special characters with the text strings listed below.
| Special Character | Description | Replacement Text String |
|---|---|---|
|
’ |
single quote |
' |
|
" |
double quote |
" |
|
> |
greater than |
> |
|
< |
less than |
< |
|
& |
ampersand |
& |
Order Management System also removes any non-standard keyboard characters from the XML message before sending it to CyberSource.
The elements and attributes of the CyberSource Debit Deposit Request (ccCaptureService) XML message that are used by Order Management System are described below. See the CyberSource Credit_Cards_SO_API.pdf document for more information on the additional values in this message.
| Attribute Name | Comments |
|---|---|
|
requestMessage |
|
|
merchantID |
The account number assigned by CyberSource to identify transmissions. From the:
|
|
merchantReferenceCode |
The company code + order number + order payment method sequence number. From the Company, Order # and OPM Seq # fields in the Order Payment Method table. |
|
invoiceHeader |
|
|
userPO |
The purchase order number associated with the deposit. From the Purchase order # field in the Order Ship To table. If a purchase order is not defined, the system defaults the Order Management System order number. From the Order # field in the Order Payment Method table. Included only if the transaction qualifies for level II or III discounting and the payment method is Visa, American Express, or MasterCard; see Level II and III Discounting. |
|
billTo |
Included only if you do not use credit card tokenization or if the credit card payment has not yet been replaced with a token from CyberSource. |
|
firstName |
The bill to customer’s first name. From the:
|
|
lastName |
The bill to customer’s last name. From the:
Note: If a last name is not passed, CyberSource fails the transaction. |
|
street1 |
The street address on the bill to customer’s address. From the:
|
|
street2 |
The second address line on the bill to customer’s address, followed by the text APT and the apartment or suite number defined for the bill to customer’s address. For example: GARDEN TERRACE APT 2B. From the:
|
|
city |
The city on the bill to address. From the:
|
|
state |
The state code on the bill to customer’s address. From the:
|
|
postalCode |
The zip code on the bill to customer’s address. If the country code is US, the 9-digit zip code is in 99999-9999 format. If the country code is CA, the 6-digit zip code is in A1B 2C3. If the country code is JP, the 7-digit zip code is in 999-9999 format. If the country code is GB, the 6-digit zip code is in AB12CD format. From the:
|
|
country |
The country code on the bill to customer’s address. The system uses the Work with Authorization Service Country Screen to cross-reference the Order Management System country code in the Customer Bill To table or Customer Sold To table to the CyberSource country code. From the Auth Service Country field in the Auth Service Country table. |
|
|
The bill to customer’s email address. If an email address is not defined for the bill to customer, null@CyberSource.com defaults. From the CST email address field in the Customer Sold To table. |
|
item |
|
|
id |
0 defaults. |
|
unitPrice |
The unit price of the item, including decimals, in the currency defined on the order, minus any hidden tax included in the item price. From the IDT Price field in the Invoice Detail table. Included only if the transaction qualifies for level II or III discounting and the payment is a method other than Discover or JCB; see Level II and III Discounting. |
|
quantity |
The quantity of the item shipped. From the IDT Qty shipped field in the Invoice Detail table. Included only if the transaction qualifies for level III discounting and the payment method is Visa or MasterCard; see Level II and III Discounting. |
|
productCode |
The item number on the deposit. From the ITM Number field in the Item table. Included only if the transaction qualifies for level III discounting and the payment method is Visa or MasterCard; see Level II and III Discounting. |
|
productName |
A description of the item. From the Description field in the Item table. Included only if the transaction qualifies for level III discounting and the payment method is Visa or MasterCard; see Level II and III Discounting. |
|
productSKU |
The SKU of the item on the deposit. From the SKU Code field in the SKU table. Included only if the transaction qualifies for level III discounting and the payment method is Visa or MasterCard; see Level II and III Discounting. |
|
taxAmount |
The tax amount for the item, including decimals, in the currency defined on the order, including any hidden tax included in the item price. From the Tax field in the Invoice Detail table. Included only if the transaction qualifies for level II discounting and the payment method is Visa, American Express, or MasterCard, or the transaction qualifies for level III discounting and the payment method is Visa or MasterCard. See Level II and III Discounting. |
|
unitOfMeasure |
The unit of measure defined for the item. From the Unit of measure field in the SKU table. Included only if the transaction qualifies for level III discounting and the payment method is Visa or MasterCard; see Level II and III Discounting. |
|
taxRate |
The tax rate defined for the item. The system uses this calculation to determine the tax rate: taxAmount / unitPrice = taxRate Included only if the transaction qualifies for level III discounting and the payment method is Visa or MasterCard; see Level II and III Discounting. |
|
totalAmount |
The total price of the item, including decimals, in the currency defined on the order. The system uses this calculation to determine the total amount: item_#_quantity x the item_#_unitPrice = item_#_totalAmount Included only if the transaction qualifies for level III discounting and the payment method is Visa or MasterCard; see Level II and III Discounting. |
|
discountAmount |
The discount amount applied to the item, including decimals, in the currency defined on the order. From the IDT Discount amount field in the Invoice Detail table. Included only if the transaction qualifies for level III discounting and the payment method is Visa or MasterCard; see Level II and III Discounting. |
|
commodityCode |
The commodity code defined for the item. From the SKU Commodity Code field in the SKU table. Included only if the transaction qualifies for level III discounting and the payment method is Visa or MasterCard; see Level II and III Discounting. |
|
grossNetIndicator |
Y defaults if a value is passed in the vatTaxAmount tag; otherwise, N defaults. Included only if the transaction qualifies for level III discounting and the payment method is MasterCard; see Level II and III Discounting. |
|
discountIndicator |
Y defaults if an amount greater than 0 exists in the discountAmount tag; otherwise, N defaults. Included only if the transaction qualifies for level III discounting and the payment method is MasterCard; see Level II and III Discounting |
|
purchaseTotals |
|
|
currency |
The currency on the order. The system uses the Work with Authorization Service Currency Screen to cross-reference the Order Management System currency code to the CyberSource currency code. From the ASC Currency code field in the Auth Service Currency table. |
|
discountAmount |
The discount amount for the deposit, including decimals, in the currency defined on the order. From the INS Discount amount filed in the Invoice Ship To table. Included only if the transaction qualifies for level III discounting and the payment method is Visa; see Level II and III Discounting. |
|
dutyAmount |
The duty amount for the deposit, including decimals, in the currency defined on the order. From the IDC Amount field in the Invoice Detail Charge table for IDC Type of Charge D. Included only if the transaction qualifies for level III discounting and the payment method is Visa; see Level II and III Discounting. |
|
grandTotalAmount |
The amount to deposit, including decimals, in the currency defined on the order. From the Total $ amt field in the CC Deposit Transaction table. |
|
freightAmount |
The freight amount for the deposit, including decimals, in the currency defined on the order. From the INS Freight field in the Invoice Ship To table. Included only if the transaction qualifies for level III discounting and the payment method is Visa or MasterCard; see Level II and III Discounting. |
|
otherTax |
|
|
vatTaxAmount |
The VAT tax amount defined for the item, including decimals, in the currency defined on the order. From the IDC Amount field in the Invoice Detail Charge table for IDC Type of Charge V. Included only if the transaction qualifies for level III discounting and the payment method is Visa; see Level II and III Discounting. |
|
vatTaxRate |
The VAT percent defined for the ship to customer’s country. From the CNT VAT percent in the Country table. Included only if the transaction qualifies for level II discounting and the payment method is Visa; see Level II and III Discounting. See How Hidden Tax is Calculated by Percentage for more information. |
|
card |
Included only if you do not use credit card tokenization or if the credit card payment has not yet been replaced with a token from CyberSource. |
|
accountNumber |
The card number to authorized and replace with a token. If you use credit card encryption, the system decrypts the credit card number before sending it to CyberSource; see the Data Security and Encryption Guide on My Oracle Support (1988467.1). From the OPM credit card number field in the Order Payment Method table. |
|
expirationMonth |
The month when the card expires, in MM format. From the first 2 positions of the OPM expiration date field in the Order Payment Method table. |
|
expirationYear |
The year when the card expires, in YYYY format. From the last 2 positions of the OPM expiration date field in the Order Payment Method table. |
|
cardType |
The vendor paytype code defined for the credit card pay type. This is the code CyberSource uses to identify the method of payment. From the CPC vendor paytype/code field in the CC Paytype Cross Ref table. |
|
issueNumber |
The card issue number defined for the card being processed. From the OPM card issue # field in the Order Payment Method table. |
|
startMonth |
The start month defined for the card being processed, in MM format. From the first 2 positions of the Start date field in the Order Payment Method table. |
|
startYear |
The start year defined for the card being processed, in YYYY format. From the last 2 positions of the Start date field in the Order Payment Method table. |
|
ccCaptureService |
|
|
ccCaptureService run |
true defaults. |
|
authRequestID |
The transaction ID for the authorization associated with the deposit. From the Transaction ID field in the Authorization History table. |
|
reconciliationID |
If the Override Reconciliation Id for CyberSource is set to:
For an e-commerce order, the alternate order number is the order_number passed in the Inbound Order XML Message (CWORDERIN) message to identify the order in the originating system or on the web storefront. If the e-commerce order number is a date, it is formatted without punctuation, for example: 20200114T123456. If the reconciliationID in the request message does not specify an invoice number or alternate order number, then CyberSource assigns a reconciliationID as a reference number for the transaction, and passes it in the response message. For more information see the Web Services Guide on https://support.oracle.com My Oracle Support (ID 2149144.1). Note:
|
|
purchasingLevel |
3 defaults if the transaction qualifies for level III discounting and the payment method is Visa or MasterCard; otherwise, this value is not passed. See Level II and III Discounting. |
|
paySubscriptionCreate Service_run |
true defaults if a token is requested in the deposit transaction. |
|
ccCapture_sequence |
The current sequence number for the order payment authorization request id for the deposit. Set to 1 if this is the first deposit for the order, and incrementing by 1 for each subsequent deposit. Not sent if both the ccCapture_sequence and the ccCapture_totalCount are set to 1. Sent when? This field is sent only if the Void auth at deposit flag for the authorization service is unselected, and the entire order does not ship and bill at once, based on the fact that it’s a debit invoice for less than the authorization amount. Maximum sequence number: The maximum sequence number sent is 99, regardless of whether the actual number of deposits for the order is greater, and a sequence number of 99 is sent only for the final deposit. Otherwise, the message continues to include a sequence number of 98 until the final deposit request is generated. Note that the actual number of deposits is still tracked in the Authorization History record. For more information: See Void Unused Authorization After Initial Deposit for background and more examples. |
|
ccCapture_totalCount |
The total number of deposits for the order. Set to 99 if the total number of deposits is unknown. Not sent if both the ccCapture_sequence and the ccCapture_totalCount are set to 1. If this is the final deposit for the order, the total count is set to match the current sequence number. Example: There are two lines on the order shipping separately. When the first line ships, the sequence is set to 1 and the total count is set to 99. When the second and final line ships, the sequence is set to 2 and the total count is also set to 2. Sent when? This field is sent only if the Void auth at deposit flag for the authorization service is unselected, and the entire order does not ship and bill at once, based on the fact that it’s a debit invoice for less than the authorization amount. If large number of deposits: If the number of deposits to process for the order exceeds 99, a total count of 99 still continues to be sent in the deposit request message. Note that the actual number of deposits is still tracked in the Authorization History record. For more information: See Void Unused Authorization After Initial Deposit for background and more examples. |
CyberSource Debit Deposit Response (ccCaptureService) XML Message
The CyberSource Debit Deposit Response (ccCaptureService) XML message contains the response from CyberSource for the CyberSource Debit Deposit Request (ccCaptureService) XML Message.
Sample transaction: See CyberSource Debit Deposit (ccCaptureService) Transaction: Sample Messages.
The elements and attributes of the CyberSource Debit Deposit Response (ccCaptureService) XML message that are used by Order Management System are described below. See the CyberSource Credit_Cards_SO_API.pdf document for more information on the additional values in this message.
| Attribute Name | Comments |
|---|---|
|
replyMessage |
|
|
merchantReferenceCode |
The company code + order number + order payment method sequence number, to match the response to the correct deposit. Updates the Company, Order # and OPM Seq # fields in the CC Deposit History table. |
|
requestID |
The unique transaction ID assigned by CyberSource for the transaction. |
|
decision |
ACCEPT indicates CyberSource approved the transaction. ERROR indicates an error occurred while CyberSource was processing the transaction. REJECT indicates CyberSource rejected the transaction. |
|
reasonCode |
The reason the transaction was approved or rejected by CyberSource. 100 indicates the transaction was successful. 151 indicates the request was received by CyberSource but there was a server timeout. If you receive this reason, do not resend the request until you have reviewed the transaction status in the CyberSource Business Center. See the documentation for your CyberSource client (SDK) for information about how to handle retries in the case of system errors. 152 indicates the request was received by CyberSource but a service did not finish running in time. If you receive this reason, do not resend the request until you have reviewed the transaction status in the CyberSource Business Center. See the documentation for your CyberSource client (SDK) for information about how to handle retries in the case of system errors. Corresponds to the Response Code field in the CC Vendor Response table. Corresponds to the Response Code field in the CC Vendor Response table and updates the Response code field in the CC Deposit History table. See Reason Codes for the Simple Order API in the CyberSource Credit_Cards_SO_API.pdf document for a complete list of valid reason codes. |
|
requestToken |
The token assigned to the credit card associated with the deposit transaction, encrypted. |
|
purchaseTotals |
|
|
currency |
The currency on the order. The system uses the Work with Authorization Service Currency Screen to cross-reference the Order Management System currency code to the CyberSource currency code. Corresponds to the ASC Currency code field in the Auth Service Currency table. |
|
ccCaptureReply |
|
|
reasonCode |
The reason the transaction was approved or rejected by CyberSource. 100 indicates the transaction was successful. 151 indicates the request was received by CyberSource but there was a server timeout. If you receive this reason, do not resend the request until you have reviewed the transaction status in the CyberSource Business Center. See the documentation for your CyberSource client (SDK) for information about how to handle retries in the case of system errors. 152 indicates the request was received by CyberSource but a service did not finish running in time. If you receive this reason, do not resend the request until you have reviewed the transaction status in the CyberSource Business Center. See the documentation for your CyberSource client (SDK) for information about how to handle retries in the case of system errors. Corresponds to the Response Code field in the CC Vendor Response table. Corresponds to the Response Code field in the CC Vendor Response table. Updates the Response code field in the CC Deposit History table. See Reason Codes for the Simple Order API in the CyberSource Credit_Cards_SO_API.pdf document for a complete list of valid reason codes. |
|
requestDateTime |
The date and time the deposit was authorized by CyberSource, in YYYY-MM-DDTHH:MM:SSZ format. Order Management System translates this date format to CYYMMDD format. Updates the Deposit date field in the CC Deposit History table. |
|
amount |
The amount deposited, including decimals, in the currency defined on the order. Updates the Deposit Amount field in the CC Deposit History table. |
|
reconciliationID |
The alternate order number or invoice number that was sent as the reconciliationID in the CyberSource Debit Deposit Request (ccCaptureService) XML Message; otherwise, this is a code assigned by CyberSource as a reference number for the transaction. Note: If this ID does not match alternate order number or invoice number that was sent in the request message, this could be because the number submitted in the request did not meet the length and formatting requirements of the credit card processor. |
|
purchasingLevel3 Enabled |
Y defaults if the transaction qualifies for level II discounting; otherwise, this value is not passed. |
CyberSource Credit Deposit Request (ccCreditService) XML Message
The CyberSource Credit Deposit Request XML message is used to deposit a credit invoice.
Sample transaction: See CyberSource Credit Deposit (ccCreditService) Transaction: Sample Messages.
Special characters: Certain special characters cannot be passed in an attribute of an XML message except through the use of replacement text strings. Order Management System replaces the following special characters with the text strings listed below.
| Special Character | Description | Replacement Text String |
|---|---|---|
|
’ |
single quote |
' |
|
" |
double quote |
" |
|
> |
greater than |
> |
|
< |
less than |
< |
|
& |
ampersand |
& |
Order Management System also removes any non-standard keyboard characters from the XML message before sending it to CyberSource.
The elements and attributes of the ccCreditService Request XML message that are used by Order Management System are described below. See the CyberSource Credit_Cards_SO_API.pdf document for more information on the additional values in this message.
| Attribute Name | Comments |
|---|---|
|
requestMessage |
|
|
merchantID |
The account number assigned by CyberSource to identify transmissions. From the:
|
|
merchantReferenceCode |
The company code + order number + order payment method sequence number. From the Company, Order # and OPM Seq # fields in the Order Payment Method table. |
|
invoiceHeader |
|
|
userPO |
The purchase order number associated with the deposit. From the Purchase order # field in the Order Ship To table. If a purchase order is not defined, the system defaults the Order Management System order number. From the Order # field in the Order Payment Method table. Included only if the transaction qualifies for level II or III discounting and the payment method is Visa, American Express, or MasterCard; see Level II and III Discounting. |
|
billTo |
|
|
firstName |
The bill to customer’s first name. From the:
|
|
lastName |
The bill to customer’s last name. From the:
Note: If a last name is not passed, CyberSource fails the transaction. |
|
street1 |
The street address on the bill to customer’s address. From the:
|
|
street2 |
The second address line on the bill to customer’s address, followed by the text APT and the apartment or suite number defined for the bill to customer’s address. For example: GARDEN TERRACE APT 2B. From the:
|
|
city |
The city on the bill to address. From the:
|
|
state |
The state code on the bill to customer’s address. From the:
|
|
postalCode |
The zip code on the bill to customer’s address. If the country code is US, the 9-digit zip code is in 99999-9999 format. If the country code is CA, the 6-digit zip code is in A1B 2C3. If the country code is JP, the 7-digit zip code is in 999-9999 format. If the country code is GB, the 6-digit zip code is in AB12CD format. From the:
|
|
country |
The country code on the bill to customer’s address. The system uses the Work with Authorization Service Country Screen to cross-reference the Order Management System country code in the Customer Bill To table or Customer Sold To table to the CyberSource country code. From the Auth Service Country field in the Auth Service Country table. |
|
|
The bill to customer’s email address. If an email address is not defined for the bill to customer, null@Cybersource.com defaults. From the CST email address field in the Customer Sold To table. |
|
item |
|
|
id |
0 defaults. |
|
unitPrice |
The unit price of the item, including decimals, in the currency defined on the order, minus any hidden tax included in the item price. From the IDT Price field in the Invoice Detail table. Included only if the transaction qualifies for level II or III discounting and the payment is a method other than Discover or JCB; see Level II and III Discounting. |
|
quantity |
The quantity of the item shipped. From the IDT Qty shipped field in the Invoice Detail table. Included only if the transaction qualifies for level III discounting and the payment method is Visa or MasterCard; see Level II and III Discounting. |
|
productCode |
The item number on the deposit. From the ITM Number field in the Item table. Included only if the transaction qualifies for level III discounting and the payment method is Visa or MasterCard; see Level II and III Discounting. |
|
productName |
A description of the item. From the Description field in the Item table. Included only if the transaction qualifies for level III discounting and the payment method is Visa or MasterCard; see Level II and III Discounting. |
|
productSKU |
The SKU of the item on the deposit. From the SKU Code field in the SKU table. Included only if the transaction qualifies for level III discounting and the payment method is Visa or MasterCard; see Level II and III Discounting. |
|
taxAmount |
The tax amount for the item, including decimals, in the currency defined on the order, including any hidden tax included in the item price. Included only if the transaction qualifies for level II discounting and the payment method is Visa, American Express, or MasterCard, or the transaction qualifies for level III discounting and the payment method is Visa or MasterCard; see Level II and III Discounting. |
|
unitOfMeasure |
The unit of measure defined for the item. From the Unit of measure field in the SKU table. Included only if the transaction qualifies for level III discounting and the payment method is Visa or MasterCard; see Level II and III Discounting. |
|
taxRate |
The tax rate defined for the item. The system uses this calculation to determine the tax rate: taxAmount / unitPrice = taxRate Included only if the transaction qualifies for level III discounting and the payment method is Visa or MasterCard; see Level II and III Discounting. |
|
totalAmount |
The total price of the item, including decimals, in the currency defined on the order. The system uses this calculation to determine the total amount: item_#_quantity x the item_#_unitPrice = item_#_totalAmount Included only if the transaction qualifies for level III discounting and the payment method is Visa or MasterCard; see Level II and III Discounting. |
|
discountAmount |
The discount amount applied to the item, including decimals, in the currency defined on the order. From the IDT Discount amount field in the Invoice Detail table. Included only if the transaction qualifies for level III discounting and the payment method is Visa or MasterCard; see Level II and III Discounting |
|
commodityCode |
The commodity code defined for the item. From the SKU Commodity Code field in the SKU table. Included only if the transaction qualifies for level III discounting and the payment method is Visa or MasterCard; see Level II and III Discounting. |
|
purchaseTotals |
|
|
currency |
The currency on the order. The system uses the Work with Authorization Service Currency Screen to cross-reference the Order Management System currency code to the CyberSource currency code. From the ASC Currency code field in the Auth Service Currency table. |
|
discountAmount |
The discount amount for the deposit, including decimals, in the currency defined on the order. From the INS Discount amount filed in the Invoice Ship To table. Included only if the transaction qualifies for level III discounting and the payment method is Visa; see Level II and III Discounting. |
|
dutyAmount |
The duty amount for the deposit, including decimals, in the currency defined on the order. From the IDC Amount field in the Invoice Detail Charge table for IDC Type of Charge D. Included only if the transaction qualifies for level III discounting and the payment method is Visa; see Level II and III Discounting. |
|
grandTotalAmount |
The amount to deposit, including decimals, in the currency defined on the order. From the Total $ amt field in the CC Deposit Transaction table. |
|
freightAmount |
The freight amount for the deposit, including decimals, in the currency defined on the order. From the INS Freight field in the Invoice Ship To table. Included only if the transaction qualifies for level III discounting and the payment method is Visa or MasterCard; see Level II and III Discounting. |
|
otherTax |
|
|
vatTaxAmount |
The VAT tax amount defined for the item, including decimals, in the currency defined on the order. From the IDC Amount field in the Invoice Detail Charge table for IDC Type of Charge V. Included only if the transaction qualifies for level III discounting and the payment method is Visa; see Level II and III Discounting. |
|
vatTaxRate |
The VAT percent defined for the ship to customer’s country. From the CNT VAT percent in the Country table. Included only if the transaction qualifies for level II discounting and the payment method is Visa; see Level II and III Discounting. See How Hidden Tax is Calculated by Percentage for more information. |
|
recurringSubscriptionInfo |
Included only if a token is passed. |
|
subscriptionID |
The token for the credit card payment. From the OPM credit card number field in the Order Payment Method table. If you use credit card encryption, the system decrypts the credit card number before sending it to CyberSource; see the Data Security and Encryption Guide on My Oracle Support (1988467.1). |
|
frequency |
on-demand defaults. |
|
ccCreditService |
|
|
ccCreditService run |
true defaults. |
|
reconciliationID |
If the Override Reconciliation Id for CyberSource is set to:
For an e-commerce order, the alternate order number is the order_number passed in the Inbound Order XML Message (CWORDERIN) message to identify the order in the originating system or on the web storefront. If the e-commerce order number is a date, it is formatted without punctuation, for example: 20200114T123456. If the reconciliationID in the request message does not specify an invoice number or alternate order number, then CyberSource assigns a reconciliationID as a reference number for the transaction, and passes it in the response message. For more information see the Web Services Guide on https://support.oracle.com My Oracle Support (ID 2149144.1). Note:
|
|
purchasingLevel |
3 defaults if the transaction qualifies for level II discounting and the payment method is Visa or MasterCard; otherwise, this value is not passed. |
CyberSource Credit Deposit Response (ccCreditService) XML Message
The CyberSource Credit Deposit Response (ccCreditService) XML message contains the response from CyberSource for the CyberSource Credit Deposit Request (ccCreditService) XML Message.
Sample transaction: See CyberSource Credit Deposit (ccCreditService) Transaction: Sample Messages.
The elements and attributes of the CyberSource Credit Deposit Response (ccCreditService) XML message that are used by Order Management System are described below. See the CyberSource Credit_Cards_SO_API.pdf document for more information on the additional values in this message.
| Attribute Name | Comments |
|---|---|
|
replyMessage |
|
|
merchantReferenceCode |
The company code + order number + order payment method sequence number, to match the response to the correct deposit. Updates the Company, Order # and OPM Seq # fields in the CC Deposit History table. |
|
requestID |
The unique transaction ID assigned by CyberSource for the transaction. |
|
decision |
ACCEPT indicates CyberSource approved the transaction. ERROR indicates an error occurred while CyberSource was processing the transaction. REJECT indicates CyberSource rejected the transaction. |
|
reasonCode |
The reason the transaction was approved or rejected by CyberSource. 100 indicates the transaction was successful. 151 indicates the request was received by CyberSource but there was a server timeout. If you receive this reason, do not resend the request until you have reviewed the transaction status in the CyberSource Business Center. See the documentation for your CyberSource client (SDK) for information about how to handle retries in the case of system errors. 152 indicates the request was received by CyberSource but a service did not finish running in time. If you receive this reason, do not resend the request until you have reviewed the transaction status in the CyberSource Business Center. See the documentation for your CyberSource client (SDK) for information about how to handle retries in the case of system errors. Corresponds to the Response Code field in the CC Vendor Response table. Corresponds to the Response Code field in the CC Vendor Response table and updates the Response code field in the CC Deposit History table. See Reason Codes for the Simple Order API in the CyberSource Credit_Cards_SO_API.pdf document for a complete list of valid reason codes. |
|
requestToken |
The token assigned to the credit card associated with the deposit transaction, encrypted. |
|
purchaseTotals |
|
|
currency |
The currency on the order. The system uses the Work with Authorization Service Currency Screen to cross-reference the Order Management System currency code to the CyberSource currency code. Corresponds to the ASC Currency code field in the Auth Service Currency table. |
|
ccCreditReply |
|
|
reasonCode |
The reason the transaction was approved or rejected by CyberSource. 100 indicates the transaction was successful. 151 indicates the request was received by CyberSource but there was a server timeout. If you receive this reason, do not resend the request until you have reviewed the transaction status in the CyberSource Business Center. See the documentation for your CyberSource client (SDK) for information about how to handle retries in the case of system errors. 152 indicates the request was received by CyberSource but a service did not finish running in time. If you receive this reason, do not resend the request until you have reviewed the transaction status in the CyberSource Business Center. See the documentation for your CyberSource client (SDK) for information about how to handle retries in the case of system errors. Corresponds to the Response Code field in the CC Vendor Response table. Corresponds to the Response Code field in the CC Vendor Response table. Updates the Response code field in the CC Deposit History table. See Reason Codes for the Simple Order API in the CyberSource Credit_Cards_SO_API.pdf document for a complete list of valid reason codes. |
|
requestDateTime |
The date and time the deposit was authorized by CyberSource, in YYYY-MM-DDTHH:MM:SSZ format. Order Management System translates this date format to CYYMMDD format. Updates the Deposit date field in the CC Deposit History table. |
|
amount |
The amount deposited, including decimals, in the currency defined on the order. Updates the Deposit Amount field in the CC Deposit History table. |
|
reconciliationID |
The alternate order number or invoice number that was sent as the reconciliationID in the CyberSource Credit Deposit Request (ccCreditService) XML Message; otherwise, this is a code assigned by CyberSource as a reference number for the transaction. Note: If this ID does not match alternate order number or invoice number that was sent in the request message, this could be because the number submitted in the request did not meet the length and formatting requirements of the credit card processor. |
|
purchasingLevel3 Enabled |
Y defaults if the transaction qualifies for level II discounting; otherwise, this value is not passed. |
|
ownerMerchantID |
The account number assigned by CyberSource to identify transmissions. From the:
|
CyberSource Authorization and Deposit Request (ccAuthService and ccCaptureService) XML Message
The CyberSource Authorization and Deposit Request XML message is used to authorize and deposit a debit invoice. The system generates this message when:
-
the deposit amount is greater than the authorization amount.
-
the authorization has expired.
-
the deposit is for a deferred payment plan.
-
the deposit is for an installment payment plan after the initial deposit for the plan.
Sample transaction: See CyberSource Authorization and Deposit (ccAuthService and ccCaptureService) Transaction: Sample Messages.
Special characters: Certain special characters cannot be passed in an attribute of an XML message except through the use of replacement text strings. Order Management System replaces the following special characters with the text strings listed below.
| Special Character | Description | Replacement Text String |
|---|---|---|
|
’ |
single quote |
' |
|
" |
double quote |
" |
|
> |
greater than |
> |
|
< |
less than |
< |
|
& |
ampersand |
& |
Order Management System also removes any non-standard keyboard characters from the XML message before sending it to CyberSource.
The elements and attributes of the Authorization and Capture Request XML message that are used by Order Management System are described below. See the CyberSource Credit_Cards_SO_API.pdf document for more information on the additional values in this message.
| Attribute Name | Comments |
|---|---|
|
requestMessage |
|
|
merchantID |
The account number assigned by CyberSource to identify transmissions. From the:
|
|
merchantReferenceCode |
The company code + order number + order payment method sequence number. From the Company, Order # and OPM Seq # fields in the Order Payment Method table. |
|
Subsequent authorization tags: See Subsequent Authorization Requests to CyberSource for more information on the following tags. |
|
|
subsequentAuthFirst |
Set to true if this is the first authorization request for the payment method, and not a merchant-initiated transaction. A first authentication can be:
Not passed when: If this is a subsequent authorization request, this tag is not passed. A subsequent request can be:
See Subsequent Authorization Requests to CyberSource for more information. |
|
subsequentAuth |
Set to true if this is a subsequent authorization request (the subsequentAuthFirst was not passed), and
Not passed when:
See Subsequent Authorization Requests to CyberSource for more information. |
|
subsequentAuthReason |
Set to:
Not passed when:
|
|
subsequentAuthTransactionID |
The ci_transaction_id identifying the authorization. Passed when this is a subsequent authorization (the subsequentAuthFirst was not passed), and the ci_transaction_id is stored on the Order Payment Method, either through the paymentNetworkTransactionID from a previous message from CyberSource, through the ci_transaction_id received in the Inbound Order XML Message (CWORDERIN), or from the customer membership if this is for a generated membership order. For more information see the Web Services Guide on https://support.oracle.com My Oracle Support (ID 2149144.1). This transaction ID is cleared from the Order Payment Method if you change the credit card number. Not passed when:
See Subsequent Authorization Requests to CyberSource for more information. |
|
subsequentAuthStoredCredential |
Set to true if the authorization credentials are stored. Passed when this is a subsequent authorization (the subsequentAuthFirst was not passed), and the ci_transaction_id is stored on the Order Payment Method, either through the paymentNetworkTransactionID from a previous message from CyberSource, through the ci_transaction_id received in the Inbound Order XML Message (CWORDERIN), or from the customer membership if this is a generated membership order. For more information see the Web Services Guide on https://support.oracle.com My Oracle Support (ID 2149144.1). Not passed when:
See Subsequent Authorization Requests to CyberSource for more information. |
|
subsequentAuthOriginalAmount |
The amount of the original approved authorization.This is the auth amount from Auth History:
Passed when this is a subsequent authorization (the subsequentAuthFirst was not passed), and the ci_transaction_id is stored on the Order Payment Method, either through the paymentNetworkTransactionID from a previous message from CyberSource, through the ci_transaction_id received in the Inbound Order XML Message (CWORDERIN), or from the customer membership if this is a generated membership order. For more information see the Web Services Guide on https://support.oracle.com My Oracle Support (ID 2149144.1). Not passed when:
See Subsequent Authorization Requests to CyberSource for more information. |
|
invoiceHeader |
|
|
userPO |
The purchase order number associated with the deposit. From the Purchase order # field in the Order Ship To table. If a purchase order is not defined, the system defaults the Order Management System order number. From the Order # field in the Order Payment Method table. Included only if the transaction qualifies for level II or III discounting and the payment method is Visa, American Express, or MasterCard; see Level II and III Discounting. |
|
billTo |
Included only if you do not use credit card tokenization or if the credit card payment has not yet been replaced with a token from CyberSource. |
|
firstName |
The bill to customer’s first name. From the:
|
|
lastName |
The bill to customer’s last name. From the:
Note: If a last name is not passed, CyberSource fails the transaction. |
|
street1 |
The street address on the bill to customer’s address. From the:
|
|
street2 |
The second address line on the bill to customer’s address, followed by the text APT and the apartment or suite number defined for the bill to customer’s address. For example: TERRACE GARDEN APT 2B. From the:
|
|
city |
The city on the bill to address. From the:
|
|
state |
The state code on the bill to customer’s address. From the:
|
|
postalCode |
The zip code on the bill to customer’s address. If the country code is US, the 9-digit zip code is in 99999-9999 format. If the country code is CA, the 6-digit zip code is in A1B 2C3. If the country code is JP, the 7-digit zip code is in 999-9999 format. If the country code is GB, the 6-digit zip code is in AB12CD format. From the:
|
|
country |
The country code on the bill to customer’s address. The system uses the Work with Authorization Service Country Screen to cross-reference the Order Management System country code in the Customer Bill To table or Customer Sold To table to the CyberSource country code. From the Auth Service Country field in the Auth Service Country table. |
|
|
The bill to customer’s email address. If an email address is not defined for the bill to customer, null@CyberSource.com defaults. From the CST email address field in the Customer Sold To table. |
|
item |
|
|
id |
0 defaults. |
|
unitPrice |
The unit price of the item, including decimals, in the currency defined on the order, minus any hidden tax included in the item price. From the IDT Price field in the Invoice Detail table. Included only if the transaction qualifies for level II or III discounting and the payment is a method other than Discover or JCB; see Level II and III Discounting. |
|
quantity |
The quantity of the item shipped. From the IDT Qty shipped field in the Invoice Detail table. Included only if the transaction qualifies for level III discounting and the payment method is Visa or MasterCard; see Level II and III Discounting. |
|
productCode |
The item number on the deposit. From the ITM Number field in the Item table. Included only if the transaction qualifies for level III discounting and the payment method is Visa or MasterCard; see v. |
|
productName |
A description of the item. From the Description field in the Item table. Included only if the transaction qualifies for level III discounting and the payment method is Visa or MasterCard; see Level II and III Discounting. |
|
productSKU |
The SKU of the item on the deposit. From the SKU Code field in the SKU table. Included only if the transaction qualifies for level III discounting and the payment method is Visa or MasterCard; see Level II and III Discounting. |
|
taxAmount |
The tax amount for the item, including decimals, in the currency defined on the order, including any hidden tax included in the item price. Included only if the transaction qualifies for level II discounting and the payment method is Visa, American Express, or MasterCard, or the transaction qualifies for level III discounting and the payment method is Visa or MasterCard; see Level II and III Discounting. |
|
unitOfMeasure |
The unit of measure defined for the item. From the Unit of measure field in the SKU table. Included only if the transaction qualifies for level III discounting and the payment method is Visa or MasterCard; see Level II and III Discounting. |
|
taxRate |
The tax rate defined for the item. The system uses this calculation to determine the tax rate: taxAmount / unitPrice = taxRate Included only if the transaction qualifies for level III discounting and the payment method is Visa or MasterCard; see Level II and III Discounting. |
|
totalAmount |
The total price of the item, including decimals, in the currency defined on the order. The system uses this calculation to determine the total amount: item_#_quantity x the item_#_unitPrice = item_#_totalAmount Included only if the transaction qualifies for level III discounting and the payment method is Visa or MasterCard; see Level II and III Discounting. |
|
discountAmount |
The discount amount applied to the item, including decimals, in the currency defined on the order. From the IDT Discount amount field in the Invoice Detail table. Included only if the transaction qualifies for level III discounting and the payment method is Visa or MasterCard; see Level II and III Discounting. |
|
commodityCode |
The commodity code defined for the item. From the SKU Commodity Code field in the SKU table. Included only if the transaction qualifies for level III discounting and the payment method is Visa or MasterCard; see Level II and III Discounting. |
|
purchaseTotals |
|
|
currency |
The currency on the order. The system uses the Work with Authorization Service Currency Screen to cross-reference the Order Management System currency code to the CyberSource currency code. From the ASC Currency code field in the Auth Service Currency table. |
|
discountAmount |
The discount amount for the deposit, including decimals, in the currency defined on the order. From the INS Discount amount filed in the Invoice Ship To table. Included only if the transaction qualifies for level III discounting and the payment method is Visa; see Level II and III Discounting. |
|
dutyAmount |
The duty amount for the deposit, including decimals, in the currency defined on the order. From the IDC Amount field in the Invoice Detail Charge table for IDC Type of Charge D. Included only if the transaction qualifies for level III discounting and the payment method is Visa; see Level II and III Discounting. |
|
grandTotalAmount |
The amount to deposit, including decimals, in the currency defined on the order. From the Total $ amt field in the CC Deposit Transaction table. |
|
freightAmount |
The freight amount for the deposit, including decimals, in the currency defined on the order. From the INS Freight field in the Invoice Ship To table. Included only if the transaction qualifies for level III discounting and the payment method is Visa or MasterCard; see Level II and III Discounting |
|
otherTax |
|
|
vatTaxAmount |
The VAT tax amount defined for the item, including decimals, in the currency defined on the order. From the IDC Amount field in the Invoice Detail Charge table for IDC Type of Charge V. Included only if the transaction qualifies for level III discounting and the payment method is Visa; see Level II and III Discounting. |
|
vatTaxRate |
The VAT percent defined for the ship to customer’s country. From the CNT VAT percent in the Country table. Included only if the transaction qualifies for level II discounting and the payment method is Visa; see Level II and III Discounting. See How Hidden Tax is Calculated by Percentage for more information. |
|
card |
Included only if you do not use credit card tokenization or if the credit card payment has not yet been replaced with a token from CyberSource. |
|
accountNumber |
The card number to authorized and replace with a token. If you use credit card encryption, the system decrypts the credit card number before sending it to CyberSource; see the Data Security and Encryption Guide on My Oracle Support (1988467.1). From the OPM credit card number field in the Order Payment Method table. |
|
expirationMonth |
The month when the card expires, in MM format. From the first 2 positions of the OPM expiration date field in the Order Payment Method table. |
|
expirationYear |
The year when the card expires, in YYYY format. From the last 2 positions of the OPM expiration date field in the Order Payment Method table. |
|
cardType |
The vendor paytype code defined for the credit card pay type. This is the code CyberSource uses to identify the method of payment. From the CPC vendor paytype/code field in the CC Paytype Cross Ref table. |
|
issueNumber |
The card issue number defined for the card being processed. From the OPM card issue # field in the Order Payment Method table. |
|
startMonth |
The start month defined for the card being processed, in MM format. From the first 2 positions of the Start date field in the Order Payment Method table. |
|
startYear |
The start year defined for the card being processed, in YYYY format. From the last 2 positions of the Start date field in the Order Payment Method table. |
|
recurringSubscriptionInfo |
|
|
subscriptionID |
The token for the credit card payment. From the OPM credit card number field in the Order Payment Method table. If you use credit card encryption, the system decrypts the credit card number before sending it to CyberSource; see the Data Security and Encryption Guide on My Oracle Support (1988467.1). |
|
frequency |
on-demand defaults. |
|
decisionManager |
|
|
enabled |
false defaults. |
|
ccAuthService |
|
|
ccAuthService_run |
true defaults. |
|
reconciliationID |
If the Override Reconciliation Id for CyberSource is set to:
For an e-commerce order, the alternate order number is the order_number passed in the Inbound Order XML Message (CWORDERIN) message to identify the order in the originating system or on the web storefront. If the e-commerce order number is a date, it is formatted without punctuation, for example: 20200114T123456. For more information see the Web Services Guide on https://support.oracle.com My Oracle Support (ID 2149144.1). If the reconciliationID in the request message does not specify an invoice number or alternate order number, then CyberSource assigns a reconciliationID as a reference number for the transaction, and passes it in the response message. Note:
|
|
commerceIndicator |
internet defaults if the E-Commerce indicator (Future use status 1) field in the Order Header table is set to I or the order type for the order matches the order type defined in the E-Commerce Order Type (G42) system control value; otherwise, moto defaults. Deferred or installment billing? If the order uses deferred or installment billing and the Notify of installments flag for the pay type is selected, the commerceIndicator is set to install for the subsequent authorization and deposit request after the initial authorization. See Subsequent Authorization Requests to CyberSource for more information. |
|
cavv |
A code received from an authentication service, such as Visa’s Verified by Visa program or MasterCard’s SecureCode program, indicating whether the card authentication password the cardholder provided was approved for the credit card. See Credit Card Authentication Service for more information. From the Authentication value field in the Order Payment Method table. |
|
eciRaw |
A code received from an authentication service, such as Visa’s Verified by Visa program or MasterCard’s SecureCode program, indicating whether the card authentication password the cardholder provided was approved for the credit card. See Credit Card Authentication Service for more information. From the Authentication value field in the Order Payment Method table. |
|
businessRules |
|
|
ignoreAVSResult |
true defaults. |
|
ignoreCVResult |
true defaults. |
|
ccCaptureService |
|
|
ccCaptureService run |
true defaults. |
|
authRequestID |
The transaction ID for the authorization associated with the deposit. From the Transaction ID field in the Authorization History table. |
|
reconciliationID |
If the Override Reconciliation Id for CyberSource is set to:
For an e-commerce order, the alternate order number is the order_number passed in the Inbound Order XML Message (CWORDERIN) message to identify the order in the originating system or on the web storefront. If the e-commerce order number is a date, it is formatted without punctuation, for example: 20200114T123456. For more information see the Web Services Guide on https://support.oracle.com My Oracle Support (ID 2149144.1). If the reconciliationID in the request message does not specify an invoice number or alternate order number, then CyberSource assigns a reconciliationID as a reference number for the transaction, and passes it in the response message. Note:
|
|
purchasingLevel |
3 defaults if the transaction qualifies for level II discounting and the payment method is Visa or MasterCard; otherwise, this value is not passed. |
|
paySubscriptionCreate Service_run |
true defaults if a token is requested in the deposit transaction. |
CyberSource Authorization and Deposit Response (ccAuthService and ccCaptureService) XML Message
The CyberSource Authorization and Capture Response XML message contains the response from CyberSource for the CyberSource Authorization and Deposit Request (ccAuthService and ccCaptureService) XML Message.
Sample transaction: See CyberSource Authorization and Deposit (ccAuthService and ccCaptureService) Transaction: Sample Messages.
The elements and attributes of the Authorization and Capture Response XML message that are used by Order Management System are described below. See the CyberSource Credit_Cards_SO_API.pdf document for more information on the additional values in this message.
| Attribute Name | Comments |
|---|---|
|
replyMessage |
|
|
merchantReferenceCode |
The company code + order number + order payment method sequence number, to match the response to the correct deposit. Updates the Company, Order # and OPM Seq # fields in the CC Deposit History table. |
|
requestID |
The unique transaction ID assigned by CyberSource for the transaction. |
|
decision |
ACCEPT indicates CyberSource approved the transaction. ERROR indicates an error occurred while CyberSource was processing the transaction. REJECT indicates CyberSource rejected the transaction. |
|
reasonCode |
The reason the transaction was approved or rejected by CyberSource. 100 indicates the transaction was successful. 151 indicates the request was received by CyberSource but there was a server timeout. If you receive this reason, do not resend the request until you have reviewed the transaction status in the CyberSource Business Center. See the documentation for your CyberSource client (SDK) for information about how to handle retries in the case of system errors. 152 indicates the request was received by CyberSource but a service did not finish running in time. If you receive this reason, do not resend the request until you have reviewed the transaction status in the CyberSource Business Center. See the documentation for your CyberSource client (SDK) for information about how to handle retries in the case of system errors. Corresponds to the Response Code field in the CC Vendor Response table. Corresponds to the Response Code field in the CC Vendor Response table and updates the Response code field in the CC Deposit History table. See Reason Codes for the Simple Order API in the CyberSource Credit_Cards_SO_API.pdf document for a complete list of valid reason codes. |
|
requestToken |
The token assigned to the credit card associated with the deposit transaction, encrypted. |
|
purchaseTotals |
|
|
currency |
The currency on the order. The system uses the Work with Authorization Service Currency Screen to cross-reference the Order Management System currency code to the CyberSource currency code. Corresponds to the ASC Currency code field in the Auth Service Currency table. |
|
ccAuthReply |
|
|
reasonCode |
The reason the transaction was approved or rejected by CyberSource. 100 indicates the transaction was successful. 151 indicates the request was received by CyberSource but there was a server timeout. If you receive this reason, do not resend the request until you have reviewed the transaction status in the CyberSource Business Center. See the documentation for your CyberSource client (SDK) for information about how to handle retries in the case of system errors. 152 indicates the request was received by CyberSource but a service did not finish running in time. If you receive this reason, do not resend the request until you have reviewed the transaction status in the CyberSource Business Center. See the documentation for your CyberSource client (SDK) for information about how to handle retries in the case of system errors. Corresponds to the Response Code field in the CC Vendor Response table. Corresponds to the Response Code field in the CC Vendor Response table. See Reason Codes for the Simple Order API in the CyberSource Credit_Cards_SO_API.pdf document for a complete list of valid reason codes. |
|
amount |
The amount authorized by CyberSource, including decimals, in the currency defined on the order. If this is for a customer membership order, the original authorization amount is also saved for the customer membership if it was not already populated. Updates the AUH amount authorized field in the Authorization History table. |
|
authorizationCode |
The authorization number provided by CyberSource. Updates the AUH auth # field in the Authorization History table. |
|
avsCode |
The address verification response for the credit card. Updates the AUH AVS response field in the Authorization History table. |
|
avsCodeRaw |
The address verification response for the credit card, from the processor. |
|
authorizedDateTime |
The date and time the credit card was authorized, in YYYY-MM-DDTHH:MM:SSZ format. Updates the AUH auth date field in the Authorization History table. |
|
processorResponse |
The response code from the bank. Informational only. |
|
reconciliationID |
The alternate order number or invoice number that was sent as the reconciliationID in the CyberSource Authorization and Deposit Request (ccAuthService and ccCaptureService) XML Message; otherwise, this is a code assigned by CyberSource as a reference number for the transaction. Note: If this ID does not match alternate order number or invoice number that was sent in the request message, this could be because the number submitted in the request did not meet the length and formatting requirements of the credit card processor. |
|
ownerMerchantID |
The account number assigned by CyberSource to identify transmissions. Corresponds to the:
|
|
paymentNetworkTransactionID |
The customer-initiated transaction ID obtained when authorizing the credit card. Included only when the credit card has not previously been authorized. A customer-initiated transaction ID is required for a credit card payment method only when tokenization is not enabled for CyberSource; however, if the ID is passed, it is stored regardless of whether tokenization is enabled. This ID can also be updated with the ci_transaction_id in the Inbound Order XML Message (CWORDERIN). It is stored for the Order Payment Method, and not updated once populated unless you change the credit card number. For more information see the Web Services Guide on https://support.oracle.com My Oracle Support (ID 2149144.1). If this is for a customer membership order, the ID is also saved for the customer membership if it was not already populated. |
|
ccCaptureReply |
|
|
reasonCode |
The reason the transaction was approved or rejected by CyberSource. 100 indicates the transaction was successful. 151 indicates the request was received by CyberSource but there was a server timeout. If you receive this reason, do not resend the request until you have reviewed the transaction status in the CyberSource Business Center. See the documentation for your CyberSource client (SDK) for information about how to handle retries in the case of system errors. 152 indicates the request was received by CyberSource but a service did not finish running in time. If you receive this reason, do not resend the request until you have reviewed the transaction status in the CyberSource Business Center. See the documentation for your CyberSource client (SDK) for information about how to handle retries in the case of system errors. Corresponds to the Response Code field in the CC Vendor Response table. Corresponds to the Response Code field in the CC Vendor Response table. Updates the Response code field in the CC Deposit History table. See Reason Codes for the Simple Order API in the CyberSource Credit_Cards_SO_API.pdf document for a complete list of valid reason codes. |
|
requestDateTime |
The date and time the deposit was authorized by CyberSource, in YYYY-MM-DDTHH:MM:SSZ format. Order Management System translates this date format to CYYMMDD format. Updates the Deposit date field in the CC Deposit History table. |
|
amount |
The amount deposited, including decimals, in the currency defined on the order. Updates the Deposit Amount field in the CC Deposit History table. |
|
reconciliationID |
The alternate order number or invoice number that was sent as the reconciliationID in the CyberSource Authorization and Deposit Request (ccAuthService and ccCaptureService) XML Message; otherwise, this is a code assigned by CyberSource as a reference number for the transaction. Note: If this ID does not match alternate order number or invoice number that was sent in the request message, this could be because the number submitted in the request did not meet the length and formatting requirements of the credit card processor. |
|
purchasingLevel3 Enabled |
Y defaults if the transaction qualifies for level II discounting; otherwise, this value is not passed. |
CyberSource Authorization Reversal Request (ccAuthReversalService) XML Message
The CyberSource Authorization Reversal Request (ccAuthReversalService) XML message is used to reverse an authorization for a credit card payment. The system generates this message when the deposit amount is greater than the authorization amount and it has not been more than 72 hours since the authorization was obtained.
Sample transaction: See CyberSource Authorization Reversal (ccAuthReversalService) Transaction: Sample Messages.
Special characters: Certain special characters cannot be passed in an attribute of an XML message except through the use of replacement text strings. Order Management System replaces the following special characters with the text strings listed below.
| Special Character | Description | Replacement Text String |
|---|---|---|
|
’ |
single quote |
' |
|
" |
double quote |
" |
|
> |
greater than |
> |
|
< |
less than |
< |
|
& |
ampersand |
& |
Order Management System also removes any non-standard keyboard characters from the XML message before sending it to CyberSource.
The elements and attributes of the Authorization Reversal Request (ccAuthReversalService) XML message that are used by Order Management System are described below. See the CyberSource Credit_Cards_SO_API.pdf document for more information on the additional values in this message.
| Attribute Name | Comments |
|---|---|
|
requestMessage |
|
|
merchantID |
The account number assigned by CyberSource to identify transmissions. From the:
|
|
merchantReferenceCode |
The company code + order number + order payment method sequence number. From the Company + Order # and OPM Seq # fields in the Order Payment Method table. |
|
purchaseTotals |
|
|
currency |
The currency on the order. The system uses the Work with Authorization Service Currency Screen to cross-reference the Order Management System currency code to the CyberSource currency code. From the ASC Currency code field in the Auth Service Currency table. |
|
grandTotalAmount |
The amount to reverse, including decimals, in the currency defined on the order. From the Amount authorized field in the Authorization History table. |
|
ccAuthReversalService |
|
|
ccAuthReversalService run |
true defaults. |
|
authRequestID |
The transaction ID for the authorization associated with the deposit. From the Transaction ID field in the Authorization History table. |
CyberSource Authorization Reversal Response (ccAuthReversalService) XML Message
The CyberSource Authorization Reversal Response (ccAuthReversalService) XML message contains the response from CyberSource for the CyberSource Authorization Reversal Request (ccAuthReversalService) XML Message.
Sample transaction: See CyberSource Authorization and Deposit (ccAuthService and ccCaptureService) Transaction: Sample Messages.
The elements and attributes of the Authorization Reversal Response XML message that are used by Order Management System are described below. See the CyberSource Credit_Cards_SO_API.pdf document for more information on the additional values in this message.
| Attribute Name | Comments |
|---|---|
|
replyMessage |
|
|
merchantReferenceCode |
The company code + order number + order payment method sequence number, used to match the response to the correct request. Corresponds to the Company, Order # and OPM Seq # fields in the Order Payment Method table. |
|
requestID |
The unique transaction ID assigned by CyberSource for the transaction. |
|
decision |
ACCEPT indicates CyberSource approved the transaction. ERROR indicates an error occurred while CyberSource was processing the transaction. REJECT indicates CyberSource rejected the transaction. |
|
reasonCode |
The reason the transaction was approved or rejected by CyberSource. 100 indicates the transaction was successful. 151 indicates the request was received by CyberSource but there was a server timeout. If you receive this reason, do not resend the request until you have reviewed the transaction status in the CyberSource Business Center. See the documentation for your CyberSource client (SDK) for information about how to handle retries in the case of system errors. 152 indicates the request was received by CyberSource but a service did not finish running in time. If you receive this reason, do not resend the request until you have reviewed the transaction status in the CyberSource Business Center. See the documentation for your CyberSource client (SDK) for information about how to handle retries in the case of system errors. Corresponds to the Response Code field in the CC Vendor Response table. Corresponds to the Response Code field in the CC Vendor Response table and its description updates the AHR response field in the Authorization History SVC Reversal table. See Reason Codes for the Simple Order API in the CyberSource Credit_Cards_SO_API.pdf document for a complete list of valid reason codes. |
|
requestToken |
The token assigned to the credit card associated with the authorization transaction, encrypted. |
|
purchaseTotals |
|
|
currency |
The currency on the order. The system uses the Work with Authorization Service Currency Screen to cross-reference the Order Management System currency code to the CyberSource currency code. Corresponds to the ASC Currency code field in the Auth Service Currency table. |
|
ccAuthReversalReply |
|
|
reasonCode |
The reason the transaction was approved or rejected by CyberSource. 100 indicates the transaction was successful. 151 indicates the request was received by CyberSource but there was a server timeout. If you receive this reason, do not resend the request until you have reviewed the transaction status in the CyberSource Business Center. See the documentation for your CyberSource client (SDK) for information about how to handle retries in the case of system errors. 152 indicates the request was received by CyberSource but a service did not finish running in time. If you receive this reason, do not resend the request until you have reviewed the transaction status in the CyberSource Business Center. See the documentation for your CyberSource client (SDK) for information about how to handle retries in the case of system errors. Corresponds to the Response Code field in the CC Vendor Response table. Corresponds to the Response Code field in the CC Vendor Response table and its description updates the AHR response field in the Authorization History SVC Reversal table. See Reason Codes for the Simple Order API in the CyberSource Credit_Cards_SO_API.pdf document for a complete list of valid reason codes. |
|
amount |
The amount reversed by CyberSource, including decimals, in the currency defined on the order. Updates the AHR Reversal amount field in the Authorization History SVC Reversal table. |
|
processorResponse |
The response code from the bank. Informational only. |
|
requestDateTime |
The date and time the credit card reversal was authorized, in YYYY-MM-DDTHH:MM:SSZ format. Updates the AHR creation date field in the Authorization History SVC Reversal table. |
Purging Tables
Topics in this part:
-
Purging Prestige Credit Card Deposits (MPSP) describes how to purge processed records from the Credit Card Deposit Prestige table.
-
Purging Orders (MPOR) described how to purge closed and canceled orders based on the date of last activity.
-
Purging Sold To Customers describes how to purge eligible sold to customers based on the customer’s last change date.
-
Purging Suspended Orders (PSOR) describes how to remove orders in a suspended status from the system.
-
Purging SKUs (MPSK) described how to remove item/SKUs based on item status from the system.
-
Additional Purges summarizes the additional purges available.
Purging Sold To Customers
Purpose: Use the PURGECS Purge Sold To Customers periodic function (program name PFR0137) to purge eligible sold to customers.
Which customers are purged? For the customer to be eligible for purge, the system verifies that:
-
the last change date for the customer is older than the number of days defined in the periodic function’s Parameter field. If the Parameter is blank or 0, records must be 365 days old to be eligible for purge.
-
there are no unpurged orders for the customer.
-
the customer does not exist in the Customer Fraud table.
-
there are no open refunds for the customer.
-
there are no open returns for the customer.
-
there are no open ticklers for the customer.
-
there are no catalog requests for the customer.
-
there are no active or in-process memberships for the customer.
-
there are no open purchase orders for the customer.
Once the purge completes, the system generates the Purged Customer List, listing the sold to customers that were removed.
The system writes processing details to the Trace log.
Purging an individual customer:
-
To purge an individual sold to customer, use the Delete option in Creating and Updating Sold-to Customers (WCST).
-
To purge an individual ship to customer, use the Delete option in Creating and Updating Sold-to Customers (WCST).
-
To purge an individual bill to customer, use the Delete option in Creating and Updating Bill-to Customers (WCBT).
Updated tables: See the Tables Updated during Customer Purge for a listing of the tables purged through the PURGECS Purge Customers periodic function (program name PFR0137).
Before you purge customers:
-
Use the Purge Catalog Request History (PCRH) menu option to delete outdated records from the Catalog Request History table.
-
Use the Deleting All Printed Catalog Requests (DCAT) menu option to delete printed catalog requests.
-
Use the PURGEOR Purge Orders periodic function (program name PFR0114) to purge orders that are closed or canceled. See Purging Orders (MPOR) for processing details.
In this topic:
For more information: See:
-
How to Schedule a Job for information on scheduling a periodic process that includes the PURGECS periodic function
-
Working with Periodic Functions (WPER) for information on setting up periodic functi
Tables Updated during Customer Purge
Purpose: The system purges records in the following customer-related and order-related tables when you use the PURGECS Purge Customers (program name PFR0137) periodic function.
-
Contract Price (PRCNPR)
-
Correspondence History (MSCOHS)
-
Cust Mail/Rent Changes (OECMRC)
-
Cust Sold To Item Class Entity (OEICEP)
-
Customer Action (CSCSAC)
-
Customer Action Note (OECACN)
-
Customer Address Change (CSCACP)
-
Customer Affinity (CSAFFY)
-
Customer Individual (CSCIFP)
-
Customer Individual Mail History (CSTIMH)
-
Customer Individual Order History (CSTIOH)
-
Customer Membership (OECSMP)
-
Customer Membership Detail (OECSMD)
-
Customer Note (CSCUNO)
-
Customer Ownership (OECSOW)
-
Customer Pay Type Exclusion (CSCPTX)
-
Customer Profile (CSCPRO)
-
Customer Ship To (CSSHIP)
-
Customer Ship To Entity (OECHEP)
-
Customer Ship To Extended (CSHXNA)
-
Customer Ship To Mail History (CSHPMH)
-
Customer Ship To Order History (CSHORH)
-
Customer Ship To Phone # (CSCTP#)
-
Customer Shipment History (FLCSHP)
-
Customer Sold To (OECSSL)
-
Customer Sold To BML (OECSBM)
-
Customer Sold To Email (OECSEM)
-
Customer Sold To Entity (OECSEP)
-
Customer Sold To Extended (CSTXNA)
-
Customer Sold To Item Class (OECSIC)
-
Customer Individual (CSCIFP)
-
Customer Sold To Item Class Entity (OEICEP)
-
Customer Sold To Mail History (CUSTMH)
-
Customer Sold To Order History (CSTOOH)
-
Customer Sold To User Field (OECSUF)
-
Customer Profile (CSCPRO)
-
Customer Sold To Promotion (OECSPR)
-
Customer Sold To Phone # (CSCSP#)
-
Customer Sold To Xref (OECSXR)
-
Customer Source Finder (CSSFND)
-
Customer Subscription (OECSSB)
-
Customer Tax (OECSTX)
-
Customer Warehouse (CDCWFP)
-
Customer Warranty Track (CSWTRP)
-
DW Correspondence History (DWCSEM)
-
EC CST Ext (EXCSTE)
-
Marketing Download Customer Address Change (IXDTCA)
-
Marketing Download Customer Inquiry (IXDTCI)
-
Marketing Download Customer Ownership (IXDTCO)
-
Marketing Download Customer Profile (IXDTCP)
-
Marketing Download Customer Status Change (IXDTCS)
-
Tickler (MSTKLR)
Additional Purges
Purpose: In addition to the purges described earlier under Purging Tables, you can use the purge options listed below to delete outdated or unneeded records in various tables. Purging unnecessary records can help save space and improve performance.
-
For more information: See:
-
Active Procedures: Purging Active Procedures (MACP).
-
Correspondence History: Purging Email History (MPCH).
-
Customer Subscriptions: Purging Subscriptions (MPCS).
-
Orders: Purging Orders (MPOR) Note: You can also purge a single order through the Purge Orders by Order Number menu option, fast path = MORP.
-
Pick Control Label Records: Unused Pick Label Purge Days (K83).
-
Prestige Credit Card Deposits: Purging Prestige Credit Card Deposits (MPSP).
-
Refund Checks: Reconciling Checks (MREC).
-
SKUs: Purging SKUs (MPSK).
-
Suspended Orders: Purging Suspended Orders (PSOR).
Flexible Payment Options
Topics in this part:
-
Deferred/Installment Billing Overview provides an overview of how flexible payment options work.
-
Deferred/Installment Billing Setup describes the steps necessary to set up deferred or installment billing pay plans.
-
Working with Flexible Payment Options (WFPO) describes the screens you use in the Work with Flexible Payment Options menu option.
-
Credit Card Net Exchange Billing describes the process the system uses to net credit invoices with debit invoices before a deposit is sent to the service bureau for an invoice associated with an exchange.
Important:
There is a known issue with deferred/installment billing functionality when processing a return. If you plan to use deferred/installment billing, contact customer support to determine if your planned use of this functionality will be impacted by this issue.
Deferred/Installment Billing Overview
Pay plans are deferred payment or installment billing options you can offer to your customers. Under a pay plan, you delay billing the customer's credit card for a prearranged interval.
There are two types of pay plans:
-
Deferred billing: You bill the customer for the shipment after a specific number of days has passed, based on either the order date or the shipment date; or, you bill the customer on a given day of the month following the order or shipment.
-
Installment billing: You bill the balance due for a shipment in a number of equal installment payments, which are due after specific intervals or on a given day of the month.
Different credit card types: Only credit cards (as opposed to different types such as stored value card or debit card) are eligible for deferred or installment billing. If you accept any other credit card type besides a regular credit card, you should make the Paytype one of the Qualification Values for each payment plan you create to prevent these other credit card types from being accepted. You can use the Copy option at the Work with Flexible Payment Option Screen to make a copy of the payment plan for each eligible credit card pay type.
EXC flexible payment option: The system delivers the EXC Net Billing for Exchanges flexible payment option in the Working with Flexible Payment Options (WFPO) menu option to use during Credit Card Net Exchange Billing (the Use CC Net Exchange Billing (M23) system control value is selected). You cannot change or delete this flexible payment option and you cannot use this flexible payment option for deferred/installment billing. See Credit Card Net Exchange Billing for processing details.
Important:
There is a known issue with deferred/installment billing functionality when processing a return. If you plan to use deferred/installment billing, contact customer support to determine if your planned use of this functionality will be impacted by this issue.
In this topic:
Not in this topic: This topic does not include general information on setting up your company to use deferred or installment billing, or on setting up the pay plans themselves; see Deferred/Installment Billing Setup. Also, see Resubmitting Rejected Deposits (SRDP) and Printing the Deposit History Summary (PDHS) for more information.
Examples
| Pay Plan Setup | Result |
|---|---|
|
Payment deferred 30 days based on invoice date |
Order entered on 9/1 and shipment confirmed on 9/15. Deposit eligible for processing on 10/15. |
|
Payment deferred 30 days based on order date |
Order entered on 9/1 and shipment confirmed on 9/15. Deposit eligible for processing on 10/1. Note: If the shipment did not take place until 10/1 or after, the deposit would be eligible for processing immediately after shipment confirmation. |
|
Payment deferred until the 25th of the month |
Order entered on 9/1 and shipment confirmed on 9/15. Deposit eligible for processing on 9/25. |
| Pay Plan Setup | Result |
|---|---|
|
Four installments, 30 day intervals |
Order entered on 9/1 for $200.00 and shipment confirmed on 9/15. Four installments of $50.00, eligible for processing on 9/15, 10/15, 11/14, 12/14 |
|
Six installments, 1st of the month |
Order entered on 9/1 for $300.00 and shipment confirmed on 9/15. Six installments of $50.00, eligible for processing on 10/1, 11/1, 12/1, 1/1, 2/1, 3/1. Note: If the shipment did not take place until 10/1, the first installment would still be eligible for processing on that same date. |
See Deposit Release Date for more examples.
Applying a Pay Plan in Order Entry
Determining eligible orders: In order to assign a pay plan to an order, the system must first determine if the order is eligible for a pay plan.
An order is eligible for a pay plan if the order:
-
is within the pay plan's starting and ending date
-
does not contain an item that is excluded from pay plans
-
contains only one credit card
-
has a source code that is not excluded from pay plans
-
meets the minimum dollar amount requirement for the pay plan, if any
-
meets the pay type requirement for the pay plan, if any
-
meets the offer requirement for the pay plan, if any
-
meets the item requirement for the pay plan, if any
Selection Hierarchy
Once the system determines which payment plans are eligible for the order, it determines the most appropriate plan.
The system selects the first qualifying pay plan as the primary plan based on the following hierarchy:
-
The pay plan is set to apply automatically to a qualifying order.
-
The pay plan is assigned to the source code on the order header.
-
Selection based on the qualification values for the pay plan:
-
An item on the order is the qualifying item for the pay plan and the order meets the qualifying merchandise dollar amount.
-
An item on the order is the qualifying item for the pay plan but the order does not meet the qualifying merchandise dollar amount.
-
The offer on the order is the qualifying offer for the pay plan and the order meets the qualifying merchandise dollar amount but does not contain the qualifying item.
-
The offer on the order is the qualifying offer for the pay plan but the order does not meet the qualifying merchandise dollar amount or contain the qualifying item.
-
The pay type on the order is the qualifying pay type for the pay plan and the order meets the qualifying merchandise dollar amount but does meet any other qualifying criteria.
-
The pay type on the order is the qualifying pay type for the pay plan but the order does not meet any of the other qualifying criteria.
-
The order meets the qualifying merchandise dollar amount but does not meet any other qualifying criteria.
-
If more than one pay plan meets the same qualifications, the system then determines the primary plan as follows:
-
The pay plan is the first eligible plan in descending starting date sequence (most current date), or
-
The pay plan is the first alphanumerically.
Applying the plan to the order: The system can apply the pay plan to the order in three different ways, depending on how you set up the pay plan:
-
Automatically apply the plan to the order, or
-
Prompt the operator to select a plan, or
-
Require the operator to manually assign a plan
| If the pay plan is set to.... | The system.... |
|---|---|
|
automatically apply to the order |
automatically applies the pay plan to the order when you enter payment method information |
|
prompt the operator |
displays the Select Payment Plan Window pop-up window, listing eligible payment plans, where the operator can select a plan to assign to the order |
|
not automatically apply to the order |
does not automatically apply the pay plan to the order or display a pop-up window; the operator must select a pay plan for the order |
Demand Updates
In addition to the standard demand updates made for every order, the system updates the following fields in the Flexible Payment Options table when you accept an order:
-
Number of orders
-
Dollars ordered
-
Number of soldouts
-
Dollars soldout
-
Number of cancels
-
Dollars canceled
You can review history for a pay plan by selecting History for the plan at the Work with Flexible Payment Option Screen.
The system also performs updates when you confirm and ship an order containing a pay plan. See Billing Updates.
Pick Slip Generation
Authorization: Unlike regular (non-pay plan) orders, deferred or installment billing orders do not automatically require an authorization for the full pickable amount of the order when you generate pick slips. The amount authorized at pick slip generation is summarized in the table:
| When you print a pick slip for... | The amount authorized is... |
|---|---|
|
a regular (non-pay plan) order |
the full pickable amount of the order (including any tax, shipping, and charges) |
|
a deferred billing pay plan order |
one dollar, unless the Authorize full amount field for the pay plan is selected |
|
an installment billing pay plan order |
the first payment of the installment plan, unless the Authorize full amount field for the pay plan is selected |
Pick messages: Any pick slip messages you have specified for the pay plan print on the customer's pick slip, provided your pick slip printing program supports it. You can enter up to three lines of messages for a pay plan.
Subsequent authorizations through CyberSource or External Payment Service: See Subsequent Authorization Requests through the External Payment Service or Subsequent Authorization Requests to CyberSource for information on how subsequent authorization requests are submitted for these two authorization service options, based on the Notify of installments settings for the pay type.
Note:
You need to verify that the end processor supports these subsequent authorization options.
Billing Updates
Flexible payment option: The system updates the total numbers and dollars shipped for the pay plan when you confirm shipment and bill. You can review history for a pay plan by selecting History for the plan at the Work with Flexible Payment Option Screen.
Invoice: In addition to all of the standard updates that occur during billing, the system calculates the deposit release date based on the terms of the pay plan. This date, which is stored in the Invoice Pay Method, indicates when the deposit will be eligible for processing. In the case of an installment plan, the deposit release date indicates when the first installment will be eligible for processing. Each installment has a separate Deposit Release Date.
Regular (non-pay plan) orders also have a deposit release date; however, it is always the same as the invoice date.
Deposit Release Date
The system assigns a deposit release date to all orders at billing. The deposit release date indicates when the deposit is eligible for processing. In the case of a regular (non-pay plan) order, the deposit release date is always the same as the invoice date, because the deposit is eligible for processing immediately. Examples of deposit release date calculation for pay plan orders are:
| Pay Plan Settings | Deposit Release Date Calculation | Examples | |
|---|---|---|---|
| fixed date | Use the fixed date; however, if this date has already passed, use the invoice date | Standard calculation: |
Order date = 9/1 Fixed date = 10/1 Invoice date = 9/15 Deposit release date = 10/1 |
| If the fixed date has already passed: |
Order date = 9/1 Fixed date = 10/1 Invoice date = 10/5 Deposit release date = 10/5 |
||
| number of days and order date | Add the number of days to the order date; however, if the resulting date has already passed, use the invoice date; or, if the pay plan expiration date is sooner than the resulting date, use the expiration date or invoice date (whichever is later) | Standard calculation: |
Order date = 9/1 Number of days = 30 Invoice date = 9/15 Deposit release date = 10/1 |
| If deposit release date based on standard calculation is earlier than current (invoice) date but before the pay plan expiration date |
Order date = 9/1 Number of days = 30 Invoice date = 10/5 Expiration date = 10/15 Deposit release date = 10/5 |
||
| If deposit release date based on standard calculation is later than the pay plan expiration date: |
Order date = 9/1 Number of days = 30 Invoice date = 9/15 Expiration date = 9/30 Deposit release date = 9/30 |
||
| number of days and invoice date | Add the number of days to the invoice date; however, if the pay plan expiration date is sooner than the resulting date, use the expiration date | Standard calculation: |
Order date = 9/1 Number of days = 30 Invoice date = 9/15 Deposit release date = 10/14 |
| If deposit release date based on standard calculation is later than the pay plan expiration date: |
Order date = 9/1 Number of days = 30 Invoice date = 9/15 Expiration date = 9/30 Deposit release date = 9/30 |
||
| fixed date | Use the next occurrence of the fixed day of the month and continue on that date for the number of installments; however, if the pay plan expiration date has occurred when you bill the order, use the invoice date | Standard calculation: |
Order date = 9/1 Fixed date = 10 (10th of the month) Number of installments = 4 Invoice date = 9/15 Installment deposit release dates = 10/10, 11/10, 12/10, 1/10 |
| If expiration date has already occurred when you bill the order: |
Order date = 9/1 Fixed date = 10 (10th of the month) Number of installments = 4 Invoice date = 9/15 Expiration date = 9/10 Deposit release date = 9/15 (no installments) |
||
| interval | Use the current date and add the number of interval days to each installment date to calculate the remaining installments; however, if the pay plan expiration date has occurred when you bill the order, use the invoice date | Standard calculation: |
Order date = 9/1 Interval number of days = 30 Number of installments = 4 Invoice date = 9/15 Installment deposit release dates = 9/15, 10/15, 11/14, 12/14 |
| If expiration date has already occurred when you bill the order: |
Order date = 9/1 Interval number of days = 30 Number of installments = 4 Invoice date = 9/15 Expiration date = 9/10 Deposit release date = 9/15 (no installments) |
||
Processing Deposits
Authorization required: Unlike a regular (non-pay plan) credit card order, a pay plan order might not have a full, valid authorization at the time you process the deposit. Regular orders normally receive a full authorization at the time you generate the pick slip, and deposit processing normally occurs soon enough after pick slip generation for the authorization to still be valid. However, deposits for pay plan orders occur at intervals after pick slip generation, and authorizations from that time may no longer be valid, or may have been for less than the full deposit amount. See Pick Slip Generation.
Action codes: The system sends an action code of B to the deposit service for any pay plan deposits that require authorization. The conditions under which the system sends an action code of B are described in Processing Auto Deposits (SDEP).
Force deposit: If a pay plan deposit fails authorization, the system will “force” the deposit if you have set up the vendor response code to do so. Forcing a deposit means that the system performs all the same updates as if the authorization had been approved. For example, the invoice payment method for the order will be updated, and the deposit will not be included on reports that list unconfirmed deposits, or be available through the Resubmit Rejected Deposits function.
Rejected Deposits
Overview: Rejected or unconfirmed deposits appear on the Unconfirmed Deposits Listing when you process deposits. You can use the Resubmit Rejected Deposits Screen to work with these deposits, including:
-
changing the credit card number or the deposit release date
-
writing off or deleting the deposit
-
entering a cash payment amount
-
confirming the deposit interactively
-
reviewing deposit history
You can also work with rejected deposits through standard order inquiry. See Order Inquiry.
Order Inquiry
Purpose: Use standard order inquiry to review information associated with a pay plan. The information and options listed below are not available in streamlined order inquiry.
-
the total amount to deposit, the amount deposited, and the remaining amount to deposit
-
credit card information
-
the deposit release date
-
installment schedule if the order uses an installment pay plan, such as:
-
the total number of installments
-
the number of installments remaining to deposit
-
the installment interval
-
the fixed installment day
-
the installment amount
-
-
rejected deposit amount
-
prepaid amount
Change options: You can also change this information related to the invoice payment method:
-
the deposit release date
-
installment information, such as:
-
the number of remaining installments
-
the installment interval
-
the fixed installment day
-
-
the prepaid check or cash amount
-
credit card information, such as:
-
the pay type
-
the credit card number
-
the credit card's expiration date
-
the authorization number
-
the authorization date
-
Rejected deposit options: If the invoice payment method is associated with a rejected deposit amount, you can perform the following updates through order inquiry:
-
resubmit the rejected deposit
-
write off the remaining amount to deposit for the invoice or write off a specified amount
-
delete the rejected deposit
Deposit history: You can also review invoice deposit attempts and responses for each invoice payment method in order inquiry. Deposit history includes whether the invoice was associated with a pay plan, the deposit amount, and the response code received from the deposit service.
Order payment history: The system records messages describing invoice activity associated with the order payment method or invoice payment method, such as:
-
deposits made
-
invoices netted against each other
-
changes made in order inquiry
-
when a pay type is deactivated
-
when you add, change, or delete the pay plan associated with the payment type on the order
Returns
Purpose: When you perform a return against an order containing a payment plan, the system does not credit a customer's credit card until a deposit amount equal to or greater than the credit amount has been processed. This check ensures that the customer does not receive a credit for the return before paying for the shipment.
For deferred payment plans, the system processes the credit invoice after the debit invoice has been deposited.
For installment payment plans, the system processes the credit invoice once the debit invoice amount deposited is equal to or greater than the credit invoice amount.
Netting Credits
You can net credit invoices against debit invoices before processing the deposit on a pay plan order. The Net Credit Card Credits for Deferred and Installment Billing (F55) system control value controls whether you net credits.
If you net credits:
-
For deferred payment plans, the system subtracts the credit invoice amount from the debit invoice amount and sends only the net amount to the service bureau for deposit.
-
For installment payment plans, the system subtracts the credit invoice amount from the debit invoice amount. The system then divides the remaining amount to deposit for the debit invoice by the number of remaining installments to determine the amount due for each remaining installment.
If you do not net credits, each credit deposit is processed separately from the related debit deposit.
See Processing Auto Deposits (SDEP) for more information on netting credits and examples.
Deposit release date: A credit invoice uses the deposit release date from the original (debit) invoice as long as that date is not earlier than the current date. If the deposit release date of the original invoice is earlier than the current date, the credit invoice uses the current date. This date assignment ensures that the customer is not credited until the deposit is processed; but if the customer has been billed, the credit will be released immediately.
Reporting
Related reports: The following reports may be useful in reviewing pay plan activity and status:
-
Sales Journal by Pay Type (fast path = PSJP): breaks out totals billed by date, including deferred, installment, and regular (non-pay plan) orders for each pay type
-
Deposit History Summary Report (fast path = PDHS): breaks out totals deposited by date, including deferred, installment, and regular (non-pay plan) orders
-
Credit Card Deposit Schedule (fast path = PCCD): lists the pay plan totals scheduled for deposit for a range of dates
-
Pending Payment Plan Deposits Report (fast path = PPPD): lists pending pay plan orders for a range of invoice dates
-
Deposit History Detail Report (fast path = PDHD): lists deposits processed during a specific date range. Within this date range, you can select to include only deposits for a specific authorization service, pay type, and status.
Additionally, the Submit Auto Deposits menu option produces the following reports:
-
Unconfirmed Deposits Listing Report: lists each deposit that was not confirmed and processed, breaking out totals by deferred, installment, and regular (non-pay plan) invoices
-
Auto Deposit Confirmation Report: breaks out totals sent and confirmed by deferred, installment, and regular (non-pay plan) orders for each pay type
More Information
Related to pay plans:
| See | For information on... |
|---|---|
|
Setting up order hold reason codes related to pay plans |
|
|
The screens you can use to review financial information on an order related to pay plans or to make changes to pay plan information in order inquiry |
|
|
The changes you can make in order maintenance related to pay plans |
|
|
Pay plan information on the Sales Journal by Pay Type |
|
|
System control values related to pay plans |
|
|
Secured features related to pay plans |
|
|
Assigning a pay plan to a source code |
|
|
Restricting an item from pay plans |
|
|
Entering orders for pay plans |
| See | For information on... |
|---|---|
|
billing updates |
|
|
order updates |
|
|
authorization and deposit services |
|
|
setup related to pay plans |
|
|
setting up the pay plans themselves |
|
|
processing deposits, handling rejected deposits, and reports related to pay plans |
Deferred/Installment Billing Setup
Purpose: Before you can used deferred or installment billing pay plans in your company, you must perform the necessary setup. Information requiring creation and setup includes:
-
system control values
-
secured features
-
authorization service settings, including response codes and currency codes
-
order hold reason codes
-
source codes that point to specific pay plans
-
items that would be exempt from pay plans
Set up pay plans: Additionally, you must set up the pay plans themselves using the Work with Flexible Payment Option Screen.
EXC flexible payment option: The system delivers the EXC Net Billing for Exchanges flexible payment option in the Working with Flexible Payment Options (WFPO) menu option to use during Credit Card Net Exchange Billing (the Use CC Net Exchange Billing (M23) system control value is selected). You cannot change or delete this flexible payment option and you cannot use this flexible payment option for deferred/installment billing. See Credit Card Net Exchange Billing for processing details.
In this topic:
System Control Values
| System Control Value | Description |
|---|---|
|
Select this field to be able to apply pay plans to orders. If this field is unselected, you will not be able to apply pay plans in order entry or order maintenance. |
|
|
Enter the number of times the same credit card number can be applied against a pay plan order before being evaluated for PV hold. This system control value works together with the Number of Days Flexible Payment Option is Used (F53) field, below. |
|
|
Enter the number of days the system should use for evaluating a credit card against the Number of Times Flexible Payment Option is Used (F52) field, above. If the same credit card number appears on orders more than the specified number of times within this number of days, the order goes on PV hold. Example: You set the Number of Times Flexible Payment Option is Used (F52) field to 5, and the Number of Days Flexible Payment Option is Used (F53) field to 14. If the same credit card number appears on pay plan orders more than 5 times in 14 days, the sixth and subsequent orders for the credit card go on PV hold. |
|
|
Dollar Threshold for Sold To Customer Orders with Flexible Payments (F54) |
Enter the total dollar amount a customer can have in pay plan orders before the system puts new orders on $P hold. Example: You set this field to 500.00. If a customer has 3 pay plan orders for a total of $450.00, and you take a new pay plan order for $75.00, the new order goes on $P hold. |
Note:
You must also create the Order Hold Reason Codes.
Each of these fields is available at the Edit Deferred/Installment Billing screen.
Secured Features
| Secured Feature | Description |
|---|---|
|
Controls the ability to select a pay plan other than the primary, system-selected plan in order entry |
|
|
Controls the ability to change information on an invoice once the order has been billed but before the invoice amount is fully deposited. The Change Invoice Pay Method Screen allows you to change the deposit release date, credit card information, the number of remaining installments; apply a cash payment; or writeoff, resubmit, or delete the deposit. This screen is available in order inquiry and Submit Rejected Deposits. |
Authorization Service Settings
When you are setting up an authorization service that supports deferred/installment billing, please note the following additional required settings:
-
Industry code: enter your DBA number
-
Deferred merchant ID
-
Installment merchant ID
-
Exclude from FPO: unselected
-
Pay type cross reference Paytypes at the Work with Authorization Services Screen): Create a cross-reference for each pay type code you will allow on pay plan orders, using the vendor pay code information supplied by the authorization service.
-
Currency cross reference (Currency at the Work with Authorization Services Screen): Create a cross-reference for each currency code you will use on pay plan orders, using the vendor currency code information supplied by the authorization service.
-
Vendor responses (Responses at the Work with Authorization Services Screen): Optionally, you can select the Force deposit for FPO field.
You can also set up merchant ID overrides by entity.
Pay types: Each pay type eligible for deferred or installment billing should have the authorization service set up as its authorization and deposit service.
More information: See Working with Currency (WCUR) for more information on setting up pay types or currency codes.
Order Hold Reason Codes
The order hold reason codes you should set up in Establishing Order Hold Reason Codes (WOHR) as part of credit checking pay plan orders are described in this table:
| Hold Reason Code | Used When... |
|---|---|
|
P$ |
You enter an order that makes the sold to customer's total undeposited pay plan orders exceeds the amount specified in the Dollar Threshold for Sold To Customer Orders with Flexible Payments (F54) system control value; see System Control Values for an example. |
|
PV |
You enter an order that makes the sold to customer's total pay plan orders exceed the limit specified in the Number of Times Flexible Payment Option is Used (F52) system control value, for the period specified in the Number of Days Flexible Payment Option is Used (F53) system control value; see System Control Values for an example. |
|
SB |
Any open orders for the same sold to customer are put on hold because a deposit for this customer was rejected at the Auto Deposit Screen. |
|
CB |
Any open orders for the same credit card number are put on hold because a deposit for this credit card number was rejected at the Auto Deposit Screen. |
Additional and Recommended Setup
Optionally, you can set up the fields described below for use in deferred or installment pay plans.
Source code: You can use the following fields to control how pay plans apply in order entry if this source code is on the order header:
-
Flex pay code: If you enter a pay plan code, it gives the pay plan priority in the evaluation hierarchy the system uses when selecting the plans that apply to an order.
-
Exclude FPO: If you select this field, orders for this source code are excluded from pay plans.
See Working with Source Codes (WSRC) for more information on setting up source codes.
Item: Select the Exclude FPO field to exclude any order containing the item from pay plans.
See Performing Initial Item Entry (MITM) for more information on setting up items.
Consolidate invoice: Selecting the Consolidated Invoice (B49) system control value if you use deferred or installment billing will simplify pay plan management considerably by limiting the number of invoices for an order.
Note:
In Order Management System 21.0 or higher, you cannot select the Consolidated Invoice system control value if it is not already selected. If the system control value is currently selected (set to Y) and you deselect it (change it to N or blank), you cannot then change it back to selected. The option to consolidate invoices will be removed at a later date.
Pay plan settings: Using the following settings for each pay plan you create will simplify pay plan management:
-
Auto apply: Set this field alike for all pay plans that might apply to an order to simplify the pay plan selection hierarchy in order entry.
-
Ship complete: Select this field to simplify pay plan management by limiting the number of invoices for an order.
See Working with Flexible Payment Options (WFPO).
Pay type setting for CyberSource: Use the Notify of installment setting for the payment method to control whether to send a commerceIndicator set to install in the subsequent authorization and deposit request to CyberSource for an order using a deferred or installment pay plan, or to have the information passed in the ccAuthService element similar to other subsequent authorizations, such as a split shipment.
For more information: See Working with Pay Types (WPAY) for more information on setting up pay types, and see CyberSource Point-to-Point Integration, including Subsequent Authorization Requests to CyberSource, for more information on the tags passed to CyberSource in the authorization and deposit request when an order uses deferred or installment billing.
Important:
In order to determine how to set this flag if you offer deferred or installment billing and use CyberSource, you need to confirm the information required by the end processor for deferred or installment payment plans for each payment type.
Credit Card Net Exchange Billing
Credit card net exchange billing allows the system to hold the credit invoice for a return to net it against the debit invoice for the associated exchange in order to reduce the number of transactions that occur for an exchange. The system uses the automatically created EXC Net Billing for Exchanges deferred payment option to determine how long to delay billing the customer’s credit card, based on the invoice date and the # of days for deferral defined for the EXC payment option.
Examples of net exchange billing: The remaining amount after the system performs credit card netting determines whether the system charges or credits the customer’s credit card.
| Type of Exchange | Example |
|---|---|
|
Even exchange |
Credit invoice for returned item = $50.00 Debit invoice for exchange item = $50.00 During deposits, the system nets the credit invoice containing the returned item against the debit invoice containing the exchange item to determine the remaining amount to deposit: 50.00 debit - 50.00 credit = 0.00 balance The system does not charge or credit the customer’s credit card. See CC Net Example: Even Exchange for more details. |
|
Uneven exchange for less expensive item |
Credit invoice for returned item = $100.00 Debit invoice for exchange item = $60.00 During deposits, the system nets the credit invoice containing the returned item against the debit invoice containing the exchange item to determine the remaining amount to deposit: 100.00 credit - 60.00 debit = 40.00 credit The system credits the customer’s credit card $40.00. See CC Net Example: Uneven Exchange for Less Expensive Item for more details. |
|
Uneven exchange for more expensive item |
Credit invoice for returned item = $100.00 Debit invoice for exchange item = $140.00 During deposits, the system nets the credit invoice containing the returned item against the debit invoice containing the exchange item to determine the remaining amount to deposit: 140.00 debit - 100.00 credit = 40.00 debit The system charges the customer’s credit card $40.00. See CC Net Example: Uneven Exchange for More Expensive Item for more details. |
Eligible orders: An order is eligible for net exchange billing if:
-
the Use CC Net Exchange Billing (M23) system control value is selected, and
-
the Hold Days for CC Netting (M24) is set to a number greater than 0, and
-
the order contains a credit card pay type, and
-
a deferred or installment pay plan has not already been assigned to the credit card pay type on the order (see Deferred/Installment Billing Overview).
Accepting an exchange transaction on an order eligible for net exchange billing: When you accept an exchange transaction on an order eligible for net exchange billing, the system:
-
updates the ODT Seq # field in the RA Exchange Item table with the order detail sequence number of the exchange item added to the order in order to link the exchange item to the associated returned item.
-
creates a manual authorization for the return amount, using the authorization code defined in the Default Auth Code for CC Netting (M25) system control value. The expiration date for the manual authorization is based on the Reauthorization days defined for the credit card pay type.
-
places the associated refund on hold and updates the Hold until date based on the # of days for deferral defined for the EXC deferred payment option. The system holds the refund for this number of days to allow time for the system to net the credit invoice containing the return item against the debit invoice containing the exchange item.
Billing an exchange transaction flagged for net exchange billing: When the exchange transaction is processed through billing, the system:
-
creates the credit invoice and assigns the EXC deferred payment option to the invoice. The system considers a credit invoice pending net exchange billing if the Invoice Payment Method record contains the EXC deferred payment option code in the FPO Payment Code and the credit invoice has not yet been deposited (the Deposit created date for the Invoice Payment Method record is blank).
-
updates the Deposit Release Date for the Invoice Payment Method record for the credit invoice with the calculated release date using the current date + the # of days for deferral defined for the EXC payment option. The deposit release date indicates when the deposit is eligible for processing; the system will not process the credit invoice until its deposit release date has been reached.
Reviewing the order in Order Inquiry: When reviewing orders flagged for net exchange billing:
-
EXC displays under the Line # field on the Order Inquiry Detail Screen for the order detail line that contains the return item to indicate the returned item is associated with an exchange item. Note: The system identifies the order detail line that contains the exchange item by the associated Order Line History record that contains the exchange reason code. You can review order line history on the Display Order Line History Screen.
-
the Net Bill field on the Display Invoices Screen for the credit invoice displays an asterisk, indicating the credit invoice is currently pending for net exchange billing. The system considers a credit invoice pending for credit card net exchange billing if the Invoice Payment Method record contains the EXC deferred payment option code in the IPM FPO Payment Code and the credit invoice has not yet been deposited (the IPM Deposit created date is blank).
Reviewing the refund: When reviewing refunds flagged for net exchange billing:
-
the Net field on the Work with Refunds Screen and Work with Refunds By Order# Screen displays an asterisk for a refund that is pending net exchange billing.
-
the text *NET BILLING displays next to the Amount field on the Change Refund Screen and Display Refund screen.
-
the system prevents you from changing the pay type of the refund to another pay type (the Pay type field on the Change Refund screen is display-only).
-
the Refund Due List by Type and the Refund Due List by Order # reports display an asterisk after the amount if the refund has been flagged for net exchange billing.
Generating a pick for the exchange item: During pick slip generation for the exchange item, the system applies the manual authorization to the shippable amount and performs batch authorization for any remaining balance due.
Shipping and billing the exchange item: When the shipment for the exchange item is processed through billing, the system:
-
creates the debit invoice for the exchange item and assigns the EXC deferred payment option to the invoice.
-
updates the Invoice Payment Method record for the debit invoice:
-
the IPM Auth # contains the authorization code defined in the Default Auth Code for CC Netting (M25) system control value.
-
the IPM Auth Date and IPM Deposit Release Date contain the current date.
-
-
updates the IPM Deposit Release Date for the credit invoice flagged for net exchange billing to the current date, releasing the credit invoice for netting.
-
processes the refund, even if the Hold until date for the refund has not been reached. However, the system does not print or email the credit card credit acknowledgment for the refund until the next time you run process refunds.
-
updates the Pay Plan Code field for the credit card pay type on the Display Order Pay Type Screen (2 of 2) with the EXC deferred flexible payment option.
Processing deposits: When you process deposits, the system nets the credit invoice containing the return item against the debit invoice containing the exchange item.
-
If the net difference is a credit, the system sends the credit invoice to the service bureau for settlement in order to refund the customer's credit card the net amount.
-
If the net difference is a debit, the system sends the debit invoice to the service bureau for settlement in order to charge the customer's credit card the net amount.
-
If the net difference is zero, the system does not send any invoice amount to the service bureau for settlement. No amount is applied to the customer's credit card.
Processing refunds: When you process refunds, the system defers the printing and emailing of credit card credit acknowledgments associated with refunds flagged for net exchange billing until the system nets the credit invoice containing the return item against the debit invoice containing the exchange item.
Once netting is performed, the system prints and emails credit card credit acknowledgments for refunds flagged for net exchange billing the next time you run process refunds. In addition, the Credit Card Credit Register displays an asterisk after the refund amount if the refund is flagged for net exchange billing.
The Display Refunds for Order Screen displays the amount of the refund that was processed.
-
If the net difference is a debit, the refund amount updates to .00.
-
If the net difference is a credit, the refund amount updates to the net credit amount.
-
If the net difference is zero, the refund amount updates to .00.
Reviewing order transaction history: The system creates the following Order Transaction History records during the net exchange process to help you understand the updates that have taken place. You can view these messages on the Display Order History Screen.
When the exchange transaction is accepted and processed through billing, the system creates records similar to the following:
| Type | Transaction Note | Amt | User |
|---|---|---|---|
|
RTN AUTH |
RA Credit pending processing |
100.00 |
TBROWN |
|
AUTH |
MANUAL AUTH# DETECTED - CCNET |
100.00 |
AUTH |
|
SHIPMENT |
CREDIT BILLED ON INVOICE# 0001014 |
100.00- |
TBROWN |
When you ship and bill the exchange item, the system creates records similar to the following:
| Type | Transaction Note | Amt | User |
|---|---|---|---|
|
REFUND |
CC Crd for inv# 1014 processed-deferred |
100.00 |
your default user |
|
SHIPMENT |
Pick# 0003977 Billed on Invoice# 0001015 |
60.00 |
TBROWN |
When you process deposits, the system creates a record similar to the following:
| Type | Transaction Note | Amt | User |
|---|---|---|---|
|
REFUND |
Refund amount netted to -40.00 |
|
TBROWN |
Reviewing order payment history: The system creates the following Order Payment History records during the net exchange process to help you understand the updates that have taken place. You can view these messages on the Display Order Payment History Screen.
When the exchange transaction is accepted, the system creates records similar to the following:
| Type | Note | Inv | User |
|---|---|---|---|
|
B |
Inv# 1014 created for $100.00- |
1014 |
TBROWN |
|
B |
with a deposit release date of 20815. |
1014 |
TBROWN |
When you ship and bill the exchange item, the system creates records similar to the following:
| Type | Note | Inv | User |
|---|---|---|---|
|
B |
Inv# 1015 created for $60.00 |
1015 |
TBROWN |
|
B |
with a deposit release date of 12915. |
1015 |
TBROWN |
When you process deposits, the system creates records similar to the following:
| Type | Note | Inv | User |
|---|---|---|---|
|
N |
Pend Dep of $60.00 on INV1015 netted |
1015 |
TBROWN |
|
N |
against CRD1014 reducing to $40.00-. |
1015 |
TBROWN |
|
N |
Pend Dep of $60.00 on INV1015 netted |
1014 |
TBROWN |
|
N |
against CRD1014 reducing to $40.00-. |
1014 |
TBROWN |
|
D |
Deposit confirmed $ 40.00-. |
1014 |
TBROWN |
Net exchange billing considerations:
-
An order is not eligible for net exchange billing if:
-
you return an item and then manually add an exchange item to the order.
-
the exchange item is soldout.
-
In these situations, the system does not link the exchange item with the return item and processes the return and exchange separately.
-
If you cancel the exchange item, the system does not perform net exchange billing and credits the customer’s credit card for the amount of the return.
-
If the manual authorization created for the return amount expires before the exchange item is shipped and billed, the system performs batch authorization during pick slip generation and continues to hold the credit invoice and refund in order to perform net exchange billing during deposits.
-
Regardless of whether you consolidate invoices, the system flags all credit and debit invoices associated with the return and exchange transaction for net exchange billing. See the following for examples:
-
If the order contains more than one credit card, the system includes both credit cards in the net exchange process.
-
If an item on the order is shipped and billed on the same day as the exchange item, the system includes the amount of the additional item in the net exchange process. See CC Net Example: Even Exchange Plus Additional Item for an example.
In this topic:
Credit Card Net Exchange Setup
Before you can use credit card net exchange billing, you must complete the required setup. Information requiring setup includes:
System Control Values for Credit Card Net Exchange Billing
| System Control Value | Description |
|---|---|
|
Use CC Net Exchange Billing (M23) |
Select this system control value if you want the system to net credit invoices with debit invoices before a deposit is sent to the service bureau for an invoice associated with an exchange. |
|
Hold Days for CC Netting (M24) |
Enter the number of days the system holds debit and credit invoices for credit card net exchange billing. The system updates the # of days for deferral field for the EXC Net Billing for Exchanges flexible payment option record with this number. Any existing refunds and Invoice Payment Method records are not updated with the new hold days. Note: Net exchange billing does not work unless this system control value is set to a number greater than 0. |
|
Default Auth Code for CC Netting (M25) |
Enter the authorization code the system uses when creating a manual authorization to allow for the netting of invoices during the credit card net exchange process. |
|
Deselect this system control value if the Use CC Net Exchange Billing (M23) system control value is selected. You cannot use preload deposit processing if you are using Credit Card Net Exchange Billing. |
EXC Net Billing for Exchanges Flexible Payment Option
The system creates the EXC Net Billing for Exchanges flexible payment option automatically if you select the Use CC Net Exchange Billing (M23) system control value for use during the Credit Card Net Exchange process. You cannot change or delete this flexible payment option or use this flexible payment option for deferred/installment billing. The default settings for the EXC flexible payment option are described below; see Working with Flexible Payment Options (WFPO) for more information on flexible payment options.
This flexible payment option is deleted automatically if you deselect the Use CC Net Exchange Billing (M23) system control value.
| Field | Description |
|---|---|
|
Payment Code |
Delivered as EXC. |
|
Description |
Delivered as Net Billing for Exchanges. |
|
Type |
Delivered as Deferred, indicating the system defers depositing the amount the customer owes for an order shipment for a specified period of time. |
|
Start |
Does not apply to net exchange billing. |
|
End |
Does not apply to net exchange billing. |
|
Expiration Date |
Does not apply to net exchange billing. |
|
View in OE/OM |
Delivered as unselected, since the EXC Net Billing for Exchanges flexible payment option is not an available selection during deferred/installment billing. |
|
Restrict to entity |
Delivered as 0, indicating the flexible payment option is not restricted to a specific entity. |
|
Auth full amount |
Delivered as unselected since this field is not used during the credit card net exchange process. |
|
Merchant ID Message |
Delivered blank since this field is not used during the credit card net exchange process. |
|
Ship Complete |
Delivered as unselected since this field is not used during the credit card net exchange process. |
|
Display Summary |
Delivered as unselected since this field is not used during the credit card net exchange process. |
|
Auto apply |
Delivered as No auto apply since this field is not used during the credit card net exchange process. |
|
Validate CC ext dt |
Delivered as unselected since this field is not used during the credit card net exchange process. |
|
Pick Message |
Delivered blank since this field is not used during the credit card net exchange process. |
|
Deferred Values |
|
|
# of days for deferral |
Delivered as 0. The system updates this field with the number of days you enter in the Hold Days for CC Netting (M24) system control value. This is the number of days the system holds debit and credit invoices for credit card net exchange billing. The system also uses this number to determine the manual authorization date during Credit Card Net Exchange Billing. |
|
Based On |
Delivered as Invoice Dt, indicating the system uses the invoice (billing) date and # of days for deferral field to calculate the deposit date. |
|
Fixed deferral date |
Delivered as 0 since this field is not used during the credit card net exchange process. |
|
Installment Values |
The # Of Installments, Interval, and Fixed Installment day fields are set to 0 for the EXC flexible payment option. |
|
Qualification Values |
The Offer and Item fields are blank and the Minimum Amt and Pay Type fields are set to 0 for the EXC flexible payment option. |
Credit Card Net Exchange Edit in Work with Pay Types (WPAY)
If the Use CC Net Exchange Billing (M23) system control value is selected, you cannot define an Alternate refund type or Alternate refund category for a Credit Card Pay type category pay type; the system displays an error message: Alt refund type/category not allowed with CC Net Exchange Billing.
Also, if an alternate refund type or alternate refund category is defined for an existing pay type, the system will ignore the alternate refund values and instead perform credit card net exchange billing for eligible orders.
Credit Card Net Exchange Examples
-
CC Net Example: Even Exchange
-
CC Net Example: Uneven Exchange for Less Expensive Item
-
CC Net Example: Uneven Exchange for Less Expensive Item Plus Ship Alone Item; Invoices Consolidated
-
CC Net Example: Uneven Exchange for More Expensive Item
- CC Net Example: Uneven Exchange for More Expensive Item Plus Ship Alone Item, Invoices Not Consolidated
-
CC Net Example: Uneven Exchange for More Expensive Item Plus Ship Alone Item; Invoices Consolidated
CC Net Example: Even Exchange
The system performs the following steps during credit card net exchange processing when the returned item is the same price as the exchange item. In this example, no other items besides the exchange item are added to the order.
| # | Step |
|---|---|
|
1. |
The customer places an order for an item for $100.00. The item is picked, shipped, and billed. The order is processed through deposits. |
|
2. |
The customer returns the item for $100.00 to exchange it for another item for the same price ($100.00). The exchange item is in-stock and reserved on the order. The customer also adds another item for $30.00 to the order. |
|
3 |
When the return and exchange transaction is accepted and billed, the system:
|
|
4 |
You run pick slip generation for the exchange item. |
|
5 |
You ship and bill the exchange item and additional item. The system:
|
|
6 |
You process deposits. The system:
|
CC Net Example: Even Exchange Plus Additional Item
The system performs the following steps during credit card net exchange processing when the returned item is the same price as the exchange item. In this example, an additional item for $30.00 is added to the order.
| # | Step |
|---|---|
|
1. |
The customer places an order for an item for $100.00. The item is picked, shipped, and billed. The order is processed through deposits. |
|
2. |
The customer returns the item for $100.00 to exchange it for another item for the same price ($100.00). The exchange item is in-stock and reserved on the order. The customer also adds another item for $30.00 to the order. |
|
3 |
When the return and exchange transaction is accepted and billed, the system:
|
|
4 |
You run pick slip generation for the exchange item and additional item. The system:
|
|
5 |
You ship and bill the exchange item and additional item. The system:
|
|
6 |
You process deposits. The system:
|
CC Net Example: Uneven Exchange for Less Expensive Item
The system performs the following steps during credit card net exchange processing when the exchange item is less expensive than the return item. In this example, no other items besides the exchange item are added to the order.
| # | Step |
|---|---|
|
1. |
The customer places an order for an item for $100.00. The item is picked, shipped, and billed. The order is processed through deposits. |
|
2. |
The customer returns the item for $100.00 to exchange it for a less expensive item ($60.00). |
|
3 |
When the return and exchange transaction is accepted and billed, the system
|
|
4 |
You run pick slip generation for the exchange item |
|
5 |
You ship and bill the exchange item and additional item. The system:
|
|
6 |
You process deposits. The system:
|
CC Net Example: Uneven Exchange for Less Expensive Item Plus Ship Alone Item; Invoices Not Consolidated
The system performs the following steps during credit card net exchange processing when the exchange item is less expensive than the return item. In this example, the customer also orders an additional ship alone item for $30.00. The Consolidated Invoice (B49) system control value is unselected.
| # | Step |
|---|---|
|
1. |
The customer places an order for an item for $100.00. The item is picked, shipped, and billed. The order is processed through deposits. |
|
2. |
The customer returns the item for $100.00 to exchange it for a less expensive item ($60.00). The customer also adds a ship alone item for $30.00 to the order. |
|
3 |
When the return and exchange transaction is accepted and billed, the system
|
|
4 |
You run pick slip generation for the exchange item ($60.00) and ship alone item ($30.00). The system generates a separate pick slip for each item. |
|
5 |
You ship and bill the exchange item and ship alone item. The system:
|
|
6 |
You process deposits. The system:
|
CC Net Example: Uneven Exchange for Less Expensive Item Plus Ship Alone Item; Invoices Consolidated
The system performs the following steps during credit card net exchange processing when the exchange item is less expensive than the return item. In this example, the customer also orders an additional ship alone item for $30.00. The Consolidated Invoice (B49) system control value is selected.
Important:
In Order Management System 21.0 or higher, you cannot select the Consolidated Invoice system control value if it is not already selected. If the system control value is currently selected (set to Y) and you deselect it (change it to N or blank), you cannot then change it back to selected. The option to consolidate invoices will be removed at a later date.| # | Step |
|---|---|
|
1. |
The customer places an order for an item for $100.00. The item is picked, shipped, and billed. The order is processed through deposits. |
|
2. |
The customer returns the item for $100.00 to exchange it for a less expensive item ($60.00). The customer also adds a ship alone item for $30.00 to the order. |
|
3 |
When the return and exchange transaction is accepted and billed, the system
|
|
4 |
You run pick slip generation for the exchange item ($60.00) and ship alone item ($30.00). The system generates a separate pick slip for each item. |
|
5 |
You ship and bill the exchange item and ship alone item. The system:
|
|
6 |
You process deposits. The system:
|
CC Net Example: Uneven Exchange for More Expensive Item
The system performs the following steps during credit card net exchange processing when the exchange item is more expensive than the return item. In this example, no other items besides the exchange item are added to the order.
| # | Step |
|---|---|
|
1. |
The customer places an order for an item for $100.00. The item is picked, shipped, and billed. The order is processed through deposits. |
|
2. |
The customer returns the item for $100.00 to exchange it for a more expensive item ($140.00). |
|
3 |
When the return and exchange transaction is accepted and billed, the system
|
|
4 |
You run pick slip generation for the exchange item. During pick slip generation, the system:
|
|
5 |
You ship and bill the exchange item and ship alone item. The system:
|
|
6 |
You process deposits. The system:
|
CC Net Example: Uneven Exchange for More Expensive Item Plus Ship Alone Item, Invoices Not Consolidated
The system performs the following steps during credit card net exchange processing when the exchange item is more expensive than the return item. In this example, the customer also orders an additional ship alone item for $30.00. The Consolidated Invoice (B49) system control value is unselected.
| # | Step |
|---|---|
|
1. |
The customer places an order for an item for $100.00. The item is picked, shipped, and billed. The order is processed through deposits. |
|
2. |
The customer returns the item for $100.00 to exchange it for a more expensive item ($140.00) and also adds a ship alone item for $30.00. |
|
3 |
When the return and exchange transaction is accepted and billed, the system
|
|
4 |
You run pick slip generation for the exchange item. During pick slip generation, the system:
|
|
5 |
You ship and bill the exchange item and ship alone item. The system:
|
|
6 |
You process deposits. The system:
|
CC Net Example: Uneven Exchange for More Expensive Item Plus Ship Alone Item; Invoices Consolidated
The system performs the following steps during credit card net exchange processing when the exchange item is more expensive than the return item. In this example, the customer also orders an additional ship alone item for $30.00. The Consolidated Invoice (B49) system control value is selected.
Important:
In Order Management System 21.0 or higher, you cannot select the Consolidated Invoice system control value if it is not already selected. If the system control value is currently selected (set to Y) and you deselect it (change it to N or blank), you cannot then change it back to selected. The option to consolidate invoices will be removed at a later date.| # | Step |
|---|---|
|
1. |
The customer places an order for an item for $100.00. The item is picked, shipped, and billed. The order is processed through deposits. |
|
2. |
The customer returns the item for $100.00 to exchange it for a more expensive item ($140.00) and also adds a ship alone item for $30.00. |
|
3 |
When the return and exchange transaction is accepted and billed, the system
|
|
4 |
You run pick slip generation for the exchange item. During pick slip generation, the system:
|
|
5 |
You ship and bill the exchange item and ship alone item. The system:
|
|
6 |
You process deposits. The system:
|
Processing Deposits
Topics in this part:
-
Processing Auto Deposits (SDEP) describes the Submit Auto Deposits menu option.
-
Resubmitting Rejected Deposits (SRDP) describes how to review and work with rejected or unconfirmed deposits.
-
Printing the Deposit History Summary (PDHS) describes how to print a report summarizing credit card deposits by date.
-
Printing the Credit Card Deposit Schedule (PCCD) describes how to print a report listing the your projected deposits for deferred or installment billing pay plans.
-
Printing the Pending Payment Plan Deposits Report (PPPD) describes how to print a report listing future deferred or installment deposits by order and invoice number.
-
Printing the Deposit History Detail Report (PDHD) describes how to print a report listing deposits processed during a specific date range. Within this date range, you can select to include only deposits for a specific authorization service, pay type, and status.
E-Commerce Interface
Topics in this part:
-
E-Commerce Catalog Requests describes how the system processes a catalog request received from the web storefront.
-
E-Commerce Item Availability Processing describes how the system extracts item availability information for download to the web storefront.
For more information see the Web Services Guide on https://support.oracle.com My Oracle Support (ID 2149144.1).
-
Working with Batch Order Maintenance Transactions (WBOM) describes how the system processes a cancellation request from the web storefront and how to work with order cancel request errors.
-
E-Commerce Setup describes the setup required in Order Management System for the e-commerce interface, and specifies additional documentation detailing setup requirements for communicating and for the web storefront.
-
Downloading E-Commerce Static Tables (ESTF) describes the process you use to extract infrequently changed information to staging files for subsequent download to the web storefront.
-
Downloading E-Commerce Offer Files (EOFR) describes the process you use to extract information related to items, source codes and offers to staging files for subsequent download to the web storefront.
-
Working with E-Mail Notification Templates (WEMT) describes how to set up templates for the various email notifications you can send to customers.
-
Sending Internet Order Ship Confirmation (ESCF) describes the menu option you use to send email confirmations for shipment of orders received through the web storefront.
Workflow Management
Topics in this part: The following topics describe the functions available for workflow management.
-
Workflow Management Overview and Setup provides an overview on workflow management and required setup.
-
Working with Tickler User Groups (WTUG) explains how to create and work with tickler user groups.
-
Working with Tickler Category (WTCT) explains how to create and work with tickler categories.
-
Working with Tickler Resolution Reasons (WTRR) explains how to create and work with tickler resolution reasons.
-
Working with Tickler Events (WTEV) explains how to define tickler event settings at the event level and event rule level and create, change, delete, and define procedures for event rules.
-
Working with Tickler Users/User Groups (WTIC) allows workflow users to review and work with ticklers in the user’s or user group’s tickler work queue.
-
Workflow Management (WWFM) allows workflow supervisors to review and work with ticklers in a tickler work queue.
-
Purging Ticklers (MPTK) allows you to purge resolved ticklers by date range.
Workflow Management Overview and Setup
Workflow management allows you to automate system actions, during which tasks (ticklers) are assigned to a user for action, according to a defined set of procedures, until the issues associated with the ticklers are resolved.
Tickler events are the system actions for which the system may create a workflow task (tickler).
Tickler event rules are the criteria that must be met by the system action for the system to create a tickler for a user to resolve.
Ticklers are tasks automatically created by the system and assigned to a user when a system action meets the criteria defined for a tickler event rule. For each tickler, you can define the procedures, or instructions, the user should follow to complete the task. A tickler can also be created manually.
Tickler procedures are the instructions a user follows to complete the tickler task.
Workflow Management Illustration

Example: This flowchart provides an example of the workflow process.

With workflow management:
-
the system automatically creates ticklers when a task must be performed and resolved.
-
the system assigns tasks to a specific user or group of users as soon as a tickler is created ensuring the tasks are not misplaced, stalled, or duplicated. Tickler assignment allows only authorized users access to the tickler and the associated data.
-
supervisors are notified if a tickler remains unresolved for a specified number of days to ensure the tasks are resolved in a timely manner. Supervisors can reassign ticklers to the appropriate resource.
-
the procedures to resolve a task are formally documented to ensure users are following the instructions exactly and reducing the cost of training staff.
-
the most important ticklers are worked on first by a specified priority so users don’t waste time choosing which tickler to work on or putting off difficult tasks.
-
a history of the activity performed against the tickler is stored for easy tracking and review of what was done and when.
In this topic:
System Delivered Tickler Events
This table describes the 11 system delivered events that can create ticklers, based on the system action and the criteria defined for the event rules. You use the Working with Tickler Events (WTEV) menu option to set up each tickler event and define criteria for each event rule.
Note:
Each tickler event is delivered as inactive.
| Tickler Event... | creates a tickler when the system... | and one or more of the following criteria is met... |
|---|---|---|
|
BO backorders |
places an item on backorder |
An item is backordered, regardless of any other criteria. The backordered item is initially backordered in order entry/maintenance and not by some other program. The customer’s life-to-date order dollars is less than, equal to, or greater than a specified life-to-date order dollars. The customer class defined for the sold to customer matches a specified customer class. The item/SKU on backorder matches a specified item/SKU. |
|
|
|
The item status of the backordered item matches a specified item status. The item class of the backordered item matches a specified item class. The ship via on the backordered order matches a specified ship via. The ship via priority for the ship via on the backordered order matches a specified ship via priority. |
|
CO cancelled orders |
cancels an item |
An item is cancelled, regardless of any other criteria. The item is cancelled by a batch process instead of interactively. The customer’s life-to-date order dollars is less than, equal to, or greater than a specified life-to-date order dollars. The customer class defined for the sold to customer matches a specified customer class. The cancelled item/SKU matches a specified item/SKU. The item status of the cancelled item matches a specified item status. |
|
|
|
The item class of the cancelled item matches a specified item class. The cancel reason matches a specified cancel reason. The ship via on the cancelled order matches a specified ship via. The ship via priority for the ship via on the cancelled order matches a specified ship via priority. |
|
HO held orders |
places an order, order recipient, or order payment method on hold |
The hold reason (order or pay type) matches a specified hold reason (order or pay type). The pay type on the held order matches a specified pay type. The order total for the held order is less than, equal to, or greater than a specified order total. The ship via on the held order matches a specified ship via. The ship via priority for the ship via on the held order matches a specified ship via priority. |
|
MN manually created |
manually creates a workflow task |
You cannot define criteria for this tickler event. |
|
NO new orders |
updates the status of an order line to open (during order accept) or closed (during the Billing Async) |
The order line status is updated to open or closed. The quantity ordered/shipped for the open/closed order line matches a specified quantity. The item status for the item on the open/closed order line matches a specified item status. The sold to customer on the order is a first time buyer. The item class for the item on the open/closed order line matches a specified item class. The item/SKU on the open/closed order line matches a specified item/SKU. The order type for the order matches a specified order type. |
|
|
|
The country code for the order matches a specified country code. The country code for the order is a country other than the Default Country for Customer Address (B17) system control value. The last order date for the sold to customer is past the current date by a specified number of days. The order total on the order is less than, equal to, or greater than a specified order dollars. The ship via code on the order line or order header matches the ship via code on the event rule. The priority for the ship via code on the order line or order header matches the ship via priority on the event rule. |
|
OO aged open orders |
evaluates aged open orders using the Evaluate Create/Resolve Ticklers periodic function (program name PFR0072) |
The order’s entered date or arrival date is older than the current date by a specified number of days. The ship via on the order matches a specified ship via. The ship via priority for the ship via on the order matches a specified ship via priority. |
|
SD stored value card activation decline |
receives a declined stored value card activation response from the service bureau |
You cannot define criteria for this tickler event. |
|
SO soldout orders |
sells out an item |
The order line is soldout by a batch process and not interactively. The order line is sold out interactively in order entry or order maintenance. The life-to-date order dollars for the sold to customer is less than, equal to, or greater than a specified life-to-date order dollars. The customer class for the sold to customer matches a specified customer class. The soldout item/SKU matches a specified item/SKU. |
|
|
|
The item status for the soldout item matches a specified item status. The item class for the soldout item matches a specified item class. The ship via on the soldout order matches a specified ship via. The ship via priority for the ship via on the soldout order matches a specified ship via priority. |
|
SV stored value card number assignment |
processes an order containing a stored value card item without a number assignment through the Billing Async |
You cannot define criteria for this tickler event. |
|
UP unconfirmed pick tickets |
evaluates unconfirmed pick slips using the Evaluate Create/Resolve Ticklers periodic function (program name PFR0072) |
The pick control date for the unconfirmed pick slip is older than the system date by a specified number of days. The pick category for the unconfirmed pick slip matches a specified pick category. The ship via on the unconfirmed pick slip matches a specified ship via. The ship via priority for the ship via on the unconfirmed pick slip matches a specified ship via priority. |
|
VP voided pick tickets |
voids a pick slip |
The ship via on the voided pick slip matches a specified ship via. The ship via priority for the ship via on the voided pick slip matches a specified ship via priority. The item/SKU on the voided pick slip matches a specified item/SKU. |
|
WF remote workflow |
receives a CWWorkflow XML message from an external system |
The source value in the CWWorkflow XML message matches the value in the Source field for the event rule. |
Defining Tickler Events and Event Rules
To create a tickler, you must define:
-
the tickler events that can create a tickler; see System Delivered Tickler Events.
-
tickler event settings, that define how the system creates ticklers for each event; see Tickler Event Settings.
-
event rule settings, that override the settings defined at the event level and determine how the event rule is processed; see Event Rule Settings.
-
event rule criteria, that define the criteria the system action must meet to create a tickler; see Event Rule Criteria.
-
event rule procedures, that define the instructions a user should follow to work with and resolve a tickler created by the event rule.
You use the Working with Tickler Events (WTEV) menu option to set up the system delivered tickler events and define event rules.
Creating Ticklers
The Create Tickler program determines if the system creates a tickler during certain system actions.
You can also manually create a tickler for the MN (manually created) tickler event; see MN (Manually Created) Event Processing.
Ticker creation logic: This flowchart describes the process the system uses to determine if a tickler is created for a system action.

The Create Tickler program:
-
1.Determines the tickler event to evaluate, based on the system action currently being performed.
See System Delivered Tickler Events for more information on when the system evaluates tickler events.
-
Determines if the tickler event is active.
In order to create a tickler for a tickler event, the Active field defined for the event must be selected.-
If the Active field for the event is selected, the tickler event is active and the system can create a tickler for the event.
-
If the Active field for the event is unselected, the tickler event is not active and the system cannot create a tickler for the event.
-
-
Determines if any event rules for the tickler event are active.
In order to create a tickler for an event rule, the Active field defined for the event rule must be selected.-
If the Active field for an event rule is selected, the event rule is active and the system can create a tickler if the system action meets the rule’s criteria.
-
If the Active field for an event rule is unselected, the event rule is not active and the system cannot create a tickler for the system action.
-
-
Determines if the system action meets the criteria required for any of the event rules to create a tickler.
In order to create a tickler for an event rule, the system action must meet the criteria defined for the event rule. If the system action does not meet the criteria, the system does not create a tickler.-
the system only evaluates event rules whose Active field is selected.
-
the system evaluates the active event rules in processing sequence order, from lowest sequence number to highest. You define the processing sequence number for an event rule in the Processing sequence number field; see Event Rule Processing Sequence.
-
-
Determines if more than one tickler can be created.
The Allow multiple ticklers field for the tickler event must be selected in order to create a tickler for each event rule whose criteria are met by the system action.-
If the Allow multiple ticklers field is unselected, the system creates one tickler for the first event rule, in processing sequence order, whose criteria are met by the system action. The AR, OO, and UP tickler events do not allow multiple ticklers.
-
If the Allow multiple ticklers field is selected, the system creates a separate tickler for each event rule whose criteria are met by the system action.
-
-
The system creates a tickler for the system action.
The system creates a tickler record in the Tickler table in an open status.
-
The system determines if the assigned to user or assigned to tickler group should be notified of the created tickler.
The Notify user/group field defined for the tickler event that created the tickler indicates whether the system sends an email notifying the user or tickler group of the created tickler.-
If the Notify user/group field is selected, the system sends an email to the assign to user or all users associated with the assign to tickler group. The system uses the email address defined for the user in the User Extended table. See Tickler Notification to review a sample email.
-
If the Notify user/group field is unselected, the system does not send an email. The user must review the ticklers assigned to him or his user group at the Work with Tickler Screen (user/group view).
Regardless if the user is notified by email of the newly created tickler, the user can review the ticklers assigned to him and his tickler user group at the Work with Tickler screen; see Working with Ticklers.
-
-
Creates a record in the Tickler History table.
The Tickler History table tracks the work cycle of a tickler; the system creates a tickler history record when a tickler is created, updated, or resolved.You can review tickler history at the Display Tickler History Screen.
-
Creates a record in the Order Transaction History table if the tickler is associated with an order.
For MN ticklers:
MN TICKLER# 000009999 HAS BEEN CREATED
NOTE:SHORT NOTE DEFINED FOR TICKLER
For all other ticklers, where XX is the tickler event code:
XX TICKLER# 000009999 HAS BEEN CREATED
RULE:DESCRIPTION OF RULE ASSOCIATED WITH TICKLER
You can review order transaction history at the Display Order History Screen.
For more information: For more information on the processing that occurs for each tickler event, see:
Why Wasn’t a Tickler Created?
Use the list below as a checklist to determine why the system did not create a tickler.
| A tickler is not created because... | Reason |
|---|---|
|
You did not restart the background jobs after you changed an event or event rule, or created a new event rule. |
The system evaluates new updates only after the background async jobs in the Background Job Control menu option are restarted. |
|
The Active field for the tickler event is unselected. |
The system only evaluates tickler events that are active. See Active Tickler Events and Rules. |
|
The Active field for the event rule is unselected. |
The system only evaluates event rules that are active. See Active Tickler Events and Rules. |
|
The Allow multiple ticklers field for the tickler event is unselected. |
If Allow multiple ticklers is selected, the system creates 1 tickler for the first event rule, in processing sequence order, whose criteria are met by the system action. If the criteria for another event rule is met, the system does not create a tickler. See Allowing Multiple Ticklers. |
|
BO tickler event: the backordered item did not meet the BO event rule criteria. |
|
|
CO tickler event: the cancelled item did not meet the CO event rule criteria. |
|
|
HO tickler event: the held order did not meet the HO event rule criteria. |
|
|
NO tickler event: the open/closed order line did not meet the NO event rule criteria. |
The system evaluates the NO event when an order:
|
|
OO tickler event: the aged open order did not meet the OO event rule criteria. |
|
|
SD tickler event: the stored value card received an approved activation response from the service bureau. |
|
|
SO tickler event: the soldout item did not meet the SO event rule criteria. |
|
|
SV tickler event: the stored value card item was assigned a number. |
|
|
UP tickler event: the unconfirmed pick slip did not meet the UP event rule criteria. |
|
|
VP tickler event: the voided pick slip did not meet the VP event rule criteria. |
|
|
WF tickler event: the remote workflow message did not meet the WF event rule criteria. |
Working with Ticklers
Once a tickler is created, a user can review, work with, and resolve ticklers using the following screens:
-
Work with Tickler Screen (user/group view)
-
Workflow Management Screen (tickler supervisor)
Update All Ticklers Secured Feature
The Update All Ticklers (B09) secured feature controls whether you can update all ticklers, regardless if the tickler is not assigned to you or your tickler groups.
If you have access to this feature, you can update any tickler, regardless if the tickler is not assigned to you or your tickler groups by:
-
selecting Change for a tickler to change it.
-
selecting Delete for a tickler to delete it.
-
selecting In process for a tickler to assign the tickler to yourself.
-
selecting Resolve for a tickler to resolve it.
If you do not have access to this feature, you can update only ticklers assigned to you or your tickler groups. However, you can still release an order associated with the tickler from hold.
User Workflow Management Window
Purpose: The system displays this window when you sign-in to Order Management System if open or in process ticklers exist that are assigned to you or your tickler groups.
You can review, work with, and resolve ticklers assigned to you or your tickler groups using the Working with Tickler Users/User Groups (WTIC) menu option
Customer Workflow Management Window
Purpose: The system displays this window if open or in process ticklers exist that are associated with the customer or order you are reviewing.
How to display this screen:
-
select Change for a customer at the Changing Sold To Customers screens.
-
select Change for a ship-to customer at the Work with Customer Ship Tos Screen.
-
select Change for a customer at the Change Bill-to Customer Screen.
-
advance to the Order Inquiry Header Screen.
-
select a customer for order entry at the Select Customer Sold To For Order Screen.
-
select a customer (CTI user) at the Customer Selection Screen.
-
select an order for return at the Select Orders For Return Authorization Screen.
The window displays once per functional area for each customer you review that has open or in process ticklers.
Example: In standard order inquiry, if you select an order for a customer with open ticklers, the system displays the Customer Workflow Management window; if you then advance to order maintenance for that customer, the system does not display the window again. Back in standard order inquiry, if you select an order for a different customer with open ticklers, the system re-displays the Customer Workflow Management window for the new customer you are reviewing.
| Screen Option | Procedure |
|---|---|
|
Review and work with the ticklers associated with the customer or order |
Select Ticklers to advance to the Work with Ticklers screen. The view of this screen varies, depending on the function you were performing:
|
Tickler Merge/Purge
Customer merge/purge: If you perform customer merge/purge (sold to or bill to), the system adds the ticklers associated with the source customers to the target customer.
Order purge: If you purge orders associated with ticklers, the system also purges the ticklers.
Resolving Ticklers
A tickler is resolved when you:
-
select Resolve for a tickler at the Work with Tickler Screen (user/group view) or Workflow Management Screen.
-
perform an action that automatically resolves the tickler; for example when you release an order from hold, the system automatically resolves HO ticklers associated with the order.
When you resolve a tickler associated with an order, the system creates an order transaction history message indicating the tickler has been resolved.
For MN ticklers:
MN TICKLER# 000009999 HAS BEEN RESOLVED
RES RSN(XXX)BY(USER/GROUP ID)NOTE(SHORT NOTE DEFINED FOR TICKLER)
For all other ticklers, where XX is the tickler event code:
XX TICKLER# 000009999 HAS BEEN RESOLVED
RES RSN(XXX)BY(USER/GROUP ID)RULE(DESCRIPTION OF RULE ASSOCIATED WITH TICKLER)
You can review order transaction history at the Display Order History Screen.
Workflow Management Setup
Purpose: To use workflow management, you must perform the necessary setup. Information requiring creation and setup includes:
System Control Value
| System Control Value | Description |
|---|---|
|
Select this field if you wish to use workflow management. |
Secured Feature
| Secured Feature | Description |
|---|---|
|
Eligible users can update all ticklers, regardless if the tickler is not assigned to him or his tickler user groups. Prohibited users cannot update all ticklers, only those ticklers assigned to him or his tickler user groups. |
|
|
Eligible users can manually create ticklers. Prohibited users cannot manually create ticklers. |
Number Assignment Value
| Number Assignment | Description |
|---|---|
|
Assigns the next available number to a newly created tickler. Note: The system automatically creates this number assignment value when the first tickler is created. |
Menu Options
| Menu Option | Description |
|---|---|
|
Allows you to create, change, and delete tickler user groups. For each tickler event and event rule, you can define the tickler user group the system assigns to a newly created tickler. |
|
|
Allows you to define the e-mail address the system uses when the user is notified of a tickler. Also, allows you to assign a tickler user group to a user. |
|
|
Allows you to create, change, and delete a tickler category. Tickler categories are used to further group ticklers. |
|
|
Allows you to create, change, and delete a tickler resolution reason. The system assigns a tickler resolution reason to a tickler once it is resolved. You can define the tickler resolution reason to use for ticklers associated with a particular event or event rule. |
|
|
Allows you to change the settings for a tickler event, create, change, or delete event rules, and create or modify event rule procedures. Note: You must restart the async jobs in the Background Job Control menu option after you change an event or event rule, or create a new event rule. |
|
|
Allows a user to review and work with ticklers assigned to him or his tickler user groups. |
|
|
Allows a supervisor to review and work with ticklers. |
|
|
Allows you to purge resolved ticklers, based on date. |
Periodic Functions
| Periodic Function | Description |
|---|---|
|
Evaluate Create/Resolve Ticklers (program name PFR0072) |
Evaluates the:
|
Event Rule Settings
For each event rule you define for a tickler event, you can define:
-
whether the event rule is active; see Active Tickler Events and Rules.
-
the tickler user/group assigned to work with ticklers created by this event rule and the supervisor to monitor the ticklers; see Tickler Assignment.
-
if tickler users are notified when a new tickler is created and if the supervisor is notified when a tickler remains unresolved for a certain number of days; see Tickler Notification.
-
the tickler category assigned to ticklers created by this event rule; see Tickler Category.
-
the tickler resolution reason assigned to ticklers created by this event rule; see Tickler Resolution Reason.
-
how the rules are processed; see Event Rule Processing Sequence.
-
the criteria the system action must meet to create a tickler; see Event Rule Criteria.
-
the procedures a user should follow to resolve the tickler; see Event Rule Procedures.
You can define event rule settings at the Create Tickler Event Rule Screen or Change Tickler Event Rule Screen.
Note:
If you create or change a tickler event rule, you must restart the asyncs in the Background Job Control menu option before your updates are applied to new ticklers.
Event Rule Processing Sequence
For each event rule you create, you can define a processing sequence number. In addition, the system assigns a rule sequence number to each event rule, based on the order in which the rules were created (the first rule created is assigned rule sequence number 1, etc.).
The Processing sequence number defined for each event rule indicates the order in which the system evaluates event rules to determine if a tickler is created.
The event rule with the lowest processing sequence number is evaluated first (where 0 is the lowest number); the event rule with the highest processing sequence number is evaluated last.
If all of the event rules have the same processing sequence number, the system evaluates the rules in rule sequence order. The event rule with the lowest rule sequence number is evaluated first; the event rule with the highest rule sequence number is evaluated last.
Note:
If the event rule is not active (the Active field is unselected), the system does not evaluate the event rule and instead skips the rule and evaluates the next event rule, based on processing or rule sequence order.
Remember: Give the most important rule the lowest processing sequence number and the least important rule the highest processing sequence number. This way the system evaluates the rules in the order of the most important to the least important. This is especially true if you do not allow multiple ticklers: you want the system to create a tickler for the most important rule whose criteria are met by the system action.
If you allow multiple ticklers, you do not need to define a processing sequence number since the system creates a tickler for each rule whose criteria are met.
Example: This example displays the order in which the system evaluates tickler rules based on processing sequence number and rule sequence number.
| Processing seq # | Rule seq # | Rule active? | Action meets criteria? | Results |
|---|---|---|---|---|
|
0 |
2 |
N |
N |
The system does not create a tickler for this event rule since the event rule is not active and the system action does not qualify. |
|
0 |
5 |
Y |
N |
The system does not create a tickler for this event rule since the system action does not qualify. |
|
1 |
4 |
N |
Y |
The system does not create a tickler for this event rule since the event rule is not active. |
|
2 |
1 |
Y |
Y |
The system creates a tickler for this event rule since the event rule is active and the system action qualifies. |
|
3 |
3 |
Y |
Y |
The system creates a tickler for this event rule only if the Allow multiple ticklers field for the event is selected; see Allowing Multiple Ticklers. |
|
3 |
6 |
Y |
Y |
The system creates a tickler for this event rule only if the Allow multiple ticklers field for the event is selected; see Allowing Multiple Ticklers. |
Event Rule Criteria
For each event rule, you must define the criteria that the system action must meet to create a tickler. Different criteria display for each tickler event. You can create multiple rules for each event by defining different criteria for each rule.
You can define more than one criterion for each event rule; however, you must define at least one criterion. If you define more than one criterion for an event rule, the system action must meet all of the rule’s criteria to create a tickler.
Example: If you create an event rule whose criteria are Pay type is 1 and Ship via is 1, the system creates a tickler only if the pay type on the order is 1 and the ship via is 1. The system does not create a tickler if the ship via on the order is 1 but the pay type on the order is 4.
Remember: If you allow multiple ticklers, you must think carefully before you create event rules. For example, if you create the following rules and you allow multiple ticklers, the system creates 3 ticklers, even though event rule 3 is a combination of rules 1 and 2:
-
Event rule 1: Ship via is 1 (UPS)
-
Event rule 2: Pay type is 1 (cash/check)
-
Event rule 3: Ship via is 1 (UPS) and Pay type is 1 (cash/check)
You can define event rule criteria at the Create Tickler Event Rule Screen.
Note:
You cannot create a duplicate event rule, meaning, you cannot create 2 rules that have the same criteria or an error message indicates: Duplicate rule exists.
Important:
If you create or change a tickler event rule, you must restart the asyncs in the Background Job Control menu option before your updates are applied to new ticklers.
For more information: For more information on the criteria you can define for each tickler event, see:
Event Rule Procedures
For each event rule, you can create tickler instructions for a user to follow to resolve the tickler.
You can create and modify event rule procedures at the Work with Tickler Event Rule Procedure Screen.
Example: These procedures may display for ticklers that are created when an order payment method is placed on AT (declined credit card hold) and the ship via is UPS Second Day.
-
Release order from hold.
-
Resend credit card for authorization.
-
Contact UPS to determine if they can deliver by expected arrival date.
-
If package will arrive late, notify customer of possible late delivery.
-
If customer is a valued customer, give customer 25% off coupon on next purchase.
Note:
A tickler user may not complete all of the tasks required to complete the tickler. Using the example above, the first assigned to user may release the order from hold and then assign the tickler to another user to resend the credit card for authorization.
Tickler work notes: The tickler user completing some or all of the tasks associated with the tickler can enter notes regarding the steps he performed for other users and the supervisor to review. See Tickler Work Notes.
Work with Tickler Event Screen
Purpose: Use this screen to change, review, or define rules for a tickler event.
When you first advance to this screen, the system automatically creates the system delivered tickler events if the Use Workflow Management (H96) system control value is selected. However, you must still define settings for each tickler event you wish to enable. You cannot create other tickler events for the system to evaluate for tickler creation.
Note:
You cannot delete a tickler event. If you do not wish to use a tickler event, set the Active field for the event to unselected.
How to display this screen: Enter WTEV in the Fast path field or select Work with Tickler Event from a menu.
| Field | Description |
|---|---|
|
Event |
A code that determines the system action for which the system may create a tickler. There are 11 system actions that can create ticklers. You cannot create other tickler events for the system to evaluate for tickler creation. BO: backorders; see BO (Backorders) Event Processing CO: cancelled orders; see CO (Cancelled Orders) Event Processing HO: held orders; see HO (Held Orders) Event Processing MN: manually created; see MN (Manually Created) Event Processing NO: new orders; see NO (New Orders) Event Processing OO: aged open orders; see OO (Aged Open Orders) Event Processing SD: stored value card activation decline; see SD (SVC Activation Decline) Event Processing SO: soldout orders; see SO (Soldout Orders) Event Processing SV: stored value card number assignment; see SV (SVC Number Assignment) Event Processing UP: unconfirmed pick tickets; see UP (Unconfirmed Pick Tickets) Event Processing VP: voided pick tickets; see VP (Voided Pick Tickets) Event Processing WF: remote workflow; see WF (Remote Workflow) Event Processing Alphanumeric, 2 positions; optional. |
|
Description |
A description of the tickler event. Alphanumeric, 40 positions; optional. |
|
Cat (Tickler event category) |
A code for the tickler category assigned to the tickler event. Tickler categories are used to group ticklers. Tickler categories are defined in and validated against the Tickler Category table; see Working with Tickler Category (WTCT). Alphanumeric, 3 positions; optional. |
|
Pty (Tickler event priority) |
The priority assigned to the tickler event, used to determine the importance of ticklers created for this event. Numeric, 1 position; optional. |
|
Act (Tickler event active flag) |
Indicates whether the tickler event is active. Selected = The tickler event is currently active; the system creates a tickler if the system action qualifies for an event rule. N = The tickler event is not currently active; the system does not create a tickler, regardless of whether the system action qualifies for an event rule. |
| Screen Option | Procedure |
|---|---|
|
Change the settings of a tickler event |
Select Change for a tickler event to advance to the Change Tickler Event Screen. |
|
Display a tickler event |
Select Display for a tickler event to advance to the Display Tickler Event Screen. You cannot change any information at this screen. See the Change Tickler Event Screen for field descriptions. |
|
Work with tickler event rules |
Select Rules for a tickler event to advance to the Work with Tickler Event Rule Screen. You cannot define event rules for the MN (manually created) or SV (SVC number assignment) tickler events. |
Create Tickler Event Rule Screen
Purpose: Use this screen to create an event rule for a specific tickler event.
This screen is divided into 2 areas:
-
The top half of the screen displays the event rule settings, such as who to notify, the tickler category, resolution reason, and processing sequence number; see Event Rule Settings.
-
The bottom half of the screen displays the event rule options, or criteria, that must be met by the system action in order for the system to create a tickler. The event rule options are different for each tickler event.
For each event rule you create, you must define at least one event rule option, or criterion, the system uses to determine if a tickler should be created. If you define more than one rule criterion, the system action must meet all of the options defined for the event rule to create a tickler.
Note:
You cannot create a duplicate event rule, meaning, you cannot create 2 rules that have the same criteria or an error message indicates: Duplicate rule exists.
The Processing sequence number defined for each event rule determines the sequence in which the system validates each event rule to determine if a tickler should be created, 1 being the first priority. You should assign the most important event rules a lower sequence number.
Important:
If you create or change an event rule, you must restart the async jobs in the Background Job Control menu option before your updates are applied to new ticklers.
How to display this screen: Select Create at the Work with Tickler Event Rule Screen.
| Field | Description |
|---|---|
|
Event |
The code and description for the tickler event associated with the event rule. Code: Alphanumeric, 2 positions; display-only. Description: Alphanumeric, 40 positions; display-only. |
|
Rule description |
A description of the event rule, usually indicating the criteria defined for the rule. Alphanumeric, 40 positions; required. |
|
Category |
A code for the tickler category assigned to the event rule. Tickler categories are used to group ticklers. The tickler category at the event level defaults, but you can override it. The tickler category defined at the event rule level overrides the tickler category defined at the event level. Tickler categories are defined in and validated against the Tickler Category table; see Working with Tickler Category (WTCT). Alphanumeric, 3 positions; optional. |
|
Resolution reason |
A code for the reason why a tickler for this event rule is resolved. Tickler resolution reason codes are assigned to a tickler once the tickler has been resolved. The resolution reason at the event level defaults, but you can override it. The resolution reason defined at the event rule level overrides the resolution reason defined at the event level. You must define a tickler resolution reason for all tickler events except for the MN (manually created) tickler event. Tickler resolution reasons are defined in and validated against the Tickler Resolution Reason table; see Working with Tickler Resolution Reasons (WTRR). Alphanumeric, 3 positions; required except for MN tickler event. |
|
Active |
Indicates whether the event rule is active. selected = The event rule is currently active; the system creates a tickler for the event rule if its criteria are met by the system action. Remember, to create a tickler for the event rule, the Active flag at the event level must also be selected. unselected = The event rule is not currently active; the system does not create a tickler, regardless of whether the system action qualifies for the event rule. |
|
Processing seq |
The processing sequence number for the event rule. The processing sequence number defines the order in which the system evaluates the rules to determine if a tickler is created, from lowest sequence number to highest. Note: The first tickler event rule that meets the criteria creates a tickler. It is important that you assign the most important event rule the lowest processing sequence number. If you do not define a processing sequence number for an event rule, the system assigns the event rule a processing sequence number of 0. If all of the rules have the same processing sequence number, the system evaluates the rules in rule sequence number. See Event Rule Processing Sequence. Numeric, 3 positions; optional. |
|
Notify user/group |
Indicates whether the system sends a Tickler Notification email to the assigned user or to all of the users in the assigned tickler user group when a tickler is created for this event rule. selected = Notify the assigned user/user group when a tickler is created; use the email address defined for the user in the User Extended table. If the tickler is assigned to a user group, send a notification to each user in the group, using the email address defined for each user in the User Extended table. unselected = Do not notify the assigned user/user group when a tickler is created; the user can review the ticklers in his queue at the Work with Tickler Screen (user/group view). The notify user/group setting at the event level defaults, but you can override it. The notify user/group setting at the event rule level overrides the notify user/group setting defined at the event level. See Tickler Notification for a sample Tickler Notification email. |
|
Assign to orig user |
Indicates if ticklers created for this event rule are assigned to the user that entered the order associated with the tickler. selected = Assign ticklers created for this event rule to the user that entered the associated order. If this field is selected, you must also enter a user ID in the Assign to user field. unselected = Do not assign ticklers created for this event rule to the user that entered the associated order; instead, assign the tickler to the specified user or tickler user group. The assign to original user setting at the event level defaults, but you can override it. The tickler assignment defined at the event rule level overrides the tickler assignment defined at the event level. Note: See Tickler Assignment. |
|
Assign to user |
The user ID of the user the system assigns to ticklers for this event rule. The assign to user setting at the event level defaults, but you can override it. The assign to setting at the event rule level overrides the assign to setting defined at the event level. You can define either an assign to user or assign to user group for the event rule, but not both. Users are defined in and validated against the User table; see Working with User Records (WUSR). See Tickler Assignment. Alphanumeric, 10 positions; optional. |
|
Assign to user group |
The tickler user group the system assigns to ticklers for this event rule. The assign to user group setting at the event level defaults, but you can override it. The assign to setting at the event rule level overrides the assign to setting defined at the event level. You can define either an assign to user or assign to user group for each event, but not both. The tickler user group you enter must be defined as a user type and not a supervisor type. Tickler user groups are defined in and validated against the Tickler User Group table; see Working with Tickler User Groups (WTUG). See Tickler Assignment. Alphanumeric, 10 positions; optional. |
|
Supervisor group |
The tickler supervisor group the system assigns to ticklers for this event rule. The supervisor group setting at the event level defaults, but you can override it. The supervisor group at the event rule level overrides the supervisor group defined at the event level. The tickler user group you enter must be defined as a supervisor type and not a user type. Tickler user groups are defined in and validated against the Tickler User Group table; see Working with Tickler User Groups (WTUG). See Tickler Assignment. Alphanumeric, 10 positions; optional. |
|
Notify supervisor |
Indicates when a Supervisor Notification Count email is sent to the supervisor, based on the number of days since a tickler was created. The system uses this calculation to determine the next notification date when a tickler is first created: tickler creation date + value in Number of days to notify supervisor field for the event/rule that created the tickler = next notification date. The system does not update the next notification date after a tickler is created. The system sends the email to the email address defined for the supervisor user group in the Tickler User Group table. The system continues sending an email to the supervisor group as long as a tickler assigned to the supervisor group is in an open or in process status and the Next notification date in the Tickler table is equal to or past the current date. If the next notification date is a future date, the system does not send an email until the next notification date is reached. If all ticklers assigned to the supervisor are resolved, the system no longer sends a Supervisor Notification Count email. |
|
|
Leave this field blank if you do not want to notify the supervisor about aging ticklers for this event rule; the supervisor can review ticklers using the Workflow Management (WWFM) menu option. The notify supervisor setting at the event level defaults, but you can override it. The notify supervisor setting at the event rule level overrides the notify supervisor setting defined at the event level. If you define a number of days in this field, you must also define the supervisor group. See Tickler Notification for a sample Supervisor Notification Count email. Numeric, 3 positions; optional. |
Event rule options: For each event rule, you must define the options, or criteria, that must be met by the system action in order for the system to create a tickler. The event rule options are different for each tickler event. You must define at least one option, or criterion, for each tickler event rule. For more information on defining event rule options, see:
BO (Backorders) Event Processing
The system creates a tickler for the BO tickler event when an item on an order is placed on backorder and the order qualifies for a BO event rule.
When is the BO event evaluated? The system evaluates the BO event when you or the system place an item on backorder:
-
during order entry processing
-
during order maintenance processing
-
during batch order entry (this includes orders received via the phone order interface and ecommerce)
-
when you void and unreserve a pick ticket in order maintenance or in the Reprinting and Voiding Pick Slips (WVRP or WSVP) menu option
-
when you unreserve an item during the Working with Interactive Reservation (MIRV) menu option
Allowing multiple ticklers for the BO event:
-
If you allow multiple ticklers, the system creates multiple ticklers for an order that contains one or more backordered items; a separate tickler is created for each event rule whose criteria are met.
-
If you do not allow multiple ticklers, the system creates only 1 tickler per order ship to that contains one or more items on backorder, regardless of whether the backordered order qualifies for more than one event rule; the system does not create a separate tickler for each transaction that backorders an item on the order.
BO Event Rule Criteria
You can define the following criteria for a BO event rule.
Note:
The system creates a separate tickler for each ship to order that has a backordered item that meets the rule’s criteria, regardless of the Allow multiple ticklers setting.
| Criterion | Event rule set up |
|---|---|
|
An item is placed on backorder by a batch process, such as voiding and unreserving a pick ticket or unreserving an item during Interactive Reservation. |
Deselect the Initial backorder field. |
|
The backordered item was initially backordered in order entry/maintenance and not by some other program. |
Select the Initial backorder field. |
|
The life-to-date order dollars for the sold to customer (the $ orders LTD field in the Customer Sold To Order History table) on the order meets the comparison criteria on the event rule. |
Enter a comparison value (valid values are GT greater than, GE greater than or equal to, LT less than, LE less than or equal to) in the Comparison field and a dollar amount in the LTD order dollars field. You can only define a whole number for the life-to-date order dollars. You can review the life-to-date order dollars for a sold to customer at the Display Customer Order History Screen. |
|
The customer class for the sold to customer on the order matches the customer class on the event rule. |
Enter a customer class in the Customer class field. Note: The system does not look at the customer class defined for the ship to customer. |
|
The item and/or SKU on backorder matches the item and/or SKU on the event rule. |
Enter an item code in the Item field and optionally, a SKU code in the SKU field. If you define an item but not a SKU code and the item contains SKUs, the system creates a tickler for the item if any of the SKUs for the item are on backorder. If you define both an item and SKU, the system creates a tickler only if that specific SKU is on backorder. |
|
The item status for the item on backorder matches the item status on the event rule. |
Enter an item status in the Item status field. |
|
The item class for the item on backorder matches the item class on the event rule. |
Enter an item class in the Item class field. |
|
The ship via for the order line or order where the item on backorder is located matches the ship via on the event rule. |
Enter a ship via code in the Ship via field. The system evaluates the ship via on the detail line first, then the ship via on the order header. If you enter a Ship via, you cannot define a Ship via priority for the event rule. Note: To create a tickler for each ship to order, the ship via for the ship to must match the ship via on the event rule. |
|
The priority of the ship via for the order line or order where the item on backorder is located matches the ship via priority on the event rule. |
Enter a ship via priority number in the Ship via priority field. The system evaluates the ship via on the detail line first, then the ship via on the order header. If you enter a Ship via, you cannot define a Ship via priority for the event rule. Note: To create a tickler for each ship to order, the ship via priority for the ship to must match the ship via priority on the event rule. |
BO Event Examples
Example 1: Allow multiple ticklers is unselected for the BO event.
The following event rules are defined for the BO event, displayed in processing sequence order.
-
Event rule 1: Item is A123.
-
Event rule 2: Item status is B.
-
Event rule 3: LTD order dollars is greater than $100.
-
Event rule 4: Customer class is CC.
You enter an order and:
-
item A123 is on backorder.
-
item B456 is on backorder and the item status is B.
-
the sold to customer’s class is CC and life-to-date order dollars is $500.
The system creates 1 tickler for rule 1: Item is A123.
In this scenario, the system creates only 1 tickler for the order containing backordered items even though the order qualified for all of the event rules.

Example 2: Allow multiple ticklers is selected for the BO event.
The following event rules are defined for the BO event, displayed in processing sequence order.
-
Event rule 1: Item is A123.
-
Event rule 2: Item status is B.
-
Event rule 3: LTD order dollars is greater than $100.
-
Event rule 4: Customer class is CC.
You enter an order and:
-
item A123 is on backorder.
-
item B456 is on backorder and the item status is B.
-
the sold to customer’s class is CC and life-to-date order dollars is $500.
The system creates 4 ticklers for the order:
-
the first tickler is created for rule 1: Item is A123.
-
the second tickler is created for rule 2: Item status is B.
-
the third tickler is created for rule 3: LTD order dollars is greater than $100.
-
the fourth tickler is created for rule 4: Customer class is CC.
In this scenario, the system creates 4 ticklers for the order containing backordered items; a separate tickler is created for each rule whose criteria are met.

Resolving BO Ticklers
A BO tickler is resolved when you or the system:-
select Resolve for a tickler at the Work with Tickler Screen (user/group view) or Workflow Management Screen.
-
receive inventory for the backordered item.
-
cancel the order containing the backordered item.
CO (Cancelled Orders) Event Processing
The system creates a tickler for the CO tickler event when an order is cancelled or contains an order line that is cancelled and the order qualifies for a CO event rule.
When is the CO event evaluated? The system evaluates the CO event when you or the system cancels an order or order line during:
-
order maintenance
Allowing multiple ticklers for the CO event:
-
If you allow multiple ticklers, the system creates multiple ticklers for an order that is cancelled or contains cancelled order lines; a separate tickler is created for each event rule whose criteria are met.
-
If you do not allow multiple ticklers, the system creates only 1 tickler per order ship to that contains a cancelled order/order line, for example if 1 tickler is created during order maintenance another tickler cannot be created during Process Auto Soldout Cancellations.
CO Event Rule Criteria
You can define the following criteria for a CO event rule.
Note:
The system creates a separate tickler for each ship to order that has a cancelled order line and meets the rule’s criteria, regardless of the Allow multiple ticklers setting. When you cancel an order, the system creates a separate tickler for each ship to order you cancel.
| Criterion | Event rule set up |
|---|---|
|
The order or order line is cancelled, regardless of whether it is by a batch process or interactively. |
Deselect the Batch process only field. |
|
The order or order line is cancelled by a batch process and not interactively. |
Select the Batch process only field. You can cancel an order/order line during a batch process using:
|
|
The life-to-date order dollars for the sold to customer (the $ orders LTD field in the Customer Sold To Order History table) on the order meets the comparison criteria on the event rule. |
Enter a comparison value (GT greater than, GE greater than or equal to, LT less than, LE less than or equal to) in the Comparison field and a dollar amount in the LTD order dollars field. You can only define a whole number for the life-to-date order dollars. You can review the life-to-date order dollars for a sold to customer at the Display Customer Order History Screen. |
|
The customer class for the sold to customer on the order matches the customer class on the event rule. |
Enter a customer class in the Customer class field. Note: The system does not look at the customer class defined for the ship to customer. |
|
The item and/or SKU on the cancelled order line matches the item and/or SKU on the event rule. |
Enter an item code in the Item field and optionally, a SKU code in the SKU field. If you define an item but not a SKU code and the cancelled item contains SKUs, the system creates a tickler for the item if any of the SKUs for the item are cancelled. If you define both an item and SKU, the system creates a tickler only if that specific SKU is cancelled. |
|
The item status for the item on the cancelled order line matches the item status on the event rule. |
Enter an item status in the Item status field. |
|
The item class for the item on the cancelled order line matches the item class on the event rule. |
Enter an item class in the Item class field. |
|
The cancel reason on the cancelled order line/order matches the cancel reason on the event rule. |
Enter a cancel reason code in the Cancel reason field. |
|
The ship via for the cancelled order/order line matches the ship via on the event rule. |
Enter a ship via code in the Ship via field. The system evaluates the ship via on the detail line first, then the ship via on the order header. If you enter a Ship via, you cannot define a Ship via priority for the event rule. Note: To create a tickler for each ship to order, the ship via for the ship to customer must match the ship via on the event rule. |
|
The priority of the ship via for the cancelled order/order line matches the ship via priority on the event rule. |
Enter a ship via priority number in the Ship via priority field. The system evaluates the priority of the ship via on the detail line first, then the priority of the ship via on the order header. If you enter a Ship via priority, you cannot define a Ship via for the event rule. Note: To create a tickler for each ship to order, the priority of the ship via for the ship to customer must match the ship via priority on the event rule. |
CO Event Examples
Example 1: Allow multiple ticklers is unselected for the CO event.
The following event rules are defined for the CO event, displayed in processing sequence order.
-
Event rule 1: Batch process only is selected
-
Event rule 2: Item is A123
-
Event rule 3: LTD order dollars is greater than 500
-
Event rule 4: Ship via is 1
You enter an order and:
-
the ship via on the order header is 1.
-
the items on the order are A123 and B456.
-
the sold to customer’s life-to-date order dollars is $75.00.
-
in order maintenance, you cancel order line 1 for item B456.
-
in Processing Item Substitutions (PSUB), you cancel item A123.
In this scenario, the system creates 1 tickler during order maintenance for rule 4: Ship via is 1. The system does not create a tickler for the other rules whose criteria are met. The system does not create a tickler during Process Substitute Items since a CO tickler already exists for the order/order ship to.

Example 2: Allow multiple ticklers is selected for the CO event.
The following event rules are defined for the CO event, displayed in processing sequence order.
-
Event rule 1: Batch process only is selected
-
Event rule 2: Item is A123
-
Event rule 3: LTD order dollars is greater than 500
-
Event rule 4: Ship via is 1
You enter an order and:
-
the ship via on the order header is 1.
-
the items on the order are A123 and B456.
-
the sold to customer’s life-to-date order dollars is $75.00.
-
in order maintenance, you cancel order line 1 for item B456.
-
in Processing Item Substitutions (PSUB), you cancel item A123.
In this scenario, the system creates 1 tickler during order maintenance for rule 4: Ship via is 1.
The system creates 2 ticklers during Process Substitute Items:
-
the first tickler is created for rule 1: Batch process only is selected.
-
the second tickler is created for rule 2: Item is A123.
A tickler is not created for rule 3 during Process Substitute Items because a tickler already exists for that order using that rule.

Resolving CO Ticklers
A CO tickler is resolved when you or the system select Resolve for a tickler at the Work with Tickler Screen (user/group view) or Workflow Management Screen.
HO (Held Orders) Event Processing
The system creates a tickler for the HO tickler event when an order’s order header, order ship to (recipient), or order payment method is placed on hold and the order qualifies for an HO event rule. The system does not create a tickler for an order line placed on hold.
When is the HO event evaluated? The system evaluates the HO event when you or the system place an order on hold during:
-
order entry processing
-
order maintenance processing
-
batch order entry (this includes orders received via the phone order interface and ecommerce)
-
credit card authorization (during order entry (online authorization), pick slip generation, and drop ship processing)
Allowing multiple ticklers for the HO event:
-
If you allow multiple ticklers, the system creates multiple ticklers for an order or order payment method that is held; a separate tickler is created for each event rule whose criteria are met.
-
If you do not allow multiple ticklers, the system creates only 1 tickler per order ship to that places an order or order payment method on hold, for example if the system creates 1 HO tickler during order entry the system will not create another HO tickler during credit card authorizations.
HO Event Rule Criteria
You can define the following criteria for an HO event rule.
Note:
The system creates a separate tickler for each ship to customer order that meets the rule’s criteria, regardless of the Allow multiple ticklers setting.
| Criterion | Event rule set up |
|---|---|
|
The order hold reason for the held order matches the order hold reason on the event rule. |
Enter a hold reason in the Order hold reason field. This setting is used for order header holds and recipient holds. The system creates a tickler for both system and user hold reasons. |
|
The pay type for the held order matches the pay type on the event rule. |
Enter a pay type code in the Pay type field. |
|
The pay type hold reason for the held order payment method matches the pay type hold reason on the event rule. |
Enter a hold reason in the Pay type hold reason field. The system creates a tickler for both system and user hold reasons. Note: The system does not create a tickler for the CW (awaiting credit card authorization) pay type hold. |
|
The order total for the held order meets the order total comparison on the event rule. |
Enter a comparison value (valid values are GT greater than, GE greater than or equal to, LT less than, LE less than or equal to) in the Comparison field and a dollar amount in the Order total field. You can only define a whole number for the order total. The order total is the sum of all charges on the order, including merchandise, freight, additional freight, tax, handling, and additional charges across all recipients on the order. |
|
The ship via for the held order/order line matches the ship via on the event rule. |
Enter a ship via code in the Ship via field. The system evaluates the ship via on the detail line first, then the ship via on the order header. If you enter a Ship via, you cannot define a Ship via priority for the event rule. Note: To create a tickler for each ship to order, the ship via for the ship to customer must match the ship via on the event rule. |
|
The priority of the ship via for the held order/order line matches the ship via priority on the event rule. |
Enter a ship via priority number in the Ship via priority field. The system evaluates the priority of the ship via on the detail line first, then the priority of the ship via on the order header. If you enter a Ship via priority, you cannot define a Ship via for the event rule. Note: To create a tickler for each ship to order, the priority of the ship via for the ship to customer must match the ship via priority on the event rule. |
HO Event Examples
Example 1: Allow multiple ticklers is selected for the HO event.
The following event rules are defined for the HO event, displayed in processing sequence order.
-
Event rule 1: Order hold reason is HS (sold to/ship to fraud)
-
Event rule 2: Order hold reason is PT (pay type hold)
-
Event rule 3: Pay type hold reason is PV (pay plan velocity hold)
You enter an order and:
-
the sold to customer on the order is a fraud (F in the Hold/bypass/fraud field for the customer). The system places the order ship to customer on HS (sold to/ship to fraud).
-
the order pay type on the order is credit card with deferred payment and the card has been used too many times within a specified time period with a deferred payment option. The system places the order header on PT (pay type) hold and the order pay type on PV (pay plan velocity) hold.
In this scenario, the system creates 3 ticklers:
-
the first tickler is created for the order ship to hold using rule 1: Order hold reason is HS (sold to/ship to fraud).
-
the second tickler is created for the order header hold using rule 2: Order hold reason is PT (pay type hold).
-
the third tickler is created for the pay type hold using rule 3: Pay type hold reason is PV (pay plan velocity hold)

Example 2:
Allow multiple ticklers is unselected for the HO event.
The following event rules are defined for the HO event, displayed in processing sequence order.
-
Event rule 1: Order hold reason is HS (sold to/ship to fraud)
-
Event rule 2: Order hold reason is PT (pay type hold)
-
Event rule 4: Pay type hold reason is PV (pay plan velocity hold)
You enter an order and:
-
the sold to customer on the order is a fraud (F in the Hold/bypass/fraud field for the customer). The system places the order ship to customer on HS (sold to/ship to fraud).
-
the order pay type on the order is credit card with deferred payment and the card has been used too many times within a specified time period with a deferred payment option. The system places the order header on PT (pay type) hold and the order pay type on PV (pay plan velocity) hold.

In this scenario, the system creates 1 tickler for the order ship to hold using the first rule: Order hold reason is HS (sold to/ship to fraud). The system does not create a tickler for the other rules whose criteria are met.
Resolving HO Ticklers
An HO tickler is resolved when you:
-
select Resolve for a tickler at the Work with Tickler Screen (user/group view) or Workflow Management Screen.
-
release the order from hold by selecting Release for a tickler at the Work with Tickler Screen (user/group view) or Workflow Management Screen.
-
release the order from hold by selecting Release for a tickler in the Release Held Orders menu option; see Performing the Release.
-
release the order from hold in order maintenance by:
-
removing the order header hold reason.
-
adding a pay type for a balance due hold.
-
MN (Manually Created) Event Processing
You can manually create a tickler at the Create Tickler Screen.
How to display this screen: You can advance to the Create Tickler screen from the:
-
Workflow Management Screen (workflow supervisor)
-
Work with Tickler Screen (user/group view) (workflow user)
Allowing multiple ticklers for the MN event: The Allow multiple ticklers setting does not apply to manually created ticklers.
MN event rule criteria: You cannot define event rules for the MN tickler event. However, you can associate a manually created tickler with a specific:
-
order number and ship to number
-
customer sold to number
-
customer ship to number
-
customer bill to number
-
existing tickler number
Depending on how you advance to the Create Tickler screen, the system automatically associates the tickler with a specific order or customer. For example, if you advance to the Create Tickler screen from the Work with Ticklers Screen (sold to customer view), the system automatically associates the manually created tickler with the sold to customer.
Resolving MN Ticklers
A MN tickler is resolved when you select Resolve for a tickler at the Work with Tickler Screen (user/group view) or Workflow Management Screen.
NO (New Orders) Event Processing
The system creates a tickler for the NO tickler event when the status of an order line updates to open or closed and the order qualifies for an NO event rule.
The system creates a tickler for each order containing one or more order lines that are updated to open or closed; the system does not create a separate tickler for each order line that is updated to open or closed.
Soldout orders: The system will never create an NO tickler for an order that is entirely soldout; this is because none of the lines on the order are ever updated to open or closed.
Note:
Even if a NO tickler exists for an order, the order can continue through the order cycle.
When is the NO event evaluated? The system evaluates the NO event when an order:
-
is accepted (because the status of an order line updates from suspended to open), before creating a pre-generated pick. If a web order is placed in an error status in an order batch, the system evaluates the NO event when you edit and accept the order batch. Note: The system does not evaluate the NO event when you accept an order in order maintenance.
-
is processed through the Billing Async (because the status of an order line updates to closed).
Allowing multiple ticklers for the NO event:
-
If you allow multiple ticklers, the system creates multiple ticklers for an order containing one or more order lines that are updated to open or closed; a separate tickler is created for each event rule whose criteria are met.
-
If you do not allow multiple ticklers, the system creates only 1 tickler for an order containing one or more order lines that are updated to open or closed, regardless of whether the order qualifies for more than one event rule; the system does not create a separate tickler for each transaction that updates or closes an order.
NO Event Rule Criteria
You can define the following criteria for an NO event rule.
The Order line status setting is used with all other criteria you define for an event rule. For example, if you define an item status, the item on the order line must match the specified item status and the status of the order line must update to open or closed (whichever order line status you specify).
Hold reason: If you enter a valid hold reason in the Hold reason field, the system places the order on hold at the user level when a NO tickler is created for the event rule. In this situation, the system removes any pick slip preparation from the order; see Preparing Orders for Pick Slip Generation.
Note:
Unless otherwise noted, the system creates a separate tickler for each ship to customer on the order that has an open/closed order line that qualifies for an event rule, regardless of the Allow multiple ticklers setting.
| Criterion | Event rule set up |
|---|---|
|
The order line status changes to open/closed. |
Enter an order line status code in the Order line status field. blank = The order line status changes to open; for example, you enter a new order line. X = the order line status changes to closed; for example, you ship an order line. |
|
The ordered quantity or shipped quantity for the open/closed order line is equal to or greater than the quantity on the event rule. |
Enter a quantity in the Quantity ordered/shipped field.
|
|
The item status for the item on the open/closed order line matches the item status on the event rule. |
Enter an item status in the Item status field. |
|
The open/closed order line is for a first time buyer. |
Select the First time buyer field. The system considers the sold to customer a first time buyer if the Current mail type field for the customer is a value other than B (buyer). Note: The system creates one tickler for the first ship to order if the sold to customer on the order qualifies; the system does not create a tickler for subsequent ship to orders. |
|
The item class for the item on the open/closed order line matches the item class on the event rule. |
Enter an item class in the Item class field. |
|
The item and/or SKU on the open/closed order line matches the item and/or SKU on the event rule. |
Enter an item code in the Item field and optionally, a SKU code in the SKU field. If you define an item but not a SKU code and the item contains SKUs, the system creates a tickler for the item if any of the SKUs for the item are on an open/closed order line. If you define both an item and SKU, the system creates a tickler only if that specific SKU is on an open/closed order line. |
|
The order type on the order matches the order type on the event rule. |
Enter an order type in the Order type field. Note: A tickler is created for each ship to order whose order type matches the order type on the event rule. |
|
The last order date for the sold to customer (the Last order field in the Customer Sold To Order History table) on the order is past the current date by the number of days on the event rule. |
Enter a number in the Number days since field. You can review the last order date for a sold to customer on the Display Customer Order History Screen. Note: The system does not create a separate tickler for each ship to. |
|
The country code on the ship to order matches the country code on the event rule. |
Enter a country code in the Country field. Note: A tickler is created for each ship to order whose country code matches the country code on the event rule. If you define a country code you cannot exclude the default country. |
|
The country code on the ship to order must be a country other than the Default Country for Customer Address (B17). |
Select the Exclude default country field. Note: A tickler is created for each ship to order whose country code qualifies for the event rule. If you exclude the default country you cannot define a country code. |
|
The order total on the order meets the order dollars comparison criteria on the event rule. |
Enter a comparison value (valid values are GT greater than, GE greater than or equal to, LT less than, LE less than or equal to) in the Comparison field and a dollar amount in the Order dollars field. The order total is the sum of all charges on the order, including merchandise, freight, additional freight, tax, handling, and additional charges across all recipients on the order. You can only define a whole number for the order dollars. |
|
The ship via code on the order line or order header matches the ship via code on the event rule. |
Enter a ship via code in the Ship via field. Ship via codes are defined in and validated against the Ship Via table. The system evaluates the ship via on the detail line first, then the ship via on the order header. A tickler is created for each ship to order whose ship via code at the line level or header level matches the ship via code on the event rule. If you enter a Ship via, you cannot define a Ship via priority for the event rule. |
|
The priority for the ship via code on the order line or order header matches the ship via priority on the event rule. |
Enter a ship via priority (1-9) in the Ship via priority field. The system evaluates the ship via on the detail line first, then the ship via on the order header. A tickler is created for each ship to order whose ship via code at the line level or header level has a ship via priority that matches the ship via priority on the event rule. If you enter a Ship via priority, you cannot define a Ship via for the event rule. |
NO Event Examples
Example 1: Allow multiple ticklers is selected for the NO event.
The following event rules are defined for the NO event, displayed in processing sequence order.
-
Event rule 1: Order line status is blank and Order type is I.
-
Event rule 2: Order line status is X.
-
Event rule 3: Order line status is blank and Exclude default country is selected.
You enter an order and:
-
the order type is I.
-
the country code on the order is JPY (the default country code is USA).
In this scenario, the system creates 2 ticklers when the order is processed by the Order Async:
-
the first tickler is created for rule 1: Order line status is blank and Order type is I.
-
the second tickler is created for rule 3: Order line status is blank and Exclude default country is selected.
You generate a pick ticket and ship the order. The system creates 1 tickler when the order is processed by the Billing Async for rule 2: Order line status is X.

Example 2: Allow multiple ticklers is unselected for the NO event.
The following event rules are defined for the NO event, displayed in processing sequence order.
-
Event rule 1: Order line status is blank and Order type is I.
-
Event rule 2: Order line status is X.
-
Event rule 3: Order line status is blank and Exclude default country is selected.
You enter an order and:
-
the order type is I.
-
the country code on the order is JPY (the default country code is USA).
In this scenario, the system creates 1 tickler when the order is processed by the Order Async for rule 1: Order line status is blank and Order type is I.
You generate a pick ticket and ship the order. The system does not create a tickler when the order is processed by the Billing Async.

Resolving NO Ticklers
A NO tickler is resolved when you:
-
select Resolve for a tickler at the Work with Tickler Screen (user/group view) or Workflow Management Screen.
-
use Selecting Held Orders (ERHO) to release the order from hold. The system resolves the tickler when you release the order from hold only if the reason the order was held was because of the tickler and a resolution reason is defined for the tickler event rule.
OO (Aged Open Orders) Event Processing
The system creates a tickler for the OO tickler event when an aged open order exists.
An aged open order is:
-
an order whose order header is open or held, and
-
the order contains one or more order lines that are open or held, and
-
the order line is not reserved (Quantity reserved is 0) or is reserved but not printed (Quantity reserved is greater than 0 and Quantity printed is 0), and
-
the order is older than a specified number of days, based on entered date or arrival date defined for the order lines on the order.
One tickler is created for each ship to customer on an aged open order that qualifies for an OO event rule; if an aged open order qualifies for more than 1 event rule, the system creates 1 tickler for the first event rule, in processing sequence order, that qualifies.
Note:
The system does not allow multiple ticklers for the OO event (the Allow multiple ticklers field must be unselected).
When is the OO event evaluated? The system evaluates the OO event when you run the Evaluate Create/Resolve Tickler periodic function (program name PFR0072).
Graduating OO ticklers: Each time you run the Evaluate Create/Resolve Tickler periodic function, the system determines is any existing OO ticklers should be graduated.
-
If an OO tickler exists for an aged open order and the aged open order qualifies for a new event rule, based on processing sequence order, the system keeps the existing tickler open and applies the new event rule to the tickler.
-
If an OO tickler exists for an aged open order and the aged open order qualifies for the event rule currently assigned to the existing tickler, the system does not create a new tickler and keeps the existing tickler without any updates.
-
If an OO tickler exists for an aged open order and the aged open order no longer qualifies for the current event rule and does not qualify for any other OO event rules, the system resolves the tickler; see Resolving OO Ticklers.
The system updates the existing tickler with the information related to the event rule that is now associated with the tickler:
-
Rule number updates to the new event rule assigned to the tickler.
-
Category updates to the category for the new event rule.
-
Priority updates to the priority for the new event rule.
-
Assigned to updates to the assigned to user/group for the new event rule.
-
Assigned date updates to the date the tickler is graduated.
-
Supervisor group updates to the supervisor group for the new event rule.
-
Date to notify supervisor updates, based on the new supervisor group assigned.
-
Tickler procedures updates to the procedures for the new event rule.
-
if the tickler was in-process, the system changes the status back to open.
-
if the Notify user/group field is selected for the new event rule, the system sends a Tickler Reassignment email; see Tickler Notification for a sample email. Note: The system sends a Tickler Reassignment email only if the new event rule has a different assigned to user/group from the previous event rule assigned to the tickler.
-
the system creates a tickler history record, indicating the tickler has been graduated from one event rule to another.
OO Event Rule Criteria
You can define the following criteria for an OO event rule.
The Orders older than date setting is used with all other criteria you define for an event rule. For example, if you define a ship via, the aged open order must match the specified ship via and the order’s entered/arrival date must be older than the system date by the number of days defined.
Note:
The system creates a separate tickler for each ship to order that has an order line that qualifies; the system does not create a separate tickler for each order line that qualifies.
| Criterion | Event rule set up |
|---|---|
|
The order line’s entered date/arrival date is older than the current date by the number of days on the event rule. |
Enter a date indicator code (E = entered date, A = arrival date) in the Date indicator field and enter a number in the Orders older than field. The system requires you to enter a date indicator and number of days. Note: The system evaluates the entered date/arrival date on the order detail line; the system does not evaluate the entered date/arrival date on the order header. |
|
The ship via for the aged open order matches the ship via on the event rule. |
Enter a ship via code in the Ship via field. The system evaluates the ship via on the detail line first, then the ship via on the order header. If you define a ship via for the event rule, you cannot define a ship via priority. Note: To create a tickler for each ship to order, the ship via for the ship to customer must match the ship via on the event rule. |
|
The priority of the ship via for the aged open order matches the ship via priority on the event rule. |
Enter a ship via priority number in the Ship via priority field. The system evaluates the priority of the ship via on the detail line first, then the priority of the ship via on the order header. If you define a ship via priority for the event rule, you cannot define a ship via. Note: To create a tickler for each ship to order, the priority of the ship via for the ship to customer must match the ship via priority on the event rule. |
OO Event Example
The following event rules are defined for the OO event rule, in processing sequence order.
-
Event rule 1: Orders older than 5 days by Arrival date and Ship via is 2
-
Event rule 2: Orders older than 1 day by Arrival date and Ship via is 2
You run the Evaluate Create/Resolve Ticklers periodic function and:
-
Order # 6599 qualifies for event rule 2 (an order line’s arrival date is older than 1 day and the ship via is 2)
-
Order # 6601 qualifies for event rule 2 (an order line’s arrival date is older than 1 day and the ship via is 2)
The system creates an OO tickler for each order.
You run the Evaluate Create/Resolve Ticklers periodic function again and:
-
Order # 6599 qualifies for event rule 1 (an order line’s arrival date is older than 5 days and the ship via is 2)
-
Order # 6601 qualifies for event rule 2 (an order line’s arrival date is older than 1 day and the ship via is 2)
The system graduates the existing tickler for order # 6599 to event rule 1; the existing tickler for order # 6601 continues using rule 2.
You run the Evaluate Create/Resolve Ticklers periodic function again, and:
-
order # 6599 qualifies for event rule 1 (an order line’s arrival date is older than 5 days and the ship via is 2)
-
order # 6601 does not qualify for any rules (a pick has been generated)
The existing tickler for order # 6599 continues using rule 1. The system resolves the existing tickler for order # 6601.

Resolving OO Ticklers
An OO tickler is resolved when you:
-
select Resolve for a tickler at the Work with Tickler Screen (user/group view) or Workflow Management Screen.
-
run the Evaluate Create/Resolve Ticklers periodic function (program name PFR0072), if the tickler no longer applies to any OO event rules. For example, the order is now cancelled.
-
generate a pick slip for the order. Note: When you generate a pick slip for the order, the system resolves the tickler automatically and does not wait until you run the Evaluate Create/Resolve Ticklers periodic function.
SD (SVC Activation Decline) Event Processing
The system creates a tickler for the SD tickler event when a stored value card activation request receives a declined activation response from the service bureau.
The system creates a tickler for each stored value card activation request that receives a declined response.
The tickler indicates the:
-
order number and ship to number associated with the stored value card
-
customer number (sold to and ship to) on the order
-
stored value card item number, SKU code, and description
To activate a declined stored value card: You must call the service bureau to activate the card.
When is the SD tickler event evaluated? The system evaluates the SD tickler event when the SVC_OUT job receives a stored value card activation response from the service bureau.
Allowing multiple ticklers for the SD event: The Allow multiple ticklers setting does not apply to SD ticklers.
SD event rule criteria: You cannot define event rules for the SD tickler event.
Resolving SD Ticklers
An SD tickler is resolved when you select Resolve for a tickler at the Work with Tickler Screen (user/group view) or Workflow Management Screen.
For more information: See Stored Value Card Purchase and Activation.
SO (Soldout Orders) Event Processing
The system creates a tickler for the SO (soldout orders) event each time an item on an order is soldout and the order qualifies for an SO event rule.
When is the SO event evaluated? The system evaluates the SO event when you or the system sell out an item during:
-
order entry processing
-
order maintenance processing
-
batch order entry (this includes orders received via the phone order interface and ecommerce)
Quotes: The system does not evaluate the SO tickler event for a quote until you convert it to an order.
Allowing multiple ticklers for the SO event:
-
If you allow multiple ticklers, the system creates multiple ticklers for an order containing soldout order lines; a separate tickler is created for each event rule whose criteria are met.
-
If you do not allow multiple ticklers, the system creates only 1 tickler per order ship to that sells out an order line, for example if the system creates 1 tickler during order entry the system will not create another tickler during auto soldout cancellations.
SO Event Rule Criteria
You can define the following criteria for an SO event rule.
Hold reason: If you enter a valid hold reason in the Hold reason field, the system places the order on hold at the user level when an SO tickler is created for the event rule unless the order is in a closed status. If the order contains more than one ship to, both ship to orders are placed on hold.
Note:
The system creates a separate tickler for each ship to order that has a soldout item, regardless of the Allow multiple ticklers setting.
| Criterion | Event rule set up |
|---|---|
|
The order line is soldout by a batch process, such as Process Auto Soldout Cancellations, and not interactively. |
Select the Batch process only field. Note: If the Batch process only field is selected, the Interactive mode field must be blank. |
|
The order line is sold out interactively in order entry, order maintenance, or batch order entry (this includes orders received via the phone order interface and ecommerce). |
Enter a mode in the Interactive mode field. E = The order line is soldout interactively in order entry or batch order entry. M = The order line is soldout interactively in order maintenance. B = The order line is soldout interactively in order entry, order maintenance, or batch order entry. Note: If you enter a value in the Interactive mode field, the Batch process only field must be unselected; this means the system creates ticklers for soldout items during the specified interactive mode and during batch processing. |
|
The life-to-date order dollars for the sold to customer (the $ orders LTD field in the Customer Sold To Order History table) on the order meets the life-to-date order dollars comparison on the event rule. |
Enter a comparison value (valid values are GT greater than, GE greater than or equal to, LT less than, LE less than or equal to) in the Comparison field and a dollar amount in the LTD order dollars field. You can only define a whole number for the life-to-date order dollars. You can review the life-to-date order dollars for a sold to customer at the Display Customer Order History Screen. |
|
The customer class for the sold to customer on the order matches the customer class on the event rule. |
Enter a customer class in the Customer class field. Note: The system does not look at the customer class defined for the ship to customer. |
|
The item and/or SKU on the soldout order line matches the item and/or SKU on the event rule. |
Enter an item code in the Item field and optionally, a SKU code in the SKU field. If you define an item but not a SKU code and the soldout item contains SKUs, the system creates a tickler for the item if any of the SKUs for the item are soldout. If you define both an item and SKU, the system creates a tickler only if that specific SKU is soldout. |
|
The item status for the soldout item matches the item status on the event rule. |
Enter an item status in the Item status field. |
|
The item class for the soldout item matches the item class on the event rule. |
Enter an item class in the Item class field. |
|
The ship via for the soldout order line matches the ship via on the event rule. |
Enter a ship via code in the Ship via field. The system evaluates the ship via on the detail line first, then the ship via on the order header. If you enter a Ship via, you cannot define a Ship via priority for the event rule. Note: To create a tickler for each ship to order, the ship via for the ship to customer must match the ship via on the event rule |
|
The priority of the ship via for the soldout order line matches the ship via priority on the event rule. |
Enter a ship via priority number in the Ship via priority field. The system evaluates the ship via on the detail line first, then the ship via on the order header. If you enter a Ship via priority, you cannot define a Ship via for the event rule. Note: To create a tickler for each ship to order, the priority of the ship via for the ship to customer must match the ship via priority on the event rule. |
SO Event Examples
Example 1: Allow multiple ticklers is unselected for the SO event.
The following event rules are defined for the SO event, displayed in processing sequence order.
-
Event rule 1: Ship via is 1
-
Event rule 2: Item is A123
-
Event rule 3: LTD order dollars is greater than $100
-
Event rule 4: Interactive mode is M (order maintenance)
You enter an order and:
-
the ship via on the order header is 1.
-
the item on the order is A123 and is not soldout in order entry.
-
the sold to customer’s life-to-date order dollars is $75.00.
-
in order maintenance, you sell out item A123.
In this scenario, the system creates 1 tickler during order maintenance for the first rule: Ship via is 1. The system does not create a tickler for the other rules whose criteria are met.

Example 2: Allow multiple ticklers is selected for the SO event.
The following event rules are defined for the SO event, displayed in processing sequence order.
-
Event rule 1: Ship via is 1
-
Event rule 2: Item is A123
-
Event rule 3: LTD order dollars is greater than $100
-
Event rule 4: Interactive mode is M (order maintenance)
You enter an order and:
-
the ship via on the order header is 1.
-
the item on the order is A123 and is not soldout in order entry.
-
the sold to customer’s life-to-date order dollars is $75.00.
-
in order maintenance, you sell out item A123.
In this scenario, the system creates 3 ticklers during order maintenance:
-
the first tickler is created for rule 1: Ship via is 1.
-
the second tickler is created for rule 2: Item is A123.
-
the third tickler is created for rule 4: Interactive mode is M (order maintenance).
A tickler is not created for rule 3: LTD order dollars is greater than $100, since the sold to customer’s life-to-date order dollars is less than $100.

Resolving SO Ticklers
An SO tickler is resolved when you select Resolve for a tickler at the Work with Tickler Screen (user/group view) or Workflow Management Screen.
SV (SVC Number Assignment) Event Processing
The system creates a tickler for the SV tickler event when an order containing a stored value card item is processed by billing without a number assignment. This may occur if you send a physical stored value card item to the manifesting station without first using the Working with Physical Stored Value Card Assignment (WPSA) menu option to assign a number to the card.
The system creates a tickler for each unit of the item that is not assigned a stored value card number.
The tickler indicates the:
-
order number and ship to number associated with the stored value card
-
customer number (sold to and ship to) on the order
-
stored value card item number, SKU code, and description
-
pick control number containing the stored value card item
If the stored value card is a physical card (SVC type P or E), you must call the customer, indicate the stored value card has not yet been activated, and ask for the number printed on the card.
If the stored value card is a virtual card (SVC type V), you must assign a number from the Virtual Card Number Table (FLSVCA) to the card and email this information to the recipient card holder.
When is the SV tickler event evaluated? The system evaluates the SV tickler event when an order containing a stored value card item is processed through the Billing Async.
Allowing multiple ticklers for the SV event: The Allow multiple ticklers setting does not apply to SV ticklers.
SV event rule criteria: You cannot define event rules for the SV tickler event.
Resolving SV Ticklers
An SV tickler is resolved when you select Resolve for a tickler at the Work with Tickler Screen (user/group view) or Workflow Management Screen.
For more information: See Stored Value Card Purchase and Activation.
UP (Unconfirmed Pick Tickets) Event Processing
The system creates a tickler for the UP tickler event when a pick ticket exists that has not been confirmed.
Note:
You can use the UP event in place of printing the Carryover report.
The system considers a pick ticket unconfirmed if the pick control header status is blank (open), M (submitted to manifest), or O (carryover). If the pick ticket’s status is some other value, the system does not create a tickler for the pick ticket.
One tickler is created for each unconfirmed pick ticket that qualifies for a UP event rule; if an unconfirmed pick ticket qualifies for more than 1 event rule, the system creates 1 tickler for the first event rule, in processing sequence order, that qualifies.
Note:
The system does not allow multiple ticklers for the UP event (the Allow multiple ticklers field must be unselected).
When is the UP event evaluated? The system evaluates the UP event when you run the Evaluate Create/Resolve Tickler periodic function (program name PFR0072).
Graduating UP ticklers: Each time you run the Evaluate Create/Resolve Tickler periodic function, the system determines is any existing UP ticklers should be graduated.
-
If a UP tickler exists for an unconfirmed pick ticket and the unconfirmed pick ticket qualifies for a new event rule, based on processing sequence order, the system keeps the existing tickler open and applies the new event rule to the tickler.
-
If a UP tickler exists for an unconfirmed pick ticket and the unconfirmed pick ticket qualifies for the event rule currently assigned to the existing tickler, the system does not create a new tickler and keeps the existing tickler without any updates.
-
If a UP tickler exists for an unconfirmed pick ticket and the unconfirmed pick ticket no longer qualifies for the current event rule and does not qualify for any other UP event rules, the system resolves the tickler; see Resolving UP Ticklers.
The system updates the existing tickler with the information related to the event rule that is now associated with the tickler:
-
Rule number updates to the new event rule assigned to the tickler.
-
Category updates to the category for the new event rule.
-
Priority updates to the priority for the new event rule.
-
Assigned to updates to the assigned to user/group for the new event rule.
-
Assigned date updates to the date the tickler is graduated.
-
Supervisor group updates to the supervisor group for the new event rule.
-
Date to notify supervisor updates, based on the new supervisor group assigned.
-
Tickler procedures updates to the procedures for the new event rule.
-
if the tickler was in-process, the system changes the status back to open.
-
if the Notify user/group field is selected for the new event rule, the system sends a Tickler Reassignment email; see Tickler Notification for a sample email. Note: The system sends a Tickler Reassignment email only if the new event rule has a different assigned to user/group from the previous event rule assigned to the tickler.
-
the system creates a tickler history record, indicating the tickler has been graduated from one event rule to another.
UP Event Rule Criteria
You can define the following criteria for a UP event rule.
Note:
The Pick older than setting is used with all other criteria you define for an event rule. For example, if you define a pick category, the pick ticket must match the specified pick category and the pick control date for the pick ticket must be older than the system date by the number of days defined.
| Criterion | Event rule set up |
|---|---|
|
The Pick control date for the unconfirmed pick ticket is older than the system date by the number of days on the event rule. |
Enter a number in the Picks older than field. The system requires you to enter a number of days. |
|
The pick category defined for the pick ticket matches the pick category on the event rule. |
Enter a pick category code in the Picks category field. D = The pick category for the unconfirmed pick ticket is D (drop ship pick ticket). R = The pick category for the unconfirmed pick ticket is R (regular pick ticket). S = The pick category for the unconfirmed pick ticket is S (special handling pick ticket. |
|
The ship via for the unconfirmed pick ticket matches the ship via on the event rule. |
Enter a ship via code in the Ship via field. The system evaluates the ship via on the unconfirmed pick ticket, not the ship via on the order. If you enter a ship via for the event rule, you cannot define a ship via priority. |
|
The priority of the ship via for the unconfirmed pick ticket matches the ship via priority on the event rule. |
Enter a ship via priority number in the Ship via priority field. The system evaluates the priority of the ship via on the unconfirmed pick ticket, not the ship via on the order. If you enter a ship via priority for the event rule, you cannot define a ship via. |
UP Event Example
The following event rules are defined for the UP event rule, in processing sequence order.
-
Event rule 1: Pick control date is 5 days for Pick category R (regular picks)
-
Event rule 2: Pick control date is 1 day for Pick category R (regular picks)
You run the Evaluate Create/Resolve Ticklers periodic function and:
-
Pick ticket # 69 qualifies for event rule 2
-
Pick ticket # 72 qualifies for event rule 2
The system creates a UP tickler for each pick ticket.
You run the Evaluate Create/Resolve Ticklers periodic function again and:
-
Pick ticket # 69 qualifies for event rule 1
-
Pick ticket # 72 qualifies for event rule 2
The system graduates the existing tickler for pick ticket # 69 to event rule 1; the existing tickler for pick ticket # 72 continues using rule 2.
You run the Evaluate Create/Resolve Ticklers periodic function again, and:
-
pick ticket # 69 qualifies for event rule 1
-
pick ticket # 72 does not qualify for any rules (the pick ticket has been confirmed)
The existing tickler for pick ticket # 69 continues using rule 1. The system resolves the existing tickler for pick ticket # 72.

Resolving UP Ticklers
A UP tickler is resolved when you:
-
select Resolve for a tickler at the Work with Tickler Screen (user/group view) or Workflow Management Screen.
-
run the Evaluate Create/Resolve Ticklers periodic function (program name PFR0072), if the tickler no longer applies to any OO event rules. For example, the pick ticket has been voided or reprinted.
-
confirm the pick ticket. Note: When you confirm the pick ticket, the system resolves the tickler automatically and does not wait until you run the Evaluate Create/Resolve Ticklers periodic function.
VP (Voided Pick Tickets) Event Processing
The system creates a tickler for the VP tickler event when a pick ticket is voided.
When is the VP event evaluated? The system evaluates the VP event when you void a pick ticket by:
-
selecting Void or Void/Unreserve for a pick ticket in the Reprinting and Voiding Pick Slips (WVRP or WSVP) menu option or order maintenance.
-
selecting Void for a pick ticket during Manually Confirming Shipments (MCON).
-
selecting Void All/Cancel Order in the Reprinting and Voiding Pick Slips (WVRP or WSVP) menu option.
-
selecting Void All in order maintenance.
Note:
The Void Pick Batch (WSVP) option does not create VP ticklers.
Allowing multiple ticklers for the VP event:
-
If you allow multiple ticklers, the system creates multiple ticklers for the voided pick ticket; a separate tickler is created for each event rule whose criteria are met.
-
If you do not allow multiple ticklers, the system creates only 1 tickler for the voided pick ticket.
VP Event Rule Criteria
You can define the following criteria for a VP event rule.
Hold reason: If you enter a valid hold reason in the Hold reason field, the system places the order on hold at the user level when a VP tickler is created for the event rule. In this situation, the system removes any pick slip preparation from the order; see Preparing Orders for Pick Slip Generation.
| Criterion | Event rule set up |
|---|---|
|
The ship via for the order ship to associated with the voided pick ticket matches the ship via on the event rule. |
Enter a ship via code in the Ship via field. If you enter a Ship via, you cannot define a Ship via priority for the event rule. The system evaluates the ship via on the order ship to, on the ship via on the pick ticket header. |
|
The priority of the ship via for the order ship to associated with the voided pick ticket matches the ship via priority on the event rule. |
Enter a ship via priority number in the Ship via priority field. If you enter a Ship via priority, you cannot define a Ship via for the event rule. The system evaluates the ship via on the order ship to, not the ship via on the pick ticket header. |
|
The item and/or SKU on the voided pick ticket matches the item and/or SKU on the event rule. |
Enter an item code in the Item field and optionally, a SKU code in the SKU field. If you define an item but not a SKU code and the item contains SKUs, the system creates a tickler for the item if any of the SKUs for the item are on a voided pick ticket. If you define both an item and SKU, the system creates a tickler only if that specific SKU is on a voided pick ticket. |
VP Event Examples
Example 1: Allow multiple ticklers is unselected for the VP event.
The following event rules are defined for the VP event, displayed in processing sequence order.
-
Event rule 1: Ship via is 1
-
Event rule 2: Item is A123
-
Event rule 3: Item is SKU2002 RED
You void 2 pick tickets:
-
pick ticket 55 is for ship via 1 and contains 2 pick ticket lines:
-
pick ticket line 1: item A123
-
pick ticket line 2: item B456
-
pick ticket 56 is for ship via 2 and contains 2 pick ticket lines:
-
pick ticket line 1: item SKU2002 GRN
-
pick ticket line 2: item SKU2002 RED
In this scenario, the system creates:
-
1 tickler for pick ticket 55 for rule 1: Ship via is 1.
-
1 tickler for pick ticket 56 for rule 3: Item is SKU2002 RED.
The system does not create a tickler for the other rules whose criteria are met.

Example 2: Allow multiple ticklers is selected for the VP event.
The following event rules are defined for the VP event, displayed in processing sequence order.
-
Event rule 1: Ship via is 1
-
Event rule 2: Item is A123
-
Event rule 3: Item is SKU2002 RED
You void 2 pick tickets:
-
pick ticket 55 is for ship via 1 and contains 2 pick ticket lines:
-
pick ticket line 1: item A123
-
pick ticket line 2: item B456
-
pick ticket 56 is for ship via 2 and contains 2 pick ticket lines:
-
pick ticket line 1: item SKU2002 GRN
-
pick ticket line 2: item SKU2002 RED
In this scenario, the system creates:
-
2 ticklers for pick ticket 55 for rule 1: Ship via is 1 and rule 2: Item is A123.
-
1 tickler for pick ticket 56 for rule 3: Item is SKU2002 RED.

Resolving VP Ticklers
A VP tickler is resolved when you select Resolve for a tickler at the Work with Tickler Screen (user/group view) or Workflow Management Screen.
WF (Remote Workflow) Event Processing
The system creates a tickler for the WF tickler event when a CWWorkflow XML message is received into Order Management System from an outside source.
When is the WF event evaluated? The system evaluates the WF event when the Workflow Processing integration layer job receives the CWWorkflow XML message into Order Management System.
CWMessageIn web service: You can use the CWMessageIn Web Service to route CWWorkFlow messages. In this situation, the target for each inbound message must match the Inbound program name for the integration layer process queue, as specified at the Integration Layer Process Queue Screen.
For more information see the Web Services Guide on https://support.oracle.com My Oracle Support (ID 2149144.1).
Web service authentication: Use the Working with Web Service Authentication (WWSA) menu option to define a valid user for basic web service authentication, or client ID if using OAuth. You must also create a corresponding user profile in Oracle Identity Cloud Service and assign the user to the corresponding web service role defined for the Order Management application.
Allowing multiple ticklers for the WF event: The Allow multiple ticklers setting does not apply to the WF tickler event.
Generic Workflow XML Message (CWWorkflow)
")
Note:
The XML message received into Order Management System for the remote workflow (WF) event must be named CWWorkflow. If the XML message is not named CWWorkflow, the Workflow Processing integration layer job does not process the message.| Attribute Name | Type | Length | Comments |
|---|---|---|---|
|
Message |
|
||
|
source |
alpha |
25 |
Identifies the source of the XML message. Note: The source value must match the Source field for the WF (remote workflow) tickler event or the system does not create a tickler. |
|
target |
alpha |
25 |
Identifies the target of the XML message. RDC indicates the XML message is sent to Order Management System. |
|
type |
alpha |
25 |
Identifies the type of information in the XML message. CWWorkflow indicates the message contains a tickler creation request. |
|
Workflow |
|
||
|
company |
numeric |
3 |
The Order Management System company where the tickler will be created. |
|
priority |
numeric |
1 |
The priority of the tickler. |
|
category |
alpha |
3 |
The tickler category assigned to the tickler. |
|
assign_to_user |
alpha |
10 |
The user ID of the user assigned to work on the tickler. |
|
assign_to_group |
alpha |
10 |
The tickler group assigned to work on the tickler. |
|
short_note |
alpha |
60 |
A brief note you can enter for the tickler. |
|
assign_date |
numeric |
8 |
The date the tickler is assigned to the assign to user or assign to user group, in MMDDYYYY format. |
|
order |
numeric |
8 |
The order associated with the tickler. |
|
order_ship_to |
numeric |
3 |
The order ship to associated with the tickler. |
|
customer_sold_to |
numeric |
9 |
The sold to customer associated with the tickler. |
|
customer_ship_to |
numeric |
3 |
The ship to customer associated with the tickler. |
|
customer_bill_to |
numeric |
7 |
The bill to customer associated with the tickler. |
|
Note |
You can have multiple work notes for a tickler, describing the task that needs to be resolved or the steps a user must take to resolve the tickler. |
||
|
note_line |
alpha |
60 |
Tickler work notes describing the task that needs to be resolved or the steps a user must take to resolve the tickl |
WF Event Rule Criteria
You can define the following criterion for a WF event rule.
| Criterion | Event rule set up |
|---|---|
|
The source of the workflow XML message received matches the message source defined for the event rule. |
Enter a message source code in the Message source field. Note: The source from the CWWorkflow XML message must match the Message source for the WF event rule. |
WF Event Example: Sample XML
A customer submits a question online regarding an order placed over the web storefront. The information in the customer’s inquiry is sent to Order Management System in the CWWorkflow XML message.
<Message source="IDC" target="RDC" type="CWWorkflow">
<Workflow company="555" priority="5" category="ORD" assign_to_user="KBROWN" short_note="exchange for order 5568" assign_date="091002" order="5568" order_ship_to="001" customer_sold_to="6849"
<Notes>
<Note note_line="Regarding order 5568,"
<Note note_line="I ordered the white tennis shoes (product number"
<Note note_line="4958) and" want to change the ordered size from size"
<Note note_line="9 to size 9.5. Please contact me at mmcstay@att.net"
<Note note_line="if you cannot change the shoe size. I am hoping to"
<Note note_line="exchange the shoe size before the item ships."
<Note note_line="Regards, Mr. Matthew McStay"The Workflow Processing integration layer job receives the CWWorkflow XML message and creates a tickler in the Tickler table using the information in the message.
| Tickler field... | is updated with... |
|---|---|
|
Create Tickler from CWWorkflow XML message: |
|
|
Company |
The company value from the CWWorkflow message. |
|
Tickler # |
The next available number from the Tickler Number number assignment value. |
|
Status |
O (open). |
|
Priority |
The priority value from the CWWorkflow message. |
|
Creation date |
The date the CWWorkflow message was received into Order Management System. |
|
Creation time |
The time the CWWorkflow message was received into Order Management System. |
|
Assigned date |
The assign_date value from the CWWorkflow message. |
|
Assigned time |
The time the tickler is assigned to the assign to user or assign to user group. |
|
Next notify date |
The next date the system sends an email to the assigned supervisor, notifying the supervisor that the tickler has not yet been resolved. The system uses this calculation to determine the next notify date when a tickler is first created: tickler creation date + value in Number of days to notify supervisor field for the event rule that created the tickler = next notify date. |
|
Source program |
The Order Management System program that created the tickler; IDC displays. |
|
Note type |
The note type defined for the WF tickler event. |
|
Short note |
The short_note value from the CWWorkflow message. |
|
Event |
WF (remote workflow). |
|
Rule sequence number |
The sequence number defined for the event rule that created the tickler. |
|
Category |
The category value from the CWWorkflow message. |
|
Original user |
The assign_to_user value from the CWWorkflow message. |
|
Original group |
The assign_to_group value from the CWWorkflow message. |
|
Current user |
The assign_to_user value from the CWWorkflow message. |
|
Current group |
The assign_to_group value from the CWWorkflow message. |
|
Created by user |
The user ID of the user that created the tickler; this is the user ID of the user that started the Workflow Processing integration layer process. |
|
Supervisor group |
The supervisor group defined for the WF (remote workflow) tickler event. |
|
Order # |
The order value from the CWWorkflow message. |
|
Order ship to # |
The order_ship_to value from the CWWorkflow message. |
|
Customer sold to # |
The customer_sold_to value from the CWWorkflow message. |
|
Customer ship to # |
The customer_ship_to value from the CWWorkflow message. |
|
Customer bill to # |
The customer_bill_to value from the CWWorkflow message. |
|
Tickler note |
The note_line value from the CWWorkflow message. A separate Tickler Note record is created for each note_line. |
Resolving WF Ticklers
A WF tickler is resolved when you select Resolve for a tickler at the Work with Tickler Screen (user/group view) or Workflow Management Screen.
Work with Tickler Event Rule Procedure Screen
Purpose: Use this screen to create or change the procedures, or instructions, a user should follow when working with a tickler.
How to display this screen: Select Procedures for an event rule at the Work with Tickler Event Rule Screen.
| Field | Description |
|---|---|
|
Event |
The code and description for the tickler event associated with the tickler event rule procedures. Code: Alphanumeric, 2 positions; display-only. Description: Alphanumeric, 40 positions; display-only. |
|
Rule |
The description of the event rule associated with the event rule procedures. Alphanumeric, 40 positions; display-only. |
|
Procedure |
Free-form lines where you can enter procedures, or instructions, a user should follow to resolve the tickler. Alphanumeric, 60 positions; optional. |
| Screen Option | Procedure |
|---|---|
|
Toggle the procedure lines between add mode and change mode |
Select Add/Change to toggle the procedure lines between add mode and change mode. In add mode, you can enter new procedure lines; in change mode, you can enter new procedure lines and also change existing procedure lines. |
Work with Tickler Event Rule Screen
Purpose: Use this screen to create, change, and delete event rules defined for a specific tickler event. You can also create procedure notes for each event rule.
Note:
Event rules display on this screen in processing sequence order, allowing you to easily see the order in which the system evaluates the rules to determine if a tickler is created; see Event Rule Processing Sequence.
How to display this screen: Select Rules for a tickler event at the Work with Tickler Event Screen.
| Field | Description |
|---|---|
|
Event |
The code and description of the event associated with the event rules. Code: Alphanumeric, 2 positions; display-only. Description: Alphanumeric, 40 positions; display-only. |
|
Proc seq # |
The processing sequence number for the event rule. The processing sequence number defines the order in which the system evaluates the rules to determine if a tickler is created, from lowest sequence number to highest. Note: The first tickler event rule that meets the criteria creates a tickler. It is important that you assign the most important tickler event rule the lowest processing sequence number. If you do not define a processing sequence number for an event rule, the system assigns the event rule a processing sequence number of 0. If all of the rules have the same processing sequence number, the system evaluates the rules in rule sequence number. See Event Rule Processing Sequence. Numeric, 3 positions; optional. |
|
Rule seq # |
The rule sequence number for the event rule. The system assigns a rule sequence number to each rule you create; the first rule you create is assigned a rule sequence number of 1, etc. Note: If all of the rules have the same processing sequence number, the system evaluates the rules to determine if a tickler is created in rule sequence number, from lowest rule number to highest. See Event Rule Processing Sequence. Numeric, 3 positions; optional. |
|
Description |
A description of the event rule, usually indicating the criteria defined for the rule. Alphanumeric, 40 positions; optional. |
|
Pty (Priority) |
The priority assigned to the event rule, used to determine the importance of ticklers created for the event rule. You can scan for ticklers by priority at the Work with Tickler Screen (user/group view) (tickler users) and Workflow Management Screen (tickler supervisors). You can assign a tickler event priority between 1-9, where 1 is the lowest priority and 9 is the highest priority. The priority defined at the tickler event level defaults, but you can override it. The tickler priority defined at the event rule level overrides the tickler priority defined at the event level. Numeric, 1 position; display-only. |
|
Act (Active flag) |
Indicates whether the event rule is active. selected = The event rule is currently active; the system creates a tickler for the event rule if its criteria are met by the system action. Remember, to create a tickler for the event rule, the Active flag at the event level must also be selected. unselected = The event rule is not currently active; the system does not create a tickler, regardless of whether the system action qualifies for the event rule. |
|
Cat (Tickler category) |
A code for the tickler category assigned to the event rule. Tickler categories are used to group ticklers. Tickler categories are defined in and validated against the Tickler Category table; see Working with Tickler Category (WTCT). Alphanumeric, 3 positions; optional. |
| Screen Option | Procedure |
|---|---|
|
Create a tickler event rule |
Select Create to advance to the Create Tickler Event Rule Screen. |
|
Change a tickler event rule |
Select Change for an event rule to advance to the Change Tickler Event Rule Screen. You can change all fields on this screen except Event code. See Create Tickler Event Rule Screen for field descriptions. Note: If you create or change a tickler event rule, you must restart the asynchronous jobs the Background Job Control menu option before your updates are applied to new ticklers. |
|
Delete a tickler event rule |
Select Delete for an event rule to delete it. Note: You can delete an event rule only if it is not associated with an open or in process tickler. |
|
Display a tickler event rule |
Select Display for an event rule to advance to the Display Tickler Event Rule Screen. You cannot change any information at this screen. See the Create Tickler Event Rule Screen for field descriptions. |
|
Create or change tickler event rule instructions |
Select Procedures for an event rule to advance to the Work with Tickler Event Rule Procedure Screen. |
Point of Sale Integration
Topics in this part: This part describes integration between Order Management System and a POS (point of sale) system.
-
Point of Sale Integration Overview provides a brief overview of the various integrations available.
-
Generic Inventory Transaction Upload describes the process of uploading inventory transactions.
-
Generic Item Download API describes the process of downloading item/SKUs.
-
Generic Vendor Download API describes the process of downloading vendors.
-
Generic Invoice Download API describes the process of downloading invoices.
-
Working with Outbound Interface Transactions (WOIT) allows you to review triggers in the IL Outbound Trigger table.
-
Generating Outbound Interface Triggers (GOIT) describes how to create triggers in the IL Outbound Trigger table for item/SKUs, vendors, and/or invoices.
-
Generic Customer History API describes how the system responds to requests for customer or order history information.
-
Generic Inventory Inquiry API describes how the system responds to requests for inventory information about an item/SKU.
-
Generic Inventory Download API describes the process of downloading item availability information.
-
Generic Customer Inquiry (Search) API describes how the system responds to requests for customer records based on various search criteria.
-
Work with Store Cross Reference (WSCR) describes how to set up a cross reference table to map store locations between Order Management System and an external system such as Order Broker or a POS application.
-
Store Upload explains how to upload store cross reference information from an external system to create or update records the Store Cross Reference table.
-
Generic Customer Download API describes the process of downloading customer information.
-
Mass Customer Download describes the process of creating a batch file containing customer information for sold to customers that meet the Mass Customer Download customer class criterion.
-
Customer Engagement Batch Customer and Sales Integration describes the process of sending customer, item, sales and return information from Order Management System to Oracle Retail Customer Engagement.
For more information see the Web Services Guide on My Oracle Support (ID 2149144.1).
Point of Sale Integration Overview
Purpose: The point of sale integration allows you to send data from Order Management System to your point of sale system and receive data from your point of sale system into Order Management System.
In this topic:
Point of Sale Download Processing
Overview: Order Management System allows you to capture the following information to download to a point of sale system:
-
item/SKUs; see Generic Item Download API
-
vendors; see Generic Vendor Download API
-
invoices; see Generic Invoice Download API
-
inventory: see Generic Inventory Download API
-
customers: see Generic Customer Download API
For more information see the Web Services Guide on My Oracle Support (ID 2149144.1).
Information flow: This flowchart explains how information is downloaded from Order Management System to a point of sale system.

What Data Can I Download?
Jobs in the Working with Integration Layer Processes (IJCT) menu option control what information is downloaded to another system:
-
Item Outbound job: generates an item download XML message for each trigger in the IL Outbound table with a File code of SKU.
-
Vendor Outbound job: generates a vendor download XML message for each trigger in the IL Outbound table with a File code of VND.
-
Invoice Outbound job: generates an invoice download XML message for each trigger in the IL Outbound table with a File code of IHD.
-
Inventory Outbound job: generates an inventory download XML message for each trigger in the IL Outbound table with a File code of ITW.
-
Customer Download job: generates a customer download XML message for each trigger in the IL Outbound table with a File code of CST.
When are Download Triggers Created?
System control values control the type of data downloaded to a point of sale system.
-
If the system control value is selected, certain actions in Order Management System triggers the system to create triggers in the IL Outbound Trigger table. The IL Outbound Trigger table acts as a “to do” list for the data that requires download.
-
If the system control value is unselected, the system does not create triggers in the IL Outbound Trigger table.
You can also create triggers for existing data in your company using the Generating Outbound Interface Triggers (GOIT) menu option.
| System Control Value | Description |
|---|---|
|
Select this field to create item download triggers in the IL Outbound Trigger table to download to the point of sale system. |
|
|
Select this field to create vendor download triggers in the IL Outbound Trigger table to download to the point of sale system. |
|
|
Select this field to create invoice download triggers in the IL Outbound Trigger table to download to the point of sale system. |
|
|
Select this field to create inventory download triggers in the IL Outbound Trigger table to download to the point of sale system. |
|
|
Select this field to create customer download triggers in the IL Outbound Trigger table to download to the point of sale system. |
Identifying Download Triggers
Each trigger in the IL Outbound Trigger table has a:
-
File code: indicating the type of information to download and which IL process job processes the trigger.
-
Key: indicating the specific record to download.
-
Capture type: indicating the type of activity performed against the record:
-
A = the record was created.
-
C = the record was maintained. Note: The system removes any duplicate change triggers; see Trigger Cleanup.
-
D = the record was deleted. Note: The system processes delete triggers immediately; see Processing Delete Triggers.
-
You can review point of sale download triggers in the Working with Outbound Interface Transactions (WOIT) menu option.
| File code | Created when | Refers to table(s) | Key | IL Process job |
|---|---|---|---|---|
|
SKU |
An item/SKU is added, updated or deleted; see Item Outbound Trigger Activities For more information see the Web Services Guide on My Oracle Support (ID 2149144.1). |
Item SKU |
11122222222222233333333333333 where: 111 is the company code 222222222222 is the item number 33333333333333 is the SKU code |
Item Outbound |
|
IHD |
An invoice is created or updated; see Invoice Outbound Trigger Activities For more information see the Web Services Guide on My Oracle Support (ID 2149144.1). |
Invoice Header Order Header |
111222222233333333 where: 111 is the company code 2222222 is the order number 33333333 is the invoice number |
Invoice Outbound |
|
VND |
A vendor is added, updated or deleted; see Vendor Outbound Trigger Activities For more information see the Web Services Guide on My Oracle Support (ID 2149144.1). |
Vendor |
1112222222 where: 111 is the company code 2222222 is the vendor code |
Vendor Outbound |
|
ITW |
Item/SKU available quantity changes; see Creating Inventory Download Triggers Interactively Due to Changes in Availability For more information see the Web Services Guide on My Oracle Support (ID 2149144.1). |
Item SKU Warehouse Item Warehouse Item UPC |
11122222222222233333333333333 where: 111 is the company code 222222222222 is the item number 33333333333333 is the SKU code |
Inventory Outbound |
|
CST |
You create, change, or delete a customer; see Customer Outbound Trigger Activities For more information see the Web Services Guide on My Oracle Support (ID 2149144.1). |
Customer Sold To tables Customer Ship To tables Customer Bill To tables |
1112222222 where: 111 is the company code 2222222 is the customer code |
Customer Download Outbound |
Outbound Interface Trigger Rules
Outbound interface trigger rules define the criteria a record must meet in order for the system to create an IL outbound trigger. For each IL Process outbound job, you can define trigger rules for certain tables. For example, you can define trigger rules for the Item table and SKU table for the Item Outbound job. If you define more than one criterion, the record must meet all of the criteria defined in order to generate a trigger.
See Defining Outbound Interface Trigger Rules for more information on setting up trigger rules for each IL Process job.
| For IL Process job: | you can create trigger rules for: | Example: |
|---|---|---|
|
Item Outbound |
Item table SKU table |
You can specify to only create item download triggers for company 555, items that are SKU’ed and whose SKUs are located in warehouse 20. To do this:
See Item Outbound Trigger Rules in the Web Services Guide on My Oracle Support (ID 2149144.1). |
|
Invoice Outbound |
Invoice Header table Order Header table |
You can specify to only create invoice download triggers for debit invoices and not credit invoices. To do this, enter EQ and I (invoice) next to the Invoice type trigger field. See Invoice Outbound Trigger Rules. For more information see the Web Services Guide on My Oracle Support (ID 2149144.1). |
|
Vendor Outbound |
Vendor table |
You can specify to only create vendor download triggers for companies 27 and 555 and vendor 202. To do this, enter LIST and 27 555 next to the Company trigger field and EQ and 202 next to the Vendor # trigger field. See Vendor Outbound Trigger Rules. For more information see the Web Services Guide on My Oracle Support (ID 2149144.1). |
|
Inventory Outbound |
Item SKU Warehouse Item Warehouse Item UPC |
You can specify not to create inventory download triggers for non-inventory items. To do this, enter NE and ’Y’ next to the Non-inventory trigger field. |
|
Customer Download Outbound |
Company Customer class Inactive? Country |
You can specify not to create customer download triggers for inactive customers. To do this, enter NE and ’Y’ next to the Inactive? trigger field. See Customer Outbound Trigger Rules. For more information see the Web Services Guide on My Oracle Support (ID 2149144.1). |
Outbound Interface Trigger Monitor
When active, each IL Outbound job monitors the IL Outbound Trigger table for unprocessed triggers at defined intervals, based on the Outbound delay time.
Each IL Outbound job:
-
looks for triggers with the appropriate File code and a Status of ready (R).
-
the Item Outbound job looks for File code SKU.
-
the Invoice Outbound job looks for File code IHD.
-
the Vendor Outbound job looks for File code VND.
-
the Inventory Outbound job looks for File code ITW.
-
the Customer Download Outbound job looks for File code CST.
-
-
sends each trigger to the IL Outbound message builder to generate an XML message.
Trigger Cleanup
Before processing triggers in the IL Outbound table, the system looks for duplicate unprocessed download triggers with the same Capture type for the same File code and Key. If duplicate triggers exist, the system removes the duplicates, leaving only the most recent trigger for the Capture type, File code and Key.
Example: The following change triggers exist in the IL Outbound table.
| File | Status | Key | Results |
|---|---|---|---|
|
SKU |
unprocessed |
555AB105004 RED GRLS SMLL |
The system deletes 2 of these triggers, leaving only one trigger to process. |
|
SKU |
unprocessed |
555AB105004 RED GRLS SMLL |
|
|
SKU |
unprocessed |
555AB105004 RED GRLS SMLL |
Note:
If both an add and change trigger exist for the same File code and Key, the system generates a download message for both triggers.
Processing Delete Triggers
The system processes triggers in the IL Outbound Trigger table with a delete (D) Capture type immediately, regardless if the IL Outbound job is active or inactive.
Note:
Since you cannot delete an invoice, the system never creates a delete download trigger for an invoice.
If one or more unprocessed triggers exist in the IL Outbound Trigger table for the same File code and Key, the system:
-
if one of the matching triggers is an add (A) Capture type: does not create the delete trigger and removes any other matching triggers (add and change). Since the point of sale system never received the add trigger, you do not want to send a delete trigger or any other triggers.
Note:
However, if an Original processed date and time exist for the add trigger (indicating the trigger was previously downloaded and then reset to reprocess again), the system generates a download message for the delete trigger and removes any other matching triggers (add and change). Since the point of sale system previously received the add trigger, you want to send a delete notification to the system.
-
if the matching trigger is a change (C) Capture type: generates a download message for the delete trigger and removes any other matching change triggers. Since the point of sale system is receiving a delete trigger, you do not need to send any change triggers.
Outbound Interface Message Builder
For each trigger, the IL Outbound message builder:
-
determines what information requires download. The system uses the Key field for the trigger to determine which records require download.
-
The Key field for item download triggers consists of company + item number + SKU code. The SKU code is included only if the item is a SKU’ed item. For example the Key 555AB100112 BLUE GRLS SMLL indicates the item and SKU information is located in company 555 for item number AB100112 and SKU code BLUE GRLS SMLL.
-
The Key field for invoice download triggers consists of company + order number + invoice number. For example the Key 55500049680000583 indicates the invoice information is located in company 555 for order number 4968 and invoice number 583.
-
The Key field for vendor download triggers consists of company + vendor number. For example the Key 5550002006 indicates the vendor information is located in company 555 for vendor number 2006.
-
The Key field for inventory download triggers consists of company + item number + SKU code. The SKU code is included only if the item is a SKU’ed item. See the description of the item download trigger key above.
-
-
determines which elements to include in the download message, based on XML inclusion rules. You can define XML inclusion rules for each IL Outbound job at the Outbound Interface XML Inclusion Screen. XML inclusion defines which elements to include in a download message.
-
If the element is included, that element and its parents are included in the generated download XML message.
-
If the element is excluded, that element and its children are excluded from the generated download message.
-
-
sends the generated download message to the queues defined for the Outbound job that are active.
For more information:
-
item download: Item Outbound XML Inclusion
-
vendor download: Vendor Outbound XML Inclusion
-
invoice download: Invoice Outbound XML Inclusion
-
inventory download: Inventory Download XML Inclusion
-
customer download: Customer Outbound XML Inclusion
For more information see the Web Services Guide on My Oracle Support (ID 2149144.1).
Outbound Interface Queues
Once the Outbound message builder determines which elements to include in the download XML message, the IL Outbound job sends each download XML message to the appropriate queues whose Enabled field is selected. If the queue is not enabled, the system does not send the download message to that queue.
You can define outbound queues for each IL Outbound job at the Work with Integration Layer Process Queues Screen.
For example, you can define a separate queue to send the download message to your:
-
retail store
-
warehouse management system
Generic Download Message Formatting
For each download message:
-
numeric fields are not zero-filled, for example 000001 displays as 1.
-
blank spaces are removed from the beginning and end of alphanumeric fields.
-
decimal places for numeric fields are implied.
-
empty elements are not included; for example, if an item/SKU does not have a vendor item defined, the system does not send the VendorItem element or its children (VITPriceBreak, VITAdditionalCharge, VITNote, and VITUserField) in the item download message.
-
empty attributes are not included; for example, if the Kit type field for an item/SKU is blank, the system does not send the Kit_type attribute in the item download message.
For more information:
-
Item Download XML Message (CWItemOut)
-
Vendor Download XML Message (CWVendorOut)
-
Invoice Download XML Message (CWInvoiceOut)
-
Inventory Download XML Message (CWInventoryDownload)
-
Customer Download XML Message (CWCustomerDownload)
For more information see the Web Services Guide on My Oracle Support (ID 2149144.1).
Point of Sale Upload Processing
The following uploads allow you to bring information into Order Management System from another system.
Generic Order Interface
Overview: Use the generic order interface to send orders into Order Management System. You can use this interface for any type of order, including retail point of sale transactions, orders received through a remote call center, and orders taken at a web storefront.
Options: Your options through the generic order interface include:
-
response: generating a detailed response, a simple response, or no response
-
separate payment message: sending the payment information separately or in the same message as the rest of the order information
-
batching: batched or non-batched orders
-
deposit and refund suppression: suppressing the order from deposit processing and refund generation
-
returns: entering a return by specifying a negative order quantity
-
customer updates: updating an existing sold-to, or creates a new sold-to, bill-to, or permanent ship-to customer
For more information: See Generic Order Interface (Order API).
Inventory Transaction Upload
Overview: You can use the Generic Inventory Transaction Upload to synchronize inventory levels in Order Management System with another system. For example, you can upload counts in retail stores. To do so, you can identify each store as a warehouse in Order Management System. The inventory counts of each store are then available for review through a menu option such as Using Inventory Inquiry (DINI) or Inquiring into Item Availability (DIAV).
For more information see the Web Services Guide on My Oracle Support (ID 2149144.1).
You can use the upload for any type of inventory transaction that is also available in Working with Inventory Transactions (WITI); for example, you can upload transfers, adjustments, returns to vendor, and resets of on-hand quantity. System transactions such as shipments or purchase order receipts are not allowed. The upload performs the same edits and validations as in batch or interactive inventory transactions.
For more information: See Generic Inventory Transaction Upload in the Web Services Guide on My Oracle Support (ID 2149144.1).
Other inventory integrations: In addition to the inventory transaction upload, you can use the:
-
Generic Inventory Download API to download current inventory information, such as availability and warehouses where an item/SKU is stored, to an external system, such as Order Broker. You can schedule the download periodically, such as once a day; the system also creates trigger records based on changes to availability levels.
-
Generic Inventory Inquiry API to respond to requests for inventory information from an external system. Through this API, the system responds to requests “behind the scenes,” and the activity is not visible on any screen.
For more information see the Web Services Guide on My Oracle Support (ID 2149144.1).
-
integration with Order Broker to share item and inventory information with multiple systems and to submit orders to another system for fulfillment. See the Order Broker Integration Overview for background.
Point of Sale Bi-Directional Processing
The following process allows you to receive a request from an external system or Order Broker, and generate a response.
Customer Inquiry (Search) Integration
Purpose: Use the generic customer inquiry integration to enable an external system to find a customer based on standard search criteria, such as alternate customer number, postal code, last name, phone number, or email address. The information in the response from Order Management System includes the customer number as well as name and address.
This search function has options similar to the Select Customer Sold To Screen, and produces similar results. When you enter search criteria at the Select Customer Sold To Screen, you advance to a subsequent screen listing customers in alphanumeric order based on values that match your search criteria. Similarly, when the system receives a customer inquiry request, it responds with a message listing customers in alphanumeric order based on values that match the search criteria from the request.
You can use this integration together with the customer history integration described below so that, once Order Management System has provided the matching customer(s) from the Customer Sold To table, the external system can then send a customer history request for a selected customer.
For more information: See Generic Customer Inquiry (Search) API in the Web Services Guide on My Oracle Support (ID 2149144.1).
Customer History Integration
Purpose: Use the generic customer history integration to provide a customer’s order history to an external system and detailed information about a single order.
The external system can request information using the Order Management System customer number or order number. It can also use its own numbers if they map to the alternate customer number or alternate (web) order number in Order Management System.
When the request provides information on the customer, Order Management System produces a customer history message in response. When the request provides information on the order, Order Management System produces a detailed or summary order message. The request can include the Order Management System customer or order numbers, or the external system can use its own numbers if they map to the alternate customer number or alternate (web) order number in Order Management System.
For more information: See Generic Customer History API in the Web Services Guide on My Oracle Support (ID 2149144.1).
Inventory Inquiry Integration
Purpose: Use the generic inventory inquiry integration to provide current inventory information for items upon request. For example, you might use this integration to send up-to-date inventory information when it is requested by an external system. See Inventory Transaction Upload for a comparison between this integration and other generic inventory integrations.
For more information: See Generic Inventory Inquiry API in the Web Services Guide on My Oracle Support (ID 2149144.1).
Point of Sale Integration Setup
You must perform the necessary Order Management System setup and processing to use the point of sale Integration.
Information requiring setup includes:
For more information: See the Generic Order Interface (Order API) and the Generic Inventory Transaction Upload in the Web Services Guide on My Oracle Support (ID 2149144.1) for information on setup related to these interfaces.
System Control Values
| System Control Value | Description |
|---|---|
|
Create Generic Item Download Trigger Records (I15) |
Select this field to create item download triggers in the IL Outbound Trigger table to download to the point of sale system. |
|
Create Generic Vendor Download Trigger Records (I16) |
Select this field to create vendor download triggers in the IL Outbound Trigger table to download to the point of sale system. |
|
Create Generic Invoice Download Trigger Records (I17) |
Select this field to create invoice download triggers in the IL Outbound Trigger table to download to the point of sale system. |
|
Create Generic Inventory Download Triggers (I32) |
Select this field to create inventory download triggers in the IL Outbound Trigger table to download to the point of sale system. |
|
Create Generic Customer Download Triggers (L12) |
Select this field to create customer download triggers in the IL Outbound Trigger table to download to the point of sale system. |
|
Enter the number of days to retain records in the IL Outbound Trigger table before purging them. Run the PURGIJT periodic function (program name ILR0026) to delete any records if: Last processed date is less than the current system date by the number of purge days and Status is X. You can also use the Purge option at the Work with Outbound Interface Transactions Screen to purge records. Example: Today is 2/07, and you have set this value to 1. Any record whose Last processed date is 2/06 or earlier is purged. |
Menu Options
| Menu Option | Description |
|---|---|
|
Generating Outbound Interface Triggers (GOIT) |
Allows you to create an IL outbound trigger record for each item/SKU, vendor, and/or invoice in your company. Run this process to initially send your data to the point of sale system. |
|
Working with Outbound Interface Transactions (WOIT) |
Allows you to review, delete, or resend IL outbound trigger records. |
|
Working with Integration Layer Processes (IJCT) |
Use this option to create the process queues and required message queues and queue managers to send and receive messages for each integration. Also, define trigger rules, XML inclusion rules, and queues for the following IL Process jobs related to point of sale: Item Outbound: processes triggers with a File code of SKU and generates an item download message. Invoice Outbound: processes triggers with a File code of IHD and generates an invoice download message. Vendor Outbound: processes triggers with a File code of VND and generates a vendor download message. Inventory Outbound: processes triggers with a File code of ITW and generates an inventory download message. |
Periodic Functions
| Periodic Function | Description |
|---|---|
|
Purge IJCT Download (program name ILR0026) |
Run this periodic function to purge processed IL outbound triggers, based on the Outbound Interface Trigger File Purge Days (I14) system control value: Capture date is less than the current system date by the number of purge days and Status is X |
|
Start All IJCT Jobs (program name MSX1288) |
Run this periodic function to start all IL Process jobs in the Working with Integration Layer Processes (IJCT) menu option. |
|
Stop All IJCT Jobs (program name MSX1289) |
Run this periodic function to end all IL Process jobs in the Working with Integration Layer Processes (IJCT) menu option. |
Batch Inventory Overlay Upload
Purpose: Use the batch inventory overlay upload process to update the on-hand quantities for a batch of item locations.
A periodic function processes the contents of a pipe-delimited text file that is placed in the CWDIRECTCP_UPLOAD_DIRECTORY, or uploaded through the File Storage API.
Processing: The batch overlay upload:
-
Processes the inventory upload file if it is found in the directory:
-
Defined in the CWDIRECTCP_UPLOAD_DIRECTORY property or,
-
In the OMS-IMPORTS container of the FILE_STORAGE table.
-
-
For each row in the file, updates the Item Location record with the on-hand quantity, or creates the Item Location record if the Item Warehouse exists.
-
Resets the on-hand quantity for the Item Warehouse record.
-
Submits a record to the Evaluate Backorder queue, if needed.
-
Writes any errors to an error file in the:
-
Errors subfolder of the CWDIRECTCP_UPLOAD_DIRECTORY, as described below, or
-
OMS-ERRORS container of the FILE_STORAGE table.
-
-
Deletes the file after processing is complete after writing any errors to the:
-
Errors subfolder, or
-
OMS-ERRORS container of the FILE_STORAGE table. You can download this file through the file storage API.
-
The periodic function does not:
-
Reset the on-hand quantity to be lower than the reserved quantity.
-
Write an Inventory Transaction History record.
Setup: Setup for the batch overlay process includes:
-
Create the INVOVRL (Program Name PFINVOVR) periodic function and assign it to a periodic process.
-
Working with Admin Properties (CPRP): Set the following admin properties:
-
COMMIT_RATE: The number of records to process at a time. In most cases, should be set to 1000 for optimal processing.
-
OVERLAY_DEBUG: Set to Y in order to create entries in the Job.log file. The log notes the number of records in the file, the number of records successfully processed, the number of errors, and the time to process, for example: File: INV_OVERLAY_005.TXT Rows: 4 Success: 1 Errors: 3 Start Time: Mon Mar 04 16:03:11 EST 2019 End Time: Mon Mar 04 16:03:11 EST 2019 Time In Seconds: 0.041420431 Time In Minutes: 6.903405166666667E-4
-
CWDIRECTCP_UPLOAD_ DIRECTORY: Indicates the location where the periodic function looks for the batch overlay import file if you are not using the file storage API; otherwise, see the File Storage API for more setup information.
-
File name: The batch overlay upload file placed in the upload directory or uploaded through the file storage API should be named INV_OVERLAY_SEQ.TXT. A zip file such as INV_OVERLAY_SEQ.ZIP is also supported if using the file storage API, provided the zip file includes a single file using the same name, for example, INV_OVERLAY_SEQ.ZIP contains INV_OVERLAY_SEQ.TXT. In all cases, the SEQ is a unique, optional sequence number. If there are multiple files in the upload directory or the OMS-IMPORTS container, the function processes them in order based on the sequence number.
File layout: A sample row in the batch overlay upload file is:
6|1000|RED 5|1|A010101|50
Where:
-
6 is the company.
-
1000 is the item code.
-
RED 5 is the SKU, if any; otherwise, this field should be empty.
-
1 is the warehouse code.
-
A010101 is the warehouse location.
-
50 is the new on-hand quantity to overlay the current on-hand quantity.
Errors: If the function finds any errors, it writes a copy of the file in:
-
The Errors subfolder in the CWDIRECTCP_UPLOAD_DIRECTORY or
-
The OMS-ERRORS container of the FILE_STORAGE table.
The TXT suffix is replaced with ERROR: for example, INV_OVERLAY_123.ERROR. The function adds a description of the error to the row in the error file. Possible errors include:
-
Location is not valid: Either the location or the company is invalid.
-
No Item Warehouse row found: Possible explanations include:
-
A matching Item Warehouse record does not exist for the specified Item Location.
-
The item specified is invalid.
-
No SKU is specified for a SKU’d item.
-
Note:
Matching for alphanumeric data, including the item, SKU, and location code, is case-sensitive.
-
Requested overlay brings on hand below Printed or Reserved: The overlay quantity is lower than the current printed or reserved quantity for the Item Location.
-
Invalid number of entries: Possible explanations include:
-
A row is empty.
-
There is no company or quantity specified for the row.
-
-
One or more entries are invalid: Possible explanations include:
-
No item was specified.
-
No warehouse was specified.
-
o location was specified.
-
Logging: The process writes records to the App.log file indicating:
-
The number of records successfully updated.
-
The number of records in error.
-
That the file was deleted after processing.
Note:
-
To prevent potential errors, Oracle recommends not passing updates to the same Item Location in the same upload file.
-
If the zip file in the OMS-IMPORTS folder does not contain a text file with a matching name, no processing occurs and the file is deleted.
Importing Store Cross Reference Locations through Order Broker’s Discovery Web Service
Purpose: You can use Order Broker’s discovery web service to request the codes, descriptions and addresses of locations from Order Broker, and use this information to create Store Cross Reference records in Order Management System. A periodic function calls the web service and specifies the system in Order Broker whose locations should be imported and used to create the cross-reference records.
Location discovery setup:
-
Periodic function: Create a periodic function such as IMPSTLC using the Program name PFR0122 and assign it to a periodic process. The Parameter for the periodic function is composed of up to 11 positions, where:
-
position 1 = Y or y if the store cross-reference records should be created with the Ship for Pickup flag selected; otherwise, you would typically set the first position to N. If the first position is set to anything other than Y or y, the Ship for pickup flag is unselected for the Store Cross Reference record.
-
positions 2-11 = The code identifying the system associated with the locations. Must be a valid system code in Order Broker.
Example: If the parameter is set to NPOS, the periodic function imports location records for system POS in Order Broker, and leaves the Ship for pickup flag for each imported location unselected.
-
-
Required property file setting: To import locations using the discovery web service, you need to set the OROB_DISCOVERY_SERVICES_WSDL_LOCATION property in Working with Customer Properties (PROP) to the endpoint for the Discovery Services web service. This entry should be set to https://SERVER:8443/Locate/DiscoveryServices, where SERVER is the name of your Oracle Retail Order Broker server.
Note:
If the discovery web service requires basic web service authentication, you must define a valid web service authentication user and password in Working with Web Service Authentication (WWSA), or client ID if using OAuth.
Location discovery processing: The periodic function:
-
Sends a request to Order Broker’s discovery web service for locations in the system specified in the Parameter for the periodic function, as described above.
-
Receives a response from Order Broker’s discovery web service, listing all locations in the specified system, excluding the Default Unfulfillable Location.
-
For each location code specified in the response message that does not match an existing record, creates a new Store Cross Reference record in the company specified for the periodic process, using the first position of the periodic function’s Parameter to determine whether to select the Ship for Pickup flag for the new record. See below for mapping details.
Note:
-
Prior to Order Broker 15.0, the Default Unfulfillable Location is labeled the Default Shipping Location at the Preferences screen.
-
If there is already a Store Cross Reference record for a location specified in the response message, the function does not update it.
-
If the first position of the Parameter is not Y or y, the Store Cross Reference records are created with the Ship for pickup flag unselected.
-
If a valid system in Order Broker is not specified by positions 2-11 of the Parameter, Order Broker does not return any locations in the response, and no Store Cross Reference records are created.
-
All characters are converted to uppercase when creating the Store Cross Reference records.
-
If the information passed for a field from Order Broker exceeds the length of the corresponding field in Order Management System, it is truncated.
-
Only the fields listed below are mapped. For example, the apartment or suite, if any, for the location is not mapped from Order Broker to Order Management System.
-
Order Broker does not log the discovery web service messages; however, Order Management System logs the activity in the OROB (Oracle Retail Order Broker) Log.
-
The function does not validate the data passed, such as city, state, or postal code, when creating new records.
For more information: See:
-
the Order Broker Operations Guide for details on the discovery web services.
-
Working with Periodic Functions (WPER) and Working with Periodic Processes (WPPR) for information on setting up and running the periodic function.
-
Work with Store Cross Reference (WSCR) for information on working with Store Cross References and on how they are used.
Location data mapping: The table below describes how the function maps the data from the web service response when creating Store Cross Reference records.
| From OROB | Store Cross Reference Record | Comments |
|---|---|---|
|
N/A |
Company code |
From the Company specified when executing the periodic process. |
|
location code |
Store # |
|
|
Name |
Description |
|
|
N/A |
Ship for Pickup |
From the first position of the Parameter specified for the periodic function; see above. |
|
Address lines 1-4 |
Address lines 1-4 |
Truncated if they exceed 32 positions. |
|
City |
City |
|
|
State or province |
State |
Truncated if it exceeds 2 positions. |
|
Postal code |
Postal code |
|
|
Country code |
Country code |
|
|
Telephone number |
Telephone number |
Truncated if it exceeds 14 positions. |
|
N/A |
Active |
Selected (set to Y). |
Stored Value Card Integration
Topics in this part: The following topics describe the functions available for stored value card integration.
-
Stored Value Card Overview and Setup provides an overview of stored value card processing and required setup.
-
Stored Value Card Purchase and Activation describes the processing that occurs when a stored value card is purchased and activated.
-
Working with Physical Stored Value Card Assignment (WPSA) describes how to assign a number to a physical stored value card.
-
Stored Value Card Balance Inquiry (MSVB) describes the processing that occurs when you perform a stored value card balance inquiry.
-
Stored Value Card Authorization Reversal describes the processing that occurs when you reimburse a stored value card payment a cancellation or deactivation amount.
-
Transmitting Activation and Reversal Transactions (SSVC) describes how to process stored value card download triggers and generate stored value card XML messages to send to the service bureau for processing.
-
Generating Stored Value Card Refunds describes how to generate a new stored value card to send to the sold to customer when you process a stored value card credit.
-
Customer Engagement Stored Value Card Integration describes the integration between Order Management System and the Oracle Retail Customer Engagement stored value card system.
Stored Value Card Overview and Setup
Overview: Stored value cards are gift cards assigned a pre-paid dollar amount that you can purchase and use as a form of payment. There are two types of stored value cards available in Order Management System: physical cards you ship to the recipient card holder and virtual cards you email to the recipient card holder.
In this topic:
For more information:
-
Stored Value Card Purchase and Activation: provides information on purchasing and activating a physical or virtual stored value card.
-
Working with Physical Stored Value Card Assignment (WPSA): provides information on assigning a number to a physical stored value card.
-
Stored Value Card Balance Inquiry (MSVB): provides information on inquiring on the remaining balance of a stored value card.
-
Stored Value Card Authorization Reversal: provides information on reimbursing a stored value card when you process a cancellation or deactivate the card and an open, unused authorization exists.
-
Transmitting Activation and Reversal Transactions (SSVC): provides information on processing stored value card download triggers to generate activation and authorization reversal messages to send to the service bureau for processing.
-
Generating Stored Value Card Refunds: provides information on generating a new stored value card for a refund amount.
-
Customer Engagement Stored Value Card Integration: provides information on the integration between Order Management System and the Oracle Retail Customer Engagement stored value card system.
Stored Value Card Overview
In Order Management System:
-
You can create an item identified as a physical or virtual stored value card.
-
Physical stored value cards are cards that you can stock in a warehouse or retail location. Physical cards are reserved on an order based on available inventory and printed on a separate pick slip from the other items on the order. Once the card is activated, the system delivers the physical card to the recipient card holder on the order.
-
Virtual stored value cards are cards that you do not stock. Virtual cards are automatically reserved on an order and express-billed during pick slip generation. Once the card is activated, an email is sent to the recipient card holder on the order, notifying the customer that a stored value card has been purchased and providing the stored value card number and dollar amount to use as a form of payment.
-
-
Customers can purchase the stored value card item on an order; see Stored Value Card Purchase and Activation.
-
Once you generate a pick slip for the order, you must assign a number to the physical stored value card before the card is shipped to the customer. The system automatically assigns a number to virtual stored value cards during pick slip generation.
-
Once the stored value card is billed, the card is sent to the service bureau for activation.
-
Once activated, the card is delivered to the recipient card holder on the order.
-
The customer can then use the stored value card as a form of payment on an order.
-
The service bureau authorizes and deposits the amount assigned to the stored value card payment.
-
The customer can inquire on the remaining balance on the stored value card; see Stored Value Card Balance Inquiry (MSVB).
-
In addition:
-
If the customer cancels an order or order line that is paid for by a stored value card payment with an open authorization or deactivates the stored value card payment, the system generates a stored value card authorization reversal to reimburse the stored value card the original authorization amount; see Stored Value Card Authorization Reversal.
-
If the customer returns a line that is paid for by a stored value card payment, the system generates a refund credit against the stored value card. When you deposit a refund credit against a stored value card, the service bureau sends back a new authorization number with the deposit response; because of this, the system creates a new authorization for the credit amount that is already updated to a deposit status. At this point, the credit amount is reimbursed to the stored value card.
-
You can define a stored value card credit as an alternate refund type; when you process stored value card credits, the system issues a new stored value card to the sold to customer for the refund amount; see Generating Stored Value Card Refunds.
-
Stored value card process flow

Stored Value Card Setup
Purpose: Before you can use stored value cards, you must perform the necessary setup.
Required setup includes:
Creating a Stored Value Card Item
There are two types of stored value cards in Order Management System:
Physical stored value cards are physical cards that you can stock in a warehouse or retail location. Physical stored value cards are reserved on an order based on available inventory and printed on a separate pick slip from the other items on the order. You must assign a number to the physical card before the card can be billed. Once the card receives an approved activation from the service bureau, the system delivers the physical card to the recipient card holder on the order. In addition, an email may be sent to the recipient card holder, notifying the customer that the physical card is in the process of being delivered.
Virtual stored value cards are virtual (non-physical) cards that you do not stock. Virtual stored value cards are automatically reserved on an order and express-billed during pick slip generation. During pick slip generation, the system also assigns a number to the virtual card. Once the card receives an approved activation from the service bureau, an email is sent to the recipient card holder on the order, notifying the customer that a stored value card has been purchased and providing the stored value card number and dollar amount to use as a form of payment.
The SVC type field at the item level indicates if the stored value card is a physical or virtual card:
-
Physical Card indicates the stored value card is a physical card.
-
Physical Card/Early Notify indicates the stored value card is a physical card and, as soon as the stored value card is activated, the system sends an email notification to the recipient card holder on the order, notifying the customer that a stored value card has been purchased and is in the process of being delivered.
-
Virtual Card indicates the stored value card is a virtual (non-physical) card. Virtual cards automatically reserve when added to an order and are express-billed during pick slip generation, regardless of the Non-inventory flag. Once the stored value card is activated, the system sends an email notification to the recipient card holder on the order, notifying the customer that a stored value card has been purchased and the stored value card number to use when making a purchase.
Some things to note when creating a stored value card:
-
The offer price is used as the pre-defined amount assigned to the stored value card if the Stored Value Card Activation Pricing Method (I25) system control value is set to OFFER. This is important to note if you create a stored value card as a SKU item and each SKU represents a different dollar amount; make sure you create a SKU offer for each SKU instead of using the item offer; otherwise each SKU of the stored value card will be assigned the dollar amount defined at the item offer level.
-
It is recommended you create the stored value card as a regular SKU or non-SKU item. For example, do not create the stored value card as a membership item or with a kit type.
-
You can create the stored value card item as an inventory or non-inventory item. If you wish to track how many cards are available for pre-defined denominations, you should create the stored value card as an inventory item.
-
You cannot assign a specific group of numbers to a stored value card item. See Assigning a Stored Value Card Number.
Stored value card refund item: When you process stored value card refunds, the system adds a stored value card item to the order for the refund amount. You define the stored value card refund item in the Default SVC Refund Item Number (I73) system control value. This item must be a non-SKU item with the SVC type field set to P or E. See Generating Stored Value Card Refunds.
Stored Value Card example using non-SKU:

| Item Level | Item Offer Level |
|---|---|
|
Item #: SVCE25 SVC type: Physical Card/Early Notify |
Price: $25.00 |
|
Item #: SVCE50 SVC type: Physical Card/Early Notify |
Price: $50.00 |
|
Item #: SVCE75 SVC type: Physical Card/Early Notify |
Price: $75.00 |
Stored Value Card example using SKU:

| Item Level | SKU Level | SKU Offer Level |
|---|---|---|
|
Item #: SVCV SVC type: V (virtual card) |
SKU: 25 |
Price: $25.00 |
|
Item #: SVCV SVC type: V (virtual card) |
SKU: 50 |
Price: $50.00 |
|
Item #: SVCV SVC type: V (virtual card) |
SKU: 75 |
Price: $75.00 |
System Control Values
The Stored Value Card Processing Values (I71) umbrella system control value contains the following values to control how stored value cards are processed.
| System Control Value | Description |
|---|---|
|
Select this field if you wish the system to send pick control records containing physical stored value cards to billing once you assign numbers to the physical cards; this assumes you never send pick control records containing physical stored value cards to a manifesting station to wand and bill the stored value card items. |
|
|
Enter the type of modulus check, if any, you wish to perform against the stored value card number. If you enter a modulus check, you can validate the stored value card number before sending the card to the service bureau for activation. |
|
|
Enter the price the system will assign to the stored value card as the card’s issue amount. You can select the offer price or order detail line price. |
|
|
Enter the code for the service bureau used to process stored value card activation requests. If you use the Customer Engagement Stored Value Card Integration, you must enter RLT. |
|
|
Enter the name of the program the system uses to generate a Stored Value Card Notification Email. You can send an email notification to the recipient card holder for virtual stored value cards and physical stored value cards set up with email notification, or generate the Outbound Email XML Message (CWEmailOut). For more information see the Web Services Guide on My Oracle Support (ID 2149144.1). The base program name is SVCNOTF. |
|
|
Select this field if you wish to process stored value card activation and authorization reversal transactions in batch mode. When you activate a stored value card or process a stored value card authorization reversal, the system generates a stored value card download trigger record.
|
|
|
Enter the stored value card item the system adds to an order when you process a stored value card refund. This item represents the new stored value card that is sent to the customer for the amount of the processed refund. The system adds this item to the order at no charge and defaults the Price Override Reason for SVC Refund Item (I74) to the order line. |
|
|
Enter the price override reason code the system defaults to the stored value card no charge order line that is added to an order when you process a stored value card refund. |
|
|
Default Pick Generation Template for SVC Refund Processing (I75) |
Enter the streamlined pick slip generation template (WSPS) the system uses to automatically generate a pick slip for the stored value card item that is added to an order when you process a stored value card refund. |
|
Select this field if you wish to perform a balance inquiry against a stored value card pay type before performing a batch authorization against the card. The system sends a balance inquiry request in batch format to the service bureau to determine the balance on the card.
See Batch Authorization Balance Inquiry for more information. If you are using the Customer Engagement Stored Value Card Integration, select this system control value. Oracle Retail Customer Engagement will approve an authorization for an amount that is less than the required authorization amount for an order. If you do not select this system control value, you must require another credit card payment on an order. |
|
|
Hold Reason for Stored Value Cards with Insufficient Funds (J18) |
Enter the hold reason code the system uses to place an order on hold when you Perform Balance Inquiry during Batch Authorizations (J19) and the balance remaining on a catch-all stored value card pay type is less than the amount to authorize. |
|
Perform Authorization Reversal during Deposit Processing (J20) |
Select this field if you wish to perform a stored value card authorization reversal during deposits processing if the authorization amount is greater than the deposit amount. Deselect this system control value if you are using the Customer Engagement Stored Value Card Integration. |
|
Retain Unused Stored Value Card Authorization After Deposit (J21) |
Select this field if you want the system to retain a stored value card authorization after it has been partially deposited. For example, if the authorization amount is 50.00 and the deposit amount is 40.00, the system retains the remaining 10.00 on the authorization. Leave this field unselected if you want the system to void the remaining balance against the authorization. For example, if the authorization amount is 50.00 and the deposit amount is 40.00, the system voids the remaining 10.00 on the authorization. If there are multiple authorizations for the order, the system does not void the other authorizations. Select this system control value if you are using the Customer Engagement Stored Value Card Integration. |
|
If you enable credit card encryption, the stored value card will be encrypted in all Order Management System tables. However, when you send the stored value card number to the service bureau (for activation, authorization, reversal or balance inquiry), the stored value card number will be unencrypted so that the service bureau can read it. In addition, the stored value card number will display on all Order Management System screens and reports in the format specified at the Credit Card Number Layout Screen for the associated pay type. For example, ************1443 may display instead of the entire stored value card number. See Credit Card Number Format for an overview. |
|
|
If selected, the system places an order on GC Gift Card order hold if it contains a stored value card item and a stored value card payment method. |
Secured Feature
| Secured Feature | Description |
|---|---|
|
If you allow access to this feature, you can view the stored value card number on screens in order inquiry and order maintenance. If you prohibit access to this feature, the stored value card number does not display in order inquiry and order maintenance. |
|
|
If you allow access to this feature, you can view the full stored value card number on Order Management System screens and reports, regardless if a credit card number format has been defined at the Credit Card Number Layout Screen. If you prohibit access to this feature, the stored value card number displays in the credit card number format specified at the Credit Card Number Layout Screen for the specified pay type. If a credit card number format is not defined for the pay type, the number displays in the default credit card number format. However, if a credit card number format has not been defined for the pay type and a default credit card number format is not defined, the full stored value card number will display on Order Management System screens and reports. Note: Regardless of the setting of this secured feature, if you do not have authority to the Restrict Access to Credit Card Numbers in OI and OM (A88) secured feature, the stored value card number will not display in order entry, order maintenance, or order inquiry. |
Periodic Function
| Periodic Function | Description |
|---|---|
|
Stored Value Card Unactivated Report (program name PFR0075) |
Create this periodic function to generate the Unactivated Stored Value Card Report. Use this report to review any stored value cards that require attention because:
|
|
Process Stored Value Card Activations (program name PFR0076) |
Create this periodic function to process stored value card activation trigger records that are in a ready (R) status. |
|
Process Stored Value Card Reversals (program name PFR0077) |
Create this periodic function to process stored value card authorization reversal trigger records that are in a ready (R) status. |
Menu Options
| Menu Option | Description |
|---|---|
|
Allows you to assign a number to a physical stored value card. See Assigning Numbers to Physical Stored Value Cards for more information. |
|
|
Activate the SV tickler event to generate a tickler when a stored value card item is billed without a number assignment. Activate the SD tickler event to generate a tickler when a stored value card activation request is declined by the service bureau. Note: To create ticklers, the Use Workflow Management (H96) system control value must be selected. |
|
|
Create a stored value card pay type. See Creating a Stored Value Card Pay Type for additional setup. Additionally, if you wish to always generate a stored value card refund for a particular pay type, enter a stored value card pay type as the alternate refund type. |
|
|
Stored Value Card Activation: When active, the SVC_OUT job creates a stored value card activation request for each unprocessed SVC download trigger in the IL Outbound Trigger table. If the Communication type field for the service bureau is Integration Layer, you must define:
Stored Value Card Balance Inquiry: The SVC_BALANC job creates a stored value card balance inquiry request when a balance inquiry is requested against a stored value card payment. If the Communication type field for the service bureau is Integration Layer, you must define:
Stored Value Card Authorization Reversal: The SVC_REVRSL job creates a stored value card authorization reversal request for each unprocessed AHR download trigger in the IL Outbound Trigger table. If the Communication type field for the service bureau is Integration Layer, you must define:
Note: Order Management System is hard-coded to use the SVC_REVRSL job to process stored value card authorization reversals; you cannot create a new integration layer job with a different process name to process stored value card authorization reversals.Note: To avoid conflict, make sure you set up each integration layer process that sends messages to the external system with a unique queue so that the system can identify the different types of messages it is receiving. |
|
|
Create a service bureau for the service that you will use to process stored value cards. |
|
|
Allows you to process stored value card download triggers and generate stored value card XML messages to send to the service bureau for processing. |
|
|
Allows you to change a refund to a stored value card refund (refund type V) by entering a stored value card pay type in the Pay type field. |
|
|
Order Entry/Maintenance Balance Inquiry |
Allows you to inquire on the remaining amount available on a specified stored value card pay type and card number. |
Virtual Card Number Table (FLSVCA)
Use this table to automatically assign the next available number to a virtual stored value card during pick slip generation. Once the system assigns the number to a virtual stored value card, the number is removed from this table and the virtual stored value card is processed through billing.
Credit card encryption: If you Use Credit Card Encryption (I97), the stored value card numbers in this table will be unencrypted since this table is populated from an external system.
Oracle Retail Customer Engagement stored value card integration: If you use the Customer Engagement Stored Value Card Integration, you do not need to populate this table; during pick slip generation for a virtual stored value card, Order Management System sends a Generate Card Request to Oracle Retail Customer Engagement and Oracle Retail Customer Engagement returns a Generate Card Response to Order Management System with the assigned virtual card number.
Note:
It is your responsibility to populate this table with stored value card numbers supplied by your service bureau. If this table does not contain an available number to assign to a virtual stored value card, the order for the stored value card will not be billed and the order will print on the Stored Value Card Assignment Errors Report.| Field | Description |
|---|---|
|
Company |
The company where the virtual stored value cards are processed. |
|
Card # |
A number to assign to a virtual stored value card, provided by the service bureau. |
|
ID # |
An ID number to assign to a virtual stored value card, provided by the service bureau. Note: Define an ID number only if your stored value card processor supports it. |
Virtual card numbers threshold: You can define a threshold for the system to notify you when the number of records in the Virtual Card Number table is below a specified number. When the actual number of records in the Virtual Card Number table falls below the threshold value, the system sends an email notification to the specified email address, providing you time to add records to this table before all of the virtual stored value card numbers are used.
If you do not already have the Virtual Card Number threshold created, the system automatically creates the threshold when you run the Batch Order Control job; however, you still need to define the threshold criteria; see Updating Threshold Actual Values.
Example: The threshold number you define is 25 with a less than comparison (the actual value must be less than the threshold value you define). Once the actual number of available virtual card number records is 24, the system sends an email to the specified email address.
| Threshold Code and Description | Comparison | Number Value | Actual Number | Email address |
|---|---|---|---|---|
|
VC: Virtual card numbers |
L (actual value is less than the threshold value) |
25 |
24 |
tbrown@example.com |
Sample email: A sample Threshold Monitor Breach email is displayed below.
From: htruman@CWIEX1.example.COM
To: eleanor.johnson@example.com
Subject: **ALERT** Threshold Monitor Breach
Virtual Card Numbers threshold exceeded.
Add numbers to the Virtual Card Number file (FLSVCA)
Co#: 555 Actual$: 000000024 > Thresh$: 000000025
Review screens and reports to monitor this breach.
For more information: See Working with Threshold Values (WTHR) for more information on defining threshold values.
Creating a Stored Value Card Pay Type
When creating a stored value card pay type in Working with Pay Types (WPAY), you must define the following information:
-
Pay category: enter Credit Card as the pay category.
-
Card type: enter Stored Value as the card type.
-
Authorization service: enter the authorization service that you will you to process stored value cards.
-
Deposit service: enter the deposit service that you will use to process stored value cards.
-
Reauthorization days: Enter the number of days before a stored value card authorization is set to expire. Enter 999 if you use the Customer Engagement Stored Value Card Integration.
-
Modulus check: enter a modulus check to verify the stored value card number is valid before sending the card to the service bureau for authorization.
In addition to creating a stored value card pay type:
-
Enter the stored value card pay type in the Alternate refund type field for each pay type for which you always wish to generate a stored value card refund.
-
Create a credit card number format if you do not want the full stored value card number to display on Order Management System screens and reports. If you do not have authority to the Display Full Credit Card Number (B14) secured feature, the stored value card number displays in the format specified at the Credit Card Number Layout Screen for the associated pay type. For example, 4788********1443 may display instead of the entire stored value card number. See Credit Card Number Format for an overview.
Notify Properties
In order to respond to Order Management System jobs that may require user intervention to proceed, you must set up the notify properties in Working with Admin Properties (CPRP).
Why would a job require user intervention?
-
An error occurred during processing
-
The job is used to send transactions to another system and communication failures occur before the transmission completes
Which types of job require user intervention?
-
Stored Value Card (activation, balance inquiry or authorization reversal) integration layer job
-
Authorization (batch only, for all card types) integration layer job
-
Deposit integration layer job
| Property Name | Description |
|---|---|
|
RESPONSE_RETRIES |
The number of times Order Management System looks for a response to a job that requires user intervention before using the default response in order to proceed with the job. For example, if this setting is 5, Order Management System will look for a user response five times, waiting 60 seconds between each time. |
|
RESPONSE_EMAILS |
The list of email addresses that receive the Response Required email when a job requires user intervention. Each email address entered must be separated by a semi-colon (;). For example: email1@add.com;email2@add.com. |
For more information: See Working with Required Responses (WREQ) for more information on the steps performed when a job requires user intervention.
Stored Value Card Purchase and Activation
Purpose: You can purchase a stored value card item on an order to deliver to the recipient card holder by mail or email. However, before the recipient card holder can use the stored value card as a form of payment, the card must be activated by the service bureau.
Activation processing: To activate a stored value card:
| # | Step |
|---|---|
|
1. |
A customer purchases a stored value card item on an order. If the stored value card is a virtual card, the system verifies that an email address is defined for the recipient card holder. See Purchasing a Stored Value Card. |
|
2. |
During pick slip preparation, the system creates a separate pre-generated pick for each physical stored value card.
For more information see the Web Services Guide on My Oracle Support (ID 2149144.1). See Assigning Numbers to Physical Stored Value Cards for additional details.
|
|
3. |
Once the stored value card is billed (see Billing a Stored Value Card), the system generates an SVC download trigger containing the information required to activate the card. |
|
4. |
The system sends a stored value card activation request to the service bureau for activation.
|
|
5. |
Once an approved stored value card activation is received from the service bureau, the system updates the stored value card and sends a Stored Value Card Notification Email to the customer, if defined, indicating the stored value card activation information. |
Stored Value Card Activation Process:

In this topic:
Purchasing a Stored Value Card
You purchase a stored value card as you would any item.
Physical stored value cards: When you purchase a physical stored value card (SVC type Physical Card or Physical Card/Early Notify), the system:
-
Reserves the item on the order, based on available inventory.
-
Does not require an email address, even if the stored value card is eligible for email notification. If you ordered a physical stored value card (with email notification) and an email address is not defined, the system still allows you to accept the order; however, the Stored Value Card Notification Email is not sent.
Note:
You can create a custom special handling template to capture stored value card information, such as the gift giver’s name, recipient’ name, and any gift message.Virtual stored value cards: When you purchase a virtual stored value card (SVC type Virtual Card), the system:
-
Automatically reserves the item on the order and express bills the item during pick slip generation.
-
Requires an email address to send the Stored Value Card Notification Email to the recipient card holder. An email address is required because the email notification is the only way the recipient of the virtual stored value card will receive the stored value card number associated with the order. If you order a virtual stored value card item and an email address is not defined or the opt in/out value is invalid, the system displays an error and does not allow you to accept the order:
Invalid e-mail address/opt in for order containing virtual SVC item.A similar error also displays when you process a web order. See Stored Value Card Email Hierarchy.
For more information: See Assigning a Stored Value Card Number for more information on how to assign a number to a stored value card.
Gift card hold: If the Use Gift Card Fraud Checking (L72) system control value is selected, the system places an order on GC Gift Card order hold if it contains a stored value card item and a stored value card payment method.
Stored Value Card Email Hierarchy
When a stored value card is activated and an email address is defined, the system sends a Stored Value Card Notification Email to the recipient of the stored value card.
The system uses the following hierarchy to determine the email address used to send a Stored Value Card Notification email to the recipient card holder. This email validation occurs in order entry and maintenance and during the generic order interface edit.
1. Send to ship to email address: Send the email to the email address defined for the ship to on the order.
-
Order ship to: Send the email to the email address defined for the order ship to. The system requires an email address for the order ship to if a stored value card item exists on the order:
Invalid email address/opt in for order containing virtual SVC item. -
Customer ship to: If an order ship to does not exist, send the email to the email address defined for the customer ship to. The system requires an email address for the customer ship to if a stored value card item exists on the order. In addition, the Opt in/opt out setting must allow for email delivery (codes O1 or O2):
Invalid email address/opt in for order containing virtual SVC item. -
Recipient (Sold To/Recipient): If an order ship to or customer ship to does not exist, send the email to the email address defined for the recipient customer. The system requires an email address for the recipient if a stored value card item exists on the order. In addition, the Opt in/opt out setting must allow for email delivery (codes O1 or O2):
Invalid email address/opt in for order containing virtual SVC item.
2. Send to customer sold to email address: If
a ship to does not exist on the order, send the email to the email
address defined for the customer sold to. The system requires an email
address for the customer sold to if a stored value card item exists
on the order. In addition, the Opt in/opt out setting
must allow for email delivery (codes O1 or O2): Invalid
email address/opt in for order containing virtual SVC item.
Note:
If the email address or opt in/opt out value changes after the order has been accepted and before the stored value card is activated, it is possible that a Stored Value Card Notification Email may not be generated.Assigning a Stored Value Card Number
Before you can activate a stored value card, you must first assign a number to the card. Assigning a number to a stored value card occurs during or after pick slip generation, depending on if the stored value card is a physical or virtual card.
Assigning Numbers to Physical Stored Value Cards
Follow these steps to assign a number to a physical stored value card (SVC type Physical Card or Physical Card/Early Notify):
1. Generate a pick slip for the order containing the physical stored value card.
When you generate a pick slip for an order containing a physical stored value card, the system:
-
prints a separate pick slip for each order line containing a physical stored value card. However, if you wish to print a separate pick slip for each unit of the stored value card item, set up the item as ship alone (Ship alone = Ship Alone).
-
creates a record in the Pick Stored Value Card Table for each unit of the stored value card item printed.
-
includes the stored value card item on the Pick Unit Report.
Pick Stored Value Card Table
This table contains a record for each physical stored value card item purchased whose pick control number has not yet been confirmed. Once you confirm the pick control number, the system deletes the stored value card record from this table. The system also uses this table to validate that a number has been assigned to the physical card before the card is shipped and confirmed.
| Field | Description |
|---|---|
|
Company |
The company where you created the pre-generated pick containing the stored value card item. |
|
PCH control # |
The pick control number assigned to the pick containing the stored value card item. |
|
Line # |
The pick control line number containing the stored value card item. |
|
Seq# |
The pick stored value card sequence number. |
|
Card # |
The number assigned to the stored value card. This field is blank when the record is created during pick slip preparation; you use the Working with Physical Stored Value Card Assignment (WPSA) menu option or the svc_card_nbr in the CWPickIn XML Message to assign a number to the physical stored value card after pick slip generation. For more information see the Web Services Guide on My Oracle Support (ID 2149144.1). If you use credit card encryption, the stored value card number in this table is encrypted to provide additional security of stored value card data. See the Data Security and Encryption Guide on My Oracle Support (1988467.1) for an overview. |
If you void or reprint the pick slip: The system updates the Pick Stored Value Card table if you use the Reprinting and Voiding Pick Slips (WVRP or WSVP) menu option to void or reprint a pick slip and the pick control number containing the physical stored value card item has not yet been billed.
| In WVRP when you: | The system: |
|---|---|
|
Decrease the quantity allocated |
Deletes the last pick stored value card record(s) created for the order line. |
|
Void the pick slip |
Deletes the associated pick stored value card records. |
|
Reprint the pick slip |
Deletes the associated pick stored value card records referencing the old pick control number and creates new pick stored value card records for the new pick control number. |
|
Void and unreserve the pick slip |
Deletes the associated pick stored value card records. |
2. Assign a number to the physical stored value card.
-
Use Working with Physical Stored Value Card Assignment (WPSA) to assign a number to a physical stored value card by pick control number, OR
-
Use the svc_card_nbr tag in the CWPickIn XML Message to receive a card assignment from an external system.
For more information see the Web Services Guide on My Oracle Support (ID 2149144.1).
3. Bill the pick control number containing the stored value card item.
The Use Streamlined Stored Value Card Billing (I23) system control value determines when the physical stored value card is sent to billing.
-
If this system control value is selected, the system sends the pick control number assigned to the stored value card to billing immediately after you assign a number to the card.
-
If this system control value is unselected, the system sends the pick control number assigned to the stored value card to billing after you wand and bill the card at the manifesting station.
If you use the Manually Confirming Shipments (MCON) menu option to confirm a pick control number containing a stored
value card item, the system verifies that the stored value card is
assigned a number. If the stored value card is not assigned a number,
the system does not allow you to confirm the pick control number or
change the status of the pick slip to carryover and instead displays
an error message: All stored value card numbers must be entered
before accepting.
For more information: See Billing a Stored Value Card for more information on the processing the system performs when you bill a stored value card.
Assigning Numbers to Virtual Stored Value Cards
To assign a number to a virtual stored value card (SVC type V), generate a pick slip for the order containing the virtual stored value card.
When you generate a pick slip for an order containing a virtual stored value card, the system:
-
automatically assigns a stored value card number to the virtual card, using the next available number from the Virtual Card Number Table (FLSVCA) and deletes the record from the Virtual Card Number table.
Note:
Make sure a number is available in the Virtual Card Number table to assign to the virtual stored value card; if a number is not available to assign to the card, the entire order line containing the stored value card item will not be billed and the order will print on the Stored Value Card Assignment Errors Report.-
express bills the item and sends the pick control number containing the virtual stored value card to billing.
-
does not include the stored value card item on the Pick Unit Report.
Oracle Retail Customer Engagement Stored Value Card integration: If you are using the Customer Engagement Stored Value Card Integration, the system does not assign a number to a virtual card from the Virtual Card Number table. Instead, the system:
-
generates a Customer Engagement Generate Card Request and sends the message to Oracle Retail Customer Engagement.
-
receives the Customer Engagement Generate Card Response from Oracle Retail Customer Engagement, containing the assigned card number.
-
express bills the item and sends the pick control number containing the virtual stored value card to billing.
-
does not include the stored value card item on the Pick Unit Report.
For more information: See Billing a Stored Value Card for more information on the processing the system performs when you bill a stored value card.
Billing a Stored Value Card
When a pick control record containing a stored value card item is billed, the system:
1. Deletes the associated record in the Pick Stored Value Card Table, if the stored value card is a physical card.
2. Determines the issue amount to apply to the stored value card.
The system control value determines the price the system uses as the amount to apply to the stored value card.
- Stored Value Card Activation Pricing Method (I25)
-
If this system control value is set to OFFER, the stored value card amount is the offer price. If the offer price is $0.00, the system uses the order line price.
-
If this system control value is set to ORDER or blank, the stored value card amount is the order line price. If the order line price is $0.00, the system uses the offer price.
If both the offer price and order line price are $0.00, the stored value card amount is $0.00.
3. Creates a record in the Stored Value Card Table for each unit of the stored value card item.
Stored Value Card Table
This table contains a record for each stored value card item that has been billed.
Once you receive an approved activation response from the service bureau, the system updates this table with the activation information. You can review the stored value card at the Display Stored Value Cards Screen.
Additionally, when you purge an order, the system deletes any associated records in this table.
| Field | Description |
|---|---|
|
Company |
The company where you processed the stored value card. |
|
Order # |
The order number where the stored value card was purchased. |
|
Ship to # |
The ship to number receiving the stored value card. |
|
Seq # |
The order line sequence number. |
|
Seq # |
The stored value card sequence number. |
|
Card # |
The stored value card number. If you use credit card encryption, the stored value card number in this table is encrypted to provide additional security of stored value card data. See the Data Security and Encryption Guide on My Oracle Support (1988467.1) for an overview. If the Remove Stored Value Card Number After Activation (J22) system control value is selected, the words REMOVED BY SYSTEM display instead of the credit card number. |
|
Card type |
The type of stored value card.
|
|
Issue date |
The date the stored value card was billed. |
|
Issue amount |
The amount assigned to the stored value card. |
|
Activation date |
The date the stored value card was activated; this is the date the system received and processed the approved stored value card activation response. |
|
Activation time |
The time the stored value card was activated; this is the time the system received and processed the stored value card activation response. |
|
Email sent date |
The date a Stored Value Card Notification Email was sent to the customer. The system sends an email when an approved activation response is received from the service bureau. |
|
Auth service |
The service bureau where the stored value card was sent for activation. |
|
Response code |
The activation response received from the service bureau. The system does not update this field until the system receives a stored value card activation response from the service bureau. |
|
ID # |
The ID number assigned to the stored value card. |
4. Creates an SV tickler, if you Use Workflow Management (H96), for each stored value card item that was processed through billing without a number assignment.
A stored value card may be billed without a number assignment if you send the physical stored value card to the manifesting station without first using the Working with Physical Stored Value Card Assignment (WPSA) menu option to assign a number to the card. The system will not create a SVC download trigger for the stored value card until the card is assigned a number.
See SV (SVC Number Assignment) Event Processing for more information on how to resolve this tickler.
5. Creates an SVC download trigger in the Outbound Interface Transaction table for each stored value card that has been billed and is assigned a stored value card number.
You can review download triggers in the Working with Outbound Interface Transactions (WOIT) menu option. See Identifying SVC Download Triggers.
For more information: See Activating a Stored Value Card for more information on processing the SVC download triggers.
Activating a Stored Value Card
The system creates an SVC download trigger in the IL Outbound Trigger table when a stored value card item is billed (see Billing a Stored Value Card).
Identifying SVC Download Triggers
You can view all download triggers in the IL Outbound Trigger table at the Work with Outbound Interface Transactions Screen.
Each SVC download trigger in the IL Outbound Trigger table contains a:
-
File code: indicating the type of information to download and which IL process job processes the trigger. For SVC download triggers, the File code is SVC.
-
Key: indicating the specific record to download. For SVC download triggers, the Key identifies the specific company, order number, ship to number, order detail sequence number, and stored value card sequence number associated with the SVC download trigger. For example, the Key
555000066760010000100004indicates the stored value card information is located in company 555 for order number 6676, ship to number 1, order detail sequence number 1, and stored value card number 4. -
Capture type: indicating the type of activity performed against the record. SVC download triggers are always capture type A indicating the stored value card was created.
SVC download triggers in a ready status are processed by the SVC_OUT integration layer job.
| File code | Refers to table | Key | IL Process job |
|---|---|---|---|
|
SVC |
Stored Value Card |
|
SVC_OUT |
Generating the Stored Value Card Activation Request
To generate a stored value card activation request, the system:
| # | Step |
|---|---|
|
1. |
Creates an SVC download trigger when an order containing a stored value card item assigned a number is billed; see Identifying SVC Download Triggers. |
|
2. |
Looks for unprocessed SVC download triggers to process, based on the setting of the Use Activation / Reversal Batch Processing (I50) system control value.
The system:
|
|
3. |
Looks at the Stored Value Card Activation Authorization Service (I26) system control value to determine the service bureau used to activate stored value cards. |
|
4. |
Looks at the Communication type field for the service bureau to determine how transactions are processed between Order Management System and the service bureau.
Process Activations Using Payment Link Communication If the Communication type field for the service bureau is Payment Link:
See Processing Authorizations and Deposits Using Point-to-Point Communication for a list of integrations that support point-to-point communication. |
|
5. |
Order Management System processes the activation response accordingly. See: |
What Happens When the Stored Value Card Activation is Approved?
A stored value card receives an approved activation if the activation response contains an authorization number. In this case, the system:
-
updates the associated record in the Integration Process Control table to CMP complete (if the Communication type field for the service bureau is Integration Layer).
-
updates the associated record in the Stored Value Card Table with the activation date, activation time, and activation response.
-
generates a Stored Value Card Notification Email and sends the email to the recipient card holder.
You can review the activated stored value card at the Display Stored Value Cards Screen. The activated stored value card number will have an Activation date, time, and response. Additionally, if a Stored Value Card Notification Email was sent, the Email sent field will display the date the email was sent to the customer.
Note:
If you receive a declined stored value card activation response after you have already received an approved response, the system does not deactivate the stored value card; the card remains activated and available to use as payment.If a customer returns a stored value card or reports the card stolen: If a customer returns a stored value card or reports the card stolen, you must call the service bureau to deactivate the card.
Stored Value Card Notification Email
The system sends a Stored Value Card Notification email or XML message to the recipient card holder when the SVC_OUT job processes an approved stored value card activation request and:
-
The SVC type field for the stored value card item is E (physical card with notification) or V (virtual card).
-
An email is defined for the recipient card holder. The system uses the Stored Value Card Email Hierarchy to determine the email address used to send a Stored Value Card Notification email to the stored value card recipient.
-
The Stored Value Card Email Notification Program (I30) system control value specifies a valid program name.
A separate email is sent for each unit of a stored value card item ordered. For example, if a customer purchases a stored value card for a quantity of 2 to send to a recipient customer, the recipient card holder receives 2 stored value card emails.
Note:
Credit card encryption allows you to encrypt the stored value card number in the Order Management System database. If you use credit card encryption, the stored value card number will be unencrypted and unformatted in this email since the customer needs to read the stored value card number for future purchases. See the Data Security and Encryption Guide on My Oracle Support (1988467.1) for an overview.Order history message: The system writes
an order transaction history message, indicating a stored value card
notification was sent to the stored value card recipient customer: SVC Notice to bmiranda@att.net.
For more information: See Working with E-Mail Notification Templates (WEMT) for more information on how the system generates email notifications, and see Stored Value Card Notification Sample and Contents for a sample email message. Also, see the Outbound Email API for information on when the system generates the Outbound Email XML Message (CWEmailOut) instead of an email, and the XML message layout.
For more information see the Web Services Guide on My Oracle Support (ID 2149144.1).
What Happens When the Stored Value Card Activation is Declined?
A stored value card receives a declined activation if the activation response does not contain an authorization number. In this case, the system:
-
updates the associated record in the Integration Process Control table to FLD error (if the Communication type field for the service bureau is Integration Layer).
-
creates a SD tickler if you Use Workflow Management (H96), indicating the stored value card activation request was declined. See SD (SVC Activation Decline) Event Processing for more information on how to resolve this tickler.
-
includes the order containing the declined stored value card on the Unactivated Stored Value Card Report. This report prints when you run the Unactivated Stored Value Cards periodic function (program name PFR0075).
-
does not send a Stored Value Card Notification Email to the customer, since the stored value card was not activated.
You can review the declined stored value card at the Display Stored Value Cards Screen. The declined stored value card number will have an Activation response, but a blank Activation date and time.
To activate a declined stored value card: You must call the service bureau to activate the card. You cannot re-send an activation request to the service bureau.
Reviewing Stored Value Card Activation Status
In standard Order Inquiry, you can review the stored value cards purchased on an order at the Display Stored Value Cards screen. This screen is also helpful if the customer purchased a virtual stored value card and forgot the number to use when making a purchase.
Note:
This screen is not available until the stored value card item has been assigned a number and processed through billing.Display Stored Value Cards Screen
This screen indicates:
-
the type of stored value card purchased
-
the issue amount applied to the stored value card
-
the card number
-
the date the card was processed through billing
-
the date and time the card was activated and the response received (if the card received a declined activation response, the system updates the Response field but does not update the Activation date and time)
-
the date a Stored Value Card Notification Email was sent to the customer
If the Remove Stored Value Card Number After Activation (J22) system control value is selected, the words REMOVED BY SYSTEM display instead of the credit card number.
Secured features:
-
If you do not have authority to the Restrict Access to Credit Card Numbers in OI and OM (A88) secured feature, the stored value card number does not display on this screen.
-
If you do not have authority to the Display Full Credit Card Number (B14) secured feature, the stored value card number displays in the format specified at the Credit Card Number Layout Screen for the associated pay type. For example, 4788********1443 may display instead of the entire stored value card number. See Credit Card Number Format for an overview.
Note:
Depending on the user’s authority to credit card information, the system writes a record to the Credit Card Audit table when this screen is displayed. See Logging Credit Card Data Access in the Data Security and Encryption Guide on My Oracle Support (1988467.1) for more information.How to display this screen: At the standard Order Inquiry detail screen, select SVC for an order line containing a stored value card that has been billed.
| Field | Description |
|---|---|
|
Order# |
The order number and ship to number where the stored value card item was purchased. Order#: Numeric, 8 positions; display-only. Ship to#: Numeric, 3 positions; display-only. |
|
Line# |
The order line number containing the stored value card item. Numeric, 3 positions; display-only. |
|
Card type |
Indicates the type of stored value card purchased.
Alphanumeric, 1 position; display-only. |
|
Issue amount |
The initial amount applied to the stored value card. This amount does not reflect the remaining balance on the card, if the card has already been used as payment for a purchase. Numeric, 13 positions with a 2-place decimal; display-only. |
|
Card# |
The number assigned to the stored value card. Masking: If you do not have authority to the Restrict Access to Credit Card Numbers in OI and OM (A88) secured feature, the stored value card number does not display on this screen. If you do not have authority to the Display Full Credit Card Number (B14) secured feature, the stored value card number displays in the format specified at the Credit Card Number Layout Screen for the associated pay type. For example, 4788********1443 may display instead of the entire stored value card number. See Credit Card Number Format for an overview. If the Remove Stored Value Card Number After Activation (J22) system control value is selected, the words REMOVED BY SYSTEM display instead of the credit card number. Alphanumeric, 20 positions; display-only. |
|
Issue date |
The date the stored value card was processed through billing. Numeric, 6 positions (user date format); display-only. |
|
Activation date |
The date the stored value card was activated; this is the date the SVC_OUT process received and processed the approved stored value card activation response. Numeric, 6 positions (user date format); display-only. |
|
Activation time |
The time the stored value card was activated; this is the time the SVC_OUT process received and processed the stored value card activation response. Numeric, 6 positions (user date format); display-only. |
|
Activation response |
The activation response received from the service bureau. Alphanumeric, 10 positions; display-only. |
|
Email sent |
The date a Stored Value Card Notification Email was sent to the customer. The system sends an email when an approved activation response is received from the service bureau. Numeric, 6 positions (user date format); display-only. |
Stored Value Card Authorization Reversal
Overview: When you process a cancellation associated with a stored value card payment or deactivate a stored value card payment, the system reimburses the original authorization amount to the stored value card.
In addition, if the Perform Authorization Reversal during Deposit Processing (J20) system control value is selected, when you process deposits and the deposit amount is less than the original authorization amount, the system reimburses the stored value card the difference; see Authorization Reversal Process During Deposits.
Stored value cards authorized through the external payment service: You can use a periodic function to submit stored value card reversal requests for stored value card pay types associated with the External Payment Service. See Stored Value Card Reversal Function for details.
In this topic:
Purpose: The system reimburses a stored value card the original authorization amount associated with the card when you process a cancellation associated with a stored value card payment or deactivate the stored value card.
Note:
If the Perform Authorization Reversal during Deposit Processing (J20) system control value is selected, when you process deposits and the deposit amount is less than the original authorization amount, the system reimburses the stored value card the difference; see Authorization Reversal Process During Deposits.Stored Value Card Authorization Reversal Process:

| # | Step |
|---|---|
|
1. |
You process a cancellation associated with a stored value card payment or deactivate the stored value card. You can process a cancellation by:
You can deactivate a stored value card payment by selecting Deactivate for a stored value card payment at the Enter Payment Method Screen. PayPal reversals: The PayPal Direct Connection Integration supports processing a reversal only for the entire authorization amount, such as when the entire order is canceled or the only item on the order is sold out, or the payment method is deactivated before there has been any activity. Processing a reversal for individual lines or partial lines is not supported. |
|
2. |
The system determines if the order is eligible for stored value card authorization reversal. For an order to be eligible for stored value card authorization reversal, the order must:
An open, unused authorization is an authorization that is:
Also, a reversal is not submitted when any lines on the order are submitted to Order Broker for fulfillment. Multiple payment methods: If the order contains one or more stored value card and/or credit card payments, the system performs authorization reversal for each eligible payment method. Authorizations in sent status: When you process a cancellation or deactivate a stored value card payment and the authorization is in an S (sent, but not received) status, the system does NOT create a SVC authorization reversal for the payment even if you later receive an approved authorization response. Expired authorizations: If the original authorization for an order is expired and the order received a new authorization during pick slip generation, the system will create an authorization reversal against the expired authorization when you process deposits. However, the service bureau will reject this authorization reversal since they have already expired the authorization and reimbursed the stored value card. Note: When the Send reversal flag is not selected for the authorization service, the system does not create an authorization reversal trigger record, described below, unless the reversal is created because the stored value card payment method is deactivated.PayPal reversals: Since the PayPal Direct Connection Integration supports processing a reversal only for the entire authorization amount, the following examples do not apply to PayPal. |
Example 1: The following transactions are applied against a stored value card payment on an order.
| Order Activity | Result |
|---|---|
|
You enter an order and pay for the order with a stored value card payment. The balance on the stored value card is 46.31. The order amount is 10.00. You send the stored value card for authorization using online authorization. |
The system authorizes the stored value card for $10.00. The balance on the stored value card is 36.31. |
|
You cancel the order in order maintenance. |
The system creates a stored value card authorization reversal for $10.00. Once the authorization reversal is processed, the balance on the stored value card is updated to 46.31. |
Example 2: The following transactions are applied against a stored value card payment on an order.
| Order Activity | Result |
|---|---|
|
You enter an order and pay for the order with a stored value card payment. The balance on the stored value card is 46.31. The order amount is 10.00. You send the stored value card for authorization using online authorization. |
The system authorizes the stored value card for $10.00. The balance on the stored value card is 36.31. |
|
You cancel an order line in order maintenance for 4.00. |
The system creates a stored value card authorization reversal for $10.00. Once the authorization reversal is processed, the balance on the stored value card is updated to 46.31. The remaining items on the order will be resent to the service bureau for authorization during pick slip generation. Note: The PayPal Direct Connection Integration does not support sending a reversal for cancellation of an individual order line if there are additional items on the order. |
Example 3: The following transactions are applied against a stored value card payment on an order.
| Order Activity | Result |
|---|---|
|
You enter an order and pay for the order with a stored value card payment. The balance on the stored value card is 40.31. The order amount is 10.00. You send the stored value card for authorization using online authorization. |
The system authorizes the stored value card for $10.00. The balance on the stored value card is 30.31. |
|
You generate a pick slip for an order line on the order for 6.00. |
The balance on the stored value card remains at 30.31. |
|
You cancel the remaining order line in order maintenance for 4.00. |
The system does not create an authorization reversal. The balance on the stored value card remains at 30.31. |
|
You ship and bill the order line for 6.00. |
The system updates the deposit amount for the authorization on the Authorization History Details screen to 6.00. The balance on the stored value card remains at 30.31. |
|
You deposit the order line for 6.00. |
The system creates a deposit record for 6.00 and updates the status of the authorization to voided. The balance on the stored value card is updated to 34.31. |
| # | Step |
|---|---|
|
3. |
The system creates an authorization reversal for the original authorization amount, not the actual amount of the reversal. |
|
4. |
The system creates a record in the Auth History SVC Reversal table for the authorization amount to reimburse. |
Auth History SVC Reversal table:
| Field | Description |
|---|---|
|
Company |
The company where you processed the stored value card authorization reversal. |
|
Order # |
The order number associated with the stored value card authorization reversal. |
|
OPM Seq # |
The order payment method sequence number associated with the stored value card payment. |
|
AUH Seq # |
The authorization history sequence number associated with the stored value card payment. |
|
Seq# |
The Auth History SVC Reversal sequence number. |
|
Creation date |
The date, in CYYMMDD format, the stored value card authorization reversal was created. |
|
Creation time |
The time, in HHMMSS format, the stored value card authorization reversal was created. |
|
Approval date |
The date, in CYYMMDD format, the stored value card authorization reversal was approved by the service bureau. |
|
Approval time |
The time, in HHMMSS format, the stored value card authorization reversal was approved by the service bureau. |
|
Reversal amount |
The amount to reimburse to the stored value card. In the case of PayPal, this is the original authorization amount. |
|
Response |
The response received from the service bureau, indicating if the authorization reversal was approved or declined. |
| # | Step |
|---|---|
|
5. |
The system creates an authorization reversal download trigger for the stored value card authorization reversal. You can view all download triggers in the IL Outbound Trigger table at the Work with Outbound Interface Transactions screen. Each authorization reversal download trigger in the IL Outbound Trigger table contains a:
|
|
6. |
Looks at the Authorization service field defined for the stored value card payment to determine the service bureau used to process the authorization reversal. Note: When the Send reversal flag is not selected for the authorization service, the system does not create an authorization reversal trigger record unless the reversal is created because the stored value card payment method is deactivated. |
|
7. |
The system looks for unprocessed AHR download triggers to process, based on the setting of the Use Activation / Reversal Batch Processing (I50) system control value.
The system:
|
|
8. |
For each authorization reversal download trigger, the system generates a Stored Value Card Authorization Reversal Request. |
|
9. |
The system looks at the Communication type field for the service bureau to determine how transactions are processed between Order Management System and the service bureau.
If the Communication type field for the service bureau is Payment Link:
|
|
10. |
Order Management System processes the authorization reversal response accordingly. See: Also, see Stored Value Card Reversal Function for information on processing reversals through the External Payment Service. Note: Stored value card authorization reversal responses contain a Response code and Response date, but may not contain an Authorization code. In this case, if the Response code is 100, the system updates the Authorization code with a dummy authorization number so that the authorization reversal is approved. |
An authorization reversal is approved if the Authorization Reversal Response message contains an authorization number. In this case, the system:
-
updates the associated record in the Integration Process Control table to CMP complete (if the Communication type field for the service bureau is Integration Layer).
-
updates the associated record in the SVC Authorization Reversal table with the approval date, approval time, and reversal response.
-
creates an order transaction history message indicating the authorization reversal was approved:
Reversal Has Been Approved. -
voids the authorization history record.
Note:
If the stored value card authorization reversal response contains an amount, the system ignores the amount sent back and continues to use the amount from the Auth History SVC Reversal table.You can review the stored value card authorization reversal at the Display Authorization Reversals Screen. The approved reversal will have a Response and an Approval date and time.
An authorization reversal receives a declined reversal if the Authorization
Reversal Response Message does not contain an authorization number.
In this case, the system creates an order transaction history message
indicating the authorization reversal was declined: Reversal
Has Been Rejected.
You can review the declined stored value card authorization reversal at the Display Authorization Reversals Screen. The declined reversal will have a blank Response, Approval date and time. You cannot resend a SVC authorization reversal request to the service bureau.
Note:
-
Except for the order transaction history message, there is no other indication that the stored value card authorization reversal request was declined.
-
Because the cancellation or deactivation amount was not reimbursed to the stored value card, the customer will not be able to use that amount on future purchases paid for against the stored value card.
-
The response received from the service bureau does not display in the Response field on the Display Authorization Reversals Screen unless it is set up as a vendor response for the service bureau in Work with Authorization Services (WASV).
Communication failures can occur if the SVC_REVRSL job is inactive, the connection between Order Management System and the service bureau is down, or the system times out before a response is received. If communication failures occur and you do not receive a response from the service bureau, the system:
-
updates the associated record in the Integration Process Control table to FLD error (if the Communication type field for the service bureau is Integration Layer).
-
does not update the associated record in the SVC Authorization Reversal table.
-
does not create an order transaction history message.
You cannot resend a stored value card authorization reversal request to the service bureau.
Purpose: If the Perform Authorization Reversal during Deposit Processing (J20) system control value is selected, when you process deposits and the deposit amount is less than the original authorization amount, the system reimburses the stored value card the difference.
| # | Step |
|---|---|
|
1. |
You process a deposit for an amount that is less than the original authorization amount. |
|
2. |
The system looks at the Communication type field for the service bureau to determine how transactions are processed between Order Management System and the service bureau.
If the Communication type field for the service bureau is Payment Link:
|
|
3. |
When a deposit response is received, Order Management System:
|
Examples:
Original authorization amount is equal to deposit amount
| Stored Value Card Activity | SCV J20 selected | SCV J20 unselected |
|---|---|---|
|
Before placing an order, you inquire on the remaining balance for a stored value card. Stored value card balance: |
53.49 |
53.49 |
|
You pay for the order using the stored value card as payment. The order total is 11.50. You authorize the stored value card and generate a pick slip for the order. Authorization amount: |
11.50 |
11.50 |
|
After the stored value card is authorized, you inquire on the remaining balance for the stored value card. Stored value card balance: |
41.99 |
41.99 |
|
You ship the order and bill the order. The invoice amount is 11.50. You process deposits. The deposit amount (11.50) equals the original authorization amount (11.50). Deposit amount: |
11.50 |
11.50 |
|
Once the deposit is processed, you inquire on the remaining balance on the stored value card. Stored value card balance: |
41.99 |
41.99 |
Original authorization amount is greater than deposit amount
Note:
The following example does not apply to PayPal reversals.| Stored Value Card Activity | SCV J20 selected | SCV J20 unselected |
|---|---|---|
|
Before placing an order, you inquire on the remaining balance for a stored value card. Stored value card balance: |
88.49 |
88.49 |
|
You pay for the order using the stored value card as payment. The order total is 11.50. You authorize the stored value card and generate a pick slip for the order. Authorization amount: |
11.50 |
11.50 |
|
After the stored value card is authorized, you inquire on the remaining balance for the stored value card. Stored value card balance: |
76.99 |
76.99 |
|
You void one of the items from the pick slip. You partial ship the remaining items on the pick slip and bill the order for the shipment amount. The invoice amount is 6.25. You process deposits. The original authorization amount is greater than the deposit amount. Deposit amount: Reversal amount: |
6.25 5.25 |
6.25 blank |
|
Once the deposit is processed, you inquire on the remaining balance on the stored value card. Stored value card balance: |
82.24 |
76.99 |
Original authorization amount is less than deposit amount
Note:
The following example does not apply to PayPal reversals.| Stored Value Card Activity | SCV J20 selected | SCV J20 unselected |
|---|---|---|
|
Before placing an order, you inquire on the remaining balance for a stored value card. Stored value card balance: |
82.24 |
82.24 |
|
You pay for the order using the stored value card as payment. The order total is 11.50. You authorize the stored value card and generate a pick slip for the order. Authorization amount: |
11.50 |
11.50 |
|
After the stored value card is authorized, you inquire on the remaining balance for the stored value card. Stored value card balance: |
70.74 |
70.74 |
|
You add an item to the order for 5.25. You authorize the stored value card and generate a pick slip for the added item. Authorization amount: |
5.25 |
5.25 |
|
After the stored value card is authorized, you inquire on the remaining balance for the stored value card. Stored value card balance: |
65.49 |
65.49 |
|
You ship the entire order and bill the order for the shipment amount. The invoice amount is 16.75. You process deposits. Deposit amount: |
16.75 |
16.75 |
|
Once the deposit is processed, you inquire on the remaining balance on the stored value card. Stored value card balance: |
65.49 |
65.49 |
When you use the External Payment Service for stored value cards, you can use a periodic function, described below, to submit stored value card reversal requests for closed or canceled orders.
REVXAHP (Program name = PFREVXAHP): Reverse Partial Auth for External Payment Service: Generates SVC reversal request messages for the external payment service within the specified company, provided that:
-
A company is specified.
-
The parameter specified for the function is a valid stored value card pay type code for the company.
-
The pay type is assigned to an authorization service configured as the external payment service.
Selecting authorization history records for reversal: The function generates the reversal request for an order if:
-
The payment method matches the parameter specified for the periodic process.
-
The pay type on the authorization history record does not match the Default Auth Code for CC Netting (M25) system control value.
-
The order header status is closed or canceled.
-
There is an authorization record in open (O) or authorized (A) status.
-
The deposit amount on the order is less than the authorization amount. Also:
-
Invoice payment method records? There are no invoice payment method records for the specified pay type, or
-
Pending deposits? If there are any invoice payment method records, there are no outstanding deposits for the invoice payment method for the pay type. The function determines that there are no outstanding deposits if there is an actual deposit created date (as opposed to a deposit created date of 9999999), or the Suppress Deposit flag is set to Y.
-
Processing and updates: For stored value card payment methods that meet the criteria, the function:
-
Determines the reversal amount to submit in the request by subtracting the deposit amount from the authorization amount.
-
Sends the authorization reversal request. The request includes the stored value card number, PIN, transaction ID, and reversal amount.
-
Sets the Authorization History record to void (V) status.
-
Creates a Stored Value Card Authorization Reversal record. You can review this record at the Display Authorization Reversals Screen.
-
Performs all additional existing processes and updates related to authorization reversal based on whether the request is successful or fails. See Stored Value Card Authorization Reversal for an overview of the authorization reversal process.
Note:
The above process takes place regardless of whether the Send Reversal flag for the authorization service is selected.Possible errors: The function may write the following errors in the APP.log if it cannot run:
"Error in parameters for Periodic Function REVXAHP. Pay
Type must be associated with an External Authorization Service.");
"Error in parameters for Periodic Function REVXAHP. Pay
Type must have card type S.");
"Error in parameters for Periodic Function REVXAHP. Pay
Type must be a credit card.");
"Error in setup for Periodic Function REVXAHP. PayType
is invalid. Please correct and retry.");
"Error in parameters for Periodic Function REVXAHP. Parameter
Format: 2 digit Pay Type. Please correct and retry.");
"Error in parameters to Periodic Function REVXAHP. The
parameter was not numeric.");
"Error in parameters for Periodic Function REVXAHP No
parameters were passed - job ended without performing any updates.");
Generating Stored Value Card Refunds
Stored value card refunds allow you to generate a credit card credit against the original stored value card on the order or generate a new stored value card for the amount of the refund to send to the customer when you process a refund.
In this topic:
For more information: See:
-
overview and setup: Stored Value Card Overview and Setup
-
activating the new stored value card for the refund amount: Stored Value Card Purchase and Activation
Stored Value Card Refunds: Credit Card Credit
If you process a return against a stored value card pay type that does not have an alternate pay type or alternate refund category defined, the system generates a credit card credit refund against the original stored value card pay type, allowing you to reimburse the refund amount to the original stored value card instead of sending a new stored value card to the customer.
Stored Value Card Refunds: New Stored Value Card
If you process a return against a stored value card pay type that has an alternate pay type or alternate refund category of stored value card defined, the system generates a new stored value card to send to the customer when you process a refund. The card is issued for the refund amount. When you process stored value card refunds, the system adds a stored value card item to the order at no charge and performs pick slip preparation. You can then follow the normal process of generating a pick slip for the stored value card item so that the card can be picked, activated, billed, and shipped to the customer.
You may wish to generate a new stored value card for the refund amount if:
-
The sold to customer paid for the order using a stored value card, but has since thrown the card away. Instead of reimbursing the original stored value card on the order the refund amount, the customer has requested a new stored value card.
-
The sold to customer paid for the order using multiple pay types. Instead of refunding each separate pay type on the order, the customer has requested the refund amount in the form of a stored value card.
Changing the Type of Stored Value Card Refund Generated
You can use Working with Refunds, Writeoffs and Balances Due (WREF) to change the type of refund that is generated for a stored value card pay type.
Credit card credit refund: If the original pay category and current pay category associated with the refund is a stored value card pay type (pay category Credit Card and Card type Stored Value), the system allows you to change the refund by entering a different refund type in the Type field on the Change Refund Screen. You can only change the refund type to a credit card credit refund (C) or stored value card refund (V). If you change the refund type to a credit card credit refund, the system adds the refund amount to the original stored value card on the order.
Stored value card refund: The system allows you to change any refund to a stored value card refund by entering a stored value card pay type in the Pay type field on the Change Refund Screen.
In addition, if the original pay category and current pay category associated with the refund is a stored value card pay type (pay category Credit Card and Card type Stored Value), the system allows you to change the refund by entering a different refund type in the Type field on the Change Refund Screen. You can only change the refund type to a credit card credit refund (C) or stored value card refund (V). If you change the refund type to a stored value card refund, the system generates a new stored value card for the refund amount.
When is a New Stored Value Card Generated for a Refund?
If the pay type associated with the refund is set up to generate a stored value card refund, the system generates a refund for refund type V (stored value card).
The system generates a stored value card refund when:
-
The alternate refund type defined for a pay type is a stored value card.
-
You process a return outside the Return Grace Period (B52) and the Alternate Pay Type (B51) is a stored value card pay type.
-
You change a refund to a stored value card refund (refund type V) in Working with Refunds, Writeoffs and Balances Due (WREF).
Alternate currency and stored value card refunds: The system can process stored value cards in the US currency only. If the order is for a currency other than US, you should change the refund to a refund type other than stored value card.
Consolidating New Stored Value Cards Generated for Refunds by Order
The system consolidates open stored value card refunds that are for the same pay type on the same order.
Example: The following activity occurs for an order. The pay type on the order has an alternate refund type of stored value card.
| Activity | Results |
|---|---|
|
You return order line 1 for 50.00 |
The system creates a stored value card refund for 50.00. |
|
You return order line 2 for 25.00 |
The system updates the existing refund to 75.00. |
|
You process stored value card refunds |
The system generates a stored value card for a refund amount of 75.00. |
|
You return order line 3 for 30.00 |
Since the first stored value card refund for the order has been processed, the system creates a new stored value card refund for 30.00. |
Multiple pay types on the same order: If the system generates a stored value card refund for different pay types on the same order, the system will not consolidate the stored value card refunds.
Example: The following activity occurs for an order. The order contains 2 pay types: cash/check for 50.00 and credit card for 55.00. Both pay types have an alternate refund type of stored value card.
| Activity | Results |
|---|---|
|
You return order line 1 for 50.00 |
The system creates a stored value card refund for 50.00. The current pay category assigned to the refund is credit card; the original pay category assigned to the refund is cash/check. |
|
You return order line 2 for 25.00 |
The system creates a stored value card refund for 25.00. The current pay category assigned to the refund is credit card; the original pay category assigned to the refund is credit card. |
|
You process stored value card refunds |
The system generates 2 stored value cards: 1 for a refund amount of 50.00 and the other for a refund amount of 25.00. |
Note:
In Working with Refunds, Writeoffs and Balances Due (WREF), if you change existing refunds for an order to stored value card refunds (by entering a stored value card pay type in the Pay type field at the Change Refund Screen), the system will not consolidate the stored value card refunds. For example, if 2 refunds exist for an order and you change both refunds to stored value card, the system will not consolidate the 2 refunds.Processing New Stored Value Cards Generated for Refunds
To generate stored value card refunds, select a Bank, select the Generate SVC credits field and optionally, specify the Amount to generate at the Process Refunds Screen.
Note:
If multiple stored value card refunds exist for an order and the first stored value card refund processed places the order on hold (due to credit checking), the system will not process the subsequent stored value card refunds since the order is now on hold.When you process stored value card refunds, the system:
-
Produces the Stored Value Card Credit Register; this report displays each order and sold to customer associated with a stored value card refund and the amount of the refund.
-
Writes an order transaction history message:
F Stored Value Card refund created. -
Adds the Default SVC Refund Item Number (I73) to the order and performs pick slip preparation. This item represents the new stored value card that is sent to the customer for the amount of the processed refund. The system adds this item to the order at no charge and defaults the Price Override Reason for SVC Refund Item (I74) to the order line.
Note:
The system will not generate a stored value card refund unless the stored value card refund item has available inventory. If the item does not have available inventory, the stored value card refund remains unprocessed. -
Automatically generates a pick slip for the new stored value card item added to the order if the Default Pick Generation Template for SVC Refund Processing (I75) system control value contains a pick slip generation template. If a pick slip generation template is not defined, you will need to advance to Streamlined Pick Slip Generation (WSPS) and select to generate a pick slip for the stored value card refund item.
Once a pick slip is generated for the stored value card item, the system goes through the regular process of assigning a number, activating, billing, and shipping the new stored value card to the sold to customer. See Activating a Stored Value Card.
Once the customer receives the stored value card containing the refund amount, the card can be used on future purchases.
Importing Item/SKU and Set Data
Topics in this part: The following topics describe how to import item/SKU and set data into Order Management System from an external system.
-
Importing Item-Related Supporting Data (SDUP) provides details on importing items/SKU information, item-related supporting table information, and set components into Order Management System.
-
Importing Set Components (WCUP) provides details on building sets, including finished goods and variable sets.
Brokered Backorders
Purpose: If the Send B/O to OROB (K08) system control value is selected, you can use the Order Broker Integration to send backordered order lines to Order Broker for fulfillment.
-
If the Use OROB for Fulfillment Assignment (M31) system control value is unselected, the system sends eligible backordered items to Order Broker for fulfillment. Order Broker will choose the best store location to fulfill and ship the item to the customer. Items that are in stock follow normal reservation and fulfillment processing.
-
If the Use OROB for Fulfillment Assignment (M31) system control value is selected, the system bypasses reservation and places all eligible items on backorder, even if the item is available in an Order Management System warehouse. Order Broker will choose the best store location or Order Management System location to fulfill and ship the item to the customer.
-
If the Use OROB for Ship for Pickup Fulfillment Assignment (M34) system control value is set to ALWAYS, the system bypasses reservation in order to send eligible items on a ship-for-pickup order to Order Broker for fulfillment assignment. In this situation, the fulfilling location may be a store location or an Order Management System warehouse and the merchandise is shipped to the customer’s selected store for pickup. See Creating a Ship-for-Pickup Order in Order Management System for more information on how to create a ship-for-pickup order.

Note:
If the item is flagged as a active PO item the system does not submit it to Order Broker for fulfillment using the standard process described here; instead, it uses the process described under Enterprise Order Integration (Future Receipts and Active PO/Pre-Order Processing).When using Order Broker for fulfillment assignment, the fulfilling location can be a store location or an OROMS warehouse location. In addition, for ship-for-pickup orders, the fulfilling location ships the order to the customer’s selected store for pickup.
In this topic:
Brokered Backorder Processing Overview
Order Broker assignment: Assigning a backordered item to Order Broker can occur through:
-
order entry or order API: When you create an order that includes a backordered line, Order Management System assigns the line, if eligible, to Order Broker for fulfillment, and withholds it from normal fulfillment processing within Order Management System.
Note:
-
If the Use OROB for Fulfillment Assignment (M31) system control value is selected, the system bypasses reservation for all eligible items on an order and places them on backorder so that Order Broker can determine the fulfilling location.
-
If the Use OROB for Ship for Pickup Fulfillment Assignment (M34) system control value is set to ALWAYS, the system bypasses reservation for all eligible items on a ship-for-pickup order and places them on backorder so that Order Broker can determine the fulfilling location.
-
-
batch process: A periodic function finds eligible backordered lines and assigns them to Order Broker.
Eligibility rules: Order Management System determines whether an order line is eligible for Order Broker fulfillment based on certain basic criteria, such as whether it is fully backordered and authorized; also, you can use related system control values to further restrict Order Broker assignment based on your business rules, such as omitting items you are due to receive soon on open purchase orders. Also, the item must be flagged as OROB eligible. See Rules for Submitting Backorders to Order Broker for details.
If the authorization for the order line has expired, the system obtains a new authorization.
Does each line create a separate order in Order Broker? Each eligible backordered line on an order is sent to Order Broker:
-
as a separate order if the Use Split Order (L56) system control value is unselected. In this case, the fulfillment of each line is tracked individually. Order Broker does not attempt to assign multiple order lines from the same fulfilling location.
-
as part of a single order if the Use Split Order (L56) system control value is selected. In this case, Order Broker attempts to assign all lines on the same order to the same fulfilling location; however, it notifies Order Management System about multiple assigned fulfilling locations if the order or lines are split. If a single backordered item is unfulfillable through Order Broker, that line returns to standard backorder processing, but additional lines on the order can still be fulfilled through Order Broker.
What information is sent to Order Broker? Order Management System sends the following information to Order Broker:
-
sold-to and ship-to customers’ names and addresses.
-
details on the requested item.
It does not send payment information, although only fully paid and authorized items are eligible for Order Broker fulfillment. If the Payment at POS for Ship for Pickup Orders (L60) system control value is selected, ship-for-pickup orders are authorized for verification only and payment is collected when the customer picks up the items at the store.
If the authorization for an order line has expired, the system obtains a new authorization.
For more information on the information sent to Order Broker, see Sample Order Broker Messages.
Brokered Backorder Fulfillment: Initial Order Creation
| # | Step |
|---|---|
|
1. |
The process begins when you create an order in Order Management System. If the Send B/O to OROB (K08) system control value is selected, the system sends eligible backordered items to Order Broker to determine the fulfilling location. In addition:
The order creation can occur through interactive order entry, batch order entry, or the order API. You can also use the BROKER periodic function to submit existing backordered lines to the Order Broker for fulfillment; see Additional Order Broker Setup in Order Management System for more information. |
|
2. |
If the order line meets the Rules for Submitting Backorders to Order Broker, the BROKER_ORD process in Order Management System generates a request message to Order Broker and creates an Order Broker record. Note: Order lines that meet the Rules for Submitting Backorders to Order Broker do not sell out initially, even if the items are flagged with soldout control codes. See Brokering Items with Soldout Control Codes for more information.If the order includes multiple backordered lines and the Use Split Order (L56) system control value is selected, the request message includes all eligible backordered lines; otherwise, each backordered item is submitted as a separate order. Each Order Broker record has a status of R (ready) at creation. Also, the order line is updated to restrict it from standard backorder processing in Order Management System:
Note: Order Broker status is not displayed in Streamlined Order Inquiry (DORI). |
|
3. |
If the BROKER_ORD
process in Working with Integration Layer Processes
(IJCT) is active, it immediately generates the submit
order request message to Order Broker to request order creation
and assignment in Order Broker. At this time, it also changes each
Order Broker record’s status to W (waiting) and creates
an Order Broker History record for each line to track the order
submission ( See the Brokered Backorder (Delivery or ShipForPickup) Submit Order Request Message Sample. Note: Although the BROKER_ORD process generates the submit order requests (and cancellation requests, if needed), the BROKER process handles other requests to Order Broker. |
|
4. |
The Routing Engine module in Order Broker receives the submit order message. If Order Management System sent each line separately, Order Broker creates each order line as a separate order in its database; otherwise, if you use the split order option, Order Broker creates a single order including all of the order lines that were eligible for submission as brokered backorders. Order Broker assigns each order or line to a location for fulfillment based on inventory availability and the business rules you have defined in Order Broker. At this point, the order status in the Order Broker database is new_order. |
|
5. |
Order Broker sends a response message to Order Management System indicating each assigned fulfilling location and the unique request ID it uses to identify each order. See the Submit Order Response Message Sample. Note: The message version is specified in the Order Broker Properties; this property must be set to16.0 or higher in order to use brokered
backorders for fulfillment assignment and to use ship-for-pickup processing.
|
|
6. |
If Order Broker successfully created an order and assigned it to one or more fulfilling locations, Order Management System:
|
Split line? If the Allow Split Line? preference in Order Broker is selected, Order Broker might split the quantity of a single brokered backorder line across more than one fulfilling location. For example, you create an order for item AB100 with a quantity of 10. There is no single location that has a quantity of 10 available. Order Broker assigns 8 units to location 100, and 2 units to location 200.
Order Broker splits order lines or line quantities only if you have selected the Allow Split Order? and Allow Split Line? preferences in Order Broker, and if there is not a single location that can fulfill the entire order or line quantity. See the Use Split Order (L56) system control value for examples, and see the Order Broker Operations Guide or online help for background.
If Order Management System is the fulfilling location: If the Use OROB for Fulfillment Assignment (M31) system control value is selected or the Use OROB for Ship for Pickup Fulfillment Assignment (M34) system control value is set to ALWAYS, Order Broker may determine that a warehouse in Order Management System is the best location to fulfill the order, or some portion of the order. In this situation:
-
Order Broker assigns the Order Management System location to the order in Order Broker as the Fulfilling location.
-
At defined intervals, the BROKER process in Work with Integration Layer Processes (IJCT) periodically sends a fulfillments request message to Order Broker to poll for newly assigned orders (those whose Fulfilling location is an Order Management System location).
-
When the BROKER process receives the order in the fulfillments response message:
-
If the original order is not a ship-for-pickup order, it creates a new delivery order and assigns the order type defined in the Order Type for Delivery Orders Originating in OROMS (M33) system control value to the order.
-
If the original order is a ship-for-pickup order, it creates a new retail pickup order and assigns the order type defined in the Order Type for Retail Pickup Orders Originating in OROMS (M35) system control value to the order.
-
-
In order to tie the originating order (the original order sent to Order Broker for fulfillment assignment) with the new fulfilling order (the delivery or retail pickup order created to fulfill the original order), Order Management System:
-
stores the originating order number in the E-commerce order number field in the Order Header Extended table for the newly created sourcing order. For example, the system updates the E-commerce order number with
ORIG#: 9999-001, whereORIG#:indicates the order has been created as a result of OROB fulfillment assignment,9999is the order number, and001is the ship-to number. -
assigns the Request ID defined for the originating order to the newly created sourcing order.
-
See Retail Pickup (including Ship-for-Pickup) or Delivery Orders for more information on how Order Management System processes a delivery or retail pickup order.
If the assigned fulfilling location rejects the order: The location assigned to fulfill an order or line can reject it if, for example, it does not have sufficient inventory. In this situation, Order Broker uses the rules set up at the Preferences screen in Order Broker to select another location to fulfill the order. If the location where the order is currently assigned changes, Order Management System updates this information the next time it sends a status inquiry to Order Broker, typically through pick slip generation, and receives the new information in the response.
Note:
An order normally remains in Rejected status in Order Broker only for a moment. If for any reason Order Broker receives a status inquiry request when the order’s status is Rejected, Order Management System does not update the order until the next time it sends a periodic status inquiry.What if Order Broker cannot find a location to fulfill
the order or line? In some cases, Order Broker cannot
assign an order to a location because there are no locations with
sufficient inventory that are eligible based on the business rules
set up in Order Broker at the Preferences screen. In this situation, Order Broker assigns the order
to the Default Unfulfillable Location specified in Order
Broker, which should match the setting of the OROB Default Location Code for Unfulfillable Orders
(K56) system control value. When Order Management System receives
a response message indicating that the order was assigned to the unfulfillable
location and has a status of Unfulfillable, it:
-
Clears the Drop ship flag and the Printed quantity on the Order Detail line.
-
If the Use OROB for Fulfillment Assignment (M31) system control value is selected or the original order is a ship-for-pickup order, unselects the Bypass reservation flag and updates the Backorder reason to
Not enough avail in whse. -
Changes the status of the Order Broker record to U (unfulfillable).
-
Writes an Order Transaction History record (for example,
Ln#: 2 Unfulfillable by Broker). -
Returns the line to standard backorder or soldout processing, including updating the Backorder quantity for the Item Warehouse and updating the PO Layering record.
An order might be flagged as unfulfillable when Order Broker first receives the request message, or after one or more locations have rejected the order for fulfillment; in this case, Order Management System receives notification the next time it sends a periodic status inquiry, as described below.
Notifying the customer of fulfillment assignment through Order Broker: The order confirmation email indicate a status of Store Ship for order lines assigned to Order Broker. See the Order Confirmation Email Sample and Contents for more information.
Fulfillment Process: After Order Creation and Status Updates
Status list inquiry request and response process: The BROKER process in Working with Integration Layer Processes (IJCT) sends periodic status list inquiry requests to Order Broker. You use the Order Broker Status Update Interval (K10) system control value to define how many minutes Order Management System should wait before sending status inquiry requests.
If status has not changed: Once the order line is in Accepted status, Order Management System does not write a history record for the status list inquiry response as long as the record remains in this status.
| Activity | Status in OROB | Status in OROMS | Updates to Order Broker and Order Transaction History |
|---|---|---|---|
|
Order Management System sends the submit order message to Order Broker and restricts the order line from standard processing in Order Management System by setting the Drop ship flag and the Printed quantity. |
not yet created |
Waiting (W) |
|
|
Order Management System receives the submit order response from Order Broker |
new_order |
Acknowledged (K) |
If there is a single fulfilling location:
Otherwise, if there are multiple fulfilling locations, Order Management System sends a status inquiry request to Order Broker and performs the above activities when it receives the response. |
|
Polling: Each fulfilling location is responsible for polling Order Broker periodically to check for new orders. Once Order Broker receives a polling request from a location, it sends a polling response, listing the details of all new orders assigned to the location for fulfillment. |
polled |
Polled (P) (after receiving status inquiry response) |
|
|
Order accepted? If the assigned location can fulfill the order or line, it sends a status update message accepting the order or line to Order Broker. |
accepted |
Accepted (A) (after receiving status inquiry response) |
Note: Once the order line is in Accepted status, Order Management System does not write a history record for the status inquiry response as long as the record remains in this status. |
|
Order rejected? If the assigned fulfilling or sourcing location cannot fulfill the order or line, or the pickup location for a ship-for-pickup order indicates that the inventory for the item was not received or was damaged in transit, it sends a status update rejecting the order or line to Order Broker. Order Broker then: |
|||
|
new_order |
Acknowledged (K) (after receiving status inquiry response) |
|
|
new_order |
unfulfillable (U) (after receiving status inquiry response) |
|
|
In Transit (ship-for-pickup, retail pickup): The location assigned to fulfill a ship-for-pickup order has sent the inventory to the location where the customer will pick up the order. Once the fulfilling location has shipped the order or line, it sends a status update message to Order Broker, providing the ship via and tracking number if available. Order Broker changes the status to In Transit and stores the ship via and tracking number so that it can send this information to Order Management System. The tracking number is not available as a live link on screens. |
In Transit |
intransit |
Create invoice? If the Invoice Ship For Pickup Order Once Intransit (M73) system control value is selected, Order Management System may create the invoice for the originating order when it receives a status inquiry response from Order Broker indicating that order lines on a ship-for-pickup order are now in transit. See that system control value for more information. |
|
Intransit Polled (ship-for-pickup): The pickup location for a ship-for-pickup order:
|
In Transit Polled |
intransit polled |
Create invoice? If the Invoice Ship For Pickup Order Once Intransit (M73) system control value is selected, Order Management System may create the invoice for the originating order when it receives a status inquiry response from Order Broker indicating that order lines on a ship-for-pickup order are now in transit polled, if the invoice was not already created. See that system control value for more information. |
|
Received (ship-for-pickup, retail pickup): The transferred inventory has been received at the location where the customer is picking up a ship-for-pickup order. |
Received |
received |
Create invoice? If the Invoice Ship For Pickup Order Once Intransit (M73) system control value is selected, Order Management System may create the invoice for the originating order when it receives a status inquiry response from Order Broker indicating that order lines on a ship-for-pickup order are now received, if the invoice was not already created. See that system control value for more information. |
|
Order shipped (delivery) or picked up (ship-for-pickup, retail pickup): Once the fulfilling location has shipped the order or line (delivery) or the customer has picked up the merchandise at the store location (ship-for--pickup), it sends a status update message to Order Broker. For delivery orders, the update message also provides the ship via and tracking number if available. Order Broker changes the status to fulfilled and stores the ship via and tracking number so that it can send this information to Order Management System. When Order Management System receives notification, it clears the Drop ship flag and the Printed quantity, and submits the order line to billing. If Order Broker provides a valid ship via code and a tracking number, the tracking number is a live link in the shipment confirmation email, although not on screens. See the OrderShipmentLineDetail in the outbound email message for details. For more information see the Web Services Guide on https://support.oracle.com My Oracle Support (ID 2149144.1). |
fulfilled |
completed (X) (after receiving status inquiry or inquiry list response) |
Example:
Note: Generating a single invoice takes place regardless of whether the fulfilled order lines have different Order Broker request IDs, provided the updates take place as described above.Note: The billing async job does not complete billing the order until one of the following occurs:
If a large number of orders were submitted in the status list request, there could be a delay of several minutes before the order is billed. Note: If there are multiple order lines confirmed as fulfilled on a single order, but for different ship-tos, this generates separate billing header records and invoice ship-tos. Multiple invoices are created for a single order if not all order lines are included in the same status list response message. |
|
Order status changes? If the Send Held Orders to OROB (M18) system control value is selected, Order Management System sends held brokered backorders to Order Broker, but with the Under Review flag set to Y; also, Order Management System sends an order update to Order Broker if the order’s status changes from held to open, or vice versa. |
no change |
no change |
|
Picked? If the assigned fulfilling location reports that a brokered backorder is in Picked status, the Working with Order Broker (WOBR) option indicates a status of Accepted.
Canceling a brokered backorder: See Canceling a Brokered Backorder Request for a discussion of the updates that take place when you cancel an Order Broker request at the Work with Order Broker Screen or in order maintenance.
Reviewing brokered backorders in order inquiry: You can use the Brokered Backorder Summary Screen to review the current status of all brokered backordered lines on a single order. Also, you can select D/S Status for a single brokered backorder line at the Order Inquiry Detail Screen to advance to the Display Order Broker Details Screen, where you can review a single brokered backorder line on the order.
Quantity not indicated in order transaction history
messages: The order transaction history messages
do not specify the quantity affected by the update; however, if you
split orders and lines, the quantity affected may be less than the
total order line quantity. For example, if Order Broker splits an
order line across two locations for fulfillment, and one of the locations
fulfills its assigned quantity, the order transaction history message
of Ln#: 2 Store Shipped Order does not indicate
the fulfilled quantity.
Rules for Submitting Backorders to Order Broker
To be eligible for submission to Order Broker, the backordered item must have the OROB eligible flag selected. Also, the order line must be:
-
fully backordered
-
in open status
In addition, if the Use OROB for Fulfillment Assignment (M31) system control value is selected or the Use OROB for Ship for Pickup Fulfillment Assignment (M34) system control value is set to ALWAYS and the original order is a ship-for-pickup order, the order or order line can include the following; otherwise, the order or order line cannot include the following.
-
be gift wrapped
-
have any special handling
Note:
only custom special handling instructions are sent to Order Broker in the submit order request; however, the system does not prevent items with standard special handling from being sent to Order Broker -
have a future arrival date or be flagged as a future order
-
be for a customer flagged to bypass reservation
If the Use OROB for Fulfillment Assignment (M31) system control value is set to ALWAYS, the originating location passed to Order Broker on a delivery order is the location defined in the Originating Location to Pass to OROB (M32) system control value.
Also, if the Use OROB for Ship for Pickup Fulfillment Assignment (M34) system control value is set to ALWAYS, the order line can be on a ship-for-pickup order; otherwise, if this system control value is set to NEVER or blank, order lines on a ship-for-pickup order are not eligible for submission to Order Broker to determine fulfillment assignment and instead are sent to Order Broker during pick slip generation and drop ship order processing time; see Ship-for-Pickup Orders.
Regardless of the settings of the Use OROB for Fulfillment Assignment (M31) and Use OROB for Ship for Pickup Fulfillment Assignment (M34) system control values, the order line must not be:
-
Flagged as a drop ship item
-
A retail pickup or delivery order received from Order Broker
-
A main set item or a set component
-
A membership item
-
A stored value card item
-
A non-inventory item
Order Management System does not consider the item’s Projected returns quantity, if any, when determining whether the item is eligible for fulfillment through Order Broker.
Also, the order must be:
-
Open, if the Send Held Orders to OROB (M18) system control value is unselected; otherwise, the order can be held. In this case, the order’s Under Review flag is selected. See the system control value for more information.
-
Fully paid and authorized. If the Payment at POS for Ship for Pickup Orders (L60) system control value is selected, ship-for-pickup orders are authorized for verification only and payment is collected when the customer picks up the items at the store.
System control values: If the Use OROB for Fulfillment Assignment (M31) system control value is selected or if the Use OROB for Ship for Pickup Fulfillment Assignment (M34) system control value is set to ALWAYS and the original order is a ship-for-pickup order, regardless of the setting of the following system control values, the system sends items to Order Broker for fulfillment assignment. Otherwise, the following system control values also determine whether an order line is eligible to send to Order Broker for fulfillment:
-
Order Broker Due Date Threshold (K11): the system does not send an item to Order Broker if the item is expected on an open purchase order line for the related warehouse with a due date within the threshold defined in this system control value.
-
Order Broker Include Ship Complete Orders (K12): if this system control value is unselected, the system does not send items to Order Broker that are on an order flagged to ship complete.
-
Order Broker Include Coordinate Grouped Orders (K13): if this system control value is unselected, the system does not send items to Order Broker that are coordinate grouped with other items.
-
Order Broker Include Gift Orders (K14): if this system control value is unselected, the system does not send items to Order Broker that are on a gift order.
Sellout prevented: If an order line meets all of the criteria, it is brokered even if the item is flagged with a soldout control code. See Brokering Items with Soldout Control Codes for a discussion.
BROKER Periodic Function
The BROKER periodic function submits orders to Order Broker if they were not eligible for submission when they were created. For example, the periodic function submits order lines if:
-
Your company was not configured to send brokered backorders to Order Broker when the order was created.
-
The order was in held status at initial creation and was subsequently released from hold, and the Send Held Orders to OROB (M18) system control value is unselected.
-
The order previously included an active PO item (see About Active PO Items for background).
-
The order line was partially reserved, but then the reserved quantity was shipped and there is still a backordered quantity remaining on the order line. The order line is not eligible to be submitted to Order Broker until any reserved quantity is printed and shipped.
Note:
This situation occurs only if the Use OROB for Fulfillment Assignment (M31) system control value is unselected; also, this situation does not apply to ship-for-pickup orders sent to Order Broker for fulfillment assignment.
Note:
When the periodic function submits an order line as a brokered backorder, the function performs all the updates described under Brokered Backorder Fulfillment: Initial Order Creation, but also decreases the Backorder quantity for the Item Warehouse record, since this quantity had been increased when the line was created.If an authorization is required, the BROKER function obtains an authorization for the entire order.
See Additional Order Broker Setup in Order Management System for background on setting up the BROKER periodic function.
Brokering Items with Soldout Control Codes
Items that are OROB eligible and flagged with a S/O control code are still eligible for brokering rather than selling out, provided they meet the Rules for Submitting Backorders to Order Broker.
In addition, the following applies if the Use OROB for Fulfillment Assignment (M31) system control value is unselected and the order is not a ship-for-pickup order.
If the soldout control status is:
-
sell out immediately: the item is eligible for brokering even if there is an available quantity in an allocatable warehouse.
-
include on-order: the item is eligible for brokering if it is backordered. There cannot be an open purchase order that could fulfill the order that is due within the Order Broker Due Date Threshold (K11), if specified. If no Order Broker Due Date Threshold (K11) is specified, the item is eligible for brokering regardless of open purchase orders. The Projected returns quantity, if any, for the item is not evaluated; see Projected Returns for background on how you can use the Projected returns quantity to prevent selling out items in certain situations.
-
exclude on-order: the item is eligible for brokering if it is backordered, regardless of whether there are any open purchase orders.
If the item is unfulfillable: If Order Broker is unable to fulfill an order line, the line returns to standard backorder or soldout processing. The process flow is:
-
An item is assigned a soldout control value and would be sold out on the order if the item were not OROB eligible. Order Management System submits the order line to Order Broker, but there is no store location that can fulfill the item, so Order Broker returns a status of Unfulfillable.
-
When Order Management System receives the status update from Order Broker, it changes the order line status to sold out (S) if the order line is currently eligible to sell out based on the soldout control value and availability.
-
The next time you use the Processing Auto Soldout Cancellations (MASO) option, the soldout line is listed on the Auto Soldout Register, even though it did not sell out through Process Auto Soldouts and even if it is not assigned a soldout control status of 1 (sell out immediately).
-
The next time you use the Generating Soldout Notifications (MSON) option, Order Management System generates a soldout notification.
The same processing occurs if Order Broker returns an error for the brokered order line.
Gift wrap or special handling: Based on the Rules for Submitting Backorders to Order Broker, if the Use OROB for Fulfillment Assignment (M31) system control value is unselected or the order is not a ship-for-pickup order, an order line is not eligible for brokering if it is flagged for gift wrap or special handling. If gift wrap or special handling applies to the item:
-
When the order line is initially created, then the line does not broker; instead, it sells out or remains backordered, as if it were not flagged as OROB eligible. This is the case when the order API or ecommerce interface creates the order.
-
After the order line is initially created (for example, by selecting Special Handling for the line in order entry), then if the soldout control status is:
-
sell out immediately: the line sells out the next time you use Processing Auto Soldout Cancellations (MASO).
-
include on-order quantity or exclude on-order quantity: the line does not sell out automatically.
-
You can use a backorder report to identify order lines that could not be brokered because of gift wrap or special handling, and that did not sell out automatically. See Order Status and Activity Reports for more information.
Future orders: If the Use OROB for Fulfillment Assignment (M31) system control value is unselected or the order is not a ship-for-pickup order, future orders are not eligible to be brokered; in this situation, items flagged OROB eligible and assigned soldout control values sell out automatically on future orders, just as they would if they were not flagged OROB eligible. Once an order is no longer considered a future order, OROB eligible items on the order can be brokered through the BROKER periodic function if they meet the Rules for Submitting Backorders to Order Broker.
If reserving against a non-allocatable warehouse: Based on the Reserve from Non-Allocatable Warehouse (J25) and Disregard Soldout Controls for Non-Allocatable Warehouses (J27) system control values, you can reserve inventory against a non-allocatable (retail) warehouse for a retail order, and disregard an item’s soldout control assignment. In this case, even if the item’s OROB eligible field is selected, the item reserves against the non-allocatable (retail) warehouse if the order type is associated with that warehouse and there is inventory in that warehouse.
Things to Note About Brokered Backorders
Canceling order lines: It is important to confirm that the remote store location assigned to fulfill the order line has not begun the shipment process before you cancel an order line or Order Broker request in Order Management System. Depending on the Order Broker Status Update Interval (K10), the most current information about the Order Broker request in Order Management System might be out of date.
Freight charges included? Freight charges for the order are included in the SubmitOrder message only if the Use Split Order (L56) system control value is selected.
Customer address updates: If you change the customer’s name or address in Order Management System after generating the initial Order Broker request, the Order Broker integration does not send this updated information to the assigned fulfilling location. For ship-for-pickup orders, the system does not allow you to change the store location defined as the one-time ship-to address on the order once the order is accepted.
Held orders submitted? When the Send Held Orders to OROB (M18) system control value is unselected, if an order is initially created in held status and then released from hold, Order Management System does not automatically submit the order to Order Broker. To submit the order, you can run the BROKER Periodic Function (program PFR0083). See Order Broker Configuration for background.
Order lines not resubmitted: If an order line has previously been submitted to Order Broker and the Order Broker request was flagged as unfulfillable or put in error status, the BROKER periodic function does not resubmit the order line to Order Broker for fulfillment.
Reserve quantity limit: If an order line exceeds the Reserve qty (Reserve quantity limit) specified for an item, Order Management System still submits the order line to Order Broker for fulfillment, provided the line is eligible based on the Rules for Submitting Backorders to Order Broker.
Inventory transaction history: If the Create Item Transaction History for Non-Inventory Items (E39) system control value is selected, Order Management System writes a NONINVISSU transaction record when the BROKER process receives a status update indicating that the assigned location has shipped the order or line. See that system control value for more information.
Backorder notices: The Generate Backorder Notices (GBOC) option does not generate backorder notices for an order line when it has an Order Broker request in process; however, if the status of the Order Broker request changes to unfulfillable (U) or error (E), or if you cancel the Order Broker request (Z) without canceling the order line itself, the order line returns to standard backorder processing and is eligible to have backorder notices generated.
Tracking numbers in shipment confirmation email: If the fulfilling location supplies information on the shipping agent and a tracking number, Order Broker passes this information to Order Management System. If the shipping agent matches a valid ship via code in Order Management System, the shipment confirmation email lists the description of the ship via and the tracking number as a live link. Otherwise, if the shipping agent does not match a ship via set up in Order Management System, then the shipment confirmation lists the shipping agent as it was passed from Order Broker, and the tracking number is plain text.
Note:
If a brokered backorder ships on the same day as a warehouse shipment, the shipment confirmation email includes just the tracking number for the brokered backorder. This occurs regardless of whether you consolidate invoices.See the Shipment Confirmation Email Sample and Contents for more information, and see the OrderShipmentLineDetail for detailed mapping.
Imp guide romcg
For more information see the Web Services Guide on https://support.oracle.com My Oracle Support (ID 2149144.1).
Important:
In Order Management System 21.0 or higher, you cannot select the Consolidated Invoice system control value if it is not already selected. If the system control value is currently selected (set to Y) and you deselect it (change it to N or blank), you cannot then change it back to selected. The option to consolidate invoices will be removed at a later date.Tracking numbers in customer history API: If Order Broker passes the shipping agent and a tracking number, the Detailed Order Inquiry Response XML Message (CWORDEROUT) includes this information provided Order Management System can link the line number, shipping agent, and tracking number from the Order Transaction History messages to the invoice based on date.
Imp guide romcg
For more information see the Web Services Guide on https://support.oracle.com My Oracle Support (ID 2149144.1).
Example:
The fulfilling location supplies information on the shipping agent and the tracking number to Order Broker, and Order Broker passes this information to Order Management System.
Order Management System writes Order Transaction History records such as:
SHIPMENT Ln#: 5 Store Shipped Order
SHIPMENT ----VIA: ABC
SHIPMENT ----TRK#: ABI123
The Order Transaction History records have the same date as the invoice.
The CWORDEROUT message passed through the customer history API includes the tracking information, for example:
<Shipment invoice_nbr="123456" invoice_ship_quantity="1"
invoice_ship_date="11292011" invoice_tracking_nbr="ABI123" invoice_ship_via_desc="ABC"/>
Note:
-
If Order Management System writes the Order Transaction History for the shipment of a brokered backorder on a date that differs from the invoice date, then no tracking information is included in the customer history response. This situation might occur if, for example, Order Management System receives the status update of the shipment before midnight, but the billing async job does not create the invoice until after the job is automatically stopped and restarted, so that the next date is assigned to the invoice.
-
The tracking information from Order Broker is not available as a live link on screens.
Other Order Broker orders not eligible: Order Management System does not submit a backordered delivery or retail pickup order to Order Broker for fulfillment. In addition, if the Use OROB for Ship for Pickup Fulfillment Assignment (M34) system control value is set to NEVER or blank, Order Management System does not submit a backordered ship-for-pickup order to Order Broker for fulfillment.
Line_locate_eligible flag in the CWORDEROUT message: If the Send B/O to OROB (K08) system control value is selected, the Detailed Order XML Response (CWORDEROUT) message used in the generic order API includes a flag for each order line to indicate whether the order line meets the Rules for Submitting Backorders to Order Broker. Even if this flag is set to Y, it is possible that the line cannot be fulfilled as a brokered backorder if, for example, Order Broker does not find a location that has the item available.
Imp guide romcg
For more information see the Web Services Guide on https://support.oracle.com My Oracle Support (ID 2149144.1).
The Generic Customer History API also uses the CWORDEROUT
message. The message includes the line_locate_eligible flag if the order line is still open. In the case of the generic
customer history API, the line_locate_eligible flag
might be set to Y even if, for example, the line was already
submitted to Order Broker, and then returned to normal backorder processing
because Order Broker did not find a location to fulfill it.
Imp guide romcg
For more information see the Web Services Guide on https://support.oracle.com My Oracle Support (ID 2149144.1).
Order Broker requires postal code: If the shipping address on a brokered backorder does not include a postal code, the Order Broker Order Broker rejects it. The Require postal code? flag for the country determines whether a postal code is required. See Setting Up the Country Table (WCTY) for background.
Reviewing brokered backorders in order inquiry: You can use the Brokered Backorder Summary Screen to review the current status of all brokered backordered lines on a single order. Also, you can select D/S Status for a single brokered backorder line at the Order Inquiry Detail Screen to advance to the Display Order Broker Details Screen, where you can review a single brokered backorder line on the order.
The OBR status remains on each order line that is fully or partially fulfilled through Order Broker as a brokered backorder. This status is displayed on the Order Inquiry Detail Screen.
The original backorder reason remains on the order line after fulfillment through Order Broker as a brokered backorder. This reason is displayed on the Display Order Detail Screen (Reviewing Order Line Detail). Typically, the backorder warehouse also remains on the order line as well, and is displayed on the Display Order Detail Screen (Reviewing Order Line Detail); however, if a shipment from the warehouse follows the fulfillment through Order Broker, the backorder warehouse field is cleared.
Change Tickler Event Screen
Purpose: Use this screen to define tickler event settings at the event level.
Important:
If you change a tickler event, you must restart the asyncs in the Background Job Control menu option before your updates are applied to new ticklers.
How to display this screen: Select Change for a tickler event at the Work with Tickler Event Screen.
| Field | Description |
|---|---|
|
Event |
A code that determines the system action for which the system may create a tickler. There are 11 system actions that can create ticklers. You cannot create other tickler events for the system to evaluate for tickler creation. BO: backorders; see BO (Backorders) Event Processing CO: cancelled orders; see CO (Cancelled Orders) Event Processing HO: held orders; see HO (Held Orders) Event Processing MN: manually created; see MN (Manually Created) Event Processing NO: new orders; see NO (New Orders) Event Processing OO: aged open orders; see OO (Aged Open Orders) Event Processing SD: stored value card activation decline; see SD (SVC Activation Decline) Event Processing SO: soldout orders; see SO (Soldout Orders) Event Processing SV: stored value card number assignment; see SV (SVC Number Assignment) Event Processing UP: unconfirmed pick tickets; see UP (Unconfirmed Pick Tickets) Event Processing VP: voided pick tickets; see VP (Voided Pick Tickets) Event Processing WF: remote workflow; see WF (Remote Workflow) Event Processing Alphanumeric, 2 positions; display-only. |
|
Description |
A description of the tickler event. Alphanumeric, 40 positions; required. |
|
Category (Tickler category) |
A code for the tickler category assigned to the tickler event. Tickler categories are used to group ticklers. You can also define a tickler category for each event rule; the tickler category defined at the event rule level overrides the tickler category defined at the event level. Tickler categories are defined in and validated against the Tickler Category table; see Working with Tickler Category (WTCT). Alphanumeric, 3 positions; optional. |
|
Resolution reason |
A code for the reason why a tickler for this event is resolved. Tickler resolution reason codes are assigned to a tickler once the tickler has been resolved. You can also define a resolution reason for each event rule; the resolution reason defined at the event rule level overrides the resolution reason defined at the event level. You must define a tickler resolution reason for all tickler events except for the MN (manually created) tickler event. Tickler resolution reasons are defined in and validated against the Tickler Resolution Reason table; see Working with Tickler Resolution Reasons (WTRR). Alphanumeric, 3 positions; required except for MN tickler event. |
|
Priority |
The priority assigned to the tickler event, used to determine the importance of ticklers created for this event. You can assign a tickler event priority between 1-9, where 1 is the lowest priority and 9 is the highest priority. You can also define a tickler priority for each event rule; the tickler priority defined at the event rule level overrides the tickler priority defined at the event level. Numeric, 1 position; required. |
|
Active |
Indicates whether the tickler event is active. selected = The tickler event is currently active; the system creates a tickler if the system action qualifies for an event rule. unselected = The tickler event and its event rules are not currently active; the system does not create a tickler, regardless of whether the system action qualifies for an event rule. |
|
Allow mult ticklers |
Indicates if the system creates multiple ticklers for this tickler event if the system action qualifies for more than one event rule. selected = The system creates a tickler for each event rule whose criteria are met by the system action. unselected (default) = The system creates one tickler for the first event rule, in processing sequence order, whose criteria are met by the system action. The system does not create more than one tickler for the tickler event, regardless of whether the system action meets the criteria of more than one event rule. Multiple ticklers are not allowed for tickler events OO (aged open orders) or UP (unconfirmed pick tickets). |
|
Assign to orig user |
Indicates if ticklers created for this tickler event are assigned to the user that entered the order associated with the tickler. selected = Assign ticklers created for this tickler event to the user that entered the associated order. If this field is selected, you must also enter a user ID in the Assign to user field. unselected (default) = Do not assign ticklers created for this tickler event to the user that entered the associated order; instead, assign the tickler to the specified user or tickler user group. You must also define tickler assignment for each event rule; the tickler assignment defined at the event rule level overrides the tickler assignment defined at the event level. Note: This field defaults to selected for MN (manually created) ticklers. See Tickler Assignment. |
|
Notify user/group |
Indicates whether the system sends a Tickler Notification email to the assigned user or to all of the users in the assigned tickler user group when a tickler is created for this tickler event. selected = Notify the assigned user/user group when a tickler is created; use the email address defined for the user in the User Extended table. If the tickler is assigned to a user group, send a notification to each user in the group, using the email address defined for each user in the User Extended table. unselected (default) = Do not notify the assigned user/user group when a tickler is created; the user can review the ticklers in his queue at the Work with Tickler Screen (user/group view). You must also define the Notify user/group setting for each event rule; the notify user/group setting at the event rule level overrides the notify user/group setting defined at the event level. See Tickler Notification for a sample Tickler Notification email. |
|
Assign to user |
The user ID of the user the system assigns ticklers to for this tickler event. You must also define the Assign to setting for each event rule; the assign to setting at the event rule level overrides the assign to setting defined at the event level. You can define either an assign to user or assign to user group for each event, but not both. Users are defined in and validated against the User table; see Working with User Records (WUSR). See Tickler Assignment. Alphanumeric, 10 positions; optional. |
|
Assign to group |
The tickler user group the system assigns ticklers to for this tickler event. You must also define the Assign to setting for each event rule; the assign to setting at the event rule level overrides the assign to setting defined at the event level. You can define either an assign to user or assign to user group for each event, but not both. The tickler user group you enter must be defined as a user type and not a supervisor type. Tickler user groups are defined in and validated against the Tickler User Group table; see Working with Tickler User Groups (WTUG). See Tickler Assignment. Alphanumeric, 10 positions; optional. |
|
Supervisor group |
The tickler supervisor group the system assigns ticklers to for this tickler event. You can also define the Supervisor group for each event rule; the supervisor group at the event rule level overrides the supervisor group defined at the event level. The tickler user group you enter must be defined as a supervisor type and not a user type. Tickler groups are defined in and validated against the Tickler User Group table; see Working with Tickler User Groups (WTUG). See Tickler Assignment. Alphanumeric, 10 positions; optional. |
|
Notify supervisor |
Indicates when a Supervisor Notification Count email is sent to the supervisor based on the number of days since a tickler was created. The system uses this calculation to determine the next notification date when a tickler is first created: tickler creation date + value in Number of days to notify supervisor field for the event/rule that created the tickler = next notification date. The system does not update the next notification date after a tickler is created. The system sends the email to the email address defined for the supervisor user group in the Tickler User Group table. The system continues sending an email to the supervisor group as long as a tickler assigned to the supervisor group is in an open or in process status and the Next notification date in the Tickler table is equal to or past the current date. If the next notification date is a future date, the system does not send an email until the next notification date is reached. If all ticklers assigned to the supervisor are resolved, the system no longer sends a Supervisor Notification Count email. |
|
|
Leave this field blank if you do not want to notify the supervisor about aging ticklers; the supervisor can review ticklers using the Workflow Management (WWFM) menu option. You can also define the Notify supervisor setting for each event rule; the notify supervisor setting at the event rule level overrides the notify supervisor setting defined at the event level. If you define a number of days in this field, you must also define the supervisor group. See Tickler Notification for a sample Supervisor Notification Count email. Numeric, 3 positions; optional. |
|
Note type |
Indicates the type of notes you enter for ticklers created for this tickler event. A = Action notes; you use the Edit Customer Actions Window to enter tickler notes. B = Bill to notes; you use the Work with Bill To Notes Screen to enter tickler notes. O = Order notes; you use the Work with Order Messages Screen to enter tickler notes. S = Sold to notes; you use the Edit Customer Notes Screen to enter tickler notes. T = Tickler notes; you use the Work with Tickler Notes Screen to enter tickler notes. You can only define the tickler work notes setting at the event level. If you change the note type for a tickler event, the system does not change the note type for previous ticklers. Alphanumeric, 1 position; required. |
Credit Card Deposit Schedule
How to print: Select Submit at the Credit Card Deposit Schedule Screen to print this report, as well as the Credit Card Deposit Schedule Summary.
For more information: See the sample report in PDF format.
Contents:
-
date range included in the report
-
date of the expected deposit
-
payment plan type:
-
I = installment
-
D = deferred
-
' ' (blank) = regular (non-pay plan) deposit
-
-
pay type code
-
order number
-
invoice number
-
deposit amount
-
for installments:
-
total number of installments
-
total installments remaining
-
installment interval, if the pay plan was set up to use a set number of days as an interval rather than to use a specific billing date
-
-
for deferred or regular deposits:
-
sold to customer name
-
-
totals, including total debits and credits, for:
-
all installments for a pay type on a given date
-
all deferrals for a pay type on a given date
-
all regular deposits for a pay type on a given date
-
all deposit types (regular, installment, or deferral) for a pay type on a given date
-
all expected deposits on a given date
-
final totals for all dates on the report
-
Declined Drop Ships
Purpose: Use this report to review orders that contain a credit card payment method that received a declined authorization. Each order contains one or more drop ship items (the Drop ship field for the item is selected).
How to print: This report prints when you perform Drop Ship Processing or select to receive and process authorizations at the Reprocess Authorizations Screen (RPAA).
For more information: See the sample report in PDF format.
Contents: Order number
Integration Layer Processes and Web Services
Purpose: This topic provides a master listing of integration layer processes and their characteristics, including whether they process inbound or outbound messages, require queues, or must be stopped and started. This topic also includes a listing of web services that do not use integration layer processes, and provides troubleshooting information for XML messages.
In this topic:
For more information: See:
-
Generic Web Services describes how to use the CWMessageIn Web Service to process XML messages for integration layer jobs that ordinarily use advanced queuing. This topic also describes how to use the CWMessageIn Web Service, which does not require an integration layer job to process the message.
For more information see the Web Services Guide on My Oracle Support (ID 2149144.1).
-
XML Messages provides a master list of Order Management System XML messages, including links to the DTDs, schemas, sample messages, and descriptions of message layouts.
-
Working with Integration Layer Processes (IJCT) describes the screens you use to work with and configure integration layer jobs.
-
Advanced Queuing for more information on using advanced queuing to send messages between Order Management System and an external system.
-
Working with Web Service Authentication (WWSA) describes how to define which Order Management System web service endpoints require web service authentication.
Integration Layer Processes
This table describes:
-
the integration layer processes
-
their functions
-
the jobs they initiate
-
the messages they handle
-
whether they require a queue
-
whether they need to be active
-
their communication type setting
| Process | Function | Submitted job or program | Messages | Needs Queue? | Must be Active? | Comm type? |
|---|---|---|---|---|---|---|
|
Order Broker integration |
Order Management System sends and receives order information and updates. See the Order Broker Integration for an overview. |
BROKER (ILR0022) |
Sends and receives information using Order Broker’s message formats; see Sample Order Broker Messages for examples. |
no |
yes |
web service |
|
Customer history, order inquiry (inbound/ outbound) |
Order Management System receives a CustHistRequest for customer order history or information on a specific order, and generates a response (CWCUSTHISTOUT or CWORDEROUT). See Generic Customer History API for an overview. For more information see the Web Services Guide on My Oracle Support (ID 2149144.1). |
CUST_HIST (ILO0012) |
CustHistRequest (to Order Management System)
CWCUSTHISTOUT (from Order Management System)
CWORDEROUT (from Order Management System) |
no (if passing target of CUSTHISTIN) |
no (if passing target of CUSTHISTIN) |
message queue or CWMessageIn web service |
|
Customer download (outbound) |
Order Management System generates an outbound CWCustomerDownload XML message when you create, change, or delete a customer. See Generic Customer Download API for an overview. For more information see the Web Services Guide on My Oracle Support (ID 2149144.1). |
CUST_OUT (ILR0022) |
CWCustomerDownload (from Order Management System) |
yes |
yes |
message queue |
|
Customer inquiry/ search (inbound/ outbound) |
Order Management System receives a CWCustomerInqRequest for information on one or more customers matching specific search criteria, and generates a CWCustomerInqResponse. See Generic Customer Inquiry (Search) API for an overview. For more information see the Web Services Guide on My Oracle Support (ID 2149144.1). |
CUST_SRCH (ILO0022) |
CWCustomerInq Request (to Order Management System)
CWCustomerInq Response (from Order Management System) |
no (if passing target of CWCUSTSRCH) |
no (if passing target of CWCUSTSRCH) |
message queue or CWMessageIn web service |
|
Customer API (inbound) |
Order Management System receives a new customer or a change to an existing customer. See Generic Customer API for an overview. Note: If using the CWCustomer web service, the CUSTOMR_IN IJCT job is not used. For more information see the Web Services Guide on My Oracle Support (ID 2149144.1). |
CUSTOMR_IN (ILO0019)
|
CWCustomerIn (to Order Management System) |
no |
no |
CWCustomer web service or CWMessageIn web service |
|
Email (outbound) |
Order Management System generates the a generic outbound XML message rather than an actual email, so that you can you can use the information to produce a reformatted HTML email that includes promotional material. See Outbound Email API. For more information see the Web Services Guide on My Oracle Support (ID 2149144.1). |
EMAIL_OUT |
CWEmailOut (from Order Management System) |
yes |
yes |
message queue |
|
Inventory download (outbound) |
Order Management System sends inventory availability information to another system in the CWInventoryDownload message. See Generic Inventory Download API for an overview. For more information see the Web Services Guide on My Oracle Support (ID 2149144.1). |
INV_DOWNLD (ILR0022) |
CWInventory Download (from Order Management System) |
yes |
yes |
message queue |
|
Inventory inquiry (inbound/ outbound) |
Order Management System receives a CWInventoryInquiryRequest for inventory availability on a specific item/SKU and generates a CWInventoryInquiryResponse. See Generic Inventory Inquiry API for an overview. For more information see the Web Services Guide on My Oracle Support (ID 2149144.1). |
INV_INQURY (ILO0013) |
CWInventoryInquiry (to Order Management System)
CWInventoryInquiryResponse (from Order Management System) |
yes |
yes |
message queue or CWMessageIn web service |
|
Invoice Outbound (outbound) |
Order Management System sends invoice information in the CWInvoiceOut message to another system, such as a retail store, financial system, or warehouse management system. See Generic Invoice Download API for an overview. For more information see the Web Services Guide on My Oracle Support (ID 2149144.1). |
INVOIC_OUT (ILR0022) |
CWInvoiceOut (from Order Management System) |
yes |
yes |
message queue |
|
Inventory transaction processor (inbound) |
Order Management System receives inventory transactions in the inCreateInvXaction message and updates inventory information, such as in the Item Location and Item Warehouse tables. Any errors create Item Transaction Error records. See Generic Inventory Transaction Upload for an overview. For more information see the Web Services Guide on My Oracle Support (ID 2149144.1). |
INVTRAN_IN (ILO0008) |
inCreateInvXaction (to Order Management System) |
yes |
yes |
message queue or CWMessageIn web service |
|
Item Outbound (outbound) |
Order Management System sends item and SKU information in the CWItemOut message to another system, such as a retail store or warehouse management system. See Generic Item Download API. For more information see the Web Services Guide on My Oracle Support (ID 2149144.1). |
ITEM_OUT (ILR0022) |
CWItemOut (from Order Management System) |
yes |
yes |
message queue |
|
Merchandise locator (outbound/ inbound) |
Order Management System sends a request for inventory information to an external system, such as Order Broker, and receives a response listing external warehouse and store locations where the specified item is available. See Merchandise Locator API for an overview. |
N/A |
LocateItems request (from Order Management System)
LocateItems response (to Order Management System)
Note: The CWMerchLoc request and response messages are used only to support processing the LocateItems request and response messages and the merchandise locator API, and are not themselves generic API messages. |
no |
no |
web service |
|
Order Cleanup |
Rejects orders that have been abandoned on the web storefront if, for example, the customer closes the browser window. This process uses the dTime Limit for Suspended E-Commerce Orders (G43) setting to determine the number of minutes to wait before rejecting an order. Only orders of the type specified in the E-Commerce Order Type (G42) system control value are eligible for cleanup, and the cleanup takes place only if the Get Orders from E-Commerce (G35) system control value is selected. The system generates the E-Commerce Orders Cleanup Log each time it deletes a suspended order and writes a record in the Deleted Order Table. |
ORDER_CLN |
This job does not generate or receive any messages and is used only to submit the order cleanup. |
no |
no |
message queue |
|
Order processor (inbound/ outbound) |
Order Management System receives new orders through a generic order interface and optionally generates detailed or simple acknowledgments, as requested in the inbound order message. See Generic Order Interface (Order API) for an overview. For more information see the Web Services Guide on My Oracle Support (ID 2149144.1). |
ORDER_IN (ILO0003) If the ORDER_IN job uses a web service and does not read from or write to queues (the default setting in Order Management System 1.1 or higher), there is no need to start or stop the job. |
CWOrderIn (to Order Management System)
CWOrderOut (from Order Management System) |
no |
no |
CWOrderIn web service (but can specify message queue or use CWMessageIn web service) |
|
Pick Outbound |
Order Management System sends a Pick Message from Order Management System (CWPickOut) for each pick slip generated. See Generic Pick Out API for an overview. For more information see the Web Services Guide on My Oracle Support (ID 2149144.1). |
PICK_OUT (ILR0022) |
CWPickOut (from Order Management System) |
yes |
yes |
message queue |
|
Purchase Order Outbound |
Order Management System sends a CWPurchaseOrderOut message to a warehouse management system or an EDI vendor. See Generic Outbound Purchase Order API. For more information see the Web Services Guide on My Oracle Support (ID 2149144.1). |
PO_OUT (ILR0022) |
CWPurchaseOrderOut (from Order Management System) |
yes |
yes |
message queue |
|
Return Inbound |
Order Management System receives a Return Request Message (CWReturnIn) to create and process a return against a specified order line. Optionally, the process sends a Return Response Message (CWReturnOut) to the external system, indicating if the return processed successfully or if an error occurred. See Inbound Return API for an overview. For more information see the Web Services Guide on My Oracle Support (ID 2149144.1). |
RETURN_IN (ILO0021) |
CWReturnIn (to Order Management System) CWReturnOut (from Order Management System) |
no (if passing target of CWRETURNIN) |
no (if passing target of CWRETURNIN) |
message queue or CWMessageIn web service |
|
Return Authorization Outbound |
Order Management System sends a Return Authorization Outbound XML Message (CWReturnRAOut) when a return authorization is created, changed, or deleted. |
RETURN_OUT (ILR0022) |
CWReturn AuthorizationOut (from Order Management System) |
yes |
yes |
message queue |
|
Tax Request (inbound / outbound) |
Order Management System sends a request for tax information for an order to an external system, and then receives the response. See Use Generic Tax XML Interface (J10) and the Vertex Interface. |
TAX_INT This process does not submit a job; it is used to determine the XML message format and the queue used to transmit the message. You do not need to start or end this job. |
CWTaxRequest (from Order Management System) CWTaxResponse (to Order Management System) |
no |
no |
web service |
|
Vendor Outbound (outbound) |
Order Management System sends a CWVendorOut message to another system, such as a retail store or warehouse management system. See Generic Vendor Download API for more information. For more information see the Web Services Guide on My Oracle Support (ID 2149144.1). |
VENDOR_OUT (ILR0022) |
CWVendorOut (from Order Management System) |
yes |
yes |
message queue |
|
Workflow processing (inbound) |
Order Management System receives the CWWorkflow XML message from an outside source and creates a tickler, based on the information in the message. This process does not process any message other than CWWorkflow. See Workflow Management Overview and Setup and WF (Remote Workflow) Event Processing. |
WORKFLOW (ILO0002) |
CWWorkflow (to Order Management System) |
yes |
yes |
message queue or CWMessageIn web service |
Web Services without Integration Layer Processes
The following web services allow you to process XML messages directly without using a process at the Work with Integration Layer Process Screen.
| Web Service | Inbound Message | Outbound Message | For More Information |
|---|---|---|---|
|
CWOrderIn |
Inbound Order XML Message (CWORDERIN) For more information see the Web Services Guide on My Oracle Support (ID 2149144.1). |
Detailed Order XML Response (CWORDEROUT), or Order Acknowledgement XML Message (CWORDEROUT) For more information see the Web Services Guide on My Oracle Support (ID 2149144.1). |
Generic Order Interface (Order API) For more information see the Web Services Guide on My Oracle Support (ID 2149144.1). |
|
CWCustomer |
Inbound Customer Message (CWCustomerIn) For more information see the Web Services Guide on My Oracle Support (ID 2149144.1). |
Outbound Customer Response Message (CWCustomerOut) |
Generic Customer API |
|
CWReceiptIn |
PO Receipt In XML Message (CWReceiptIn) For more information see the Web Services Guide on My Oracle Support (ID 2149144.1). |
none |
Purchase Order Receipt In API For more information see the Web Services Guide on My Oracle Support (ID 2149144.1). |
|
CWPickIn |
CWPickIn XML Message For more information see the Web Services Guide on My Oracle Support (ID 2149144.1). |
none |
Generic Pick In API (Shipments, Voids, and Backorders) For more information see the Web Services Guide on My Oracle Support (ID 2149144.1). |
| CWServiceIn |
Order Transaction History Message (CWOrderTransactionHistory) For more information see the Web Services Guide on My Oracle Support (ID 2149144.1). |
none |
Generic Order Transaction History API For more information see the Web Services Guide on My Oracle Support (ID 2149144.1). |
|
Order Line History In Message (CWOrdLnHstIn) For more information see the Web Services Guide on My Oracle Support (ID 2149144.1). |
none |
Order Line History In API For more information see the Web Services Guide on My Oracle Support (ID 2149144.1). |
|
|
Item Availability Request XML Message (CWItemAvailabilityWeb) For more information see the Web Services Guide on My Oracle Support (ID 2149144.1). |
Availability Response XML Message (CWItemAvailabilityResponseWeb) For more information see the Web Services Guide on My Oracle Support (ID 2149144.1). |
Item Availability API For more information see the Web Services Guide on My Oracle Support (ID 2149144.1). |
|
|
E-Commerce Cancel Request Message (CWCancel) For more information see the Web Services Guide on My Oracle Support (ID 2149144.1). |
none |
||
|
E-Commerce Catalog Request Message (CWCatRequest) For more information see the Web Services Guide on My Oracle Support (ID 2149144.1). |
E-Commerce Catalog Request Response Message (CWCatreqResponse) For more information see the Web Services Guide on My Oracle Support (ID 2149144.1). |
E-Commerce Catalog Requests For more information see the Web Services Guide on My Oracle Support (ID 2149144.1). |
|
|
CWProcessIn Message For more information see the Web Services Guide on My Oracle Support (ID 2149144.1). |
none |
Using the CWProcessIn Message to Start a Periodic Process For more information see the Web Services Guide on My Oracle Support (ID 2149144.1). |
|
|
CWMessageIn this web service works with any of the integration layer processes set up through Working with Integration Layer Processes (IJCT); see CWMessageIn Web Service for more information For more information see the Web Services Guide on My Oracle Support (ID 2149144.1). |
Inbound Customer Search Message (CWCustomerInqRequest)
For more information see the Web Services Guide on My Oracle Support (ID 2149144.1). |
Outbound Customer Search Response (CWCustomerInqResponse)
For more information see the Web Services Guide on My Oracle Support (ID 2149144.1). |
queue not required if target is CWCUSTSRCH; see Generic Customer Inquiry (Search) API
For more information see the Web Services Guide on My Oracle Support (ID 2149144.1). |
| Inbound Customer Message (CWCustomerIn)
For more information see the Web Services Guide on My Oracle Support (ID 2149144.1). |
Outbound Customer Response Message (CWCustomerOut)
For more information see the Web Services Guide on My Oracle Support (ID 2149144.1). |
queue not required if type is CWCustomerIn; see Generic Customer API
For more information see the Web Services Guide on My Oracle Support (ID 2149144.1). |
|
| Customer History Request XML Message (CWCustHistIn)
For more information see the Web Services Guide on My Oracle Support (ID 2149144.1). |
Customer History Response XML Message (CWCustHistOut) or Detailed Order Inquiry Response XML Message (CWORDEROUT) For more information see the Web Services Guide on My Oracle Support (ID 2149144.1). |
queue not required if target is CUSTHISTIN; see Generic Customer History API
For more information see the Web Services Guide on My Oracle Support (ID 2149144.1). |
|
| Email XML Message (CWEmail)
For more information see the Web Services Guide on My Oracle Support (ID 2149144.1). |
none |
Email Repository Overview For more information see the Web Services Guide on My Oracle Support (ID 2149144.1). |
|
| Inventory Inquiry Request XML Message (CWInventoryInquiry)
For more information see the Web Services Guide on My Oracle Support (ID 2149144.1). |
Inventory Inquiry Response XML Message (CWInventoryInquiryResponse)
For more information see the Web Services Guide on My Oracle Support (ID 2149144.1). |
Generic Inventory Inquiry API
For more information see the Web Services Guide on My Oracle Support (ID 2149144.1). |
|
| Inventory Transaction Upload XML Message (inCreateInvXaction) For more information see the Web Services Guide on My Oracle Support (ID 2149144.1). |
none | Generic Inventory Transaction Upload
For more information see the Web Services Guide on My Oracle Support (ID 2149144.1). |
|
|
CWMessageIn continued |
Inbound Order XML Message (CWORDERIN)
For more information see the Web Services Guide on My Oracle Support (ID 2149144.1). |
Detailed Order XML Response (CWORDEROUT) or Order Acknowledgement XML Message (CWORDEROUT) For more information see the Web Services Guide on My Oracle Support (ID 2149144.1). |
Generic Order Interface (Order API)
For more information see the Web Services Guide on My Oracle Support (ID 2149144.1). |
| Return Request Message (CWReturnIn)
For more information see the Web Services Guide on My Oracle Support (ID 2149144.1). |
Return Response Message (CWReturnOut)
For more information see the Web Services Guide on My Oracle Support (ID 2149144.1). |
queue not required if target is CWRETURNIN; see Inbound Return API
For more information see the Web Services Guide on My Oracle Support (ID 2149144.1). |
|
| Generic Workflow XML Message (CWWorkflow) | Workflow Management Overview and Setup and WF (Remote Workflow) Event Processing |
Troubleshooting XML Messages and Integration Layer Processes
See also Using the JOBCLN Function to Resolve Job Status Across Servers.| Question | Possible Solution |
|---|---|
|
What are some reasons why inbound messages might not be processed? |
If the process uses a JMS provider (advanced queuing):
|
|
Do you need to use a JMS provider (advanced queuing) for integration layer processes or e-commerce? |
You can use the Generic Web Services to send XML messages if you prefer not to use advanced queuing. For more information see the Web Services Guide on My Oracle Support (ID 2149144.1). |
|
What is the purpose of an integration layer job that doesn’t need to be stopped or started? |
Some possible purposes:
|
|
Are all integration layer processes listed at the Work with Integration Layer Process Screen? |
If you have hidden a process, it is not listed. See Hiding an Integration Layer Process. |
|
How can I track the messages processed? |
See Order Management System Application Logs for information on the logs you can use to track XML messages. |
|
How can the version number of an XML message be higher than the Order Management System release number? |
XML version numbers do not increase in sync with the current Order Management System release number; instead, the XML version number increases each time new elements or attributes are added to the message, which can occur multiple times between major Order Management System releases. See XML Versions for a discussion. |
|
Does the inbound XML version number matter? |
The inbound XML version number is informational, indicating when new elements or attributes are added. Even if the inbound XML version number is lower than the one in which the new elements or attributes were added, the integration layer job can still process the inbound message if the elements or attributes were added prior to the current Order Management System release. See XML Versions for a discussion. |
|
Is it necessary to start and stop a process manually? |
See Scheduling Jobs and Additional Interface (INT) Periodic Functions for more information on how to schedule a periodic function and for a list of the periodic functions used to start and stop the integration layer jobs. |
|
Where can I find DTDs and schemas, for XML messages? |
See XML Messages. |
Integration with the Sales Audit Module of the Oracle Retail Merchandising Foundation Cloud Service
Overview: Use the integration with Sales Audit module of the Oracle Retail Merchandising Foundation Cloud Service (Sales Audit module) to export information on sales and returns.
Types of information sent for transactions: The following information is included:
-
transaction header
-
customer
-
items
-
discounts
-
tax
-
payment
-
tenders
-
transaction tail
The file also includes transaction open and close records, and file header and trail records.
Tracking shipments and credits: If you enable the Sales Audit module sales audit integration in Order Management System, the system writes records in the INT_RESALOG table in the database, and updates the table with records as shipments and order credits bill throughout the day.
Packaging the DAT file into a ZIP file: On a daily basis, you use a periodic process to add file header and trailer records to “wrap” the transaction information, and convert the contents of the INT_RESALOG table into a DAT file that is ready for Sales Audit module to retrieve and process. This file is named RTLOG_6_20190721145902950.DAT, where 6 is the company number or the store number, and 20190721145902950 is the date and time stamp. The DAT file is then packaged into a ZIP file of the same name, for example, RTLOG_6_20190721145902950.ZIP.
In this topic:
Data Flow from Order Management System to Sales Audit Module
If your company is configured for Sales Audit module integration, processing takes place as follows:
-
Sale or credit invoices are created through the day and are processed by the billing async job in Background Job Control (MBJC).
-
Outbound Interface Transaction trigger records with a File setting of IHD are created based on the invoices. You can review these trigger records in Working with Outbound Interface Transactions (WOIT).
-
The INVOIC_OUT process in Working with Integration Layer Processes (IJCT) works through the IHD trigger records to collect the required information for each invoice, and creates records in the INT_RESALOG database table for transactions in each company that is configured for the Sales Audit module integration.
-
When the RTLOG periodic function runs, it:
-
Consolidates multiple records for the same invoice found in the INT_RESALOG table. This can occur if, for example, you ship multiple ship-alone items on a single order and you have the Consolidated Invoice (B49) system control value selected.
Note:
In Order Management System 21.0 or higher, you cannot select the Consolidated Invoice system control value if it is not already selected. If the system control value is currently selected (set to Y) and you deselect it (change it to N or blank), you cannot then change it back to selected. The option to consolidate invoices will be removed at a later date. -
Uses the records in the INT_RESALOG table to create a DAT file that contains the transaction data from the temporary file for the company specified for the function, as well as the header, close store, and footer records. The DAT file name is
RTLOG_1234_20190621140400561.DAT, where:-
1234is the Parameter specified for the periodic function. This needs to be the store number assigned by the Sales Audit module. If no store number is specified as the parameter, the company number is used. -
20190621140400561is the date and time.
-
-
Creates a compressed ZIP file containing the DAT file, using the same naming convention as described above the for DAT file and places the ZIP file in the CWDIRECTCP_FTP_FOLDER.
-
The Sales Audit module then needs to retrieve the ZIP file from the CWDIRECTCP_FTP_FOLDER.
Transmitting the RTLOG File to Object Storage
Use the following process to transmit the RTLOG file to object storage instead of using secure FTP.
Note:
Object storage is supported in Sales Audit module version 21.0 and later.Run the RTLOG periodic function, as described above, to create the RTLOG file and place it in the CWDIRECTCP_FTP_FOLDER.
Run the SNDRTLG periodic function. If there is an RTLOG file in the CWDIRECTCP_FTP_FOLDER, and if the Sales Audit File Service URL (M64) and Sales Audit Import Folder Path (M65) are populated, this function:
-
Sends a POST request message for each RTLOG file to the Sales Audit module, using the authentication set up for the Sales Audit File Service through the Work with Outbound Web Service Authentication Screen.
-
If the Sales Audit module returns a response indicating that the pre-authentication request (PAR) was successful, the periodic function processes a PUT to the URL that was returned in the Sales Audit module response.
-
After processing the PUT, the periodic function:
-
Removes the RTLOG file from the CWDIRECTCP_FTP_FOLDER.
-
Saves a copy of the RTLOG zip file in the OMS-SALES-AUDIT container of the FILE_STORAGE table. This copy is available in case there was an issue with the Sales Audit module receiving the file, so it will be available to be resent, if necessary, through the RCVRTLG periodic function, described below.
-
-
If no pre-authentication response is received, the Order Management System Support Notification is generated. Possible reasons for an unsuccessful process include an invalid setting for any of the Additional System Control Values Related to Transmitting to Object Storage.
Resending the RTLOG file: If the pre-authentication response was received during SNDRTLG processing, but the Sales Audit module did not actually receive the RTLOG file, you can use the RCVRTLG periodic function to resend the file.
For example, Sales Audit module staff indicate the date and time when the RTLOG file was expected but not received. In this case:
-
Use the
getFilesfile storage request to obtain a list of files in the OMS-SALES-AUDIT container of the FILE_STORAGE table. See File Storage API for information on the file storage API and the FILE_STORAGE table. -
Based on the date and time when the missing RTLOG file was generated, obtain the exact file name to send.
-
Enter the exact RTLOG file name as the Parameter for the RCVRTLG periodic function, and run the function.
Note:
The records in the OMS-SALES-AUDIT container of the FILE_STORAGE table are not purged automatically. You can use thedeleteFile file storage request to delete these records.
Configuration for the Sales Audit Module Integration
Configuration within Order Management System
The configuration required in Order Management System to support the integration with Sales Audit module includes the following.
System Control Values
Set the following system control values:
-
ReSA RTLOG Format (M39): Must be set to RTLOG or RTLOGQ.
-
Consolidated Invoice (B49): Needs to be unselected. Otherwise, if this system control value is selected, it is possible to generate multiple transaction heads with the transaction numbers, as individual lines on the order are billed. The items that bill first could then accumulate and repeat on each subsequent transaction: for example, if 3 items ship separately, invoice 1 contains item 1; invoice 2 contains items 1 and 2; invoice 3 contains invoice 1, 2, and 3.
Note:
In Order Management System 21.0 or higher, you cannot select the Consolidated Invoice system control value if it is not already selected. If the system control value is currently selected (set to Y) and you deselect it (change it to N or blank), you cannot then change it back to selected. The option to consolidate invoices will be removed at a later date. -
Create Generic Invoice Download Trigger Records (I17): Must be selected in order to create the IHD trigger records for processing.
-
Use Async Start Date for Billing Transactions (E95): Oracle recommends leaving this system control value unselected.
-
Item for Non-Merchandise Amounts (L39): Used as the non-merchandise item (NMITEM) in the DAT file for Sales Audit module.
-
ReSA Warehouse for Non-Inventory Returns (M56): Used as the return warehouse for a credit invoice for a return that does not affect inventory. Must map to a Physical Warehouse defined in the Sales Audit module.
-
Default Warehouse (A04): Used as the return warehouse for a credit invoice for a return that does not affect inventory, if no ReSA Warehouse for Non-Inventory Returns (M56) is specified.
Additional System Control Values Related to Transmitting to Object Storage
Set the following additional system control values if you are using the process described under Transmitting the RTLOG File to Object Storage:
-
Sales Audit File Service URL (M64): Defines the endpoint for the SNDRTLG periodic function to use when submitting the RTLOG file to object storage.
-
Sales Audit Import Folder Path (M65): Defines the folder where RTLOG files should be placed when you are using object storage.
-
IDCS Enterprise Endpoint Scope (M66): Defines the limits that control where the OAuth token can be used to support posting to object storage.
-
IDCS Enterprise Endpoint URL (M67): Defines the endpoint to use for OAuth authentication to support posting to object storage.
Property
The process uses the CWDIRECTCP_FTP_FOLDER, defined through Working with Admin Properties (CPRP), for the RTLOG function to place the ZIP file for the Sales Audit module.
Periodic Functions and Processes
Use Working with Periodic Functions (WPER) to set up:
-
The RTLOG periodic function. If the function needs to run in more than one company, mapping to more than one store in the Sales Audit module, you can name the function RTLOGN, where N is a unique number. When setting up the function:
-
Set the Program name to PFR0201
-
Set the Parameter to the store number assigned by the Sales Audit module, but if not passed, uses company number
-
-
The SNDRTLG periodic function, if you use the process described under Transmitting the RTLOG File to Object Storage. When setting up the function:
-
Set the Program name to PFR0206
-
Set the Parameter to the store number assigned by the Sales Audit module, but if not passed, uses company number
-
-
The RCVRTLG periodic function, if you use the process described under Transmitting the RTLOG File to Object Storage. When setting up the function:
-
Set the Program name to PFR0208
-
Set the Parameter to the name of the RTLOG file that you are resubmitting to object storage, but if not passed, uses company number. See Transmitting the RTLOG File to Object Storage for more information
-
Use Working with Periodic Processes (WPPR) to assign each periodic function to a periodic process. The RTLOG and SNDRTLG processes should run at the end of day, because records accumulate in a temporary file until the function runs.
Authentication
In order to use the process described under Transmitting the RTLOG File to Object Storage, you need to use the Work with Web Service Authentication screen (WWSA) to set up authentication for the Sales Audit File Service, using an authentication type of OAuth. See the Work with Outbound Web Service Authentication Screen for background.
Miscellaneous Setup
Do not set Trigger Rules or XML Inclusion rules for the INVOIC_OUT job in Working with Integration Layer Processes (IJCT).
Set the Outbound version for INVOIC_OUT to 3.0 in Working with Integration Layer Processes (IJCT).
Mapping Configuration between Order Management System and the Sales Audit Module
In addition to the Configuration within Order Management System, described above, you need to map the following information from the Sales Audit module:
-
Store number: Specify as the Parameter for the RTLOG periodic function. This store number is used as part of the DAT file name, as described above, and also populates the Location Number in the FHEAD record. If no Parameter is specified for the periodic function, the company number is used.
-
Return Reason Codes: The return reason codes used must map to SARR codes defined in the Sales Audit module.
-
Return Warehouse Codes: Any warehouse codes that might be passed as return warehouses must map to Physical Warehouses defined in the Sales Audit module.
-
Pay Types: Each pay type sent must map to a Pay Type in the Sales Audit module.
-
Items: The Reference # for the item must map to an item in the Sales Audit module. Items are ordinarily imported from Oracle Retail Merchandising Foundation Cloud Service (RMFCS) into the Sales Audit module and Order Management System, and the Reference # is set to the same value as the item code. The Reference # should not be changed. See Oracle Retail Merchandising Foundation Cloud Service (RMFCS) and Oracle Retail Pricing Cloud Service (RPCS) Integration for background.
Considerations for the Sales Audit module Integration
The RTLOG periodic function needs to run on the same server as the CWDIRECTCP_FTP_FOLDER, and where you run INVOIC_OUT process.
Cross-channel orders are not excluded from the RTLOG file for the Sales Audit module, and as a result can be submitted by multiple systems that integrate with the Sales Audit module.
Example: Xstore submits an order to Order Broker, and the order is fulfilled through assignment to Order Management System; in this case, both Xstore and Order Management System submit the order to the Sales Audit module. Similarly, if the Use OROB for Fulfillment Assignment (M31) system control value is selected, Order Management System sends invoices for both the originating order and fulfilling order, or there could be multiple transactions sent for same order if a line splits in Order Broker.
The Cross Channel Orders to Exclude in Sales Feed (L35) does not affect the selection of orders to include in the export file.
If the Consolidated Invoice (B49) system control value is selected, the RTLOG periodic function consolidates the records for an invoice into a single record in the RTLOG file.
Important:
In Order Management System 21.0 or higher, you cannot select the Consolidated Invoice system control value if it is not already selected. If the system control value is currently selected (set to Y) and you deselect it (change it to N or blank), you cannot then change it back to selected. The option to consolidate invoices will be removed at a later date.Additional Things to Note
It is not necessary to create queues for the INVOIC_OUT job in Working with Integration Layer Processes (IJCT) if the trigger records are required only for the Sales Audit module integration. In this case, you should set the ReSA RTLOG Format (M39) to RTLOG, and no invoice out message is generated or logged. If you set the ReSA RTLOG Format (M39) to RTLOGQ rather than RTLOG, errors will be logged if no queues have been created.
The invoice amount passed in the RTLOG file may not be the same as the paid amount in the case of an underpayment, overpayment, or canceled return.
Invoice to RTLog Mapping
The file type record descriptors for each record type included in the RTLog file, and a brief summary of their contents:
-
FHEAD: The header for the file, indicating basic information such as the originating system, the store number, and the file creation date and time. Added through the RTLOG periodic function. One header per file.
-
THEAD (SALE or RETURN transaction): This File Type Descriptor contains the header for each transaction, indicating the date and time generated, the invoice (transaction) number, and whether the transaction was a shipment (SALE) or refund (RETURN).
-
The first THEAD record in the file is the THEAD (OPEN transaction) following the initial FHEAD, and the last THEAD record is the THEAD (CLOSE transaction) at the end of the transactions. Unlike the OPEN transaction, the CLOSE transaction is created through the RTLOG periodic function.
-
TCUST: Information about the customer, including customer number and name and address.
-
TITEM: Information about each item sold or returned, including item number, quantity, and pricing, as well as the order number and invoice number.
-
IDISC: Discount line information for sales transactions.
-
IGTAX: Item-level tax amounts.
-
TTAX: Tax amounts.
-
TPYMT: Payment amounts for sales, exclusive of tax.
-
TTEND: Tender information for each transaction.
-
TTAIL: Indicates the total number of lines in the transaction.
-
FTAIL: The total number of lines in the file. The last entry in the file. Added through the RTLOG periodic function.
The following table describes the fields that are mapped into the RTLog file, or that are hard-coded.
Note:
Fields that are left blank are not included in the following table.| Field | Data Type and Length | Value Passed | Description/ Comments |
|---|---|---|---|
|
FHEAD |
This File Type Descriptor identifies a single record at the beginning of the file. Created by the RTLog periodic function, and not found in the temporary file. |
||
|
File Line Identifier |
Number (10) |
0000000001 |
Identifies the line number in the file. Zero-padded. Set to 0000000001 for the FHEAD. |
|
File Type Definition |
Character (4) |
RTLG |
Hard-coded. |
|
File Create Date |
Character (14) |
System date and time |
The date and time when the file was created. Example: 20190621140400, where 2019 is the year, 06 is the month, 21 is the date, and 140400 is the time. |
|
Business Date |
Character (8) |
System date |
The date when the file was created. Example: 20190621, where 2019 is the year, 06 is the month, and 21 is the date. |
|
Location Number |
Character (10) |
Location ID |
The location ID assigned in the Sales Audit module. From the Parameter defined for the RTLOG periodic function. If no Parameter was defined, this is the company number. |
|
RTLOG Originating System |
Character (3) |
OMS |
Hard-coded. |
|
THEAD (OPEN transaction) |
The first record in the file with a File Type Descriptor of THEAD is an OPEN transaction, and follows the initial FHEAD record in the DAT file created by the RTLOG periodic function. |
||
|
File Line Identifier |
Number (10) |
Next sequential number in the file. |
Identifies the line number in the file. Ordinarily set to 0000000002, since this line follows the FHEAD record. Zero-padded. |
|
Register |
Character (5) |
01 |
Hard-coded. |
|
Transaction Date |
Character (14) |
System date and time |
The date and time when the record was created. Example: 20190621140400, where 2019 is the year, 06 is the month, 21 is the date, and 140400 is the time. |
|
Transaction Number |
Number (10) |
Next transaction number in the file. |
Zero-padded. Ordinarily set to 0000000002 for the OPEN transaction type. |
|
Transaction Type |
Character (6) |
OPEN |
Hard-coded. |
|
Sub-transaction Type |
Character (6) |
OSTORE |
Hard-coded. |
|
THEAD (SALE or RETURN transaction) |
Records with this File Type Descriptor contains the header for each transaction, indicating the date and time generated, the invoice (transaction) number, and whether the transaction was a shipment (SALE) or refund (RETURN). The first THEAD record in the file is an OPEN transaction following the initial FHEAD, and the last THEAD record is a CLOSE transaction at the end of the transactions. |
||
|
File Line Identifier |
Number (10) |
Next sequential number |
Identifies the line number in the file. Zero-padded. |
|
Register |
Character (5) |
01 |
Hard-coded. |
|
Transaction Date |
Character (14) |
System date and time |
The date and time when the INVOIC_OUT job processed the transaction record. Example: 20190621140400, where 2019 is the year, 06 is the month, 21 is the date, and 140400 is the time. |
|
Transaction Number |
Number (10) |
Invoice number |
The unique number identifying the invoice in Order Management System. |
|
Cashier |
Character (10) |
Salesman number |
The unique number identifying the salesman, if any, associated with the order. |
|
Salesperson |
Character (10) |
Salesman number |
The unique number identifying the salesman, if any, associated with the order. |
|
Transaction Type |
Character (6) |
SALE or RETURN |
Set to SALE if the merchandise was shipped; otherwise, set to RETURN if the merchandise was returned, or if a negative additional charge was applied and express-billed. NOTE: Typically, if the merchandise was shipped, the invoice type is I, but it is possible that negative additional charges, applied through the non-inventory item, could exceed the value of the shipped items. Similarly, if the merchandise is returned, the invoice type is C, but it is possible that positive additional charges could exceed the value of the returned items. |
|
Value Sign |
Character (1) |
P |
Set to P for both sales and credit invoices. |
|
Rounded Amount Sign |
Character (1) |
P |
Set to P for both sales and credit invoices. |
|
Rounded Off Sign |
Character (1) |
P |
Set to P for both sales and credit invoices. |
|
Transaction Processing System |
Character (3) |
POS or OMS |
Passes POS:
Otherwise, passes OMS. |
|
TCUST |
Records with this File Type Descriptor contains information about the sold-to customer, including customer number and name and address. TCUST records follow THEAD records with File Type Descriptors of SALE or RETURN. The information in this record type is primarily from the Sold To Customer record. |
||
|
File Line Identifier |
Number (10) |
Line number |
Identifies the line number in the file. Zero-padded. |
|
Customer ID |
Character (16) |
Sold-to customer number. |
The sold-to customer on the order. |
|
Customer Type ID |
Character (6) |
CUSTID |
Hard-coded. |
|
Customer Name |
Character (120) |
Customer first name, last name, and company. |
Values are concatenated, with spaces between each. |
|
Address 1 |
Character (240) |
First address line |
All address and phone number information is for the sold-to customer. |
|
Address 2 |
Character (240) |
Second address line |
Blank if no second address line exists. Apartment number is not passed. |
|
City |
Character (120) |
City |
|
|
State |
Character (12) |
State or province code |
If blank, spaces are passed. |
|
Zip Code |
Character (30) |
Zip or postal code |
If blank, spaces are passed. |
|
Country |
Character (3) |
Country code |
Two positions. |
|
Home Phone |
Character (20) |
Day phone |
|
|
Work Phone |
Character (20) |
Evening phone |
|
|
|
Character (100) |
Email address |
The sold-to customer’s primary email address. |
|
TITEM |
Records with this File Type Descriptor contains information about each item sold or returned, including item number, quantity, and pricing, as well as the order number and invoice number. The information for this record type is primarily from the Invoice Detail table. |
||
|
File Line Identifier |
Number (10) |
Line number |
Identifies the line number in the file. Zero-padded. |
|
Item Status |
Character (6) |
ORD or C |
Set to ORD if the invoice is for a shipment; otherwise, set to R if the invoice is for a return, or for a negative additional charge that was express-billed. |
|
Item Type |
Character (6) |
ITEM or NMITEM |
Set to NMITEM for the Item for Non-Merchandise Amounts (L39); otherwise, set to ITEM. |
|
Item Number Type |
Character (6) |
ITEM |
Hard-coded. |
|
Item |
Character (25) |
Item code |
The item’s Reference # (retail reference number) from the SKU table. The Reference # is automatically populated with the item number through Importing Enterprise Foundation Data through Omnichannel Cloud Data Service (OCDS). If for any reason the Reference # is blank, the base item code is passed instead. The item code passed does not include a SKU. SKUs are not supported in the Sales Audit module. NOTE: Each item must map to an item in the Sales Audit module. |
|
Non-Merchandise Item |
Character (25) |
Non-merchandise item code |
From the Item for Non-Merchandise Amounts (L39) system control value. This must be a valid item code in the Sales Audit module. |
|
Quantity Sign |
Character (1) |
P or N |
Typically set to P for a sale invoice; otherwise, set to N for a credit invoice. However, if this is the NMITEM, the Quantity Sign indicates the effect of the charge, for example:
|
|
Quantity |
Number (12) |
Shipped or returned unit quantity |
Zero-padded with a 4-position implied decimal; for example, a quantity of 2 is passed as 000000020000. Absolute value. Quantity of 1 is passed for the Item for Non-Merchandise Amounts. |
|
Selling Unit of Measure |
Character (4) |
EA |
Hard-coded. |
|
Unit Retail |
Number (20) |
Pre-discount price |
Zero-padded with a 4-position implied decimal; for example, a price of 1.50 is passed as 00000000000000015000. Absolute value. If the selling price is less than the offer price on a sales transaction, an IDISC record provides details on the discount. NOTE Ordinarily the same as the Original Unit Retail, except for the following scenarios.
|
|
Override Reason |
Character (6) |
OMS |
Hard-coded. |
|
Original Unit Retail |
Number (20) |
Offer price from the Order Detail record |
The original offer price. Set to 0.00 if no offer price is defined. See Overriding the Item/SKU Offer Price for a discussion of how the offer price for an Order Detail record is determined when offers are not set up, and a price override reason code is used to set the price for the order line. If the selling price is lower than the original offer price, the Unit Discount Amount specified in the IDISC record indicates the unit amount of the discount. |
|
Taxable Indicator |
Character (1) |
Y or N |
Set to Y, unless:
|
|
Item_swiped_ind |
Character (1) |
N |
Hard-coded. |
|
Return Reason Code |
Character (6) |
Return reason code |
The return reason code used for a return of an order line. See Establishing Return Reason Codes (WRTR) for background. NOTE The return reason codes used MUST map to SARR codes defined in the Sales Audit module |
|
Salesperson |
Character (10) |
Salesman number |
The unique number identifying the salesman, if any, associated with the order. |
|
Drop Ship Ind |
Character (1) |
Y or N |
Set to Y for a drop ship item on a sale transaction; otherwise, set to N. Set to N for a return. |
|
Uom_qty |
Number (12) |
Shipped quantity |
The shipped quantity on the invoice detail. Zero-padded with a 4-position implied decimal; for example, a quantity of 2 is passed as 000000020000. Absolute value. Quantity of 1 passed for the Item for Non-Merchandise Amounts. |
|
Catchweight_ind |
Character (1) |
N |
Hard-coded. |
|
Total_igtax_amount |
Number (21) |
Invoice detail tax amount |
The total tax for the invoice detail line. |
|
Selling item |
Character (25) |
Item code |
The base item code. Does not include a SKU. SKUs are not supported in the Sales Audit module. |
|
Customer Order Number |
Character (48) |
Order number |
The Order Management System order number. Does not include the ship-to suffix. |
|
Customer Order Date |
Character (14) |
Order date |
The order date from the Order Header. YYYYMMDD format. |
|
Fulfillment Order Number |
Character (48) |
Invoice number |
Included only for sales transactions. Not included for returns. |
|
No Inventory Return |
Character (1) |
Y or N |
Used only for credit invoice records. Set to Y when inventory was not updated for the transaction creating the invoice detail record (there is no Item Transaction History record, as indicated in Display Inventory Transaction History (DITH)). For example, this flag is selected when a negative additional charge express bills against a closed order. Otherwise, set to N if inventory was updated, or if this is a non-merchandise item (NMITEM). |
|
Sales Type |
Character (1) |
E |
Hard-coded. |
|
Return Warehouse |
Character (10) |
Warehouse code |
Used only for return records that are not for the non-merchandise item (NMITEM):
Note: Any warehouse codes that might be passed MUST map to Physical Warehouse defined in the Sales Audit module. |
|
Return Disposition |
Character (10) |
COR |
Sent only when No Inventory Return is set to N, or the record is for the NMITEM. |
|
Location Type |
Character (2) |
Location type identifier |
Not passed for returns. |
|
Location Number |
Character (10) |
Code identifying fulfilling or pickup location |
Not passed for returns. |
|
IDISC |
Records with this File Type Descriptor contain discount line information for sales transactions when the selling price is lower than the offer price. These records are not created for returns. Also, if the offer price is lower than the selling price, such as when the offer price is zero, no discount record is created. This record follows the TITEM record for the discounted item. The information for this record type is primarily from the Invoice Detail table. |
||
|
File Line Identifier |
Number (10) |
Line number |
Identifies the line number in the file. Zero-padded. |
|
RMFCS Promotion Number |
Character (6) |
2000 |
Hard-coded. |
|
Discount Type |
Character (6) |
ITEM |
Hard-coded. |
|
Quantity Sign |
Character (1) |
P |
Hard-coded. A quantity sign of N is not used, since only sales transactions create these records. |
|
Quantity |
Number (12) |
Shipped quantity |
The shipped quantity on the invoice detail. Zero-padded with a 4-position implied decimal; for example, a quantity of 2 is passed as 000000020000. |
|
Unit Discount Amount |
Number (20) |
Discount amount divided by shipped quantity |
The discount amount shipped quantity on the invoice detail. Zero-padded with a 4-position implied decimal; for example, a unit discount amount of 2.5 is passed as 000000025000. |
|
Uom_qty |
Number (12) |
Shipped quantity |
The shipped quantity on the invoice detail. Zero-padded with a 4-position implied decimal; for example, a quantity of 2 is passed as 000000020000. |
|
Catchweight_ind |
Character (1) |
N |
Hard-coded. |
|
IGTAX |
Records with this File Type Descriptor contain item-level tax amounts. This record type follows the IDISC, if any; otherwise, follows the TITEM. NOTE VAT amounts are not passed in this record type, since they are included in item prices. |
||
|
File Line Identifier |
Number (10) |
Line number |
Identifies the line number in the file. Zero-padded. |
|
Tax Authority |
Character (10) |
TOTALTAX |
Hard-coded. |
|
Igtax Code |
Character (6) |
TOTAX |
Hard-coded. |
|
Igtax Amount Sign |
Character (1) |
P or N |
Set to P for a sale invoice; otherwise, set to N for a credit invoice. |
|
Igtax Amount |
Number (21) |
Tax amount |
The total tax amount for the invoice detail line, including any GST or PST as well as tax on any special handling or gift wrap for the item. For the NMITEM, includes the total order-level freight tax from the Invoice Payment Method record for all payment methods. Zero-padded with a 5-position implied decimal; for example, a tax amount of 2.38 is passed as 000000000000000238000. Absolute value. |
|
TTAX |
Records with this File Type Descriptor contain tax amounts. NOTE VAT amounts are not passed in this record type, since they are included in item prices. |
||
|
File Line Identifier |
Number (10) |
Line number |
Identifies the line number in the file. Zero-padded. |
|
Tax Code |
Character (6) |
TOTAX |
Hard-coded. |
|
Tax Sign |
Character (1) |
P or N |
Set to P for a sale invoice; otherwise, set to N for a credit invoice. |
|
Tax Amount |
Number (20) |
Tax amount |
The total tax amount for the invoice, including any GST or PST. Zero-padded with a 4-position implied decimal; for example, a tax amount of 2.38 is passed as 00000000000000023800. Absolute value. |
|
TPYMT |
Records with this File Type Descriptor contain payment amounts for sales, exclusive of tax, although VAT is not subtracted if the order is subject to VAT. These records are not created for return or credit transactions. |
||
|
File Line Identifier |
Number (10) |
Line number |
Identifies the line number in the file. Zero-padded. |
|
Payment Sign |
Character (1) |
P |
Hard-coded. A payment sign of N is not used, since only sales transactions create these records. |
|
Payment Amount |
Number (20) |
Deposit amount minus tax |
The deposit amount for the invoice payment method, exclusive of tax. Zero-padded with a 4-position implied decimal; for example, a payment amount of 37.60 is passed as 00000000000000376000. |
|
TTEND |
Records with this File Type Descriptor contain tender information for each transaction. |
||
|
File Line Identifier |
Number (10) |
Line number |
Identifies the line number in the file. Zero-padded. |
|
Tender Type Group |
Character (6) |
CHECK, CCARD, or VOUCH |
Set to:
|
|
Tender Type ID |
Number (6) |
Pay type code |
The pay type code, as set up in Work with Pay Types (WPAY). NOTE Each pay type must map to a Pay Type in the Sales Audit module. |
|
Tender Sign |
Character (1) |
P or N |
Set to P for a sale invoice; otherwise, set to N for a credit invoice. |
|
Tender Amount |
Number (20) |
Deposit amount |
The deposit amount for the invoice payment method, including tax. Zero-padded with a 4-position implied decimal; for example, a payment amount of 39.98 is passed as 00000000000000399800. |
|
CC_no |
Character (40) |
Last 4 positions of the credit card number |
The last 4 positions of the credit card or stored value card. From the Order Payment Method table. Included only if the Send Payment Card Data in ReSA RTLOG (M74) system control value is selected, and only if numeric; otherwise, blank. |
|
cc_token |
Character (40) |
Character (40) |
The tokenized credit card number, if any, from the Invoice Payment Method table. A stored value card or gift card number is not passed in this field. Included only if the order payment method is a credit card and is tokenized, and if the Send Payment Card Data in ReSA RTLOG (M74) system control value is selected; otherwise, blank. |
|
Voucher_no |
Character (25) |
Gift card number or stored value card number |
The stored value card number from the Invoice Payment Method table. Included only for a gift card or stored value card, and if the Send Payment Card Data in ReSA RTLOG (M74) system control value is selected; otherwise, blank. |
|
TTAIL |
A Type Record Descriptor for the transaction trailer record following each transaction, including an OPEN or CLOSE transaction. |
||
|
File Line Identifier |
Number (10) |
Line number |
Identifies the line number in the file. Zero-padded. |
|
Transaction Record Counter |
Number (10) |
Number of records in the transaction |
Set to 0000000000 for an OPEN or CLOSE transaction. Zero-padded. |
|
THEAD (CLOSE transaction) |
The last record in the file with a File Type Descriptor of THEAD is a CLOSE transaction. This record is followed by the TTAIL and FTAIL records. Created by the RTLog periodic function, and not found in the temporary file. The CLOSE THEAD record is followed by a TTAIL record, and then the FTAIL record. |
||
|
File Line Identifier |
Number (10) |
Next sequential number in the file. |
Identifies the line number in the file. Zero-padded. |
|
Register |
Character (5) |
01 |
Hard-coded. |
|
Transaction Date |
Character (14) |
Date and time |
The date and time when the RTLOG function created the DAT file. |
|
Transaction Number |
Number (10) |
Next transaction number in the file. |
Identifies the transaction number in the file. Zero-padded. |
|
Transaction Type |
Character (6) |
DCLOSE |
Hard-coded. |
|
Sub-transaction Type |
Character (6) |
DSTORE |
Hard-coded. |
|
FTAIL |
The total number of lines in the file. The last entry in the file. Added through the RTLOG periodic function. |
||
|
File Line Identifier |
Number (10) |
Next sequential number in the file |
Identifies the line number in the file. Zero-padded. |
|
File Record Counter |
Number (10) |
Next sequential number in the file |
Identifies the transaction number in the file. Zero-padded. |
Invoice Download XML Message (CWInvoiceOut)
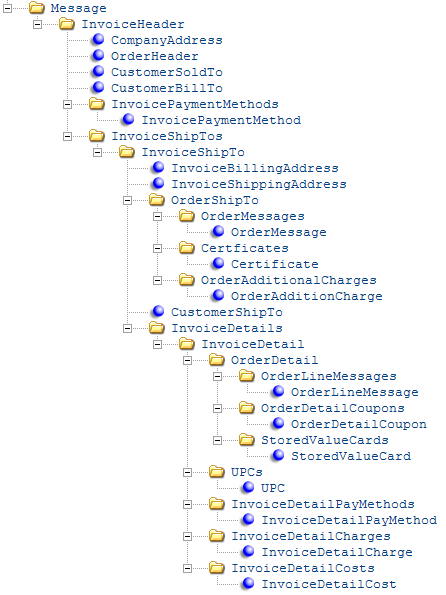
The invoice download message contains invoice information to send from Order Management System to another system, such as a retail store or financial system. See Generic Invoice Download API for an overview.
For more information see the Web Services Guide on https://support.oracle.com My Oracle Support (ID 2149144.1).
Message formatting specific to invoice download:
-
A separate message is generated for each debit or credit invoice you create.
-
Decimal points are included in numeric fields.
-
All dates are in YYYY-MM-DD format.
-
All times are in HH:MM:SS format.
-
If you exclude the element InvoiceHeader and all of its children (using the v rules), the system sends an invoice download message including only the Message element and its attributes:
-
For more information see the Web Services Guide on https://support.oracle.com My Oracle Support (ID 2149144.1).
See Generic Download Message Formatting for more information on how the system formats all download messages.
Invoice download message: See Invoice Download Message: Sample XML for a sample message.
| Attribute Name | Type | Length | Comments |
|---|---|---|---|
|
Message |
One Message element is required. |
||
|
source |
alpha |
|
Identifies the source of the XML message. |
|
target |
alpha |
|
Identifies the target of the XML message. |
|
type |
alpha |
|
Identifies the type of information in the XML message. CWINVOICEOUT indicates the message contains invoice download information. |
|
date_created |
numeric |
10 |
The date the XML message was generated, in YYYY-MM-DD format. |
|
time_created |
numeric |
8 |
The time the XML message was generated, in HH:MM:SS format. |
|
InvoiceHeader |
There is one InvoiceHeader element for each invoice download message. For example, if you create 2 invoices, the system generates a separate invoice download message for each invoice. |
||
|
ihd_transaction_ type |
alpha |
1 |
Indicates the type of invoice information being downloaded. A (add): new invoice. C (change): updated invoice. |
|
ihd_company |
numeric |
3 |
The Order Management System company where the invoice is located. From the Company in the Invoice Header table. |
|
ihd_order_nbr |
numeric |
8 |
The order number associated with the invoice. From the Order # in the Invoice Header table. |
|
ihd_invoice_nbr |
numeric |
7 |
The invoice number assigned to the customer’s bill or credit. From the Invoice # in the Invoice Header table. |
|
ihd_invoice_type |
alpha |
1 |
Indicates the type of invoice. C (Credit memo) = Invoice credit. I (Invoice) = Invoice debit. From the Invoice type in the Invoice Header table. |
|
ihd_sj_print_date |
numeric |
8 |
The date you printed the sales journal that included the invoice in MMDDYYYY format. From the SJ printed date in the Invoice Header table. |
|
ihd_invoice_print_date |
numeric |
8 |
From the Invoice print date in the Invoice Header table. Not included in the message unless it contains a date, and not updated by the system. |
|
ihd_invoice_ currency_code |
alpha |
3 |
A code for the currency of the invoice. From the CUR currency code in the Invoice Currency table. Included if the Multi Currency by Offer (E03) system control value is selected. |
|
ihd_invoice_ currency_desc |
alpha |
30 |
A description of the currency. From the CUR currency description in the Currency table. |
|
ihd_invoice_ currency_rate |
numeric |
11.7 |
The currency rate for the currency at the time the order was placed. From the ICF billing currency rate in the Invoice Currency table. |
|
CompanyAddress |
There is one CompanyAddress element for each invoice download message. |
||
|
company_ description |
alpha |
30 |
The Description from the Company table. |
|
company_ address1 |
alpha |
32 |
The first address line from the Company Address table. |
|
company_ address2 |
alpha |
32 |
The second address line from the Company Address table. |
|
company_city |
alpha |
25 |
The City from the Company Address table. |
|
company_state |
alpha |
2 |
The State from the Company Address able. |
|
company_state_ name |
alpha |
25 |
The Description from the State table. |
|
company_zip |
alpha |
10 |
The Zip from the Company Address table. |
|
company_country |
alpha |
3 |
The Country from the Company Address table. |
|
company_country_name |
alpha |
30 |
The Description from the Country table. |
|
company_phone |
alpha |
14 |
The Phone number from the Company Address table. |
|
company_fax |
alpha |
14 |
The Fax number from the Company Address table. |
|
OrderHeader |
There is one OrderHeader element for each invoice download message. |
||
|
ohd_reference_ order_nbr |
alpha |
30 |
The Order Management System order number. From the Order # in the Order Header table. |
|
ohd_order_status |
alpha |
1 |
The status of the order. blank = Open. X = Closed. From the OHD order status in the Order Header table. |
|
ohd_nbr_of_ recipients |
numeric |
3 |
The number of recipients on the order. Every order has at least one recipient. From the OHD # of recipients in the Order Header table. |
|
ohd_order_date |
numeric |
10 |
The date the order was placed in YYYY-MM-DD format. From the OHD order date in the Order Header table. |
|
ohd_enter_date |
numeric |
10 |
The date the order was entered in YYYY-MM-DD format. From the OHD entered date in the Order Header table. |
|
ohd_enter_time |
numeric |
8 |
The time the order was entered in HH:MM:SS format. From the Entered time in the Order Header table. |
|
ohd_batch_ sequence_nbr |
numeric |
7 |
The sequence number assigned to the order batch that includes the order. From the OHD batch sequence # in the Order Header table. |
|
ohd_user_defined_date |
numeric |
10 |
A user-defined date in YYYY-MM-DD format. From the OHD user defined date in the Order Header table. |
|
ohd_billing_batch_nbr |
numeric |
9 |
The billing batch number assigned to the order. From the OHD billing batch # in the Order Header table. |
|
ohd_order_ channel |
alpha |
2 |
Indicates if the order is an e-commerce order or was received from Order Broker. I = Internet (e-commerce) order. C = Received from Order Broker, including fulfilling orders based on originating orders submitted to Order Broker and then assigned to Order Management System for fulfillment. From the OHD Internet Order field in the Order Header table. |
|
ohd_master_ carton_label |
alpha |
1 |
Indicates whether the system prints a master pick slip for the order. Y = The system prints a master pick slip for the order. N = The system does not print a master pick slip for the order. From the OHD master carton label? in the Order Header table. |
|
ohd_membership_id |
alpha |
12 |
A code that identifies the membership program, if any, assigned to the sold to customer on the order. From the MEM membership ID in the Order Header table. |
|
ohd_membership_seq_nbr |
numeric |
3 |
The sequence number assigned to the membership program on the order. From the CSM sequence # in the Order Header table. |
|
ohd_order_batch_nbr |
numeric |
5 |
The order batch number assigned to the order. From the OBA batch # in the Order Header table. |
|
ohd_order_type |
alpha |
1 |
A code for the type of order, such as telephone or e-commerce. From the OTY order type in the Order Header table. |
|
ohd_order_type_ description |
alpha |
30 |
A description of the type of order. From the OTY description in the Order Type table. |
|
ohd_salesman_ nbr |
numeric |
7 |
A number for the salesman associated with the order. From the SLS salesman # in the Order Header table. |
|
ohd_salesman_ name |
alpha |
30 |
The name of the salesman associated with the order. From the SLS name in the Salesman table. |
|
ohd_invoice_ source_code |
alpha |
9 |
The source code on the order. From the OHD SRC source code in the Order Header table. |
|
ohd_invoice_ source_ description |
alpha |
30 |
A description of the source code. From the SRC description in the Source table. |
|
ohd_invoice_ division_code |
alpha |
2 |
The division associated with the source code on the order. From the Div in the Source table. |
|
ohd_invoice_ division_ description |
alpha |
30 |
A description of the division. From the Description in the Division table. |
|
ohd_invoice_ entity_nbr |
numeric |
3 |
The entity associated with the source code on the order. From the Entity number in the Division table. |
|
ohd_invoice_ entity_description |
alpha |
25 |
A description of the entity. From the ENT description in the Entity table. |
|
ohd_customer_ class |
alpha |
2 |
A code assigned to the sold to customer used to categorize the consumer environment at a high level. From the CCL customer class in the Order Header table. |
|
ohd_customer_ class_description |
alpha |
30 |
A description of the customer class. From the CCL description in the Customer Class table. |
|
ohd_order_email_ address |
alpha |
50 |
The email address for the order. From the OHE order email address in the Order Header Extended table. |
|
ohd_order_entry_ wrkstn |
alpha |
10 |
The workstation where the order was entered. From the OHD Order entry wrkstn in the Order Header table. |
|
ohd_freight_ charge |
numeric |
20.2 |
The total charge for shipping the order, not including additional freight charges. From the Freight charge in the Order Header table. |
|
ohd_freight_ override |
alpha |
1 |
Indicates if the freight was overridden on the order. You can override freight by entering a Freight override amount on the Work with Order Ship To Properties screen. From the OHD freight override in the Order Header table. |
|
ohd_freight_ balance |
numeric |
20.2 |
The unpaid portion of freight on the order. From the Freight balance in the Order Header table. |
|
ohd_remit_ amount |
numeric |
20.2 |
The amount on the associated purchase order invoice. From the OHD remit amount in the Order Header table. |
|
ohd_email_ confirm_date |
numeric |
8 |
The date, in MMDDYYYY format, when the system generated an automatic email confirmation for the order. From the OHD future use date 1 in the Order Header table. |
|
ohd_cbt_account_nbr |
numeric |
7 |
The account number of the bill to customer on the order. From the CBT account # in the Order Header table. |
|
ohd_user_hold_ reason |
alpha |
2 |
The user hold reason code assigned to the order. From the OHD OHR usr hold reason in the Order Header table. |
|
ohd_system_hold_reason |
alpha |
2 |
The system hold reason code assigned to the order. From the OHD OHR sys hold reason in the Order Header table. |
|
ohd_cst_ customer_nbr |
numeric |
9 |
The number of the sold to customer on the order. From the Cust # in the Order Header table. |
|
ohd_usr_user |
alpha |
10 |
The user ID of the person currently working with the order. From the User in the Order Header table. |
|
ohd_entered_by_user |
alpha |
10 |
The user ID of the person who entered the order. From the OHD entered by USR user in the Order Header table. |
|
ohd_ecomm_ order_number |
alpha |
30 |
The order number, if any, that was passed in the CWOrderIn message for an order created through the e-commerce interface (order API). From the OHE E-Comm order number in the Order Header Extended table. |
|
ohd_ecomm_ip_ address |
alpha |
15 |
The ip_addr, if any, in the Inbound Order XML Message (CWORDERIN) for an order received through the e-commerce interface (order API). For more information see the Web Services Guide on https://support.oracle.com My Oracle Support (ID 2149144.1).From the E-Commerce IP address in the Order Header Extended table. |
|
ohd_originating_ store |
alpha |
10 |
The store number assigned to the order. Store numbers are defined in and validated against the Store Cross Reference table; see WSCR. Note: The store number defined for the order does not have to be associated with the salesrep defined on the Order Header. From Originating Store in the Order Header table. Available in: 3.0 (release 3.5 of Order Management System). |
|
CustomerSoldTo |
Each invoice download message contains one CustomerSoldTo element, indicating the sold to customer on the order. The name and address provided in the message are the current information from the time the message is generated, but are not necessarily identical to the name and address when the invoice itself was generated. See the InvoiceBillingAddress and the InvoiceShippingAddress for more information. |
||
|
sold_to_nbr |
numeric |
9 |
The number assigned to the sold to customer on the order. From the Cust # in the Order Header table. |
|
sold_to_prefix |
alpha |
3 |
The sold to customer’s prefix. From the NAM prefix in the Customer Sold To table. |
|
sold_to_fname |
alpha |
15 |
The sold to customer’s first name. From the NAM first name in the Customer Sold To table. |
|
sold_to_initial |
alpha |
1 |
The sold to customer’s middle initial. From the NAM initial in the Customer Sold To table. |
|
sold_to_lname |
alpha |
25 |
The sold to customer’s last name. From the NAM last name in the Customer Sold To table. |
|
sold_to_suffix |
alpha |
3 |
The sold to customer’s suffix. From the NAM suffix in the Customer Sold To table. |
|
sold_to_company |
alpha |
30 |
The sold to customer’s company. From the NAM company name in the Customer Sold To table. |
|
sold_to_apt |
alpha |
10 |
The apartment for the sold to customer’s address. From the NAM apartment in the Customer Sold To table. |
|
sold_to_address1 |
alpha |
32 |
The sold to customer’s street address. From the NAM street address in the Customer Sold To table. |
|
sold_to_address2 |
alpha |
32 |
The second address line for the sold to customer’s address. From the NAM address line 2 in the Customer Sold To table. |
|
sold_to_address3 |
alpha |
32 |
The third address line for the sold to customer’s address. From the Address line 3 in the Customer Sold To Extended table. |
|
sold_to_address4 |
alpha |
32 |
The fourth address line for the sold to customer’s address. From the Address line 4 in the Customer Sold To Extended table. |
|
sold_to_city |
alpha |
25 |
The city for the sold to customer’s address. From the NAM city in the Customer Sold To table. |
|
sold_to_country |
alpha |
3 |
The country on the sold to customer’s address. From the RPR country in the Customer Sold To table. |
|
sold_to_country_ name |
alpha |
30 |
The name of the country. From the Description in the Country table. |
|
sold_to_state |
alpha |
2 |
The state on the sold to customer’s address. From the NAM state in the Customer Sold To table. |
|
sold_to_state_ name |
alpha |
25 |
The name of the state. From the Description in the State table. |
|
sold_to_zip |
alpha |
10 |
The postal code on the sold to customer’s address. From the NAM zip in the Customer Sold To table. |
|
sold_to_delivery_ code |
alpha |
1 |
Identifies the address as a business or residential address. B = Business address. R = Residential address. N = No distinction between business and residence. From the NAM delivery code in the Customer Sold To table. |
|
sold_to_po_box |
alpha |
1 |
Identifies the customer’s delivery address as a post office box. Y = The address is a post office box. N = The address is not a post office box. From the NAM PO box? in the Customer Sold To table. |
|
sold_to_email_ address |
alpha |
50 |
The sold to customer’s primary email address. From the Email in the Customer Sold To table. |
|
sold_to_day_ phone |
numeric |
7 |
The sold to customer’s day phone number. From the Phone in the Customer Sold To Phone # table for CS# Phone # type D. |
|
sold_to_day_ext |
alpha |
4 |
The day phone number extension. From the CS# extension in the Customer Sold To Phone # table. |
|
sold_to_eve_ phone |
numeric |
7 |
The sold to customer’s evening phone number. From the Phone in the Customer Sold To Phone # table for CS# Phone # type E. |
|
sold_to_eve_ext |
alpha |
4 |
The evening phone number extension. From the CS# extension in the Customer Sold To Phone # table. |
|
sold_to_fax_ phone |
numeric |
7 |
The sold to customer’s third (fax or mobile) number. From the Phone in the Customer Sold To Phone # table for CS# Phone # type F. |
|
sold_to_fax_ext |
alpha |
4 |
The third phone number extension. From the CS# extension in the Customer Sold To Phone # table. |
|
sold_to_job_title |
alpha |
25 |
The sold to customer’s job title. From the Job title in the Customer Sold To table. |
|
sold_to_rent_ name |
alpha |
1 |
Indicates whether to include the sold to customer’s name in lists you sell to other companies for their own catalog mailings. Y = Sell the customer’s name to another company. N = Do not sell the customer’s name to another company. From the CST rent name? in the Customer Sold To table. |
|
sold_to_mail_ name |
alpha |
1 |
Indicates whether the customer receives future catalogs. Y = Mail catalogs to the customer. N = Do not mail catalogs to the customer. From the CST mail name? in the Customer Sold To table. |
|
sold_to_rent_ |
alpha |
1 |
This field is not currently implemented. From the CST rent e-mail in the Customer Sold To table. |
|
sold_to_email_ status |
alpha |
2 |
Indicates the preferred method of correspondence for the sold to customer’s primary email address. O1 (Email) = Email is the preferred method of correspondence. O2 (Order-only email) = Use email for order-related correspondence only; generate a document for other correspondence. O3 (No email) = Do not use email for any correspondence; generate a document instead. O4 (Do not ask customer) = Do not ask the customer for an email address; the customer has already been asked and has declined to provide it. From the CST email status in the Customer Sold To table. |
|
sold_to_mail_ code |
alpha |
3 |
A code that specifies how often, and under what conditions, you will send mail to the customer. From the CST mail code in the Customer Sold To table. |
|
sold_to_mail_ code_desc |
alpha |
40 |
A description of the mail code. From the MCC mail code description in the Mail/Call Code table. |
|
sold_to_call_code |
alpha |
3 |
A code used to indicate when and under what circumstances to call or send mail to the customer. From the CST call code in the Customer Sold To table. |
|
sold_to_call_code_desc |
alpha |
40 |
A description of the call code. From the MCC mail code description in the Mail/Call Code table. |
|
sold_to_tax_ status |
alpha |
1 |
The tax status of the sold to customer. E (Exempt) = The customer is not required to pay tax on purchases. G (GST only) = The customer is a Canadian customer and subject to the Goods and Services Tax on purchases only; not PST. N (Non-taxable) = The customer will not be taxed on purchases. P (PST only) = The customer is a Canadian customer and subject to the Provincial Services Tax only; not GST. R (Resale) = The customer is a reseller and not subject to tax. T (Taxable) = The customer is subject to all taxes. Canadian customers are subject to both GST and PST tax. From the Tax exempt status (Tax code) in the Customer Sold To table. |
|
sold_to_associate |
alpha |
1 |
Identifies the sold to customer as an associate or member who is eligible to receive special pricing on merchandise. Y = The customer is an associate customer. N = The customer is not an associate customer. From the CST associate customer? in the Customer Sold To table. |
|
sold_to_type |
alpha |
3 |
A code that identifies the type of sold to customer, used to group customers. From the CST customer type in the Customer Sold To table. |
|
sold_to_inactive |
alpha |
1 |
Identifies the sold to customer’s status. Y = Customer is inactive. N = Customer is active. From the CST inactive? in the Customer Sold To table. |
|
sold_to_commercial |
alpha |
1 |
Identifies the sold to customer as commercial or non-commercial. Y = This is a commercial customer. N = This is a non-commercial customer. From the CST commercial? in the Customer Sold To table. |
|
sold_to_alternate_id |
alpha |
15 |
A code used as an additional way to identify the sold to customer. From the Interface cust code in the Customer Sold To table. |
|
sold_to_cross_ref_nbr |
numeric |
3 |
A code used as an additional way to identify the sold to customer. From the CST customer nbr xref in the Customer Sold To table. |
|
sold_to_currency_code |
alpha |
3 |
A code that identifies the currency used by the sold to customer. From the Currency code in the Customer Sold To table. |
|
sold_to_currency_desc |
alpha |
30 |
A description of the currency. From the CUR currency description in the Currency table. |
|
sold_to_language_code |
alpha |
3 |
A code that identifies the language used by the sold to customer. From the Language code in the Customer Sold To table. |
|
sold_to_language_desc |
alpha |
30 |
A description of the language. From the Description in the Language table. |
|
sold_to_ warehouse |
numeric |
3 |
A code used to identify the warehouse (store location) where you replenish stock for this customer (store). From the Whs in the Customer Warehouse table. |
|
sold_to_ warehouse_name |
alpha |
30 |
The name of the warehouse. From the Name in the Warehouse table. |
|
orce_customer_id |
alpha |
128 |
The Oracle Retail Customer Engagement customer ID. Included only if the ORCE Customer Integration (L37) system control value is set to INTERACT and a Customer Engagement ID is assigned to the customer. Available in: Version 6.0 in Order Management System 21.1 or later. |
|
CustomerBillTo |
Each invoice download message can contain one CustomerBillTo element, indicating the bill to customer, if any, associated with the sold to customer on the order. The name and address provided in the message are the current information from the time the message is generated, but are not necessarily identical to the name and address when the invoice itself was generated. See the InvoiceBillingAddress for more information. |
||
|
bill_to_nbr |
pack |
9 |
The number assigned to the bill to customer on the order. From the CBT account # in the Customer Bill To table. |
|
bill_to_prefix |
alpha |
3 |
The bill to customer’s prefix. From the Prefix in the Customer Bill To table. |
|
bill_to_fname |
alpha |
15 |
The bill to customer’s first name. From the First name in the Customer Bill To table. |
|
bill_to_initial |
alpha |
1 |
The bill to customer’s middle initial. From the Initial in the Customer Bill To table. |
|
bill_to_lname |
alpha |
25 |
The bill to customer’s last name. From the Last name in the Customer Bill To table. |
|
bill_to_suffix |
alpha |
3 |
The bill to customer’s suffix. From the Suffix in the Customer Bill To table. |
|
bill_to_company |
alpha |
30 |
The bill to customer’s company. From the Company name in the Customer Bill To table. |
|
bill_to_apt |
alpha |
10 |
The apartment number for the bill to customer’s address. From the Apartment in the Customer Bill To table. |
|
bill_to_address1 |
alpha |
32 |
The bill to customer’s street address. From the Street address in the Customer Bill To table. |
|
bill_to_address2 |
alpha |
32 |
The second address line on the bill to customer’s address. From the Address line 2 in the Customer Bill To table. |
|
bill_to_address3 |
alpha |
32 |
The third address line on the bill to customer’s address. From the Address line 3 in the Customer Bill To Extended table. |
|
bill_to_address4 |
alpha |
32 |
The fourth address line on the bill to customer’s address. From the Address line 4 in the Customer Bill To Extended table. |
|
bill_to_city |
alpha |
25 |
The city on the bill to customer’s address. From the City in the Customer Bill To Extended table. |
|
bill_to_country |
alpha |
3 |
The country on the bill to customer’s address. From the RPR country in the Customer Bill To table. |
|
bill_to_country_ name |
alpha |
30 |
The name of the country. From the Description in the Country table. |
|
bill_to_state |
alpha |
2 |
The state on the bill to customer’s address. From the State in the Customer Bill To table. |
|
bill_to_state_ name |
alpha |
25 |
The name of the state. From the Description in the State table. |
|
bill_to_zip |
alpha |
10 |
The postal code on the bill to customer’s address. From the Zip in the Customer Bill To table. |
|
bill_to_deliver_ code |
alpha |
1 |
Identifies the address as a business or residential address. B = Business address. R = Residential address. N = No distinction between business and residence. From the Delivery code in the Customer Bill To table. |
|
bill_to_po_box |
alpha |
1 |
Identifies the customer’s delivery address as a post office box. Y = The address is a post office box. N = The address is not a post office box. From the PO box? in the Customer Bill To table. |
|
bill_to_email_ address |
alpha |
50 |
The bill to customer’s email address. From the CBT email address in the Customer Bill To table. |
|
bill_to_day_ phone |
numeric |
7 |
The bill to customer’s day phone number. From the Phone in the Customer Bill To Phone # table for CB# Phone # type D. |
|
bill_to_day_ext |
alpha |
4 |
The day phone number extension. From the CB# extension in the Customer Bill To Phone # table. |
|
bill_to_eve_phone |
numeric |
7 |
The bill to customer’s evening phone number. From the Phone in the Customer Bill To Phone # table for CB# Phone # type E. |
|
bill_to_eve_ext |
alpha |
4 |
The evening phone number extension. From the CB# extension in the Customer Bill To Phone # table. |
|
bill_to_fax_phone |
numeric |
7 |
The bill to customer’s third (fax or mobile) number. From the Phone in the Customer Bill To Phone # table for CB# Phone # type F. |
|
bill_to_fax_ext |
alpha |
4 |
The third phone number extension. From the CB# extension in the Customer Bill To Phone # table. |
|
bill_to_print_ statement |
alpha |
1 |
Not implemented. |
|
bill_to_email_ status |
alpha |
2 |
Indicates the preferred method of correspondence for the bill to customer’s email address. O1 (Email) = Email is the preferred method of correspondence. O2 (Order-only email) = Use email for order-related correspondence only; generate a document for other correspondence. O3 (No email) = Do not use email for any correspondence; generate a document instead. O4 (Do not ask customer) = Do not ask the customer for an email address; the customer has already been asked and has declined to provide it. From the CBT opt in/opt out in the Customer Bill To table. |
|
bill_to_currency_code |
alpha |
3 |
A code for the currency used by the bill to customer. From the Currency code in the Customer Bill To table. |
|
bill_to_currency_desc |
alpha |
30 |
A description of the currency. From the CUR currency description in the Currency table. |
|
bill_to_language_code |
alpha |
3 |
A code for the language used by the bill to customer. From the Language code in the Customer Bill To table. |
|
bill_to_language_desc |
alpha |
30 |
A description of the language. From the Description in the Language table. |
|
bill_to_terms_ code |
numeric |
2 |
Not currently implemented. |
|
bill_to_terms_ desc |
alpha |
30 |
Not currently implemented. |
|
InvoicePaymentMethod |
The InvoicePaymentMethod element and its attributes repeat for each payment method associated with the invoice. |
||
|
ipm_seq_nbr |
numeric |
2 |
The sequence number assigned to the invoice payment method. From the OPM seq # in the Invoice Payment Method table. |
|
ipm_pay_type |
numeric |
2 |
A code that represents the method of payment associated with the invoice. From the PAY Pay type in the Order Payment Method table. |
|
ipm_pay_type_desc |
alpha |
30 |
A description of the pay type. From the PAY description in the Pay Type table. |
|
ipm_pay_category |
alpha |
1 |
The category of the pay type.
From the Pay category in the Invoice Payment Method table. |
|
ipm_merchandise_amt |
numeric |
20.2 |
The merchandise amount assigned to the invoice payment method. From the IPM merch in the Invoice Payment Method table. |
|
ipm_merchandise_balance_amt |
numeric |
20.2 |
The unpaid portion of the merchandise amount assigned to the invoice payment method. From the IPM merch balance in the Invoice Payment Method table. |
|
ipm_freight_amt |
numeric |
20.2 |
The freight charge amount assigned to the invoice payment method. From the Freight in the Invoice Payment Method table. |
|
ipm_freight_ balance_amt |
numeric |
20.2 |
The unpaid portion of the freight charge amount assigned to the invoice payment method. From the Freight balance in the Invoice Payment Method table. |
|
ipm_addl_freight_amt |
numeric |
20.2 |
The additional freight amount assigned to the invoice payment method. From the Add’l frt in the Invoice Payment Method table. |
|
ipm_addl_freight_balance_amt |
numeric |
20.2 |
The unpaid portion of the additional freight amount assigned to the invoice payment method. From the Add’l freight balance in the Invoice Payment Method table. |
|
ipm_addl_charge_amt |
numeric |
20.2 |
The additional charge amount assigned to the invoice payment method. From the Add’l chg in the Invoice Payment Method table. |
|
ipm_addl_charge_balance_amt |
numeric |
20.2 |
The unpaid portion of the additional charge amount assigned to the invoice payment method. From the Add’l charge balance in the Invoice Payment Method table. |
|
ipm_hand_charge_amt |
numeric |
20.2 |
The handling charge amount assigned to the invoice payment method. From the Handling in the Invoice Payment Method table. |
|
ipm_hand_charge_balance_amt |
numeric |
20.2 |
The unpaid portion of the handling charge amount assigned to the invoice payment method. From the Handling balance in the Invoice Payment Method table. |
|
ipm_tax_amt |
numeric |
20.5 |
The tax amount assigned to the invoice payment method. From the IPM tax in the Invoice Payment Method table. |
|
ipm_tax_balance_amt |
numeric |
20.5 |
The unpaid portion of the tax amount assigned to the invoice payment method. From the IPM tax balance in the Invoice Payment Method table. |
|
ipm_gst_amt |
numeric |
20.5 |
The GST amount assigned to the invoice payment method. From the IPM GST in the Invoice Payment Method table. |
|
ipm_gst_balance_amt |
numeric |
20.5 |
The unpaid portion of the GST amount assigned to the invoice payment method. From the IPM GST balance in the Invoice Payment Method table. |
|
ipm_pst_amt |
numeric |
20.5 |
The PST amount assigned to the invoice payment method. From the IPM PST in the Invoice Payment Method table. |
|
ipm_pst_balance_amt |
numeric |
20.5 |
The unpaid portion of the PST amount assigned to the invoice payment method. From the IPM PST balance in the Invoice Payment Method table. |
|
ipm_ord_lvl_frt_amt |
numeric |
20.2 |
The freight charges that apply to the total order. From the IPM order lvl frt in the Invoice Payment Method table. |
|
ipm_ord_lvl_frt_balance_amt |
numeric |
20.2 |
The unpaid portion of the order level freight charges. From the IPM order lvl frt bal in the Invoice Payment Method table. |
|
ipm_ord_lvl_frt_ tax_amt |
numeric |
20.2 |
The total tax amount assigned to the invoice payment method. From the IPM order lvl frt tax in the Invoice Payment Method table. |
|
ipm_ord_lvl_frt_ tax_bal_amt |
numeric |
20.2 |
The unpaid portion of the total tax amount assigned to the invoice payment method. From the IPM order lvl frt tax bal in the Invoice Payment Method table. |
|
ipm_deposit_ created_date |
numeric |
20 |
The date the deposit was created in the YYYY-MM-DD. From the IPM deposit created date in the Invoice Payment Method table. |
|
ipm_auth_number |
alpha |
10 |
The number used to authorize the credit card payment associated with the invoice. From the IPM auth # in the Invoice Payment Method table. |
|
ipm_auth_date |
numeric |
10 |
The date you manually authorize a payment method, or the date the payment method receives an authorization from the service bureau, in YYYY-MM-DD format. From the IPM auth date in the Invoice Payment Method table. |
|
ipm_cc_credit_ status |
alpha |
1 |
Indicates the credit status of the return. Included only if the invoice payment method is associated with a return or exchange. P = Refund pending. You performed a return or exchange in order entry, order maintenance, or through Work with Return Authorizations and have not yet processed the refund. R = Refund processed/ready. You processed the refund in Process Refunds. blank = Refund deposited. From the IPM C/C credit status in the Invoice Payment Method table. |
|
ipm_payment_ option_type |
alpha |
1 |
The type of pay plan on the order. D = Deferred billing pay plan. I = Installment billing pay plan. Included only if the credit card payment method is associated with a pay plan. From the IPM payment option type in the Invoice Payment Method table. |
|
ipm_invoice_date |
numeric |
10 |
The date the invoice was created, in YYYY-MM-DD format. From the IPM invoice date in the Invoice Payment Method table. |
|
ipm_nbr_of_ installments |
numeric |
3 |
The total number of installments assigned to the invoice payment method. Installment billing allows you to break the payment evenly into installments (for example, 3 payments on the 1st of each month). Included only if the credit card payment method is associated with a pay plan. From the IPM # of installments in the Invoice Payment Method table. |
|
ipm_nbr_ installments_ remain |
numeric |
3 |
The number of installments remaining. This number reduces by 1 each time an installment is sent for deposit. Included only if the credit card payment method is associated with a pay plan. From the IPM # of installment remain in the Invoice Payment Method table. |
|
ipm_installment_ interval |
numeric |
3 |
The number of days between installments. The system uses this interval number to determine the next deposit release date if you are basing installment dates on intervals, for example, 3 installments in 30 day intervals. Included only if the credit card payment method is associated with a pay plan. From the IPM installment interval in the Invoice Payment Method table. |
|
ipm_fix_install_ bill_day |
numeric |
3 |
The day of the month when an installment is billed. For example, if the fix installment date is 15, each installment would be due on the 15th of every month. Included only if the credit card payment method is associated with a pay plan. From the IPM fix install bill day in the Invoice Payment Method table. |
|
ipm_deposit_ release_date |
numeric |
10 |
The date when the invoice is eligible for deposit, in YYYY-MM-DD format. The system updates this field when a deposit is confirmed with the next deposit release date if there is a remaining amount to deposit, for example, in installment billing. For regular orders, the deposit release date is the same as the invoice date. The deposit is eligible for processing immediately after billing. From the IPM deposit release date in the Invoice Payment Method table. |
|
ipm_credit_card_nbr |
alpha |
20 |
Not implemented. |
|
ipm_cc_expiration_date |
numeric |
4 |
Not implemented. |
|
ipm_deposit_ amount |
numeric |
20.2 |
The total amount to deposit in order for the invoice to be completely deposited. From the IPM deposit amount in the Invoice Payment Method table. |
|
ipm_total_deposit_to_date |
numeric |
20.2 |
The total amount deposited to date. When a deposit is confirmed, the system updates this field by the deposit amount. From the IPM total deposit to date in the Invoice Payment Method table. |
|
ipm_prepaid_ amount |
numeric |
20.2 |
The amount prepaid against the pay method, for example, the customer’s credit card was rejected and the customer decides to send a check instead. From the IPM prepaid amount in the Invoice Payment Method table. |
|
ipm_suppress_ deposit |
alpha |
1 |
Indicates whether the system will include the credit card payment method when you process deposits. Y = The system will not attempt to deposit the credit card payment method. Once you bill the payment method, the system resets this flag to N. N = The credit card payment method will be included when you process deposits. |
|
ipm_card_start_ date |
numeric |
4 |
The first date when the card is effective. From the Card start date in the Invoice Payment Method table. |
|
ipm_deposit_ adjust_amount |
numeric |
20.2 |
The amount of the deposit that has been changed or is in transition. This amount includes:
From the IPM deposit adjust amount in the Invoice Payment Method table. |
|
ipm_prepaid_pay_method |
numeric |
2 |
A code that represents the pre-paid payment method. This must be a cash/check pay type. From the IPM prepaid pay method in the Invoice Payment Method table. |
|
ipm_fpo_payment_code |
alpha |
5 |
The payment plan code associated with the credit card pay type on the order. From the IPM FPO payment code in the Invoice Payment Method table. |
|
ipm_spv_hidden_tax_amt |
numeric |
20.5 |
The hidden tax billed or refunded. This tag is included only when all of the following are true:
For example, a single-use voucher for 100.00 had a hidden tax amount of 20.00 for a rate of 20%. If 50.00 of the single-use voucher is redeemed, the ipm_spv_hidden_tax_amt passed is 20% of 50.00, or 10.00. Available in: Version 4.0 in Order Management System Release 19.0 or later. |
|
InvoiceShipTo |
The InvoiceShipTo element and its attributes repeat for each ship to customer associated with the invoice. The name and address provided in the message are the current information from the time the message is generated, but are not necessarily identical to the name and address when the invoice itself was generated. See the InvoiceShippingAddress for more information. |
||
|
ins_ship_to_nbr |
numeric |
3 |
The ship to customer number associated with the invoice. From the Ship to # in the Invoice Ship To table. |
|
ins_invoice_date |
numeric |
10 |
The date the invoice was created, in YYYY-MM-DD format. From the Invoice date in the Invoice Ship To table. |
|
ins_merchandise_amt |
numeric |
20.2 |
The merchandise amount assigned to the invoice for the ship to customer. From the Merchandise in the Invoice Ship To table. |
|
ins_freight_amt |
numeric |
20.2 |
The freight charge amount assigned to the invoice for the ship to customer. From the Freight in the Invoice Ship To table. |
|
ins_addl_freight_amt |
numeric |
20.2 |
The additional freight amount assigned to the invoice for the ship to customer. From the Add’l freight in the Invoice Ship To table. |
|
ins_addl_charge_amt |
numeric |
20.2 |
The additional charge amount assigned to the invoice for the ship to customer. From the Add’l charges in the Invoice Ship To table. |
|
ins_hand_charge_amt |
numeric |
20.2 |
The handling charge amount assigned to the invoice for the ship to customer. From the Handling in the Invoice Ship To table. |
|
ins_tax_amt |
numeric |
20.2 |
The tax amount assigned to the invoice for the ship to customer. From the Tax in the Invoice Ship To table. |
|
ins_gst_amt |
numeric |
20.2 |
The GST amount assigned to the invoice for the ship to customer. From the GST in the Invoice Ship To table. |
|
ins_pst_amt |
numeric |
20.2 |
The PST amount assigned to the invoice for the ship to customer. From the PST in the Invoice Ship To table. |
|
ins_cost_amt |
numeric |
20.2 |
The actual cost of the merchandise billed on the invoice for the ship to customer. From the Cost in the Invoice Ship To table. |
|
ins_hidden_frt_ amt |
numeric |
20.2 |
The hidden freight amount assigned to the invoice for the ship to customer. From the Hidden freight in the Invoice Ship To table. |
|
ins_discount_amt |
numeric |
20.2 |
The difference between the actual price charged for the items and the offer prices. A negative amount indicates a charge greater than the original offer price. From the Discount amount in the Invoice Ship To table. |
|
ins_ocr_b_ number |
alpha |
30 |
Not currently implemented. |
|
OrderShipTo |
The name and address provided in the message are the current information from the time the message is generated, but are not necessarily identical to the name and address when the invoice itself was generated. See the InvoiceBillingAddress and the InvoiceShippingAddress for more information. |
||
|
ost_additional_ charge |
numeric |
20.2 |
The total additional charges for the order ship to. From the OST add’l charges in the Order Ship To table. |
|
ost_additional_ charge_balance |
numeric |
20.2 |
The unpaid portion of additional charges. Ordinarily, no unpaid portion remains after billing. From the OST add’l chg balance in the Order Ship To table. |
|
ost_additional_ freight |
numeric |
20.2 |
The total amount for freight charges exceeding the base freight charge. From the Add’l freight in the Order Ship To table. |
|
ost_additional_ freight_balance |
numeric |
20.2 |
The unpaid portion of additional freight charges. From the Add’l frt bal in the Order Ship To table. |
|
ost_arrival_date |
numeric |
10 |
The date the customer expects to receive the order in the format YYYY-MM-DD. From the OST arrival date in the Order Ship To table. |
|
ost_broker_ delivery_type |
alpha |
1 |
Indicates the type of an order received from or sent to the Order Broker. Possible settings are: R = retail pickup order: a store location requests the Order Management System distribution center transfer the requested merchandise to the originating store for customer pickup D = delivery order: a store location requests the Order Management System distribution center ship the order directly to the customer S = ship-for-pickup: Order Management System ships the merchandise to a designated store location for customer pickup This information is stored in the Order Ship To table, and is included only if the order is a retail pickup, delivery, or ship-for-pickup order being fulfilled through integration with the Order Broker. Orders that include items that are backordered in Order Management System and sent to the we Order Broker for fulfillment (brokered backorders) do not have an ost_broker_delivery_type. See the Order Broker Integration for a discussion. Available in: Version 2.0 in Order Management System 2.5 or later. |
|
ost_calculate_ freight |
alpha |
1 |
Indicates whether the system calculates and adds freight charges and service charges by ship via to the order ship to. Y = The system calculates freight based on the freight method for the source code. N = The system does not calculate freight. From the Calculate freight in the Order Ship To table. |
|
ost_cancel_bo |
alpha |
1 |
Indicates whether items that are unavailable (backordered) should be cancelled automatically with the first shipment on the order. Y = Cancel backordered items with the first shipment. N = Do not cancel backordered items. From the OST cancel BO in the Order Ship To table. |
|
ost_cancel_date |
numeric |
10 |
The date the customer wants the order cancelled if it has not been shipped in the format YYYY-MM-DD. From the OST cancel date in the Order Ship To table. |
|
ost_contact_ name |
alpha |
30 |
The name of the person who should receive the order at the shipping destination. From the OST contact name in the Order Ship To table. |
|
ost_csh_ship_to_nbr |
numeric |
3 |
The ship to customer number associated with the order ship to. From the OST CSH ship to # in the Order Ship To table. |
|
ost_cst_customer_nbr |
numeric |
9 |
The sold to customer number associated with the order ship to. From the OST CST customer # in the Order Ship To table. |
|
ost_destination_ store |
alpha |
12 |
The store number identifying the destination for a ship-for-pickup order, as set up through Work with Store Cross Reference (WSCR) and stored in the Order Ship To Address table. Included only for ship-for-pickup orders sent to the Order Broker. See the Order Broker Integration for a discussion. Available in: Version 2.0 in Order Management System 2.5 or later. |
|
ost_discount_pct |
numeric |
5.2 |
A flat discount percentage applied to discountable merchandise only for the order ship to. From the Disc % in the Order Ship To table. |
|
ost_estimated_ freight |
numeric |
20.2 |
The estimated charge for shipping the order. From the OST estimated freight in the Order Ship To table. |
|
ost_fedex_nbr |
alpha |
10 |
The number of the customer’s account with the carrier. From the OST federal express # in the Order Ship To table. |
|
ost_freight |
numeric |
20.2 |
The actual charge for shipping the order. From the OST freight in the Order Ship To table. |
|
ost_freight_ balance |
numeric |
20.2 |
The unpaid portion of the freight. From the OST freight balance in the Order Ship To table. |
|
ost_freight_ override |
alpha |
1 |
Indicates if the freight charges on the order were overridden in order entry or order maintenance. Y = The freight charge was overridden. N = The freight charge was not overridden. From the OST freight override in the Order Ship To table. |
|
ost_geographic_ zone |
alpha |
3 |
A code used to identify the geographic zone where the ship to destination is located. From the OST GZF geographic zone in the Order Ship To table. |
|
ost_geographic_ zone_desc |
alpha |
30 |
A description of the geographic zone. From the GZF description in the Geographic Zone table. |
|
ost_gift_flag |
alpha |
1 |
Indicates if the ship to order is a gift order. Y = The ship to order is a gift order. N = The ship to order is not a gift order. From the OST gift order in the Order Ship To table. |
|
ost_gst |
numeric |
20.2 |
The Canadian Federal Goods and Services tax that applies to the order ship to. From the OST GST in the Order Ship To table. |
|
ost_gst_balance |
numeric |
20.2 |
The unpaid portion of the Canadian Federal Goods and Services tax. From the OST GST balance in the Order Ship To table. |
|
ost_handling |
numeric |
20.2 |
The cost of any special handling on the order, including any duty charge. From the OST handling in the Order Ship To table. |
|
ost_handling_ balance |
numeric |
20.2 |
The unpaid portion of the handling charge and/or duty charge. From the OST handling balance in the Order Ship To table. |
|
ost_last_pick_ print_date |
numeric |
10 |
The most recent date when a pick slip was printed for the order ship to, in YYYY-MM-DD format. From the OST last pick print date in the Order Ship To table. |
|
ost_last_ reservation_date |
numeric |
10 |
The most recent reservation date for the order ship to, in YYYY-MM-DD format. From the OST last reservation date in the Order Ship To table. |
|
ost_line_of_ business |
alpha |
3 |
A code used to identify the line of business, or business unit, assigned to the order ship to. From the OST line of business in the Order Ship To table. |
|
ost_line_of_ business_desc |
alpha |
40 |
A description of the line of business. From the LOB description in the Line Of Business table. |
|
ost_merchandise |
numeric |
20.2 |
The total value of merchandise for the order ship to. From the OST merch in the Order Ship To table. |
|
ost_merchandise_balance |
numeric |
20.2 |
The unpaid portion of the merchandise total. From the OST merch balance in the Order Ship To table. |
|
ost_ohr_hold_ reason |
alpha |
2 |
The order hold reason code assigned to the order ship to. From the OST OHR hold reason in the Order Ship To table. |
|
ost_order_ combination_type |
alpha |
10 |
The long SKU class code assigned to the items on the order. Informational-only; not updated by the system. From the OST future use code 1 in the Order Ship To table. |
|
ost_originating_ store |
alpha |
12 |
The store number identifying the store location where a retail pickup or delivery order originated, as set up through Work with Store Cross Reference (WSCR) and stored in the Order Message table. Included only for retail pickup and delivery orders received from the Order Broker. See the Order Broker Integration for a discussion. Available in: Version 2.0 in Order Management System 2.5 or later. |
|
ost_nbr_of_picks_out |
numeric |
3 |
The number of pick slips that have been printed for the order ship to, but have not yet shipped. From the OST # of picks outstand in the Order Ship To table. |
|
ost_nbr_of_ shipments |
numeric |
3 |
The number of shipments made to each ship to address. Included only if items on the order have been picked and billed; no number included for express billed orders. From the OST # of shipments in the Order Ship To table. |
|
ost_number_of_ lines |
numeric |
3 |
The number of order lines for the order ship to. From the # of lines in the Order Ship To table. |
|
ost_pst |
numeric |
20.2 |
The Canadian Provincial Services tax that applies to the order ship to. From the OST PST in the Order Ship To table. |
|
ost_pst_balance |
numeric |
20.2 |
The unpaid portion of the Canadian Provincial Services tax. From the OST PST balance in the Order Ship To table. |
|
ost_priority |
numeric |
1 |
The priority for order fulfillment on a backordered item for the order ship to. Priority codes range from 0 - 9, where 0 is the lowest priority and 9 is the highest priority. From the OST priority in the Order Ship To table. |
|
ost_purchase_ order_nbr |
alpha |
15 |
The purchase order number under which the order was placed. From the Purchase order # in the Order Ship To table. |
|
ost_resale_ exempt_nbr |
alpha |
30 |
A number or code that identifies the customer as exempt from taxes on purchases. From the OST resale/exempt # (Tax identification) in the Order Ship To table. |
|
ost_ship_ complete |
alpha |
1 |
Indicates if all items on the order must ship together. Y = Ship all items on the order in one shipment. N = Items on the order ship as soon as they are reserved. From the OST ship complete in the Order Ship To table. |
|
ost_ship_via_ code |
numeric |
2 |
A code indicating the shipper used to deliver the merchandise to the ship to customer. From the Ship via in the Order Ship To table. |
|
ost_ship_via_ description |
alpha |
30 |
A description of the shipper. From the VIA shipper name in the Ship Via table. |
|
ost_status |
alpha |
1 |
The status of the ship to order. blank = Open. A = Archived. This option is not currently implemented. C = Cancelled. H = Held. S = Suspended. X = Closed. From the OST order status in the Order Ship To table. |
|
ost_tax |
numeric |
20.2 |
The total sales tax that applies to the order for the order ship to. This total does not include any hidden tax. From the OST tax in the Order Ship To table. |
|
ost_tax_balance |
numeric |
20.2 |
The unpaid portion of the taxes. From the OST tax balance in the Order Ship To table. |
|
ost_tax_code |
alpha |
2 |
The tax status of the ship to customer. E (Exempt) = The customer is not required to pay tax on purchases. G (GST only) = The customer is a Canadian customer and subject to the Goods and Services Tax on purchases only; not PST. N (Non-taxable) = The customer will not be taxed on purchases. P (PST only) = The customer is a Canadian customer and subject to the Provincial Services Tax only; not GST. R (Resale) = The customer is a reseller and not subject to tax. T (Taxable) = The customer is subject to all taxes. Canadian customers are subject to both GST and PST tax. From the Tax code in the Order Ship To table. |
|
ost_whs_ warehouse |
numeric |
3 |
A code for the warehouse from where the merchandise on the order will ship. From the Whs in the Order Ship To table. |
|
ost_warehouse_ name |
alpha |
30 |
The name of the warehouse. From the Name in the Warehouse table. |
|
OrderMessage |
The OrderMessage element and its attributes repeat for each order message on the order header. |
||
|
order_msg_seq_ nbr |
numeric |
3 |
The sequence number assigned to the order line message. From the OMS seq # in the Order Message table. |
|
order_message_ text |
alpha |
60 |
The order line message. From the OMS message in the Order Message table. |
|
order_message_ |
alpha |
1 |
Indicates whether, and where, the message prints. P = Print the message on the pick slip. I = Print the message on the invoice. B = Print the message on the pick slip and invoice. From the OMS print? in the Order Message table. |
|
order_message_ date |
numeric |
7 |
The date the message was entered, in YYYY-MM-DD format. From the OMS date in the Order Message table. |
|
order_message_ user |
alpha |
10 |
The user ID of the person who entered the message. From the User in the Order Message table. |
|
Certificate |
Not implemented. Available in: Version 2.0 in Order Management System 2.5 or later. |
||
|
certificate_ amount |
numeric |
20.2 |
Not implemented. |
|
certificate_ number |
alpha |
40 |
Not implemented. |
|
transaction_id |
alpha |
40 |
Not implemented. |
|
redeemed_ amount |
numeric |
20.2 |
Not implemented. Available in: 3.0 (release 3.5 of Order Management System). |
|
OrderAdditionalCharge |
The OrderAdditionalCharge element and its attributes repeat for each order additional charge applied to the order that has been billed (is associated with an invoice date). This element and its attributes are included on debit and credit invoices. Additional charges are user-defined types of charges that you can add to an order for any reason. These additional charges are order-level charges, and are not associated with any particular item. See Adding Miscellaneous Charges or Credits in Order Entry for more information. Note: The additional charges defined here may not tie out to the additional charges defined for the invoice payment method, invoice ship to, or order ship to. Available in: 3.0 (release 3.5 of Order Management System). |
||
|
oac_addl_charge_ amt |
numeric |
20.2 |
The amount of the additional charge. A negative sign displays if the amount is a negative (credit) amount. Additional charges may include:
From the Add’l charges field in the Order Additional Charge table. Available in: 3.0 (release 3.5 of Order Management System). |
|
oac_addl_charge_ code |
alpha |
2 |
A code that represents the additional charge. From the Add’l chg code field in the Order Additional Charge table. Available in: 3.0 (release 3.5 of Order Management System). |
|
oac_addl_charge_ inv_date |
numeric |
7 |
The date the invoice associated with the additional charge was billed, in CYYMMDD format. The system includes only additional charges that have been billed. From the Date invoiced field in the Order Additional Charge table. Available in:3.0 (release 3.5 of Order Management System). |
|
CustomerShipTo |
The CustomerShipTo element and its attributes indicate if the recipient is someone other than the sold to customer. You can send a shipment to:
The name and address provided in the message are the current information from the time the message is generated, but are not necessarily identical to the name and address when the invoice itself was generated. See the InvoiceShippingAddress for more information. |
||
|
ship_to_customer_nbr |
numeric |
9 |
The number assigned to the ship to customer on the order. Included only if you are shipping to a permanent ship to customer or recipient sold to customer. From the OST CST customer # in the Order Ship To table. |
|
permanent_ship_ to_nbr |
numeric |
3 |
The number assigned to the permanent ship to customer on the order. Included only if you are shipping to a permanent ship to customer for the sold to customer on the order. If you are shipping to a permanent ship to customer, the Ship_to_customer_nbr is the associated sold to customer number. From the CSH ship to # in the Customer Ship To table. |
|
ship_to_prefix |
alpha |
3 |
The ship to customer’s prefix. From the:
|
|
ship_to_fname |
alpha |
15 |
The ship to customer’s first name. From the:
|
|
ship_to_initial |
alpha |
1 |
The ship to customer’s middle initial. From the:
|
|
ship_to_lname |
alpha |
25 |
The ship to customer’s last name. From the:
|
|
ship_to_suffix |
alpha |
3 |
The ship to customer’s suffix. From the:
|
|
ship_to_company |
alpha |
30 |
The ship to customer’s company. From the:
|
|
ship_to_apt |
alpha |
10 |
The ship to customer’s apartment. From the:
|
|
ship_to_address1 |
alpha |
32 |
The ship to customer’s street address. From the:
|
|
ship_to_address2 |
alpha |
32 |
The second address line on the ship to customer’s address. From the:
|
|
ship_to_address3 |
alpha |
32 |
The third address line on the ship to customer’s address. From the:
|
|
ship_to_address4 |
alpha |
32 |
The fourth address line on the ship to customer’s address. From the:
|
|
ship_to_city |
alpha |
25 |
The city on the ship to customer’s address. From the:
|
|
ship_to_country |
alpha |
3 |
The country on the ship to customer’s address. From the:
|
|
ship_to_country_name |
alpha |
30 |
The name of the country. From the Description in the Country table. |
|
ship_to_state |
alpha |
2 |
The state on the ship to customer’s address. From the:
|
|
ship_to_state_ name |
alpha |
25 |
The name of the state. From the Description in the State table. |
|
ship_to_zip |
alpha |
10 |
The postal code on the ship to customer’s address. From the:
|
|
ship_to_delivery_code |
alpha |
1 |
Identifies the address as a business or residential address. B = Business address. R = Residential address. N = No distinction between business and residence. From the:
|
|
ship_to_po_box |
alpha |
1 |
Identifies the customer’s delivery address as a post office box. Y = The address is a post office box. N = The address is not a post office box. From the:
|
|
ship_to_email_ address |
alpha |
50 |
The ship to customer’s email address. From the:
|
|
ship_to_day_ phone |
alpha |
14 |
The ship to customer’s day phone number. From the:
|
|
ship_to_day_ext |
alpha |
4 |
The day phone number extension. From the:
|
|
ship_to_eve_ phone |
alpha |
14 |
The ship to customer’s evening phone number. From the:
|
|
ship_to_eve_ext |
alpha |
4 |
The evening phone number extension. From the:
|
|
ship_to_fax_ phone |
alpha |
14 |
The ship to customer’s third (fax or mobile) number. From the:
|
|
ship_to_fax_ext |
alpha |
4 |
The third phone number extension. From the:
|
|
ship_to_rent_ name |
alpha |
1 |
Indicates whether to include the ship to customer’s name on a mailing list that you rent. Y = Rent the customer’s name. N = Do not rent the customer’s name. From the:
|
|
ship_to_mail_ code |
alpha |
3 |
A code used to identify when, and under what conditions, you send mail to the customer. From the:
|
|
ship_to_mail_ code_desc |
alpha |
40 |
A description of the mail code. From the MCC mail code description in the Mail/Call Code table. |
|
ship_to_call_code |
alpha |
3 |
A code that identifies when, and under what conditions, you call the customer. From the:
|
|
ship_to_call_code_desc |
alpha |
40 |
A description of the call code. From the MCC mail code description in the Mail/Call Code table. |
|
ship_to_language_code |
alpha |
3 |
A code that identifies the language used by the ship to customer. From the:
|
|
ship_to_language_desc |
alpha |
30 |
A description of the language. From the Description in the Language table. |
|
ship_to_job_title |
alpha |
25 |
The sold to customer’s job title. Not included for an order ship to address or permanent ship to address. Recipient sold to: From the Job title in the Customer Sold To table. |
|
ship_to_mail_ name |
alpha |
1 |
Indicates whether the customer receives future catalogs. Y = Mail catalogs to the customer. N = Do not mail catalogs to the customer. Not included for an order ship to address or permanent ship to address. Recipient sold to: From the Mail name? in the Customer Sold To table. |
|
ship_to_email_ status |
alpha |
2 |
Indicates the preferred method of correspondence for the sold to customer’s primary email address. O1 (Email) = Email is the preferred method of correspondence. O2 (Order-only email) = Use email for order-related correspondence only; generate a document for other correspondence. O3 (No email) = Do not use email for any correspondence; generate a document instead. O4 (Do not ask customer) = Do not ask the customer for an email address; the customer has already been asked and has declined to provide it. Not included for an order ship to address or permanent ship to address. Recipient sold to: From the CST email status in the Customer Sold To table. |
|
ship_to_rent_ |
alpha |
1 |
This field is currently not implemented. From the CST rent e-mail in the Customer Sold To table. |
|
ship_to_tax_ status |
alpha |
1 |
The tax status of the sold to customer. E (Exempt) = The customer is not required to pay tax on purchases. G (GST only) = The customer is a Canadian customer and subject to the Goods and Services Tax on purchases only; not PST. N (Non-taxable) = The customer will not be taxed on purchases. P (PST only) = The customer is a Canadian customer and subject to the Provincial Services Tax only; not GST. R (Resale) = The customer is a reseller and not subject to tax. T (Taxable) = The customer is subject to all taxes. Canadian customers are subject to both GST and PST tax. Not included for an order ship to address or permanent ship to address. Recipient sold to: From the Tax exempt status (Tax code) in the Customer Sold To table. |
|
ship_to_associate |
alpha |
1 |
Identifies the sold to customer as an associate or member who is eligible to receive special pricing on merchandise. Y = The customer is an associate customer. N = The customer is not an associate customer. Not included for an order ship to address or permanent ship to address. Recipient sold to: From the CST associate customer? in the Customer Sold To table. |
|
ship_to_type |
alpha |
3 |
Not currently implemented. |
|
ship_to_inactive |
alpha |
1 |
Identifies the sold to customer’s status. Y = Customer is inactive. N = Customer is active. Not included for an order ship to address or permanent ship to address. Recipient sold to: From the CST inactive? in the Customer Sold To table. |
|
ship_to_ commercial |
alpha |
1 |
Identifies the sold to customer as commercial or non-commercial. Y = This is a commercial customer. N = This is a non-commercial customer. Not included for an order ship to address or permanent ship to address. Recipient sold to: From the CST commercial? in the Customer Sold To table. |
|
ship_to_ alternate_id |
alpha |
15 |
A code used as an additional way to identify the sold to customer. Not included for an order ship to address or permanent ship to address. Recipient sold to: From the Interface cust code in the Customer Sold To table. |
|
ship_to_cross_ ref_nbr |
pack |
9 |
A code that represents the customer on another system. From the CST customer nbr xref in the Customer Sold To table. |
|
ship_to_currency_code |
alpha |
3 |
A code that identifies the currency used by the sold to customer. Not included for an order ship to address or permanent ship to address. Recipient sold to: From the Currency code in the Customer Sold To table. |
|
ship_to_currency_desc |
alpha |
30 |
A description of the currency. Not included for an order ship to address or permanent ship to address. From the CUR currency description in the Currency table. |
|
ship_to_ warehouse |
numeric |
3 |
A code used to identify the warehouse (store location) where you replenish stock for this customer (store). Not included for an order ship to address or permanent ship to address. Recipient sold to: From the Whs in the Customer Warehouse table. |
|
ship_to_ warehouse_name |
alpha |
30 |
The name of the warehouse. Not included for an order ship to address or permanent ship to address. From the Name in the Warehouse table. |
|
order_ship_to_ prefix |
alpha |
3 |
This field and the following fields prefixed with order_ship_to represents an order ship to address. The order ship to address values are from the Order Ship To Address table. The order ship to customer’s prefix. From the NAM prefix in the Order Ship To Address table. |
|
order_ship_to_ fname |
alpha |
15 |
The order ship to customer’s first name. From the NAM first name in the Order Ship To Address table. |
|
order_ship_to_ initial |
alpha |
1 |
The order ship to customer’s middle initial. From the NAM initial in the Order Ship To Address table. |
|
order_ship_to_ lname |
alpha |
25 |
The order ship to customer’s last name. From the NAM last name in the Order Ship To Address table. |
|
order_ship_to_ suffix |
alpha |
3 |
The order ship to customer’s suffix. From the NAM suffix in the Order Ship To Address table. |
|
order_ship_to_ company |
alpha |
30 |
The order ship to customer’s company. From the NAM company name in the Order Ship To Address table. |
|
order_ship_to_apt |
alpha |
10 |
The order ship to customer’s apartment. From the NAM apartment in the Order Ship To Address table. |
|
order_ship_to_ address1 |
alpha |
32 |
The order ship to customer’s street address. From the NAM street address in the Order Ship To Address table. |
|
order_ship_to_ address2 |
alpha |
32 |
The order ship to customer’s second address line. From the NAM address line 2 in the Order Ship To Address table. |
|
order_ship_to_ address3 |
alpha |
32 |
The order ship to customer’s third address line. From the NAM address line 3 in the Order Ship To Address table. |
|
order_ship_to_ address4 |
alpha |
32 |
The order ship to customer’s fourth address line. From the NAM address line 4 in the Order Ship To Address table. |
|
order_ship_to_ city |
alpha |
25 |
The city for the order ship to customer’s address. From the NAM city in the Order Ship To Address table. |
|
order_ship_to_ country |
alpha |
3 |
The country for the order ship to customer’s address. From the RPR country in the Order Ship To Address table. |
|
order_ship_to_ country_name |
alpha |
30 |
The name of the country. From the Description in the Country table. |
|
order_ship_to_ state |
alpha |
2 |
The state for the order ship to customer’s address. From the NAM state in the Order Ship To Address table. |
|
order_ship_to_ state_name |
alpha |
25 |
The name of the state. From the Description in the State table. |
|
order_ship_to_zip |
alpha |
10 |
The postal code for the order ship to customer’s address. From the NAM zip in the Order Ship To Address table. |
|
order_ship_to_ delivery_code |
alpha |
1 |
Identifies the address as a business or residential address. B = Business address. R = Residential address. N = No distinction between business and residence. Maps to the NAM delivery code in the Order Ship To Address table. |
|
order_ship_to_ po_box |
alpha |
1 |
Indicates if the customer’s delivery address is a post office box. Y = The address is a post office box. N = The address is not a post office box. From the NAM PO box in the Order Ship To Address table. |
|
order_ship_to_ email_address |
alpha |
50 |
The order ship to customer’s email address. From the Email address in the Order Ship To Address table. |
|
InvoiceBillingAddress |
This element is included only if a record exists in the Invoice Address table. The system saves the billing address in this table when it bills a shipment only if the Capture Addresses for Invoice (J24) system control value was selected. The billing address indicated here is based on the bill-to account, if any, associated with the order; otherwise, it is based on the sold-to customer. For more information: See the Display Invoice Address Screen (Billing Address) for more information on the invoice billing address. |
||
|
iba_ship_to_nbr |
numeric |
3 |
|
|
iba_prefix |
alpha |
3 |
|
|
iba_fname |
alpha |
15 |
|
|
iba_initial |
alpha |
1 |
|
|
iba_lname |
alpha |
25 |
|
|
iba_suffix |
alpha |
3 |
|
|
iba_company |
alpha |
30 |
|
|
iba_apt |
alpha |
10 |
|
|
iba_address1 |
alpha |
32 |
|
|
iba_address2 |
alpha |
32 |
|
|
iba_address3 |
alpha |
32 |
|
|
iba_address4 |
alpha |
32 |
|
|
iba_city |
alpha |
25 |
|
|
iba_country |
alpha |
3 |
|
|
iba_country_ name |
alpha |
30 |
|
|
iba_state |
alpha |
2 |
|
|
iba_state_name |
alpha |
25 |
|
|
iba_zip |
alpha |
10 |
|
|
iba_deliver_code |
alpha |
1 |
Identifies the address as a business or residential address. B = Business address. R = Residential address. N = No distinction between business and residence. |
|
InvoiceShippingAddress |
This element is included only if a record exists in the Invoice Address table.The system saves the shipping address in this table when it bills a shipment only if the Capture Addresses for Invoice (J24) system control value was selected. See the Display Invoice Address Screen (Shipping Address) for more information on the invoice shipping address. |
||
|
isa_ship_to_nbr |
numeric |
3 |
|
|
isa_prefix |
alpha |
3 |
|
|
isa_fname |
alpha |
15 |
|
|
isa_initial |
alpha |
1 |
|
|
isa_lname |
alpha |
25 |
|
|
isa_suffix |
alpha |
3 |
|
|
isa_company |
alpha |
30 |
|
|
isa_apt |
alpha |
10 |
|
|
isa_address1 |
alpha |
32 |
|
|
isa_address2 |
alpha |
32 |
|
|
isa_address3 |
alpha |
32 |
|
|
isa_city |
alpha |
25 |
|
|
isa_country |
alpha |
3 |
|
|
isa_country_ name |
alpha |
30 |
|
|
isa_state |
alpha |
2 |
|
|
isa_state_name |
alpha |
25 |
|
|
isa_zip |
alpha |
10 |
|
|
isa_deliver_code |
alpha |
1 |
Identifies the address as a business or residential address. B = Business address. R = Residential address. N = No distinction between business and residence. |
|
InvoiceDetail |
The InvoiceDetail element and its attributes repeat for each item associated with the invoice. |
||
|
idt_seq_nbr |
numeric |
5 |
The sequence number assigned to the invoice detail. From the Seq # in the Invoice Detail table. |
|
idt_line_nbr |
numeric |
3 |
The invoice detail line number. From the IDT line # in the Invoice Detail table. |
|
idt_control_nbr |
numeric |
7 |
The pick control number assigned to the invoice detail line. From the Control # in the Invoice Detail table. |
|
idt_ship_date |
numeric |
10 |
The date the item on the invoice line was shipped in YYYY-MM-DD format. From the IDT date shipped in the Invoice Detail table. |
|
idt_return_date |
numeric |
10 |
Not currently implemented. |
|
idt_shipped_qty |
numeric |
5 |
The shipped quantity for the item on the invoice line. From the IDT qty shipped in the Invoice Detail table. |
|
idt_return_qty |
numeric |
5 |
The quantity of the item on the invoice line that the customer returned. From the IDT qty returned in the Invoice Detail table. |
|
idt_credited_qty |
numeric |
5 |
The quantity of the item on the invoice line for which you have credited the customer. From the Qty credited in the Invoice Detail table. |
|
idt_actual_price |
numeric |
13.2 |
The actual unit price of the shipped item. From the IDT price in the Invoice Detail table. |
|
idt_discount_amt |
numeric |
20.2 |
The total extended discount amount applied to the item on the invoice line. From the Discount amount in the Invoice Detail table. |
|
idt_freight_amt |
numeric |
13.2 |
The freight amount applied to the item on the invoice line. From the IDT freight in the Invoice Detail table. |
|
idt_tax_amt |
numeric |
13.5 |
The tax amount applied to the item on the invoice line. If a tax override amount is defined for the order line and you process multiple shipments against the line, the system prorates the tax override amount across the units shipped on the order line to determine the new tax override amount and the tax amount to apply to each shipment. Example: If the tax override amount for the order line is 9.00 and the order quantity is 3, the system charges 3.00 if you ship 1 unit of the item and then charges 6.00 if you ship the remaining 2 units of the item. From the IDT tax in the Invoice Detail table. |
|
idt_gst_amt |
numeric |
13.5 |
The GST amount applied to the item on the invoice line. From the IDT GST in the Invoice Detail table. |
|
idt_pst_amt |
numeric |
13.5 |
The PST amount applied to the item on the invoice line. From the IDT PST in the Invoice Detail table. |
|
idt_handling_amt |
numeric |
13.2 |
The handling charge amount applied to the item on the invoice line. From the IDT handling in the Invoice Detail table. |
|
idt_cost_amt |
numeric |
13.4 |
The cost of the item. From the Cost in the Invoice Detail table. |
|
OrderDetail |
|||
|
odt_ordered_qty |
numeric |
5 |
The number of units ordered on the order line. From the ODT qty ordered in the Order Detail table. |
|
odt_reserved_qty |
numeric |
5 |
The number of units on the order line for which stock has been reserved. From the ODT qty reserved in the Order Detail table. |
|
odt_printed_qty |
numeric |
5 |
The number of units on the order line for which pick slips have been printed. From the ODT qty printed in the Order Detail table. |
|
odt_cancelled_qty |
numeric |
5 |
The number of units on the order line that have been cancelled. From the ODT qty cancelled in the Order Detail table. |
|
odt_sold_out_qty |
numeric |
5 |
The number of units on the order line that are sold out and are no longer available to ship. Note: This number is updated only if a sold out reason code has been assigned to the item and the shipped quantity does not match the order quantity; this number is not updated when you sell out immediately. From the ODT qty sold out in the Order Detail table. |
|
odt_shipped_qty |
numeric |
5 |
The number of units on the order line that have shipped. From the ODT qty shipped in the Order Detail table. |
|
odt_returned_qty |
numeric |
5 |
The number of units on the order line that the customer has returned. From the ODT qty returned in the Order Detail table. |
|
odt_credited_qty |
numeric |
5 |
The number of returned units on the order line for which a credit was issued. From the Qty credited in the Order Detail table. |
|
odt_line_status |
alpha |
1 |
The status of the order line. blank = Open. C = Cancelled. H = Held. S = Suspended. X = Closed. From the ODT line status in the Order Detail table. |
|
odt_drop_ship |
alpha |
1 |
Set to D if the item on the order line is a drop ship item. From the ODT drop ship flag in the Order Detail table. |
|
odt_item |
alpha |
12 |
The code for the item on the order line. From the ITM number in the Order Detail table. |
|
odt_item_ description |
alpha |
40 |
The description of the item. From the Description in the Item table. |
|
odt_sku |
alpha |
14 |
A code for the SKU, such as color, size, or style, of the item. Included only when the item has a SKU. From the SKU code in the Order Detail table. |
|
odt_short_sku |
numeric |
7 |
The short SKU code for the item on the order line. From the Short SKU in the SKU table. |
|
odt_sku_description |
alpha |
40 |
The description of the SKU, if this is a SKU’d item. From the Description in the SKU table. |
|
odt_retail_ref_nbr |
numeric |
15 |
The retail reference number for the item on the order line. From the SKU retail x-ref # in the SKU table. |
|
odt_offer |
alpha |
3 |
The offer code assigned to the order line. From the Offer number in the Order Detail table. |
|
odt_alias |
alpha |
12 |
A code used as an additional way to identify the item on the order line. From the Alias in the Order Detail table. |
|
odt_page_letter |
alpha |
6 |
The page on which the item on the order line is advertised in the offer and the letter that identifies the item on the page. From the Page letter in the Order Detail table. |
|
odt_page_nbr |
numeric |
5 |
The page on which the item on the order line is advertised in the offer. From the Page# in the Order Detail table. |
|
odt_sub_set |
alpha |
1 |
From the ODT sub set? in the Order Detail table. |
|
odt_sub_set_seq_nbr |
numeric |
3 |
From the ODT sub set sequence # in the Order Detail table. |
|
odt_warranty_item |
alpha |
1 |
Indicates if the item on the order line is a warranty item. Y = The item is a warranty item. N = The item is not a warranty item. From the ODT warranty item? in the Order Detail table. |
|
odt_source_code |
alpha |
9 |
A code that identifies the source code assigned to the order line. From the ODT SRC source code in the Order Detail table. |
|
odt_source_ description |
alpha |
30 |
A description of the source code. From the SRC description in the Source table. |
|
odt_division_code |
alpha |
2 |
A code that identifies the division associated with the source code on the order line. From the Div in the Source table. |
|
odt_division_description |
alpha |
30 |
A description of the division. From the Description in the Division table. |
|
odt_entity_nbr |
numeric |
3 |
A code that identifies the entity associated with the source code on the order line. From the Entity number in the Division table. |
|
odt_entity_description |
alpha |
25 |
A description of the entity. From the ENT description in the Entity table. |
|
odt_discount_applied |
alpha |
1 |
Indicates if a discount was applied against the order line. Y = A discount was applied against the order line. N = A discount was not applied against the order line. From the Discount applied in the Order Detail table. |
|
odt_no_charge |
alpha |
1 |
Indicates if the item is sold at no charge. Y = The item is sold at no charge. N = The item is sold for a price. From the ODT no charge in the Order Detail table. |
|
odt_second_ choice_status |
alpha |
1 |
This field is not currently implemented. From the ODT second choice status in the Order Detail table. |
|
odt_affect_ inventory |
alpha |
1 |
Controls whether the system reserves the item on the order line and reduces inventory after shipment. Y = Reserve the item and reduce inventory. N = Do not affect inventory. From the ODT affect inventory in the Order Detail table. |
|
odt_arrival_date |
numeric |
10 |
The date the customer requested delivery of the item, in YYYY-MM-DD format. From the ODT arrival date in the Order Detail table. |
|
odt_bo_level |
numeric |
2 |
A number that controls the priority of order fulfillment on a backordered item. From the ODT BO level in the Order Detail table. |
|
odt_cancel_date |
numeric |
10 |
The last date on which the customer will accept receipt of the item, in YYYY-MM-DD format. From the ODT cancel date in the Order Detail table. |
|
odt_coordinate_ group |
numeric |
3 |
A number assigned to 2 or more order lines to ensure that they ship together. From the ODT coordinate group in the Order Detail table. |
|
odt_date_printed |
numeric |
10 |
The date on which a pick slip for the order line was printed, in YYYY-MM-DD format. From the ODT date printed in the Order Detail table. |
|
odt_date_ reserved |
numeric |
10 |
The date when units on the order line were reserved, in YYYY-MM-DD format. From the ODT date reserved in the Order Detail table. |
|
odt_discount |
numeric |
5.2 |
The amount of the discount applied to the item. This field is not currently implemented. From the ODT discount in the Order Detail table. |
|
odt_expected_ ship_date |
numeric |
10 |
For backordered items, this is the date a purchase order containing the backordered item is expected, in YYYY-MM-DD format. From the ODT expected ship date in the Order Detail table. |
|
odt_freight_ charge |
numeric |
13.2 |
The charge for shipping the item. From the ODT freight charge in the Order Detail table. |
|
odt_future_order |
alpha |
1 |
Indicates that the arrival date for the item is too far in the future to reserve stock. The item is reserved whenever the current date reaches the requested arrival date minus lead days for picking and shipping. Y = This is a future order; do not reserve inventory. N = This is not a future order and is eligible for inventory reservation. From the ODT future order in the Order Detail table. |
|
odt_next_bo_card_date |
numeric |
10 |
The most recent date the system generated a backorder notice, in YYYY-MM-DD format. A backorder notice is sent to the customer regarding a shipment delay on an item. From the ODT next BO card date in the Order Detail table. |
|
odt_original_price |
numeric |
13.2 |
The offer price of the item before any discount is applied. From the ODT original price in the Order Detail table. |
|
odt_price |
numeric |
13.2 |
The price the customer is charged for a single unit of the item. From the ODT price in the Order Detail table. |
|
odt_bypass_ reservation |
alpha |
1 |
Indicates whether the item bypasses immediate reservation, requiring you to manually reserve the item. Y = Bypass immediate reservation. N = Do not bypass reservation. From the Bypass res in the Order Detail table. |
|
odt_special_ handling_dollars |
numeric |
20.2 |
The charge for special handling for the item. From the ODT special handling $ in the Order Detail table. |
|
odt_tax |
numeric |
20.5 |
Sales tax charged for the item on the order line. If a tax override amount is defined for the order line and you process multiple shipments against the line, the system prorates the tax override amount across the units shipped on the order line to determine the new tax override amount and the tax amount to apply to each shipment. Example: If the tax override amount for the order line is 9.00 and the order quantity is 3, the system charges 3.00 if you ship 1 unit of the item and then charges 6.00 if you ship the remaining 2 units of the item. From the ODT tax in the Order Detail table. |
|
odt_gst |
numeric |
13.5 |
The Canadian Goods and Services tax for the order line. From the ODT GST in the Order Detail table. |
|
odt_pst |
numeric |
13.5 |
The Provincial Services tax for the order line. From the ODT PST in the Order Detail table. |
|
odt_time_ reserved |
numeric |
8 |
The time the item on the order line was reserved in the format HH:MM:SS. From the ODT time reserved in the Order Detail table. |
|
odt_units_ confirmed |
numeric |
5 |
The number of units on the order line that have been confirmed for shipment. From the ODT units confirmed in the Order Detail table. |
|
odt_upsell_cross_sell |
alpha |
1 |
Indicates if an upsell/cross-sell promotion has been applied against the order line. C = Coordinate cross sale. P = Net Perception add on. N = No promotion. Y = Upsell/cross-sell promotion. From the Upsell/cross-sell in the Order Detail table. |
|
odt_gift_wrap |
alpha |
1 |
Indicates whether the item is gift wrapped. Y = Gift wrap the item. N = Do not gift wrap the item. From the Gift wrap in the Order Detail table. |
|
odt_cost_override |
numeric |
13.4 |
The override to the item’s cost from order entry or maintenance. From the Cost override in the Order Detail table. |
|
odt_entered_date |
numeric |
10 |
The date on which the order line was entered, in YYYY-MM-DD format. From the Entered date in the Order Detail table. |
|
odt_entered_time |
numeric |
8 |
The time on which the order line was entered, in HH:MM:SS format. From the Entered time in the Order Detail table. |
|
odt_priority |
numeric |
1 |
A number that controls the priority of order fulfillment on a backordered item. Priority codes range from 0 - 9, where 0 is the lowest priority and 9 is the highest priority. From the Priority in the Order Detail table. |
|
odt_backorder_reason |
alpha |
1 |
A code that represents the reason the item is on backorder. blank = The item is not backordered. D = The item is a drop ship item that is not kept in inventory. F = The item is a future order. R = Item/Warehouse reservation freeze. I = No Item/Warehouse record. W = No warehouse specified. N = Non-allocatable warehouse. O = Not enough inventory available to fulfill the entire order quantity. S = Not selected batch reservation. B = Reservation bypassed. L = SKU reserve limit exceeded. U = Interactive unreserve. Z = Zoned reservation. From the Backorder reason in the Order Detail table. |
|
odt_freight_override |
alpha |
1 |
Indicates if the freight was overridden for the order line. Y = The freight was overridden for the order line. N = The fright was not overridden for the order line. From the ODT Freight override in the Order Detail table. |
|
odt_freight_additional |
numeric |
13.2 |
The additional freight charges for the order line. From the Freight additional in the Order Detail table. |
|
oft_offer_price |
numeric |
13.2 |
The offer price of the item on the order line before any discount is applied. From the Offer price in the Order Detail table. |
|
odt_price_method |
alpha |
1 |
The method the system used to calculate the price of an item, but before applying an order-level discount. 1 = Coupon item price 2 = Customer discount% 3 = Contract price 4 = Special source price 5 = Column price 6 = Quantity break price C = Item cost D = Regular plus reprice E = Price codes I = Repriced (quantity break by item) N = No charge/cost tracking O = No charge/no cost tracking P = Regular hierarchy Q = Repriced (quantity break by offer) R = Price override V = Volume discount From the Price method in the Order Detail table. |
|
odt_allow_repricing |
alpha |
1 |
Indicates whether repricing is allowed for the order line. Y = Repricing is allowed for the order line. N = Repricing is not allowed for the order line. From the Allow repricing in the Order Detail table. |
|
odt_promotion_used |
alpha |
1 |
Indicates if a promotion was applied against the order line. Y = A promotion was applied against the order line. N = A promotion was not applied against the order line. From the Promo used? in the Order Detail table. |
|
odt_freight_unit_charge |
numeric |
13.2 |
The amount of freight charged for each unit of the item on the order line. From the ODT freight unit charge in the Order Detail table. |
|
odt_set_main_item |
alpha |
1 |
Indicates if the item on the order line is a main set item. Y = The item is a main set item. N = The item is not a main set item. From the Set main item in the Order Detail table. |
|
odt_set_seq_nbr |
numeric |
3 |
The sequence number assigned to a set item, allowing you to group all components of a set. From the Set seq # in the Order Detail table. |
|
odt_coupon |
alpha |
1 |
Indicates if a coupon has been applied to the order line. Y = A coupon has been applied to the order line. N = A coupon has not been applied to the order line. From the Coupon in the Order Detail table. |
|
odt_coupon_ dollar_override |
numeric |
13.2 |
The coupon amount subtracted from the order line price. From the Coupon $ override in the Order Detail table. |
|
odt_ft_purchase_date |
numeric |
7 |
The fast track purchase date entered at the Enter Fast Track window to add an item to the order in place of the representative fast track item. From the F/T purch in the Order Detail table. |
|
odt_ft_serial_nbr |
numeric |
9 |
The fast track serial number entered at the Enter Fast Track window to add an item to the order in place of the representative fast track item. From the F/T ser # in the Order Detail table. |
|
odt_pre_discount |
numeric |
13.2 |
The price of the item before any discounts were applied. From the ODT pre-discount in the Order Detail table. |
|
odt_duty |
numeric |
13.2 |
The amount of duty charged for the item. From the ODT duty in the Order Detail table. |
|
odt_upsell_type |
alpha |
1 |
A code indicating the type of upsell promotion applied to the order line. From the ODT upsell type in the Order Detail table. |
|
odt_need_by_date |
numeric |
|
This field is currently not implemented. From the ODT need by date in the Order Detail table. |
|
odt_pickup_type |
alpha |
2 |
Set to SPU for a store pickup. From the ODT Pickup Type in the Order Detail table. |
|
odt_tax_override |
alpha |
1 |
If this flag is Y, the order was received from an external system that specified a tax, GST, or PST amount, indicating the tax amount from the external system should be retained on the order line. From the ODT future use Y/N 1 in the Order Detail table. |
|
odt_sh_exclude_tax |
alpha |
1 |
Indicates if special handling charges were excluded from tax. From the ODT future use Y/N 2 in the Order Detail table. |
|
odt_pickup_location_id |
alpha |
10 |
The code identifying the location where a pickup order was picked up. From the ODT Pickup Location ID in the Order Detail table. |
|
odt_location_system_id |
alpha |
10 |
The system in Order Broker associated with the location where the order line was fulfilled. From the OROB System system control value. |
|
odt_additional_charge_code |
alpha |
2 |
The code that represents the type of special handling that applies to the item. From the ADD add’l chg code in the Order Detail table. |
|
odt_whs_warehouse |
numeric |
3 |
A code for the warehouse in which the item was reserved. From the ODT WHS warehouse in the Order Detail table. |
|
odt_whs_warehouse_name |
alpha |
30 |
The name of the warehouse. From the Name in the Order Detail table. |
|
odt_cancel_reason_code |
numeric |
2 |
A code indicating the reason the order line was cancelled. From the CNR cancel reason code in the Order Detail table. |
|
odt_via_ship_via_code |
numeric |
2 |
A code for the shipper assigned to the order line. From the ODT VIA ship via code in the Order Detail table. |
|
alpha |
|
A description of the shipper. From the VIA shipper name in the Ship Via table. |
|
|
odt_second_choice_sku_item |
alpha |
12 |
From the ODT second choice SKU ITM in the Order Detail table. Note: This field contains the hidden tax amount from the order detail line if the order is subject to VAT. |
|
odt_second_choice_sku_sku |
alpha |
14 |
From the ODT second choice SKU SKU in the Order Detail table. |
|
odt_price_override_code |
alpha |
1 |
A code that represents the reason for overriding the item price or giving the item to the customer at no charge. From the POR price override code in the Order Detail table. |
|
odt_backorder_warehouse |
numeric |
3 |
A code that identifies the warehouse from which a backordered item will be shipped. From the ODT B/O warehouse in the Order Detail table. |
|
odt_backorder_warehouse_name |
alpha |
30 |
The name of the backorder warehouse. From the Name in the Warehouse table. |
|
odt_aoc_addon_code |
alpha |
3 |
This field is not currently implemented. From the ODT AOC add-on code in the Order Detail table. |
|
odt_seq_nbr |
numeric |
5 |
A unique sequence number identifying the order line. Might differ from the order line number if, for example, you added another item before this item in order entry, and then deleted the previous item before accepting the order. Not displayed on any screen. From the Seq # in the Order Detail table. Available in: Version 5.0 in Order Management System Release 19.3 or later. |
|
OrderLineMessage |
The OrderLineMessages element and its attributes repeat for each order line message for the item on the order line. |
||
|
line_msg_seq_nbr |
numeric |
3 |
The sequence number assigned to the order line message. From the Seq # in the Order Line Messages table. |
|
line_message_text |
alpha |
60 |
The order line message. From the OLM message in the Order Line Messages table. |
|
line_message_print |
alpha |
1 |
Indicates whether, and where, the message prints. P = Print the message on the pick slip. I = Print the message on the invoice. B = Print the message on the pick slip and invoice. From the OLM print? in the Order Line Messages table. |
|
line_message_date |
numeric |
10 |
The date the message was entered in the format YYYY-MM-DD. From the Entry date in the Order Line Messages table. |
|
line_message_ user |
alpha |
10 |
The user ID of the person who entered the message. From the User in the Order Line Messages table. |
|
OrderDetailCoupon |
The OrderDetailCoupon element and its attributes repeat for each coupon applied to the order line. See Entering Coupon Promotions on an Order for more information on applying coupons to an order or order line on the order. Available in: 3.0 (release 3.5 of Order Management System). |
||
|
odc_coupon_code |
alpha |
6 |
The code that identifies the coupon applied to the order or order detail line. From the Coupon Code field in the Order Detail Coupon table. Available in: 3.0 (release 3.5 of Order Management System). |
|
odc_coupon_type |
alpha |
1 |
Indicates whether this is an order-level or detail-level coupon. Valid values are:
From the Coupon Type field in the Order Detail Coupon table. Available in: 3.0 (release 3.5 of Order Management System). |
|
odc_post_discount_price |
numeric |
13.2 |
The price of the item after the coupon has been applied. This is the unit price of the item, not the extended price of the order line. From the Pre-Discount Price field in the Order Detail Coupon table. Available in: 3.0 (release 3.5 of Order Management System). |
|
odc_pre_discount_price |
numeric |
13.2 |
The price of the item before the coupon has been applied. This is the unit price of the item, not the extended price of the order line. From the Post-Discount Price field in the Order Detail Coupon table. Available in: 3.0 (release 3.5 of Order Management System). |
|
StoredValueCard |
The StoredValueCard element and its attribute repeats for each stored value card number assigned to the stored value card item on the order line. A unique stored value card number must be assigned to each stored value card ordered; for example, if you order two stored value cards, you must assign a unique number to each card. See Assigning a Stored Value Card Number for more information on assigning a number to a stored value card. Available in: 3.0 (release 3.5 of Order Management System). |
||
|
svc_card_nbr |
alpha |
20 |
The number assigned to the stored value card on the order line. The system masks this number in the MQ Log. Note:
From the SVC Card # field in the Stored Value Card table. Available in: 3.0 (release 3.5 of Order Management System). |
|
UPC |
The UPC element and its attributes repeat for each UPC code defined for the item on the invoice line. |
||
|
upc_type |
alpha |
3 |
The type of UPC code, identifying the type of validation the system performs against the UPC code. E13 = EAN-13 validation. E8 = EAN-8 validation. UA = UPC-A validation. UE = UPC-E validation. From the UPC type in the Item UPC table. |
|
upc_nbr |
alpha |
14 |
The UPC code defined for the item on the order line. From the UPC in the Item UPC table. |
|
upc_vendor_nbr |
numeric |
7 |
A code for the supplier who sells you merchandise. From the UPC VND vendor nbr in the Item UPC table. |
|
InvoiceDetailPayMethod |
The InvoiceDetailPayMethod element and its attributes repeat for each pay type assigned to the invoice. |
||
|
idp_opm_seq_nbr |
numeric |
5 |
The sequence number assigned to the invoice detail payment method. From the Seq # in the Invoice Detail Pay Method table. |
|
idp_merchandise_amt |
numeric |
13.2 |
The merchandise amount assigned to the invoice payment method. From the Merch in the Invoice Detail Pay Method table. |
|
idp_merchandise_balance_amt |
numeric |
20.2 |
The unpaid portion of the merchandise amount assigned to the invoice payment method. From the Merch balance in the Invoice Detail Pay Method table. |
|
idp_freight_amt |
numeric |
20.2 |
The freight amount assigned to the invoice payment method. From the Freight in the Invoice Detail Pay Method table. |
|
idp_freight_balance_amt |
numeric |
20.2 |
The unpaid portion of the freight amount assigned to the invoice payment method. From the Freight balance in the Invoice Detail Pay Method table. |
|
idp_hand_charge_amt |
numeric |
20.2 |
The handling charge amount assigned to the invoice payment method. From the Handling in the Invoice Detail Pay Method table. |
|
idp_hand_charge_balance_amt |
numeric |
20.2 |
The unpaid portion of the handling charge amount assigned to the invoice payment method. From the Handling balance in the Invoice Detail Pay Method table. |
|
idp_tax_amt |
numeric |
20.5 |
The tax amount assigned to the invoice payment method. From the Tax in the Invoice Detail Pay Method table. |
|
idp_tax_balance_amt |
numeric |
20.5 |
The unpaid portion of the tax amount assigned to the invoice payment method. From the Tax balance in the Invoice Detail Pay Method table. |
|
idp_gst_amt |
numeric |
20.5 |
The GST amount assigned to the invoice payment method. From the GST in the Invoice Detail Pay Method table. |
|
idp_gst_balance_amt |
numeric |
20.5 |
The unpaid portion of the GST amount assigned to the invoice payment method. From the GST balance in the Invoice Detail Pay Method table. |
|
idp_pst_amt |
numeric |
20.5 |
The PST amount assigned to the invoice payment method. From the PST in the Invoice Detail Pay Method table. |
|
idp_pst_balance_amt |
numeric |
20.5 |
The unpaid portion of the PST amount assigned to the invoice payment method. From the PST balance in the Invoice Detail Pay Method table. |
|
InvoiceDetailCharge |
The InvoiceDetailCharges element and its attributes repeat for each additional charge assigned to the item on the invoice line. |
||
|
idc_charge_type |
alpha |
1 |
Identifies the type of charge assigned to the item on the invoice line. D = Duty charge. S = Shipper/item charge. V = VAT/hidden tax charge. From the IDC type of charge in the Invoice Detail Charge table. |
|
idc_charge_amt |
numeric |
20.2 |
The amount of the charge assigned to the item on the invoice line. From the IDC amount in the Invoice Detail Charge table. |
|
idc_unit_amt |
numeric |
13.2 |
The flat rate the system used to calculate the duty amount. From the Unit amount in the Invoice Detail Charge table. |
|
idc_duty_pct |
numeric |
5.2 |
The percentage the system used the calculate the duty amount. From the Duty percent in the Invoice Detail Charge table. |
|
InvoiceDetailCost |
Not currently used. |
||
|
ivc_fifo_seq_nbr |
numeric |
7 |
Not currently used. |
|
ivc_fifo_date |
numeric |
10 |
Not currently used. |
|
ivc_fifo_cost |
numeric |
13.4 |
Not currently used. |
|
ivc_quantity |
numeric |
7 |
Not currently used. |
|
ivc_unit_balance |
numeric |
7 |
Not currently used. |
Invoice Download Message: Sample XML
A sample of the Invoice Download XML Message (CWInvoiceOut) is presented below.
<Message source="CWDirect" target="CWIntegrate" type="CWINVOICEOUT" date_created="2022-02-22" time_created="16:37:17">
<InvoiceHeader ihd_transaction_type="A" ihd_company="123" ihd_order_nbr="123" ihd_invoice_nbr="123" ihd_invoice_type="I">
<CompanyAddress company_description="Company Name" company_address1="Company Address" company_city="WESTBOROUGH" company_state="MA" company_state_name="MASSACHUSETTS" company_zip="01581" company_country="US" company_country_name="UNITED STATES"/>
<OrderHeader ohd_reference_order_nbr="123" ohd_order_status="X" ohd_nbr_of_recipients="1" ohd_order_date="2022-02-21" ohd_enter_date="2022-02-21" ohd_enter_time="15:04:32" ohd_order_type="E" ohd_order_type_description="ECOMMERCE ORDER" ohd_invoice_source_code="CANSOURCE" ohd_invoice_source_description="SOURCE CODE FOR CANADIAN OFFER" ohd_invoice_division_code="2" ohd_invoice_division_description="CANADIAN DIVISION" ohd_invoice_entity_nbr="1" ohd_invoice_entity_description="ENTITY" ohd_order_entry_wrkstn="WORKSTATION" ohd_freight_override="N" ohd_email_confirm_date="2022-02-21" ohd_cst_customer_nbr="106" ohd_entered_by_user="USERID" ohd_order_email_address="first.last@example.com"/>
<CustomerSoldTo sold_to_nbr="106" sold_to_fname="FIRST" sold_to_lname="LAST" sold_to_address1="10 SAMPLE STREET" sold_to_city="WORCESTER" sold_to_country="US" sold_to_country_name="UNITED STATES" sold_to_state="MA" sold_to_state_name="MASSACHUSETTS" sold_to_zip="01602" sold_to_delivery_code="R" sold_to_po_box="N" sold_to_email_address="first.last@example.com" sold_to_rent_name="N" sold_to_mail_name="N" sold_to_email_status="O1" sold_to_mail_code="N" sold_to_mail_code_desc="NO" sold_to_tax_status="N" sold_to_associate="N" sold_to_inactive="N" sold_to_commercial="N" sold_to_day_phone="(508)555-0103" sold_to_eve_phone="(508)555-0104" orce_customer_id="123"/>
<InvoicePaymentMethods>
<InvoicePaymentMethod ipm_seq_nbr="1" ipm_pay_type="1" ipm_pay_type_desc="CASH, CHECKS" ipm_pay_category="1" ipm_merchandise_amt="10" ipm_merchandise_balance_amt="10" ipm_freight_amt="1" ipm_freight_balance_amt="1" ipm_addl_freight_amt="15" ipm_addl_freight_balance_amt="15" ipm_tax_amt="1.56" ipm_tax_balance_amt="1.56" ipm_ord_lvl_frt_amt="16" ipm_ord_lvl_frt_balance_amt="16" ipm_ord_lvl_frt_tax_amt="0.96" ipm_ord_lvl_frt_tax_bal_amt="0.96" ipm_invoice_date="2022-02-21" ipm_deposit_release_date="2022-02-21" ipm_deposit_amount="27.56"/>
</InvoicePaymentMethods>
<InvoiceShipTos>
<InvoiceShipTo ins_ship_to_nbr="1" ins_invoice_date="2022-02-21" ins_merchandise_amt="10" ins_freight_amt="1" ins_addl_freight_amt="15" ins_tax_amt="1.56" ins_discount_amt="-10">
<InvoiceBillingAddress iba_ship_to_nbr="1" iba_fname="FIRST" iba_lname="LAST" iba_address1="10 SAMPLE STREET" iba_city="WORCESTER" iba_country="US" iba_country_name="UNITED STATES" iba_state="MA" iba_state_name="MASSACHUSETTS" iba_zip="01602" iba_deliver_code="R"/>
<InvoiceShippingAddress isa_ship_to_nbr="1" isa_fname="FIRST" isa_lname="LAST" isa_address1="10 SAMPLE STREET" isa_city="WORCESTER" isa_country="US" isa_country_name="UNITED STATES" isa_state="MA" isa_state_name="MASSACHUSETTS" isa_zip="01602" isa_deliver_code="R"/>
<OrderShipTo ost_ship_via_code="9" ost_ship_via_description="FEDERAL EXPRESS NEXT DAY" ost_status="X" ost_tax_code="T" ost_gift_flag="N" ost_nbr_of_shipments="1" ost_arrival_date="2022-02-21" ost_cancel_bo="N" ost_freight="1" ost_freight_override="N" ost_last_pick_print_date="2022-02-21" ost_merchandise="10" ost_ship_complete="N" ost_tax="1.56" ost_number_of_lines="1" ost_additional_freight="15" ost_calculate_freight="Y"/>
<CustomerShipTo ship_to_customer_nbr="106" ship_to_fname="FIRST" ship_to_lname="LAST" ship_to_address1="10 SAMPLE STREET" ship_to_city="WORCESTER" ship_to_country="US" ship_to_country_name="UNITED STATES" ship_to_state="MA" ship_to_state_name="MASSACHUSETTS" ship_to_zip="01602" ship_to_delivery_code="R" ship_to_po_box="N" ship_to_email_address="first.last@example.com" ship_to_day_phone="(508)555-0103" ship_to_eve_phone="(508)555-0104" ship_to_rent_name="N" ship_to_mail_code="N" ship_to_mail_code_desc="NO" ship_to_mail_name="N" ship_to_email_status="O1" ship_to_tax_status="N" ship_to_associate="N" ship_to_inactive="N" ship_to_commercial="N"/>
<InvoiceDetails>
<InvoiceDetail idt_seq_nbr="1" idt_line_nbr="1" idt_control_nbr="472" idt_ship_date="2022-02-21" idt_shipped_qty="1" idt_actual_price="10" idt_discount_amt="-10" idt_tax_amt="0.6">
<OrderDetail odt_ordered_qty="1" odt_shipped_qty="1" odt_line_status="X" odt_item="CINNAMON" odt_short_sku="133" odt_offer="OF2" odt_warranty_item="N" odt_source_code="CANSOURCE" odt_source_description="SOURCE CODE FOR CANADIAN OFFER" odt_division_code="2" odt_division_description="CANADIAN DIVISION" odt_entity_nbr="1" odt_entity_description="ENTITY" odt_affect_inventory="Y" odt_arrival_date="2022-02-21" odt_date_printed="2022-02-21" odt_date_reserved="2022-02-21" odt_future_order="N" odt_original_price="10" odt_price="10" odt_bypass_reservation="N" odt_tax="0.6" odt_time_reserved="15:04:55" odt_gift_wrap="N" odt_entered_date="2022-02-21" odt_entered_time="15:04:32" odt_freight_override="N" odt_price_method="R" odt_set_main_item="N" odt_coupon="N" odt_pre_discount="10" odt_price_override_code="Z" odt_item_description="CINNAMON 1 OZ"/>
<InvoiceDetailPayMethods>
<InvoiceDetailPayMethod idp_opm_seq_nbr="1" idp_merchandise_amt="10" idp_merchandise_balance_amt="10" idp_tax_amt="0.6" idp_tax_balance_amt="0.6"/>
</InvoiceDetailPayMethods>
</InvoiceDetail>
</InvoiceDetails>
</InvoiceShipTo>
</InvoiceShipTos>
</InvoiceHeader>
</Message>Merchandise Locator API
Purpose: Use the merchandise locator integration to request current availability information about an item/SKU in retail stores within a geographic search area or in external warehouses.
The merchandise locator search finds locations where the item is available for pickup, as well as indicating whether the item is available for shipment from a location. Your search specifies the requested quantity, and Order Management System uses the ProductAvailability request and response to communicate with Order Broker.
Does not create orders: The merchandise locator search is an inquiry only, and does not create or update an order. See the Order Broker Integration for information on submitting a brokered backorder (delivery or ship-for-pickup), store pickup, or ship-for-pickup order to Order Broker.
For more information: See:
-
Order Broker Integration Overview for background on integration between Order Broker and Order Management System
-
Order Broker Configuration for required setup in Order Management System
-
the Order Broker Operations Guide for details on the LocateItems request and response messages or the ProductAvailability request and response messages, your options in configuring merchandise locator searching, and details on logging and troubleshooting in Order Broker
In this topic:
Merchandise Locator Process Overview
Searching for Pickup Locations and Shipment Availability
Overview: A typical process of inquiring on locations where an item is available for pickup, as well as whether the item is available for shipment from a location, is described below.
-
A customer wants to know if an item/SKU is available for pickup at a nearby store or available for shipment from a store location. You select the item/SKU for merchandise locator inquiry. This option is available in order entry, order maintenance, and at the Display Item Availability Screen.
-
You advance to the Merchandise Locator Search Window (Searching for an Item), where you provide or confirm the customer’s geographic location, the requested quantity of the item, and the radius to search within (for example, search all stores within 25 miles of the customer’s home).
Note:
The Order Broker supports merchandise locator searches only in the U.S. and Canada. -
In the background, the MERCH_LOC process:
-
Generates the ProductAvailability request message and sends it to Order Broker. Order Broker checks the availability of the item in stores that stock the item/SKU within the search area, as well as whether the item is available for shipment at any store locations within the same search area.
-
Receives the ProductAvailability response returned by Order Broker. This message lists:
-
the item/SKU’s current or estimated availability in each searched location that stocks the item for pickup
-
an indicator of whether the requested quantity of the item/SKU is available for shipment within the search area
-
-
-
You advance to the Merchandise Locator Search Results Screen, displaying the item/SKU’s availability for pickup in each of the locations, including information on any open purchase orders. The screen also indicates whether the requested quantity of the item/SKU is available for delivery from a store within the same search area.

How does Order Broker select the locations to include?
-
Locations eligible to fulfill pickup orders:
-
Only store locations flagged as Pickup available can be included in the search results displayed at the Merchandise Locator Search Results Screen.
-
Order Broker uses any probability rules you have set up to determine whether to include locations in the results, and the available quantity to indicate. For example, you might set up a probability rule for certain locations indicating to exclude them if the available quantity falls below 5 units, or to reduce the available quantity returned in the response message by 10%.
Results displayed: For each location included in the search results as eligible for a pickup order, the Merchandise Locator Search Results Screen indicates:
-
the available quantity, next purchase order date, and next purchase order quantity
-
whether the store location will ship the item for pickup in another store location
-
the name, address, and phone number of the location
-
the distance from the search address:
-
locations are sorted in ascending order by distance (closest location listed first)
-
locations that are not flagged to Use Proximity Locator are listed without a distance
-
-
Note:
-
Any locations associated in Order Broker with your Order Management System system are excluded from the results, regardless of whether there is a corresponding warehouse record in Order Management System.
-
If a location that stocks the item and is within the search radius is flagged in Order Broker as Backorder Available, it is returned in the search results even if it does not have the item available. In this case, the Pickup avail qty listed can be blank, or can be a negative quantity.
-
If there are locations that stock the item and are within the search radius, but none have the full requested quantity available (and are not flagged as Backorder Available), the Merchandise Locator Search Results Screen displays the locations, but does not indicate the Dist, Pickup avail qty, Open PO qty, or Next PO date. This situation could occur if, for example, the customer requests 5 units, and none of the locations have more than 4 units available. To display the full information for the displayed locations, search again with a lower Search quantity.
-
Locations eligible to fulfill delivery orders: Only store locations flagged as Shipping available are eligible to fulfill a delivery order. Also, Order Broker:
-
uses any probability rules you have set up to determine whether to include locations in the results, and the available quantity. For example, you might set up a probability rule for certain locations indicating to exclude them if the available quantity falls below 5 units, or to reduce the available quantity indicated in the response message by 10%.
-
does not exclude locations flagged as Backorder available, even if the available quantity in the location is less than the requested quantity.
-
restricts eligible locations to a fulfillment zone based on the search address, if configured in Order Broker.
-
excludes locations associated with Order Management System’s system in Order Broker, if the Disallow shopping within same system option is selected for the Order Management System system in Order Broker.
-
excludes locations that have already been assigned the Maximum Daily Orders, if Use Maximum Order Limits preference is selected in Order Broker.
Results displayed: If the results indicate that one or more locations could deliver the requested quantity, the Merchandise Locator Search Results Screen indicates Delivery From Store Is Available; otherwise, the screen indicates Delivery From Store Is Not Available. This message might be displayed even if one or more locations could ship the requested quantity, even if these locations are not displayed in the search results.
-
Note:
The delivery evaluation uses the same search radius as the pickup evaluation. To determine whether the item can be shipped without restricting the results to locations within driving distance of the customer, retry the search with a higher search radius.For more information: See the Merchandise Locator Search Results Screen and the Sample ProductAvailability Messages for more information on the search results.
ProductAvailability request not used when creating a pickup order: Unlike the merchandise locator search described here, when you create a pickup order in order entry by selecting the Store Pickup option, Order Management System uses the LocateItems request message to search for store locations where the customer can pick up the order, regardless of the CW_LOCATE_MESSAGE_VERSION specified in Working with Customer Properties (PROP).
Merchandise Locator for Different Types of Items
Merchandise locator searches are not useful for the following types of items:
-
membership item
-
subscription item
-
component of a set (although you can include the main set item)
Also, an item must have its OROB eligible flag selected in order to be eligible for a merchandise locator search. Typically, you would use this flag to exclude inappropriate items, such as gift cards or any other items that are not available in external store locations.
Note:
The restriction against set components applies only if the item is added to the order as a component of a set. If you enter the item as a separate order line, merchandise locator searching is still available.Merchandise Locator Troubleshooting
| Problem | Possible Explanation or Solution |
|---|---|
|
A location that stocks the requested item is not listed at the Merchandise Locator Search Results Screen |
The location might:
|
|
The merchandise locator request message is producing invalid XML |
Check that text fields included in the message, such as the item or SKU description, do not include any special characters. For example, the carat (^) and the pipe symbol (¦) are not valid characters in an XML message. |
|
The Merchandise
Locator Search Results Screen displays the error: |
Could occur because:
|
|
The Merchandise
Locator Search Results Screen displays the error |
The item’s OROB eligible flag is unselected, so Order Broker would not be able to identify the item. |
|
The Merchandise
Locator Search Results Screen displays the error |
The selected item is OROB eligible, but has not yet been created in Order Broker. |
|
The Merchandise Locator Search Results Screen does not indicate the Dist, Pickup avail qty, Open PO qty, or Next PO date |
This situation can occur if there are locations that stock the item and are within the search radius, but none have the full requested quantity available (and are not flagged as Backorder Available): for example, the customer requests 5 units, and none of the locations have more than 4 units available. To display the full information for the displayed locations, search again with a lower Search quantity. |
|
The Merchandise Locator Search Results Screen lists a location with no quantity, or with a negative quantity |
This situation can occur if a location that stocks the item and is within the search radius is flagged in Order Broker as Backorder Available. |
Sample ProductAvailability Messages
Sample Product Availability request and response messages are provided below, along with notes on the information included in each message.
For complete documentation on these messages, see the Order Broker Operations Guide.
Logged where? Order Management System does not log these messages; however, they are available for review in Order Broker’s XML log file. See the Order Broker Operations Guide for more information.
Not used when creating a pickup order: When you create a pickup order in order entry by selecting the Store Pickup option, Order Management System uses the LocateItems request message to search for store locations where the customer can pick up the order, regardless of the version specified in the Order Broker Properties.
Sample Product Availability Request Message
The information in this message includes:
-
version: from CW_LOCATE_MESSAGE_VERSION in Working with Customer Properties (PROP)
-
destination: from the OROB Account (K49) system control value
-
requesting location code: from the OROB Default Location (K51) system control value
-
requesting system code: from the OROB System (K50) system control value
-
type: the request includes a
fulfillment_typewith atypeof:-
DELIVERY: The Product Availability Response should indicate whether there are any locations that could fulfill a retail pickup or delivery order for the requested item and quantity. -
PICKUP: The Product Availability Response should return a list of locations which could fulfill a pickup order for the requested item and quantity. -
SHIPFORPICKUP: The Product Availabilty Response should return a list of locations where the customer could pick up the item for the requested quantity.
-
-
range_distance: from the distance entered in the Search within field at the Merchandise Locator Search Window (Searching for an Item)
-
range_unit: from the Merchandise Locator Distance Measurement (I39) system control value
-
item ID: always indicates the Order Management System item and SKU code, regardless of the setting of the OROB Product Code ID (K66) system control value
-
qty: the Search quantity entered at the Merchandise Locator Search Window (Searching for an Item)
-
address information: from the address information entered at the Merchandise Locator Search Window (Searching for an Item)
<ns2:ProductAvailability xmlns:ns2="http://retail.com/Locate">
<ns2:product_availability_request_message>
<message_header xaction_type="INSERT" xaction_response="" message_type="">
<datetime>2015-02-27T14:48:44</datetime>
<version>5.0</version>
<source>OROMS</source>
<destination>LOCATE</destination>
</message_header>
<message_body>
<requesting_location location_cd="1" system_cd="6" />
<fulfillment_types>
<fulfillment_type type="DELIVERY" range_distance="10" range_unit="M" />
<fulfillment_type type="PICKUP" range_distance="10" range_unit="M" />
</fulfillment_types>
<items>
<item item_id="KABNOSKU " qty="5" />
</items>
<address>
<city></city>
<province></province>
<postal>01581</postal>
<country>USA</country>
</address>
</message_body>
</ns2:product_availability_request_message>
</ns2:ProductAvailability>Sample Product Availability Response Message
The information in the response includes:
-
version: the version specified in the request message
-
for the fulfillment_type with a type of
DELIVERY:-
response_cd: set to
0if the requested quantity of the item is available for delivery within the search radius; otherwise, set to1011 -
response_description: set to
Successif the requested quantity of the item is available for delivery within the search radius; otherwise, set toProduct not available within search criteria -
item ID: the item and SKU specified in the request message
If the full requested quantity is available for delivery, the Merchandise Locator Search Results Screen indicates Delivery From Store Is Available; otherwise, the screen indicates Delivery From Store Is Not Available. This message might be displayed even if one or more locations could ship the requested quantity, even if these locations are not displayed in the search results.
-
-
for the fulfillment_type with a type of
PICKUP:-
response_cd: set to
0if the requested quantity of the item is available for pickup within the search radius; otherwise, set to1011 -
response_description: set to
Successif the requested quantity of the item is available for pickup within the search radius; otherwise, set toProduct not available within search criteria -
item ID: the item and SKU specified in the request message
-
location_cd: the code identifying the location, as set up in Order Broker
-
system_cd: the code identifying the location’s system, as set up in Order Broker
-
distance: the total miles or kilometers (depending on the setting of the Merchandise Locator Distance Measurement (I39) system control value) between the address entered at the Merchandise Locator Search Window (Searching for an Item) and the address of the location. See the Dist for more information.
-
distance_unit: set to
Mif the distance unit specified was miles; otherwise, set toK -
available_qty: see the Pickup avail qty field for more information.
-
next_po_qty: see the Open PO qty field for more information.
-
po_dt: see the Next PO date field for more information.
-
-
-
for the fulfillment_type with a type of
SHIPFORPICKUP:-
response_cd: set to
0if the requested quantity of the item is available for pickup within the search radius; otherwise, set to1011 -
response_description: set to
Successif the requested quantity of the item is available for pickup within the search radius; otherwise, set toProduct not available within search criteria -
item ID: the item and SKU specified in the request message
-
location_cd: the code identifying the location, as set up in Order Broker
-
system_cd: the code identifying the location’s system, as set up in Order Broker
-
distance: the total miles or kilometers (depending on the setting of the Merchandise Locator Distance Measurement (I39) system control value) between the address entered at the Merchandise Locator Search Window (Searching for an Item) and the address of the location. See the Dist for more information.
-
distance_unit: set to
Mif the distance unit specified was miles; otherwise, set toK
-
-
-
location: for each location included in the response, the name and address is included. The Display Merchandise Locator Search Result Screen displays much of the location name and address included in the message.
<ns2:ProductAvailabilityResponse xmlns:ns2="http://retail.com/Locate">
<product_availability_response_message>
<message_header xaction_response="OK" xaction_type="INFO">
<datetime>2015-02-27T14:48:45.201</datetime>
<version>5.0</version>
<source>LOCATE</source>
<destination>OROMS</destination>
</message_header>
<message_body>
<fulfillment_types>
<fulfillment_type type="DELIVERY" response_cd="0" response_description="Success">
<items>
<item item_id="KABNOSKU " />
</items>
</fulfillment_type>
<fulfillment_type type="PICKUP" response_cd="0" response_description="Success">
<items>
<item item_id="KABNOSKU ">
<locations_lu location_cd="28" system_cd="cws" distance="0.0" distance_unit="M" available_qty="25" next_po_qty="0" po_dt="" />
<locations_lu location_cd="9101112" system_cd="STC" distance="0.0" distance_unit="M" available_qty="910" next_po_qty="0" po_dt="" />
</item>
</items>
</fulfillment_type>
</fulfillment_types>
<locations>
<location location_cd="28" system_cd="cws13doc">
<locationname>test inherit location type settings</locationname>
<address>
<address1>Main Street</address1>
<address2></address2>
<address3></address3>
<address4></address4>
<apt></apt>
<city>Westborough</city>
<province>MA </province>
<postal>01581</postal>
<email></email>
<phone1></phone1>
<country>US</country>
</address>
</location>
<location location_cd="9101112" system_cd="STC_EZK">
<locationname>Westborough Store</locationname>
<address>
<address1>1234 Example Street</address1>
<address2>Address2</address2>
<address3>Address3</address3>
<address4>Address4</address4>
<apt>A123456789</apt>
<city>Westborough</city>
<province>MA </province>
<postal>01581</postal>
<email>ejohnson@sample_email.com</email>
<phone1>5085550137</phone1>
<country>US</country>
</address>
</location>
</locations>
</message_body>
</product_availability_response_message>
</ns2:ProductAvailabilityResponse>Merchandise Locator Search Window (Searching for an Item)
Purpose: Use this window to check availability for an item across external locations, such as retail stores, typically through Order Broker. To search, you need to specify the customer’s location, either by city and state or postal code, the search radius, and a search quantity.
Address defaults: If you advance to this window in order entry or order maintenance, the customer’s address information defaults. Also, if you have overridden the address information in order entry or order maintenance, the system continues to default the override information until you are working with a different customer. For example, if you perform a search using the customer’s work address for an item/SKU, and then select another item/SKU for a search while working with the same order, the customer’s work address defaults.
How to display this window: Select Merch locator for an item at the:
Note:
This option is available only if:
-
The Use Merchandise Locator (I38) system control value is selected. Otherwise, the screen displays an error message:
Merchandise Locator is not enabled. Also, merchandise locator searching is not available for all items; see Merchandise Locator for Different Types of Items for a listing of items that are not eligible. -
You have not already selected a quantity of the item to add to the current order at the Display Item Availability Screen in order entry. Otherwise, the screen displays an error message:
Option not allowed since item already selected.
Important:
Order Broker supports merchandise locator searches only within the U.S. and Canada.The merchandise locator search is an inquiry only, and does not create or update an order. See the Order Broker Integration for information on submitting a brokered backorder, store pickup, or ship-for-pickup order to Order Broker.
| Field | Description |
|---|---|
|
Item |
The item selected at the previous screen. The SKU information, if any, is to the right. Item code: alphanumeric, 12 positions; display-only. SKU: alphanumeric, three 4-position fields; display-only. |
|
Item description |
The description of the item. Even if the item has SKUs, the item description is displayed. Alphanumeric, 120 positions; display-only. |
|
Postal code |
Note: If you advanced to this window from order entry or order maintenance, the customer’s address information defaults.The customer’s U.S. zip or Canadian postal code, to serve as the central point for the search radius. For example, if the Search within field is set to 25 miles, the search includes stores within 25 miles of this postal code. The search radius applies only to locations that use proximity rules. You might set up Order Broker so that proximity rules apply to stores only and not warehouses. Note: Your entry in this field is not validated against the Zip/City/State table.Alphanumeric, 10 positions; required if you do not enter a city and state. |
|
Address |
The customer’s street address, to serve as the central point for the search radius. The search radius applies only to locations that use proximity rules. You might set up Order Broker so that proximity rules apply to stores only and not warehouses. Alphanumeric, 32 positions; optional. |
|
City |
The customer’s city, to serve as the central point for the search radius. The search radius applies only to locations that use proximity rules. You might set up Order Broker so that proximity rules apply to stores only and not warehouses. Alphanumeric, 25 positions; required if you do not enter a postal code. |
|
State |
The customer’s U.S. state or Canadian province, to identify the location of the city. The search radius applies only to locations that use proximity rules. You might set up Order Broker so that proximity rules apply to stores only and not warehouses. Alphanumeric, 2 positions; required if do not enter a postal code. |
|
Country |
The customer’s country. The country defaults from the customer address if you advanced to this window from order entry or order maintenance; otherwise, it defaults from the vDefault Country for Customer Address (B17) system control value. Defined in and validated against the Country table; see Setting Up the Country Table (WCTY) for more information. The search radius applies only to locations that use proximity rules. You might set up Order Broker so that proximity rules apply to stores only and not warehouses. Alphanumeric, 2 positions; required. |
|
Search quantity |
The requested quantity of the item. Defaults to 1. Numeric, 7 positions; required. |
|
Search within |
Indicates the search radius, in miles or kilometers, to search within for the selected item. The search radius defaults from the Default Search Within Radius (I40) system control value, but you can override it. Note:
Numeric, 5 positions; required. |
Completing this window:
-
If they have not already defaulted, indicate the postal code or the city and state to serve as the central point for the search radius.
-
Optionally, override the Search quantity.
-
Optionally, override the Search within radius to a different distance.
-
Click OK. The system generates the ProductAvailability request message. See Sample ProductAvailability Messages for more information.
When the system receives the response message, you advance to the Merchandise Locator Search Results Screen.
Merchandise Locator Search Results Screen
Purpose: Use this screen to review an item’s availability in external locations and the details about the external location.
The Ship for Pickup and Pickup Available Quantity fields indicate whether the store location supports store pickup orders, ship-for-pickup orders, or both.
-
If the Ship for Pickup field is set to Y and a quantity is defined in the Pickup Available Quantity field, the store location supports both ship-for-pickup orders and store pickup orders.
-
If the Ship for Pickup field is set to Y and the Pickup Available Quantity field is blank, the store location supports ship-for-pickup orders but not store pickup orders.
-
If the Ship for Pickup field is set to N and a quantity is defined in the Pickup Available Quantity field, the store location supports store pickup orders but not ship-for-pickup orders.
-
If the Ship for Pickup field is set to N and the Pickup Available Quantity field is blank, the store location does not support ship-for-pickup orders or store pickup orders.
If you advanced to this screen during Order Entry and the Ship for Pickup field is set to Y for a store, you can select Ship for Pickup to convert the order to a ship-for-pickup order; in this situation, the system updates the one-time ship to address on the order to the store’s name and address and sends a broker backorder for the ship-for-pickup order to the Order Broker for fulfillment assignment. See Brokered Backorders for processing details.
How to display this screen: Complete the Merchandise Locator Search Window (Searching for an Item) and click OK.
Troubleshooting: See Merchandise Locator Troubleshooting.
For more information: See the Sample ProductAvailability Messages for an example of the actual response messages used to populate the information on this screen.
Note:
You cannot submit an order to Order Broker through this screen. See the Order Broker Integration for information on submitting a brokered backorder, store pickup, or ship-for-pickup order to Order Broker.| Field | Description |
|---|---|
|
Locations closest to |
The address information provided at the Merchandise Locator Search Window (Searching for an Item). This information could be just a postal code or a city and state, or could include additional information such as the street address. The information is truncated if it exceeds the space allowed on this screen. The search radius applies only to locations that use proximity rules. You might set up Order Broker so that proximity rules apply to stores only and not warehouses. Alphanumeric, 55 positions; display-only. |
|
Radius |
The Search within radius selected at the Merchandise Locator Search Window (Searching for an Item). The setting of the Merchandise Locator Distance Measurement (I39) (miles or kilometers) is to the right. The search radius applies only to locations that use proximity rules. You might set up Order Broker so that proximity rules apply to stores only and not warehouses. Numeric, 5 positions; display-only. |
|
Location types |
Always set to All (both stores and warehouses). Alphanumeric, 3 positions; display-only. |
|
Item |
The item selected for search. The SKU information, if any, is to the right. Item code: alphanumeric, 12 positions; display-only. SKU: alphanumeric, three 4-position fields; display-only. |
|
Item description |
The description of the item. Even if the item has SKUs, the item description is displayed. Alphanumeric, 120 positions; display-only. |
|
Delivery availability (unlabeled field to the right of the item description) |
If the results indicate that one or more locations could deliver the requested quantity, the Merchandise Locator Search Results Screen indicates Delivery From Store Is Available; otherwise, the screen indicates Delivery From Store Is Not Available. This message might be displayed even if one or more locations could ship the requested quantity, even if these locations are not displayed in the search results. |
|
Dist |
Each location in the search results where the customer could pick up the item is displayed below. Locations are sorted by distance (nearest to farthest away). The number of miles or kilometers, based on the Merchandise Locator Distance Measurement (I39), from the search location. This distance might be approximate, depending on the actual criteria used to search (for example, postal code or city), and does not represent an actual driving distance. No distance is displayed if the location is not set up in Order Broker to use proximity rules. In this situation, the location is always considered to be within the specified search radius. Also, no distance is displayed if the store location and the search location are in the same zip or postal code. The distance is rounded down when determining whether to include the location in the search results. For example, if the Search radius is 10 miles, and the location is 10.84 miles away, the location is included in the results. Numeric, 7 positions with a 2-place decimal. |
|
Ship for Pickup |
Indicates whether the store location is available for selection as a destination for a ship-for-pickup order. This is from the Ship for Pickup setting for the store location in the Work with Store Cross Reference (WSCR) menu option. Y = the store location is available for selection as a destination for a ship-for-pickup order. During Order Entry, if you select Ship for Pickup for the store location, the system updates the ship to address on the order to the address defined for the store location and converts the order to a ship-for-pickup order. See Brokered Backorders for processing details. N = the store location is not available for selection as a destination for a ship-for-pickup order. Alphanumeric, 1 position; display-only. |
|
Location |
The description and address of the location where the item/SKU is available, and can include:
This information is provided directly from Order Broker, and is not derived from the Store Cross Reference table in Order Management System. Note: Searching the locations displayed on the screen based on location name is not currently implemented.Description: alphanumeric, 40 positions; display-only. City: alphanumeric, 25 positions; display-only. State: alphanumeric, 2 positions; display-only. Postal code: alphanumeric, 10 positions; display-only. Country: alphanumeric, 3 positions; display-only. |
|
Pickup avail qty |
The quantity of the item/SKU reported in the response message as available for pickup in this location. Depending on your settings within Order Broker, this quantity may be approximate, or calculated based on probability rules. Note:
Numeric, 7 positions; display-only. |
|
Open PO qty |
The quantity of the item/SKU reported on open purchase orders for this location; depends on how the external system calculates the open PO quantity. Note: If there are locations that stock the item and are within the search radius, but none have the full requested quantity available (and are not flagged as Backorder Available), the Merchandise Locator Search Results Screen displays the locations, but does not indicate the Dist, Pickup avail qty, Open PO qty, or Next PO date. This situation could occur if, for example, the customer requests 5 units, and none of the locations have more than 4 units available. To display the full information for the displayed locations, search again with a lower Search quantity.Numeric, 7 positions; display-only. |
|
Next PO date |
The date when the next purchase order for this item/SKU is due to be received at this location; depends on how the externals system calculates the next PO date. Note: If there are locations that stock the item and are within the search radius, but none have the full requested quantity available (and are not flagged as Backorder Available), the Merchandise Locator Search Results Screen displays the locations, but does not indicate the Dist, Pickup avail qty, Open PO qty, or Next PO date. This situation could occur if, for example, the customer requests 5 units, and none of the locations have more than 4 units available. To display the full information for the displayed locations, search again with a lower Search quantity.Numeric, 6 positions (user date format); display-only. |
| Option | Procedure |
|---|---|
|
Display a location |
Select Display for a location to advance to the Display Merchandise Locator Search Result Screen. |
|
Select the store location as the pickup location for a ship-for-pickup order Note: This option is available only if you advanced to this screen during Order Entry. |
Select Ship for Pickup for a location. The system:
See Brokered Backorders for processing details. |
|
Search again |
Select Search again to return to the Merchandise Locator Search Window (Searching for an Item). |
Display Merchandise Locator Search Result Screen
Purpose: Use this screen to review additional details about a location where the customer might be able to pick up the item. You cannot make any changes on this screen.
The address components, such as postal code, country, and phone number, are provided by external systems and might not be formatted or validated at this screen the same way as they are for data stored in Order Management System.
How to display this screen: Select Display for a location at the Merchandise Locator Search Results Screen.
| Field | Description |
|---|---|
|
Item |
The item selected for search. The SKU information, if any, is to the right. Item code: alphanumeric, 12 positions; display-only. SKU: alphanumeric, three 4-position fields; display-only. |
|
Description |
The description of the item. Even if the item has SKUs, the item description is displayed. Alphanumeric, 120 positions; display-only. |
|
Loc type |
Always set to All (both stores and warehouses). Note: Not included if the CW_LOCATE_MESSAGE_VERSION in Working with Customer Properties (PROP) specifies a message version of 5.0 or higher.Alphanumeric, 3 positions; display-only. |
|
Distance |
The number of miles or kilometers, based on the Merchandise Locator Distance Measurement (I39), from the search location. This distance might be approximate, depending on the actual criteria used to search (for example, postal code or city), and does not represent an actual driving distance. The setting of the Merchandise Locator Distance Measurement (I39) (miles or kilometers) is to the right. The distance displayed
is Numeric, 7 positions with a 2-place decimal. |
|
Location |
The description and address of the location where the item/SKU is available, consisting of:
This information is provided directly from Order Broker, and is not derived from the Store Cross Reference table in Order Management System. Description: alphanumeric, 40 positions; display-only. Street: alphanumeric, 40 positions each; display-only. City: alphanumeric, 25 positions; display-only. State: alphanumeric, 2 positions; display-only. Postal code: alphanumeric, 10 positions; display-only. Country: alphanumeric, 3 positions; display-only. Phone number: alphanumeric, 14 positions; display-only. |
|
Available |
The quantity of the item/SKU reported in the response message as available for pickup in this location. Depending on your settings within Order Broker, this quantity may be approximate, or calculated based on probability rules. Note:
Numeric, 7 positions; display-only. |
|
Open PO |
The quantity of the item/SKU reported on open purchase orders for this location; depends on how the external system calculates the open PO quantity. If there are locations that stock the item and are within the search radius, but none have the full requested quantity available (and are not flagged as Backorder Available), the Merchandise Locator Search Results Screen displays the locations, but does not indicate the Dist, Pickup avail qty, Open PO qty, or Next PO date. This situation could occur if, for example, the customer requests 5 units, and none of the locations have more than 4 units available. To display the full information for the displayed locations, search again with a lower Search quantity. Numeric, 7 positions; display-only. |
|
Next PO |
The date when the next purchase order for this item/SKU is due to be received at this location; depends on how the externals system calculates the next PO date. If there are locations that stock the item and are within the search radius, but none have the full requested quantity available (and are not flagged as Backorder Available), the Merchandise Locator Search Results Screen displays the locations, but does not indicate the Dist, Pickup avail qty, Open PO qty, or Next PO date. This situation could occur if, for example, the customer requests 5 units, and none of the locations have more than 4 units available. To display the full information for the displayed locations, search again with a lower Search quantity. Numeric, 6 positions (user date format); display-only. |
Oracle Retail Merchandising Foundation Cloud Service (RMFCS) and Oracle Retail Pricing Cloud Service (RPCS) Integration
Overview: Use the integration with Oracle Retail Merchandising Foundation Cloud Service (RMFCS) to import item information.
The import from RMFCS also supports importing pricing information from Oracle Retail Pricing Cloud Service (RPCS). This import is also described below.
Note:
This integration will be deprecated in a future release. Importing Enterprise Foundation Data through Omnichannel Cloud Data Service (OCDS) can be used instead to import items and pricing.In this topic:
Data Flow from RMFCS and RPCS to Order Management System
If your company is configured for RMFCS integration for item creation and update, processing takes place as follows:
1. Import momzip file into file storage or FTP folder: If the File Storage API is enabled, you can use the API to place the inbound momzip file from RMFCS in the FILE_STORAGE table; otherwise, import the file into the CWDIRECTCP_UPLOAD_DIRECTORY. Note that RMFCS does not support populating the FILE_STORAGE table through the file storage API. See Working with File Imports for background.
Note:
You cannot use Work with File Uploads (WUPL) to process the momzip file.About the momzip file: The momzip file must contain one or more pipe-delimited text files, each with the DAT extension, created from RMFCS. The momzip file itself is a compressed file.
Item information: The itemhdr DAT file contains the item information to import from RMFCS
into Order Management System. Note that not all fields in this file
are mapped into Order Management System. See RMFCS to OMS Mapping and RPCS to OMS Mapping for details.
Pricing information: RPCS provides two DAT files:
-
Regular price: The
REGPCDAT file includes regular pricing information for items. -
Clearance price: The
CLRPCDAT file includes clearance pricing for items.
Like the Itemhdr file, the two pricing files
from RPCS are pipe-delimited text files. If either or both of these
files are included in the momzip file, the file contents update the RI Item Upload Table (RIIUPP) and, ultimately,
the Item Offer and Item Price tables. Because no offer information
is mapped from RPCS, the offer code to use defaults from the RMS Item Upload Periodic Function. See RPCS to OMS Mapping for mapping details.
File naming: The periodic function identifies
DAT files containing item or pricing data by the file name. The file
from RMFCS needs to begin with itemhdr, while the
pricing files need to begin with REGPC or CLRPC. Each file needs to include the store ID assigned
in RMFCS.
For example, a file might be named itemhdr_20180702123456_1234_delta_50.dat, where 201807123456 is the date and time stamp, 1234 is the store ID, delta indicates
that the file includes only changed records, and 50 is the total number
of records in the file. Including the text delta in
the file name is informational; regardless of whether it is included,
processing the records works the same way.
Similarly, a pricing file name might be REGPC_20180702021616_1234.dat.
Any other files included in the momzip file are not used.
Note:
File names and suffixes are not case-sensitive. For example, either momzip or MOMZIP are acceptable and will not result in an error.2. Process records in momzip file and create RI Item Upload records: Once the momzip file is available in either the FILE_STORAGE table or the CWDIRECTCP_UPLOAD_DIRECTORY, the RMSItem Upload periodic function can process the contents of the file and create records in the RI Item Upload Table (RIIUPP). The periodic function includes a parameter defining the store ID assigned in RMFCS, as well as specifying the Company number.
See RMS Item Upload Periodic Function for details on configuring the periodic function.
If there are multiple momzip files, the oldest file is processed.
When this step completes, an RIIUPP record is created for each eligible row in the DAT file, and displayed at the Work with File Upload Screen even though you cannot use this screen to upload import files from RMFCS or RPCS.
This preliminary step of creating the RI Item Upload records does not include all the field mapping that ultimately needs to take place when updating the target tables; instead, the mapping is completed during the next step in the process, when the target tables are updated.
3.Use RI Item Upload records to create or update items, offers, and prices: The RI Item Upload Translation Program and RI Item Upload Edit Program process the records in the RI Item Upload table, and use these records to create or update items, offers, and prices. You can begin these programs by selecting Process File at the Work with Retail Item Upload Screen, or by submitting the RIUPLD Function.
Configuration for RMFCS and RPCS Integrations
Configuration within Order Management System
The configuration required in Order Management System to support importing items from RMFCS and RPCS is described below.
System Control Values
The following system control values must be selected:
-
Important:
See Retail Integration (External System into Order Management System) Overview and Setup for background on the additional setup required to support retail item integration. If you do not complete this setup, the import will not be successful.
The following system control values must be unselected:
Since this information is not provided by RMFCS, the import will not be successful if the information is required.
Properties
The FILE_STORAGE_IMPORTS_ENABLED property controls whether the File Storage API is enabled. If not, the CWDIRECTCP_UPLOAD_ DIRECTORY is used.
The FILE_STORAGE_MAX_SIZE admin property controls the maximum size of a file that can be uploaded through the file storage API. Uploaded files should be less than 1G in size, so this property should be set to 1073741824 or less.
RMS Item Upload Periodic Function
Use Working with Periodic Functions (WPER) to set up the RMS Item Upload periodic function. If the function needs to run in more than one company, mapping from more than one store in RMFCS, you can name the function RMSZIPN, where N is a unique number. When setting up the function:
-
Set the Program name to PFRRMS.
-
Set the Parameter to the store ID assigned in RMFCS, and the default offer code in Order Management System, separated by an underscore. For example, if the store ID is 1234 and the default offer is OFR, set the Parameter to 1234_OFR.
The offer code is required for the import of pricing information from RPCS. If you set the parameter to just the store ID, such as 1234, but do not include the offer code, such as 1234_OFR, the Current Offer (A33) applies.
-
Select the Company Parameter flag.
RIUPLD Function
Use Working with Periodic Functions (WPER) to set up the RIUPLD periodic function, if it does not already exist. When setting up the function, set the Program name to PFR0084.
Periodic Process
Use Working with Periodic Processes (WPPR) to assign either or both of the periodic functions described above to a periodic process. The Company parameter is required to indicate the company where the records should be created or updated.
Additional Considerations for RMFCS Integration
Does not support SKUs: Since RMFCS does not support SKU’s, all items imported from RMFCS are non-SKU’d items.
Using RMFCS Item Level and Tran Level to determine whether to create or update an item: RMFCS uses a different hierarchy than Order Management System for multi-level items. The RMFCS hierarchy supports:
-
A level 1 item: For example, a picture frame that comes in only one finish and size.
-
A level 2 item: For example, an item group that includes a novelty tee shirt in sizes small, medium, and large. Level 1 is the tee shirt, while level 2 includes the sizes.
-
A level 3 item: For example, an item group that includes a polo shirt in red, blue, and yellow, and sizes small, medium, and large. Level 1 is the polo shirt, level 2 is the sizes, and level 3 is the colors.
The records in the itemhdr file that map
to items in Order Management System are identifiable by the fact
that the ItemLevel passed in the file is the same as the TranLevel.
If the ItemLevel and the TranLevel are different, the record is not
used to update the RIIUPP table in Order Management System.
Troubleshooting Information for the RMFCS Item and Pricing Import
If the process ends without populating the RIIUPP table, possible explanations include:
-
The momzip file was not found.
-
The number of columns in the DAT file was incorrect.
-
The RIIUPP table already contained records that need to be cleared before the process could run again.
When there is an error with the import, it is listed on the Work with File Upload Screen with a File Type of RIIUPP and a status of Error, and you can view the error description by selecting Action > View Error.
If the momzip file did not contain a DAT file containing the itemhdr data, the upload remains at the Work with File Upload Screen in Submitted status. To correct this situation, you need to delete the momzip file from the FILE_STORAGE table if you use the File Storage API, or from the CWDIRECTCP_UPLOAD_DIRECTORY.
Mapping Item and Pricing Information into Order Management System
RMFCS to OMS Mapping
The item information that updates the RI Item Upload Table (RIIUPP) and ultimately updates the target tables, including information mapped from RMFCS, is described in the following table. The process creates record type 01 (Item/SKU) records in the table based on the information from RMFCS. See RI Item Upload Table (RIIUPP) for more information on the updated fields.
The file from RMFCS contains no null fields. A blank is passed for an alphanumeric field with no data, and a 0 is passed for a numeric field.
**DFLT ITEM? Certain fields default from the **DFLT ITEM Item/SKU, if one is configured. These fields are indicated below. This information defaults when the RI Item Upload Translation Program and RI Item Upload Edit Program run, using the information in the RI Item Upload table to update the target tables.
**DFTCHG Item? The **DFTCHG Item/SKU controls the update of existing items:
-
Any fields that are populated for the **DFTCHG item are not changed for an existing item that is passed from RMFCS.
-
And any fields that are not populated for the **DFTCHG item are eligible to be updated for an existing item that is passed from RMFCS.
See the **DFTCHG Item/SKU for more information.
See RPCS to OMS Mapping for information on how pricing information in the RI Item Upload Table (RIIUPP) is updated based on the data received from RTM.
Additional information from RMFCS: Additional information is included in the DAT files from RMFCS; however, only the fields that update the RI Item Upload Table (RIIUPP) are described in the following table.
Sample itemhdr row:
ITEMS|FULLHDR|1234|102900077|||N|N|1|1|Y|||||||||||||2CDQ|2222|5274|2222|5485|A|Item
102900077||Item 102900077||Y|N|1000|EA||||E|N|12.22|USD||USD|||N|N|N|N|N|ITEM|||||N||||N|N|Y|Y||||N|N|N|N||||||||N|N|
Note:
About unmapped item/SKU fields: Any item/SKU in Order Management System fields not listed below are not mapped from RMFCS. They are left blank if alphanumeric, or set to 0 if numeric.| Target Field | Value Used | Description/ Comments |
|---|---|---|
|
Item Updates |
||
|
Company |
Company number from the periodic process |
The periodic process set up for the RMS Item Upload periodic function should be set up to require the Company Parameter. |
|
Record Created Date |
Current date when record created |
|
|
Record Created Time |
Current time when record created |
|
|
Record Type |
01 |
Hard-coded. |
|
Request Type |
blank |
Since RMFCS does not indicate whether the record is an Add or a Change, Order Management System updates the record for the item if it exists. If no matching item exists, it creates a new item. |
|
Sequence # |
Sequential assigned number |
Assignment of sequence numbers starts at 1 and continues for the first 999 records in the upload file. After the first 999 records, the Record Created Time increases by 1 second, and sequential assignment begins again and again runs from 1 through 999. This pattern continues for all records in the upload file, so that each has a unique Record Created Time/Sequence # assignment. |
|
Key Type |
IT |
Hard-coded. |
|
Item |
RMFCS item code |
Rather than using item SKU fields in the same way as Order Management System, RMFCS uses a hierarchical system to identify the relationships between individual items. An item code in the import table creates or updates an item in Order Management System only if the item’s ItemLevel and TranLevel in RMFCS are the same. See Additional Considerations for RMFCS Integration for a discussion. |
|
SKU |
Blank |
Not used. See Additional Considerations for RMFCS Integration for a discussion. |
|
Status |
U |
Unprocessed. |
|
Processed Date |
Blank |
Populated through the RI Item Upload Process. |
|
Processed Time |
Blank |
Populated through the RI Item Upload Process. |
|
Allow SKUs |
N |
Hard-coded. SKUs are not supported through the integration. |
|
Drop Ship |
Blank |
From the **DFLT ITEM Item/SKU; otherwise, unselected. |
|
Long SKU Style |
ItemParent |
If no ItemParent is passed, the item code is used as the Long SKU Style. |
|
Retail Style # |
Item |
The item code from RMFCS is used as the Retail Style #. |
|
Long SKU Vendor |
Subclass |
The Subclass from RMFCS is used as the Long SKU Vendor. |
|
Non-Inventory |
Blank |
From the **DFLT ITEM Item/SKU; otherwise, not selected. Note: Non-inventory items from RMFCS, indicated by a setting of N in the MerchandiseInd field, are not imported into Order Management System. |
|
Selling Qty |
1 |
|
|
Selling Weight |
0 |
From the **DFLT ITEM Item/SKU; otherwise, 0. |
|
Serial # Tracking |
N |
Not implemented in Order Management System. |
|
Ship Alone |
From ShipAloneInd |
When the ShipAloneInd from RMFCS is set to Y, the Ship Alone field is set to S; otherwise, the Ship Alone field is left blank. |
|
Allow % Discount? |
Blank |
From the **DFLT ITEM Item/SKU; otherwise, not selected. |
|
Oversize |
Blank |
From the **DFLT ITEM Item/SKU; otherwise, not selected. |
|
Description |
ItemDesc |
From the ItemDesc in RMFCS. |
|
Exclude From Flex Pay |
Blank |
From the **DFLT ITEM Item/SKU; otherwise, not selected. |
|
Royalty |
N |
From the **DFLT ITEM Item/SKU; otherwise, not selected. |
|
Membership |
Blank |
From the **DFLT ITEM Item/SKU; otherwise, not selected. |
|
Buyer |
Blank |
From the **DFLT ITEM Item/SKU; otherwise, blank. |
|
Item Class |
Blank |
From the **DFLT ITEM Item/SKU; otherwise, blank. |
|
Location Class |
Blank |
From the **DFLT ITEM Item/SKU; otherwise, blank. |
|
Class (Long SKU Class) |
Class |
The Class from RMFCS is used as the Long SKU Class. |
|
Department (Long SKU Department) |
Department |
The Department from RMFCS is used as the Long SKU Department. |
|
UOM (Unit of Measure) |
StandardUOM from RMFCS |
Needs to be a valid unit of measure in Order Management System, set up through Working with Units of Measure (WUOM). Note: Units of measure set up in RMFCS should not exceed 3 positions, since this is the maximum field length supported in Order Management System. |
|
Vendor # |
Blank |
From the **DFLT ITEM Item/SKU; otherwise, blank. |
|
Ship Via Code |
Blank |
From the **DFLT ITEM Item/SKU; otherwise, blank. |
|
Manufacturer Vendor |
Blank |
From the **DFLT ITEM Item/SKU; otherwise, blank. |
|
Entity Number |
Blank |
From the **DFLT ITEM Item/SKU; otherwise, blank. |
|
Season |
Blank |
From the **DFLT ITEM Item/SKU; otherwise, blank. |
|
Subscription |
Blank |
From the **DFLT ITEM Item/SKU; otherwise, not selected. |
|
Height Override |
0 |
From the **DFLT ITEM Item/SKU; otherwise, 0. |
|
Length Override |
0 |
From the **DFLT ITEM Item/SKU; otherwise, 0. |
|
SKU Gift Certificate |
N |
Hard-coded. Not supported in Order Management System. |
|
Restrict Orders |
Blank |
From the **DFLT ITEM Item/SKU; otherwise, blank. |
|
VAT Exempt Flag |
Blank |
From the **DFLT ITEM Item/SKU; otherwise, not selected. |
|
Suppress B/O Card |
Blank |
From the **DFLT ITEM Item/SKU; otherwise, not selected. |
|
Returnable |
Blank |
From the **DFLT ITEM Item/SKU; otherwise, not selected. |
|
Whs (Warehouse) |
From the **DFLT ITEM Item/SKU; otherwise, from the Default Warehouse (A04); otherwise, set to 0. |
|
|
Soldout Control Code |
Blank |
Defaults from the Default Soldout Control Code (D72). |
|
UOM Type |
StandardUOM from RMFCS |
Needs to match a unit of measure in Order Management System, set up through Working with Units of Measure (WUOM). |
|
OROB Eligible |
Selected. |
RPCS to OMS Mapping
The offer and pricing information that updates the RI Item Upload Table (RIIUPP) and ultimately updates the target tables, including information mapped from RPCS, is described in the following table. The process creates record type 03 (Item Offer) and 05 (Item Price) records in the table based on the information from RPCS. See RI Item Upload Table (RIIUPP) for more information on the updated fields.
The file from RPCS contains no null fields. A blank is passed for an alphanumeric field with no data, and a 0 is passed for a numeric field.
See RMFCS to OMS Mapping for information on how item information in the Item table and related tables is updated based on the data received from RMFCS.
Additional information from RPCS: Additional information is included in the DAT files from RPCS. The files each include a header record (FHEAD) and a tail record (FTAIL), as well as a detail record (FDETL) for each item offer and price. However, only the fields that update the RI Item Upload Table (RIIUPP) are described in the following table.
Unmapped Item Offer fields: Any Item Offer or Item Price fields not listed in the following tables are not mapped from RMFCS. They are left blank if alphanumeric, or set to 0 if numeric.
Sample REGPC file contents:
FHEAD|1|REGPC|20180627021616|1234|S
FDETL|2|CRE|1001|101000122|20180404000000|1|16.75|EA|USD|0||||
FDETL|3|CRE|1002|101000132|20180405000000|1|16.75|EA|USD|0||||
FDETL|4|CRE|1003|101000123|20180627000000|1|16.75|EA|USD|0||||
FTAIL|5|3
Sample CLRPC file contents:
FHEAD|1|CLRPC|20180404021514|4241|S
FDETL|2|CRE|10002|101000126|20180404000000|6.85|EA|USD|
FDETL|3|CRE|10003|101000136|20180405000000|8.85|EA|USD|
FDETL|4|CRE|10004|101000135|20180404000000|7.85|EA|USD|
FTAIL|5|3
Item Offer Mapping from RPCS
| Target Field | Value Used | Description/ Comments |
|---|---|---|
|
Item Updates |
||
|
Company |
Company number from the periodic process |
The periodic process set up for the RMS Item Upload Periodic Function should be set up to require the Company Parameter. |
|
Record Created Date |
Current date when record created |
|
|
Record Created Time |
Current time when record created |
|
|
Record Type |
03 |
Indicates Item Offer. Hard-coded. |
|
Request Type |
blank |
Since RPCS does not indicate whether the record is an Add or a Change, Order Management System updates the record for the item if it exists. If no matching item exists, it creates a new item. |
|
Sequence # |
Sequential assigned number |
Assignment of sequence numbers starts at 1 and continues for the first 999 records in the upload file. After the first 999 records, the Record Created Time increases by 1 second, and sequential assignment begins again and again runs from 1 through 999. This pattern continues for all records in the upload file, so that each has a unique Record Created Time/Sequence # assignment. |
|
Key Type |
IT |
Hard-coded. |
|
Item |
RMFCS item code |
The item to be updated with the Item Offer information. |
|
SKU |
Blank |
Not used. See Additional Considerations for RMFCS Integration for a discussion. |
|
Status |
U |
Unprocessed. |
|
Processed Date |
Blank |
Populated through the RI Item Upload Process. |
|
Processed Time |
Blank |
Populated through the RI Item Upload Process. |
|
Offer for Item Offer |
Offer from periodic function |
The offer code defaults from the Parameter defined for the RMS Item Upload Periodic Function. If no offer code is specified for the periodic function, the Current Offer (A33) applies. |
Item Price Mapping from RPCS
The following mapping applies to both the REGPC (regular price) and CLRPC (clearance price) files from RPCS.
| Target Field | Value Used | Description/ Comments |
|---|---|---|
|
Item Updates |
||
|
Company |
Company number from the periodic process |
The periodic process set up for the RMS Item Upload Periodic Function should be set up to require the Company Parameter. |
|
Record Created Date |
Current date when record created |
|
|
Record Created Time |
Current time when record created |
|
|
Record Type |
05 |
Indicates Item Price. Hard-coded. |
|
Request Type |
blank |
Since RPCS does not indicate whether the record is an Add or a Change, Order Management System updates the record for the item if it exists. If no matching item exists, it creates a new item. |
|
Sequence # |
Sequential assigned number |
Assignment of sequence numbers starts at 1 and continues for the first 999 records in the upload file. After the first 999 records, the Record Created Time increases by 1 second, and sequential assignment begins again and again runs from 1 through 999. This pattern continues for all records in the upload file, so that each has a unique Record Created Time/Sequence # assignment. |
|
Key Type |
IT |
Hard-coded. |
|
Item |
RMFCS item code |
The item to be updated with the Item Offer information. |
|
SKU |
Blank |
Not used. See Additional Considerations for RMFCS Integration for a discussion. |
|
Status |
U |
Unprocessed. |
|
Processed Date |
Blank |
Populated through the RI Item Upload Process. |
|
Processed Time |
Blank |
Populated through the RI Item Upload Process. |
|
Offer for Item Offer |
Offer from periodic function |
The offer code defaults from the Parameter defined for the RMS Item Upload Periodic Function. If no offer code is specified for the periodic function, the Current Offer (A33) applies. |
|
Effective Date |
RPCS Effective Date |
The date when the price becomes effective. |
|
Qty |
RPCS: Multi-Units |
The quantity required for the price break. In the case of the CLRPC file (clearance price), the quantity is hard-coded to 1. |
|
Price |
RPCS Multi-Unit Retail |
The item price. |
Order Broker Originating Location, Fulfilling Location, and Pickup Location
The screens in the Working with Order Broker (WOBR) menu option display the following types of locations: originating, fulfilling, and pickup.
-
The Originating location is the location (store or warehouse) where the order originated. This location displays as the Placed location in Order Broker.
-
The Fulfilling location is the location supplying the inventory for the order. This location displays as the Sourced location in Order Broker.
-
The Pickup location is the location where the customer picks up the order; this location does not display for orders that are shipped to the customer. This location displays as the Pickup location in Order Broker.
The following table explains how the system determines the originating, fulfilling, and pickup locations for each broker delivery type.
| Broker delivery type | Originating location | Fulfilling location | Pickup location |
|---|---|---|---|
|
blank (brokered backorder for delivery or ship-for-pickup) |
an Order Management System warehouse this is the location_cd in the store_location element of the submit order request message:
|
the store location or Order Management System warehouse assigned to ship the item to the customer this is the fulfillment_location_cd in the fulfillment_detail element of the submit order response message; when a status request response message is received, the location may update based on the fulfilling_location_cd in the items element |
delivery: N/A; the order is shipped to the customer ship-for-pickup: this is the location_cd in the shipforpickup_location element of the submit order request message: from the store code in the one-time ship-to address |
|
delivery |
a store location or Order Management System warehouse this is the request_location_cd in the store_location element of the fulfillments response message |
an Order Management System warehouse this is the location_cd in the store_location element of the fulfillments response message |
N/A; the order is shipped to the customer |
|
store pickup |
an Order Management System warehouse this is the location_cd in the store_location element of the submit order request message: from the OROB Default Location (K51) |
the store location the customer has selected to pick up the order; the inventory is available at this location and does not need to be transferred there this is the fulfillment_location_cd in the fulfillment_detail element of the submit order response message |
the store location where the customer has selected to pick up the order this is the location_cd in the first transaction_detail element of the submit order request message: from the location, selected at the Store Pickup Search Results Screen, where the customer wants to pick up the order |
|
retail pickup (traditional retail pickup and retail pickup created as a result of a brokered ship-for-pickup) |
the store location where the customer would like to pick up the merchandise this is the request_location_cd in the store_location element of the fulfillments response message |
an Order Management System warehouse this is the location_cd in the store_location element of the fulfillments response message |
the store location where the customer has selected to pick up the order this is the location_cd in the shipforickup_location element of the fulfillments response message |
|
ship-for-pickup (pick gen/drop ship) |
an Order Management System warehouse this is the location_cd in the store_location element of the submit order request message: from the OROB Default Location (K51) if the Send Inventory by Warehouse to OROB (L06) system control value is unselected or for a drop ship item; otherwise, from the OROB location from the warehouse associated with the order |
an Order Management System warehouse this is the location_cd in the transaction_detail element of the submit order request message: from the OROB Default Location (K51) if the Send Inventory by Warehouse to OROB (L06) system control value is unselected or for a drop ship item; otherwise, from the OROB location from the warehouse associated with the order |
the store location where the customer has selected to pick up the order this is the location_cd in the shipforpickup_location element of the submit order request message: from the store code in the one-time ship-to address |
Location description: Even if the location
is a warehouse within your company in Order Management System, the
description of the location is from the cross-reference record set
up through Work with Store Cross Reference (WSCR), and is separated from the code by a hyphen. For example, a request
assigned to warehouse 10, East Coast DC, lists a location of 10 - East Coast. Although the location code field in the
Order Management System database is 25 positions, you cannot
create a code that exceeds 10 positions in Order Broker.
Note:
-
The location description is stored in the Order Broker table. Entering or updating a location cross reference through Work with Store Cross Reference (WSCR) does not update the originating location displayed here.
-
The location description displayed here is blank if you had not set up the cross reference at the time the response was received from Order Broker.
-
Even if the location is an Order Management System warehouse, the warehouse description is not displayed here; you need to set up the cross-reference through Work with Store Cross Reference (WSCR).
When is the fulfilling location blank? The fulfilling location is blank for:
-
store pickup orders: if you canceled the order in Order Management System. If another location sent a cancel request to Order Broker, which relayed it to Order Management System through a status inquiry request, the Order Broker record retains the fulfilling location; however, if a single line on a store pickup order is rejected, the entire order (including any additional lines) is canceled, and in this situation the fulfilling location is blank for all items except the rejected item.
-
brokered backorders whose status is:
-
Z: Canceled
-
C: Closed
-
J: Rejected
-
R: Ready
-
W: Waiting
-
The field might also be blank for requests in E: Error status, depending on the nature of the error. For example, requests that Order Broker did not receive and create successfully are not assigned to fulfilling locations.
Unfulfillable status: If Order Broker was unable to find a location to fulfill a brokered backorder, the fulfilling location matches the OROB Default Location Code for Unfulfillable Orders (K56) system control value. In this situation, the current status is Unfulfillable.
Order Broker Status Summary Table
The following table summarizes the status codes displayed at the screens in the Working with Order Broker (WOBR) menu option.
| OROMS status | OROB status | Order types | Description |
|---|---|---|---|
|
A (Accepted) |
Accepted or Picked |
brokered backorder (delivery or ship-for-pickup) or store pickup |
The location assigned to fulfill the order has accepted it, or has accepted the order and is preparing it for shipment or pickup. |
|
C (Closed) |
N/A |
brokered backorder (delivery or ship-for-pickup) |
You canceled the request when its status was R (Ready), before it was submitted to Order Broker. |
|
E (Error) |
N/A |
Any order type |
Order Broker has returned an error response. See Troubleshooting the Order Broker Integration for information on some possible errors. A record might also be in Error status if another system submitted a status update request to Order Broker to cancel the order line. |
|
F (Picking) |
New_Order or Picked |
retail pickup, delivery, or ship-for-pickup (pick gen/drop ship) |
The pick slip has been printed. |
|
G (Resend Fulfilled) |
N/A |
delivery |
The Order Status Update request message to change the status in Order Broker to fulfilled did not generate a response message from Order Broker, possibly because message authentication failed or communication is down. In this case, the BROKER_ORD job re-sends the Order Status Update request the next time it runs. |
|
H (Resend Intransit) |
N/A |
ship-for-pickup |
The Order Status Update request message to change the status in Order Broker to intransit did not generate a response message from Order Broker, possibly because message authentication failed or communication is down. In this case, the BROKER_ORD job re-sends the Order Status Update request the next time it runs. |
|
I (In Process) |
Accepted |
retail pickup or delivery |
The order was received from Order Broker and created without error. |
|
J (Rejected) |
unknown (order reassigned to new fulfilling location) |
retail pickup or delivery |
The order was sold out after creation in Order Management System. |
|
K (Acknowledged) |
New_Order |
brokered backorder (delivery or ship-for-pickup) or store pickup |
Order Broker has received the order request, assigned a request ID, selected a fulfilling location (brokered backorder), and created the order in its database. |
|
L (Partial Fulfill) |
Partially Fulfilled |
retail pickup, ship-for-pickup, or store pickup |
The customer has picked up one or more items on the order, but not the complete order. |
|
N (New) |
Polled |
retail pickup or delivery |
The order was received from Order Broker but is in error. |
|
O (Posted) |
Posted |
brokered backorder, store pickup, or ship-for-pickup |
Order Broker has submitted the order or order line for enterprise fulfillment. See Enterprise Order Integration (Future Receipts and Active PO/Pre-Order Processing) for background. |
|
P (Polled) |
Polled |
Any order type |
Brokered backorder (delivery or ship-for-pickup) or store pickup: The assigned fulfilling location has polled Order Broker for new orders and been notified of this order. Retail pickup or delivery order: Order Management System created the order in held status. |
|
R (Ready) |
N/A |
brokered backorder (delivery or ship-for-pickup), store pickup |
Brokered backorder: The request is ready to be sent to Order Broker, but the BROKER_ORD process has not yet generated the request message. Store pickup: Order Management System attempted to send the order to Order Broker, but Order Broker has not responded. In this case, Order Management System retains the order information in the Store Pickup tables until communication with Order Broker resumes. |
|
S (Received by Store) |
Received |
brokered backorder (ship-for-pickup), retail pickup or ship-for-pickup |
The order has been received by the store location but not yet picked up by the customer. NOTE: This status is not displayed for ship-for-pickup or retail pickup orders that are actually in this status in Order Broker after Order Management System has submitted a status update message to Order Broker indicating that the merchandise is in transit to the pickup location; instead, the displayed status is X (Completed). |
|
T (In Transit) |
Intransit |
brokered backorder (ship-for-pickup), retail pickup or ship-for-pickup |
Ship-for-pickup: The location fulfilling the order has shipped the merchandise to the store for pickup. NOTE his status is displayed for ship-for-pickup if Use OROB for Ship for Pickup Fulfillment Assignment (M34) is set to ALWAYS; however, it is not displayed for retail pickup orders, or for ship-for-pickup orders if Use OROB for Ship for Pickup Fulfillment Assignment is set to NEVER, if the orders are actually in this status in Order Broker after Order Management System has submitted a status update message to Order Broker indicating that the merchandise is in transit to the pickup location; instead, the displayed status is X (Completed). |
|
U (Unfulfillable) |
N/A (brokered backorder) or Rejected (store pickup) |
brokered backorder (delivery or ship-for-pickup) or store pickup |
Brokered backorder: Order Broker has not found a location able to fulfill the order based on the rules set up in Order Broker. When it receives a response indicating that Order Broker cannot fulfill the order, Order Management System returns the order line to standard backorder or soldout processing. Store pickup: the assigned store location has rejected the order. |
|
V (In Transit Polled) |
Intransit Polled |
brokered backorder (ship-for-pickup), retail pickup or ship-for-pickup (pick gen/drop ship) |
The pickup location for a ship-for-pickup order line:
Only the pickup location for a ship-for-pickup order can update the status to intransit polled. This status applies only to ship-for-pickup orders. NOTE: This Status is not displayed for ship-for-pickup or retail pickup orders that are actually in this status in Order Broker after Order Management System has submitted a status update message to Order Broker indicating that the merchandise is in transit to the pickup location; instead, the displayed status is X (Completed). |
|
W (Waiting) |
unknown |
brokered backorder (delivery or ship-for-pickup) |
The order request message has been sent to Order Broker, but Order Management System has not yet received a response. |
|
X (Completed) |
Fulfilled |
all order types |
NOTE: This status is also displayed for retail pickup orders, and ship-for-pickup orders if Use OROB for Ship for Pickup Fulfillment Assignment (M34) is set to NEVER, after Order Management System has submitted a status update message to Order Broker indicating that the merchandise is in transit to the pickup location, even if the customer has not yet picked up the order. |
|
Y (Pending Cancel) |
unknown |
brokered backorder (delivery or ship-for-pickup), store pickup, retail pickup, delivery, or special ship-for-pickup |
Brokered backorder: You have canceled the order line (including the Order Broker request), or you have canceled just the Order Broker request at the Work with Order Broker Screen, but you have not yet received a confirmation of the cancellation from Order Broker. Store pickup: You have canceled the order, but you have not yet received a confirmation of the cancellation from Order Broker. Retail pickup, delivery, or special ship-for-pickup: You have voided the pick slip through the generic pick in API and the Cancel Reason (Pick In) (L86) system control value specifies a cancel reason, or a backorder cancellation reason code is specified in the CWPickIn XML Message, but you have not yet received a confirmation of the cancellation from Order Broker. For more information see the Web Services Guide on My Oracle Support (ID 2149144.1). |
|
Z (Canceled) |
Canceled |
brokered backorder (delivery or ship-for-pickup), store pickup, special ship-for-pickup, or retail pickup |
You have requested that the Order Broker order be canceled, and Order Broker has confirmed the cancellation. If the order line itself is not canceled, it returns to regular backorder processing. Note: If a status inquiry list response from Order Broker indicates that a brokered backorder line is canceled, the original Order Management System order line is put in error status; as a result, the canceled order line is either reserved, backordered, or sold out in Order Management System. If there is a fulfilling (bounceback) order that was created in Order Management System, it is put in Held status, with an order transaction history note of Order held - line[s] canceled in Order B. |
Retail Pickup (including Ship-for-Pickup) or Delivery Orders
Overview: Use the retail pickup or delivery options in the Order Broker Integration to receive orders from Order Broker in order to fulfill the orders in Order Management System.
-
If the order is a retail pickup order or a retail pickup order that originated as a ship-for-pickup order, Order Management System ships the merchandise to the customer-selected store location for pickup.
-
If the order is a delivery order, Order Management System ships the merchandise to the customer’s ship-to address.

If the originating location was Order Management System: If the Use OROB for Fulfillment Assignment (M31) system control value is selected or the Use OROB for Ship for Pickup Fulfillment Assignment (M34) system control value is set to ALWAYS, the order may have originated in Order Management System and during Brokered Backorders processing, Order Broker determined that Order Management System was the best fulfilling location. In this situation:
-
Order Broker assigns the Order Management System location to the originating order in Order Broker as the Fulfilling location. See Brokered Backorders for additional processing information.
-
At defined intervals, the BROKER process in Work with Integration Layer Processes (IJCT) periodically sends a fulfillments request message to Order Broker to poll for newly assigned orders (those whose Fulfilling location is an Order Management System location). See Retail Pickup (including Ship-for-Pickup) and Delivery Order Processing for additional processing information.
-
When the BROKER process receives the order in the fulfillments response message, it looks at the values in the fulfillments response to determine the type of order to create.
-
The system creates a new delivery order if the transaction_type_id is DELIVERY.
-
The system creates a new retail pickup order if the transaction_type_id is RETAILPICKUP or SHIPFORPICKUP.
See Building the Retail Pickup (including Ship-for-Pickup) or Delivery Order for additional information.
-
-
In order to tie the originating order (the original order sent to Order Broker for fulfillment assignment) with the new sourcing order (the delivery or retail pickup order created to fulfill the original order), Order Management System stores the originating order number in the E-commerce order number field in the Order Header Extended table for the newly created sourcing order and prefixes the order number with the text
ORIG#:. For example, the system updates the E-commerce order number withORIG#: 9999-001, whereORIG#: indicates the order has been created as a result of Order Broker fulfillment assignment,9999is the order number, and001is the ship-to number. See Reviewing Retail Pickup (including Ship-for-Pickup) or Delivery Orders in Order Inquiry for additional information.
In this topic:
-
Retail Pickup (including Ship-for-Pickup) and Delivery Order Processing
-
Building the Retail Pickup (including Ship-for-Pickup) or Delivery Order
-
Retail Pickup (including Ship-for-Pickup) or Delivery Processing after Order Creation
-
Reviewing Retail Pickup (including Ship-for-Pickup) or Delivery Orders in Order Inquiry
-
Things to Note about Retail Pickup (including Ship-for-Pickup) and Delivery Orders
For more information: See Reauthorization and Under Review Hold Scenarios for Orders Fulfilled through Order Broker.
Retail Pickup (including Ship-for-Pickup) and Delivery Order Processing
Poll for orders? If both the Order Type for Orders Brokered for Delivery (K91) and Order Type for Retail Pickup Orders Brokered to OROMS (K92) system control values specify order types, the BROKER process in Working with Integration Layer Processes (IJCT) periodically sends a fulfillments request message to Order Broker to poll for newly assigned orders. The polling interval is based on the Outbound delay time specified for the BROKER process.
fulfillments request: Information in the fulfillments request message includes:
-
requesting location: From the OROB Default Location (K51) if the Send Inventory by Warehouse to OROB (L06) system control value is unselected; otherwise, from the OROB location from each warehouse that has this field populated. The requesting location must match an existing location set up in Order Broker.
-
message source and requesting system: From the OROB System (K50).
-
destination: From the OROB Account (K49).
See the Fulfillments Request Message Sample (Retail Pickup, Ship-for-Pickup, or Delivery Orders) for an example.
The endpoint where Order Management System sends the fulfillments request message is specified in Working with Customer Properties (PROP).
Create order? When the BROKER process receives an order in the fulfillments response message, it:
-
Checks the setting of the Retain Backordered Lines Brokered to OROMS (K89) system control value. If this value is unselected and there is not a purchase order that might be able to fulfill the order expected within the Order Broker Due Date Threshold (K11), the process rejects the order. The process uses the Send Inventory by Warehouse to OROB (L06) system control value to determine whether to check a specific warehouse, or to check across all warehouses.
-
Regardless of the setting of the Retain Backordered Lines Brokered to OROMS (K89) system control value, if the only item on the order is sold out, the process rejects the order.
Note:
-
Drop ship items are eligible to be fulfilled on a retail pickup or delivery order regardless of whether any units are currently stocked in the warehouse, provided they are not flagged with a soldout control value.
-
If a retail pickup or delivery order includes multiple order lines, and one of them is sold out, Order Management System still accepts the order. To avoid this situation, have integrating systems submit each order line as a separate order.
Multiple order lines? Submit each ordered unit to Order Broker as a separate order. Sending orders this way prevents any inconsistencies in order status that might occur if, for example, a multi-line order in Order Management System included a soldout item, but the other order lines could still be shipped from the warehouse, or if a multi-unit line was split across different warehouses for fulfillment.
Building the Retail Pickup (including Ship-for-Pickup) or Delivery Order
The processing to build a new retail pickup or delivery order from the contents of the fulfillments response message is similar to that used by the generic order API. In addition to the system (company) and location (warehouse) sent in the fulfillments request message, the information used to build the order includes the following.
Header Information
-
order type: from one of the following system control values:
-
Order Type for Orders Brokered for Delivery (K91): the system assigns this order type to delivery orders whose originating location is not Order Management System.
-
Order Type for Retail Pickup Orders Brokered to OROMS (K92): the system assigns this order type to retail pickup orders whose originating location is not Order Management System.
-
Order Type for Delivery Orders Originating in OROMS (M33): the system assigns this order type to delivery orders whose originating location is Order Management System. The system identifies the originating location as Order Management System if the
request_system_cdin the fulfillments response message matches the system code in the OROB System (K50) system control value. -
Order Type for Retail Pickup Orders Originating in OROMS (M35): the system assigns this order type to retail pickup orders whose originating location is Order Management System. The system identifies the originating location as Order Management System if the
request_system_cdin the fulfillments response message matches the system code in the OROB System (K50) system control value.
The
transaction_type_idin the fulfillments response message indicates whether the order is a retail pickup or delivery order.-
DELIVERY displays if the order is a delivery order.
-
RETAILPICKUP displays if the order is a retail pickup order.
-
SHIPFORPICKUP displays if the order is a retail pickup order that originated as a brokered ship-for-pickup order.
-
-
order channel (Internet order): set to C. The
transaction_channelspecified in the fulfillments response message is not used. -
alternate order number: from the order number in the originating system, passed as the
order_idfrom the fulfillments response (the external system’s order number). The system stores this number in the E-commerce order number field in the Order Header Extended table. If the originating location is Order Management System, the system prefaces the alternate order number withORIG#: 1234-001, whereORIG#: indicates the order was created as a result of OROB fulfillment assignment,1234is the order number, and001is the ship-to number.Note:
The system identifies the originating location as Order Management System if therequest_system_cdin the fulfillments response message matches the system code in the OROB System (K50) system control value. -
order date: the current date.
-
entered date: the current date.
-
source code:
-
If the order did originate in Order Management System:
-
Use the Order Broker Source Code (K93), if specified; otherwise, if this system control value is blank,
-
Use the source code, if any, specified for the store cross reference record for the originating location, which is based on the Originating Location to Pass to OROB (M32) system control value; otherwise,
-
Use the source code passed in the fulfillments response message from Order Broker, which would be from the originating order.
-
-
If the order did not originate in Order Management System:
-
Use the
source_code, if any, passed in the fulfillments response message from Order Broker; otherwise, -
Use the source code, if any, specified for the store cross reference record for the originating location; otherwise,
-
Use the Order Broker Source Code (K93), if specified; otherwise, if this system control value is blank,
-
The order is created in error status because of the missing source code.
-
-
Customer Mapping and Updates
If the ORCE Customer ID in OROB Fulfillment (M72) system control value is NOT selected:
-
customer number:
-
if the
customer_nopassed in the fulfillments response is a valid customer number, then use this customer. For example, acustomer_noof13827or000013827indicates sold-to customer 13827. Zero-filling the customer number is optional. Otherwise, -
if the
customer_nopassed is invalid, or if nocustomer_nowas passed, then Order Management System uses standard name and address matching. See Customer Sold To Selection, Creation and Update in the Web Services Guide on My Oracle Support (ID 2149144.1) for more background.Note:
If thecustomer_nois invalid, the error is logged in Order Management System’sAPP.logfile, even though the order can still be created successfully using the name and address information in the message.
Note:
If the Sold to Email Update for Orders Brokered to OROMS (K96) or Sold to Address Update for Orders Brokered to OROMS (K97) system control values are selected, Order Management System updates the existing customer record with any changed information. -
-
email address updated? The Sold to Email Update for Orders Brokered to OROMS (K96) system control value indicates whether to update the customer’s email address with the email address passed for the order.
-
sold-to phone numbers: the
phone1passed updates the customer’s daytime phone number and thephone2passed updates the customer’s evening phone number if the Sold to Address Update for Orders Brokered to OROMS (K97)Sold to Address Update for Orders Brokered to OROMS (K97)Sold to Address Update for Orders Brokered to OROMS (K97)Sold to Address Update for Orders Brokered to OROMS (K97)Sold to Address Update for Orders Brokered to OROMS (K97)Sold to Address Update for Orders Brokered to OROMS (K97) system control value is selected. Any non-numeric characters passed in the phone numbers are stripped out.
If the ORCE Customer Integration (L37) system control value IS selected and the ORCE Customer ID in OROB Fulfillment (M72) is not selected:
-
customer number:
-
Matching customer number: if the
customer_nopassed in the fulfillments response is a valid customer number, then use this customer. For example, acustomer_noof13827or000013827indicates sold-to customer 13827. Zero-filling the customer number is optional.-
If the matching customer based on the customer number has an ORCE customer ID, update the customer and pass the update to Customer Engagement.
-
If the matching customer based on the customer number does not have an ORCE customer ID, update the customer and pass the update to Customer Engagement, then update the customer with the ORCE customer ID returned from Customer Engagement.
-
-
No matching customer number: if the
customer_nopassed is invalid, or if nocustomer_nowas passed, then Order Management System uses standard name and address matching. See Customer Sold To Selection, Creation and Update in the Web Services Guide on My Oracle Support (ID 2149144.1) for more background. -
Order Management System then passes the customer information to Customer Engagement, and updates the customer with the ORCE customer ID returned from Customer Engagement.
Note:
If thecustomer_nois invalid, the error is logged in Order Management System’sAPP.logfile, even though the order can still be created successfully using the name and address information in the message.
-
If the ORCE Customer Integration (L37) system control value IS selected and the ORCE Customer ID in OROB Fulfillment (M72) IS ALSO selected:
-
Matching customer based on ORCE customer ID: If the ORCE customer ID is passed as the
customer_no, and a customer with same ORCE customer ID is found, update the customer record if needed but do not send an update to Customer Engagement. -
No matching customer based on ORCE customer ID: If the ORCE customer ID is passed as the
customer_no, but no matching customer based on the ORCE customer ID is found, call out to Customer Engagement to get the customer information based on the ORCE customer ID, and create the customer in Order Management System based on the response from Customer Engagement. -
No customer_no passed: Order Management System uses standard name and address matching. See Customer Sold To Selection, Creation and Update in the Web Services Guide on My Oracle Support (ID 2149144.1) for more background.
-
Order Management System then passes the customer information to Customer Engagement, and updates the customer with the ORCE customer ID returned from Customer Engagement.
Additional customer information updates if not matching based on ORCE customer ID:
-
sold-to name and address: the information passed in the fulfillments response message is used to create or update the customer; however, if the customer number passed in the fulfillments response is valid and the Sold to Address Update for Orders Brokered to OROMS (K97) system control value is unselected, the process does not update the customer information. If the customer does not already exist, the name is created in all upper case even if passed from Order Broker in upper and lower case.
Note:
The information passed in the fourth address line is not used. -
email address updated? The Sold to Email Update for Orders Brokered to OROMS (K96) system control value indicates whether to update the customer’s email address with the email address passed for the order.
-
sold-to phone numbers: the
phone1passed updates the customer’s daytime phone number and thephone2passed updates the customer’s evening phone number if the Sold to Address Update for Orders Brokered to OROMS (K97) system control value is selected. Any non-numeric characters passed in the phone numbers are stripped out.
Ship-to Information
-
ship complete? from the
ship_completesetting passed in the fulfillments response message; otherwise, from the Ship Complete for Orders Brokered to OROMS (L01) system control value. -
ship via: from the Order Broker Ship Via (K94) system control value if there is not a valid, numeric
ship_viapassed in the fulfillments response message. If the Order Broker Ship Via (K94) is blank, the Default Ship Via (A77) applies. -
gift order? from the Gift Flag for Orders Brokered to OROMS (L03). This system control value overrides the setting passed in the fulfillments response message.
-
freight charges: from the
freight_amountspecified in the fulfillments response message, if any; otherwise, Order Management System calculates freight. If an additional freight charge is specified for the ship via, Order Management System adds it to the order. -
tax: the total of the detail-level tax
amountpassed in the fulfillments response message for each item, plus any tax calculated based on freight and handling charges. The order-level tax amount passed in the message is not used to build the order. -
freight tax override: always selected, regardless of the setting of the Tax on Freight (B14) system control value.
-
purchase order number: from the
ref_transaction_nopassed in the fulfillments response message. Displayed at the Display Order Properties Screen in standard order inquiry and at the Third Streamlined Order Inquiry Screen (Order Summary). -
warehouse: If the Send Inventory by Warehouse to OROB (L06) system control value is selected, this is based on the OROB location for the warehouse sending the fulfillments request message.
-
delivery type (retail pickup or delivery): from the
transaction_type_idspecified in the fulfillments response message. SHIPFORPICKUP transaction types map to a retail pickup delivery type. -
ship-to name and address: from the
ship_toinformation for the first item on the order; the ship-to information for any additional item(s) is not used. Creates an Order Ship To Address record, which you can review at the Display Alternate Address Screen. The one-time ship-to phone number is from thephone1, if any, for the first item. If nophone1is passed for the first item, then thephone2for the first item is used. For a retail pickup order, the ship-to name and address should specify the name and address of the originating store location. The process creates a one-time ship-to address. If the customer does not already exist, the name is created in all upper case even if passed from Order Broker in upper and lower case. -
store location and system:
-
location_cd: the location fulfilling the order. This is the fulfilling, or sourced, location. For delivery and retail pickup orders, this is always an Order Management System warehouse. This is the Store # for the Store Cross Reference record.
-
system_cd: Order Management System. This is the OROB System (K50).
-
request_location_cd: the location generating the order. This is the originating, or placed, location. This can be a store location or an Order Management System warehouse if the original order was from Order Management System and was brokered for fulfillment assignment. This is the Store # for the Store Cross Reference record.
-
request_system_cd: If the order originated in a store, this is the code identifying your POS system, from the System Code, if any, for the Store Cross Reference record; otherwise, from the Name in OROB for Point of Sale (L09). If the order originated in Order Management System, from the System Code, if any, for the Store Cross Reference record; otherwise, from the OROB System (K50).
-
-
ship-for-pickup location and system:
-
location_cd: the store location where the customer picks up a ship-for-pickup order. This is the pickup location. From the Store # for the Store Cross Reference record.
-
system_cd: The code identifying your POS system, from the System Code, if any, for the Store Cross Reference record; otherwise, from the Name in OROB for Point of Sale (L09).
-
Detail Information
The process creates an order detail line for each item passed in the fulfillments response message. Also:
-
price: the
unit_pricefrom the fulfillments response message. Order Management System does not recalculate the price. -
price override reason code: from the Order Broker Price Override (K95) system control value.
-
requesting system line number: from the
requesting_system_line_nopassed in the fulfillments response message. Identifies the line number in the originating system. -
quantity: the
qtyfrom the fulfillments response message. -
gift wrap: from the
order_line_gift_wrapflag setting passed in the fulfillments response message. The gift wrap charge specified in the Item Offer, multiplied by the unit quantity, is included in the Handling bucket. -
order line messages: from the
order_line_messagepassed in the fulfillments response message:-
If the message passed exceeds the field length of 60 positions, the message is continued on an additional message line.
-
The Print flag for the message lines is set to B (both invoices and pick slips).
-
-
customization: customization is created for an order line only if:
-
the Item Offer associated with the source code on the order header specifies an additional charge code for a custom special handling format that includes a single line of customization instructions, and
-
the
customizationselement in the message specifies acustomization_codeandcustomization_messageIf:
-
there is no custom special handling format specified for the Item Offer, the information from the customization_code and customization_message are saved as Order Line Messages, with a Print flag of P (Picks), and the order is not suspended with an error.
-
the special handing format detail specifies any valid responses, and the customization message passed is not one of the responses, the order is suspended with an error of
Input not valid response -
the special handling format detail specifies a Max # characters, and the customization message passed exceeds this length, the order is suspended with an error of
Exceeds max character
Note:
-
Order Management System does not validate that the
customization_codematches the Field label for the special handling format detail. -
Custom special handling formats that include more than one detail line are not currently supported for retail pickup and delivery orders received from Order Broker.
-
Regardless of whether Order Management System creates custom special handling for an order line, any
order_line_customization_chargeis still applied to the Handling bucket on the order. -
The Evaluate Special Handling Charges by Order Line (D67) system control value determines whether to multiply the customization charge passed in the message by the unit quantity.
-
-
Tax amount: from the tax
amountpassed for the item in the fulfillments response message. Order Management System does not recalculate tax for items.
Note:
Only the tax amounts passed at the detail level are added to the order in Order Management System; thetransaction_tax from the fulfillments response message header level is not
used.
Payment Information
-
pay type: from the Order Broker Payment Type (K98).
-
credit card number: From the description of this pay type.
-
suppress deposit flag: set to Y.
-
suppress refund flag: set to Y.
Note:
The tender information, if any, passed in the fulfillments response message is not used.Order Messages
-
originating store location: written as an Order Message, for example:
Originating Store: 317. -
request ID: written as an Order Message, for example:
OROB Request ID: 123456. This information is also saved in the Order Broker record. -
special instructions: the
special_instructionsat the Order level from the fulfillments response message are written as an Order Message in capital letters, for example:ADD MONOGRAM HEB. -
additional order messages: the
order_messageis written as one or more Order Message lines:-
If the message passed exceeds the field length of 60 positions, the message is continued on an additional message line.
-
The Print flag for the message lines is set to B (both invoices and pick slips).
-
Note:
Special instructions passed at the item level in the fulfillments response message are not retained.See the Fulfillments Response Message Sample for an example.
Additional Information on Mapping
If any of the information passed in the fulfillments response message exceeds the maximum field length in Order Management System, the information is truncated.
Note:
The system identifies the originating location as Order Management System if therequest_system_cd in the fulfillments response
message matches the system code in the OROB System (K50) system
control value. In this situation, the system prefaces the E-commerce
order number in the Order Header Extended table with ORIG#: 9999-001, where ORIG#: indicates
the order was created as a result of OROB fulfillment assignment, 9999 is the order number, and 001 is
the ship-to number.
Not mapped: The following information is not mapped from Order Broker when creating the order in Order Management System:
-
order additional freight charges
-
order additional charges
-
the setting of the Under Review flag
-
order line extended freight
-
the setting of the order line Ship Alone flag
-
order line ship weight
-
item UPC or EAN codes
Response messages: After receiving the fulfillments response message, depending on whether it was able to create the order successfully:
-
order creation successful: The BROKER process sends a status update message with a status of Accepted.
-
order created on hold: The BROKER process sends a status update message with a status of Polled.
-
order in error: If the Re-Polling for Orders Brokered to OROMS (L04) system control value is:
-
selected: the BROKER process sends a status update message with a status of Polled
-
unselected: the BROKER process does not send a status update message
Also, if the order is in error, it is assigned to the Order Broker Error Batch Number (K90).
-
-
order cannot be created: If the BROKER process cannot create the order in Order Management System, it sends a status update with a status of Rejected.
Order Broker record: The process creates an Order Broker record regardless of whether the order is in error. The initial status of the Order Broker record is New if there are any errors; otherwise, it is In process.
Canceled by originating system? If the order is initially created in Order Management System in error status and then corrected, Order Management System sends an inquiry request to Order Broker before changing the order’s status to open. If the response from Order Broker indicates that the originating system has canceled the order, Order Management System then puts the order on hold and writes an order transaction history message, such as: Order held - line[s] canceled in Order B.
Changing the order in batch order entry: If the order is suspended or in error, you can use batch order entry to make changes to the order, although you cannot add an order line. Once the order is in held or open status, the restrictions described under Maintaining Retail Pickup or Delivery Orders from the Order Broker apply.
Retail Pickup (including Ship-for-Pickup) or Delivery Processing after Order Creation
Checking for canceled or under review retail pickup or delivery orders during pick slip generation: Pick slip generation sends an inquiry to Order Broker for all retail pickup and delivery orders eligible for pick slips based on their current status, item availability, and the pick slip selection criteria, to determine whether an eligible order has been canceled in the originating system.
When the response indicates that an order is in canceled status, the program does not generate a pick slip for the order; instead, it puts the order on hold using the Order Broker Hold Reason (Cancel) (L02) system control value.
When the response indicates that an order is under review, the program does not generate a pick slip for the order; instead, it puts the order on hold using the AU hold reason (BROKER ORDER UNDER REVIEW).
Otherwise, Order Management System puts the Order Broker record into Picking status when the pick slip is printed and sends a status update message to Order Broker indicating that the order or line is in Picked status. Note that this occurs regardless of whether communication with Order Broker is successful when pick slip generation sends the inquiry.
Note:
Pick slip generation does not check that the sourcing location for the order is still set to an Order Management System location. For example, a user in Order Broker may have changed the sourcing location for the order to a location other than an Order Management System location. In this situation, Order Management System will still generate a pick slip for the order.Which status request message? Pick slip generation uses the order inquiry status request only if the Use OROB Status Inquiry List Web Service (M05) system control value is set to NO or blank; otherwise, it uses the order status list request. See Use OROB Status Inquiry List Web Service (M05) for details on how Order Management System confirms whether to generate a pick slip for retail pickup and delivery orders.
Streamlined allocation? If there are any retail pickup or delivery orders eligible for pick slip generation, the program can use streamlined allocation only when it uses the status list request. See Use Streamlined Allocation (L63) for background.
Sample messages: See:
Shipment confirmation: Once the shipment is confirmed, the Order Broker record status changes to Intransit for a retail pickup order, or Completed for a delivery order. The corresponding statuses for the orders in Order Broker are Intransit and Fulfilled.
Status updates after shipment of a retail pickup order: Once the Order Broker record for a retail pickup is in Intransit Polled status, the order status in Order Management System is X (completed); however the requesting store location still needs to receive the order, notify the customer, and have the customer pick up the order.
Deactivating the payment method: When you ship a retail pickup or delivery order, the billing async job deactivates the payment method. Once the payment method is deactivated, you cannot process a refund against the order unless you add a new payment method.
Sending the ship via and tracking number to Order Broker: When you confirm shipment, the BROKER process sends a message to Order Broker. The information includes the description of the ship via used (even if it is different from the ship via on the order) and the tracking number, if available.
This information is available for review in Order Broker at the Order screen. The actual ship via used and tracking number used are displayed on the History tab.
Status inquiry: The BROKER process includes shipped retail pickup orders in order status inquiry list requests just once a day. The Order Broker record might be put in any of the following statuses:
-
Received: indicates that the originating store has received the transfer.
-
Completed: indicates that the customer has picked up the order.
-
Partially fulfilled: indicates that the customer has picked up part of the order.
See Setting the Daily Status Inquiry Time Window (all versions) for more information.
Other status updates after order creation:
The Order Broker integration supports a business process in which only the originating location cancels a retail pickup or delivery order, since the customer is not necessarily aware that the distribution center can be involved in order fulfillment. As a result:
-
Sell out: If you sell out an order line, either in order maintenance or through the Process Auto Soldouts option, Order Management System sends a status update to Order Broker indicating the order or order line (based on whether you split orders) was Rejected. Order Broker then attempts to reassign the order or line to another location for fulfillment. The Order Broker record’s status in Order Management System changes to Rejected.
-
Cancel: If you cancel an order or order line, Order Management System changes the Order Broker record’s status to Canceled and sends a status inquiry request to Order Broker. If the order’s status in Order Broker is:
-
Canceled: Order Management System does not send a status update to Order Broker; otherwise,
-
If the order’s status in Order Broker is anything but Canceled, Order Management System sends a status update to Order Broker indicating the order was Rejected. In this situation, if Order Broker is configured to “reshop” the order and there are any other possible fulfilling locations, Order Broker reassigns the order to the next possible location based on the fulfillment rules set up in Order Broker, and the order returns to new order status; otherwise, if Order Broker cannot “reshop” the order, the order is assigned to the OROB Default Location Code for Unfulfillable Orders (K56), and the order status is unfulfillable.
You cannot cancel a partial quantity of an order line on a retail pickup or delivery order.
Note:
Although Order Management System does not prevent you from canceling a retail pickup or delivery order, some business processes require that only the originating location can cancel an order. In this situation, if the customer contacts the call center to cancel the order, the operator notifies the originating store location and requests that the store perform the cancellation and trigger the status update to Order Broker. Using this process, Order Management System receives notification of the cancellation the next time it sends a periodic status inquiry on the order to Order Broker, and then holds the entire order (even if only one line was canceled) using the Order Broker Hold Reason (Cancel) (L02). -
-
Voiding a pick slip for a retail pickup or delivery order: If the Cancel Reason (Pick In) (L86) system control value specifies a valid cancel reason or if a backorder cancellation reason code is specified in the CWPickIn XML Message, and you use the generic pick in API to void a pick slip for a retail pickup or delivery order, then Order Management System cancels the order and sends a status update to Order Broker to reject the order. Otherwise, if the system control value is blank, you need to use order maintenance to cancel the order and send the status update to Order Broker.
For more information see the Web Services Guide on My Oracle Support (ID 2149144.1).
-
Rejecting the order: If you reject a batch that includes a retail pickup or delivery order, the BROKER process sends a status update rejecting the order; also, it deletes the related Order Broker and Order Broker History records.
Cancel reason sent? The status update message to reject a retail pickup or delivery order includes a cancel reason code and description if you:
-
cancel the order in order maintenance: the entered cancel reason is sent
-
void the pick slip: the Cancel Reason (Pick In) (L86) system control value is sent if a backorder cancellation reason code is not specified in the CWPickIn XML Message,
For more information see the Web Services Guide on My Oracle Support (ID 2149144.1).
-
reject the batch that includes the retail pickup or delivery order: no cancel reason is sent
For more information: See the Order Status Update Sample (Retail Pickup, Delivery, or Ship-for-Pickup, and Fulfilling Orders) for a sample of the information sent to Order Broker when you cancel a retail pickup or delivery order.

Reviewing Retail Pickup (including Ship-for-Pickup) or Delivery Orders in Order Inquiry
In addition to reviewing information through the Working with Order Broker (WOBR) menu option, you can also use standard order inquiry. Your options include:
-
Finding the order number: Use the Order cross ref # at the Order Inquiry Scan Screen to find a retail pickup or delivery order based on the order number in the originating system. This number also displays as the Alt ord number at the Display Order Properties Screen. The system stores the originating order number in the E-Commerce order number field in the Order Header Extended table. If the originating system is Order Management System, the system prefaces the originating order number with the text
ORIG#:. For example:ORIG#: 9999-001, whereORIG#: indicates the order originated in Order Management System,9999is the original order number in Order Management System, and001is the ship-to number.Note:
To review all retail pickup and delivery orders whose originating system is Order Management System, you can enterORIG#: in the Order cross ref # field and select OK to advance to the Scan by Order Cross Reference # screen where all orders whose E-Commerce order number in the Order Header Extended table begin withORIG#: display. -
Originating order message: If the E-Commerce order number in the Order Header Extended table begins with the text
ORIG#:, indicating the originating system for a retail pickup or delivery order is Order Management System, the messageThis order is fulfilling another order: 9999-001displays for the sourcing order, where9999is the originating order number in Order Management System, and001is the ship-to number. This message displays on the Order Inquiry Header screen (OIOM), Order Inquiry Detail screen (OIOM), and in Streamlined Order Inquiry (DORI) for the sourcing order. -
Broker detail and history: Use the Display Order Broker Details Screen to review Order Broker Detail and Order Broker History, as well as other information such as the delivery type and the request ID.
-
Identifying the Order Broker type: In addition to the Display Order Broker Details Screen, you can also review the Broker delivery type at the Display Order Properties Screen and the Display Order Broker Details Screen to determine whether the order originated as a Retail Pickup or Delivery order.
-
Originating store, request ID, and special instructions: The originating store number and request ID are available for review at the Work with Order Messages Screen, for example:
Originating Store: 317OROB Request ID: 70122Also, if any special instructions were passed for the order, this information is also available for review at this screen.
-
Order history: The Display Order History Screen displays activity related to sending status updates to and from Order Broker, such as:
-
Ln#: 1 Ready for Fulfillment:Written for each line received on a retail pickup or delivery order when the order is accepted and put into Open or Held status. -
Ln#: 1 Selected for Fulfillment:Written for each line printed on a pick slip. -
Ln#: 1 Fulfilled:Written for each delivery order line when you confirm shipment. -
Ln#: 1 In Transit:Written for each retail pickup order line when you confirm shipment.Note:
After you ship a retail pickup order, Order Management System checks for status updates on a daily basis, and writes a single Order Transaction History message for each status change until the order is fulfilled. See Setting the Daily Status Inquiry Time Window (all versions) for setup information. -
Ln#: 1 Store Received:Written after the originating store location has received a retail pickup order. -
Ln#: 1 Customer Partial Pick Up:Written after the customer has picked up part of a retail pickup order. -
Ln#: 1 Customer Picked Up:Written after the customer has picked up all units of a retail pickup order. -
Ln#: 1 Cancel Acknowledged by Broker:Written when you cancel an order line in order maintenance or through Working with Backorders Pending Cancellation (WBPC). -
Ln#: 1 Rejected for Fulfillment:Written when Order Management System rejects an order line because the item is soldout or backordered; if you reject the order when it is suspended; or when you sell out a line afterward in order maintenance or through Processing Auto Soldout Cancellations (MASO). -
Order held - line[s] canceled in OROB:Written if Order Broker responds to a status inquiry indicating that any of the lines on the order were canceled. In this situation, Order Management System puts the order on hold using the Order Broker Hold Reason (Cancel) (L02).
-
Things to Note about Retail Pickup (including Ship-for-Pickup) and Delivery Orders
Both system control values required: You need to complete both the Type for Orders Brokered for Delivery (K91) and the Order Type for Retail Pickup Orders Brokered to OROMS (K92) system control values in order for Order Management System to request new orders from Order Broker, even if you do not process both order types.
In addition:
-
if the Use OROB for Fulfillment Assignment (M31) system control value is selected, you need to complete the Order Type for Delivery Orders Originating in OROMS (M33) system control value in order for Order Management System to assign the correct order type to delivery orders created as a result of the Brokered Backorders process assigning an Order Management System warehouse to fulfill a brokered backorder.
-
if the Use OROB for Ship for Pickup Fulfillment Assignment (M34) system control value is set to ALWAYS, you need to complete the Order Type for Retail Pickup Orders Originating in OROMS (M35) system control value in order for Order Management System to assign the correct order type to retail pickup orders created as a result of the Brokered Backorders process assigning an Order Management System warehouse to fulfill a brokered backorder on a ship-for-pickup order.
-
if the Send Inventory by Warehouse to OROB (L06) system control value is selected but the OROB location for a warehouse does not specify a valid location in Order Broker, the fulfillments request message is not generated.
Discounts: If the customer is eligible for a discount, such as one from a loyalty membership, Order Management System still applies the discount to a retail pickup or delivery order.’
Additional freight: If the ship via on the order is subject to additional freight charges, these charges are added to the order.
Gift flag: The setting of the Gift Flag for Orders Brokered to OROMS (L03) system control value overrides the setting of the gift flag passed in the fulfillments response message.
Outbound invoice message: If you generate the CWInvoiceOut message, the message is generated for retail pickup or delivery orders unless excluded based on trigger rules (for example, not including these order types).
Tax: The tax amount for each order detail line is passed as a tax override amount.
Customer matching: If the fulfillments response message from Order Broker does not specify a valid sold-to customer number, Order Management System uses its standard customer name and address matching to either select an existing customer or create a new customer.
Oracle Retail Customer Engagement customer integration: If you use the Customer Engagement Customer Integration, Order Management System may also new customer records in Oracle Retail Customer Engagement as part of creating retail pickup and delivery orders. See Building the Retail Pickup (including Ship-for-Pickup) or Delivery Order for more information.
Order maintenance: The Maintain Brokered Fulfillment Orders (B20) secured feature controls the ability to maintain a retail pickup or delivery order. Even if you have authority under this secured feature, your ability to maintain the order is limited. For example, you cannot add or change an order line. See Maintaining Retail Pickup or Delivery Orders from the Order Broker for a discussion.
Creating the invoice for a ship-for-pickup order: The Invoice Ship For Pickup Order Once Intransit (M73) system control value controls whether to create the invoice for a ship-for-pickup order when Order Broker indicates that the order is now in transit or received. See that system control value for more information.
If the payment method expires: If the payment method for an order expires, the system sends an update to Order Broker indicating to put the order Under Review. Also, if a fulfilling retail pickup order was created for the originating order, the order goes on hold, and any open pick slips are canceled.
Processing returns: If the Suppress Returns for Retail Pickup/Delivery (L88) system control value is:
-
selected: You cannot process a return against a retail pickup or delivery order, or create a return authorization
-
unselected: You can process a return against a retail pickup or delivery order or create a return authorization; however, the Order Broker Payment Type (K98) is deactivated when you ship a retail pickup or delivery order. As a result, in order to process a return against the order, you need to add a new payment method.
Note:
Regardless of the setting of the Suppress Returns for Retail Pickup/Delivery (L88) system control value, you cannot process an exchange against a retail pickup or delivery order, enter an item with a negative quantity, enter a negative additional charge, or apply a discount to a shipped order line.Order Management System does not send a status update to Order Broker when you process a return against a retail pickup or delivery order.
Membership items: You should not set up your Order Broker integration to include membership items on retail pickup or delivery orders, since the customer membership would not be created correctly in Order Management System. To prevent Order Management System from sending membership items to Order Broker as part of Order Broker’s Product, Product Location, and Incremental Inventory Import Process, do not flag them as OROB eligible.
Voiding or reprinting pick slips:
-
If you use Reprinting and Voiding Pick Slips (WVRP or WSVP) to void or reprint a pick slip for a retail pickup or delivery order, this activity does not produce a status update to Order Broker.
-
If you use the Generic Pick In API (Shipments, Voids, and Backorders) to void a pick slip for a retail pickup or delivery order and the Cancel Reason (Pick In) (L86) system control value specifies a cancel reason code, or if a backorder cancellation reason code is specified in the CWPickIn XML Message, Order Management System cancels the order using the specified cancel reason and sends a status update rejecting the order to Order Broker, including the cancel reason from the system control value.
For more information see the Web Services Guide on My Oracle Support (ID 2149144.1).
Important:
To prevent inconsistent updates to Order Broker for retail pickup and delivery orders:-
Prevent Order Management System from generating multiple pick slips for a single retail pickup or delivery order:
-
Select the Ship Complete for Orders Brokered to OROMS (L01) system control value.
-
Do not create retail pickup or delivery orders for ship-alone items.
-
Do not select the Retain Backordered Lines Brokered to OROMS (K89) system control value.
-
-
Do not process void/unreserve transactions or partial backorders for these orders through the Generic Pick In API (Shipments, Voids, and Backorders); confirm or void the entire pick slip.
For more information see the Web Services Guide on My Oracle Support (ID 2149144.1).
Note:
Retail pickup and delivery orders that originate in Xstore include a single item.Documents for store receiving: In order to support store receiving, you can generate the Pick Message from Order Management System (CWPickOut) or the PO Download XML Message (CWPurchaseOrderOut). Each of these messages includes details on the order, including the Order Broker request ID, the order number in the originating system, and the delivery type. See the Generic Pick Out API and the Generic Outbound Purchase Order API in the Web Services Guide on My Oracle Support (ID 2149144.1) for more information.
For more information: See Reauthorization and Under Review Hold Scenarios for Orders Fulfilled through Order Broker.
Sample Order Broker Messages
Overview: Order Management System communicates with Order Broker using Order Broker’s XML message formats. Sample request and response messages are presented below as background.
Key information included in each message is described below with the related sample.
Reviewing order information in Order Broker: You can use the Order Inquiry and Order screens in Order Broker to review brokered backorders, store pickup, and ship-for-pickup orders originating in Order Management System, and retail pickup or delivery orders assigned to Order Management System.
For more information: See Brokered Backorders, Retail Pickup (including Ship-for-Pickup) or Delivery Orders, Store Pickup Orders, and Ship-for-Pickup Orders for information on when each message is generated or received.
Endpoint: See Order Broker Properties for more information on the endpoint where Order Management System sends the messages.
Logging messages: If specified in the XML Logging setting at the Event Logging screen in Order Broker, Order Broker logs messages.
Message version: The OROB_MESSAGE_VERSION in Working with Customer Properties (PROP) specifies the message version number for all request messages that Order Management System sends to Order Broker, with the exception of the order update message used to change an order’s Under Review setting (see Order Update Request Sample (Changing the Under Review Setting for a Brokered Backorder or Store Pickup Order)).
-
A message version of 5.0 or higher is required to use the status list request message and streamlined allocation at pick slip generation. See Use OROB Status Inquiry List Web Service (M05) and Use Streamlined Allocation (L63) for background.
-
A message version of 16.0 or higher is required to send orders to Order Broker for fulfillment assignment. See Brokered Backorders for background.
Note that this property cannot be set higher than 19.9 for integration with Order Broker 19.x, or higher than 21.1 for integration with Order Broker 22.2.301.0 or higher.
CWMessageRequest: See Email Request Message (CWEmailRequest) for background on the XML message you can use to trigger the store pickup notification email.
Sample messages:
-
Brokered Backorder (Delivery or ShipForPickup) Submit Order Request Message Sample
-
Ship-for-Pickup (during Pick Generation/Drop Ship Processing) Submit Order Request Message Sample
-
Order Status Update Cancel Request Message Sample (Brokered Backorder or Store Pickup)
-
Fulfillments Request Message Sample (Retail Pickup, Ship-for-Pickup, or Delivery Orders)
-
Order Status Update Sample (Retail Pickup, Delivery, or Ship-for-Pickup, and Fulfilling Orders)
Brokered Backorder (Delivery or ShipForPickup) Submit Order Request Message Sample
Message contents: The BROKER_ORD process generates this message to request that Order Broker find a location to fulfill one or more backordered order lines. See Brokered Backorders for processing details.
Information passed to Order Broker includes:
-
datetime: from the system date and time. Order Broker uses the current date as the order date when it creates the order.
-
version: from OROB_MESSAGE_VERSION in Working with Customer Properties (PROP).
-
source: composed of the concatenated company, order number, and ship-to number, zero-filled and including five trailing zeros. For example, a source of
0060000895300100000indicates company6, order8953, ship-to1. This information is passed back in the response messages so that Order Management System can identify the order. -
destination: from the OROB Account (K49).
-
transaction_no: the order number, zero-filled, followed by the zero-filled ship-to number (for example,
0001234-001). -
order_id: consisting of:
-
the order number, not zero-filled.
-
the ship-to number, zero-filled.
For example,
1234-001
-
-
transaction_type_id:
-
DELIVERY -
SHIPFORPICKUPif the order is a ship-for-pickup order; the system sends ship-for-pickup orders to Order Broker for fulfillment assignment when the Use OROB for Ship for Pickup Fulfillment Assignment (M34) system control value is set to ALWAYS and the Send B/O to OROB (K08) system control value is selected.
-
-
ref_transaction_no: the purchase order number, if any.
-
transaction_date: from the system date and time. Order Broker uses the current date as the order date when it creates the order.
-
employee_id: set to
CWS -
transaction_subtotal: the merchandise total of the brokered items included in the SubmitOrder message.
-
transaction_tax: includes the tax for the brokered items plus the prorated portion of any additional tax on the order, such as tax on freight or handling.
-
transaction_total: includes the total merchandise, tax, and the
freight_amountpassed for the brokered items. -
transaction_status: set to
new_order. -
transaction_channel: set to
1 -
ship_via code from the order header and the associated ship via description.
-
gift flag. Y or N indicates whether the order is a gift. If the Use OROB for Fulfillment Assignment (M31) system control value is unselected, the Order Broker Include Gift Orders (K14) system control value controls whether to submit gift orders as brokered backorders. If the Use OROB for Ship for Pickup Fulfillment Assignment (M34) system control value is set to ALWAYS, eligible ship-for-pickup gift orders are always submitted as brokered backorders.
-
source_code from the order header.
-
freight_amount: includes the total freight on the order, plus any additional charges on the order. This amount is not limited to the freight charges for the brokered backorder line(s); however, when the assigned location ships the item(s), the freight charges on the invoice reflect those of the brokered backorder line.
Note:
-
Freight charges for the order are included in the message only if the Use Split Order (L56) system control value is selected.
-
The order amounts in the message can include up to a 15-position decimal, although Order Broker rounds these decimals to 2 positions.
-
-
balance_due: Set to zero.
-
currency: The code identifying the currency associated with the order. From the Order Header Extended table, if specified; otherwise, from the Local Currency Code (A55) system control value.
-
order_additional_freight_charges: The additional freight charges on the order, if any.
-
order_additional_charges: The total additional charges on the order, if any.
-
ship_complete: The setting of the Ship complete flag.
-
freight_tax: The freight tax override, of any, from the Order Ship To table. See the Display Order Properties Screen for more information.
-
order_message: Any order message lines for the Order Ship To with a flag of Print (P) or Both (B).
-
gift_message: Any order message lines for the Order Ship To with a flag of Gift (G). Gift message lines are sent in the order in which they were added to the order with an encoded carriage return between each line to indicate a line break.
-
under_review flag: Set to
Yif the Send Held Orders to OROB (M18) system control value is selected and the order is held. -
sold_to customer_no zero-padded. This is the customer’s ORCE customer if:
-
the Send ORCE Customer ID to OROB (M71) system control value is selected, and
-
the ORCE Customer Integration (L37)system control value is set to INTERACT, and
-
an ORCE customer ID is assigned to the customer
Otherwise, this is the Order Management System customer number.
-
-
sold_to customer name: includes company name, prefix, first, middle initial, last, and suffix. A first and last name or a company name are required for the sold-to customer on all orders sent to Order Broker.
-
sold_to customer address: includes address lines 1-4, apartment, city, state/province, postal code, order email address, day and evening phone numbers (unformatted), and the country code.
-
requesting location and system:
-
location_cd: the location generating the order. This is the originating, or placed, location.
-
if the transaction_type_id is
DELIVERYand the Use OROB for Fulfillment Assignment (M31) is unselected, from the OROB Default Location (K51) (regardless of the setting of the Send Inventory by Warehouse to OROB (L06) system control value). -
if the transaction_type_id is
DELIVERYand the Use OROB for Fulfillment Assignment (M31) is selected or the transaction_type_id isSHIPFORPICKUP, from the Originating Location to Pass to OROB (M32).
-
-
system_cd: from the OROB System (K50).
-
-
ship-for-pickup location and system (only if the OROB_MESSAGE_VERSION property is set to 16.0 or higher):
-
location_cd: the location where the customer picks up a ship-for-pickup order. This is the pickup location. From the store code in the one-time ship-to address.
-
system_cd: The code identifying your POS system, from the System Code, if any, for the Store Cross Reference record; otherwise, from the Name in OROB for Point of Sale (L09).
-
-
for each backordered item included in the request message:
-
line_item_no: the order line sequence number. The sequence number might differ from the order line number displayed in order maintenance or order inquiry if, for example, you deleted one of the previous lines on the order.
-
item_id: the Order Management System item/SKU code. The item and SKU code are concatenated, with blank spaces inserted after the item code so that the SKU code begins at position 13.
-
qty: the total backordered quantity to be fulfilled through Order Broker.
-
unit_price: the single-unit price of the backordered item.
-
ship_to customer name and address: For delivery orders, includes the same information as the sold-to customer, plus the Attention line, if any. For ship-for-pickup orders, this is the name and address of the store location where the customer has selected to pickup the order.
-
taxes: the total tax amount for the entire backordered quantity of the item. If there are multiple tax charges on the order line (for example, if there is GST and PST), then each tax amount is passed separately, and Order Broker adds them together to determine the total tax for the order line; the message also indicates the total in the
transaction_taxat the header level. -
order_line_extended_freight: the freight charges for the item. Included only when the order uses a line-level freight calculation.
-
order_line_gift_wrap: N or Y, based on the gift wrap flag for the order line.
-
order_line_ship_alone: set to Y if the item is flagged to ship alone; otherwise, set to N.
-
order_line_ship_weight: the ship weight, if any, specified for the item.
-
order_line_message: Any order line message lines for the item with a flag of Print (P) or Both (B).
-
customization: Any custom special handling instructions for the order line. Standard special handling information is not included.
-
order_line_customization_charge: the line charge for custom special handling.
-
customization_code: the Field label for the special handling instructions.
-
customization_message: the Input of the special handling instructions.
-
-
Not included: Information that is not passed includes:
-
payment methods
-
any order lines that are being fulfilled through the warehouse or drop shipment; are not flagged as OROB eligible; are soldout, canceled, or already shipped; or are non-inventory items.
-
additional backordered lines, If the Use Split Order (L56) system control value is unselected; each backordered order line is submitted separately and creates a separate order in Order Broker. Otherwise, if the system control value is selected, the message includes all brokered backorders on the order.
-
UPC or EAN numbers
<ns2:SubmitOrder xmlns:ns2="http://microsretail.com/Locate">
<ns2:order_request_message>
<message_header message_type="SubmitOrder" xaction_response="1" xaction_type="INSERT">
<datetime>2015-07-15T01:30:01</datetime>
<version>18.0</version>
<source>006000001234500000</source>
<destination>LOCATE</destination>
</message_header>
<message_body>
<transactions>
<transaction_header transaction_type_id="DELIVERY" transaction_no="00000123-001" request_id="" order_id="123-001">
<ref_transaction_no />
<transaction_date>2019-05-09T01:30:01</transaction_date>
<employee_id>CWS</employee_id>
<transaction_subtotal>1.0</transaction_subtotal>
<transaction_tax>0.06</transaction_tax>
<transaction_total>1.06</transaction_total>
<special_instructions />
<transaction_status>new_order</transaction_status>
<transaction_channel>1</transaction_channel>
<ship_via>1</ship_via>
<ship_via_description>UPS GROUND</ship_via_description>
<gift>N</gift>
<source_code>SOURCE</source_code>
<freight_amount>0.0</freight_amount>
<balance_due>0</balance_due>
<currency>US</currency>
<order_additional_freight_charges>0.00</order_additional_freight_charges>
<order_additional_charges>0.00</order_additional_charges>
<ship_complete>N</ship_complete>
<freight_tax>0.00</freight_tax>
<order_message />
<gift_message />
<under_review />
<sold_to_customer customer_no="12345">
<name>
<company_name />
<prefix />
<first>FIRST</first>
<middle />
<last>LAST</last>
<suffix />
</name>
<address>
<attention />
<address1>12345 EXAMPLE STREET</address1>
<address2 />
<address3 />
<address4 />
<apt />
<city>WORCESTER</city>
<province>MA</province>
<postal>01602</postal>
<email>first.last@example.com</email>
<phone1>508 555 0100</phone1>
<phone2>508 555 0200</phone2>
<country>US</country>
</address>
</sold_to_customer>
<store_location location_cd="1234567890" system_cd="6" />
<transaction_details>
<transaction_detail line_item_no="4">
<location_cd />
<system_cd />
<item_id>PENCIL </item_id>
<qty>1</qty>
<unit_price>1.0</unit_price>
<ship_to>
<name>
<company_name />
<prefix />
<first>FIRST</first>
<middle />
<last>LAST</last>
<suffix />
</name>
<address>
<attention />
<address1>12345 EXAMPLE STREET</address1>
<address2 />
<address3 />
<address4 />
<apt />
<city>WORCESTER</city>
<province>MA</province>
<postal>01602</postal>
<email>first.last@example.com</email>
<phone1>508 555 0100</phone1>
<phone2>508 555 0200</phone2>
<country>US</country>
</address>
</ship_to>
<taxes>
<tax description="Tax" line_item_no="4">
<amount>0.06</amount>
</tax>
</taxes>
<line_item_status>new_order</line_item_status>
<special_instructions />
<shipping_agent />
<tracking_number />
<item_upc_cd />
<item_ean_cd />
<order_line_extended_freight>0.00</order_line_extended_freight>
<order_line_customization_charge>0.00</order_line_customization_charge>
<order_line_gift_wrap>N</order_line_gift_wrap>
<order_line_ship_alone>N</order_line_ship_alone>
<order_line_ship_weight>0.000</order_line_ship_weight>
<order_line_message />
<customizations />
</transaction_detail>
</transaction_details>
</transaction_header>
</transactions>
</message_body>
</ns2:order_request_message>
</ns2:SubmitOrder>Store Pickup SubmitOrder Request Message Sample
Message contents: The BROKER_ORD process generates this message to Order Broker as notification that the customer would like to pick up the order at the store location indicated. See Store Pickup Orders for processing details.
The information passed includes:
-
datetime: from the system date and time. Order Broker uses the current date as the order date when it creates the order.
-
version: from OROB_MESSAGE_VERSION in Working with Customer Properties (PROP).
-
source: composed of the concatenated company, order number, and ship-to number, zero-filled and including five trailing zeros. For example, a source of
0060000895300100000indicates company6, order8953, ship-to1. This information is passed back in the response messages so that Order Management System can identify the order. -
destination: from the OROB Account (K49).
-
transaction_type_id:
PICKUP -
transaction_no: the order number, zero-filled, followed by the zero-filled ship-to number (for example,
0001234-001). -
order ID: consisting of:
-
the order number, not zero-filled.
-
the ship-to number, zero-filled.
For example,
1234-001 -
-
transaction_date: from the system date and time. Order Broker uses the current date as the order date when it creates the order.
-
employee_id: set to
CWS -
transaction_subtotal: the merchandise total of the items on the order.
-
transaction_tax: the total tax amount for the order.
-
transaction_total: the total merchandise, tax, freight, and handling for the order.
-
transaction_channel: set to
1 -
ship_via code from the order header and the associated ship via description.
-
source_code from the order header.
-
currency: The code identifying the currency associated with the order. From the Order Header Extended table, if specified; otherwise, from the Local Currency Code (A55) system control value.
-
freight_amount: includes the total freight on the order, if any, plus any additional charges.
Note:
The order amounts in the message can include up to a 15-position decimal, although Order Broker rounds these decimals to 2 positions. -
balance_due: If the Payment at POS for Store Pickup (M16) system control value is selected, this is the order total; otherwise, it is zero.
-
order_additional_freight_charges: The additional freight charges on the order, if any.
-
order_additional_charges: The total additional charges on the order, if any.
-
freight_tax: The freight tax override, of any, from the Order Ship To table. See the Display Order Properties Screen for more information.
-
order_message: Any order message lines for the Order Ship To with a flag of Print (P) or Both (B).
-
under _review flag: Set to
Yif the order is held and if the Payment at POS for Store Pickup (M16) system control value is unselected. -
sold_to customer_no: zero-padded. This is the customer’s ORCE customer if:
-
the Send ORCE Customer ID to OROB (M71) system control value is selected, and
-
the ORCE Customer Integration (L37) system control value is set to INTERACT, and
-
an ORCE customer ID is assigned to the customer
Otherwise, this is the Order Management System customer number.
-
-
sold_to_customer name: includes company name, prefix, first, middle initial, last, and suffix. A first and last name or a company name are required for the sold-to customer on all orders sent to Order Broker.
-
sold_to_customer address: includes address lines 1-4, apartment, city, state/province, postal code, order email address, day and evening phone numbers (unformatted), and the country code.
-
requesting location and system:
-
location_cd: from the OROB Default Location (K51) (regardless of the setting of the Send Inventory by Warehouse to OROB (L06) system control value).
-
system_cd: from the OROB System (K50).
-
-
for each item to be picked up at the store:
-
line_item_no: the order line sequence number. The sequence number might differ from the order line number displayed in order maintenance or order inquiry if, for example, you deleted one of the previous lines on the order.
-
location_cd: the location, selected at the Store Pickup Search Results Screen, where the customer wants to pick up the order.
-
system_cd: The code identifying your POS system, from the System Code, if any, for the Store Cross Reference record; otherwise, from the Name in OROB for Point of Sale (L09).
-
item_id: the Order Management System item/SKU code. The item and SKU code are concatenated, with blank spaces inserted after the item code so that the SKU code begins at position 13.
-
qty: the total to be picked up.
-
unit_price: the single-unit price of the item to be picked up.
-
ship_to customer name and address (repeated for each item): The ship-to name and address indicates the store location where the customer picks up the order. The information passed includes the company name, address lines 1-4, city, state, postal code, and country defaulted from the Store Cross Reference record for the selected location. The ship-to information can also include the ship-to name, attention line, or apartment and suite, that does not default from the Store Cross Reference record.
-
taxes: the total tax amount for the entire quantity of the backordered item.If there are multiple tax charges on the order line (for example, if there is GST and PST), then each tax amount is passed separately, and Order Broker adds them together to determine the total tax for the order line; the message also indicates the total in the
transaction_taxat the header level. -
order_line_extended_freight: The freight charges for the item. Included only when the order uses a line-level freight calculation.
-
order_line_ship_weight: The ship weight, if any, specified for the item.
-
order_line_message: Any order line message lines for the item with a flag of Print (P) or Both (B).
-
Not included: Information that is not passed includes:
-
purchase order number
-
payment methods
-
any phone numbers or email address entered for the ship-to address
-
UPC or EAN numbers
-
other tags in the SubmitOrder message, such as gift messages, the ship complete flag, and the ship alone flag, which do not apply to store pickup orders
Note:
Order Broker does not retain the ship-to address for a store pickup order.<ns2:SubmitOrder xmlns:ns2="http://retail.com/Locate">
<ns2:order_request_message>
<message_header message_type="SubmitOrder" xaction_response="1" xaction_type="INSERT">
<datetime>2015-02-24T10:23:20</datetime>
<version>5.0</version>
<source>0060001234500100000</source>
<destination>LOCATE</destination>
</message_header>
<message_body>
<transactions>
<transaction_header transaction_type_id="PICKUP" transaction_no="00012345-001" request_id="" order_id="12345-001">
<ref_transaction_no></ref_transaction_no>
<transaction_date>2015-02-24T10:23:20</transaction_date>
<employee_id>CWS</employee_id>
<transaction_subtotal>20.00</transaction_subtotal>
<transaction_tax>1.0</transaction_tax>
<transaction_total>24.489999771118164</transaction_total>
<special_instructions></special_instructions>
<transaction_status>new_order</transaction_status>
<transaction_channel>1</transaction_channel>
<ship_via>50</ship_via>
<ship_via_description>FEDERAL EXPRESS 2-DAY</ship_via_description>
<gift>N</gift>
<source_code>PROMOS</source_code>
<freight_amount>3.490000009536743</freight_amount>
<balance_due>24.489999771118164</balance_due>
<currency>US</currency>
<order_additional_freight_charges>4.72</order_additional_freight_charges>
<order_additional_charges>-1.23</order_additional_charges>
<ship_complete>N</ship_complete>
<freight_tax>0.00</freight_tax>
<order_message>Order message flagged P
Another order message flagged P</order_message>
<gift_message></gift_message>
<under_review></under_review>
<sold_to_customer customer_no="000000006">
<name>
<company_name>EXAMPLE CONSULTING</company_name>
<prefix>MR.</prefix>
<first>FIRST</first>
<middle>Q</middle>
<last>Example</last>
<suffix>JR.</suffix>
</name>
<address>
<attention></attention>
<address1>257 Example Street</address1>
<address2></address2>
<address3></address3>
<address4></address4>
<apt>SUITE 123</apt>
<city>WORCESTER</city>
<province>MA</province>
<postal>01602-0008</postal>
<email>flast@example.com</email>
<phone1>5085550121</phone1>
<phone2>5085550122</phone2>
<country>US</country>
</address>
</sold_to_customer>
<store_location location_cd="1" system_cd="6" />
<transaction_details>
<transaction_detail line_item_no="1">
<location_cd>1234</location_cd>
<system_cd>STC</system_cd>
<item_id>KABNOSKU </item_id>
<qty>2</qty>
<unit_price>10.0</unit_price>
<ship_to>
<name>
<company_name>WORCESTER STORE</company_name>
<prefix></prefix>
<first></first>
<middle></middle>
<last></last>
<suffix></suffix>
</name>
<address>
<attention>MR. FIRST </attention>
<address1>1234 EXAMPLE STREET</address1>
<address2></address2>
<address3></address3>
<address4></address4>
<apt></apt>
<city>WORCESTER</city>
<province>MA</province>
<postal>01699</postal>
<email></email>
<phone1>5085550123</phone1>
<phone2>5085550124</phone2>
<country>US</country>
</address>
</ship_to>
<taxes>
<tax description="Tax" line_item_no="1">
<amount>1.00000</amount>
</tax>
</taxes>
<line_item_status>new_order</line_item_status>
<special_instructions></special_instructions>
<shipping_agent></shipping_agent>
<tracking_number></tracking_number>
<item_upc_cd></item_upc_cd>
<item_ean_cd></item_ean_cd>
<order_line_extended_freight>0.00</order_line_extended_freight>
<order_line_customization_charge>0.00</order_line_customization_charge>
<order_line_gift_wrap>N</order_line_gift_wrap>
<order_line_ship_alone>N</order_line_ship_alone>
<order_line_ship_weight>1.110</order_line_ship_weight>
<order_line_message>Order line message flagged P
Another order line message flagged P</order_line_message>
<customizations />
</transaction_detail>
</transaction_details>
</transaction_header>
</transactions>
</message_body>
</ns2:order_request_message>
</ns2:SubmitOrder>Ship-for-Pickup (during Pick Generation/Drop Ship Processing) Submit Order Request Message Sample
Message contents: When the Use OROB for Ship for Pickup Fulfillment Assignment (M34) system control value is set to NEVER or blank, the pick slip generation job generates this message to Order Broker as notification that the warehouse is sending a ship-for-pickup order, in order to notify the store location where the customer wants to pick up the order. See Ship-for-Pickup Orders for processing details.
The information passed is derived from the order, order ship-to, and pick slip. This information includes:
-
datetime: from the system date and time. Order Broker uses the current date as the order date when it creates the order.
-
version: from OROB_MESSAGE_VERSION in Working with Customer Properties (PROP).
-
source: composed of the concatenated company, order number, and ship-to number, zero-filled and including five trailing zeros. For example, a source of
0060000895300100000indicates company6, order8953, ship-to1. This information is passed back in the response messages so that Order Management System can identify the order. -
destination: from the OROB Account (K49).
-
transaction_type_id:
SHIPFORPICKUP -
transaction_no: the order number, zero-filled, followed by the zero-filled ship-to number (for example,
0001234-001). -
order_id: consisting of:
-
the order number, not zero-filled.
-
the ship-to number, zero-filled.
For example,
1234-001 -
-
ref_transaction_no: the purchase order number, if any.
-
transaction_date: from the system date and time. Order Broker uses the current date as the order date when it creates the order.
-
employee_id: set to
CWS -
transaction_subtotal: the merchandise total of the items included on the pick slip. Each pick slip for the order generates a separate SubmitOrder message to Order Broker.
Note:
The totals include all items shipping on the pick slip, even if they are not flagged as OROB eligible. These items are not included in the transaction details sent to Order Broker. As a result, the transaction details might not tie out evenly to the totals. -
transaction_tax: the total amount of tax on the pick slip, including any items that are not flagged as OROB eligible, and also including tax on freight or handling. Does not include hidden tax.
-
transaction_total: the total on the pick slip, including merchandise, tax, freight, additional freight, additional charges, and special handling.
-
transaction_status: set to
new_order. -
transaction_channel: set to
1 -
ship_via code for the pick slip and the associated ship_via_description.
-
gift: set to
Yif the order is a gift; otherwise, set toN. -
source_code from the order header. See the Order Broker Source Code (K93) system control value for a discussion of how the source code is selected for retail pickup or delivery orders that originate in Order Management System and that Order Broker assigns to Order Management System for fulfillment.
-
freight_amount: includes the total freight, additional freight, handling, and additional charges for the pick slip. If you do not prorate freight and the order generates multiple pick slips, the total freight charges are included on the first pick slip.
-
balance_due: Indicates the total for the pick slip if the Payment at POS for Ship for Pickup Orders (L60) system control value is selected; otherwise, set to zero.
Note:
The order amounts in the message can include up to a 15-position decimal, although Order Broker rounds these decimals to 2 positions. -
currency: The code identifying the currency associated with the order. From the Order Header Extended table, if specified; otherwise, from the Local Currency Code (A55) system control value.
-
order_additional_freight_charges: The additional freight charges on the order, if any.
-
order_additional_charges: The total additional charges on the order, if any.
-
freight_tax: The freight tax override, of any, from the Order Ship To table. See the Display Order Properties Screen for more information.
-
order_message: Any order message lines for the Order Ship To with a flag of Print (P) or Both (B).
-
gift_message: Any order message lines for the Order Ship To with a flag of G (Gift).
-
sold_to customer_no: zero-padded. This is the customer’s ORCE customer if:
-
the Send ORCE Customer ID to OROB (M71) system control value is selected, and
-
the ORCE Customer Integration (L37) system control value is set to INTERACT, and
-
an ORCE customer ID is assigned to the customer
Otherwise, this is the Order Management System customer number.
-
-
sold_to customer name: includes company name, prefix, first, middle initial, last, and suffix. A first and last name or a company name are required for the sold-to customer on all orders sent to Order Broker.
-
sold_to customer address: includes address lines 1-4, apartment, city, state/province, postal code, order email address, day and evening phone numbers (unformatted), and the country code.
-
requesting location and system:
-
location_cd: The originating, or placed, location. From the OROB Default Location (K51) if the Send Inventory by Warehouse to OROB (L06) system control value is unselected or for a drop ship item; otherwise, from the OROB location from the warehouse associated with the order.
Note:
If you are generating ship-for-pickup orders for drop ship items, you need to specify a valid Order Broker location in the OROB Default Location (K51) system control value; otherwise, Order Broker returns an error indicating that the requesting location is invalid. -
system_cd: from the OROB System (K50).
-
-
shipforpickup location and system:
-
location_cd: the location where the customer picks up a ship-for-pickup order. This is the pickup location. From the store code in the one-time ship-to address.
-
system_cd: The code identifying your POS system, from the System Code, if any, for the Store Cross Reference record; otherwise, from the Name in OROB for Point of Sale (L09).
-
-
for each item included in the request message:
Note:
Only items on the pick slip that are as flagged as OROB eligible are included in the message.-
line_item_no: the order line sequence number. The sequence number might differ from the order line number displayed in order maintenance or order inquiry if, for example, you deleted one of the previous lines on the order.
If the Create Separate Picks for Ship for Pickup Orders (L89) system control value is selected, the line item number passed for a non-drop ship item is the Order Detail sequence number (typically the same as the line number unless a line has been deleted in order entry) concatenated with the zero-filled shipping warehouse number. For example, for line 2 shipping from warehouse 1, the line item number passed to Order Broker is
2001. -
location_cd: The fulfilling, or sourcing, location. From the OROB Default Location (K51) if the Send Inventory by Warehouse to OROB (L06) system control value is unselected or for a drop ship item; otherwise, from the OROB location from the warehouse associated with the order.
-
system_cd: from the OROB System (K50).
-
item_id: the Order Management System item/SKU code. The item and SKU code are concatenated, with blank spaces inserted after the item code so that the SKU code begins at position 13.
-
qty: the total quantity printed on the pick slip.
-
unit_price: the single-unit price of the item.
-
ship_to (repeated for each item): The ship-to name and address indicates the store location where the customer picks up the order. The information passed includes the company name, address lines 1-4, city, state, postal code, and country defaulted from the Store Cross Reference record for the selected location. The ship-to information can also include the ship-to name, attention line, or apartment and suite, that does not default from the Store Cross Reference record.
-
taxes: the total tax amount for the entire quantity of the item. If there are multiple tax charges on the order line (for example, if there is GST and PST), then each tax amount is passed separately, and Order Broker adds them together to determine the total tax for the order line; the message also indicates the total in the
transaction_taxat the header level. -
order_line_extended_freight: The freight charges for the item. Included only when the order uses a line-level freight calculation.
-
order_line_ship_weight: The ship weight, if any, specified for the item.
-
order_line_message: Any order line message lines for the item with a flag of Print (P) or Both (B).
-
order_line_customization_charge: The total special handling charges. Includes any items with standard special handling, although standard special handling instructions are not included in the message. Custom special handling instructions are included in the
customizationelement. -
order_line_gift_wrap: Set to
Yif the item is flagged for gift wrap; otherwise, set toN. -
order_line_ship_alone: Set to
Yif the item is flagged to ship alone; otherwise, set toN. -
order_line_ship_weight: the ship weight, if any, specified for the item.
-
order_line_message: Any order line message lines for the item with a flag of Print (P) or Both (B).
-
customization: Any custom special handling instructions for the order line. Standard special handling information is not included.
-
customization_code: The Field label for the special handling instructions.
-
customization_message: The Input of the special handling instructions.
-
-
Not included: Information that is not passed includes:
-
standard special handling instructions
-
payment methods
-
UPC or EAN codes
-
any items on the pick slip that are not flagged as OROB eligible
-
any order lines that were not included on the pick slip (for example, items shipping separately, backorders, or drop ships; these items create separate ship-for-pickup orders in Order Broker)
-
any phone numbers or email address entered for the ship-to address
<ns2:SubmitOrder xmlns:ns2="http://retail.com/Locate">
<ns2:order_request_message>
<message_header message_type="SubmitOrder" xaction_response="1" xaction_type="INSERT">
<datetime>2015-02-24T10:45:09</datetime>
<version>5.0</version>
<source>0060001234500100000</source>
<destination>LOCATE</destination>
</message_header>
<message_body>
<transactions>
<transaction_header transaction_type_id="SHIPTOSTORE" transaction_no="00012345-001" request_id="" order_id="12345-001">
<ref_transaction_no></ref_transaction_no>
<transaction_date>2015-02-24T10:45:09</transaction_date>
<employee_id>CWS</employee_id>
<transaction_subtotal>8.75</transaction_subtotal>
<transaction_tax>2.0999999046325684</transaction_tax>
<transaction_total>42.94</transaction_total>
<special_instructions></special_instructions>
<transaction_status>new_order</transaction_status>
<transaction_channel>1</transaction_channel>
<ship_via>50</ship_via>
<ship_via_description>FEDERAL EXPRESS 2-DAY</ship_via_description>
<gift>N</gift>
<source_code>PROMOS</source_code>
<freight_amount>32.09000015258789</freight_amount>
<balance_due>0</balance_due>
<currency>US</currency>
<order_additional_freight_charges>2.50</order_additional_freight_charges>
<order_additional_charges>-1.23</order_additional_charges>
<ship_complete>N</ship_complete>
<freight_tax>0.00</freight_tax>
<order_message>Order message flagged P
Order message 2 flagged P</order_message>
<gift_message>Order message flagged G
Another order message flagged G</gift_message>
<under_review></under_review>
<sold_to_customer customer_no="000000006">
<name>
<company_name>EXAMPLE CONSULTING</company_name>
<prefix>MR.</prefix>
<first>FIRST</first>
<middle>Q</middle>
<last>Example</last>
<suffix>JR.</suffix>
</name>
<address>
<attention></attention>
<address1>257 Example Street</address1>
<address2></address2>
<address3></address3>
<address4></address4>
<apt>SUITE 123</apt>
<city>WORCESTER</city>
<province>MA</province>
<postal>01602-0008</postal>
<email>flast@example.com</email>
<phone1>5085550125</phone1>
<phone2>5085550126</phone2>
<country>US</country>
</address>
</sold_to_customer>
<store_location location_cd="1" system_cd="6" />
<shipforpickup_location system_cd="STC" location_cd="7"
<transaction_details>
<transaction_detail line_item_no="2">
<location_cd>1</location_cd>
<system_cd>6</system_cd>
<item_id>PEN BLUE </item_id>
<qty>3</qty>
<unit_price>2.25</unit_price>
<ship_to>
<name>
<company_name>MR STORE 317</company_name>
<prefix></prefix>
<first></first>
<middle></middle>
<last></last>
<suffix></suffix>
</name>
<address>
<attention>MR. FIRST </attention>
<address1>10 EXAMPLE STREET</address1>
<address2>ADDRESS LINE 2</address2>
<address3>ADDRESS LINE 3</address3>
<address4>ADDRESS LINE 4</address4>
<apt></apt>
<city>WEBSTER</city>
<province>MA</province>
<postal>01603</postal>
<email></email>
<phone1>5085550127</phone1>
<phone2>5085550128</phone2>
<country>US</country>
</address>
</ship_to>
<taxes>
<tax description="Tax" line_item_no="2">
<amount>0.33750</amount>
</tax>
</taxes>
<line_item_status>new_order</line_item_status>
<special_instructions></special_instructions>
<shipping_agent></shipping_agent>
<tracking_number></tracking_number>
<item_upc_cd></item_upc_cd>
<item_ean_cd></item_ean_cd>
<order_line_extended_freight>0.00</order_line_extended_freight>
<order_line_customization_charge>0.00</order_line_customization_charge>
<order_line_gift_wrap>N</order_line_gift_wrap>
<order_line_ship_alone>N</order_line_ship_alone>
<order_line_ship_weight>0.150</order_line_ship_weight>
<order_line_message>Order line message flagged P
Order line message 2 flagged P</order_line_message>
<customizations />
</transaction_detail>
<transaction_detail line_item_no="1">
<location_cd>1</location_cd>
<system_cd>6</system_cd>
<item_id>PENCIL </item_id>
<qty>2</qty>
<unit_price>1.0</unit_price>
<ship_to>
<name>
<company_name>MR STORE 317</company_name>
<prefix></prefix>
<first></first>
<middle></middle>
<last></last>
<suffix></suffix>
</name>
<address>
<attention>MR. FIRST </attention>
<address1>10 EXAMPLE STREET</address1>
<address2>ADDRESS LINE 2</address2>
<address3>ADDRESS LINE 3</address3>
<address4>ADDRESS LINE 4</address4>
<apt></apt>
<city>WEBSTER</city>
<province>MA</province>
<postal>01603</postal>
<email></email>
<phone1>5085550129</phone1>
<phone2>5085550130</phone2>
<country>US</country>
</address>
</ship_to>
<taxes>
<tax description="Tax" line_item_no="1">
<amount>1.59700</amount>
</tax>
</taxes>
<line_item_status>new_order</line_item_status>
<special_instructions></special_instructions>
<shipping_agent></shipping_agent>
<tracking_number></tracking_number>
<item_upc_cd></item_upc_cd>
<item_ean_cd></item_ean_cd>
<order_line_extended_freight>0.00</order_line_extended_freight>
<order_line_customization_charge>10.00</order_line_customization_charge>
<order_line_gift_wrap>Y</order_line_gift_wrap>
<order_line_ship_alone>N</order_line_ship_alone>
<order_line_ship_weight>1.000</order_line_ship_weight>
<order_line_message></order_line_message>
<customizations>
<customization>
<customization_code>FIRST NAME LABL
</customization_code>
<customization_message>FIRST
</customization_message>
</customization>
<customization>
<customization_code>COLOR FLD
LBL</customization_code>
<customization_message>black
</customization_message>
</customization>
<customization>
<customization_code>LAST NAME
LABEL</customization_code>
<customization_message>EXAMPLE</customization_message>
</customization>
</customizations>
</transaction_detail>
</transaction_details>
</transaction_header>
</transactions>
</message_body>
</ns2:order_request_message>
</ns2:SubmitOrder>Submit Order Response Message Sample
The Routing Engine module in Order Broker returns this message when it receives the SubmitOrder request message for a successful store pickup, ship-for-pickup order, or brokered backorder (delivery or shipforpickup) request.
Information passed in the order response includes:
-
the concatenated company, order number, ship-to number, and order line sequence number, returned as the
destinationso that Order Management System can identify the company for the order -
a response code of 0 and the response description
Order Acknowledged, indicating that the order was successfully received -
request ID assigned by the Routing Engine to track the order in Order Broker
-
system and location code assigned to fulfill each item on the order
Order Management System matches the location code passed in the response message with the cross reference you have set up through the Work with Store Cross Reference (WSCR) option, and stores this information as the fulfilling location and description; see Order Broker Originating Location, Fulfilling Location, and Pickup Location.
<ns2:SubmitOrderResponse xmlns:ns2="http://retail.com/Locate">
<generic_response_message>
<message_header xaction_response="OK" xaction_type="INFO">
<datetime>2015-02-24T10:45:10.511</datetime>
<version>5.0</version>
<source>LOCATE</source>
<destination>0060001234500100000</destination>
</message_header>
<message_body>
<response order_id="12345-001" request_id="12345" response_code="0">
<response_description>Order Acknowledged</response_description>
<fulfillment_details>
<fulfillment_detail fulfillment_qty="3" fulfillment_location_cd="317" fulfillment_system_cd="SYSTEM01" item_id="PEN BLUE " requesting_system_line_no="2" line_no="1" />
<fulfillment_detail fulfillment_qty="2" fulfillment_location_cd="317" fulfillment_system_cd="SYSTEM01" item_id="PENCIL " requesting_system_line_no="1" line_no="2" />
</fulfillment_details>
</response>
</message_body>
</generic_response_message>
</ns2:SubmitOrderResponse>Order Inquiry Status Request Message Sample
If the Use OROB Status Inquiry List Web Service (M05) system control is set to NO or blank, pick slip generation sends this message to Order Broker to confirm that each eligible retail pickup and delivery orders order has not been canceled and is still eligible for shipment.
If the Use OROB Status Inquiry List Web Service (M05) system control value is set to CANCELED or ALL, pick slip generation sends the status list request instead. See the Order Status List Request Message Sample and Order Status List Response Message Sample for examples.
Message contents: Information passed in the message includes:
-
the concatenated company, order number, ship-to number, and order line sequence number (passed as the
source) -
the request ID assigned by the Routing Engine to track the order in Order Broker
-
the requesting location code, from the OROB Default Location (K51) if the Send Inventory by Warehouse to OROB (L06) system control value is unselected; otherwise, it is from the warehouse’s OROB location
-
the requesting system code, from the OROB System (K50)
-
the OROB_MESSAGE_VERSION from Working with Customer Properties (PROP)
<ns2:StatusRequest xmlns:ns2="http://retail.com/Locate">
<ns2:status_request_message>
<message_header xaction_type="INSERT" xaction_response="?" message_type="StatusRequest">
<datetime>2015-02-24</datetime>
<version>5.0</version>
<source>0060001234500100000</source>
<destination>LOCATE</destination>
</message_header>
<message_body>
<lookup_data order_id="" request_id="12345">
<ref_transaction_no></ref_transaction_no>
<employee_id></employee_id>
<store_location location_cd="1" system_cd="6"/>
</lookup_data>
</message_body>
</ns2:status_request_message>
</ns2:StatusRequest>Order Inquiry Status Response Message Sample
The Routing Engine module in Order Broker returns this response when it receives the status request message for an order. Information passed in the message includes:
-
The concatenated company, order number, and ship-to number from the request message (passed as the
destination). -
Most of the same customer, address, and item information that was passed in the Submit Order message, except that the status response message does not include all dollar amounts.
-
The current status of the order and order lines in Order Broker, and the currently assigned fulfilling location(s) and system(s). The items on the order can be assigned to multiple fulfilling locations if the Use Split Order (L56) system control value is selected. See that system control value for a discussion.
-
Tracking information:
-
The shipping agent and tracking number, if available, for a fulfilled order or line. Order Management System writes Order Transaction History messages to note this information, such as
----VIA: ABCand----TRK#: ABC123. When Order Management System creates the Order Shipment Details record, it sets the shipping agent code asship_viaand sets theshipping_agentto the description of the ship via. -
If the shipping agent passed matches a ship via code in Order Management System, then the description of the ship via is included in the shipment confirmation email to the customer, and the tracking number in the email is a live link.
-
The
shipment_date, if passed, can indicate the actual date when the fulfilling location shipped the order line. This tag, which is passed only if the OROB_MESSAGE_VERSION is set to 19.0 or higher, indicates the actual shipment date from the fulfilling system if that system submitted the date through the status update message to Order Broker. -
The shipment information passed for each shipped item is written to the order shipment details table. This information is available to include the CWEmailOut message for shipment confirmations, as well as through the Narvar Integration.
-
See the Shipment Confirmation Email Sample and Contents and the Outbound Email XML Message (CWEmailOut) for more information. Also, the shipping agent and tracking number, if available, are included in the Detailed Order Inquiry Response XML Message (CWORDEROUT) through the customer history API.
For more information see the Web Services Guide on My Oracle Support (ID 2149144.1).
-
Note:
The tracking information is not available as a live link on screens.<ns2:StatusRequestResponse xmlns:ns2="http://retail.com/Locate">
<status_response_message>
<message_header xaction_response="OK" xaction_type="INFO">
<datetime>2015-03-03T13:30:03.774</datetime>
<version>5.0</version>
<source>LOCATE</source>
<destination>0060001234500100000</destination>
</message_header>
<message_body>
<orders>
<order currency="" ref_transaction_no="" balance_due="0.0" freight="7.0" source_code="PROMOS" gift="N" ship_via_description="UNITED PARCEL SERVICE COMPANY" ship_via="1" special_instructions="" transaction_total="17.85" transaction_tax="0.85" transaction_subtotal="10.0" order_date="2015-02-24T14:11:58.000" originating_location_description="Main Distribution Center" originating_location_cd="1" originating_system_cd="6" order_status="polled" order_id="12345-001" request_id="12345" under_review="N" order_additional_freight_charges="5.0000" order_additional_charges="0.0000" ship_complete="N" freight_tax="0.0000">
<order_type>2</order_type>
<items>
<item special_instructions="" tax_amount="0.5" unit_price="10.0" item_description="TEST FOR ORDER BROKER" status_date="2015-02-24T14:11:58.877" requesting_system_line_no="1" line_no="1" fulfilling_system_cd="STC" fulfilling_location_cd="5678" item_status="polled" tracking_number="" shipping_agent="" item_qty="1" item_id="KABNOSKU" item_upc_cd="abcdefghijklmnopqrstuvwxyz" item_ean_cd="EANCUMIN" order_line_extended_freight="0.0000" order_line_customization_charge="0.0000" order_line_gift_wrap="N" order_line_ship_alone="Y" order_line_ship_weight="1.110">
<ship_to>
<name>
<company_name>EXAMPLE CONSULTING</company_name>
<prefix>MR.</prefix>
<first>FIRST</first>
<middle>Q</middle>
<last>Example</last>
<suffix>JR.</suffix>
</name>
<address>
<attention></attention>
<address1>257 EXAMPLE STREET</address1>
<address2></address2>
<address3></address3>
<address4></address4>
<apt>SUITE 123</apt>
<city>WORCESTER</city>
<province>MA</province>
<postal>01602-0008</postal>
<email>flast@example.com</email>
<phone1>5085550131</phone1>
<phone2>5085550132</phone2>
<country>US </country>
</address>
</ship_to>
<taxes>
<tax description="Tax" line_item_no="1">
<amount>0.5000</amount>
</tax>
</taxes>
<customizations/>
</item>
</items>
<sold_to_customer customer_no="000000006">
<name>
<company_name>EXAMPLE CONSULTING</company_name>
<prefix>MR.</prefix>
<first>FIRST</first>
<middle>Q</middle>
<last>Example</last>
<suffix>JR.</suffix>
</name>
<address>
<address1>257 EXAMPLE STREET</address1>
<address2></address2>
<address3></address3>
<address4></address4>
<apt>SUITE 123</apt>
<city>WORCESTER</city>
<province>MA</province>
<postal>01602-0008</postal>
<email>flast@example.com</email>
<phone1>5085550133</phone1>
<phone2>5085550134</phone2>
<country>US </country>
</address>
</sold_to_customer>
<transaction_tenders/>
</order>
</orders>
</message_body>
</status_response_message>
</ns2:StatusRequestResponse>Order Status List Request Message Sample
Both the BROKER job and pick slip generation generate the order status list request message.
BROKER Job
The BROKER job periodically checks the status of open orders as follows.
How often? The Order Broker Status Update Interval (K10) system control value defines the number of minutes that the BROKER process in Working with Integration Layer Processes (IJCT) should wait between sending status inquiry or update request messages to Order Broker for an individual order.
Sequence by Broker status: When the BROKER process generates this request, it includes order lines within each company based on their Order Broker status, sending all orders in a company that are in the same status before beginning to send orders in the next status. For example, it sends all orders in K status in company 1 before beginning to send orders in O status in company 1.
The sequence is:
-
Acknowledged (K)
-
Posted (O)
-
Polled (P)
-
Accepted (A)
After checking for orders by these statuses, the process generates fulfillments requests. See the Fulfillments Request Message Sample (Retail Pickup, Ship-for-Pickup, or Delivery Orders) for more information.
Checking if under review: In cases where an order is on AU (Broker Order Under Review) hold, if the response indicates that the order is no longer under review, it removes the AU hold, if any, on the order. However, if the response from Order Broker indicates that the order is now canceled, the order is put on hold using the Order Broker Hold Reason (Cancel) (L02). If that system control value is blank, the order remains on AU hold. See Reauthorization and Under Review Hold Scenarios for Orders Fulfilled through Order Broker for background.
Next, order lines in the following statuses are checked, if eligible, based on the OROB_LIMITED_STATUS_BEG_TIME and OROB_LIMITED_STATUS_END_TIME properties, as described below:
-
Partial Fulfill (L)
-
Received by Store (S)
-
In Transit (T)
-
In Transit Polled (V)
Note:
-
Between processing each group of orders as described above, the process checks to see if the BROKER job is in Ending status. If so, it ends the job before processing the next group of orders by status.
-
The setting of the Order Broker Status Update Interval (K10) system control value does not control status inquiry requests for Order Broker records whose current status is In Transit, Received by Store, or Partial Fulfill; the BROKER process sends these requests once a day based on the
OROB_LIMITED_STATUS_BEG_TIMEandOROB_LIMITED_STATUS_END_TIMEproperties in Working with Customer Properties (PROP) and the setting of the Use OROB for Ship for Pickup Fulfillment Assignment (M34) system control value; see Setting the Daily Status Inquiry Time Window (all versions). -
The BROKER process does not include an order line in Completed, Fulfilled, Closed, Error, Rejected, or Canceled status in the status inquiry list request message.
Pick Slip Generation
To determine whether any retail pickup or delivery orders have been canceled by the originating system or are under review, pick slip generation sends the status list request to Order Broker for all retail pickup and delivery orders eligible for pick slips based on their status, item availability, and the pick slip selection criteria.
Based on the setting of the Use OROB Status Inquiry List Web Service (M05) system control value:
-
If the system control value is set to CANCELED, the status list request specifies to return an order in the response only if its current status is canceled, including the following:
<statuses><statuses status="canceled"/></statuses> -
If the system control value is set to ALL, the status list request does not specify to return orders based on a status. The
statusestag is not included.
Otherwise, if the system control value is set to NO, pick slip generation sends the order status request instead. See Order Inquiry Status Request Message Sample for more information.
For more information: See Retail Pickup (including Ship-for-Pickup) or Delivery Processing after Order Creation for a process overview, and see Use OROB Status Inquiry List Web Service (M05) for more details.
Maximum Number of Request IDs
Each status list request includes no more than the maximum number of request IDs specified in the OROB_MAXIMUM_STATUS_LIST_REQUEST_ORDERS property.
-
Pick slip generation example: if the property is set to 500 and there are 1200 request IDs eligible for pick slip generation, pick slip generation sends:
-
A status list request for the first 500 request IDs;
-
A status list request for the second 500 request IDs;
-
A status list request for the remaining 200 request IDs.
-
-
BROKER process example: If the property is set to 500 and there are 1200 request IDs in status K in company 1, the BROKER process sends:
-
A status list request for the first 500 request IDs in company 1 in status K;
-
A status list request for the second 500 request IDs in company 1 in status K;
-
A status list request for the remaining 200 request IDs in company 1 in status K;
-
If the BROKER process is not ending, it starts generating a status list request for request IDs in the company that are in the next status, applying the same rules.
-
If there are no request IDs orders to inquire on in company 1, the process starts generating the status list request for request IDs in company 2.
-
Regardless of the setting of the property, no more than 1000 request IDs are included in each status list request.
Message contents: Information passed in the message includes:
-
The request ID assigned by Order Broker to track the retail pickup or delivery order in Order Broker
-
The requesting system code, from the OROB System (K50)
-
The OROB_MESSAGE_VERSION (5.0 or higher) from Working with Customer Properties (PROP)
-
A
response_typeofSUMMARYis passed when this message is sent during pick slip generation; otherwise, no response type is indicated. -
A requested status of
canceledis passed when this message is sent during pick slip generation if the Use OROB Status Inquiry List Web Service (M05) system control value is set to CANCELED. -
The OROB Default Location (K51) is passed as the
location_cdwhen this message is sent through the BROKER job.
The following sample illustrates a request generated at pick slip
generation when the Use OROB Status Inquiry List Web Service (M05) system
control value is set to CANCELED. Otherwise, no status is specified.
<ns2:StatusListRequest xmlns:ns2="http://retail.com/Locate">
<ns2:status_list_request_message>
<message_header xaction_type="INSERT" xaction_response="?" message_type="StatusListRequest">
<datetime>2015-03-03</datetime>
<version>5.0</version>
<source></source>
<destination>LOCATE</destination>
</message_header>
<message_body>
<lookup_data response_type="SUMMARY" status_condition="EQ">
<ref_transaction_no></ref_transaction_no>
<employee_id></employee_id>
<store_location location_cd="" system_cd="6"/>
<request_ids>
<request_ids request_id="11111"/>
<request_ids request_id="22222"/>
<request_ids request_id="33333"/>
<request_ids request_id="44444"/>
</request_ids>
<statuses>
<statuses status="canceled"/>
</statuses>
</lookup_data>
</message_body>
</ns2:status_list_request_message>
</ns2:StatusListRequest>Order Status List Response Message Sample
Usage by the BROKER process: When the BROKER process receives the response, Order Management System:
-
Updates the Order Broker history for the order if the status has changed to Accepted or Fulfilled; otherwise, it does not update Order Broker history. However, it does update Order Transaction History for other status changes.
-
If the response message indicates that the order status has changed to Canceled, Order Management System creates an Order Broker history record indicating that an error occurred, and clears the printed quantity for the order line.
-
If the response message indicates a change in the Under Review setting, the system adds or removes the AU (Broker Order Under Review) hold. See Reauthorization and Under Review Hold Scenarios for Orders Fulfilled through Order Broker for background.
Note:
If one or more of the request IDs specified in the status list request message are not valid in Order Broker, the response message from Order Broker does not include these request IDs or return an error; however, Order Broker writes an entry in its error log for each invalid request ID, for example:2020-08-29 16:57:06,935
ERROR Error: Status List Request ID Invalid: 1234567 where
1234567 is the invalid request ID.
Usage during pick slip generation:
-
Canceled retail pickup or delivery orders: The status list response message includes information on each canceled retail pickup or delivery order specified in the status list request message when the Use OROB Status Inquiry List Web Service (M05) system control value is set to CANCELED.
-
All retail pickup or delivery orders: During pick slip generation, the status list response message includes information on all retail pickup and delivery orders specified in the order status list request message if the Use OROB Status Inquiry List Web Service (M05) system control value is set to ALL.
If the Use OROB Status Inquiry List Web Service (M05) system control value is set to NO or blank, the order status inquiry request is sent during pick slip generation instead of the order status list request. See Order Inquiry Status Request Message Sample for a sample message.
Shipping and tracking information: The
status list response message includes the shipment_date, shipping_agent, and tracking_number for a fulfilled order line, provided:
-
The OROB_MESSAGE_VERSION property (PROP) in Order Management System is set to 19.0 or higher, and
-
The release of Order Broker is 19.0.5, or 19.3 or higher, and
-
The fulfilling system passed the
status_date,shipping_agent, andtracking_numberto Order Broker in the status update request message when the order line was fulfilled.
Otherwise, the shipment_date passed is from
when the status of the line was changed to fulfilled in Order Broker.
For other types of status updates, the status_date indicates when the status was updated in Order Broker.
For more information: See the Order Status List Request Message Sample for a discussion on generating the status list request message and its criteria, and see the Order Status List Response Message Sample for information on additional fields returned in the status list response.
<ns0:StatusListRequestResponse xmlns:ns0="http://microsretail.com/Locate">
</status_list_request_message>
<message_header xaction_response="OK" xaction_type="INFO">
<datetime>2020-09-05T12:08:47.745</datetime>
<version>18.0</version>
<source>Locate</source>
<destination>Sample</destination>
</message_header>
<message_body>
<orders>
<order request_id="12345" order_id="12345-01" order_status="polled" originating_system_cd="SYS1" originating_location_cd="1" originating_location_description="Warehouse 1" order_date="2020-08-28T11:59:22.000" ref_transaction_no=" " under_review="N">
<order_type>1</order_type>
<items>
<item item_id="BD1001" item_qty="1" shipping_agent="" tracking_number="" item_status="polled" fulfilling_location_cd="21" fulfilling_system_cd="STC" line_no="1" requesting_system_line_no="11" status_date="2020-08-28T07:59:23.000" fulfillment_id="" />
</items>
</order>
<order request_id="23456" order_id="23456-001" order_status="fulfilled" originating_system_cd="SYS1" originating_location_cd="3" originating_location_description="Originating Location" order_date="2020-09-03T16:06:51.000" ref_transaction_no=" " under_review="N">
<order_type>2</order_type>
<items>
<item item_id="ITEM" item_qty="1" shipping_agent="2" tracking_number="TRACKING_NBR" item_status="fulfilled" fulfilling_location_cd="101" fulfilling_system_cd="POS_SYS" line_no="1" requesting_system_line_no="2" status_date="2020-09-03T13:39:09.000" fulfillment_id="12345" shipment_date="2020-08-30" />
</items>
</order>
</orders>
</message_body>
</status_list_request_message>
</ns0:StatusListRequestResponse>Order Status Update Cancel Request Message Sample (Brokered Backorder or Store Pickup)
The only status update message that Order Management System sends to Order Broker for a brokered backorder or store pickup is the cancel request. The BROKER_ORD process generates this request. Information passed in this message includes:
-
OROB_MESSAGE_VERSION from Working with Customer Properties (PROP)
-
request ID assigned by Order Broker
-
requesting location code from the OROB Default Location (K51) if the Send Inventory by Warehouse to OROB (L06) system control value is unselected; otherwise, from the warehouse’s OROB location
-
requesting system code from the OROB System (K50)
-
the requested status of
canceled -
the cancellation reason code and description
Order-level or item-level status updates: If you use the split order option, Order Broker uses the line_no to identify the item to update (the item code is
not passed), and updates the item with the:
-
item_status -
item_status_reason_code: cancel reason code -
item_status_reason_note: cancel reason description
Otherwise, Order Broker updates the entire order with the:
-
order_statusAnd updates each line with the:
-
order_status_reason_code: cancel reason code -
order_status_reason_note: cancel reason description
Note:
If you do not split orders and you cancel multiple items with different cancel reasons during a single order maintenance session, the cancel reason code and description sent to Order Broker may both be from the first line canceled.See the Use Split Order (L56) system control value for a discussion of splitting orders.
<ns2:StatusUpdate xmlns:ns2="http://retail.com/Locate">
<ns2:status_update_request_message>
<message_header xaction_response="1" xaction_type="INSERT" message_type="">
<datetime>2015-03-03T15:08:45</datetime
><version>5.0</version>
<source>0060001234500100000</source>
<destination>LOCATE</destination>
</message_header>
<message_body>
<order request_id="12345" order_id="" order_status="canceled" order_status_reason_code="" order_status_reason_note="">
<employee_id></employee_id>
<store_location location_cd="1" system_cd="6"/>
<items>
<item item_id="" item_qty="0" shipping_agent="" tracking_number="" item_status="canceled" fulfilling_location_cd="" fulfilling_system_cd="" line_no="1" requesting_system_line_no="0" status_date="" item_status_reason_code="1" item_status_reason_note="CUSTOMER REQUEST"/>
<item item_id="" item_qty="0" shipping_agent="" tracking_number="" item_status="canceled" fulfilling_location_cd="" fulfilling_system_cd="" line_no="2" requesting_system_line_no="0" status_date="" item_status_reason_code="8" item_status_reason_note="FOUND BETTER DEAL ELSEWHERE"/>
</items>
</order>
</message_body>
</ns2:status_update_request_message>
</ns2:StatusUpdate>Order Status Update Cancel Response Message Sample
Order Broker responds to the cancel request for a brokered
backorder or store pickup indicating either a success or a failure.
The only reason why a cancel request for an identified order might
fail is if the order is already in the requested status in the Order
Broker database; in this case, the result indicated in the message
is FAILED rather than OK.
This response message does not identify the order number.
<ns2:StatusUpdateResponse xmlns:ns2="http://retail.com/Locate">
<generic_response_message>
<message_header xaction_response="OK" xaction_type="INFO">
<datetime>2015-03-03T15:08:45.377</datetime>
<version>5.0</version>
<source>LOCATE</source>
<destination>0060001234500100000</destination>
</message_header>
<message_body>
<response order_id="" request_id="12345" response_code="0">
<response_description>Status updated successfully.</response_description>
</response>
</message_body>
</generic_response_message>
</ns2:StatusUpdateResponse>Fulfillments Request Message Sample (Retail Pickup, Ship-for-Pickup, or Delivery Orders)
Requesting location: If the Order Broker Values (K15), including the Order Type for Orders Brokered for Delivery (K91) and Order Type for Retail Pickup Orders Brokered to OROMS (K92), are specified, Order Management System periodically sends fulfillments requests to Order Broker to poll for newly assigned orders. The BROKER process generates this request.
Separate requests by warehouse? If the Send Inventory by Warehouse to OROB (L06) system control value is selected, Order Management System sends a separate request for each warehouse that has a OROB location specified; otherwise, it sends a single fulfillments request for the OROB Default Location (K51).
Note:
If the Send Inventory by Warehouse to OROB (L06) system control value is selected but you do not define a valid OROB location in Creating and Maintaining Warehouses (WWHS), fulfillments requests are not sent to Order Broker.Message contents: Information passed in the fulfillments request message includes:
-
source and system: from the OROB System (K50)
-
version: from OROB_MESSAGE_VERSION in Working with Customer Properties (PROP)
-
destination: from the OROB Account (K49)
-
location code: from the OROB Default Location (K51) if the Send Inventory by Warehouse to OROB (L06) system control value is selected; otherwise, it is from the warehouse’s OROB location field. A message is generated for a warehouse only if you specified its OROB location.
How often? Order Management System sends these messages periodically based on the Outbound delay time specified through Working with Integration Layer Processes (IJCT).
<ns2:Fulfillments xmlns:ns2="http://retail.com/Locate">
<ns2:fulfillment_request_message>
<message_header xaction_type="INSERT" xaction_response="" message_type="">
<datetime>2015-03-03</datetime>
<version>5.0</version>
<source>6</source>
<destination>LOCATE</destination>
</message_header>
<message_body>
<store_location location_cd="1" system_cd="6"/>
</message_body>
</ns2:fulfillment_request_message>
</ns2:Fulfillments>Fulfillments Response Message Sample
Order Broker sends the fulfillments response when it receives the fulfillments request message.
Number of request IDs: The response message includes no more than 1000 request IDs.
For more information: See Building the Retail Pickup (including Ship-for-Pickup) or Delivery Order for details on how Order Management System uses the information in this message to create new orders.
<ns2:FulfillmentsResponse xmlns:ns2="http://retail.com/Locate">
<fulfillment_response_message>
<message_header xaction_response="OK" xaction_type="INFO">
<datetime>2015-02-25T16:58:57.544</datetime>
<version>5.0</version>
<source>LOCATE</source>
<destination>6</destination>
</message_header>
<message_body>
<orders>
<order transaction_no="originating trans ID" transaction_type_id="DELIVERY" request_id="12345" order_id="12345" transaction_status="new_order">
<ref_transaction_no></ref_transaction_no>
<transaction_date>2015-02-25T00:00:00.000</transaction_date>
<employee_id>EXAMPLE</employee_id>
<transaction_subtotal>1.0123</transaction_subtotal>
<transaction_tax>1.0123</transaction_tax>
<transaction_total>1.0123</transaction_total>
<special_instructions>special_instructions</special_instructions>
<transaction_channel>1</transaction_channel>
<ship_via>01</ship_via>
<ship_via_description>Ship via description</ship_via_description>
<gift>Y</gift>
<source_code>SOURCE</source_code>
<freight_amount>9.0123</freight_amount>
<balance_due>99.0112</balance_due>
<currency>US</currency>
<under_review>N</under_review>
<order_additional_freight_charges>1.1235</order_additional_freight_charges>
<order_additional_charges>2.1235</order_additional_charges>
<ship_complete>Y</ship_complete>
<freight_tax>1.0000</freight_tax>
<order_message>This is an order message at the
transaction_header level</order_message>
<gift_message>This is a
gift message at the
transaction_header level</gift_message>
<sold_to_customer customer_no="0000006">
<name>
<company_name>Example Industries</company_name>
<prefix>Mr.</prefix>
<first>FIRST</first>
<middle>Q</middle>
<last>Example</last>
<suffix>Jr.</suffix>
</name>
<address>
<address1>4444 Example Street</address1>
<address2>address 2</address2>
<address3>address 3</address3>
<address4>address 4</address4>
<apt>apt 123</apt>
<city>Worcester</city>
<province>MA</province>
<postal>01602</postal>
<email>flast@example.com</email>
<phone1>5085550135</phone1>
<phone2>5085550136</phone2>
<country>US </country>
</address>
</sold_to_customer>
<store_location request_system_cd="cws13doc" request_location_cd="317" system_cd="6" location_cd="1" />
<items>
<item_detail requesting_system_line_no="11" line_item_status="new_order" line_item_no="1">
<location_cd>1</location_cd>
<system_cd>6</system_cd>
<item_id>PENCIL</item_id>
<qty>2</qty>
<unit_price>9.95</unit_price>
<ship_to>
<name>
<company_name>Example Industries</company_name>
<prefix>Ms.</prefix>
<first>First</first>
<middle>Q</middle>
<last>LastName</last>
<suffix>Jr.</suffix>
</name>
<address>
<attention>attention</attention>
<address1>1234 Example Street</address1>
<address2>address2</address2>
<address3>address3</address3>
<address4>address4</address4>
<apt>11</apt>
<city>Worcester</city>
<province>MA</province>
<postal>01602</postal>
<email></email>
<phone1></phone1>
<phone2></phone2>
<country>US</country>
</address>
</ship_to>
<taxes>
<tax description="GST" line_item_no="1">
<amount>1.0123</amount>
</tax>
</taxes>
<special_instructions>special instructions</special_instructions>
<item_upc_cd>1234567890</item_upc_cd>
<item_ean_cd>2345678901</item_ean_cd>
<order_line_extended_freight>1.1235</order_line_extended_freight>
<order_line_customization_charge>2.1235</order_line_customization_charge>
<order_line_gift_wrap>Y</order_line_gift_wrap>
<order_line_ship_alone>N</order_line_ship_alone>
<order_line_ship_weight>3.126</order_line_ship_weight>
<order_line_message>This is an
order_line_
message</order_line_message>
<customizations>
<customization>
<customization_code>COLOR FLD
LBL</customization_code>
<customization_message>blue
</customization_message>
</customization>
<customization>
<customization_code>FIRST NAME
LABL</customization_code>
<customization_message>First
</customization_message>
</customization>
<customization>
<customization_code>LAST NAME
LABEL</customization_code>
<customization_message>LastName
</customization_message>
</customization>
</customizations>
</item_detail>
</items>
<transaction_tenders>
<transaction_tender line_item_no="1">
<tender_description>test</tender_description>
<tender_amount>1.0123</tender_amount>
<tender_account></tender_account>
</transaction_tender>
</transaction_tenders>
</order>
</orders>
</message_body>
</fulfillment_response_message>
</ns2:FulfillmentsResponse>Order Status Update Sample (Retail Pickup, Delivery, or Ship-for-Pickup, and Fulfilling Orders)
Retail pickup or delivery status updates: Order Management System notifies Order Broker when a retail pickup or delivery order is picked, shipped, or sold out. The BROKER process generates this request.
Fulfilling order updates: This message is also generated for a fulfilling order for an order that originated in Order Management System, was submitted to Order Broker for assignment, and that Order Broker assigned to Order Management System for fulfillment. See the Use OROB for Fulfillment Assignment (M31) system control value for background.
Similarly, this message is generated when a ship-for-pickup order assigned to Order Management System for sourcing is in transit.
If the fulfilled or intransit update fails: If Order Management System does not receive a response to the update request for a shipped delivery order or an intransit ship-for-pickup order, the billing async job sets the status of the Order Broker record in Order Management System to:
-
G (Resend Fulfilled) for a delivery order, or
-
H (Resend Intransit) for a ship-for-pickup order.
The BROKER_ORD job then sends another update request the next time it runs.
A request might not be received if, for example, message authentication failed, or communication with Order Broker was down.
Canceling a retail pickup or delivery order: If you cancel a retail pickup or delivery order or order line, Order Management System changes the Order Broker record’s status to Canceled and sends a status inquiry request to Order Broker. If the order’s status in Order Broker is:
-
Canceled: Order Management System does not send a status update to Order Broker; otherwise,
-
If the order’s status in Order Broker is anything but Canceled, Order Management System sends a status update to Order Broker indicating the status is Rejected. In this situation, Order Broker then changes the order status to New_order.
Important:
If Order Broker is configured to “reshop” (the Search retries setting at the Preferences screen is not set to 0), then in this situation Order Broker attempts to assign the order to another location for fulfillment.Ship-for-pickup status updates: Order Management System notifies Order Broker when a ship-for-pickup order is shipped, or if you cancel the order or order line. In certain situations, it also notifies Order Broker when you void a pick slip for a ship-for-pickup order. For more information, see Updates to a Ship-for-Pickup Order in Order Management System.
Brokered backorder or store pickup: The only notification that Order Management System sends for brokered backorders or store pickup orders is the cancel notice. See Order Status Update Cancel Request Message Sample (Brokered Backorder or Store Pickup) for more information.
Information included in the status update:
-
location code: from the OROB Default Location (K51) if the Send Inventory by Warehouse to OROB (L06) system control value is unselected; otherwise, from the OROB location from the warehouse associated with the order
-
system code: from the OROB System (K50)
-
request id: the unique request ID number that Order Broker uses to track each order
-
status: the new status. From Order Broker’s status description, rather than the order or Order Broker status in Order Management System
-
destination: from the OROB Account (K49)
-
shipping agent: for shipments, the notification includes the code of the ship via actually used, if this information is available. Not included for a cancellation.
Note:
Because Order Management System includes the ship via description rather than the code in this message when a fulfilling order ships, the Narvar Order Request Message for a fulfilling order does not include a valid ship via code. As a result, the shipment notification messages generated through the Narvar Integration do not include a live shipping link. -
ship tracking number: for shipments, the notification includes the shipper’s tracking number, if this information is available
-
cancellation reason code and description: If you:
-
cancel the order in order maintenance: the entered cancel reason is sent
-
void the pick slip through the generic pick in API: the Cancel Reason (Pick In) (L86) system control value is sent, or the backorder cancellation reason code, if it is specified in the CWPickIn XML Message,
-
reject the batch that includes the retail pickup or delivery order: no cancel reason is sent
-
For more information see the Web Services Guide on My Oracle Support (ID 2149144.1).
Order-level or item-level status updates: If you use the split order option, Order Broker updates the
item with the item_status; otherwise, Order Broker updates
the entire order with the order_status. See the Use
Split Order (L56) system control value for a discussion of splitting
orders.
<ns2:StatusUpdate xmlns:ns2="http://retail.com/Locate" xmlns:ns3="http://retail.com/LocatePurchasing">
<ns2:status_update_request_message>
<message_header xaction_response="" xaction_type="" message_type="">
<datetime>2014-07-11</datetime>
<version>5.0</version>
<source>OROMS</source>
<destination>LOCATE</destination>
</message_header>
<message_body>
<order request_id="12345" order_id="" order_status="canceled" order_status_reason_code="8" order_status_reason_note="FOUND BETTER PRICE ELSEWHERE">
<employee_id></employee_id>
<store_location location_cd="1" system_cd="6" />
<items>
<item item_id="" item_qty="0" shipping_agent="" tracking_number="" item_status="" fulfilling_location_cd="" fulfilling_system_cd="" line_no="0" requesting_system_line_no="0" status_date="" item_status_reason_code="" item_status_reason_note="" />
</items>
</order>
</message_body>
</ns2:status_update_request_message>
</ns2:StatusUpdate>Order Update Request Sample (Changing the Under Review Setting for a Brokered Backorder or Store Pickup Order)
Changing the Under Review setting for a brokered backorder: If the Send Held Orders to OROB (M18) system control value is selected, Order Management System submits brokered backorders to Order Broker to fulfillment even if the order is held. With this setting, Order Management System uses the order update message to notify Order Broker if the order’s status changes from held to open, or vice versa. The BROKER process generates this request.
This message indicates a change to the setting of the Under Review flag in Order Broker. If the fulfilling location’s system supports it, this flag in the SubmitOrder message indicates that the order is not yet eligible for fulfillment, but that the inventory can be reserved and prepared for shipping. Once the Under Review flag is cleared, the order is eligible for shipment by the fulfilling location.
See the Send Held Orders to OROB (M18) system control value for a discussion.
Changing the Under Review setting for a store pickup order: If a store pickup order is held, Order Management System still submits it to Order Broker; however, if the order is held and the Payment at POS for Store Pickup (M16) system control value is unselected, Order Management System submits the order with the Under Review flag selected. This flag indicates that the order should not be picked up until the Under Review flag is cleared, because Order Management System needs to be able to collect payment first, but enables the store associates with the opportunity to reserve the inventory and prepare the order in the meantime. When the order is released from hold, Order Management System sends an order update indicating to clear the Under Review flag if the Payment at POS for Store Pickup (M16) system control value is unselected.
Selecting the Under Review setting when a reauthorization fails: This message is generated when an attempt to reauthorize an expired authorization fails. See Reauthorizing Expired Authorizations.
Information included in the order update:
-
version: From OROB_MESSAGE_VERSION in Working with Customer Properties (PROP)
-
source: The concatenated company, order number, ship-to number, and order line sequence number
-
request id: The unique request ID number that Order Broker uses to track each order
-
order ID: The Order Management System order number, including the ship-to number
-
under review flag: Set to
Nif the order was released from hold; otherwise, set toYif the order was previously open and then placed on hold -
employee ID: The employee ID of the person who performed the update
-
location code: from the OROB Default Location (K51) if the Send Inventory by Warehouse to OROB (L06) system control value is unselected; otherwise, from the OROB location from the warehouse associated with the order
-
system code: from the OROB System (K50)
<ns2:StatusUpdate xmlns:ns2="http://retail.com/Locate">
<ns2:status_update_request_message>
<message_header xaction_response="" xaction_type="" message_type="">
<datetime>2015-03-03</datetime>
<version>5.0</version>
<source>OROMS</source>
<destination>LOCATE</destination>
</message_header>
<message_body>
<order request_id="12345" order_id="" order_status="" order_status_reason_code="" order_status_reason_note="">
<employee_id></employee_id>
<store_location location_cd="1" system_cd="6"/>
<items>
<item item_id="" item_qty="0" shipping_agent="12" tracking_number="ABC1234567890" item_status="intransit" fulfilling_location_cd="" fulfilling_system_cd="" line_no="1" requesting_system_line_no="0" status_date="" item_status_reason_code="" item_status_reason_note=""/>
</items>
</order>
</message_body>
</ns2:status_update_request_message>
</ns2:StatusUpdate>Order Update Response Sample
Order Broker returns this response to the Order Update Request Sample (Changing the Under Review Setting for a Brokered Backorder or Store Pickup Order). See that sample message for background.
<ns2:StatusUpdateResponse xmlns:ns2="http://retail.com/Locate">
<generic_response_message>
<message_header xaction_response="OK" xaction_type="INFO">
<datetime>2015-03-03T15:27:36.290</datetime>
<version>5.0</version>
<source>LOCATE</source>
<destination>OROMS</destination>
</message_header>
<message_body>
<response order_id="" request_id="12345" response_code="0">
<response_description>Status updated successfully.</response_description>
</response>
</message_body>
</generic_response_message>
</ns2:StatusUpdateResponse> Ship-for-Pickup Orders
Overview: You can use the ship-for-pickup option in the Order Broker Integration to send the merchandise for an order to a designated store, where the customer can pick it up. The Order Broker integration facilitates communication between Order Management System and the designated store location, so the store receives notification that the order is in transit, and sends notification back to Order Management System after the merchandise is received and when the customer picks up the order.
The items on the order do not need to be stocked in the store. In addition, the Use OROB for Ship for Pickup Fulfillment Assignment (M34) system control value controls whether Order Management System fulfills the order or whether the order is sent to Order Broker for fulfillment assignment.
-
If this system control value is set to NEVER, Order Management System fulfills the order and sends the items on the order to the store selected for customer pick up. In this situation, if an item on the order is not in stock, the item is placed on backorder until it can be fulfilled by Order Management System. The order can include up to two locations for processing:
-
the originating, or placed, location that creates the order. For ship-for-pickup orders, the originating location is always an Order Management System warehouse.
-
the fulfilling, or sourcing, location that provides the inventory for the order. If the Use OROB for Ship for Pickup Fulfillment Assignment (M34) system control value is set to NEVER, this is always an Order Management System warehouse.
-
the pickup location where the customer picks up the items on the order. For ship-for-pickup orders, this is always the store location the customer selected for pickup.
-
-
If this system control value is set to ALWAYS, the system sends the order to Order Broker for fulfillment assignment. In this situation, Order Broker determines the best location to fulfill the order and the order can include up to three locations for processing:
-
the originating, or placed, location that creates the order. For ship-for-pickup orders, the originating location is always an Order Management System warehouse.
-
the fulfilling, or sourcing, location that provides the inventory for the order. If the Use OROB for Ship for Pickup Fulfillment Assignment (M34) system control value is set to ALWAYS, this is the location the Order Broker selected for fulfillment of the order. This location can be a store location or an Order Management System warehouse.
-
the pickup location where the customer picks up the items on the order. For ship-for-pickup orders, this is always the store location the customer selected for pickup.
-
If Order Broker determines that Order Management System is the best location to fulfill the order, the system creates a new retail pickup order in Order Management System to fulfill the ship-for-pickup order; see Retail Pickup (including Ship-for-Pickup) or Delivery Orders
Important:
Regardless of when you send ship-for-pickup orders to Order Broker, in order to use ship-for-pickup processing, you must select the Enable Ship For Pickup option on the Organization window in Order Broker. Once you enable ship for pickup, the Ship for Pickup Enabled Date displays on the Organization window and this option cannot be changed.Examples: Examples of ship-for-pickup include the following.
Example 1 (three different locations):
The customer places an order on the web site (originating location A, Order Management System) and wants to pick the order up at store location B. Order Broker selects store location C as the fulfilling, or sourcing, location. Store location C ships the inventory to store location B, where the customer can pick it up.

Example 2 (fulfilling location and pickup location are the same):
The customer places an order on the web site (originating location A, Order Management System) and wants to pick the order up at store location B. Order Broker selects store location B as the fulfilling, or sourcing, location. Once the order is ready at store location B, the customer can pick it up.

Example 3 (originating location and fulfilling location are the same):
The customer places an order on the web site (originating location A, Order Management System) and wants to pick the order up at store location B. Order Broker selects warehouse location A, Order Management System, as the fulfilling, or sourcing, location. Order Management System ships the items on the order to store location B. Once the order is ready at store location B, the customer can pick it up.

Example 4 (originating location and fulfillment location are the same; items on the order are shipped to the store during pick slip generation/drop ship processing):
The customer places an order on the web site (originating location A, Order Management System) and wants to pick the order up at store location B. Order Management System fulfills the items on the order and during pick slip generation, ships the items on the order to store location B. Order Broker manages communication between Order Management System and store location B. Once the order is ready at store location B, the customer can pick it up.

Version compatibility: Fulfillment assignment and ship-for-pickup functionality is available in release 16.0 or higher of Order Management System and release 16.0 or higher of Order Broker. Also, in order to use ship-for-pickup processing, you must select the Enable Ship For Pickup option on the Organization window in Order Broker. Once you enable ship for pickup, the Ship for Pickup Enabled Date displays on the Organization window and you cannot deselect this option.
An OROB_MESSAGE_VERSION of 16.0 or higher is required to use the Ship-for-Pickup Orders integration with Order Broker. Note that this property cannot be set higher than 19.9 for integration with Order Broker 19.x, or higher than 21.1 for integration with Order Broker 22.2.301.0 or higher.
In this topic:
-
Communicating with Order Broker about a Ship-for-Pickup Order
-
Updates to a Ship-for-Pickup Order in Order Management System
Creating a Ship-for-Pickup Order in Order Management System
You can create a ship-for-pickup order through interactive order entry, or through the order API.
Note:
A ship-for-pickup order should have a single ship-to.Creating a Ship-for-Pickup Order in Order Entry
Ship-for-pickup orders originate in Order Management System, either through order entry or through the generic order API. The order creation process is similar to that of a regular order, except that a ship-for-pickup order includes a one-time ship-to address representing the store location.
To select the store location in order entry:
-
Select the One Time Ship To option.
-
At the Create One Time Ship To Address Screen, select Store.
-
Select a store at the Store Location Screen. This screen displays each store location set up through Work with Store Cross Reference (WSCR) whose Ship for Pickup flag is selected. The description and address set up for the Store Cross Reference default to the Create One Time Ship To Address screen.
-
Complete entry of the order.
-
If the Use OROB for Ship for Pickup Fulfillment Assignment (M34) system control value is set to NEVER, the system uses existing logic to reserve items in order to fulfill the ship-for-pickup order from an Order Management System warehouse. See Sending a Ship-for-Pickup Order to Order Broker during Pick Slip Generation and Drop Ship Order Processing.
-
If the Use OROB for Ship for Pickup Fulfillment Assignment (M34) system control value is set to ALWAYS and the Send B/O to OROB (K08) system control value is selected, the system bypasses reservation and places all eligible items on backorder, even if the item is available in an Order Management System warehouse, in order to send all eligible items to Order Broker for fulfillment assignment; see Rules for Submitting Backorders to Order Broker. Order Broker will choose the best store location or Order Management System location to fulfill and ship the item to the store location selected by the customer for store pickup. See Brokered Backorders for processing details.
-
Note:
To avoid shipment problems, once you accept a ship-for-pickup order, the system does not allow you to change the store selected as the one-time ship-to address; in order to change the pickup store location, you must cancel the order and create a new ship-for-pickup order.Ship-alone items on ship-for-pickup orders: If an item is flagged as Ship alone, Order Management System does not let you enter an order line on a ship-for-pickup order with a quantity greater than one. If the customer wants more than one unit, enter a separate order line for each unit. This restriction applies even if the item is not flagged as OROB eligible.
Creating a Ship-for-Pickup Order through the Generic Order API
In the Inbound Order XML Message (CWORDERIN):
-
use the
store_codeattribute to specify the store location code. This needs to be a store location set up through Work with Store Cross Reference (WSCR), as described above for order entry. -
specify a
delivery_typeof S -
use the
ShipToelement in the Inbound Order XML Message (CWORDERIN) to specify the shipping address of the store, or leave the shipping name and address attributes blank in order to use the information set up in the Store Cross Reference record.For more information see the Web Services Guide on My Oracle Support (ID 2149144.1).
Name and address for ship-for-pickup order: If the ship-to name and address fields are passed for a ship-for-pickup order, these fields should indicate the shipping address of the store selected for pickup; otherwise, if no ship-to name and address is passed, the information defaults from the Store Cross Reference record.
Partial ship-to address? The name or address fields from the Store Cross Reference record default for any fields not passed in the message.
Example: If the CWOrderIn message indicates the ship-to customer’s first and last name, this information defaults to the order, in addition to the company name and address from the Store Cross Reference record.
Communicating with Order Broker about a Ship-for-Pickup Order
Submitting the order to Order Broker: The setting of the Use OROB for Ship for Pickup Fulfillment Assignment (M34) system control value controls when the order is submitted to Order Broker.
The system submits a ship-for-pickup order to Order Broker for fulfillment assignment when the Use OROB for Ship for Pickup Fulfillment Assignment (M34) system control value is set to ALWAYS and the Send B/O to OROB (K08) system control value is selected, and:
-
You create an order that contains an eligible item in interactive order entry or through the generic order interface (Order API).
-
You run the BROKER Periodic Function to find eligible items to send to Order Broker.
See Brokered Backorders for processing details.
The system submits a ship-for-pickup order to Order Broker during pick slip generation or drop ship purchase order processing in the following scenarios.
-
When the Use OROB for Ship for Pickup Fulfillment Assignment (M34) system control value is set to NEVER or blank, or
-
When the Use OROB for Ship for Pickup Fulfillment Assignment (M34) system control value is set to ALWAYS but the Send B/O to OROB (K08) system control value is unselected.
See Sending a Ship-for-Pickup Order to Order Broker during Pick Slip Generation and Drop Ship Order Processing for processing details.
Sending a Ship-for-Pickup Order to Order Broker during Pick Slip Generation and Drop Ship Order Processing
Submitting the order to Order Broker: The system submits a ship-for-pickup order to Order Broker when you generate the pick slip or drop ship purchase order in the following scenarios.
-
When the Use OROB for Ship for Pickup Fulfillment Assignment (M34) system control value is set to NEVER or blank.
-
When the Use OROB for Ship for Pickup Fulfillment Assignment (M34) system control value is set to ALWAYS but the Send B/O to OROB (K08) system control value is unselected.
At this time, the system also creates the Order Broker record displayed at the Work with Order Broker Screen.
Which items are included in the Submit Order message? Only items that are flagged as OROB eligible are included in the message to Order Broker. However, all items that print on the pick slip or purchase order can be included in the shipment to the store location.
Note:
It is important to confirm that including additional items on the pick slip or purchase order and in the shipment will not present a problem to the store receiving the ship-for-pickup order.No items OROB eligible? If you create a ship-for-pickup that does not include any OROB eligible items, Order Management System does not submit the order to Order Broker or create an Order Broker record; however, you can still generate the pick slip or drop ship purchase order and ship the order to the store location for customer pickup. It is important to note that, in this case, the selected store does not receive advance notification of the order.
For more information on the contents of the message, see the Ship-for-Pickup (during Pick Generation/Drop Ship Processing) Submit Order Request Message Sample.
Submit separate orders for each order line? If the Create Separate Picks for Ship for Pickup Orders (L89) system control value is selected, Order Management System generates a separate pick slip or drop ship purchase order for each item, and as a result, submits each order line as a separate order to Order Broker. Creating separate orders in Order Broker can prevent confusion about order status if, for example, a single order line is canceled or fulfilled. See the Create Separate Picks for Ship for Pickup Orders (L89) system control value for more information.
What if Order Broker is unavailable? If
Order Broker does not respond to the submit order request during
pick slip or drop ship purchase order generation, Order Management
System does not print the pick slip or purchase order. Instead,
it writes an order transaction history message: Submit Order
Failed - OROB Unavailable. The order is eligible for selection
the next time you generate pick slips or drop ship purchase orders.
Creating the Order Broker record: When the job generates the Submit Order request, it initially creates the Order Broker record in In Process status.
Message response: The Submit Order response message indicates whether Order Broker was able to create the order:
-
Order rejected? If Order Broker returns an error in the response message, Order Management System puts the order on hold using the Hold Reason for Errored Ship for Pickup Orders (L10). Order Broker might return an error if, for example, the order includes an item that does not exist in Order Broker or in the point-of-sale system associated with the store location. In this case, the Order Broker record in Order Management System is deleted and Order Transaction History indicates:
Submit Order Rejected/Order HeldRsn:PRODUCT NOT STOCKED IN REQUESTED LOCATION. -
Order accepted? If Order Broker accepts the order, the generation process sends a status update indicating a status of Picked. The process finishes and the Order Broker record remains in Picking status until you confirm shipment of the pick slip or purchase order.
Note:
The designated store location cannot reject a ship-for-pickup order.Sample message: See Ship-for-Pickup (during Pick Generation/Drop Ship Processing) Submit Order Request Message Sample for a sample message and more information.
Fulfilling location in Order Management System vs. Order Broker:
-
When order submitted to Order Broker:
-
originating / placed location = the OROMS warehouse shipping the merchandise to the store location.
-
fulfilling / sourced location = the OROMS warehouse shipping the merchandise to the store location.
-
pickup location = the store location the customer selected for store pickup.
-
-
When store receives the merchandise or customer picks up the order: Once Order Management System receives a status inquiry response indicating that the store location has received the merchandise on the order, or that the customer has picked the order up, the store location is identified as the fulfilling location.
-
originating / placed location = the OROMS warehouse shipping the merchandise to the store location.
-
fulfilling / sourced location = the OROMS warehouse shipping the merchandise to the store location.
-
pickup location = the store location the customer selected for store pickup.
-
Excluded from brokered backorder processing: If the Use OROB for Ship for Pickup Fulfillment Assignment (M34) system control value is set to NEVER, backordered items on ship-for-pickup orders are not eligible for processing through the brokered backorder integration with Order Broker.
Creating ship-for-pickup orders for drop ship items: When you create a ship-for-pickup order for a drop ship item, Order Management System submits the order to Order Broker when you use Selecting Vendors for Drop Ship Processing (MDSP).
Note:
There is no warehouse associated with a drop ship item, so in this case Order Management System designates the OROB Default Location (K51) as the requesting location. If you are generating ship-for-pickup orders for drop ship items, you need to specify a valid Order Broker location in this system control value; otherwise, Order Broker returns an error indicating that the requesting location is invalid.Documents for store receiving: In order to support store receiving, you can generate the Pick Message from Order Management System (CWPickOut) or the PO Download XML Message (CWPurchaseOrderOut). Each of these messages includes details on the order submitted to Order Broker, including the Order Broker request ID, the order number in the originating system, and the delivery type. See the Generic Pick Out API and the Generic Outbound Purchase Order API in the Web Services Guide on My Oracle Support (ID 2149144.1) for more information.
Special Ship-for-Pickup Orders
In order to support processing special ship-for-pickup orders that originated in a retail location and then sent to Order Management System through the order API:
-
If the order type matches the Order Type for Special Orders (L15), the Submit Order message specifies the e-commerce order number, rather than the Order Management System order number, as the
order_id, so that the originating location can more easily identify and track the order. -
If the pay type matches the Pay Type for Special Orders (L16), the
balance_duespecified in the Submit Order message is the order total, indicating that the customer needs to pay for the order when picking it up. Otherwise, if the pay type on the order does not match this system control value, the Submit Order message does not specify a balance due, even if the order type matches the Order Type for Special Orders (L15).
See the Order Type for Special Orders (L15) and Pay Type for Special Orders (L16) system control values for more information.
If you use the Generic Pick In API (Shipments, Voids, and Backorders) to void a pick slip for a special ship-for-pickup order and the Cancel Reason (Pick In) (L86) system control value specifies a cancel reason code, or a backorder cancel reason is specified in the CWPickIn XML Message, Order Management System cancels the order using the specified cancel reason and sends a status update to Order Broker canceling the order.
Important:
To prevent inconsistent updates to Order Broker for special ship-for-pickup orders, do not process partial backorders for these orders through the Generic Pick In API (Shipments, Voids, and Backorders); confirm or void the entire pick slip.For more information see the Web Services Guide on My Oracle Support (ID 2149144.1).
Collect Payment for a Ship-for-Pickup Order at the Store?
You can use the Payment at POS for Ship for Pickup Orders (L60) system control value to indicate that the customer pays for a ship-for-pickup order when picking up the order at the store, rather than billing the order when you ship it to the store from the warehouse. In this case:
-
The order must include only credit card payment methods; also, each pay type’s Card type must be set to Credit. No other card types, such as stored value cards, can be included.
-
The payment method’s Suppress deposit and Suppress refund flags are set to Y.
-
The payment method is authorized for $1.00 only during online authorization.
-
Authorization is suppressed during pick slip generation.
-
Order Management System sends the order total to Order Broker as the
balance_duein the Submit Order message.
Note:
The above restrictions do not apply to ship-for-pickup orders whose order type matches the Order Type for Special Orders (L15).Returns suppressed: Selecting the Payment at POS for Ship for Pickup Orders (L60) system control value suppresses most options for creating a return authorization, processing a return, and creating a refund. See that system control value for details.
Updates to a Ship-for-Pickup Order in Order Management System
Add an item? If you add an item to a ship-for-pickup order, or are able to ship a backordered item once you have generated the pick slip and created the ship-for-pickup order in Order Broker, the new item is not added to the original Order Broker record or to the order in Order Broker. Printing the pick slip for the new order line creates a new Order Broker record and a new order in Order Broker.
Voiding or reprinting a pick slip: Order Management System sends a status update to Order Broker if you void a pick slip for an order line on an existing ship-for-pickup order:
-
Special ship-for-pickup orders: If the Cancel Reason (Pick In) (L86) system control value specifies a cancel reason or if a backorder cancellation reason code is specified in the CWPickIn XML Message, and you void the pick slip for a special ship-for-pickup order through the generic pick in API, Order Management System cancels the order or line and sends a cancellation to Order Broker, including the cancel reason from the system control value. For more information see the Web Services Guide on My Oracle Support (ID 2149144.1). Also see Special Ship-for-Pickup Orders for background on these orders.
-
Regular ship-for-pickup orders: If the Create Separate Picks for Ship for Pickup Orders (L89) system control value is selected and you void the pick slip for a regular (not special) ship-for-pickup order, Order Management System does not cancel the order or line, but it does send a cancellation to Order Broker. No cancel reason is included in this case. This status update occurs regardless of whether you use the generic pick in API to void the pick slip, or void it at a Order Management System screen.
If you then reprint the pick slip for a regular ship-for-pickup order in this situation, Order Management System submits a new order to Order Broker; however, if you cancel the order after voiding the pick slip, no update is sent to Order Broker.
Aside from the two scenarios described above, Order Management System does not send a status update to Order Broker when you void or reprint a pick slip.
Canceling a ship-for-pickup order: Aside from the two scenarios, described above, which generate status updates for voided pick slips, Order Management System sends a status update to Order Broker when you cancel the order or item. In most cases, this status update includes the cancel reason you enter:
-
Cancel after voiding pick slip: If you cancel an item or the entire ship-for-pickup order in order maintenance after voiding the pick slip, and Order Management System has not already sent a status update when the pick slip was voided, it sends a status update that includes the cancel reason you enter. This situation can occur if, for example, you void a ship-for-pickup order through the Void/Reprint Picks menu option, or if you void a regular ship-for-pickup order with the Create Separate Picks for Ship for Pickup Orders (L89) system control value unselected.
-
Cancel drop ship purchase order in purchase order maintenance: If you cancel a drop ship purchase order in purchase order maintenance, Order Management System sends a status update that includes the Auto Soldout Cancel Reason (C20), since you do not have an opportunity to enter a cancel reason in this case.
-
Cancel drop ship purchase order sent to vendor through drop ship integration: To cancel items fulfilled through the drop ship integration, you need to use the Display P/O Drop Ship Screen in order inquiry. If you cancel a drop ship purchase order at this screen, and the purchase order is successfully canceled through the drop ship integration, it sends a status update that includes the cancel reason you enter.
Note:
-
Canceling single item cancels entire order in Order Broker: If you do not split orders and the pick slip creating the order in Order Broker included multiple items, canceling a single item in Order Management System results in canceling the entire order in Order Broker. This situation might occur if the Create Separate Picks for Ship for Pickup Orders (L89) system control value is not selected.
-
Canceling before order created in Order Broker: If you cancel the order before pick slip generation or drop ship purchase order generation, there is no need to notify Order Broker, since the order was never sent.
-
Cancel after shipment confirmation? Once you have confirmed shipment, it is not possible to cancel the ship-for-pickup order in Order Broker.
Ship-for-Pickup Order Processing on or after Shipment
Confirm shipment: When you confirm shipment of the pick slip, Order Management System changes the status of the Order Broker record and sends a status update to Order Broker with a status of Intransit, indicating that the order is on its way.
Additional processing:
-
When the assigned location sends a fulfillments request message to Order Broker to poll for newly assigned orders, it receives notification of the ship-for-pickup order.
Note:
The location assigned to a ship-for-pickup order cannot reject the order. -
The assigned store location sends the following additional status updates:
-
Received when the merchandise arrives at the store
-
Fulfilled (Order Management System status = Completed) when the customer picks up the order, or Partially fulfilled if the customer does not initially pick up the entire order
Note:
When Order Management System receives a status list inquiry response from Order Broker indicating that the merchandise was received at the store or that the customer has picked up the order, the fulfilling location on the Order Broker record in Order Management System changes from the warehouse shipping the order to the store location where the customer picks up the order. -
How Order Management System checks for additional status updates: Once you confirm shipment of the ship-for-pickup order to the store location, Order Management System includes the order in a status list inquiry request message once a day to Order Broker to check on whether the order has been received or picked up. See Setting the Daily Status Inquiry Time Window (all versions) for more information.
Returning a ship-for-pickup order: Selecting the Payment at POS for Ship for Pickup Orders (L60) system control value suppresses most options for creating a return authorization, processing a return, and creating a refund. See that system control value for details.
Reviewing a Ship-for-Pickup Order in Order Inquiry
In addition to reviewing information through the Working with Order Broker (WOBR) menu option, you can also use order inquiry. Your options include:
-
Identifying the Order Broker type: The Broker delivery type at the Display Order Properties Screen and the Display Order Broker Details Screen identifies a Ship for Pickup order.
-
Broker detail and history: Use the Display Order Broker Details Screen to review Order Broker Detail and Order Broker History.
-
Designated store: The Display Alternate Address Screen displays the store shipping address. You can advance to this screen by selecting the Ship To option from the header screen in order inquiry.
-
Order history: The Display Order History Screen displays activity related to sending status updates to and from Order Broker, such as:
-
Ln#: 1 Selected for Fulfillment:Written for each line on a ship-for-pickup order printed on a pick slip and sent to Order Broker in the Submit Order Message. -
Ln#: 1 In Transit shipment:Written for each printed line when you confirm shipment. -
Ln#: 1 Accepted by Broker:Written when you receive the status inquiry request indicating that the location where the customer is picking up the ship-for-pickup order has been notified. -
Ln#: 1 Cancel Acknowledged by Broker:Written when you receive the status update response message following the cancellation of a ship-for-pickup order. This situation occurs if you void the pick slip after initially notifying Order Broker about the order. -
Ln#: 1 Store Received:Written when you receive the status inquiry response message indicating that the order merchandise has been received at the store where the customer will pick up the order. At this point, the fulfilling location on the Order Broker record in Order Management System changes from the warehouse shipping the merchandise to the store location where the customer picks up the order. -
Ln#: 1 Customer Partial Pick Up:Written when you receive the status inquiry response message indicating that the customer has picked up some, but not all, of the merchandise on the order. -
Ln#: 1 Shipped by Broker order:Written when you receive a status inquiry response message indicating that the customer has picked up the order in full.
-
If Order Broker returns an error: If Order Broker returns an error during pick slip generation, Order Management System writes Order Transaction History messages such as:
Submit Order Rejected/Order Held
Rsn:INVALID ITEM (SYSTEM PRODUCT), ITEM
(PEN BLUE ) DOES NO
T EXIST. PRODUCT NOT STOCKED IN REQU
If the error occurs as a result of Selecting Vendors for Drop Ship Processing (MDSP), the messages might also indicate that the pick slip or purchase order was created, for example:
DROP SHIP PO# 1234567 CREATED.
However, in this situation the process does not produce the pick slip or purchase order.
If you submit a drop ship order and the OROB Default Location (K51) system control value does not specify a valid location in Order Broker, Order Broker returns an error during drop ship processing. In this case, Order Management System writes Order Transaction History messages such as:
Submit Order Rejected/Order Held
Rsn:INVALID OR MISSING REQUESTING LOCATI
ON LOCATION CODE, (STORE_LOCATION.LO
CATION_CD) IS REQUIRED.
Store Pickup Orders
Overview: You can create a store pickup order if the customer prefers to pick up an order from a retail location where the inventory is already available rather than waiting for a shipment from the warehouse. Unlike ship-for-pickup orders, store pickup orders do not require you to transfer the inventory from a warehouse or other store location; instead, the customer selects a location that already has the ordered quantity of all the items in stock.

In this topic:
Store Pickup Order Creation Overview
Store Pickup option: You can create a store pickup order by selecting the Store Pickup option at the Work with Order Lines Screen (Adding Items to the Order) after entering the items on the order. The Store Pickup option is available only if the Use Merchandise Locator (I38) system control value is selected and the Store Pickup Order Type (L33) system control value specifies an order type. Also, this option is available in order entry only, not in order maintenance.
Requirements: You cannot select the Store Pickup option if the order includes any items that:
-
are not flagged OROB eligible
-
are flagged for special handling or have the Gift wrap flag selected
-
are held
-
are sold out
Also, the order must:
-
not include more than one ship-to
-
not be a ship-for-pickup order
What if the order is held? Order Management System submits a store pickup order to Order Broker regardless of whether the order is held; however, if the order is held and the Payment at POS for Store Pickup (M16) system control value is unselected, Order Management System submits the order to Order Broker with the Under Review flag selected. This setting indicates that the order should not be picked up until the Under Review flag is cleared, because Order Management System needs to be able to collect payment, but enables the store associates with the opportunity to reserve the inventory and prepare the order in the meantime. When the order is released from hold, Order Management System sends the order status update message, indicating to clear the Under Review flag.
See the Payment at POS for Store Pickup (M16) system control value for a discussion.
Searching for locations: When you select the Store Pickup option on a qualifying order, you advance to the Merchandise Locator Search Window (Store Pickup) so that you can find a store location near the customer’s location where the items are available. Optionally, you can specify a different location or change the search radius. See the Merchandise Locator Search Window (Store Pickup) for more information.
Note:
The Order Broker Routing Engine supports merchandise locator searches only in the U.S. and Canada.LocateItems request and response messages: Order Management System sends the LocateItems request message to Order Broker. This message specifies the items on the order, the customer’s location, and the search radius.
Selecting a location: After you complete the Merchandise Locator Search Window (Store Pickup), you advance to the Store Pickup Search Results Screen. This screen lists locations that:
-
were included in the LocateItems response message, indicating that the location is flagged as Pickup available in Order Broker, it stocks the item(s) on the order, and
-
have records in the Store Cross Reference table, set up through the Work with Store Cross Reference (WSCR) option.
See the Store Pickup Search Results Screen for more information.
When you select a location at this screen, Order Management System:
-
flags all Order Detail lines with a Pickup type of SP
-
updates the Pickup location ID and Location system ID with the selected location code and the System Code, if any, from the Store Cross Reference record; otherwise, from the Name in OROB for Point of Sale (L09).
-
sets the Delivery type field in the Order Ship To table to P
Requirements to accept the order: When you accept the order, Order Management System verifies that:
-
the order has a credit card payment method, and no other pay types
-
all lines on the order are flagged for store pickup and do not include any special handling or gift wrap charges
Note:
If you have changed the quantity on an order line or added any new items to the order, you need to select the Store Pickup option again before you accept the order.Also, the customer must have:
-
an email address, and
-
the opt-in/out flag for the email address set to O1 (all emails) or O2 (order-related emails).
The email address and opt-in/out setting are required so that Order Management System or Order Broker can notify the customer by email when the order is ready for pickup at the designated store location. See Store Pickup Notifications for more information on a notification you can have Order Management System generate; however, the Store Connect module uses a notification email generated by Order Broker. See the Order Broker online help for more information.
Updates at accept: At acceptance, Order Management System performs additional updates to order-related tables:
-
Order Detail:
-
Drop ship flag set to D
-
Printed quantity set to the ordered quantity
-
Reserved quantity, Backorder quantity, and Backorder warehouse set to zero
-
-
Order Ship To:
-
Freight and Freight balance, if any, set to zero and the Calculate freight flag set to N if the Calculate Freight for Store Pickup Orders (L32) system control value is unselected
-
-
Order Header: Order type set to the Store Pickup Order Type (L33). If the Store Pickup Order Type (L33) is not flagged for online authorization, this change prevents Order Management System from sending the payment method out for authorization
-
Order Ship To Address: creates a record using the information set up through the Work with Store Cross Reference (WSCR) option; however, if you entered a name or apartment/suite, or selected a permanent ship-to number, this information is retained
-
Order Payment Method: If the Payment at POS for Store Pickup (M16) is:
-
selected:
-
the payment method is authorized for $1.00
-
the Suppress deposit flag set to Y, so that the deposit is not processed in Order Management System when the order is billed
-
the
balance_duespecified in the SubmitOrder message is equal to the order total
-
-
unselected:
-
the payment method is authorized for the full amount
-
the Suppress deposit flag is set to N, so that the deposit is processed in Order Management System when the order is billed
-
the
balance_duespecified in the SubmitOrder message is zero
-
-
Sending the SubmitOrder request to Order Broker: When you accept a store pickup order, Order Management System sends a SubmitOrder request to Order Broker. See Store Pickup SubmitOrder Request Message Sample for more information.
When Order Management System receives the SubmitOrder response
message from Order Broker, it sets the Order Broker record in
Acknowledged status and writes an Order Transaction History message
on the order: Submit Order Succeeded. This message
indicates that the order was created successfully in Order Broker,
not that the selected location has already accepted the order. The
system also updates the line number(s) in the Order Broker and
Order Broker History records.
What if the order is held? Order Management System submits a store pickup order to Order Broker regardless of whether the order is held; however, if the order is held and the Payment at POS for Store Pickup (M16) system control value is unselected, Order Management System submits the order to Order Broker with the Under Review flag selected. This setting indicates that the order should not be picked up until the Under Review flag is cleared, because Order Management System needs to be able to collect payment, but enables the store associates with the opportunity to reserve the inventory and prepare the order in the meantime.
If the order is not held, or if the Payment at POS for Store Pickup (M16) system control value is selected, Order Management System does not select the Under Review flag when submitting the order, so the order is eligible for pickup.
When a store pickup order is released from hold, Order Management System sends an update to Order Broker indicating to clear the Under Review flag. See the Order Update Request Sample (Changing the Under Review Setting for a Brokered Backorder or Store Pickup Order) for more information.

Merchandise Locator Search Window (Store Pickup)
Purpose: Use this window to enter the search criteria when selecting a store location where the customer can pick up all the items on the order. See Store Pickup Orders for background.
How to display this screen: Select Store Pickup at the Work with Order Lines Screen (Adding Items to the Order) after entering the items on the order. The Store Pickup option is available only if:
-
the Use Merchandise Locator (I38) system control value is selected and the Store Pickup Order Type (L33) system control value specifies an order type
-
you are in order entry, and not order maintenance
-
you are entering the first and only ship-to on the order
You cannot select the Store Pickup option if the order includes any items that:
-
are not flagged OROB eligible
-
have special handling instructions or have the Gift wrap flag selected
-
are held (however, if the order itself is held after acceptance, Order Management System still submits it to Order Broker for fulfillment)
Also, the order must:
-
include at least one item that is not sold out
-
not be a ship-for-pickup order
Note:
This window is very similar to the Merchandise Locator Search Window (Searching for an Item) you use for informational merchandise locator searches for a single item. See Merchandise Locator API for background on merchandise locator searches.Important:
Order Broker supports merchandise locator searches only within the U.S. and Canada.| Field | Description |
|---|---|
|
NOTE
|
|
|
Postal code |
The customer’s U.S. zip or Canadian postal code, to serve as the central point for the search radius. For example, if the Search within field is set to 25 miles, the search includes stores within 25 miles of this postal code. NOTE: Your entry in this field is not validated against the Zip/City/State table. Alphanumeric, 10 positions; required if you do not enter a city and state. |
|
Address |
The customer’s street address, to serve as the central point for the search radius. Alphanumeric, 32 positions; optional. |
|
City |
The customer’s city, to serve as the central point for the search radius. Alphanumeric, 25 positions; required if you do not enter a postal code. |
|
State |
The customer’s U.S. state or Canadian province, to identify the location of the city. Alphanumeric, 2 positions; required if you do not enter a postal code. |
|
Country |
The customer’s country. The country defaults from the customer address if you advanced to this window from order entry or order maintenance; otherwise, it defaults from the Default Country for Customer Address (B17) system control value. Defined in and validated against the Country table; see Setting Up the Country Table (WCTY) for more information. Alphanumeric, 2 positions; required. |
|
Search within |
Indicates the search radius, in miles or kilometers, to search within for the selected item. The search radius defaults from the Default Search Within Radius (I40) system control value, but you can override it. NOTE: The distance unit of measure (miles or kilometers) specified with the Merchandise Locator Distance Measurement (I39) system control value is to the right. Numeric, 5 positions; required. |
Completing this window:
-
Optionally, override the postal code or the city and state to serve as the central point for the search radius.
-
Optionally, override the Search within radius to a different distance.
-
Click OK. Order Management System generates the LocateItems request message. When it receives the LocateItems response message, you advance to the Store Pickup Search Results Screen.
Troubleshooting: If you cannot display this window, or if the screen displays an error message after you attempt to search, see Troubleshooting Creation of Store Pickup Orders and Things to Note for help.
Store Pickup Search Results Screen
Purpose: Use this screen to select a store location for the customer to pick up all the items on the order.
Which locations listed? This screen lists locations that:
-
Have records set up through the Work with Store Cross Reference (WSCR) option, and
-
Were returned in the Locateitems response message from Order Broker, indicating that:
-
They are within the search radius specified at the Merchandise Locator Search Window (Store Pickup)
-
Have the requested quantity of all items on the order in stock
-
Are flagged in Order Broker as Pickup available
-
Were not eliminated from the search results due to probability rules in Order Broker
-
Were not eliminated from the search results because the number of eligible locations exceeded the Maximum No. Responses specified in Order Broker.
-
Note:
A distance of zero indicates that the location is not flagged to Use proximity locator in Order Broker. In this case, the location is always eligible to be included in the search results if it is also flagged as Pickup available, if it has the requested quantity of the items on the order, and if there is a Store Cross Reference record set up in Order Management System.Troubleshooting:
-
Only store locations that have Store Cross Reference records are eligible for display at this screen. See Work with Store Cross Reference (WSCR) for background.
-
See Troubleshooting Creation of Store Pickup Orders and Things to Note for possible error messages.
Updates when you select a store location: When you select a location, Order Management System updates all Order Detail records:
-
Sets the Pickup type for each item to SP
-
Updates the Pickup location ID with the code of the selected location
-
Updates the Location system ID with the System Code, if any, from the Store Cross Reference record; otherwise, from the Name in OROB for Point of Sale (L09)
For more information: See Store Pickup Orders for an overview, including details on information required before you can accept a store pickup order.
How to display this screen: Complete the Merchandise Locator Search Window (Store Pickup).
Note:
Although the information at this screen is from the location record in Order Broker, when you accept a store pickup order Order Management System uses the Store Cross Reference record to create the Order Ship To Address for the order.| Field | Description |
|---|---|
|
Store |
Select the store location where the customer would like to pick up the order. The store information consists of: Store code The code identifying the store location in Order Broker and in the Store Cross Reference table. Alphanumeric, 10 positions. Store name The name of the store location from Order Broker. If the name exceeds 35 positions, it is truncated. Alphanumeric, 35 positions. Street The street address of the store location from Order Broker. If the street address exceeds 40 positions, it is truncated. Alphanumeric, 40 positions. City The city of the store location from Order Broker. If the city name exceeds 35 positions, it is truncated. Alphanumeric, 35 positions. State The state of the store location from Order Broker. Alphanumeric, 2 positions. Postal code The postal code of the store location from Order Broker. Alphanumeric, 10 positions. Country The country of the store location from Order Broker. Alphanumeric, 3 positions. Phone number The phone number of the store location from Order Broker. If the phone number exceeds 14 positions it is truncated. Alphanumeric, 14 positions. |
|
Distance |
The number of miles or kilometers, based on the Merchandise Locator Distance Measurement (I39), from the search location. This distance might be approximate, depending on the actual criteria used to search (for example, postal code or city), and does not represent an actual driving distance. The distance displayed is Numeric, 7 positions with a 2-place decimal. |
Status Inquiry and Updates after Creation
Overview: Once Order Management System submits the order to Order Broker, it begins including the order in periodic status inquiry list requests to determine when:
-
the selected store location polls Order Broker for new orders and is notified about the order
-
the location accepts or rejects the order
-
the customer picks up the order, either partially or completely
-
potentially, the customer cancels the order at the store location
How often? The BROKER process in Working with Integration Layer Processes (IJCT) sends periodic status inquiry list request messages to Order Broker for store pickup orders:
-
If the current status of the Order Broker record in Order Management System is Acknowledged, Polled, or Accepted, the process uses the Order Broker Status Update Interval (K10) to determine how often to request an update.
-
If the current status is Partially Fulfilled, the process sends the message once a day. See Setting the Daily Status Inquiry Time Window (all versions) for background.
Updates based on status inquiry responses: Order Management System initially creates the Order Broker record in Acknowledged status, indicating that Order Broker has received notification of the order and assigned it a request ID. The following table summarizes the updates that take place in Order Management System based on the current status indicated in the response message from Order Broker.
| Status in Update Response from OROB | Status of Order Broker record in OROMS | Additional Updates |
|---|---|---|
|
Polled |
Polled |
None |
|
Accepted |
Accepted |
None |
|
Picked |
Accepted |
None |
|
Partial Fulfill |
Partially Fulfilled |
None |
|
Fulfilled |
Completed |
|
|
Unfulfillable |
Rejected |
Order Management System cancels the order using the Cancel Reason (Rejected Store Pickup Orders) (G11) and writes Order Transaction History messages such as the following:
An Order Transaction History message such as the above is written for each line on the order. |
|
Canceled |
Canceled |
Note:
If the status in Order Broker is Verified or Processed, Order Management System does not update the status of the Order Broker record.Sample messages: See Order Inquiry Status Request Message Sample and Order Inquiry Status Response Message Sample.
Other ways to update store pickup orders? After you create a store pickup order, maintenance to the order is prohibited. The only possible update you can make within Order Management System is to cancel the order; see Canceling a Store Pickup Order.
Notifying the Customer that the Store Pickup Order is Ready
If the order is assigned to a Store Connect location, you can configure Order Broker to generate its own pickup notification email. See the Order Broker Operations Guide or the Order Broker online help for more information.
Your point-of-sale system can use the CWEmailRequest message to request that Order Management System generate Store Pickup Notifications. The notification indicates that the customer’s order is ready for pickup in the designated store location.
See Store Pickup Confirmation Email Program (L48) and the Store Pickup Notification Sample and Contents for more information.
Note:
This program is not used for Store Connect. If the order is assigned to a Store Connect location, you can configure Order Broker to generate its own pickup notification email. See the Order Broker Operations Guide or the Order Broker online help for more information.Store Pickup Order Fulfillment
When Order Management System receives a status list response message from Order Broker indicating that a store pickup order is in Fulfilled status, it:
-
Changes the status of the Order Broker record to Completed (X).
-
Submits the order to the BILL_ASYNC job.
-
Clears the Drop ship flag on the order details.
-
Deactivates the payment method(s).
-
If the Payment at POS for Store Pickup (M16) is selected, sets the Suppress deposit flag for the order payment method to Y, so that the deposit is not processed in Order Management System when the order is billed; otherwise, the Suppress deposit flag is set to N, so that the deposit is processed in Order Management System.
-
Clears the hold reason(s), if any, on the order.
-
Writes Order Transaction History messages such as:
Ln#1: Shipped by Broker
CC DEPOSIT BYPASSED ON INVOICE # 1234567
Pick# 0000000 Billed on Invoice# 1234567
For more information: See Fulfillment Process: After Order Creation and Status Updates for details on additional updates at fulfillment, including invoice creation.
Creating a Store Pickup Order through the Order API
Overview: You can create a store pickup through the order API by specifying:
-
a
delivery_typeof P -
the
store_codeidentifying the store location where the customer would like to pick up the order
Other requirements: Creating a store pickup order through the order API is subject to the same requirements described under Store Pickup Orders.
Freight calculation: The Calculate Freight for Store Pickup Orders (L32) system control value does not apply to the order API. To prevent
freight from applying to a store pickup order, the CWOrderIn message
can include the calc_frt attribute set to N;
otherwise, normal freight calculation applies.
Ship-to address: As in interactive order entry, the order API uses the Store Cross Reference record to create the Order Ship To Address for the order. If the CWOrderIn message included any ship-to name and address information, only the name and apartment/suite number (and permanent ship-to number, if any) are retained on the order.
Note:
The order API does not prevent the creation of multiple shipping addresses for a store pickup order; however, you should avoid submitting such orders through the order API to prevent errors in order processing.CWORDEROUT message: If the response_type in the CWOrderIn message indicates to
return a detailed response, the CWORDEROUT response message includes
the following information related to a store pickup order:
-
ShipToelement:-
delivery_typeis Store Pickup -
ship-to name and address is from the Store Cross Reference record for the selected store location
-
-
Detailelement:-
pickup_typeis SP -
pickup_system_locationis from the System Code, if any, for the Store Cross Reference record; otherwise, from the Name in OROB for Point of Sale (L09) -
pickup_locationis the selected location’s store code from Order Broker and the Store Cross Reference record -
broker_statusis Acknowledged if the SubmitOrder message was successfully processed by Order Broker; otherwise, thebroker_statusis not included
-
Errors: In addition to the normal edits that take place in the order API, the following errors can apply to store pickup orders:
-
HDR errors:
-
Invalid Store Code= Thestore_codeis invalid, or nostore_codewas specified. If the message specified an invalid store code that is not in the Store Cross Reference table, additional errors related to the ship-to address are included (such as Invalid Ship To Address, State Blank, City Blank, and so on) -
Invalid Delivery Type= thedelivery_typewas not P (store pickup) or S (ship-for-pickup) -
Email Missing/Ineligible= The customer does not have an email address, or the customer’s opt-in/out setting is not O1 (all emails) or O2 (order-related emails). The email address and opt-in/out setting are required so that Order Management System can generate the store pickup notification email when the order is ready for pickup at the designated store location. See Store Pickup Notifications for more information.
-
-
DTLS errors:
-
Ineligible for Store Pick= The order does not meet the requirements for a store pickup order, such as an invalid pay type; see Store Pickup Order Creation Overview -
Store Fulfillment Loc Msg= Included if there is nostore_codespecified -
Store Fulfillment Subscription= Included if the order included a subscription item -
Store Fulfillment Membership= Included if the order included a membership item
-
If there are any errors on the order, Order Management System does not submit it to Order Broker. You can use batch order entry to correct the errors and submit the order for store pickup.
Order type change: The order type does not change to the Store Pickup Order Type (L33) until after the order is submitted for online authorization.
For more information: See:
-
Generic Order Interface (Order API)
For more information see the Web Services Guide on My Oracle Support (ID 2149144.1).
Reviewing a Store Pickup Order in Order Inquiry
Identifying a store pickup order in order inquiry: The following information identifies a store pickup order in order inquiry:
-
Order properties: The Delivery type at the Display Order Properties Screen and the Display Order Broker Details Screen is Store Pickup.
-
Order detail: The line is flagged with a status of SPU at the Order Inquiry Detail Screen, and the Printed quantity is the same as the ordered quantity. You can select D/S Status for a single line at the Order Inquiry Detail Screen to advance to the Display Order Broker Details Screen, where you can review details and history for the order line.
-
Order type: The order Type on the Order Inquiry Header Screen matches the Order Type for Retail Pickup Orders Brokered to OROMS (K92).
-
Order ship to address: The ship-to name and address at the Display Alternate Address Screen defaults from the Store Cross Reference record for the selected store location.
-
Broker detail and history: Use the Display Order Broker Details Screen to review Order Broker Detail and Order Broker History.
Reviewing Order Transaction History messages: The following table provides sample Order Transaction History messages and their explanations. You can review these messages at the Display Order History Screen.
| Order Transaction History Message(s) | Explanation |
|---|---|
|
|
Communication with Order Broker is not available, or the Order Broker application is not active. Order Management System saves the information about the order in the Store Pickup tables, and attempts to submit the order to Order Broker the next time you start the BROKER_ORD process. |
|
|
Order Management System submitted the order to Order Broker. |
|
|
Order Broker created the order and responded with the request ID. NOTE: A similar message is included for each line on the order. |
|
|
Order Broker responded to a status inquiry and indicated that the selected location has accepted the order. NOTE: A similar message is included for each line on the order. |
|
|
Order Management System generated the store pickup notification email to the customer, indicating that the order is ready for pickup at the designated store location. The email address may be truncated if the entire message exceeds 30 positions. See Store Pickup Notifications for more information. |
|
|
Order Management System could not generate the store pickup notification. Possible reasons are:
If Order Management System could not generate the store pickup notification for any other reason (for example, if the order is closed or canceled), no Order Transaction History message is written. NOTE: This notification is not used by the Store Connect module. See Store Pickup Notifications for more information. |
|
|
Order Broker responded to a status inquiry and indicated that the customer has picked up part of the order from the selected location. NOTE: A similar message is included for each line on the order. Order Broker does not indicate which line(s) have been picked up and which have not. |
|
|
Order Broker responded to a status inquiry and indicated that the customer has picked up the entire order from the selected location. NOTE: The first message line is included for each line on the order. |
|
|
Order Broker responded to a status inquiry and indicated that the selected location has rejected the order. In this situation, Order Management System cancels the order, using the Cancel Reason (Rejected Store Pickup Orders) (G11). NOTE: The last message line is included for each line on the order. |
|
|
Order Broker responded to a status inquiry and indicated that the selected location has rejected the order; however, the Cancel Reason (Rejected Store Pickup Orders) (G11) system control value is blank, so Order Management System could not cancel the order. |
|
|
Order Broker responded to a status inquiry and indicated that the order has been canceled at an external location, typically the location selected for pickup. In this situation, Order Management System cancels the order, using the Cancel Reason (Rejected Store Pickup Orders) (G11). NOTE: The last message line is included for each line on the order. |
|
|
You canceled the order in order maintenance, and the status update message was sent to and acknowledged by Order Broker. NOTE: The last message line is included for each line on the order. |
|
|
Order Broker was not able to create the order, because the selected location was not set up correctly in Order Broker. In this situation, Order Management System cancels the order, using the Cancel Reason (Rejected Store Pickup Orders) (G11). |
|
|
Order Broker was not able to create the order, because the SubmitOrder request message from Order Management System to create the order did not specify a valid location associated with a valid system code in Order Broker. Check the System Code, if any, from the Store Cross Reference record, or the Name in OROB for Point of Sale (L09), and confirm that the code sent to Order Broker is a valid system code associated with the store location code. |
You can also review information about the order through the Working with Order Broker (WOBR) option.
Canceling a Store Pickup Order
Canceling a store pickup order in order maintenance: You cannot maintain a store pickup order, although you can cancel it in order maintenance if you have authority under the Cancel Order Broker Lines (B19) secured feature:
-
If you do not have authority under the secured feature, when you select a store pickup order for maintenance a pop-up window indicates:
Not authorized to maintain brokered order. -
If you have authority under the secured feature, when you select a store pickup order for maintenance a pop-up window indicates:
This is a Store Pickup order and can only be canceled!-
If you click OK, you advance directly from this pop-up window to the Confirm Cancel window.
-
If you click OK at the Confirm Cancel window, you advance to the Enter Cancel Reason Window.
-
If you complete the Enter Cancel Reason window, Order Management System cancels the order.
-
Hold reason(s) removed: When you cancel a store pickup order, Order Management System removes the hold reason(s), if any, on the order.
Notification to Order Broker: After you cancel a store pickup order, Order Management System changes the Order Broker record’s status to Pending Cancel, and then to Canceled once the BROKER_ORD job has sent the status update message to Order Broker and received the response. The status update includes the cancel reason you entered at the Enter Cancel Reason window. When it processes the response, Order Management System writes Order Transaction History messages such as:
Order was maintained
Ln#: 1 Cancel Acknowledged by Broker
A line-specific message such as in the above sample is written for each line on the order.
See Order Status Update Cancel Request Message Sample (Brokered Backorder or Store Pickup) for a sample.
Notification timing: The BROKER_ORD process in Working with Integration Layer Processes (IJCT) uses its Outbound delay time to determine how often to “wake up” and start evaluating Order Broker records. If it finds orders in Pending Cancel status, it generates the status update immediately and does not wait for the entire Order Broker Status Update Interval (K10).
Example: The Outbound delay time for the BROKER_ORD process is 60 seconds. When you start the process, it sends status updates for any orders in Pending Cancel status, then evaluates whether to send any other request messages based on the Order Broker Status Update Interval (K10). Once it has evaluated all orders in all companies, it then waits 60 seconds before restarting the process of checking for orders in Pending Cancel status and evaluating whether to send inquiry request messages for orders in other statuses.
Order Management System does not verify the pickup order’s current status in Order Broker before processing the cancellation.
Note:
Although the BROKER_ORD process generates the submit order requests (and cancellation requests, if needed), the BROKER process handles other requests to Order Broker.Receiving a Store Pickup Cancellation from Order Broker
If the customer cancels the order, or an item on the order, at a retail location, Order Management System receives the cancel status update when it sends a periodic status inquiry list request and receives the response. In this situation, Order Management System cancels the order or item using the Cancel Reason (Rejected Store Pickup Orders) (G11); also, it writes Order Transaction History such as:
Order was maintained
Web cancel request processed.
Ln#: 1 Canceled by Store
A line-specific message such as in the above sample is written for each canceled line on the store pickup order.
Note:
-
The Cancel Reason (Rejected Store Pickup Orders) (G11) system control value must specify a valid cancel reason in order to correctly cancel an order or item based on messages received from Order Broker.
-
Canceling individual lines is supported only if the Use Split Order (L56) system control value is selected, and the corresponding preference is selected in Order Broker. See Order Broker Configuration and the Order Broker online help for background.
Troubleshooting Creation of Store Pickup Orders and Things to Note
| Issue or Note | Explanation or Solution |
|---|---|
|
Merchandise locator searching: errors |
|
|
|
Optionally, you can:
|
|
|
The postal code or location specified at the search window were not found in the Order Broker proximity database. |
|
|
This item is not flagged as OROB eligible. If multiple items on the order are not flagged as OROB eligible, the error message lists just the first one on the order. |
|
|
The Order Broker application is not active. |
|
Merchandise locator searching: things to note |
|
|
The item is listed as available in a particular location in Order Broker, but the location is not included at the search results screen |
Can occur if:
Note: The Merchandise Locator option for individual order lines does not require a Store Cross Reference record in order to include a location at its search results screen. As a result, if you use both options there is a possible discrepancy between the results listed at the Merchandise Locator Search Results Screen and those available for selection at the Store Pickup Search Results Screen. |
|
Order acceptance: errors |
|
|
|
The Work with Order/Recap screen displays this error if there are any payment methods on the order are not credit cards. |
|
|
The Work with Order/Recap screen displays this error if any items have been added to the order since you selected a store location at the Store Pickup Search Results Screen. To correct, go back to the Work with Order Lines screen and select Store Pickup again. |
|
|
There is no email address specified for the customer, or the associated opt-in/out setting is not O1 (all emails) or O2 (order-related emails). The email address and opt-in/out setting are required so that Order Management System can generate the store pickup notification email when the order is ready for pickup at the designated store location. See Store Pickup Notifications for more information. |
|
Order creation and acceptance: things to note |
|
|
If the Order Broker record is not created immediately after order acceptance |
This situation
can occur if communication with Order Broker is interrupted or
if the Order Broker application is inactive. In this case, Order
Management System creates a record in the Store Pickup tables
to use as a trigger for each store pickup order that it needs to submit
to Order Broker when the connection is restored. Order Management
System also writes an Order Transaction History message such
as |
|
If Order Broker cannot create the order |
If the selected store location was not created correctly in Order Broker--for example, if it was not assigned to the System Code, if any, for the Store Cross Reference record, or the Name in OROB for Point of Sale (L09)--then Order Broker responds to the SubmitOrder request indicating that it cannot create the order. In this case, Order Management System cancels the order using the Cancel Reason (Rejected Store Pickup Orders) (G11) and writes Order Transaction History messages such as the following:
|
|
If the order is held |
Order Management System uses its regular credit-checking routine at order acceptance of a store pickup order, and may put the order on hold. A held order status does not prevent Order Management System from submitting the store pickup order to Order Broker, although Order Management System does select the order’s Under Review flag if the order is held and the Payment at POS for Store Pickup (M16) system control value is unselected. However, Order Management System removes the hold reason(s), if any, when the order is canceled for any reason (cancellation in Order Management System or Order Broker, an error in Order Broker, or rejection by the selected store) or is fulfilled. If a store pickup order was submitted with the Under Review flag selected, and the order is subsequently released from hold, Order Management System sends Order Broker an order update message indicating to clear the Under Review flag. See the Order Update Request Sample (Changing the Under Review Setting for a Brokered Backorder or Store Pickup Order). |
|
Free gifts or promotional inserts |
Once an order is flagged for store pickup, Order Management System does not add free gifts or promotional inserts when you accept the order. To prevent Order Management System from adding free gifts or promotional inserts, select the Store Pickup option before attempting repricing. |
|
Batch order entry |
When you work with store pickup orders in batch order entry, you might need to change or add individual order lines that are in error. After you do so, use the Store Pickup option and select a location where the customer can pick up the order. |
|
Alternate Shipping Charges by Via Window still opens |
Even if the Calculate Freight for Store Pickup Orders (L32) system control value is unselected, this window still opens in order entry. In this case, exit out of the window without making a selection. |
|
Creating the Order Ship To Address record |
Order Management System creates the Order Ship To Address record using the description and address from the Store Cross Reference record for the selected store. |
|
Separate Order Broker record for each order line |
There is a separate Order Broker record for each order line sent to Order Broker; however, the entire order has a single request ID, and creates a single order in Order Broker. |
|
Entering a negative quantity |
Although
Order Management System does not prevent you from creating a
store pickup order with a negative quantity, the order creates an
error in Order Broker and cannot be processed normally. The error
( |
|
System control value setting requirements for order API |
If the order API receives a store pickup order, but the required system control values are not set correctly, the API creates the order and ignores the store pickup information in the CWOrderIn messages. To create a store pickup order through the order API, as in interactive order entry, the Use Merchandise Locator (I38) system control value must be selected and the Store Pickup Order Type (L33) system control value must specify an order type. |
|
After order creation: things to note |
|
|
If the order remains open rather than canceled when the selected location rejects the order or if Order Broker cannot create the order |
If you have not specified a Cancel Reason (Rejected Store Pickup Orders) (G11), then the system cannot cancel the order, and the order remains open if it cannot be fulfilled through Order Broker. |
|
Maintenance prohibited |
You cannot maintain a store pickup after creation except to cancel it (although you can use batch order entry to correct an order received through the order API if there are any errors). See Canceling a Store Pickup Order for more information. |
|
Returns prohibited |
You cannot process a return in Order Management System against a store pickup order. |
|
Email notifications for store pickup orders |
You can select the different types of email notifications to generate from Order Management System based on the Cancel Reason (Rejected Store Pickup Orders) (G11). The Email notification flag for this order type must be selected in order to generate the store pickup notification to the customer when the order is ready for pickup. Also, the opt-in/out setting for the email address on the order must be O1 (all emails) or O2 (order-related emails). |
|
Skipped by Process Auto Soldouts |
The Process Auto Soldouts program ignores lines on store pickup orders. See Processing Auto Soldout Cancellations (MASO), |
Tickler Event Settings
For each tickler event, you must define settings that determine how the system creates ticklers for the event. The settings you define are used as defaults for the created ticklers. You can also define settings at the event rule level. Unless otherwise noted, the settings at the event rule level override the settings at the event level.
You can define tickler event settings at the Change Tickler Event Screen and event rule settings at the Create Tickler Event Rule Screen or Change Tickler Event Rule Screen.
Active Tickler Events and Rules
The Active field defines whether the system creates ticklers for the event or event rule.
-
Select the Active field for a tickler event to have the system evaluate the event when the associated system action is performed. The system does not create ticklers for tickler events that are not active, regardless of whether one or more of the event’s rules is active.
-
Select the Active field for an event rule to have the system evaluate the event rule when the associated system action is performed. The system does not create ticklers for event rules that are not active, regardless of whether the event rule criteria are met.
If you do not want the system to create ticklers for a system action, deselect the Active field for the associated tickler event.
If you want the system to create ticklers for a system action, but do not want the system to create ticklers for a specific event rule, select the Active field for the associated tickler event and deselect the Active field for the event rule. Remember, to create a tickler for a tickler event at least one event rule must be active.
Tickler Assignment
You can define the user(s) to work with and resolve ticklers created for the tickler event and also the tickler supervisor to monitor the ticklers created for the tickler event.
The tickler assignment settings at the event rule level override the tickler assignment settings at the event level.
Tickler user: You can define the user or group of users to work with and resolve ticklers created by the tickler event.
-
select the Assign to original user field to assign ticklers to the order entry operator that entered the order associated with the tickler. If you assign ticklers to the original order entry operator, you must also enter a user ID in the Assigned to user field in case the original order entry operator is no longer valid. Note: If the order is an ecommerce order, the system uses the user ID from the Assigned to user field.
-
enter a user ID in the Assigned to user field to assign ticklers to a specific user.
-
enter a tickler user group code in the Assigned to group field to assign ticklers to a specific tickler user group. You can create tickler user groups using the Working with Tickler User Groups (WTUG) menu option; the tickler user group type indicates if the tickler group is a user group (type U).
Tickler supervisor: Optionally, you can define the supervisor to monitor the ticklers created by the tickler event by entering a supervisor group in the Supervisor group field.
Tickler supervisors perform all the actions a tickler user performs (works with and resolves ticklers) and also monitors the ticklers assigned to his supervisor group or monitor all ticklers, regardless of the assigned supervisor. A tickler supervisor can also reassign ticklers to different users or different tickler user groups.
You can create supervisor groups using the Working with Tickler User Groups (WTUG) menu option; the tickler user group type indicates if the group is a supervisor group (type S).
Tickler assignment example: The flowchart below displays tickler assignment at the event level and event rule level. In this example:
-
ticklers created for event rule 1 are assigned to user group TUSERS and placed in this group’s work queue. Any user belonging to the TUSERS user group can work with and resolve the ticklers. Additionally, the supervisor group SUPER1 monitors the ticklers created for event rule 1. Any user belonging to the SUPER1 supervisor group can monitor the ticklers.
-
ticklers created for event rule 2 are assigned to user ERIKH and placed in his work queue. User ERIKH belongs to user group TUSERS, but other members of this group cannot work with and resolve ticklers created for event rule 2 unless user ERIKH or a supervisor reassigns the tickler. Additionally, the supervisor group SUPER2 monitors the ticklers created for event rule 2. User JANEC monitors the ticklers since she is the only user assigned to this supervisor group.

Allowing Multiple Ticklers
The Allow multiple ticklers field defines whether the system creates more than one tickler for a tickler event.
-
Select this field to create a tickler for each event rule whose criteria are met by the system action.
-
Deselect this field to create one tickler for the first event rule, in processing sequence order, whose criteria are met by the system action. The system does not create more than one tickler for the tickler event, regardless of whether the system action meets the criteria of more than one event rule. The Allow multiple ticklers setting must be unselected for the AR, OO, and UP tickler events.
Regardless of the Allow multiple ticklers setting:
-
the system creates a separate tickler for each tickler event that qualifies. For example, if you enter an order and the order meets the criteria for a HO event rule and a SO event rule, the system creates a separate tickler for each event.
-
the system does not create a tickler if a tickler already exists for the same event/order/order ship to combination. For example, if a tickler already exists for the NO tickler event, order 5988, and order ship to 1, the system does not create another tickler if you add a new order line to order 5988 for ship to 1 and it qualifies for an NO event rule.
Remember: If you allow multiple ticklers, you must think carefully before you create event rules. For example, if you create the following rules and you allow multiple ticklers, the system creates 3 ticklers, even though event rule 3 is a combination of rules 1 and 2:
-
Event rule 1: Ship via is 1 (UPS)
-
Event rule 2: Pay type is 1 (cash/check)
-
Event rule 3: Ship via is 1 (UPS) and Pay type is 1 (cash/check)
Tickler Notification
For each tickler event, you can define whether the system sends an email when:
-
a tickler is created for the event
-
an existing tickler for the event is reassigned to another user or user group
-
existing open or in process ticklers exist and are older than a specified number of days
Tickler Notification email: The Tickler Notification email informs the assigned to user/group that a new tickler has been created and placed in the tickler work queue. Users can review and work with ticklers assigned to them or their tickler user group using the Working with Tickler Users/User Groups (WTIC) menu option.
To generate: An email is generated and sent to the assigned to user or to all of the users in the assigned to user group each time the system creates a new tickler or a user manually creates a tickler and the Notify user/group field in the Tickler table is selected. The system uses the email address from the User Extended table.
The notify user/group setting at the event rule level overrides the notify user/group setting at the event level.
Email template: The format of the Tickler Notification email differs based on whether the system action that creates the tickler is an interactive process or batch process.
-
If ticklers are created for an interactive process, such as order entry, the system sends an email to the assigned to user/user group for each tickler created.
-
If ticklers are created for a batch process, the system sends one email to the assigned to user/user group for all of the ticklers created by the batch process. The system includes a report with the email, which displays the ticklers created by the batch process. The batch processes that create ticklers are:
-
Evaluate Tickler periodic function (program name PFR0072); used to create ticklers for the OO and UP tickler events.
Note:
When you manually create a tickler and assign the tickler a future date, the system sends a Tickler Notification email when the tickler is created, not when the assigned future date is reached.
Sample email (interactive): The system generates an email similar to the sample below for all interactive system actions that create ticklers.
From: flast@EXAMPLE.COM
To: eleanorjohnson@example.com
Subject: Tickler # 000002923 CO# 555
Tickler # 000002923 ORDER LINE STATUS IS BLANK (OPEN) has been assigned to you with a date of 10/11/22.
Contents:
-
From: The email address of the user that started the background async jobs.
-
To: The Email address field in the User Extended table for:
-
the assigned to user.
-
the user belonging to the assigned to user group.
-
the user that entered the order associated with the tickler (the assigned to original user).
-
-
Subject: Standard subject for tickler notification emails.
-
the tickler number is the next available number for the Tickler Number number assignment value.
-
the company number is the company where the system action occurred that created the tickler.
-
-
Message line: Standard message notifying the user of the newly created tickler.
-
For MN ticklers, the text defined for the Short note displays after the tickler number. The date is the assigned date defined for the tickler. The text of the line differs if the tickler is assigned to you (...assigned to you...) or one of your tickler groups (...assigned to KAB...).
-
For all ticklers except MN, the description of the event rule that created the tickler displays after the tickler number. The date is the assigned date defined for the tickler. The text of this line differs if the tickler is assigned to you (...assigned to you...) or one of your tickler groups (...assigned to KAB...).
-
Sample email (batch): The system generates an email similar to the sample below for batch processes that create ticklers.
From: flast&EXAMPLE.COM
To: eleanorjohnson@example.com
Submject: XXREPORT.TXT
Sold Out Orders Report Count for CO# 555 for KAB is 4. Please see attached report for more information.
Contents:
-
From: The email address of the user that started the background async jobs.
-
To: The Email address field in the User Extended table for:
-
the assigned to user.
-
the user belonging to the assigned to user group.
-
the user that entered the order associated with the tickler (the assigned to original user).
-
-
Subject: Standard subject for tickler notification batch emails, where XX is the tickler event code.
-
Message line: Standard message notifying the user of the newly created ticklers, displaying:
-
the name of the process that created the ticklers, for example Sold Out Orders.
-
the user ID or tickler group assigned to the ticklers.
-
the number of ticklers created.
-
Tickler Notification batch report: The report sorts in event, user/user group, created date, tickler number sequence.
The name of the report is based on the batch process that created the ticklers:
-
Backorders Report displays for newly created BO ticklers.
-
Cancelled Orders Report displays for newly created CO ticklers.
-
Aged Open Orders Report displays for newly created OO ticklers.
-
Sold Out Orders Report displays for newly created SO ticklers.
-
Unconfirmed Picks Report displays for newly created UP ticklers.
10/15/02 12:02:15 KAB Co. Sold Out Orders Report for KAB
Event: SOLD OUT ORDERS
User: KBROWN
Created Assigned Tickler# Sts Evnt Cat Rule Description/Note
10/15/02 10/15/02 3132 O SO SO 001 BATCH PROCESS ONLY IS Y
Order# Sts Customer# Name/Email Telephone#
6270 - 001 X 6 PAWS AND CLAWS PET SUPPLIES ATTN: LAST 508 555-0100
pawsandclaws@example.net
--------------------------------------------------------------------------------------
10/15/02 10/15/02 3133 O SO SO 002 INTERACTIVE MODE IS M
Order# Sts Customer# Name/Email Telephone#
6270 - 001 X 11 NONNIE, NONA 978 555-0101
nnonnie@example.net
--------------------------------------------------------------------------------------
10/15/02 10/15/02 3134 O SO SO 003 ITEM IS BLUEBERRY
Order# Sts Customer# Name/Email Telephone#
6270 - 001 X 16 LAST, FIRST 508 555-0102
bmiranda@example.net
--------------------------------------------------------------------------------------
Total ticklers for event SO 3
Total ticklers 3
-
Contents:
-
Event: The description of the tickler event associated with the ticklers created by the batch process.
-
User/user group: The user or tickler group assigned to the newly created ticklers.
-
Created: The date the tickler was created.
-
Assigned: The date the tickler was assigned to the current user/tickler user group; the assigned date is the same date as the created date.
-
Tickler#: The newly created tickler number.
-
Status: The status of the tickler; when a tickler is first created, the status is O (open).
-
Event: the code for the tickler event associated with the newly created tickler.
-
Category: The tickler category assigned to the tickler.
-
Rule: The event rule that created the tickler.
-
Description: A description of the event rule that created the tickler.
-
Order#: The order associated with the tickler.
-
Status: The status of the order associated with the tickler.
-
Customer#: The sold to customer associated with the tickler. If this email is for the AR tickler event, the bill to customer associated with the tickler displays.
-
Name: The sold to customer associated with the tickler.
-
Email: The primary email address defined for the sold to customer.
-
Telephone: The telephone number defined for the sold to customer.
-
Total ticklers for event: The total number of newly created ticklers for the tickler event.
-
Total ticklers: The total number of newly created ticklers across all tickler events.
Tickler Reassignment email: The system sends an email each time an existing tickler is reassigned to a new user or tickler user group.
Note:
The system sends a Tickler Reassignment email only if the Notify user/group field for the event rule associated with the tickler is selected.
To generate: An email is generated when an existing tickler is:
-
reassigned to a new user or tickler user group. A tickler user can reassign ticklers currently assigned to him at the Change Tickler Screen; a tickler supervisor can reassign ticklers, regardless of who is currently assigned, at the Change Tickler screen or Reassign Ticklers Window.
-
graduated to a new event rule; only ticklers for the AR, OO, and UP events are graduated. The system sends a Tickler Notification Reassignment email only if the new event rule has a different assigned to user/group from the previous event rule assigned to the tickler.
From: flast&EXAMPLE.EXAMPLE.COM
To: eleanorjohnson@example.com
Subject: Tickler # 000002923 CO# 555 (REASSIGNED)
Tickler# 7159 OLDER THAN 5 DAYS (ARRIVAL0, SHIP VIA 2 has been assigned to KAB with a date of 10/14/02.
Contents:
-
From: The email address of the user that started the background async jobs.
-
To: The Email address field in the User Extended table for:
-
the new assigned to user.
-
the user belonging to the new assigned to user group.
-
-
Subject: Standard subject for tickler reassignment emails.
-
The tickler number is the number of the tickler that has been reassigned.
-
the company number is the company where the system action occurred that created the tickler.
-
-
Message line 1: Standard message notifying the user of the reassigned tickler.
-
For MN ticklers, the text defined for the Short note displays after the tickler number. The date is the assigned date defined for the tickler. The text of the line differs if the tickler is assigned to you (...assigned to you...) or one of your tickler groups (...assigned to KAB...).
-
For all ticklers except MN, the description of the event rule defined for the tickler displays after the tickler number. The date is the assigned date defined for the tickler. The text of this line differs if the tickler is assigned to you (...assigned to you...) or one of your tickler groups (...assigned to KAB...).
-
Supervisor Notification Count email: The Supervisor Notification Count email informs the users in the tickler supervisor group that open and in process ticklers exist that are assigned to the supervisor group and have not yet been resolved. The email includes a report which displays the number of open ticklers assigned to the supervisor group that have not yet been resolved. The tickler supervisor can use the report to determine if he should reassign ticklers based on the current workload of users assigned to work with and resolve the ticklers.
To generate: An email is generated and sent to all of the users in the supervisor group when you run the Evaluate Tickler periodic function if:
-
an open or in process tickler exists, and
-
the tickler is assigned to a supervisor group, and
-
the Next notification date defined for the tickler in the Tickler table is equal to or past the current date.
The system sends an email to the email address defined for the supervisor user group in the Tickler User Group table.
Note:
If a user belongs to more than one tickler supervisor group, that user will receive a separate Supervisor Notification Count email for each tickler supervisor group that has aged ticklers.
The supervisor setting at the event rule level overrides the supervisor setting at the event level.
Once an initial Supervisor Notification Count email is sent to the supervisor group, the system sends an email each time you run the Evaluate Tickler periodic function.
-
When the system creates a tickler, the system calculates the date when the supervisor should be notified and updates the Next notification date field in the Tickler table with the initial notice date. The system uses this calculation to determine the next notification date when a tickler is first created: tickler creation date + value in Number of days to notify supervisor field for the event rule that created the tickler = next notify date.
-
Once an initial Supervisor Notification Count email is sent to the supervisor, the system sends an email to the supervisor group each time you run the Evaluate Tickler periodic function since the next notification date is past the current date. The system does not update the next notification date once an initial email is sent to the supervisor.
Note:
The system does not use the Notify user/group setting defined for the event to determine if a Supervisor Notification Count email is sent to the supervisor.
The system continues sending an email to the supervisor as long as a tickler assigned to the supervisor group is in an open or in process status and the Next notification date is equal to or past the current date. If all ticklers assigned to the supervisor are resolved, the system no longer sends a Supervisor Notification Count email.
Sample email:
From: flast&EXAMPLE.COM
To: eleanor.johnson@example.com
Subject: SUPERVSR.TXT
Supervisor Notification Count for CO# 555 for HOSUPER is 55. Please see attached report for more information.
Contents:
-
From: The email address of the user that started the background async jobs.
-
To: The email address defined for the supervisor user group in the Tickler User Group table.
-
Subject: Standard subject for supervisor notification count emails.
-
Message line: Standard message notifying the supervisor of the supervisor notification count. The tickler count is the number of ticklers in an open or in process status that are assigned to the supervisor group and the next notification date for the tickler in the Tickler table is equal to or past the current date.
Supervisor Notification report: The Supervisor Notification report breaks by event and within event by user/user group. The report sorts in event, user/user group, created date, tickler number sequence. A total displays for each event and across all events.
10/15/02 8:11:11 KAB Co. Supervisor Notification for SUPERKAB
Event: HELD ORDERS
User: KAB
Created Assigned Tickler# Sts Evnt Cat Rule Description/Note
9/18/02 10/15/02 3060 O HO HO 001 ORDER HOLD REASON IS AT
Order# Sts Customer# Name/Email Telephone#
6261 - 001 H 11 LAST, FIRST 5085550103
flast@example.com
--------------------------------------------------------------------------------------
Total ticklers for event HO 1
Event: BACKORDERS
User: DDICESARE
Created Assigned Tickler# Sts Evnt Cat Rule Description/Note
9/28/02 10/15/02 3263 O BO BO 003 ITEM IS AB10000
Order# Sts Customer# Name/Email Telephone#
6781 - 001 H 19 LAST, FIRST 9785550103
flast@example.com
--------------------------------------------------------------------------------------
Total ticklers for event BO 1
Total ticklers 2
Contents:
-
Supervisor group: The name of the supervisor group assigned to the open or in process ticklers.
-
Event: The description of the tickler event associated with open or in process ticklers.
-
User/user group: The user or tickler group assigned to open or in process ticklers for the event.
-
Created: The date the tickler was created.
-
Assigned: The date the tickler was assigned to the current user/tickler user group.
-
Tickler #: The tickler number that is open or in process.
-
Status: The status of the tickler; O (open) or I (in process).
-
Event: The code for the tickler event associated with the tickler.
-
Category: The tickler category assigned to the tickler.
-
Rule: The event rule that created the tickler.
-
Description/Note:
-
For MN ticklers: the text from the Short note field displays. If the Short note field for the tickler is blank, the description of the MN event displays.
-
For all ticklers except MN: the description of the event rule displays.
-
-
Order#: The order and ship to associated with the tickler.
-
Status: The status of the order.
-
Customer#: The sold to customer associated with the tickler.
-
Name: The name of the sold to customer.
-
Email: The primary email address defined for the sold to customer.
-
Telephone#: The telephone number defined for the sold to customer.
-
Total ticklers for event: The number of open or in process ticklers assigned to the supervisor group for the tickler event.
-
Total ticklers: The number of open or in process ticklers assigned to the supervisor group across all tickler events
Tickler Work Notes
The Note type field defines the type of tickler work notes a user enters for each tickler event; these work notes describe resolution notes and progress notes.
-
A = Action notes; the user enters tickler work notes at the Edit Customer Actions Window.
-
B = Bill to notes; the user enters tickler work notes at the Work with Bill To Notes Screen.
-
O = Order notes; the user enters tickler work notes at the Work with Order Messages Screen.
-
S = Sold to notes; the user enters tickler work notes at the Edit Customer Notes Screen.
-
T = Tickler notes; the user enters tickler work notes at the Work with Tickler Notes Screen.
You can only define the tickler work notes setting at the event level. If you change the note type setting, the system does not change the note type for previously created ticklers.
Tickler Priority
The tickler priority defines the importance of ticklers created for the tickler event; you can scan for ticklers by priority at the Work with Tickler Screen (user/group view) (tickler users) and Workflow Management Screen (tickler supervisors).
You can assign a tickler priority between 1-9, where 1 is the lowest priority and 9 is the highest priority.
The tickler priority defined at the event rule level overrides the tickler priority defined at the event level.
Tickler Category
Optionally, if you wish to group ticklers, you can assign a tickler category to ticklers.
You can scan for ticklers assigned to this category at the Work with Tickler Screen (user/group view) (tickler users) and Workflow Management Screen (tickler supervisors).
Example:To view only ticklers created for a specific HO rule, create a tickler category for each HO rule you create. This way you can view all ticklers created for HO rule 1 (paytype hold reason is AT) versus ticklers created for HO rule 2 (order hold reason is SF). In this example, tickler category for rule 1 may be HAT and tickler category for rule 2 may be HSF.
The tickler category defined at the event rule level overrides the tickler category defined at the event level.
You can create tickler categories using the Working with Tickler Category (WTCT) menu option.
Tickler Resolution Reason
Tickler resolution reasons are required when you or the system resolves a tickler; the resolution reason indicates the reason why the tickler is resolved.
You can define a tickler resolution reason for a tickler event or event rule; when the system creates a tickler for the tickler event/rule, the system updates the Resolution reason field in the Tickler table.
It is recommended you create at least 2 ticklers resolution reasons: one reason to use when the system resolves the tickler, and one reason to use when you manually resolve a tickler.
The resolution reason defined at the event rule level overrides the resolution reason defined at the event level.
You can create tickler resolution reasons using the Working with Tickler Resolution Reasons (WTRR) menu option
Tracking User, Authority, and Password Updates
Overview: Order Management System tracks updates to users, and user classes, and external payment service settings in the User Audit table, and tracks user password changes in the Password Audit table.
User Audit table: The User Audit table tracks activity that has taken place in creating or changing user records, user classes, and user authority. The table also tracks changes to external payment services. The activities that trigger updates to the User Audit table include:
-
Creating, changing, or deleting a user in Work with Users (WUSR), including updates to:
-
Company authority
-
Menu option authority
-
Secured features
-
Tickler group assignment
-
-
Creating, changing, or deleting a user classes in Work with User Classes (WUCL), including updates to:
-
Company authority
-
Menu option authority
-
Secured feature authority
-
Vendor authority
-
-
Changes to user or user class authority for order hold reasons (WOHR)
-
Changes to user or user class authority for return disposition value codes (WRDV)
-
Creating, changing, copying, or deleting a secured feature (WSYS or NSEC)
-
Updating a user’s email address (MUEE)
-
Updating a user’s default menu (pressing F17 at a menu screen)
-
Creating or changing information at the Work with External Service screen (WASV)
-
Deleting an active procedure (MACX)
-
Creating, changing, or deleting an inbound or outbound web service user or client ID, and password or client secret in Work with Web Service Authentication (WWSA)
-
Generating a client, updating access, updating a client secret, or refreshing the applications displayed at the Manage External Application Access page in Modern View (MEAA)
Reporting: Use the Print User Security Audit Reports (PUSA) menu option to generate reports of the activity tracked in the User Audit and Password Audit tables. Note that not all activity tracked in the User Audit table is included in these reports.
Purging the audit tables: The PURGEUA periodic function (Program name = PFR0215) purges User Audit and Password Audit records based on date.
Use the Parameter field for the periodic function to specify the number of days old a User Audit or Password Audit record must be to be eligible for purge. If the Parameter is blank or 0, records must be 365 days old to be eligible for purge.
In this topic:
The updates to the User Audit table, based on updates to users, user classes, and secured features, are described below. See the Fields Used by Updated Table (User Audit) for a listing of the fields updated in the User Audit table for each updated source table.
| Field | Attributes | Description |
|---|---|---|
|
Common Fields |
The following fields are populated for all records in the User Audit table. |
|
|
Numeric, 7 positions (CYY/MM/DD format) |
The date when the change occurred. Always populated. |
|
|
Numeric, 6 positions (HHMMSS format) |
The time when the change occurred. Always populated. |
|
|
Alphanumeric, 1 position |
Indicates whether the record reflects:
Change: A change to an existing record creates both an A and a B audit record. Addition: Creation of a new record creates just an A audit record. Deletion: Deletion of an existing record creates just a B audit record. Always populated. |
|
|
Alphanumeric, 1 position |
The type of action that took place:
Always populated. Note: Creating a new user results in audit records for the User and Users tables, as well as the User Extended table if you specify an email address. Additional table updates take place as you work with different types of user authorization, such as assigning authority to a company and then setting that company as the user’s default. |
|
|
Alphanumeric, 25 positions |
The table updated by the activity. See the Fields Used by Updated Table (User Audit) for a listing, including the activities that create each type of audit record and the included fields. All fields populated: All fields that are populated in the updated table are populated in the audit record. For example, a user record includes a default company and a default output queue. If you make any change to the user record, the default company and default output queue are included in the before and after records, even if these settings have not changed. However, the User Authority Change Report includes fields only if they have been updated. Also, the report does not include all types of updates. Certain activities update multiple tables: For example, deleting a user also deletes the User Extended record, the Auth User Company record, and other dependent records. Always populated. |
|
|
Alphanumeric, 10 positions |
The ID of the user who performed the activity. Always populated. |
|
|
Alphanumeric, 30 positions |
The name of the user who performed the activity at the time of the update. From the User record. Always populated. |
|
|
Alphanumeric, 10 positions |
The record affected by the activity. Possible authority entries:
Always populated except for records created when the updated table is Webservice Users, Webserviceout, and INT Cloud App Client. |
|
|
Alphanumeric, 1 position |
The authority type affected by the activity. Possible types:
Always populated except for records created when the updated table is Webservice Users, Webserviceout, and INT Cloud App Client. |
|
|
Alphanumeric, 30 positions |
The name of the user, user class, or secured feature related to the activity. Always populated except for records created when the updated table is Webservice Users, Webserviceout, and INT Cloud App Client. User name: Populated with a user name by a change related to the user, when the Updated Table is User, Users, User Extended, Auth User Company, Auth User Feature, Auth User Menu Option, User Field Authority, or User Tickler Group. In the case of an External Payment Service update, this is the user who performs the update. From:
User class: Populated with the user class name by a change related to the user class, when the Updated Table is User Class, Auth User Class Company, Auth User Class Feature, Auth User Class Option, User Class Field Auth, or User Class Vend Auth. In this case, the Name/description is the same as the User class description. Secured feature: Populated with the secured feature description, when the Updated Table is Secured Feature. In this case, the Name/description is the same as the Secured feature description. |
|
|
Alphanumeric, 512 positions |
Lists the settings of any changed fields:
Example: You changed the default company for a user from 12: After: Default Company: 3 Before: Default Company: 12 This information is listed on the User Authority Change Report or on the generated spreadsheet file if the information’s length exceeds the available space on the report. A Before record is not created as the result of a Refresh in Manage External Application Access (MEAA). Instead, there is just an After record, such as After: IDCS Refresh Applications job is executed by: FIRST.LAST. Note that the user name may be truncated. |
|
|
Additional Fields |
Each remaining field in the User Audit table is populated only if the corresponding source table includes the same field, and it is populated in the source table. For example, only the User table includes the CTI user type field, so this field can be populated in the User Audit table only for an audit record of a User record that has a CTI user type specified. |
|
|
Numeric, 3 positions |
The Company related to the update. Populated for the following tables by:
Updates that are not specific to a company, such as creating or updating web service users, have the company set to 0. |
|
|
The following fields are populated only for User table updates, not for web service user updates. |
||
|
Alphanumeric, 1 position |
The CTI user setting for the created, changed, or deleted user. Possible settings:
Populated only for User table updates. |
|
|
Alphanumeric, 1 position |
The CTI user type setting for the created, changed, or deleted user. Optional field. Possible types:
Populated only for User table updates. |
|
|
Alphanumeric, 1 position |
The CTI default screen setting for the created, changed, or deleted user. Optional field. Possible settings:
Populated only for User table updates. |
|
|
Alphanumeric, 4 positions |
The CTI telephone extension setting for the created, changed, or deleted user. Optional field. Populated only for User table updates. |
|
|
Alphanumeric, 10 positions |
Populated for the following tables by:
|
|
|
Alphanumeric, 30 positions |
The Description of the created, changed, or deleted user class. Populated only for User Class table updates. |
|
|
Alphanumeric, 8 positions |
Possible settings are:
Populated for the following tables by:
|
|
|
Alphanumeric, 1 position |
The Log use setting for the created, changed, or deleted user. Optional field. Possible settings:
Populated only for User table updates. |
|
|
Alphanumeric, 1 position |
The Security administrator setting for the created, changed, or deleted user. Optional field. Possible settings:
Populated only for User table updates. |
|
|
Alphanumeric, 1 position |
The Fast path setting for the created, changed, or deleted user. Optional field. Possible settings:
Populated only for User table updates. |
|
|
Alphanumeric, 10 positions |
The default Output queue for the created, changed, or deleted user. Optional field. Populated only for User table updates. |
|
|
Alphanumeric, 10 positions |
The Default menu setting for the created, changed, or deleted user. Optional field. Populated only for User or User Class table updates. |
|
|
Alphanumeric, 3 positions |
The Language for the created, changed, or deleted user. Optional field. Populated only for User table updates. |
|
|
Alphanumeric, 50 positions |
The user’s Email address. Populated only for User Extended table updates. |
|
|
Alphanumeric, 3 positions |
The code identifying the secured feature. Populated for the following tables by:
|
|
|
Alphanumeric, 40 positions |
The description of the secured feature. Populated only for Secured Feature updates. |
|
|
Alphanumeric, 10 positions |
The code identifying the tickler group added to or deleted from the user. Populated only for User Tickler Group updates for a user. |
|
|
Numeric, 7 positions |
The vendor whose authority was changed for the user class. Populated only for User Class/Vendor Auth updates. |
|
|
CPG program |
Alphanumeric, 10 positions |
Not currently implemented. |
|
Alphanumeric, 2 positions |
The code identifying a:
Populated for the following tables by:
|
|
|
Alphanumeric, 2 positions |
The code identifying the type of user field changed. Possible values:
Populated for the following tables by:
|
|
|
Alphanumeric, 4 positions |
The Fast path identifying a menu option. Populated for the following tables by:
|
|
|
UDF seq# |
Numeric, 5 positions |
Not currently implemented. |
|
Alphanumeric, 1 position |
Indicates if the user is flagged for LDAP authentication. This setting is always set to N since LDAP authentication is not currently implemented. Populated only for User table updates. |
|
|
Alphanumeric, 10 positions |
The domain to use for LDAP authentication. Populated only for User table updates. Not currently implemented. |
|
|
Alphanumeric, 50 positions |
The user name that matches the network user ID for network authentication. Used only for LDAP authentication, which is not currently implemented. Populated only for User table updates. |
|
|
Alphanumeric, 2 positions |
The two-position code identifying the user’s locale. Possible locales:
|
|
|
Alphanumeric, 3 positions |
The three-position code identifying the date format for the user. Possible date formats:
Note: The current date format at the time of the change is included in the Before and After entries for each user change. |
|
|
Numeric, 1 position |
The user’s authority rank. Set to:
Populated only for Users table updates made either through the Work with Users option, or the User Control screen available through Advanced Commands. |
|
|
Alphanumeric, 1 position |
Set to:
Populated only for Users table updates made either through the Work with Users option, or the User Control screen available through Advanced Commands. |
|
|
Alphanumeric, 10 positions |
Indicates when the password for a user expires when IDCS or OCI IAM is not enabled. Valid values are:
Populated only for Users table updates through either the Work with Users option or the User Control screen available through Advanced Commands. |
|
|
Alphanumeric, 1 position |
Indicates the user’s authority to other users’ submitted jobs:
Populated only for Users table updates made either through the Work with Users option, or the User Control screen available through Advanced Commands. |
|
|
Alphanumeric, 10 positions |
Indicates if the user has access to Order Management System. Possible settings:
Populated only for Users table updates made either through the Work with Users option, or the User Control screen available through Advanced Commands. |
|
|
Alphanumeric, 200 positions |
The code identifying the job whose active procedure was deleted. Used only when the updated table is Active Procedure. |
|
|
Numeric, 19 positions |
The number identifying the active procedure that was deleted. Used only when the updated table is Active Procedure. |
Fields for all audit records: All records in the User Audit table use the following fields:
| Table | Fields | Ways to Update/Sample Report Entries |
|---|---|---|
|
Note: Optional fields, such as the Output queue, CTI settings, and User class, may be blank for the audit record. |
Work with Users (WUSR):
Press F17 from a menu screen to make the current menu the default Sample entries on the User Authority Change Report:
|
|
|
Name/ description from Users table |
Work with Users (WUSR):
The User Control screen available through Advance Commands Sample entries on the User Authority Change Report:
|
|
|
Name/ description from User table |
Work with Users (WUSR):
Update Email Address Domain (MUEE) Sample entries on the User Authority Change Report:
|
|
|
Name/ description from User table |
WUSR:
Sample entry on the User Authority Change Report: After: User: USER_ID Company Authority: <CMP_NO> |
|
|
Note: This is the company that was active when you changed the function authority, even if the user does not have authority to the company.Name/ description from User table |
WUSR:
Sample entry on the User Authority Change Report: After: User: USER_ID Feature: A01 Default Company: <CMP_NO> Default Authority: *ALLOW, where A01 identifies the secured feature, and the Default Company is the company where the feature authority was set |
|
|
Name/ description from User table |
WUSR:
Sample entry on the User Authority Change Report: After: User: USER_ID Menu Option: DABJ Default Authority: *ALLOW |
|
|
This is the company that was active when you changed the function authority, even if the user does not have authority to the company. Name/ description from User table |
Work with Order Hold Reasons (WOHR): User release auth (any change) Work with Return Disposition Values (WRDV): User authority (any change) WUSR: Delete Sample entry on the User Authority Change Report: After: User: <USER_ID> Hold Reason: AT Type: HR Default Authority: *ALLOW |
|
|
Name/ description from User table |
WUSR: Tickler group (assigning or deleting) Sample entry on the User Authority Change Report: After: User: <USER_ID> Tickler Group: BASIC |
|
|
User Class |
Name/ description of the user class (same as the User class description) |
Work with User Classes (WUCL):
Sample entries on the User Authority Change Report:
|
|
Name/ description of the user class |
WUCL: Company auth (adding or removing) Sample entry on the User Authority Change Report: After: User Class: OE Company Authority: <CMP_NO> |
|
|
Name/ description of the user class |
WUCL: Feature auth (any change) Sample entry on the User Authority Change Report: After: User Class: CS2 Feature: A05 Default Company: <CMP_NO> Default Authority: *EXCLUDE, where A05 is the secured feature, and Company <CMP_NO> is the company where the feature was set |
|
|
Name/ description of the user class |
WUCL: Menu option auth (any change) Sample entry on the User Authority Change Report: After: User Class: CS2 Menu Option: DABJ Default Authority: *ALLOW |
|
|
Name/ description of the user who performed the update |
WASV: Enter or change any information at the Work with External Authorization Service Screen The Authentication User and encrypted Authentication Password are included if they were changed. The Auth Service code is always included. Sample entry on the User Authority Change Report: After: Auth Service: EXT Url: https://server.<HOSTNAME>.com:<PORT>/CC-REST/cc/Test User: authUser Password: <ENCRYPTED_PASSWORD> |
|
|
This is the company that was active when you changed the function authority, even if the user does not have authority to the company. Name/ description of the user class |
Work with Order Hold Reasons (WOHR): User release auth (any change) Work with Return Disposition Values (WRDV): User authority (any change) Sample entry on the User Authority Change Report: After: User Class: CS2 Hold Reason: DH Type: HR Default Authority: *ALLOW |
|
|
Name/ description of the user class |
WUCL: Vendor auth (*EXCLUDE, deletion only) Sample entry on the User Authority Change Report: Before: User Class: CS2 Company: <CMP_NO> Vendor: <VENDOR_NO> |
|
|
Name/ description of the secured feature |
Work with System Values/Features (WSYS): Secured features:
Process New Secure Feature Values (NSEC) Sample entries on the User Authority Change Report:
|
|
|
Purge Active Procedures Across Users (MACX): Select Delete for an active procedure. Note:
|
||
|
INT Cloud App Client |
No additional fields updated. |
Manage External Application Access (MEAA) in Modern View creates records for the following Action types:
Sample Before/after changes entry: IDCS Refresh Applications job is executed by: FIRST.LAST. |
|
Webservice Users |
No additional fields updated. |
Work with Web Service Authentication (WWSA) creates records for the following Action types:
Manage External Application Access (MEAA) in Modern View creates records for the following Action types:
Sample Before/after changes entry: After: Webservice: CWPickOut User: FIRST.LAST |
|
Webserviceout |
No additional fields updated. |
Work with Web Service Authentication (WWSA) creates records for the following Action types:
Sample Before/after changes entry: After: Webservice: Job Notification Only Client Secret is changed |
Password changes are not tracked when the IDCS_ENABLED property
is set to true. Once IDCS (Oracle Identity Cloud
Service) or OCI IAM (Oracle Cloud Infrastructure Identity and Access
Management) use is enabled, password tracking ends; however, password
audit records created before IDCS or OCI IAM use was enabled remain
in the table.
The information in the Password Audit table is listed below:
| Field | Attributes | Description |
|---|---|---|
|
Change date |
Numeric, 7 positions (CYY/MM/DD format) |
The date when the change occurred. |
|
Change time |
Numeric, 6 positions (HHMMSS format) |
The time when the change occurred. |
|
User ID of password |
Alphanumeric, 10 positions |
The user ID whose password was updated. |
|
User name |
Alphanumeric, 30 positions |
The name of the user. From the Name set up through Work with Users. |
|
Updated by user |
Alphanumeric, 10 positions |
The ID of the user who performed the activity. |
|
Updated by user name |
Alphanumeric, 30 positions |
The name of the user who performed the activity at the time of the update. From the User record. |
Translating Special Characters
Certain special characters cannot be passed in an attribute of an XML message except through the use of replacement text strings. For outbound XML messages, Order Management System replaces these with the text strings listed below. Similarly, for inbound messages, you can pass the special characters listed below by replacing them with the related text strings. For example, if the item description includes a double quote, Order Management System replaces it in the item_description attribute in the Detailed Order Response Message: Sample XML with ". Similarly, you can pass a single quote in the line_hyperlink attribute in the Inbound Order XML Message (CWORDERIN) by replacing it with '
For more information see the Web Services Guide on My Oracle Support (ID 2149144.1).
If an inbound message includes any of the special characters listed below without using the replacement text string, the system returns an error: Cannot Parse XML Message or Invalid XML Message.
| Special Character | Description | Replacement Text String |
|---|---|---|
|
’ |
single quote |
' |
|
" |
double quote |
" |
|
greater than |
> |
|
|
< |
less than |
< |
|
& |
ampersand |
& |
Other special characters (such as $ or !) can be passed in an attribute of an XML message without using replacement text strings.
Troubleshooting the Order Broker Integration
See the Order Broker Operations Guide for information on possible errors returned by Order Broker and additional troubleshooting information.
See also:
-
Things to Note about Retail Pickup (including Ship-for-Pickup) and Delivery Orders
-
Troubleshooting Creation of Store Pickup Orders and Things to Note
-
Reauthorization and Under Review Hold Scenarios for Orders Fulfilled through Order Broker
Credit card authorization reversals: Authorization reversals take place when the Order Broker status is:
-
C (Closed): The request was canceled before submission to Order Broker.
-
E (Error): Order Broker returned an error response.
-
J (Rejected): The order was rejected by the pickup location. Reversal takes place only for a pickup order.
-
U (Unfulfillable): Order Broker cannot fulfill the order or line.
-
Y (Pending Cancel): A request to cancel the order or line has been sent to Order Broker.
-
Z (Canceled): Order Broker has confirmed that the order or line was canceled.
For more information:
-
See Order Broker Status Summary Table for more information on Order Broker statuses.
-
Use the Order Broker Lines option at the Batch Job Statistics page in Modern View to check the total number of Order Broker lines in the currently selected company, broken out by current status.
| Problem | Possible Explanation |
|---|---|
|
No fulfilling location is displayed at the Work with Order Broker Screen |
Is the Order Broker request’s status E (error), U (unfulfillable), C (Closed) or Z (canceled)? In this case, the order line will not be fulfilled through Order Broker. |
|
The status of the Order Broker request is Closed, but there have not been any shipments |
Order Management System changes the status of a brokered backorder request to C (closed) if you cancel it before it has been submitted to Order Broker (when its status is R (ready)). |
|
A backordered order line is not being submitted to Order Broker for fulfillment |
|
|
I created a ship-for-pickup order, but it is not listed at the Work with Order Broker Screen or on the Order Inquiry screen in Order Broker |
If the Use OROB for Ship for Pickup Fulfillment Assignment (M34) system control value is set to NEVER, Order Management System does not send ship-for-pickup orders to Order Broker until you generate the pick slip. See Ship-for-Pickup Orders for an overview. |
|
Order Broker returned an error |
The error is displayed at the Display Order Broker History Screen.
See the Order Broker Operations Guide for a list of possible errors that Order Broker might return to a Submit Order request. |
|
Will there be Order Broker records in error if the Order Broker application is not running? |
If Order Management System includes orders in a status inquiry list request and does not receive a response from Order Broker, the Order Broker records remain in their current status. |
|
Where are messages logged between Order Management System and Order Broker? |
If specified in the XML Logging setting at the Event Logging screen in Order Broker, Order Broker logs the messages. |
|
Retail pickup and delivery orders not created in Order Management System |
If the Send Inventory by Warehouse to OROB (L06) system control value is selected, Order Management System does not send fulfillments requests to Order Broker unless an OROB location is specified for the warehouse. |
|
Ship-for-pickup orders are not created |
An OROB_MESSAGE_VERSION of 16.0 or higher is required to use the Ship-for-Pickup Orders integration with Order Broker. Note that this property cannot be set higher than 19.9 for integration with Order Broker 19.x, or higher than 21.1 for integration with Order Broker 22.2.301.0 or higher. |
|
Status updates are not generated when ship-for-pickup orders are in transit |
The Order Type for Retail Pickup Orders Brokered to OROMS (K92) and Order Type for Orders Brokered for Delivery (K91) system control values must be populated to generate the status update message when a ship-for-pickup order is in transit. |
|
Order initially created in Order Management System in error status, then put on hold after error corrected |
Canceled by originating system? If an order is initially created in Order Management System in error status and then corrected, Order Management System sends an inquiry request to Order Broker before changing the order’s status to open. If the response from Order Broker indicates that the originating system has canceled the order, Order Management System then puts the order on hold and writes an order transaction history message, such as: Order held - line[s] canceled in Order B. |
|
Tax is not calculated correctly for the invoice on a fulfilling order, while it is calculated correctly on the originating order |
Select the Tax on Freight (B14) system control value if this issue occurs. |
|
Multiple invoices are created for the lines on a single order that was fulfilled on the same day |
The invoice is consolidated for order lines that were previously in the same status and confirmed as fulfilled in the same status inquiry response from Order Broker, even if your company is not configured to consolidate invoices. Example: A line on the order is set to fulfilled in Order Broker at 9:00, and the other line at 9:02:
NOTE:
|
|
An order received from Order Broker is created in error status because the Price Override Limit Percent (E55) was exceeded |
This situation can occur if the order includes a free or low-priced item, such as through a BOGO promotion. A possible solution to prevent this error is to set the Order Broker Price Override (K95) to a price override reason code whose Override item offer price flag is selected. |
|
Delivery orders are in G (Resend Fulfilled) status, or ship-for-pickup orders are in H (Resend Intransit) status |
Orders can be in these statuses if the order status update request message, generated to set their statuses to Complete (delivery order) or Intransit (ship-for-pickup order), did not receive a response from Order Broker. This might occur if, for example, message authentication failed or communication is down. In this case, the BROKER_ORD job resends the request the next time it runs. |
Reauthorization and Under Review Hold Scenarios for Orders Fulfilled through Order Broker
Checking status in pick slip generation: A retail pickup or delivery order is put on AU (Broker Order Under Review) hold when:
-
Pick slip generation sends a status list request to Order Broker, and
-
The response message indicates that the order is under review.
Checking if under review through the BROKER process: When the BROKER integration layer process sends the status list request to Order Broker and receives a response indicating that an order is not under review, it removes the AU hold, if any, on the order. However, if the response from Order Broker indicates that the order is now canceled, the order is put on hold using the Order Broker Hold Reason (Cancel) (L02). If that system control value is blank, the order remains on AU hold.
Note:
If there are other holds on the order, they are not automatically removed.When an originating order is put on AR hold: When both an originating and fulfilling order exist, the holds applied work as follows:
-
A ship-for-pickup order or brokered backorder that originated in Order Management System was assigned by Order Broker to Order Management System for fulfillment, and Order Management System created a new fulfilling order.
-
The originating order’s initial authorization expired.
-
The attempt to reauthorize the originating order through the REAUTH periodic function failed, and the originating order was put on AR hold. See Reauthorizing Expired Authorizations for background.
In this case, the system:
-
Applies the AU hold reason to the fulfilling order.
-
Voids any pending pick slips that are in the statuses listed under Selecting Expired Authorizations and Amounts for Reauthorization. Also, writes an order transaction history record such as: Pick #### voided due to expired auth.
-
Writes an order transaction history message such as SYS-HLD - BROKER ORDER UNDER REVIEW, where BROKER ORDER UNDER REVIEW is the description of the hold reason code.
-
If the Generic Pick Out API is in use, generates a trigger for a CWPickout message indicating that the pick slip was voided.
For more information see the Web Services Guide on https://support.oracle.com My Oracle Support (ID 2149144.1).
Note:
Drop ship pick slips or purchase orders, including those fulfilled through supplier direct fulfillment in Order Broker, are not updated when the reauthorization fails. You need to monitor these orders separately.If the reauthorization is declined after shipment through the fulfilling order: It is possible, based on the timing of the REAUTH job and billing, that the REAUTH job can attempt to reauthorize the originating order after the fulfilling order has made the shipment. In this case, the system still sends the order update to Order Broker indicating to put the order under review, even though the order may already be closed in Order Broker. If the order is already closed, no additional automatic updates take place.
For more information: See Reauthorizing Expired Authorizations for background on the reauthorization process.
Releasing Orders from AR or AU Holds
Restrictions: Orders on AR (Declined Credit Card Authorization) or AU (Broker Order Under Review) system holds can only be released under the following conditions:
-
AR: You cannot release an order on AR system hold unless the order has a valid authorization for the balance of the order. Otherwise, you can cancel the order.
-
AU: You cannot release an order on AU hold through a screen in Classic or Modern View. Instead, based on the response received from Order Broker through the BROKER integration layer process, the AU hold is removed automatically if the response indicates that the order is no longer under review. Also, the order can be canceled based on the response received through the BROKER process.
Using the ASYNC Jobs (MBJC)
ASYNC (background) jobs process the non-time sensitive table updates, such as analysis and reporting updates, associated with transactions that are processed throughout the day in the following modules: Order Entry, Order Maintenance, Purchase Order Maintenance, Purchase Order Receiving, and Billing.
ASYNC jobs are used to process these updates for the following reasons:
-
System response time would be affected if all table updates associated with each system transaction were processed interactively.
-
Table updates can occur more quickly by dynamically updating the tables through out the day rather than running an end of day batch process.
-
Analysis information can be viewed and reported more quickly.
Example: When new orders are entered onto the system, the order records are created interactively, and if desired, inventory can be reserved for the order. The order can be maintained, viewed, and is eligible for shipment as soon as it is entered.
The marketing information associated with the order is updated via the Order Processing ASYNC function. These table updates occur throughout the day as the records are sent to the data queue associated with the Order Processing ASYNC function.
ASYNC processing allows you to quickly update the tables necessary to create and ship the order, and eliminates the need to run a batch process at the end of the day to update all of the system tables associated with recording the order.
The following ASYNC jobs are used:
| ASYNC Job | Function |
|---|---|
|
CNTL_ASYNC |
Starts and ends all of the ASYNC jobs. See Starting the ASYNC Jobs and Ending the ASYNC Jobs. |
|
BILL_ASYNC |
Updates system tables as orders are billed. |
|
EBO_ASYNC |
Performs reservation for backordered items when inventory levels for an item change. |
|
ORDR_ASYNC |
Updates system tables as orders are entered and maintained. |
|
OTHR_ASYNC |
Updates system tables as purchase orders are entered, maintained, and received. |
In this topic:
Running the ASYNC (Background) Jobs
Purpose: The ASYNC jobs, or background jobs, are used to process system table updates throughout the day. These jobs run in the background and process transactions in sequence as they are sent to the data queues. These jobs are placed in a Wait (DEQW) status when there are no records to process.Starting the ASYNC Jobs
The following ASYNC jobs must be running to process the records in the data queue tables. The controlling ASYNC job (CNTL_ASYNC) is used to start the ASYNC jobs.-
BILL_ASYNC
-
EBO_ASYNC
-
OTHR_ASYNC
Note:
The ORDR_ASYNC job updates system tables with order and demand information as orders are entered and maintained. As you enter or maintain orders, the system sends the records to the Order Processing data queue for processing. As soon as the Order Processing Data queue receives a record to process, the record is processed immediately, regardless of the status of the Order Processing ASYNC (ORDR_ASYNC) job. The ORDR_ASYNC job processes multiple orders simultaneously. While the Order Async job does not need to be active to process records, you should set the Order Async job to active to handle reorganization and cleanup of any transactions that did not process correctly.If you start the ASYNC jobs and the ASYNC subsystem is not running, the status of the CNTL_ASYNC job will be *JOBQ. The status will change to *ACTIVE as soon as the ASYNC subsystem is up.
Scheduling when the Async Jobs Start: You can create a schedule for a periodic process that contains the STRASYN periodic function to start asyncs.
| Function | Description | Program | Summary |
|---|---|---|---|
|
STRASYN |
Start asyncs |
MSSTRASYNC |
If the asyncs are currently Inactive, this periodic function calls the Controlling Data Queue (CNTL_ASYNC) in Background Job Control (MBJC) and starts the background jobs. This periodic function performs the same updates as selecting Start for the CNTL_ASYNC to start the background jobs. See Starting the Background ASYNC Jobs. |
For more information:
-
See Working with Periodic Processes (WPPR) for information on how to assign each function to a periodic process.
-
See Executing Periodic Processes (EPRO) for more information on scheduling a periodic process to run at a specified time.
Processing Transactions
As transactions are processed on the system, records are sent to the data queues. The records are processed one-by-one in the sequence in which they were sent to the data queue. A separate data queue is used for each ASYNC job.The status of each data queue record can be viewed at any point by displaying the data queue associated with the ASYNC job.
Errors: If an error occurs as a record is being processed, the system stops processing the record at the error point, and moves on to the next record in sequence for processing.
The records in error remain on the system until the error is corrected and processing can be fully completed. The errors are listed on the error reports that print when the ASYNC jobs are ended. A separate error report is printed for each ASYNC job.
Processing errors occur when a table associated with the transaction cannot be updated. This usually occurs because the system is attempting to update a record that no longer exists.
Example: If the Source Code record associated with an order is deleted before the order is billed, an error will occur during BILL_ASYNC.
Status of async jobs: When the Async jobs are active, the system checks the status of each async job under Job Management (My Jobs). If the async job is active and the job status is not RUN, the next time the system checks the status of the async jobs, the system automatically updates the job status to RUN. For example, if the Order Async is Active and you change the ORDR_ASYNC job to END, the system will automatically change the status of the ORDR_ASYNC job back to RUN. To start or stop the Async jobs, you need to start or stop the Controlling Async job in the Background Job Control (MBJC) menu option.
Ending the ASYNC Jobs
The ASYNC jobs must be ended to clear the completed records from the data queue tables and to print the error reports. The controlling ASYNC job (CNTL_ASYNC) is used to end all of the ASYNC jobs. You can use the ENDASYN periodic function to end them.The ASYNC jobs should be ended once per day so that the data queues can be deleted and any errors can be corrected in a timely manner. If you do not bring these jobs down regularly:
-
Completed records in the data queues will not be deleted and the data queue tables will become quite large.
-
The 'shut down' process will take longer.
-
Errors will be more difficult to correct.
For more information: See Troubleshooting the Async Jobs for more information.
Scheduling when the Async Jobs End: You can create a schedule for a periodic process that contains the ENDASYN periodic function to end asyncs.
| Function | Description | Program | Summary |
|---|---|---|---|
|
ENDASYN |
End asyncs |
MSENDASYNC |
If the asyncs are currently Active, this periodic function calls the Controlling Data Queue (CNTL_ASYNC) in Background Job Control (MBJC) and ends the background jobs. This periodic function performs the same updates as selecting End for the controlling data queue to end the background jobs; however, any records in the data queue will be processed when the background ASYNC jobs are restarted. See Ending the Background ASYNC Jobs for more information on the updates that are performed. |
For more information:
-
See Working with Periodic Processes (WPPR) for information on how to assign each function to a periodic process.
-
See Executing Periodic Processes (EPRO) for more information on scheduling a periodic process to run at a specified time.
When the ASYNC jobs are ended:
-
If you manually end asyncs, a terminator record is sent to each data queue to identify the last record to be processed. Records sent to the data queue before the terminator record will be processed; records sent to the data queue after the terminator record was sent will be processed when the background ASYNC jobs are restarted.
-
If you use the ENDASYN periodic function to end asyncs, any records in the data queue will be processed when the background ASYNC jobs are restarted.
-
The data queue will be reorganized. All completed records will be deleted from the data queue tables.
-
An error report listing all of the records that could not be processed, and the reason for the error, will be printed. A separate error report will print for each ASYNC job.
-
The status of the ASYNC jobs will change to *INACTIVE.
If someone reboots the server: If someone restarts Order Management System while an asynchronous job is active, the system updates the job on the Job Management Screen (under My Jobs) to MSG status. In this situation, you will need to run the JOBCLN periodic function. See Running the JOBCLN Periodic Function to Correct the Async Jobs for more information.
ASYNC Job Status Codes
| Status | Description |
|---|---|
|
*ACTIVE |
The ASYNC job is up and running. |
|
*INACTIVE |
The ASYNC job is not running. |
|
*JOBQ |
The ASYNC job has been submitted to the job queue for start-up. The ASYNC jobs are in a *JOBQ status only when the ASYNC subsystem has not been started. |
|
*ENDPEND |
The ASYNC job is in the process of ending. |
|
*REORG |
Completed records processed by the ASYNC job are being deleted from the tables. |