Contents
![[Important]](../common_oracle/images/admon/important.png) |
Important |
|---|---|
|
The API Service Manager tool is deprecated in API Gateway 11.1.2.2.0, and will be removed in API Gateway 11.1.2.2.1. You are recommended to use Policy Studio to virtualize all APIs and services. For more details, see Managing the Web Service Repository. |
API Service Manager is a web-based API management tool available in the API Gateway Manager web console. It provides quick and easy access to enable you to manage your services and policies online. For example, you can perform tasks such as registering API services, applying policies, and deploying to an API Gateway group. For details on accessing the web-based API Gateway Manager tool, see the section called “Launching API Gateway Manager”.
You can use the API Services tab in API Service Manager to virtualize services with the API Gateway. The Business Services repository stores service URLs, definitions and related information such as XML schemas. Clients can query this repository for service information (for example, URLs or WSDL files), and use it to send messages to the service through the API Gateway.
When you virtualize a service in the repository, the API Gateway exposes a virtualized version of the service. The host and port for the service are changed dynamically to point to the machine running the API Gateway. For example, the client can then send a message to the virtualized service through the API Gateway, without knowing its real location. Some policies are also automatically generated for the virtualized service. These include resolvers and connection filters, and are hidden by default in API Service Manager.
You can also use the API Services tab to perform tasks such as assigning policy assemblies to a service, configuring monitoring options, and assigning tags to help identify a service. A policy assembly is a sequence of modular, reusable message filters, each of which processes a message in a particular way. For example, a typical policy might contain an authentication filter (WS-Security UserNameToken), followed by several content-based filters (Schema Validation, Threatening Content, and Message Size). If all configured filters run successfully, the message is routed on to the configured destination.
You must first perform the following steps to create a workspace in API Service Manager:
-
Click the API Service Manager button in the API Gateway Manager toolbar.
-
Select the group and API Gateway instance that you wish to use to virtualize the service (for example,
Group1) andAPIServer1. -
Click the Create button to create the workspace.
-
Enter the configuration passphrase if one exists for this API Gateway instance, and click OK.
-
Click the New API Service button on the left in the toolbar of the API Services tab to launch the New API Service wizard.
You can have zero or one working configuration in your workspace at a time, and you can deploy a configuration at any time to a group or a subset of API Gateways in a group. You can also reset the working configuration, or select a different one from the list of available API Gateway groups and instances.
![[Note]](../common_oracle/images/admon/note.png) |
Note |
|---|---|
|
Session management (login and logout) is tracked in the API Gateway Manager session. When you log out of API Gateway Manager, your session expires. However, any updates that you have not yet deployed in API Service Manager remain unchanged in your working configuration. This configuration is persisted in your workspace and is available at your next login. |
The first step in the New API Service wizard is to specify the service URL. Perform the following steps:
-
Enter the service name in Name field (for example,
MyAPIService). -
Enter the API service URL in the Destination URL field. For example:
http://www.example.com/my_api_service
-
Click Next to specify how the service is exposed.
The second step in the wizard enables you to specify how the service is exposed. Perform the following steps:
-
Enter or select the protocol. Defaults to
HTTP. You can also click Show Details to view the default port address (${env.PORT.TRAFFIC}defaults to8080). -
Enter or select the services group. Defaults to
Default Services. -
Enter the relative path. Defaults to the path after the service domain name (for example,
my_service). You may wish to virtualize the service on a different relative path. -
Click Next.
The third step in the wizard enables you to specify policy assemblies used for request processing. (for example, an OAuth policy assembly for authentication. Perform the following steps:
-
Click the green plus icon, and select a policy assembly from the list.
-
Select whether this policy assembly is
Requiredor Optional. Defaults toRequired. -
Click the Edit Parameters icon to specify any policy parameters (for example, the value of a message attribute selector such as
${http.request.uri}). -
Repeat these steps to add more request processing policy assemblies.
-
Click Next when finished.
|
Note |
|---|---|
|
You can use the Policy Studio to create reusabe policy assemblies that can be applied to services in API Service Manager. For more details, see Configuring Policy Assemblies. |
The fourth step in the wizard enables you to specify policy assemblies used for routing (for example, JMS). Perform the following steps:
-
Click the green plus icon, and select a policy assembly from the list.
-
Select whether this policy assembly is
Requiredor Optional. Defaults toRequired. -
Click the Edit Parameters icon to specify any policy parameters (for example, the value of a message attribute selector such as
${http.headers}). -
Repeat these steps to add more routing policy assemblies.
-
Click Next when finished.
The fifth step in the wizard enables you to specify policy assemblies used for response processing (for example, a policy assembly that removes sensitive information such as credit card details from the message). Perform the following steps:
-
Click the green plus icon, and select a policy assembly from the list.
-
Select whether this policy assembly is
Requiredor Optional. Defaults toRequired. -
Click the Edit Parameters icon to specify any policy parameters (for example, the value of a message attribute selector such as
${content.body}). -
Repeat these steps to add more repsonse processing policy assemblies.
-
Click Next when finished.
The sixth step in the wizard enables you to select the following monitoring options for the service:
-
Monitor API Service usage:
Specifies whether to store message metrics for this service. This is selected by default.
-
Monitor API Service usage per client:
Specifies whether to generate reports monitoring which authenticated clients are calling which services. This is selected by default.
-
Monitor client usage:
If you want to generate reports on authenticated clients, but are not interested in which services they are calling, select this option and deselect Monitoring service usage per client.
-
Message Attribute:
Enter the message attribute to use to identify authenticated clients. The default
authentication.subject.idattribute stores the identifier of the authenticated user (for example, the username or user's X.509 Distinguished Name).
Click Next when finished.
The final step in the wizard enables you to specify tags for this service. Tags are user-friendly names to help organize, search, and browse API Gateways and services in API Gateway Manager and Policy Studio. Perform the following steps:
-
Click the green plus icon to add a tag.
-
Enter a Tag name (for example,
Dept). -
Enter a Value (for example,
QA). -
Click Finish.
To view services by tag in API Gateway Manager, perform the following steps:
-
Click the Show Columns button on the right in the API Services toolbar.
-
Select the tag that you wish to display.
-
Click Apply to view tag in the list.
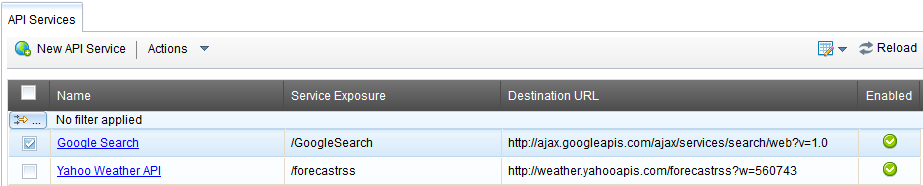
The virtualized service is displayed on the API Services tab:
 |
When you have completed the steps in the wizard, you must deploy the updated configuration to an API Gateway group, or a subset of API Gateways in a group, as follows:
-
Click Actions -> Deploy on the left in the API Services tab.
-
In the Deployment Wizard, select the group and API Gateway instance(s) to which you wish to deploy the current working configuration, and click the Next.
-
Enter a comment for this deployment (for example,
registering google search
                                    	   service
). -
Click Deploy.
-
Click Finish.
|
Note |
|---|---|
|
Services virtualized using API Service Manager and deployed to the API Gateway can also be viewed in the Policy Studio tree under the Business Services -> API Service Manager node. For details on using Policy Studio to import services, see Managing the Web Service Repository. |
To reset the current working configuration in API Service Manager, click Actions -> Discard on the left in the API Services tab, and click OK. This brings you back to the list of available API Gateway configurations, where you can select another configuration to create a new workspace.
Resetting the configuration resets the API Service Manager working configuration back to the currently deployed API Gateway configuration. This enables you to discard any undeployed configuration updates, in your workspace, and to obtain the latest deployed configuration updates from the Admin Node Manager.
