Classic Campaign – Previewing Documents and Forms
Important: Effective June 2024, Responsys will not support Classic Campaign functionality. After the effective date, Campaign Designer will be the only Responsys tool for creating and sending targeted and personalized campaigns. Learn more about the Campaign Designer.
In Preview step of a Classic Campaign, you can preview your message to see exactly how it will appear to your recipients.
The following illustration shows the options you can select for previews.
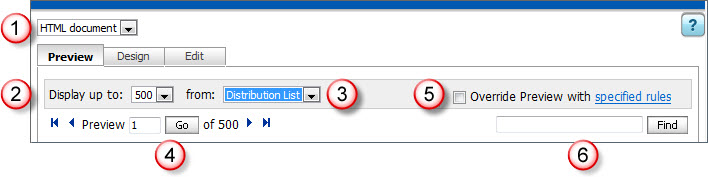
 Document type
If your campaign includes HTML and plain text content, select the document to preview.
 Number of records to display
For example, if you select 25 records, you will preview the campaign for the first 25 records in the list.
 Group to use for preview
Select one of the following options:
Proof Group—available only if a Proof List is associated with the campaign. Uses the recipients in your Proof List.
Quick View—available only if the list associated with the campaign contains more than 100,000 records. Uses a randomized sample of your target audience. The Quick View list is produced using the same algorithm as the filter Quick Count.
Distribution List—uses the full distribution list.
 Move through records
Use  ,
,  ,
,  ,
,  to
move through the recipients in the selected group. To go to a specific record, enter the record number in the Preview field and click Go.
to
move through the recipients in the selected group. To go to a specific record, enter the record number in the Preview field and click Go.
 Override Preview
When
testing dynamic content, use this option to display your
message as it would appear to recipients meeting the specified rule conditions. For example...![]()
To use this option:
- Select the Override Preview checkbox.
- Click specified rules to open the Dynamic Content Specified Rules page.
- Select the rules you want to use.
- Click Apply.
You might see different-colored icons for dynamic content modules:
- Red icon—indicates a problem with dynamic content in the document. Click Invalid to see details about the problem.
- Gray icon—dynamic content is correctly defined, but there is a problem with its usage in the document.
- Missing icon—the dynamic content module is not included in the document.
- Green icon—no errors.
 Find a specific recipient
Use Find to search for a string in an email address.
Next steps:
- To check for errors in this step, click Save then click
 .
.
The Errors window opens, showing errors in each step. To close the Errors window, click  .
.
- To continue to the next step, testing links, click Save & Next.
- Campaign – Defining General Campaign Characteristics
- Campaign – Selecting Recipients
- Campaign – Selecting Proof and Seed Lists
- Campaign – Selecting Additional Data Sources
- Campaign – Setting Up Message Content
- Campaign – Selecting Dynamic Content
- Campaign – Enabling External Tracking
- Campaign – Setting Up Link Tracking
- Campaign – Selecting Attachments
- Campaign – Setting Defaults and Variables
- Campaign – Reviewing the Campaign Dashboard
- Campaign – Testing Links
- Campaign – Running Deliverability Tests
- Campaign – Verifying Campaign Options
- Campaign – Sending a Proof Test
- Campaign – Launching a Campaign
- Campaign Dashboard
- Campaign Wizard Overview