Classic Campaign – Selecting Dynamic Content
Important: Effective June 2024, Responsys will not support Classic Campaign functionality. After the effective date, Campaign Designer will be the only Responsys tool for creating and sending targeted and personalized campaigns. Learn more about the Campaign Designer.
In this step, you add dynamic content to the campaign document. For more information about dynamic content, see Understanding Dynamic Content.
Before You Begin:
Before you can add dynamic content, you must:
- Select recipients
- Set up message content
- Define dynamic content regions in the campaign document
The dynamic content regions specify where in the document the module appears.Tip: If your document does not already include dynamic content regions or you want to add more regions, follow instructions for adding dynamic content regions below.
Creating Dynamic Content
This page lists the dynamic content modules in the campaign. In the list, ![]() or
or ![]() in the In Document column indicate that the module is used in the document; no icon means that the dynamic content module is not used in the document.
in the In Document column indicate that the module is used in the document; no icon means that the dynamic content module is not used in the document.
You can copy an existing module or template, or create a new one.
For each module, you need to define the rules that will control what content appears in the module. You can define the rules in any order, then rearrange them so they'll be evaluated in the order you want.
To create a dynamic content region:
- Click Open Designer.
The Designer opens.
- Select the Edit tab.
- Follow the instructions for inserting dynamic content.
To define a dynamic content module:
- Click Define Dynamic Content.
The editor section opens.
- Optionally, change the name in the Name field.
The name must include only the following characters: A-Z a-z 0-9 space ! - = @ _ [ ] { }
- To use an existing module, select the module from the Copy from drop down list.
- To include the module in the Dynamic Content report, select the Track for Reporting checkbox.
- Follow the instructions below for defining dynamic content rules.
Defining and arranging dynamic content rules
Tip: You can add rules in any order, then rearrange them so they will be evaluated in the order you want.
To define a rule
- Click Add Dynamic Content Rule.
The rule definition section opens.
- In the Rule Name field, type the name for the rule.
The rule name must include only the following characters: A-Z a-z 0-9 space ! - = @ _ [ ] { }
- Define the rule using Field, Condition and Value.
- Specify the content to display when the conditions of the rule are met:
- To specify the version of the document to which the rule applies, select HTML or Text tab.
- Select the type of content to use:
- Text—uses plain text you add in the field below. The text can include Oracle Responsys Built-in Functions and any other text that is appropriate for the format you are editing. When you select this option, you can include partner content if available. The partner content providers are defined by the Account Administrator. For more information, see About Dynamic Content Partners.
- Document—uses the document you select from a folder in your account
- Nothing—uses nothing, for example as a default rule
To rearrange or delete rules:
Rules are evaluated top-to-bottom.
- To rearrange the rules, use
 and
and  .
. - To delete a rule, click Delete, then click OK on the confirmation message that opens.
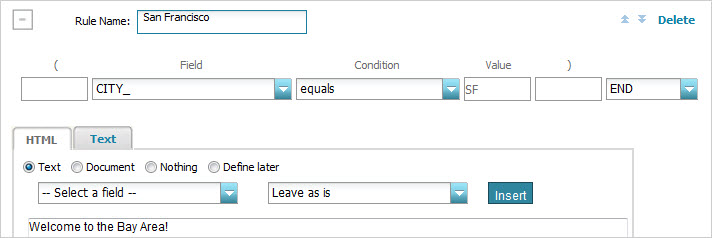
Rule example
The following illustration shows a rule called San Francisco. If the field CITY_ equals SF, the rule displays the text "Welcome to the Bay Area!"
About dynamic content partners
You can take advantage of product and offer recommendation engines to insert highly targeted content into a campaign. If the Account Administrator has defined any of these partner content providers for your account, you can use them in your campaign.
To use partner content:
- Select the partner content provider from the drop down list.
- Click Insert tags to insert the default partner tags.
- Edit the tags as needed for the campaign.
Creating a Dynamic Subject Line
If you selected the Use Dynamic Content Module for Subject Line when setting up message content, you must create that subject line in this step.
You can insert text replacement fields and specify rules as you do for other dynamic content modules.
To create a dynamic subject line:
- Click Dynamic Subject.
The subject line editing section opens.
- In the Subject line field, place the cursor where you want the field to appear.
- Select the field from the Name drop down list.
- To select the way the field is formatted, for example, capitalize the first character, select the format from the drop down list next to the name.
- Click Insert.
- To insert a field into the subject line:
- Specify rules in the same way as for any dynamic content module, but in this case, use plain text for the subject line.
- To include the subject line in the Dynamic Content report, select the Track for Reporting checkbox.
- To check for errors in this step, click Save then click
 .
.
The Errors window opens, showing errors in each step. To close the Errors window, click  .
.
- To continue to the next step, enabling external tracking, click Save & Next.
- Campaign – Defining General Campaign Characteristics
- Campaign – Selecting Recipients
- Campaign – Selecting Proof and Seed Lists
- Campaign – Selecting Additional Data Sources
- Campaign – Setting Up Message Content
- Campaign – Enabling External Tracking
- Campaign – Setting Up Link Tracking
- Campaign – Selecting Attachments
- Campaign – Setting Defaults and Variables
- Campaign – Reviewing the Campaign Dashboard
- Campaign – Previewing Documents and Forms
- Campaign – Testing Links
- Campaign – Running Deliverability Tests
- Campaign – Verifying Campaign Options
- Campaign – Sending a Proof Test
- Campaign – Launching a Campaign
- Campaign Dashboard
- Campaign Wizard Overview