Configuring QuickViews

For both entry and transaction forms you use the QuickViews subtab to customize which fields appear in the QuickView for that transaction or record. The following screenshot shows an example of a QuickView for a phone call record.

Sample QuickView for a Phone Call record.

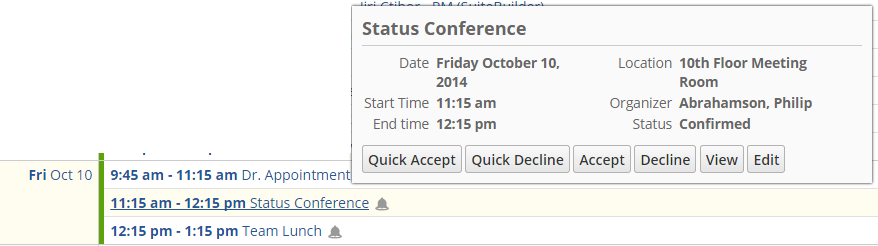
Body fields and custom fields are supported in QuickViews. However, you cannot add sublist fields. You can add a maximum of 20 fields to a QuickView.

Note that you can also configure QuickViews on forms associated with custom records. For more information, see Configuring QuickViews for Custom Records for information.

Configuring QuickViews for Upgraded Forms

QuickView customization work best if you have upgraded the custom forms in your account to include field groups and all other look-and-feel enhancements introduced in NetSuite in a previous release. After a form has been upgraded, a QuickView configuration tab appears on the form customization page. You use this tab to add, remove, and rearrange the fields in a QuickView.

To configure QuickViews:

  1. Open the Custom Form or Custom Transaction form you want to edit. For more information, see Creating Custom Entry and Transaction Forms.

  2. On the Edit Custom Entry [or Transaction] Form page, click the QuickView tab.

    If the page does not have a QuickView tab, this means that the form you want to work with has not yet been upgraded/deployed. For more information, see Deploying Upgraded Forms

  3. In the Field Description column, add the fields you want to appear in the QuickView for records that use this form. After you select the field, click Add. To remove a field, click the X icon on the right side of the field.

  4. Click Save.

Note these additional guidelines when customizing your QuickViews:

  • If you customize a form's QuickView and select Store Form with Record, these customizations supersede any customization made to a form set to Form is Preferred.

  • During form customization, if you make field updates on the Fields subtab, you must save the form customization page before those updates appear on the QuickView subtab.

  • On the Fields subtab, if a field is not set to Show , the field does not appear in the QuickView, even if you add the field on the QuickView subtab.

  • The fields that appear on the QuickView tab match the fields listed in the Description column on the Fields subtab. However, on the QuickView subtab the custom label for the field displays.

  • The list of fields available on the QuickView subtab includes all of the fields that are on a record. The list includes fields that appear on a record when it is in View mode and Edit mode. Fields that appear on a record only when the record is in Edit mode do not appear in QuickViews. If you add a field to a QuickView, yet the field does not appear when the QuickView displays, you may have added a field that is visible only when the record is in Edit mode.

See also: Configuring QuickViews for Nonupgraded Forms.

Configuring QuickViews for Custom Records

Unlike built-in standard records, there is no default QuickView for custom records. Because the fields on every custom record are unique, there is no way for the system to set default QuickView fields for all custom records. Therefore, you must create custom record QuickViews yourself by performing the following steps.

To configure QuickViews for custom records:

  1. Go to Customization > Lists, Records, & Fields > Record Types.

  2. Select the custom record type you want to display QuickViews.

  3. On the Edit Custom Record Type page, click the Forms subtab.

  4. Click Customize next to the standard version of the custom record form. Or, if you already have an existing custom form, click Edit next to this form.

  5. On the page that appears, click the QuickView tab.

  6. In the Field Description column, add the fields you want to appear in the QuickView for this custom record type. After adding each new field, click Add. To remove a field, click the X icon that appears to the right of the field.

  7. Click Save.

On the list page for this custom record type, you can hover over a record to see the QuickView.

Related Topics

Creating Custom Entry and Transaction Forms
Custom Entry Form Properties
Custom Transaction Forms Properties
Storing Custom Forms with Transactions
Configuring Subtabs for Custom Entry and Transaction Forms
Moving Fields and Lists Between Subtabs
Configuring Field Groups
Configuring Fields or Screens
Configuring Buttons and Actions
Configuring Printing Fields
Configuring Sublists
Configuring Sublist Fields
Associating Custom Code (Client SuiteScript) Files With Custom Forms
Defining Preferred Forms
Adding Disclaimers to Transaction Form Footers
Specifying Check Layout by Subsidiary
Customizing Multiple Page Transaction Forms
Linking Transaction Forms

General Notices