System-directed Quality Control (QC)
Oracle WMS Cloud has the ability to flag SKUs during the receiving process for a quality control check. Items are flagged for QC based on the vendor that sent the PO and ASN.
Configuration
- Make sure there are Vendors configured in the system. To do this, go to the “Vendors” screen.
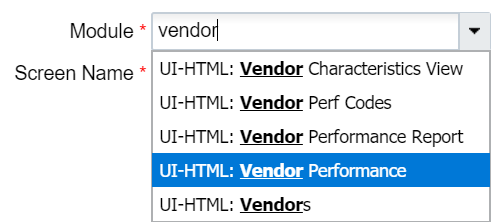
- From the “Screen Configuration” screen, search “Vendor Performance” in the
module field to add the “Vendor QC” screen (called “Vendor Performance” in
Oracle WMS Cloud):
- Add this screen to the appropriate Menu
- Go to the “Vendor QC” screen.
- For each Vendor that requires QC validations, create a new record by clicking the Create button ().
- For each Vendor QC record, populate the following fields:
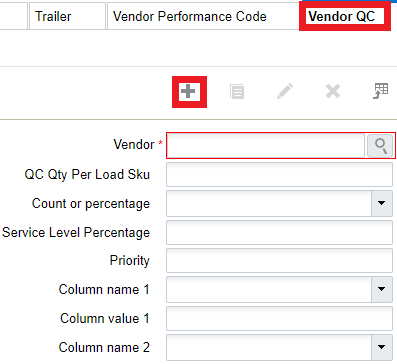
- Vendor: Populate the Vendor that will be used for QC. Use the magnifying glass to display a list of Vendors currently in the system.
- QC Qty Per Load SKU: Enter a value that will be checked for QC.
- Count or percentage: Enter a “U” for count and “P” for percentage.
- Service Level Percentage: Also known as ‘Reception Percent Level’, this parameter is used for advanced LPN distribution to ensure the inventory is evenly distributed to multiple stores.
- Column_Name_1: Users will be presented with the following columns for
configuring additional filter criteria:
- Shipment.Shipment Type
- Item.Putaway Type
- Item Facility.Putaway Type
- Item.Group Code
- Vendor.Custom_Field_1 to 5
- Column_value_1: Comparison value for the selected column in column_name_1. If no value is provided, the system will search for the corresponding column_name_1 with value =blank
- Column_Name_2: Users will be presented with the following columns for
configuring additional filter criteria:
- Shipment.Shipment Type
- Item.Putaway Type
- Item Facility.Putaway Type
- Item.Group Code
- Vendor.Custom_Field_1 to 5
- Column_value_2: Comparison value for the selected column in column_name_1. If no value is provided, the system will search for the corresponding column_name_1 with value =blank.
- Click ‘Save’.If you want to configure all of the inventory from a vendor to be marked for QC, then it should only configure the vendor, QC Qty Per Load SKU, and count or percentage fields. If you would like to be more specific on the inventory selected to be marked for QC, then from the Vendor QC UI, you can configure fields Column_Name 1 and 2 with the available values. This allows you more flexibility for the inventory sent to QC, as you could have the following set up:
- If we receive inventory from Vendor-1 for an item with Putaway type "ABC", then we would like to divert 30% of Received Inventory to the QC area.
- If we receive inventory from Vendor-1 for item with Putaway type "XYZ", then we would like to divert 75% of Received Inventory to the QC area.
- Configure the RF modules that will be used in QC. First, enable the receiving RF
module to recognize LPNs for QC.
- From the ‘Screen Configuration’ screen, select an RF receiving module that will capture QC and click on Details.
- If you have a Quality Control location, set the Module Parameter
‘qc_handling_mode’ to ‘Mark for QC prompt QC locn’. If you do not have a
Quality Control location, select the parameter and click the ‘Edit’
button in order to update this parameter.
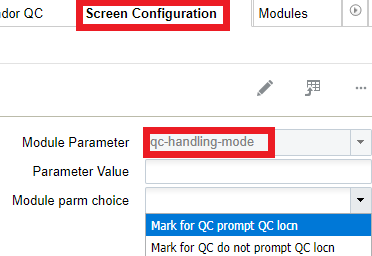
- Click “Save”.
- The Mark LPN for QC transaction allows you to randomly select LPNs from a
shipment to be marked for quality control. You can use Mark LPN for QC
for cartonized shipments, and users/supervisors can select the LPNs that they
would like to designate for QC.
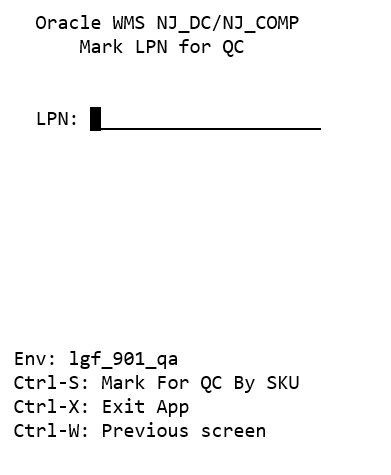 If you need to do quality control for all of the inventory for a specific
SKU, select the hot key Ctrl-S. Ctrl-S will mark the shipment detail for quality
control. Once you select Ctrl-S, the Mark SKU for QC screen
displays:
If you need to do quality control for all of the inventory for a specific
SKU, select the hot key Ctrl-S. Ctrl-S will mark the shipment detail for quality
control. Once you select Ctrl-S, the Mark SKU for QC screen
displays: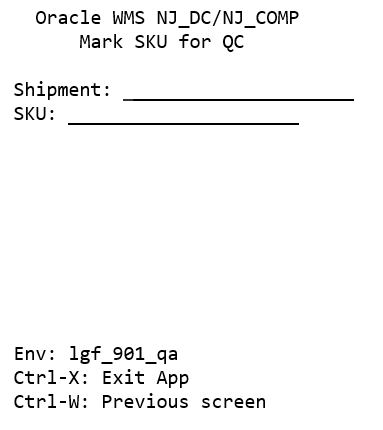
The Mark SKU for QC transaction does not support scanning an LPN which has already been received. If the LPN has already been marked for QC, the LPN is part of a shipment, and the status is Verified, the error “Scanned LPN is not valid for QC” displays.
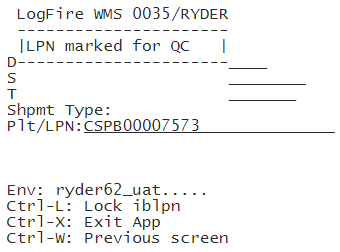
If the LPN meets the criteria, the system displays the message “LPN% marked for QC”. The marked for qc flag on the inbound shipment detail for the corresponding LPN will be set to yes.
LPNs or inventory designated for QC will be marked “Yes” on the marked for qc flag in the Inbound Shipment detail.Note: The above settings and criteria apply as long as the receiving Screen parameter "Mode" is not Set to Pre-Receiving.If any of the detail for the Received LPN part of a Cartonized or non-cartonized Shipment has the Marked for QC Flag set to "yes", then the LPNs will be marked for QC without even considering the Vendor QC Configuration.
- You can use the Verification Questions UI to set up Verification
questions to use during RF QC Complete.
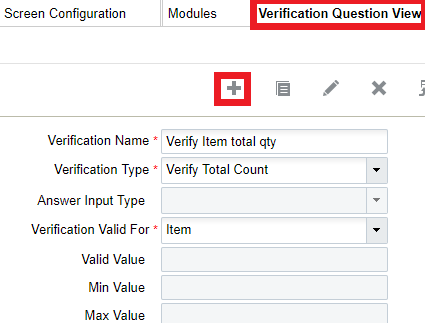
Table 1. Verification Questions UI Fields Description Verification Name What you want to call your verification questions. Verification Type Allows you to verify total count, standard case, standard pack, or user-defined verification question. Answer Input Type Allows you to set the answer input type. The Answer Input Type options include the following: - Yes/NO
- Text
- Date
- Decimal
- Integer
- Yes
Verification Valid From Can be for Item or LPN. Valid Value Allows you to specify valid value. Min Value Allows you to specify minimum value. Max Value Allows you to specify maximum value. - The verification question must be assigned to a vendor in order for the right
questions to be asked during QC confirmation.
Next, go to the Verification Question Configuration UI and click Create to set up the Verification Question Configuration.
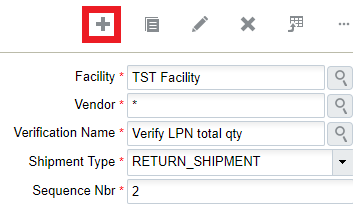
You can associate questions to the following items:
- Facility Type
- Vendor Type
- Verification Name
- Shipment Type
- Sequence Number
Questions will be displayed in the sequence set up in this screen.
- Configure the RF module for processing the LPNs for QC.
- Go to the ‘Screen Configuration’ screen.
- Add a new RF screen with the Create button ().

- Add this new RF screen to the appropriate Menu.
Table 2. QC Complete Parameters Description qty-entry-mode None/Sku-Qty/Sku-Scan qty-uom None/Units/Packs/Cases distribute-lpn-transaction Valid Transaction name to call distribute LPN when QC passes or the LPN is accepted prompt-vendorperf-code None/No/Yes
- Create locations of type “Quality Check”. When an LPN is flagged for QC, it must
be sent to a Quality Check location for processing.
- Go to the “Locations” screen.
- Add a new location by clicking the Create button ().
- Populate the necessary fields. Make sure that the “Type” is set to “QC”.
- Click “Save”.
Receiving/QC Process:
- During receiving, if the user receives an ASN from a Vendor that was flagged for
QC, the LPN will be marked for QC. This is system driven, so the user will
receive a message in the RF. Press Ctrl-A to proceed:
- The RF will prompt the user to locate this LPN to a QC location. Move this LPN
to a QC location and scan its location barcode.
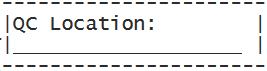 You can configure RF receiving screens to prompt or not prompt for the QC location. You can do this by configuring the screen parameter qc-handling-mode in the receiving transaction.Note: If the screen parameter on the Receiving "mode" is set to "pre-receiving", the system always pushes the received inventory to QC Area irrespective of the configuration.
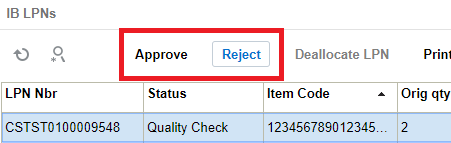
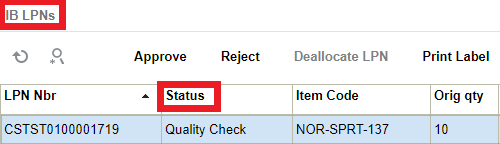
 - At that point, the LPN will be updated to status “Quality Check” in the “IBLPN”
screen:
 Note: This will NOT add inventory to the warehouse until the LPN has been approved.
The IHT 72-Container Received Subject to QC is written when the received LPN gets marked for QC.
Approving/Rejecting LPNs:
The LPN can be approved or rejected after it is received. If approved, the LPN’s status will change to “Located” and its contents are added to the facility’s inventory.
- Approving an LPN will update its status to “Received” and clear its current location.
- Rejecting an LPN will update it to status “Cancelled”.
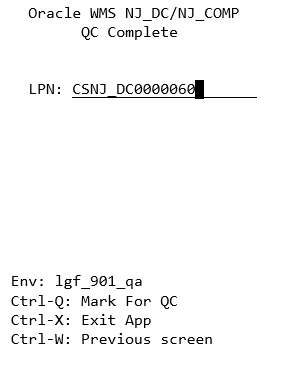
Processing LPNs from the RF:
- Enter the “Process QC” RF module.
- Scan the LPN that will be processed for QC.
User can make use of the control options to approve or reject LPNs.
- Press Ctrl-P to mark the LPN to be ready for QC:
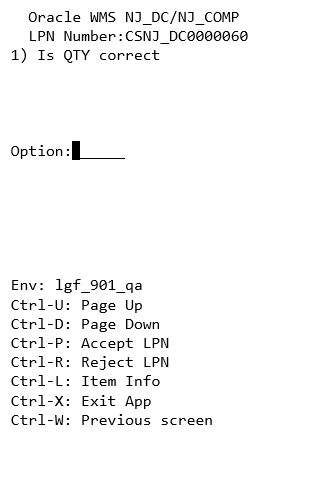
You can answer all of the questions set up in the verification question view, and also use the control options to approve or reject LPNs.
- Press Ctrl-P to approve and Ctrl-R to reject.
- If the user enters Ctrl-R to REJECT, the RF will display a confirmation message. Press Ctrl-A to proceed.
- If the user enters Ctrl-P to APPROVE, the RF will display a confirmation message. Press Ctrl-A to proceed.
Processing LPNs from the UI
- From the Inbound Shipments screen, select the ASN with QC LPNs.
- Clicki either “Approve” or “Reject.” This will affect ALL QC LPNs in the
shipment.
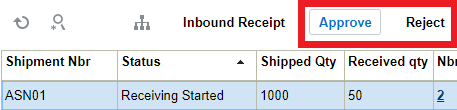
- From the IBLPN screen, select the IBLPN that is in “Quality Check” status.
- Click either “Approve” or “Reject” to process it.