Using JavaFX UI Controls
19 HTML Editor
In this chapter, you learn how to edit text in your JavaFX applications by using the embedded HTML editor.
The HTMLEditor control is a full functional rich text editor. Its implementation is based on the document editing feature of HTML5 and includes the following editing functions:
-
Text formatting including bold, italic, underline, and strike though styles
-
Paragraph settings such as format, font family, and font size
-
Foreground and background colors
-
Text indent
-
Bulleted and numbered lists
-
Text alignment
-
Adding a horizontal rule
-
Copying and pasting text fragments
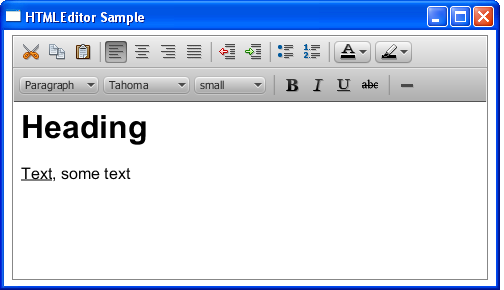
Figure 19-1 shows a rich text editor added to a JavaFX application.
The HTMLEditor class presents the editing content in the form of an HTML string. For example, the content typed in the editor in Figure 19-1 is presented by the following string: "<html><head></head><body contenteditable="true"><h1>Heading</h1><div><u>Text</u>, some text</div></body></html>."
Because the HTMLEditor class is an extension of the Node class, you can apply visual effects or transformations to its instances.
Adding an HTML Editor
Like any other UI control, the HTMLEditor component must be added the scene so that it can appear in your application. You can add it directly to the scene as shown in Example 19-1 or through a layout container as done in other examples.
Example 19-1 Adding an HTML Editor to a JavaFX Application
import javafx.application.Application;
import javafx.scene.Scene;
import javafx.scene.web.HTMLEditor;
import javafx.stage.Stage;

public class HTMLEditorSample extends Application {

    @Override
    public void start(Stage stage) {
        stage.setTitle("HTMLEditor Sample");
        stage.setWidth(400);
        stage.setHeight(300);
        final HTMLEditor htmlEditor = new HTMLEditor();
        htmlEditor.setPrefHeight(245);
        Scene scene = new Scene(htmlEditor);
        stage.setScene(scene);
        stage.show();
    }

    public static void main(String[] args) {
        launch(args);
    }
}
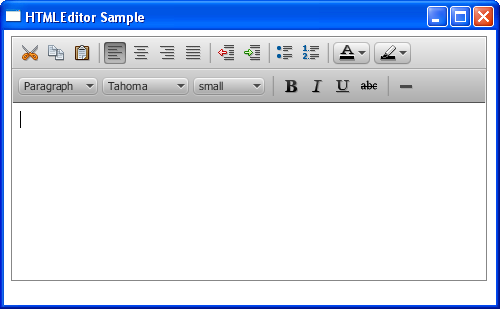
Compiling and running this code fragment produces the window shown in Figure 19-2.
Figure 19-2 Initial View of the HTMLEditor Component
Description of "Figure 19-2 Initial View of the HTMLEditor Component"
The formatting toolbars are provided in the implementation of the component. You cannot toggle their visibility. However, you still can customize the appearance of the editor by applying CSS style, as shown in Example 19-2.
Example 19-2 Styling the HTMLEditor
htmlEditor.setStyle(
    "-fx-font: 12 cambria;"
    + "-fx-border-color: brown; "
    + "-fx-border-style: dotted;"
    + "-fx-border-width: 2;"
);
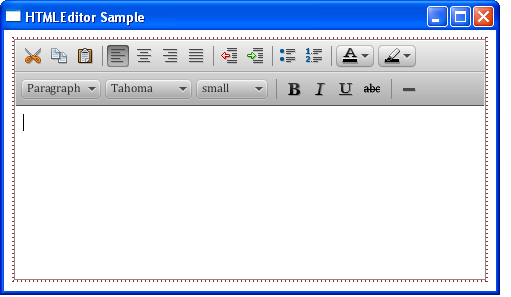
When this code line is added to Example 19-1, the editor changes, as shown in Figure 19-3.
Figure 19-3 Alternative View of the HTMLEditor Component
Description of "Figure 19-3 Alternative View of the HTMLEditor Component"
The applied style changes the border of the component and the font of the formatting toolbars.
The HTMLEditor class provides a method to define the content that appears in the editing area when the application starts. Use the setHtmlText method, as shown in Example 19-3 to set the initial text for the editor.
Example 19-3 Setting the Text Content
private final String INITIAL_TEXT = "<html><body>Lorem ipsum dolor sit "
    + "amet, consectetur adipiscing elit. Nam tortor felis, pulvinar "
    + "in scelerisque cursus, pulvinar at ante. Nulla consequat"
    + "congue lectus in sodales. Nullam eu est a felis ornare "
    + "bibendum et nec tellus. Vivamus non metus tempus augue auctor "
    + "ornare. Duis pulvinar justo ac purus adipiscing pulvinar. "
    + "Integer congue faucibus dapibus. Integer id nisl ut elit "
    + "aliquam sagittis gravida eu dolor. Etiam sit amet ipsum "
    + "sem.</body></html>";

htmlEditor.setHtmlText(INITIAL_TEXT);
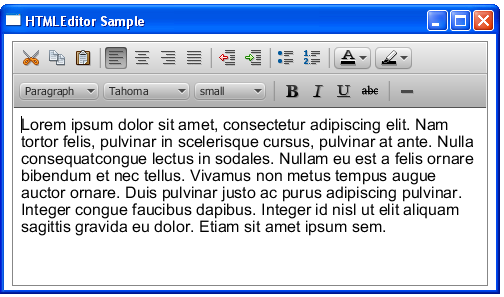
Figure 19-4 demonstrates the text editor with the text set by using the setHTMLText method.
Figure 19-4 HTMLEditor with the Predefined Text Content
Description of "Figure 19-4 HTMLEditor with the Predefined Text Content"
You can use the HTML tags in this string to apply specific formatting for the initially rendered content.
Using an HTML Editor to Build the User Interface
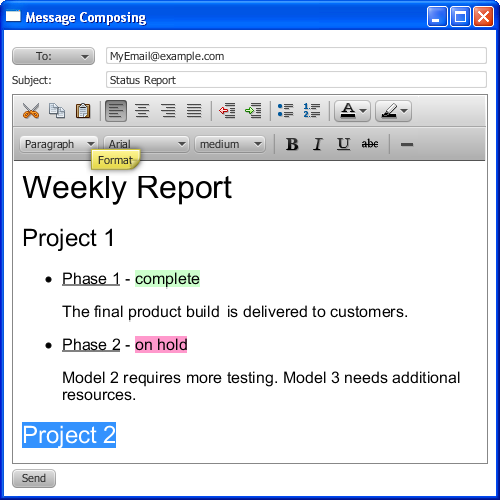
You can use the HTMLEditor control to implement typical user interfaces (UIs) in your JavaFX applications. For example, you can implement instant messenger services, email clients, or even content management systems.
presents the user interface of a message composing window that you can find in many email client applications.
Example 19-4 HTMLEditor Added to the Email Client UI
import javafx.application.Application;
import javafx.collections.FXCollections;
import javafx.geometry.Insets;
import javafx.geometry.Pos;
import javafx.scene.Group;
import javafx.scene.Scene;
import javafx.scene.control.*;
import javafx.scene.layout.GridPane;
import javafx.scene.layout.VBox;
import javafx.scene.web.HTMLEditor;
import javafx.stage.Stage;

public class HTMLEditorSample extends Application {

    @Override
    public void start(Stage stage) {
        stage.setTitle("Message Composing");
        stage.setWidth(500);
        stage.setHeight(500);
        Scene scene = new Scene(new Group());

        final VBox root = new VBox();
        root.setPadding(new Insets(8, 8, 8, 8));
        root.setSpacing(5);
        root.setAlignment(Pos.BOTTOM_LEFT);

        final GridPane grid = new GridPane();
        grid.setVgap(5);
        grid.setHgap(10);

        final ChoiceBox sendTo =
            new ChoiceBox(FXCollections.observableArrayList(
                "To:", "Cc:", "Bcc:")
        );

        sendTo.setPrefWidth(100);
        GridPane.setConstraints(sendTo, 0, 0);
        grid.getChildren().add(sendTo);

        final TextField tbTo = new TextField();
        tbTo.setPrefWidth(400);
        GridPane.setConstraints(tbTo, 1, 0);
        grid.getChildren().add(tbTo);

        final Label subjectLabel = new Label("Subject:");
        GridPane.setConstraints(subjectLabel, 0, 1);
        grid.getChildren().add(subjectLabel);

        final TextField tbSubject = new TextField();
        tbTo.setPrefWidth(400);
        GridPane.setConstraints(tbSubject, 1, 1);
        grid.getChildren().add(tbSubject);

        root.getChildren().add(grid);

        final HTMLEditor htmlEditor = new HTMLEditor();
        htmlEditor.setPrefHeight(370);

        root.getChildren().addAll(htmlEditor, new Button("Send"));

        final Label htmlLabel = new Label();
        htmlLabel.setWrapText(true);

        scene.setRoot(root);
        stage.setScene(scene);
        stage.show();
    }

    public static void main(String[] args) {
        launch(args);
    }
}
The user interface includes a choice box to select a type of recipient, two text fields to enter the email address and the subject of the message, a label to indicate the subject field, the editor, and the Send button.
The UI controls are arranged on the application scene by using the Grid and VBox layout containers. When you compile and run this application, the window shown in Figure 19-5 shows the output of this application when a user is composing a weekly report.
You can set the specific width and height values for the HTMLEditor object by calling the setPrefWidth or setPrefHeight methods, or you can leave its width and height unspecified. Example 19-4 specifies the height of the component. Its width is defined by the VBox layout container. When the text content exceeds the height of the editing area, the vertical scroll bar appears.
Obtaining HTML Content
With the JavaFX HTMLEditor control, you can edit text and set the initial content. In addition, you can obtain the entered and edited text in HTML format. The application shown in Example 19-5 implements this task.
Example 19-5 Retrieving HTML Code
import javafx.application.Application;
import javafx.event.ActionEvent;
import javafx.event.EventHandler;
import javafx.geometry.Insets;
import javafx.geometry.Pos;
import javafx.scene.Group;
import javafx.scene.Scene;
import javafx.scene.control.*;
import javafx.scene.layout.VBox;
import javafx.scene.web.HTMLEditor;
import javafx.stage.Stage;

public class HTMLEditorSample extends Application {
    private final String INITIAL_TEXT = "Lorem ipsum dolor sit "
            + "amet, consectetur adipiscing elit. Nam tortor felis, pulvinar "
            + "in scelerisque cursus, pulvinar at ante. Nulla consequat"
            + "congue lectus in sodales. Nullam eu est a felis ornare "
            + "bibendum et nec tellus. Vivamus non metus tempus augue auctor "
            + "ornare. Duis pulvinar justo ac purus adipiscing pulvinar. "
            + "Integer congue faucibus dapibus. Integer id nisl ut elit "
            + "aliquam sagittis gravida eu dolor. Etiam sit amet ipsum "
            + "sem.";

    @Override
    public void start(Stage stage) {
        stage.setTitle("HTMLEditor Sample");
        stage.setWidth(500);
        stage.setHeight(500);
        Scene scene = new Scene(new Group());

        VBox root = new VBox();
        root.setPadding(new Insets(8, 8, 8, 8));
        root.setSpacing(5);
        root.setAlignment(Pos.BOTTOM_LEFT);

        final HTMLEditor htmlEditor = new HTMLEditor();
        htmlEditor.setPrefHeight(245);
        htmlEditor.setHtmlText(INITIAL_TEXT);

        final TextArea htmlCode = new TextArea();
        htmlCode.setWrapText(true);

        ScrollPane scrollPane = new ScrollPane();
        scrollPane.getStyleClass().add("noborder-scroll-pane");
        scrollPane.setContent(htmlCode);
        scrollPane.setFitToWidth(true);
        scrollPane.setPrefHeight(180);

        Button showHTMLButton = new Button("Produce HTML Code");
        root.setAlignment(Pos.CENTER);
        showHTMLButton.setOnAction(new EventHandler<ActionEvent>() {
            @Override public void handle(ActionEvent arg0) {
                htmlCode.setText(htmlEditor.getHtmlText());
            }
        });

        root.getChildren().addAll(htmlEditor, showHTMLButton, scrollPane);
        scene.setRoot(root);

        stage.setScene(scene);
        stage.show();
    }

    public static void main(String[] args) {
        launch(args);
    }
}
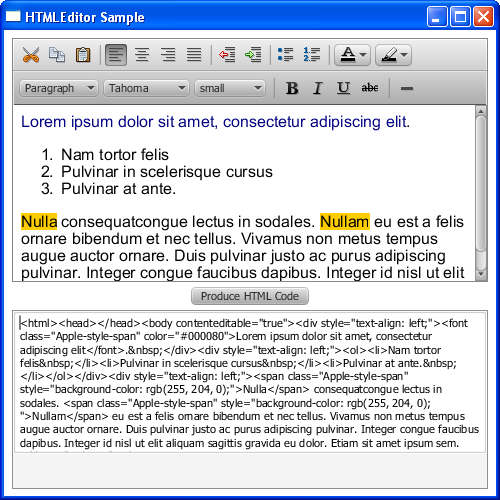
The getHTMLText method called on the HTMLEditor object derives the edited content and presents it as an HTML string. This information is passed to the text area, so that you can observe, copy, and paste the produced HTML code. Figure 19-6 shows an HTML code of the text is being edited in the HTMLEditor sample.
Similarly, you can obtain HTML code and save it in the file or send it to the WebView object to synchronize content in the editor and the embedded browser. See how this task is implemented in Example 19-6.
Example 19-6 Rendering Edited HTML Content in a Browser
import javafx.application.Application;
import javafx.event.ActionEvent;
import javafx.event.EventHandler;
import javafx.geometry.Insets;
import javafx.geometry.Pos;
import javafx.scene.Group;
import javafx.scene.Scene;
import javafx.scene.control.*;
import javafx.scene.layout.VBox;
import javafx.scene.web.HTMLEditor;
import javafx.scene.web.WebEngine;
import javafx.scene.web.WebView;
import javafx.stage.Stage;

public class HTMLEditorSample extends Application {
    private final String INITIAL_TEXT = "Lorem ipsum dolor sit "
            + "amet, consectetur adipiscing elit. Nam tortor felis, pulvinar "
            + "in scelerisque cursus, pulvinar at ante. Nulla consequat"
            + "congue lectus in sodales. Nullam eu est a felis ornare "
            + "bibendum et nec tellus. Vivamus non metus tempus augue auctor "
            + "ornare. Duis pulvinar justo ac purus adipiscing pulvinar. "
            + "Integer congue faucibus dapibus. Integer id nisl ut elit "
            + "aliquam sagittis gravida eu dolor. Etiam sit amet ipsum "
            + "sem.";

    @Override
    public void start(Stage stage) {
        stage.setTitle("HTMLEditor Sample");
        stage.setWidth(500);
        stage.setHeight(500);
        Scene scene = new Scene(new Group());

        VBox root = new VBox();
        root.setPadding(new Insets(8, 8, 8, 8));
        root.setSpacing(5);
        root.setAlignment(Pos.BOTTOM_LEFT);

        final HTMLEditor htmlEditor = new HTMLEditor();
        htmlEditor.setPrefHeight(245);
        htmlEditor.setHtmlText(INITIAL_TEXT);

        final WebView browser = new WebView();
        final WebEngine webEngine = browser.getEngine();

        ScrollPane scrollPane = new ScrollPane();
        scrollPane.getStyleClass().add("noborder-scroll-pane");
        scrollPane.setStyle("-fx-background-color: white");
        scrollPane.setContent(browser);
        scrollPane.setFitToWidth(true);
        scrollPane.setPrefHeight(180);

        Button showHTMLButton = new Button("Load Content in Browser");
        root.setAlignment(Pos.CENTER);
        showHTMLButton.setOnAction(new EventHandler<ActionEvent>() {
            @Override public void handle(ActionEvent arg0) {
                webEngine.loadContent(htmlEditor.getHtmlText());
            }
        });

        root.getChildren().addAll(htmlEditor, showHTMLButton, scrollPane);
        scene.setRoot(root);

        stage.setScene(scene);
        stage.show();
    }

    public static void main(String[] args) {
        launch(args);
    }
}
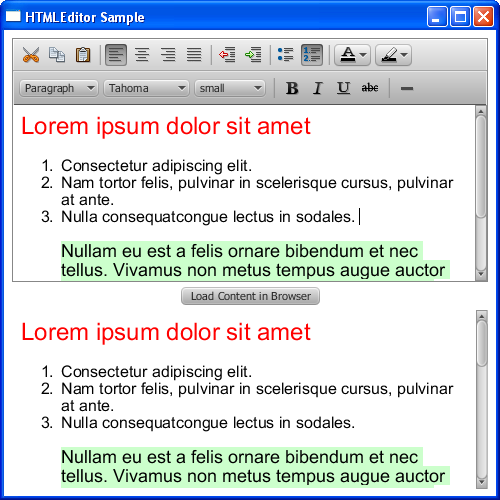
HTML code received from the htmlEditor component is loaded in the WebEngine object that specifies the content for the embedded browser. Each time a user clicks the Load Content in Browser button, the edited content is updated in the browser. Figure 19-7 demonstrates Example 19-6 in action.
You can use the Text component to add non-editing text content to your UI. See Using Text and Text Effects in JavaFX for more information about the Text component.
Related API Documentation
 Alla is a technical writer for Oracle. She lives in St. Petersburg, Russia, and develops tutorials and technical articles for Java and JavaFX technologies. Prior to her assignment at Oracle, she worked as a technical writer in different IT companies.

