Using JavaFX UI Controls
18 Hyperlink
This chapter tells about the Hyperlink control used to format text as a hyperlink.
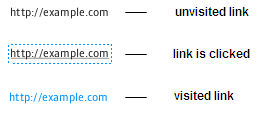
The Hyperlink class represents another type of Labeled control. Figure 18-1 demonstrates three states of the default hyperlink implementation.
Figure 18-1 Three States of a Hyperlink Control

Description of "Figure 18-1 Three States of a Hyperlink Control"
Creating a Hyperlink
The code fragment that produces a hyperlink is shown in Example 18-1.
Example 18-1 Typical Hyperlink
Hyperlink link = new Hyperlink();
link.setText("http://example.com");
link.setOnAction(new EventHandler<ActionEvent>() {
    @Override
    public void handle(ActionEvent e) {
        System.out.println("This link is clicked");
    }
});
The setText instance method defines the text caption for the hyperlink. Because the Hyperlink class is an extension of the Labeled class, you can set a specific font and text fill for the hyperlink caption. The setOnAction method sets the specific action, which is called whenever the hyperlink is clicked, similar to how this method works for the Button control. In Example 18-1, this action is limited to printing the string. However, in your application, you might want to implement more common tasks.
Linking the Local Content
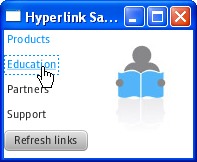
The application in Figure 18-2 renders images from the local directory.
Review the source code of this application shown in Example 18-2.
Example 18-2 Using Hyperlinks to VIew Images
import javafx.application.Application;
import javafx.event.ActionEvent;
import javafx.event.EventHandler;
import javafx.scene.*;
import javafx.scene.control.*;
import javafx.scene.image.Image;
import javafx.scene.image.ImageView;
import javafx.scene.layout.VBox;
import javafx.stage.Stage;

public class Main extends Application {

    final static String[] imageFiles = new String[]{
        "product.png",
        "education.png",
        "partners.png",
        "support.png"
    };
    final static String[] captions = new String[]{
        "Products",
        "Education",
        "Partners",
        "Support"
    };
    final ImageView selectedImage = new ImageView();
    final ScrollPane list = new ScrollPane();
    final Hyperlink[] hpls = new Hyperlink[captions.length];
    final Image[] images = new Image[imageFiles.length];

    public static void main(String[] args) {
        Application.launch(args);
    }

    @Override
    public void start(Stage stage) {
        Scene scene = new Scene(new Group());
        stage.setTitle("Hyperlink Sample");
        stage.setWidth(300);
        stage.setHeight(200);

        selectedImage.setLayoutX(100);
        selectedImage.setLayoutY(10);

        for (int i = 0; i < captions.length; i++) {
            final Hyperlink hpl = hpls[i] = new Hyperlink(captions[i]);
            final Image image = images[i] = new Image(
                getClass().getResourceAsStream(imageFiles[i])
            );
            hpl.setOnAction(new EventHandler<ActionEvent>() {
                @Override
                public void handle(ActionEvent e) {
                    selectedImage.setImage(image);
                }
            });
        }

        final Button button = new Button("Refresh links");
        button.setOnAction(new EventHandler<ActionEvent>() {
                @Override
                public void handle(ActionEvent e) {
                    for (int i = 0; i < captions.length; i++) {
                        hpls[i].setVisited(false);
                        selectedImage.setImage(null);
                    }
                }
            });

        VBox vbox = new VBox();
        vbox.getChildren().addAll(hpls);
        vbox.getChildren().add(button);
        vbox.setSpacing(5);

        ((Group) scene.getRoot()).getChildren().addAll(vbox, selectedImage);
        stage.setScene(scene);
        stage.show();
    }
}
This application creates four Hyperlink objects within a for loop. The setOnAction method called on each hyperlink defines the behavior when a user clicks a particular hyperlink. In that case, the corresponding image from the images array is set for the selectedImage variable.
When a user clicks a hyperlink, it becomes visited. You can use the setVisited method of the Hyperlink class to refresh the links. The code fragment in Example 18-3 accomplishes this task.
Example 18-3 Refreshing the HyperlInks
final Button button = new Button("Refresh links");
button.setOnAction(new EventHandler<ActionEvent>() {
    @Override
    public void handle(ActionEvent e) {
       for (int i = 0; i < captions.length; i++) {
           hpls[i].setVisited(false);
           selectedImage.setImage(null);
       }
    }
});
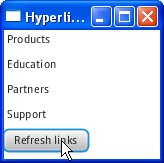
When clicked, the Refresh Links button brings all the hyperlinks to the unvisited state, as show in Figure 18-3.
Because the Hyperlink class is an extension of the Labeled class, you can specify not only a text caption but also an image. The application provided in the next section uses both a text caption and an image to create hyperlinks and to load remote HTML pages.
Linking the Remote Content
You can render HTML content in your JavaFX application by embedding the WebView browser in the application scene. The WebView component provides basic web page browsing functionality. It renders web pages and supports user interaction such as navigating links and executing JavaScript commands.
Study the source code of the application in Example 18-4. It creates four hyperlinks with text captions and images. When a hyperlink is clicked, the corresponding value is passed as a URL to the embedded browser.
Example 18-4 Loading Remote Web Pages
import javafx.application.Application;
import javafx.event.ActionEvent;
import javafx.event.EventHandler;
import javafx.scene.*;
import javafx.scene.control.*;
import javafx.scene.image.Image;
import javafx.scene.image.ImageView;
import javafx.scene.layout.HBox;
import javafx.scene.layout.Priority;
import javafx.scene.layout.VBox;
import javafx.scene.text.Font;
import javafx.scene.web.WebEngine;
import javafx.scene.web.WebView;
import javafx.stage.Stage;

public class Main extends Application {

    final static String[] imageFiles = new String[]{
        "product.png",
        "education.png",
        "partners.png",
        "support.png"
    };
    final static String[] captions = new String[]{
        "Products",
        "Education",
        "Partners",
        "Support"
    };

    final static String[] urls = new String[]{
        "http://www.oracle.com/us/products/index.html",
        "http://education.oracle.com/",
        "http://www.oracle.com/partners/index.html",
        "http://www.oracle.com/us/support/index.html"
    };

    final ImageView selectedImage = new ImageView();
    final Hyperlink[] hpls = new Hyperlink[captions.length];
    final Image[] images = new Image[imageFiles.length];

    public static void main(String[] args){
        launch(args);
    }

    @Override
    public void start(Stage stage) {
        VBox vbox = new VBox();
        Scene scene = new Scene(vbox);
        stage.setTitle("Hyperlink Sample");
        stage.setWidth(570);
        stage.setHeight(550);

        selectedImage.setLayoutX(100);
        selectedImage.setLayoutY(10);

        final WebView browser = new WebView();
        final WebEngine webEngine = browser.getEngine();

        for (int i = 0; i < captions.length; i++) {
            final Hyperlink hpl = hpls[i] = new Hyperlink(captions[i]);

            final Image image = images[i] =
                    new Image(getClass().getResourceAsStream(imageFiles[i]));
            hpl.setGraphic(new ImageView (image));
            hpl.setFont(Font.font("Arial", 14));
            final String url = urls[i];

            hpl.setOnAction(new EventHandler<ActionEvent>() {
                @Override
                public void handle(ActionEvent e) {
                    webEngine.load(url);
                }
            });
        }

        HBox hbox = new HBox();
        hbox.getChildren().addAll(hpls);

        vbox.getChildren().addAll(hbox, browser);
        VBox.setVgrow(browser, Priority.ALWAYS);

        stage.setScene(scene);
        stage.show();
    }
}
The hyperlinks are created within a for loop similar to the one in Example 18-2. The action set for a hyperlink passes the corresponding URL from the urls array to the WebEngine object of the embedded browser.
When you compile and run this application, it produces the window shown in Figure 18-4.
Figure 18-4 Loading Pages from the Oracle Corporate Site

Description of "Figure 18-4 Loading Pages from the Oracle Corporate Site"
Related API Documentation
 Alla is a technical writer for Oracle. She lives in St. Petersburg, Russia, and develops tutorials and technical articles for Java and JavaFX technologies. Prior to her assignment at Oracle, she worked as a technical writer in different IT companies.


