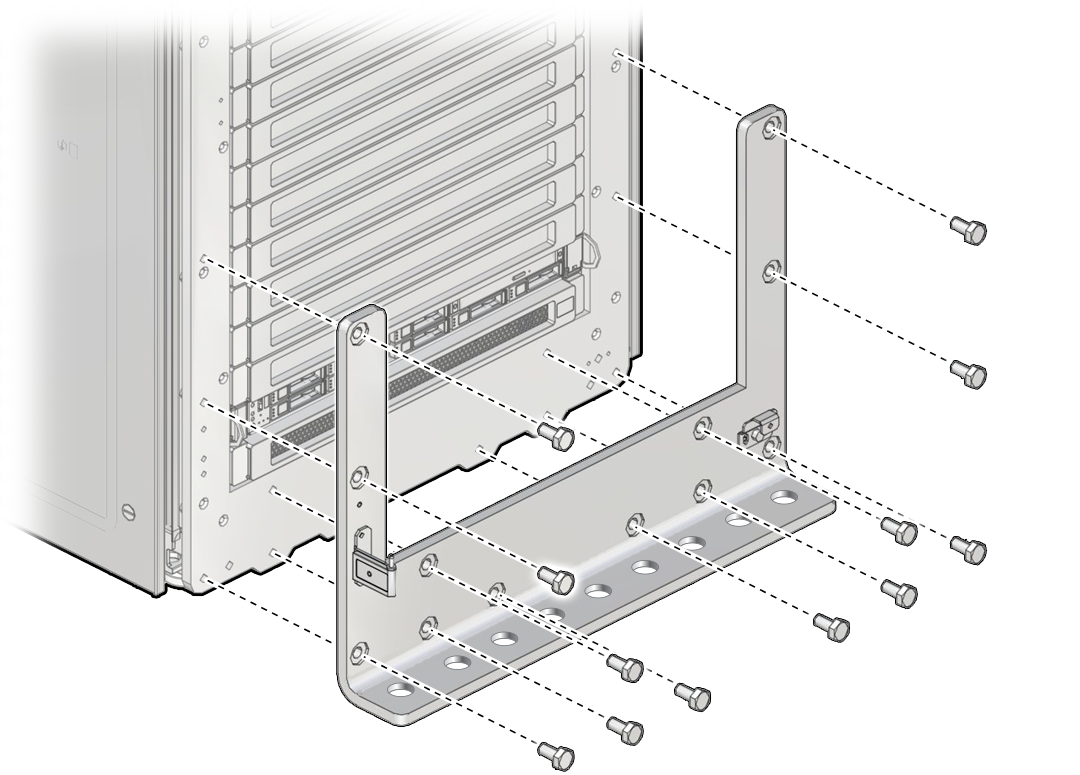
Secure the Modular System to a Concrete Floor
This procedure explains how to securely attach the modular system to protect against natural disasters, such as an earthquake.
If you decide to mount the modular system to a concrete floor, you must purchase ten M12 concrete anchors, such as Hilte HSL-3-B M12/25.
 | Caution - Carefully review and follow the installation procedures that come with the seismic anchors you purchased. The procedure below is an overview of the process, but you must follow the instructions from the seismic anchor vendor to ensure that the anchors work properly. |
-
Locate the front and rear seismic plates in the separate packaging.

Caution - Each seismic plate weighs about approximately 25 lbs, so take care when lifting and handling them.
-
Carry the seismic plates to the installation location.
Do not mount the seismic plates before you move them to the final location. The seismic plates sit just above the floor, and rolling the frame across thresholds and any significant distance with the seismic plates attached can be difficult and dangerous.
-
In the modular system's final location, prepare to attach the seismic plates.
- Remove the bottom door hinges and the front and back catches, as well as the spacers in the front and back.
-
Use a 19-mm torque wrench to attach the M12 bolts to the seismic plates, but do not torque them to final tightness.
The M12 bolts are included in the separate packaging. Tighten each bolt to 10 in-lbs at a time until you reach 85 in-lbs for final torque for all bolts.
Note - To meet NEBS earthquake requirements, bolts must be installed in at least 5 of the 9 holes in each seismic bracket.
- Roll the modular system to its final installation position.
-
Mark an outline on the concrete floor for the four front and four back slots through the seismic plate.
This outline shows you where to drill the concrete.
- Roll the modular system away from the installation location, and protect the system from dust and debris from the drilling.
-
Drill holes into the concrete floor within the marked slots on the concrete.
Use an appropriate drill bit and always drill the holes according to the data sheet for the appropriate seismic anchors.
Tip - If you encounter rebar while drilling, move the drill to another location within the marked slot to bypass the rebar. - Remove debris in all 10 concrete holes.
- Roll the modular system back into position so that all drilled holes into the concrete are visible through the seismic brackets.
- Install one seismic anchor through the seismic plate into each hole drilled into the concrete.
- Tighten each bolt loosely until all seismic anchors are installed.
-
Tighten each bolt in each anchor approximately 10 in-lbs. at a time, until the torque-indicator bolt cap breaks off for each bolt.
This method ensures the proper torque for the seismic anchors.
-
Install the bottom door hinges and latches, without spacers.
Using the smaller screws provided with the earthquake brackets, reinstall the bottom door hinges and door catches. Do not reinstall the spacers.
- Install the front and rear doors.
- Connect the cables.