| Skip Navigation Links | |
| Exit Print View | |

|
Sun Storage J4500 Array System Overview |
Overview of the Sun Storage J4500 Array
Exterior Features, Controls, and Indicators
Sun Storage J4500 Array Rack Slide Rails
To Place the Array Into Standby Power Mode
AC Power Failure Auto-Recovery
Updated Driver Files Required for Windows
Clustering Software Not Supported With the J4500 Array
Management Options When Using the StorageTek SAS RAID External HBA (Adaptec-Based)
Management Options When Using the StorageTek SAS External HBA (LSI-Based)
Using the Common Array Manager Software
Viewing Sun Storage J4500 Array Information With CAM
Zoning Array Storage Resources Using CAM
Upgrading Sun Storage J4500 Array Firmware Using CAM
Using the StorageTek RAID Manager Software
Viewing Sun Storage J4500 Array Information With the Sun StorageTek RAID Manager
3. Adding and Zoning Array Storage Using CAM
Access Configuration (Zoning) Guidelines
Adding (Cascading) a J4500 Array to An Existing Zoned J4500 Array
To Prepare an Existing Array Prior to Cascading Additional Storage
To Prepare a New J4500 Array for Cascading
Configuring Multiple Host Access for a J4500 Array
To Configure Multiple Host Access for a J4500 Array
Supported Sun Storage J4500 Array Firmware and Common Array Manager (CAM) Software
Supported Operating Systems and Drivers
Supported Drives for Multipath
Multipathing Configuration Guidelines
Multipathing With One Host, One HBA and One Array
Multipathing With One Host, One HBA and Cascaded Arrays
Multipathing With One Host, Two HBAs and Cascaded Arrays
Multipathing With Two Hosts, Four HBAs and Cascaded Arrays
Multipathing With Two Hosts, Multiple HBAs and Cascaded Arrays
Enabling and Disabling Multipathing in the Solaris Operating System
Dynamic Discovery of SAS Devices
To Enable Multipathing on LSI-Based Multipath-Capable Controllers
To Disable Multipathing on LSI-Based Multipath-Capable Controllers
Configuring Multipathing on Selected Ports
Enabling and Disabling Multipathing in the Linux Operating System
To Enable Multipathing in Linux
To Disable Multipathing in Linux
Enabling and Disabling Multipathing in the Windows Operating System
How a Failover is Handled by Windows
To Access Service Advisor Procedures
Taking Electrostatic Discharge (ESD) Precautions
To Reserve the Array for Maintenance
To Release the Array After Maintenance
Understanding the CAM Event Log
Troubleshooting Problems with the Array
Check the Event and Performance Logs
Using the Array Management Software to Monitor Enclosure Health
Resetting the Enclosure Hardware
To Reset the Enclosure Hardware Using the Reset Button
Clearing the Enclosure Zoning Password
This section describes how to enable or disable multipathing for your J4500 array with the Windows operating system.
Multipathing of disks is handled through the Microsoft MPIO architecture in conjunction with a DSM (Device-Specific Module). For Windows Server 2008, use the built-in Microsoft generic DSM.
Note - For the Windows operating system, there is only J4500 array multipath support for Windows Server 2008.
If you want to have multiple hosts accessing disks in the array, you must first set up zoning per host as described in Chapter 3, Adding and Zoning Array Storage Using CAM.
When you configure your J4500 array for a multipath support, Windows will initially see two copies of each disk from the OS since you are using two separate array connection paths (one to SAS A and one to SAS B). You will use MPIO to combine the two paths for each type of disk in the array so that the OS sees each multipathed disk as one disk.
After installing the built-in MPIO driver for Windows Server 2008, multipath disks will be combined into a single multipathed disk.
For example, Multipath Disks Seen in Windows Server 2008 Before and After MPIO shows how Windows Server 2008 Device Manager sees a server's four external multipath disks and two internal single path disks before [1] and after [2] MPIO.
Figure 4-7 Multipath Disks Seen in Windows Server 2008 Before and After MPIO
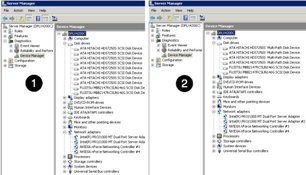
If you remove one path to a multipath disk, failover is handled automatically by MPIO. You continue to see the exact same list of disks in the Windows Device Manager and Windows Disk management views. However, you will see MPIO messages in the system event log indicating a failover has occurred.
An MPIO utility is part of Windows Server 2008, but you must install it manually. For multipath support, you must have already done the following:
Make sure that the J4500s that you want to setup for multipathing are properly connected to the host system and are up and running.
You should have already downloaded and installed the Sun Storage J4500 array Windows Device Manager update driver package from the Sun software download site to ensure Windows will properly recognize the array.
That any zoning of J4500 array storage using the Sun StorageTek Common Array Manager has been successfully completed (see Chapter 3, Adding and Zoning Array Storage Using CAM).
Figure 4-8 Start Menu with Server Manager Selected
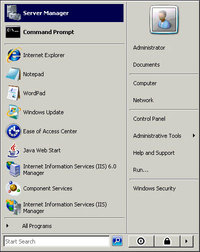
The features summary page appears. See Server Manager Features Selected.
Figure 4-9 Server Manager Features Selected
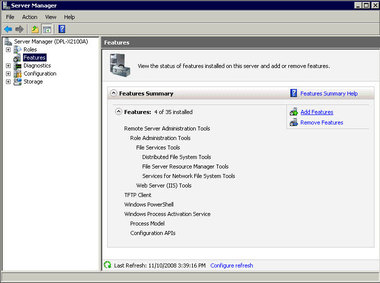
The Add Features wizard begins and presents the default Features selected and a list of optional features available for installation in your system. See Add Features Selection Page.
Figure 4-10 Add Features Selection Page
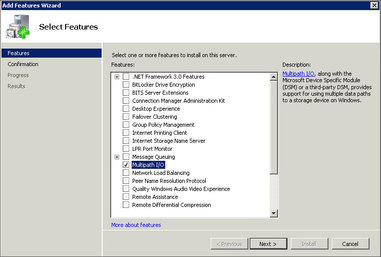
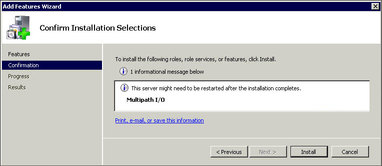
The Add Features wizard Confirm Installation Selections page appears. See Confirm Installation Selections Page.
Figure 4-11 Confirm Installation Selections Page
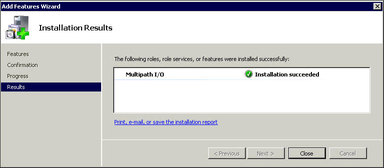
When the installation is finished, the Add Features wizard Installation Results page appears.
Figure 4-12 Installation Results Page
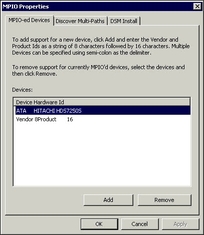
After multipathing is installed, use MPIO properties to select the types of disks that will be multipathed.
Figure 4-13 Example MPIO Properties
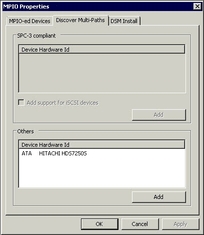
A list of all the disk drives by manufacturer ID and type are displayed. See Example MPIO Properties Discover Multi-Paths Tab.
Figure 4-14 Example MPIO Properties Discover Multi-Paths Tab
At this point, MPIO is installed and configured for dual paths. The second path is hidden by Windows. By default, MPIO is configured for active passive path failover.
An example view of disks is shown in Example of Dual-Path Disks as Seen in Device Manager.
Figure 4-15 Example of Dual-Path Disks as Seen in Device Manager
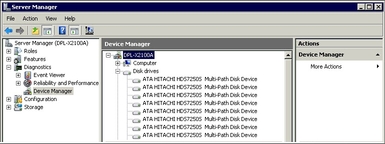
Next, you must make sure that the Load Balancing property for each disk is Failover Only.
The device properties dialog box appears.
Figure 4-16 Disk Device Properties Dialog Box with MPIO Tab Selected
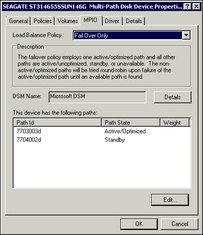
The J4500 array only supports Failover.
Disabling multipathing to drives can be done at two levels:
Remove drive types from MPIO control, but leave the MPIO feature enabled.
Disable the MPIO feature.
The steps below describe both methods.
The MPIO Properties dialog box appears.
Figure 4-17 MPIO Properties Dialog Box
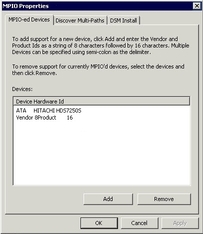
Once all multipath devices have been removed, you will next uninstall the multipath driver.
The features summary page appears.
Figure 4-18 The Features Summary Page

The Remove Features wizard begins.
Figure 4-19 Remove Features Wizard Page
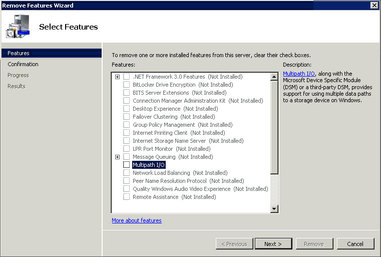
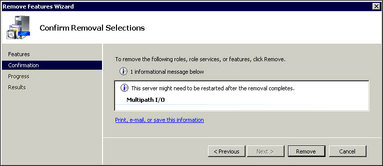
The Confirm Removal Selections page appears. See Confirm Removal Selections Page.
Figure 4-20 Confirm Removal Selections Page
The Removal Results page appears.
Figure 4-21 Remove Results Page
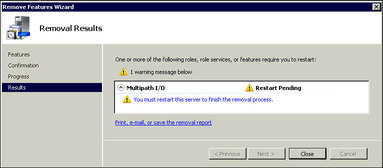
You will be prompted to reboot the system.
The server will shut down and restart.
Figure 4-22 Removal Results Page
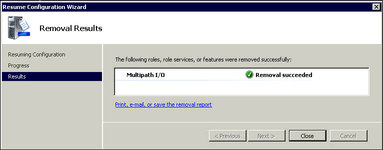
Multipath has been disabled.