| Skip Navigation Links | |
| Exit Print View | |

|
Sun Storage J4500 Array System Overview |
Overview of the Sun Storage J4500 Array
Exterior Features, Controls, and Indicators
Sun Storage J4500 Array Rack Slide Rails
To Place the Array Into Standby Power Mode
AC Power Failure Auto-Recovery
Updated Driver Files Required for Windows
Clustering Software Not Supported With the J4500 Array
Management Options When Using the StorageTek SAS RAID External HBA (Adaptec-Based)
Management Options When Using the StorageTek SAS External HBA (LSI-Based)
Using the Common Array Manager Software
Viewing Sun Storage J4500 Array Information With CAM
Zoning Array Storage Resources Using CAM
Upgrading Sun Storage J4500 Array Firmware Using CAM
Using the StorageTek RAID Manager Software
Viewing Sun Storage J4500 Array Information With the Sun StorageTek RAID Manager
3. Adding and Zoning Array Storage Using CAM
Access Configuration (Zoning) Guidelines
Adding (Cascading) a J4500 Array to An Existing Zoned J4500 Array
To Prepare an Existing Array Prior to Cascading Additional Storage
To Prepare a New J4500 Array for Cascading
Configuring Multiple Host Access for a J4500 Array
To Configure Multiple Host Access for a J4500 Array
Supported Sun Storage J4500 Array Firmware and Common Array Manager (CAM) Software
Supported Operating Systems and Drivers
Supported Drives for Multipath
Multipathing Configuration Guidelines
Multipathing With One Host, One HBA and One Array
Multipathing With One Host, One HBA and Cascaded Arrays
Multipathing With One Host, Two HBAs and Cascaded Arrays
Multipathing With Two Hosts, Four HBAs and Cascaded Arrays
Multipathing With Two Hosts, Multiple HBAs and Cascaded Arrays
Enabling and Disabling Multipathing in the Solaris Operating System
To Enable Multipathing on LSI-Based Multipath-Capable Controllers
To Disable Multipathing on LSI-Based Multipath-Capable Controllers
Configuring Multipathing on Selected Ports
Enabling and Disabling Multipathing in the Linux Operating System
To Enable Multipathing in Linux
To Disable Multipathing in Linux
Enabling and Disabling Multipathing in the Windows Operating System
How a Failover is Handled by Windows
To Enable Multipathing in Windows Server 2008
To Disable Multipathing in Windows Server 2008
To Access Service Advisor Procedures
Taking Electrostatic Discharge (ESD) Precautions
To Reserve the Array for Maintenance
To Release the Array After Maintenance
Understanding the CAM Event Log
Troubleshooting Problems with the Array
Check the Event and Performance Logs
Identifying Disks in the Array Enclosure
Using the Array Management Software to Monitor Enclosure Health
Switching SAS Cables or Making New Connections
Guidelines for Removal and Replacement of RAID Storage
Persistent Affiliation When Changing HBAs
If You Do Not See All of the 48 Disks
Clearing the Enclosure Zoning Password
In the event the array becomes non-responsive to host commands or you cannot see its disks, you may need to reset the array enclosure hardware. You can reset the array with the power on. The array takes about 1 minute to reset before relinking to the host.
Note - The enclosure may be reset remotely using the Common Array Manager (CAM) software.
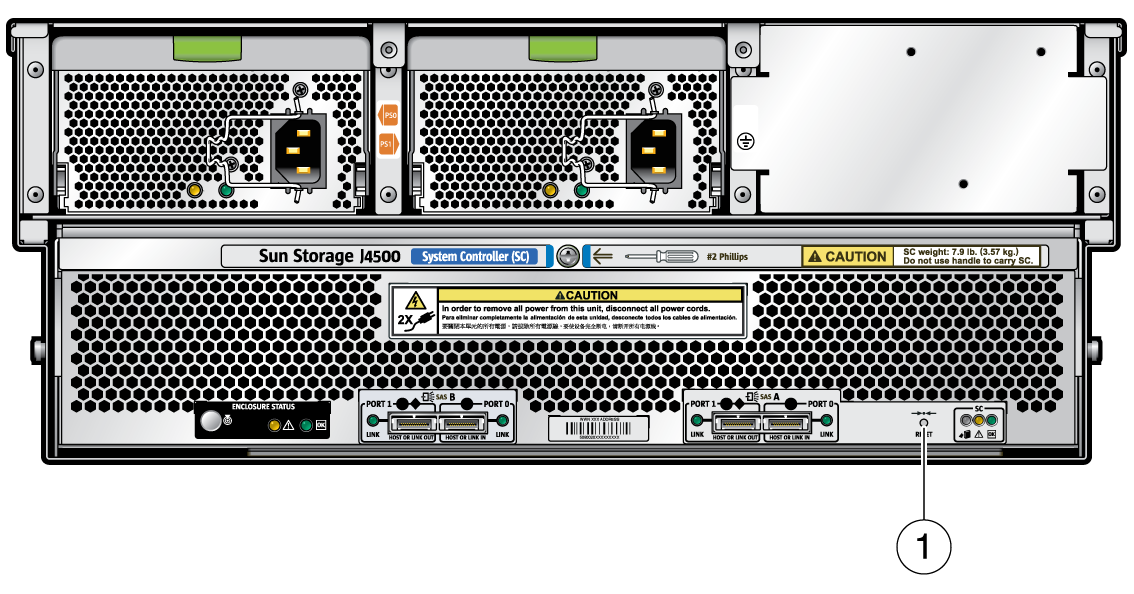
Resetting the array is done by pressing a recessed button at the rear of the array (see Enclosure Reset Button ). The array may also be reset remotely using the Sun Common Array Manager.
Note - This procedure should only be performed after you've checked of other problems at the server and have shut down all server processes that are actively accessing the J4500 array.
The reset process takes about 1 minute. After that, the server should again see the array disks.
Figure 5-1 Enclosure Reset Button

Figure Legend
1 Enclosure Reset button