| Skip Navigation Links | |
| Exit Print View | |

|
Sun Storage J4500 Array System Overview |
Overview of the Sun Storage J4500 Array
Exterior Features, Controls, and Indicators
Sun Storage J4500 Array Rack Slide Rails
To Place the Array Into Standby Power Mode
AC Power Failure Auto-Recovery
Updated Driver Files Required for Windows
Clustering Software Not Supported With the J4500 Array
Management Options When Using the StorageTek SAS RAID External HBA (Adaptec-Based)
Management Options When Using the StorageTek SAS External HBA (LSI-Based)
Using the Common Array Manager Software
Viewing Sun Storage J4500 Array Information With CAM
Zoning Array Storage Resources Using CAM
Upgrading Sun Storage J4500 Array Firmware Using CAM
Using the StorageTek RAID Manager Software
Viewing Sun Storage J4500 Array Information With the Sun StorageTek RAID Manager
3. Adding and Zoning Array Storage Using CAM
Access Configuration (Zoning) Guidelines
Adding (Cascading) a J4500 Array to An Existing Zoned J4500 Array
To Prepare an Existing Array Prior to Cascading Additional Storage
To Prepare a New J4500 Array for Cascading
Supported Sun Storage J4500 Array Firmware and Common Array Manager (CAM) Software
Supported Operating Systems and Drivers
Supported Drives for Multipath
Multipathing Configuration Guidelines
Multipathing With One Host, One HBA and One Array
Multipathing With One Host, One HBA and Cascaded Arrays
Multipathing With One Host, Two HBAs and Cascaded Arrays
Multipathing With Two Hosts, Four HBAs and Cascaded Arrays
Multipathing With Two Hosts, Multiple HBAs and Cascaded Arrays
Enabling and Disabling Multipathing in the Solaris Operating System
To Enable Multipathing on LSI-Based Multipath-Capable Controllers
To Disable Multipathing on LSI-Based Multipath-Capable Controllers
Configuring Multipathing on Selected Ports
Enabling and Disabling Multipathing in the Linux Operating System
To Enable Multipathing in Linux
To Disable Multipathing in Linux
Enabling and Disabling Multipathing in the Windows Operating System
How a Failover is Handled by Windows
To Enable Multipathing in Windows Server 2008
To Disable Multipathing in Windows Server 2008
To Access Service Advisor Procedures
Taking Electrostatic Discharge (ESD) Precautions
To Reserve the Array for Maintenance
To Release the Array After Maintenance
Understanding the CAM Event Log
Troubleshooting Problems with the Array
Check the Event and Performance Logs
Using the Array Management Software to Monitor Enclosure Health
Resetting the Enclosure Hardware
To Reset the Enclosure Hardware Using the Reset Button
Clearing the Enclosure Zoning Password
The example in this section describes an initial multi-host set up with each host owning a separate portion of array storage that is configured using the CAM browser interface. The storage owned by each host is configured for multipath failover. Do the following before you begin:
If you have already configured operating system multipath software for a host, disable the multipath software until after the CAM access configuration is complete so that CAM will see all array-connected initiators.
If your server is running the Windows Server 2008 operating system and you have already configured multipathing, remove the J4500 array disk drives from the MPIO-ed Devices list (through Control Panel -> MPIO properties).
The server used to configure access configuration can also be the combination of a network-connected Management station and a single proxy server directly connected to array storage designated as the primary host.
Note - For other hosts that will be connected, you must remove CAM proxy agents (if installed) prior to performing the following steps in order to prevent SATA affiliation issues. In addition, no commands that might access the disks should be run from any host other than the chosen primary host. For more information see the “Troubleshooting Access Configuration” section in the Sun StorageTek Common Array Manager Release Notes.
Note - If any re-cabling of an existing host and array setup is required to achieve a supported multi-host cascaded configuration, you must record the initiator SAS address and any desired disk associations from the CAM Access Configuration page before re-cabling. If the initiator moves from one array connector port to another (even in the same SAS fabric) its disk access configuration will need to be re-created.
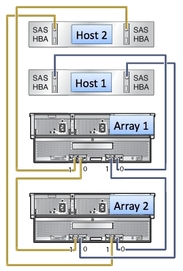
Figure 3-14 Multiple Host Connection to Cascaded J4500 Arrays

https://host-name:6789
Where host-name is the DNS name of the server connected to the array.
All attached arrays should be found. If they are not, perform a host reboot (i.e. Full reboot reconfigure on Solaris) and attempt the registration again.
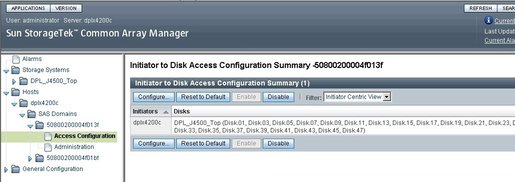
The Access Configuration Summary page displays. See Example Access Configuration Summary Page.
Figure 3-15 Example Access Configuration Summary Page

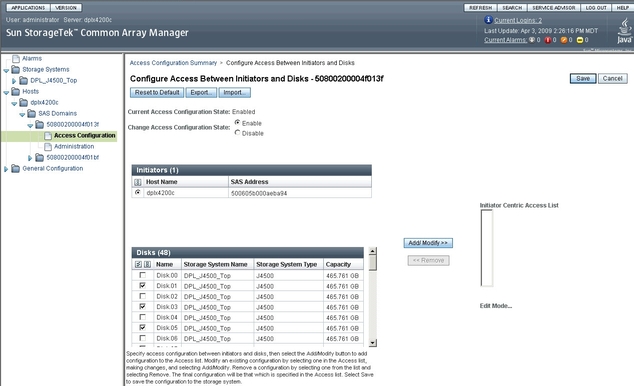
The Configure Access Between Initiators and Disks page displays. See Example Access Configuration Between Initiator and Disks Page.
At this time, all arrays, domains, and initiators from all attached hosts should be seen within the corresponding Access Configuration Pages.
If any initiators from any attached hosts are not seen, verify that the OS multipathing software is disabled on those hosts. In addition, a reboot might be necessary to force an attached host to register their initiators with the storage arrays.
Note - In the Access Configuration page, the initiator(s) from the additional host(s) should be visible; however, they may only be represented as unique SAS addresses (no host names) since the proxy has not been discovered yet.
Figure 3-16 Example Access Configuration Between Initiator and Disks Page

If the initiator selected is from a host whose cable did not need to be moved from one array port to another in order to conform to a supported array cascade configuration, you can implement an existing access configuration for it. Any host connections that were moved from their original array port connection to a different array port must have access configuration manually recreated for that initiator.
If multipathing is planned, drives may be shared by the initiators of a single host. The initiators must be attached to separate SAS domains to ensure a separate failover path. Disk drives in the array should never be shared by more than one host whether multipathing or not.
Note - The J4500 array is not supported in a clustering configuration.
All initiators should be configured at this time (i.e., initiator #1 might have all odd numbered disks and initiator #2 might have all even numbered disks). This includes the initiators of other attached hosts.
If multiple initiators are seen, access configuration should also be performed at this time. This includes the initiators of other attached hosts.
Install and discover the CAM proxy agents on any additional hosts other than the primary CAM host. For installation information, see the Sun StorageTek Common Array Manager User Guide for your version of CAM.
Verify the appropriate Access Configuration is now active (for example, on an array-attached host running Solaris, use the format utility to confirm that only disks configured for the initiators of that host are now available).
Verify operating system multipathing software is installed/enabled and configured for each server. Verify that the disk drives show both paths to the operating system (see Chapter 4, SAS Multipathing).
Note - If your server is running the Windows Server 2008 operating system, and you had previously configured it for multipathing, add back the J4500 array disk drives to the MPIO-ed Devices list (through Control Panel -> MPIO properties).