JavaScript is required to for searching.
Skip Navigation Links
Exit Print View
Sun Storage F5100 Flash Array Topic Set
search filter icon
search icon

Document Information

Preface

Related Documentation

Documentation, Support, and Training

Documentation Feedback

Installation

Installing the System

Preparing for Installation

Rackmounting the System

Cabling the System

Power On

Managing the System

Power Off

Service

Sun Storage F5100 Flash Array Overview

Overview

Replaceable Components

Hot-Swappable Components

Obtaining the Chassis Serial Number

Diagnosing System Faults

Choosing a Method for Diagnosing Faults

Diagnosing Faults With Sun StorageTek Common Array Manager Software

Diagnosing Faults With LEDs and Indicators

Troubleshooting Components

Preparing to Service the System

Safety Information

Service Preparation Reference

Powering the System Off

Performing an Antistatic Discharge

Positioning the Chassis

Accessing Internal Components

Replacing System Components

Component Overview

Customer-Replaceable and Field-Replaceable Components

Replacing Flash Modules

Remove a Flash Module

Install a Flash Module

Verify Flash Module Replacement

Replacing a Fan Module

Remove a Fan Module

Install a Fan Module

Verify Fan Module Replacement

Replacing a Power Supply

Remove a Power Supply

Install a Power Supply

Verify Power Supply Replacement

Replacing an Energy Storage Module

Remove an Energy Storage Module

Install an Energy Storage Module

Verify Energy Storage Module Replacement

Replacing Fan Boards

Remove a Fan Board

Install a Fan Board

Verify Fan Board Replacement

Replacing the Motherboard Assembly

Remove the Motherboard Assembly

Install the Motherboard Assembly

Verify Motherboard Replacement

Replacing a Power Distribution Board

Remove a Power Distribution Board

Install a Power Distribution Board

Verify Power Distribution Board Replacement

Replacing the Connector Board Assembly

Remove the Connector Board Assembly

Install a Connector Board Assembly

Verify Connector Board Replacement

Replacing the Energy Storage Backplane

Remove the Energy Storage Backplane

Install the Energy Storage Backplane

Verify Energy Storage Backplane Replacement

Returning the System to Service

Replace the Top Chassis Cover

Install the Chassis to Maintenance Position

Return the System to the Fully Installed Position

Install AC Power Cord Retention Clips

Power On the System

Index

Install the Motherboard Assembly


Caution

Caution - This procedure requires that you handle components that are sensitive to static discharge. This sensitivity can cause the component to fail. To avoid this problem, ensure that you follow antistatic practices as described in Perform Static Discharge Procedures.


  1. Reinstall the eight energy storage module power cables on the motherboard to their original positions.

    Note - The ESM cables fit firmly on their receptacles. Use care when reinstalling these cables to avoid damaging the motherboard.


  2. Position the motherboard so that its screw holes align with the chassis standoffs as shown in panel 1 of Installing a Motherboard.
  3. Using the green handle and the back edge of the motherboard tray, push down firmly and equally while sliding the motherboard to the front of the chassis as shown in panel 2 of Installing a Motherboard.

    Tip - After installing the motherboard on the chassis, ensure that the motherboard is correctly seated by gently lifting up on the green handle. If the board moves upward, then it is not correctly seated. Ensure that the motherboard tray sits flush with the chassis floor. Also, check for binds and ensure that the bus bar screw holes are correctly aligned with the bus bar at the front of the motherboard.


  4. Tighten the green captive screw that secures the motherboard to the front of its tray in the chassis as shown in panel 3 of Installing a Motherboard.
  5. Using a No. 2 Phillips screwdriver, install the four screws and the green captive screw that were removed during the removal procedure as shown in panel 3 of Installing a Motherboard.

    When you reinstall the motherboard, you must use the correct screws to attach the motherboard to the bus bar.


    Figure 35 Installing a Motherboard

  6. Reinstall the two cables that connect the motherboard to the backplane as shown in Installing Cables on Backplane.

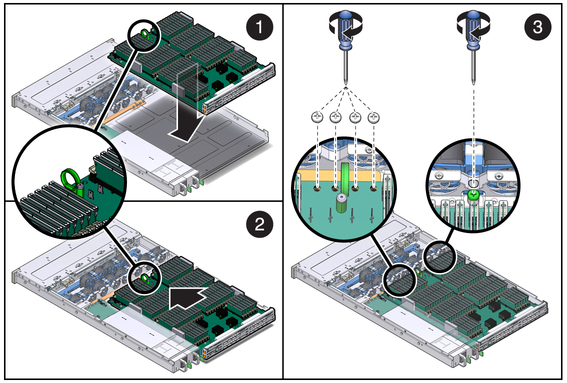
    Figure 36 Installing Cables on Backplane

  7. If you are installing a new motherboard, reinstall the Flash Modules on the motherboard in the same configuration in which they were previously installed.
  8. Reinstall the motherboard-to-PDB cable as shown in Installing the Motherboard-to-PDB Cable.

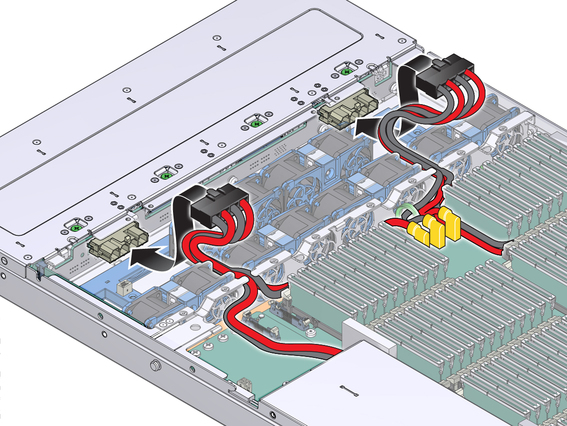
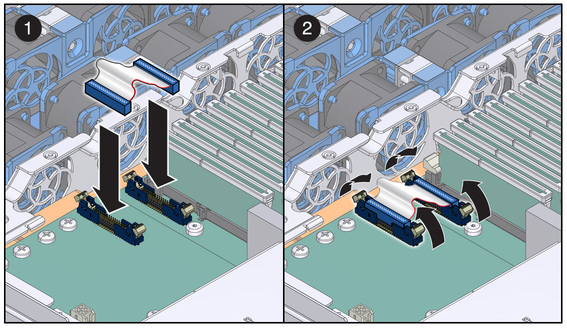
    Figure 37 Installing the Motherboard-to-PDB Cable

  9. Replace the top chassis cover.

    Refer to Replace the Top Chassis Cover.

  10. Return the system to the installed position.

    Refer to Return the System to the Fully Installed Position.

  11. Reconnect any cables that were disconnected before the motherboard was removed.
  12. Restore power to the system.

    Refer to Power On the System.