This section describes the basic steps you perform to create scenarios. Important: If you want to create or edit scenarios through the ACC on the management server (the server where ATG Content Administration and the Business Control Center are installed), you must run the ATG platform with the Preview layer. For more information, see the ATG Business Control Center Administration and Development Guide.
The following example shows how you would create a scenario to implement the plan outlined at the beginning of this chapter for retaining more new members at your Web site. The plan can be summarized as follows:
Send a “Welcome!” e-mail to all new members as soon as they register.
For members who do not return to the site within the next month, send an e-mail including a special offer.
Complete the following steps to create this scenario:
Start the ATG Control Center. (For more information, see Starting the ATG Control Center.) Note that you must use the ATG Control Center that is connected to the scenario editor server; otherwise, the menu options that allow you to create and edit scenarios will not be available. For more information on the differences between global, individual, and scenario editor servers, refer to the ATG Personalization Programming Guide.
Select Scenarios from the main ATG Control Center window, and then select Scenarios. The following window appears:
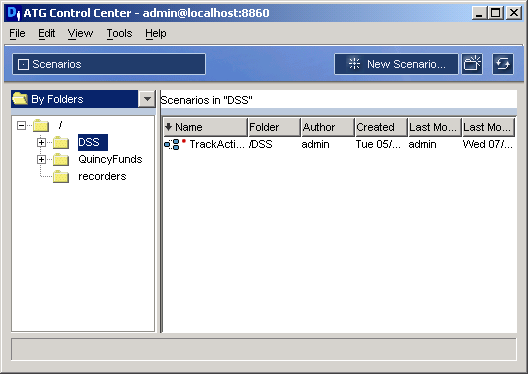
Scenarios > Scenarios window
Select By Folders from the dropdown list in the top left corner of the window.
Select File > New Scenario. The Create New Scenario wizard appears.
In the first screen, Use Scenario Template?, click No.
Templates are pre-defined scenarios that contain a variety of standard elements. You can customize templates by adding your own elements, and you can create your own new templates for scenarios you expect to use frequently. For more information, see Creating Templates for Scenarios or Creating a Scenario from a Template.
Click Next, and use the window that appears to name the new scenario and to specify the folder where you want to save it. Note that these folders are internal to the ATG Scenarios module.
Click Finish. The scenario editor window appears, and it displays the first element of a new segment. Segments are the individual phases of a scenario.

Double-click the word “Segment” to make the text editable, and type a descriptive name. Then press Enter. The new name appears.

The following section shows how to add elements to the new scenario segment:
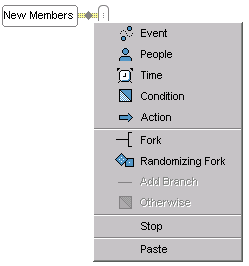
To add the next element, move the mouse over the line between the two rectangles and click the small diamond that appears on the line. (The line is called a connector.) A drop-down list appears showing the types of elements you can select.
A set of standard elements is provided with the Scenarios module, but you can also add your own if necessary. For more information, see Adding Custom Elements to Scenarios.
Event elements are the “what” part of the scenario. They define the visitor behavior that you want to use as a trigger for the next element in the scenario. Examples: “visits page in folder /shoes” or “views an item from Products in the category ‘shoes.’” For more information, see Using Event Elements in Scenarios.
People elements are the “who” part of the scenario. They act as filters that define the group of site visitors to include. Example: “People whose gender is female.” The system compares the criterion in the People element to the visitor profiles in your profile repository and includes in the scenario those people whose profiles match the criterion. For more information, see Using People Elements in Scenarios.
Time elements are the “when” part of the scenario. They can define either a specific moment in time (for example, “on March 13th at 12:00 PM”) or a period of time that you want the system to wait between elements (for example, “wait three months”). For more information, see Using Time Elements in Scenarios.
Condition elements add an “if” condition to the scenario, qualifying the preceding element. For example, after a
visits page in folder /shoeselement, you could have a Condition element that specifies the exact page: “if page is/shoes/hikingboots.jsp.” If the site visitor meets the criterion, the system applies the next scenario element. For more information, see Using Condition Elements in Scenarios.Action elements extend the “what” part of the scenario. While Event elements define what the site visitor does, Action elements define what the system does in response. For example, you can have the system send an e-mail, modify a specific property in a user’s profile, or display a specific piece of content in a slot. (For more information on slots, see Using Slots.) For more information, see Using Action Elements in Scenarios.
Fork elements add parallel “if” conditions, allowing you to divide a scenario into separate branches and treat each branch differently. For example, you can have the system split the group of visitors according to gender, with one branch for female visitors and another for male visitors. You could then add different Action elements to each branch, displaying appropriate promotional items to each group. For more information, see Using Fork Elements in Scenarios.
The following image shows a scenario that includes a fork:

You can also use forks to watch for and handle multiple events within the same scenario. For example, you can create a scenario that watches for any visitor to log into a Web site and then watches for them to visit any one of a number of pages. You would add a Fork element and then add a “Visits” Event element to each branch, with each branch handling a different page.
You can create nested forks (forks within a fork), which allow you to handle complex “if” criteria within a single scenario.
Randomizing Fork elements are the foundation for the powerful user sampling functionality of the Scenarios module. They are essentially the same as forks, except they allow you to divide the group of site visitors by percentage. So, for example, you could divide a scenario into two branches, displaying Product A to 50 percent of the group and Product B to the other 50 percent. You use this element type in combination with the Scenario module’s data tracking features to measure the success of scenarios and Web content; in this case, you could measure the popularity of Product A over Product B in terms of quantity sold.
For more information, see Performing User Sampling.
Add Branch elements allow you to add new empty branches to a fork.
Otherwise elements allow you to add an “else” statement to a fork. For more information, see Using Otherwise Elements in Scenarios.
Stop elements prevent a visitor from progressing through a scenario in a given situation. When a visitor triggers a stop element, he or she is removed from the scenario and does not proceed to any subsequent elements. A Stop element is also added automatically to the end of each scenario. For more information, see Specifying the End of a Scenario.
In this example, the first step in the scenario is to identify people who have just registered at your site. You select Event and then you select Registers from the list of available event types.
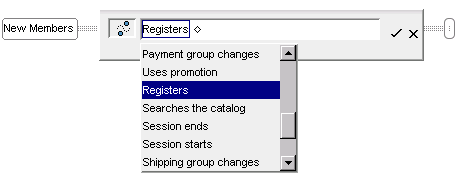
Click the check mark at the end of the edit box to accept this element as part of the scenario. (Clicking the x removes this element.)
The ATG Control Center displays the new element in the scenario:

The Registers element tells the system to wait for a visitor to register at your site and then allow him or her to continue to the next element of the scenario. You can also include various qualifiers that further define the registration event – for example, you can include a qualifier that tells the system to watch only for those registrations that occur during a specific type of visitor session. For this example, however, you want to apply the scenario to all registrations, so you do not add any qualifications to the element.
Note that the connector (the line between elements) has changed from a triple line to a single one. The difference in line width shows that any remaining elements in the scenario apply only to individual site visitors rather than to all visitors.
Next, you want the scenario to send a “Welcome!” e-mail to the people who just registered. First you add a Time element, Wait 5 Minutes, to allow the system to process the registration before sending the message. You click the connector and add the Time element. Then you add an Action element, selecting Send Email from the menu. In the Send Email element, you specify welcome.jsp from the list of available targeted e-mail templates. (Your page developer sets these up in the Pages and Components > Pages area of the ATG Control Center. For more information, see Working with Targeted E-Mail.)

Note: In most cases, it is not necessary to add a Wait element between an Event element and a Send Email element. The exception is the Registers event.
At this point you want the system to respond differently to new members depending on their behavior.
You add a Fork element to the scenario. You use one branch to handle members who do return to the site. To this branch you add an Event element, selecting “Logs in” from the list of available events.

You use the other branch for people who do not satisfy the “Logs in” condition in the first branch. You add a Time element, selecting “Wait thirty days” from the list. To that same branch, you then add a Send Email Action element, selecting newmemberoffer.jsp from the list of targeted e-mail templates. Again, a page developer sets these up in the Pages and Components > Pages area of the ATG Control Center.

Note that the vertical order of the branches is not important.
Select File > Save. The scenario is complete. It is not active, however, until you enable it and then copy it to your live site (see Enabling and Disabling Scenarios).
A Note About Scenarios with More than One Segment
Scenarios can contain as many segments as you require. However, it is important to note that there is no physical connection between separate segments in the same scenario; visitors do not pass from the end of one segment to the beginning of the next. The advantage of including more than one segment in a scenario is organizational: you can give the scenario a meaningful name (for example, “promotions”) and then keep all segments related to that subject in the same scenario.
To add a new segment to a scenario, select Edit > Add Segment.
By default, the segments in a scenario are not processed in any specific order. For example, if two segments contain the same element (for example, a Registers element), you cannot by default control which segment will be triggered first; the order depends on variables such as the number of scenario servers that are waiting for events and the speed with which each one processes the events it receives. (For more information, refer to the ATG Personalization Programming Guide.) You can change this behavior, however, by specifying a priority level for each segment. If two segments contain the same element, the element within the segment with the higher priority level is triggered first.
Consider the following example:
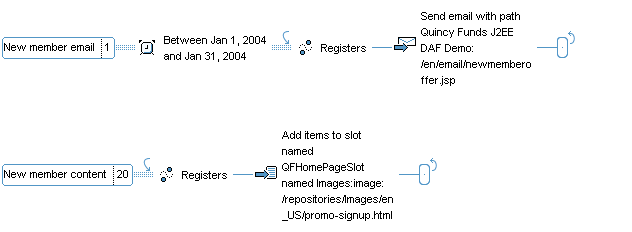
Between the dates shown in the New Member Email segment, both segments are waiting for a site visitor to register as a new member. However, the priority level of the second segment is higher, so the Registers element in the second segment is processed first.
To set a segment’s priority level, perform the following steps:
Right-click the segment’s name.
Select Set Segment Priority from the pop-up menu.
Type the priority level for this segment. The default value is 0. You can enter negative as well as positive values. Higher values take priority; for example, a segment with priority 2 is processed before segments with priority 0 or -1.
The segment’s priority level is displayed only if the value is other than 0.
Note that a segment’s priority level applies only within its own scenario.
