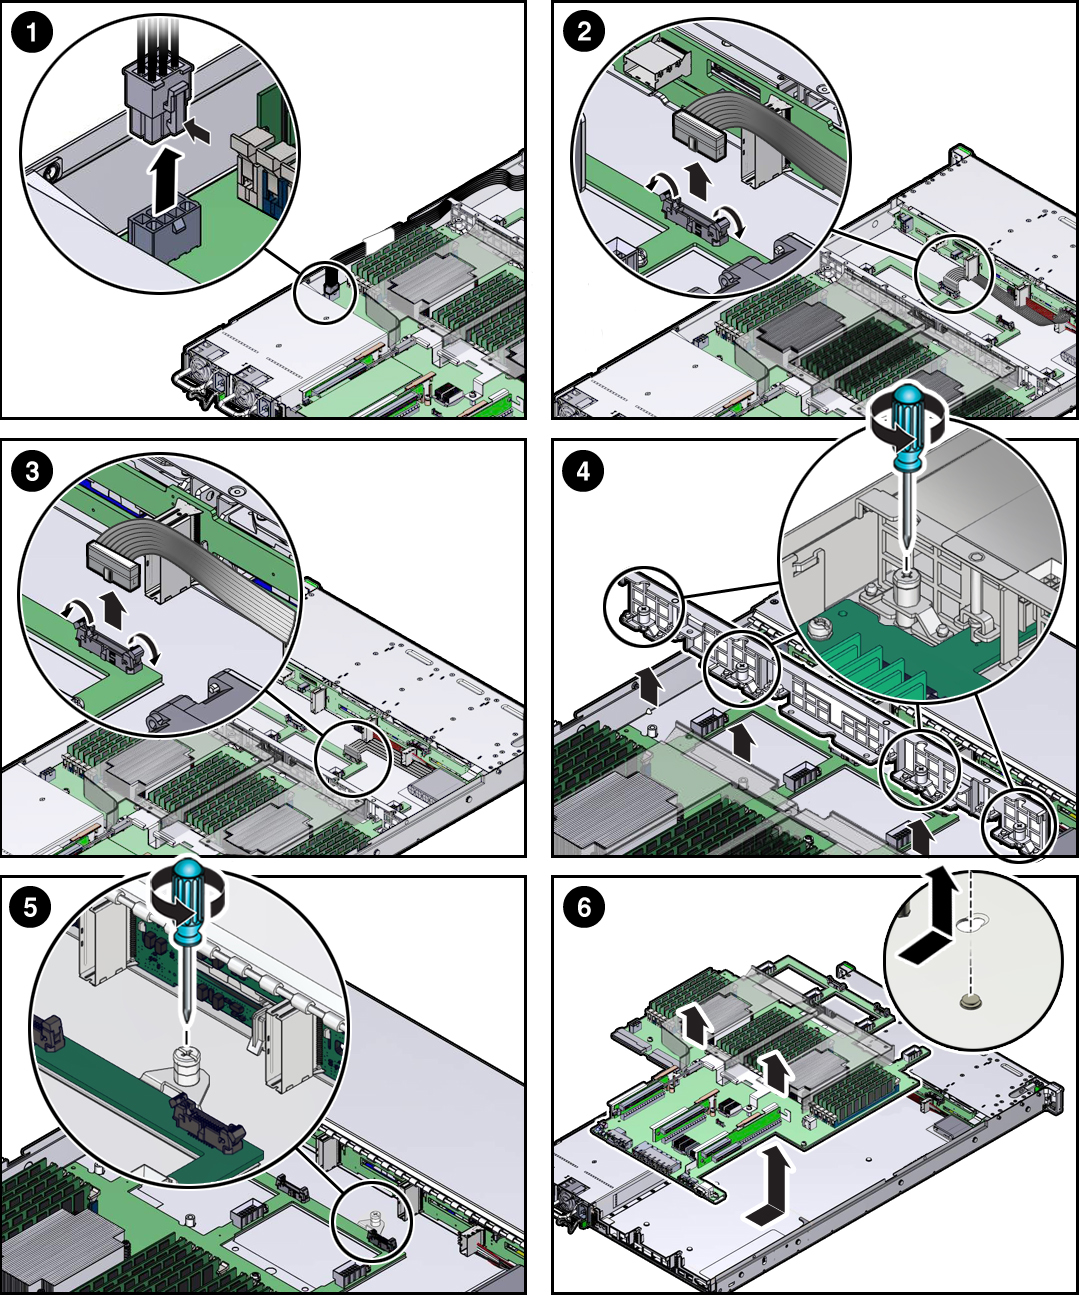
Remove the Motherboard
 | Caution - Use the Oracle ILOM backup utility prior to removing the motherboard. This utility backs up the Oracle ILOM configuration of the service processor. For more information, see the "Back Up the Oracle ILOM Configuration Settings" section in the Oracle ILOM Documentation Library at https://docs.oracle.com/cd/E37444_01/html/E37446/z400371a1482122.html#scrolltoc. |
This is a cold-service procedure that must be performed by qualified service personnel. Power down the server completely before performing this procedure.
- Prepare for servicing.
- Remove the air baffle from the motherboard and set it aside.
-
Remove these reusable components.
-
Fan modules.
See Remove a Fan Module.
- Power supplies.
-
PCIe risers and attached PCIe cards.
See Servicing PCIe Cards.
-
NVMe and SAS HBA cables.
See Remove the HBA SAS Cable Assembly and Remove the NVMe Cables.
-
Fan modules.
-
Disconnect the drive backplane power cable from the motherboard by pressing in
on the connector latch and pull the connector (1).

- Eject the drive backplane auxiliary power and front indicator module cable connectors by opening both side latches (2, 3).
-
Remove the server mid-wall (4).
- Using a screwdriver (No. 2 Phillips or flathead), loosen the four green captive screws that secure the mid-wall to the server chassis.
- Lift up the mid-wall slightly to disengage it, then lift it out of the server and set it aside.
- Loosen the one green captive screw that secures the motherboard to the chassis (5).
-
Remove the motherboard from the server chassis (6).
- Grasp the metal bracket located just to the rear of the DIMM sockets and slide the motherboard toward the front of the server and lift it slightly to disengage it from the standoffs that are located on the server chassis under the motherboard.
- Lift the motherboard out of the server chassis, and place it on an antistatic mat and next to the replacement motherboard.
- Remove the eUSB drive from the motherboard and install it on the replacement motherboard.
- Remove the SEEPROM from the motherboard and install it on the replacement motherboard.
-
Remove the DIMMs from the motherboard and install them in the corresponding
DIMM sockets on the replacement motherboard.
For instructions, see Servicing DIMMs.
Note - Install the DIMMs only in the sockets (connectors) that correspond to the sockets from which they were removed. Performing a one-to-one replacement of the DIMMs significantly reduces the possibility that the DIMMs will be installed in the wrong slots. If you do not reinstall the DIMMs in the same sockets, server performance might suffer and some DIMMs might not be used by the server.