Contents
Oracle API Gateway is a dedicated network device for offloading processor-intensive tasks from applications running in general purpose application servers. The API Gateway performs application networking by routing traffic based on both content and sender. Its patented high performance XML acceleration engine, coupled with acceleration hardware ensures wirespeed network performance.
Tivoli Access Manager is a commonly used product for securing web resources. The Tivoli message filter allows the API Gateway to leverage existing Access Manager policies, thus avoiding the need to maintain duplicate policies in both products. At runtime, the Tivoli filters can delegate authentication and authorization decision to Access Manager, and can also retrieve user attributes. Therefore, the API Gateway integrates with Tivoli Access Manager by providing the following functionality:
-
Connects to Tivoli Access Manager
-
Authenticates a user against Access Manager
-
Authorizes a user against Access Manager
-
Retrieves user attributes from Access Manager
The API Gateway has been built to integrate with Tivoli Access Manager 6.0.
The Oracle API Gateway contains a set of message filters that directly or indirectly restrict access to Web services. For example, filters that directly control access include XML-signature verification, CA certificate chain verification, and SAML assertion verification. With this class of filters, policy decisions are made and enforced within the API Gateway's core engine itself.
On the other hand, filters that indirectly control access offload the policy decision to an external system, such as Tivoli Access Manager. With indirect filters, the policy decision is made by the external system but then enforced by the API Gateway.
The objective of this integration solution is to implement a message filter that forwards policy decisions to IBM's Tivoli Policy Director/Access Manager. The architecture can be seen in the following diagram.
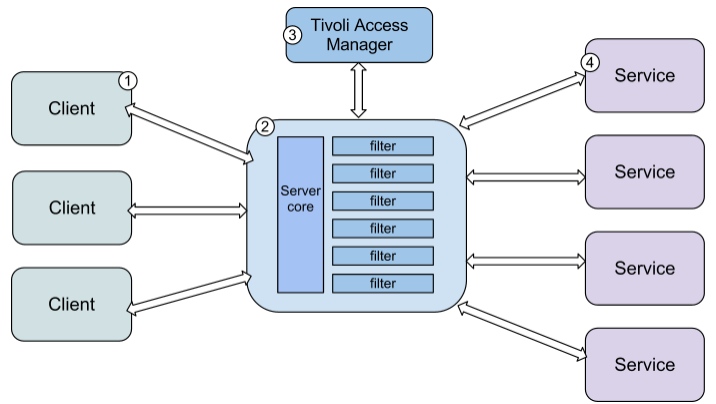 |
The following processing stages are executed:
-
The client sends a message to the API Gateway (for example, using SOAP over HTTPS).
-
The API Gateway dispatches the message to the appropriate policy. The filters configured for that policy are then executed.
-
Assuming that the Tivoli filter is one of the filters that is configured for this policy, the API Gateway asks Tivoli Access Manager to authenticate, authorize, or retrieve attributes for a given user. Tivoli Access Manager makes its security decision and returns it to the API Gateway, where the decision is enforced.
-
If Tivoli Access Manager successfully authenticates or authorizes the user, or can retrieve attributes about that user, the message is routed on to the configured target system. Otherwise, the message is blocked and a fault is returned to the client.
IBM Tivoli integration requires the following:
Tivoli API
Integration with the IBM Tivoli Access Manager requires the IBM Tivoli Access Manager for e-business Authorization C API. You must add the required third-party binaries to your API Gateway and Policy Studio installations.
API Gateway
To add third-party binaries to the API Gateway, you must perform the following steps:
-
Add the binary files as follows:
-
Add
.jarfiles to theinstall-dir/apigateway/ext/libdirectory. -
Add
.dllfiles to theinstall-dir\apigateway\Win32\libdirectory. -
Add
.sofiles to theinstall-dir/apigateway/platform/libdirectory.
-
-
Restart the API Gateway.
Policy Studio
To add third-party binaries to Policy Studio, you must perform the following steps:
-
Select Windows > Preferences > Runtime Dependencies in the Policy Studio main menu.
-
Click Add to select a JAR file to add to the list of dependencies.
-
Click Apply when finished. A copy of the JAR file is added to the
pluginsdirectory in your Policy Studio installation. -
Click OK.
-
Restart Policy Studio.
Tivoli Runtime
The Tivoli Access Manager Runtime must be installed on the machine running the API Gateway.
![[Note]](../common_oracle/images/admon/note.png) |
Note |
|---|---|
|
The Tivoli Access Manager Runtime for Java is not required. The Tivoli runtime is not packaged with the API Gateway product, so the IBM installers need to run to install the runtime. |
The Tivoli Access Manager Runtime may be installed using the native utilities instead of the Installation Wizard. This is advised so that the IBM Java Runtime 1.4.2 does not get installed. The Java Runtime 1.4.2 is required by the Installation Wizard, but not by any of the runtime software.
Tivoli Configuration Files
The API Gateway uses information stored in the Tivoli configuration files in order to connect to a Tivoli server. These configuration files can be generated using the svrsslcfg command line utility, which is shipped with the Tivoli Access Manager Runtime discussed in the previous section. The generated configuration files are then either uploaded to the API Gateway using Oracle Policy Studio or manually copied into a location on the API Gateway's file system.
The following example shows how to run the svrsslcfg utility (using Windows file paths):
svrsslcfg -config -f "C:\conf\config.conf" -d "C:\conf" -n API Gateway
-s remote -P passw0rd -S passw0rd -r 7777 -h test.vordel.com
The available arguments are described as follows:
| Argument | Description |
|---|---|
-config |
Creates the configuration files required for the API Gateway to communicate with Tivoli. |
-f |
Name of the main Tivoli configuration file. This file is generated by the command. |
-d |
Name of the directory that is to contain the SSL key file
(.kdb) for the server. This command generates the key file.
|
-n |
Name of the application connecting to Tivoli (the API Gateway). |
-s |
Mode in which the application (the API Gateway) runs. The most likely scenario is that the API Gateway runs remotely. |
-P |
Administrator's password. |
-S |
Password for the API Gateway. |
-r |
Listening port for the API Gateway.. |
-h |
Name of the host on which the API Gateway is running. |
After the svrsslcfg utility has been run with the -config option, the following command must be run:
svrsslcfg -add_replica -f "c:\conf\config.conf" -h tivoli.qa.vordel.com
The available arguments are described as follows:
| Argument | Description |
|---|---|
-add_replica |
Adds a Tivoli authorization server replica. The API Gateway contacts this server to make authorization decisions. |
-f |
Name of the main Tivoli configuration file. This file is generated by the command. |
-h |
name of the Tivoli authorization server. |
Generated Files
The following files are generated after running these commands:
-
c:\conf\config.conf - The main Tivoli configuration file.
-
c:\conf\API Gateway.kdb - The SSL key file.
-
c:\conf\API Gateway.sth - The stash file for the SSL key file.
-
c:\conf\API Gateway.conf.obf - The database configuration file.
|
Note |
|---|---|
|
Depending on the version of the API Gateway you are running, the above file names may or may not have spaces in them. |
Please refer to the Tivoli documentation for more information on running these command line utilities.
Create a Tivoli Object Space
An object space, user, and ACL (Access Control List) may be created within Tivoli using the pdadmin command as follows:
> login -a sec_master  passw0rd
> objectspace create /vordel/test "For testing purposes" 9
> user create -gsouser jsmith "cn=John Smith, o=Vordel" "John Smith" Smith passw0rd
> user modify jsmith account-valid yes
> acl create VordelACL
> acl modify VordelACL set user jsmith brT
> acl attach /vordel/test VordelACL
The following commands allow you to view the details of the newly added user:
> user show jsmith
> objectspace list
> acl show VordelACL
Please refer to the Tivoli documentation for more information on running the pdadmin utility.
Policy Studio is used to configure all Tivoli connections and settings
within the API Gateway. It can be run from the /bin
directory of your product installation.
There are two global Tivoli-specific settings that can be configured:
-
Tivoli Connections
-
Tivoli Repositories
Tivoli Connections:
Tivoli Connections determine how a particular API Gateway instance connects to an instance of a Tivoli server. Each API Gateway instance can connect to a single Tivoli server. This connection can be configured by right-clicking the API Gateway instance under the Listeners node in the tree on the left of the Policy Studio, and clicking the Tivoli menu option.
Alternatively, you can add a global Tivoli Connection by right-clicking the External Connections > Tivoli Connection node in the tree, and selecting the Add a Tivoli Connection option. The newly added connection can then be assigned to a particular API Gateway instance.
In both cases, the Tivoli Configuration dialog is used to add the connection details required for the API Gateway to connect to the Tivoli server. As stated in the Prerequisites section above, the connection details are stored in the Tivoli configuration files that are generated by the svrsslcfg utility. This dialog allows you to upload these files to the API Gateway.
The Policy Studio can be used to upload the Tivoli configuration files to the machine on which the API Gateway is running or, alternatively, the configuration files may be copied manually using the tool of your choice onto the API Gateway's file system. This section now describes how to perform each of these methods in turn.
Complete the following steps to upload a configuration file to the API Gateway:
-
Enter a name on the Tivoli Configuration dialog. A previously configured Tivoli Connection can be selected to base the new configuration on.
-
Select the Upload Tivoli configuration files option.
-
Select the version of the Tivoli server that this connection connects to. Both Tivoli 5.1 and 6.0 are supported.
-
Check the Connection enabled checkbox if you want to immediately enable the connection. It can be disabled at a later stage by toggling this checkbox. Click the Next button.
-
On the Upload Tivoli configuration files screen, click the Load File button and browse to the location of the main Tivoli configuration file. The contents of this file are then displayed in the text area. Any of the details can be edited in the text area at this stage if required.
For example, it may be necessary to change the file locations of the configuration files. This is because when you use the Upload ... option, the API Gateway writes out the files on startup and on server update to the following directory, where
PROCESS_NAMEis API Gateway instance andINSTALL_DIRrefers to the root of your product installation:[INSTALL_DIR]\conf\plugin\tivoli\[PROCESS_NAME]Note Spaces are substituted with
-in the API Gateway instance name.In addition, the API Gateway names each file asconfig.[EXTENSION]. For example, the directory,[INSTALL_DIR]\conf\plugin\tivoli\API Gatewaycontainsconfig.conf,config.kdb,config.sth, andconfig.conf.obf. The API Gateway overwrites these files each time at startup or refresh (for example, when configuration updates are deployed). This means that any changes to the main configuration file must be made using the Policy Studio and not directly to the file on disk. -
Click the Next button.
-
Click the Load File button and browse to the location of the Tivoli SSL key file. Once again, the contents of this file are displayed in the text area.
Note In this case, the (base-64 encoded) SSL keys can not be edited in the text area. Click the Next button.
-
Click the Load File button and browse to the location of the Tivoli SSL stash file. Click the Next button.
-
Click the Load File button and browse to the location of the Tivoli Configuration database configuration file. Click the Finish button to upload all the selected files.
Alternatively, the configuration files may be copied manually onto the API Gateway's file system. Having done this using some out-of-bounds method, complete the following steps to configure the API Gateway to pick up the uploaded files:
-
Enter a name on the Tivoli Configuration dialog.
-
Select the Set file location for main Tivoli Configuration file option and click the Next button. Click the Next button.
-
Enter the full path to the main Tivoli configuration file on the server's file system in the Server-side Tivoli configuration field. Click the Finish button.
-
If you have not already manually copied the configuration files on to the API Gateway's file system you should do so now. Please ensure that the settings contained in the main configuration file that point to other configuration filenames are set correctly.
Note When the Set file location option is selected, the API Gateway does not overwrite the files at startup or refresh time. You may edit the main configuration file directly using an editor of your choice.
Tivoli Repositories:
A Tivoli Repository is used to authenticate clients against a running instance of a Tivoli server. All authentication filters can pass identity credentials to the Tivoli Repository in order to authenticate clients. The Tivoli server decides whether or not to authenticate the client and the API Gateway subsequently enforces the decision.
Tivoli Repositories can be configured globally by right clicking on the Tivoli Repositories node in the tree on the Policy Studio and selecting the Add option.
Enter a name for the Repository in the Repository Name field on the Authentication Repository dialog. Select the Finish button to complete the configuration. You may specify Tivoli Connection details from the Repository Configuration screen or via the Settings button. On the Tivoli Configuration dialog, select the API Gateway instance whose connection details you want to configure, then follow the steps outlined above in the Tivoli Connections section.
When configuring an authentication filter, you can select this globally configured Tivoli Repository to authenticate clients against. The authentication filter uses the connection details of whatever API Gateway instance was selected.
The Tivoli Authorization filter can be found in the Authorization category of filters. To configure this filter, drag and drop it on to the policyt editor and configure the following fields:
Name:
Enter a name for the Tivoli filter here.
Object Space:
The object space represents the resource for which the client must be authorized. Enter the name of the resource in the Object Space field.
You can also enter a selector that represents the value of a message attribute. At runtime, the API Gateway expands the selector to current value of the corresponding message attribute.
Message attribute selectors have the following format:
${message.attribute}
For example, to specify the original path on which the request was received as the resource, enter the following selector:
${http.request.uri}
For more details on selectors, see Selecting configuration values at runtime.
Permissions:
Clients can access a resource with a number of permissions such as read, write, execute, and so on. A client is only authorized to access the requested resource if it has the relevant permissions checked in the Action Bit table. You can edit existing permissions by clicking the Edit button.
Attributes:
You can specify a list of user attributes to retrieve from the Tivoli server. You can add attributes to be retrieved can be added by clicking the Add button and entering the attribute name in the dialog. If you want all attributes to be retrieved, leave the table blank, and select the Set attributes for SAML Attribute token option. These attributes can then be made available to the Insert SAML Attribute Assertion filter at a later stage. If you do not require any attribute retrieval, do not select the Set attributes for SAML Attribute token option.
|
Note |
|---|---|
|
The permissions for the |
Enter a name for the group in the Name field. Click
the Add button to add a new action bit to the group.
The Tivoli Action dialog is displayed. You must
enter an Action Bit (for example, r) and a
Description (for example, Read permission)
for the new action bit. Click the OK button on the
Tivoli Action dialog to return to the
Tivoli Action Group dialog.
Add as many action bits as required to your new group before clicking OK on the Tivoli Action Group dialog. The new action bits are then available for selection in the table on the main filter screen.
Tivoli Configuration Files:
As stated earlier, a Tivoli configuration file that contains all the required connection details is associated with a particular Oracle API Gateway instance. Click the Settings button to display the Tivoli Configuration dialog.
On the Tivoli Configuration dialog, select the API Gateway instance whose connection details you want to configure, then follow the steps as outlined above in the Tivoli Connections section.
|
Note |
|---|---|
|
You do not have to configure the Tivoli Connection for each filter or Authentication Repository. The Settings button is placed on the filter screen as a convenient way to access the Tivoli Connection settings. The Tivoli Connection needs to be configured once per API Gateway instance. |
It is possible to authenticate clients against a Tivoli Access Manager repository. In this way, the API Gateway can leverage existing Tivoli security policies without the need to duplicate policies across both products.
The Tivoli repository is available from all authentication filters. However, for demonstration purposes, assume that you want to use the HTTP Basic Authentication filter to authenticate a client against a Tivoli Repository using a username and password combination.
Drag the HTTP Basic filter from the Authentication category of filters and drop it onto the policy editor of the Policy Studio. Complete the following fields:
Name:
Enter a name for the authentication filter here.
Realm:
The Realm entered here is presented to the client at the same time as they are entering their username and password. The client is then said to be logging into this realm. It is useful in cases where a given user might belong to many different realms, and so, by presenting the realm to the client, he can specify which realm he wants to log into.
Credential Format:
The username presented to the API Gateway during the HTTP Basic handshake can be of many formats, usually either username or distinguished name. Since the API Gateway has no way of inherently telling one format from the other (the client's username could be a DName), it is necessary to specify the format of the credential presented by the client.
Allow Client Challenge:
HTTP Basic Authentication can be configured to work in two ways:
-
Direct Authentication:
The client sends up the
AuthorizationHTTP Basic Authentication header in its first request to the server. -
Challenge-Response Handshake:
The client does not send the
Authorizationheader when sending its request to the server (it does not know that the server requires HTTP Basic Authentication). The server responds with anHTTP 401 response code, instructing the client to authenticate to the server by sending up theAuthorizationheader. The client then sends up a second request, this time including theAuthorizationheader and the relevant username and password.
The first case is used mainly for machine-to-machine transactions in which there is no human intervention. The second case is typical of situations where a browser is talking to a Web Server. When the browser receives the HTTP 401 response to its initial request, it pops up a dialog to allow the user to enter the username and password combination.
If you wish to force clients to always send the HTTP Basic
Authorization header to the API Gateway, disable the
Allow client challenge checkbox. If, on the other hand,
you wish to allow clients to engage in the HTTP Basic Authentication
challenge-response handshake with the API Gateway, make sure this feature
is enabled by checking this option.
Remove HTTP Authentication Header:
Select this checkbox to remove the HTTP Authorization
header from the downstream message. If this option is left unchecked,
the incoming Authorization header is forwarded
onwards to the target system.
Repository Name:
The Repository Name field specifies the name of the Authentication Repository where all User profiles are stored. You can select a previously configured Tivoli repository by simply selecting the name of this repository from the Repository Name dropdown. Alternatively, a new repository can be added by clicking the Add button.
On the Authentication Repository dialog, select
Tivoli Repository from the Repository Type
field, and then enter a name for this type of store in the
Repository Name field.
Select the OK button on the Authentication Repository dialog and then Finish button on the HTTP Basic filter to complete the configuration.
Connections to Tivoli authentication repositories can be configured globally by expanding the Authentication Repository Profiles node in the Policy Studio, right-clicking on the Tivoli Repositories node and selecting the Add a New Repository menu option. The globally configured repository is then available for selection in authentication filters, such as the HTTP Basic authentication filter, as described above.
The Tivoli Attribute Retrieval filter can be used in cases where you would like to retrieve user attributes independently from authorizing the user against Tivoli Access Manager. This filter can be found in the Attributes category of filters. The following fields should be configured:
Name:
Enter a name for the filter in this field.
User ID:
Enter the ID of a user to retrieve attributes for. You can enter this as a static username, Distinguished Name (DName), or selector representing a message attribute. The selector is expanded at runtime to the value of the message attribute.
For example, you can enter ${authentication.subject.id}
in this field. This means that the ID of the authenticated user, which is
normally a DName, is used to retrieve attributes for. For this to work correctly,
an authentication filter must have been configured to run before this filter in
the policy. For more details on selectors, see Selecting configuration values at runtime.
Attributes:
You can specify a list of user attributes to retrieve from the Tivoli server. Individual attributes to be retrieved can be added by clicking the Add button and entering the attributes in the dialog. If you want all attributes to be retrieved, simply leave the table blank.
Tivoli Configuration Files:
A Tivoli configuration file that contains all the required connection details is associated with a particular Oracle API Gateway instance. Click the Settings button to display the Tivoli Configuration dialog.
On the Tivoli Configuration dialog, select the API Gateway instance whose connection details you want to configure, then follow the steps as outlined above in the Tivoli Connections section.
