Contents
The WebSocket protocol provides an extension to the HTTP 1.1 protocol to establish persistent, bidirectional communication between a client and a server.
The WebSocket protocol can be summarized as follows:
-
To establish a communication channel between a client and a server, the client needs to send an HTTP
Upgraderequest to the server. This is known as the WebSocket protocol handshake. -
If the server is capable and willing to upgrade the connection, it sends a HTTP
101response to the requesting client. At this point the handshake is considered successful and the connection between the server and the client is upgraded to the WebSocket protocol.![[Note]](../common_oracle/images/admon/note.png)
Note As soon as the client receives the HTTP
101response the connection is no longer considered an HTTP connection. -
Messages can now flow bidirectionally between the server and the client over the WebSocket connection.
-
Any participant in the data exchange can request the WebSocket connection be terminated by sending a
Closerequest to the other participant.
For a detailed description of the protocol, see RFC 6455.
API Gateway can act as a WebSocket proxy, whereby it is deployed in front of a WebSocket capable web server (for example, Jetty or Apache Tomcat) and provides governance (security, monitoring, and so on) on the WebSocket traffic flowing between the client, API Gateway, and the web server.
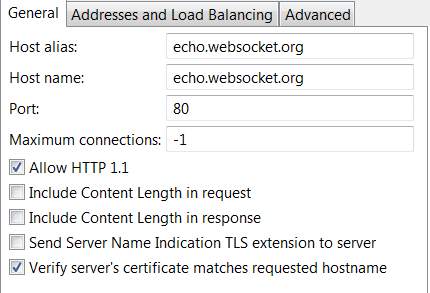
Each WebSocket server that API Gateway is routing to must be defined as an HTTP/1.1 remote host. To add a remote host to an API Gateway instance, right-click the API Gateway instance in the Policy Studio tree view, and select Add Remote Host. For more information, see Configure remote host settings.
For example, if API Gateway is proxying WebSocket traffic to the URL http://echo.websocket.org/,
then you would configure a remote host as shown in the following figure:
To enable API Gateway to accept an HTTP Upgrade request from a client you must add a WebSocket
handler to your API Gateway configuration and configure it with the HTTP path that the upgrade can be expected
on.
To add a WebSocket handler, follow these steps:
-
In the Policy Studio tree, select a list of relative paths (for example, Listeners > API Gateway > Default Services > Paths).
-
In the Resolvers window on the right, click Add > WebSocket to display the WebSocket configuration dialog.
Configure the following fields on the WebSocket configuration dialog:
Enable this path resolver:
Select or deselect the check box to enable or disable the WebSocket handler. It is enabled by default.
You can assign specific policies on this tab to specific URIs that define the WebSocket endpoints.
For example, you might need to handle frames being exchanged between a client and
ws://example.org/echo differently to frames being exchanged between a client and
ws://example.org/voip.
|
Note |
|---|---|
|
In the above scenario, different sets of policies need to be defined for each URI
( |
When a request arrives that matches the path:
Enter the path on which WebSocket connections are to be accepted. This defines the URI of the WebSocket endpoint. A relative path resolver for this path must already exist.
Default MIME type for message body:
Enter the MIME type of the messages. The default is application/json.
When messages are flowing bidirectionally between a WebSocket server and client, they are no longer HTTP messages and as such they do not contain a Content type header. For API Gateway to process the content of the message it needs to know what type of content the message is. This field enables you to specify the type of message being exchanged between the server and the client.
On Upgrade request from client:
Click the browse button to select a policy to be used by API Gateway when an Upgrade
request is received.
This policy is executed when a connection is being upgraded from HTTP to WebSocket. For example,
you might statically route all WebSocket requests to ws://example.org to
wss://example.com by using a policy. A policy for an HTTP connection
must be provided and this policy must provide a mechanism to connect to the remote server.
For example, to route all requests to ws://example.org to wss://example.com,
you can use the Static Router filter. Similarly, for dynamic routing you can use
the Dynamic Router or Connect to URL filters.
In the latter case, the remote host that the client is
attempting to connect to can be extracted from the Host header of the request. This value can then
be passed to the Connect to URL filter and used by that filter to establish a connection
to the remote host.
The on upgrade policy is also a good place to perform authentication and authorization of the requesting client.
On WebSocket communication from client:
Click the browse button to select a policy to be used by API Gateway when frames are received from the WebSocket client.
On WebSocket communication from server:
Click the browse button to select a policy to be used by API Gateway when frames are received from the WebSocket server.
|
Note |
|---|---|
|
After a successful upgrade request, the context used to upgrade the connection from HTTP to WebSocket protocol is accessible to the policies called for specific frames. This context is not shared between different WebSocket connections and it is destroyed when the connection is closed. The context contains all the message attributes (including authorization and authentication data) used by the upgrade request. This context should be accessed by the server and client policies in read only mode. |
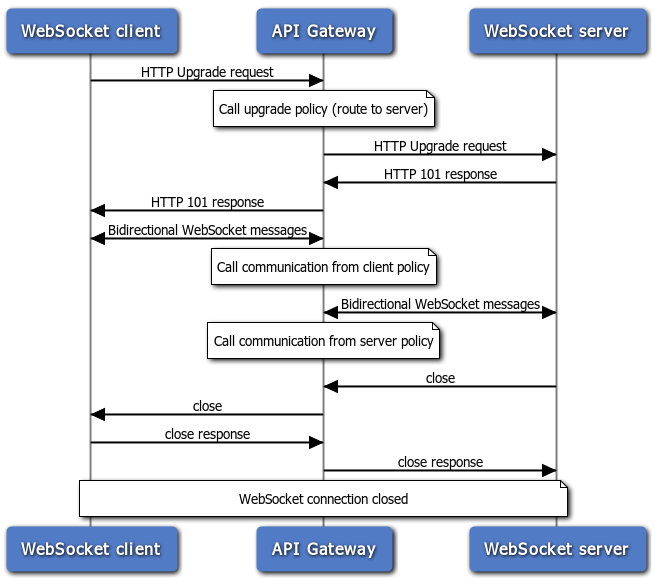
The following figure shows the flow of messages between the client, API Gateway, and the server in a typical WebSocket communication. It also shows at which point each of the API Gateway policies are called.
Connection expire time:
Enter a numerical value and choose the units from the list. The available options are: seconds, minutes,
hours, and days. The default value is 0, which means unlimited.
This is the absolute time for the connection to be active. For example, if this value is set to 1 hour, then after 1 hour the connection is dropped by API Gateway even if the connection is still active (frames are being sent).
![[Tip]](../common_oracle/images/admon/tip.png) |
Tip |
|---|---|
|
You can define an idle timeout for the connection as a part of the remote host configuration. |
For details on the fields on this tab, see the section called “Advanced settings” in the Configure relative paths topic.
For details on the fields on this tab, see the section called “CORS settings” in the Configure relative paths topic.
You can use the API Gateway Manager web console to monitor WebSocket traffic. You can view the initial HTTP Upgrade
request and response on the Traffic > HTTP tab. You can view all the WebSocket frames processed
by API Gateway on the Traffic > WebSockets tab.
To view all the WebSocket frames processed by API Gateway in API Gateway Manager, follow these steps:
-
Click the Traffic button at the top of the window.
-
Click the WebSockets tab.
A view of all WebSocket frames sent from or received by API Gateway is displayed.
Tip A message might consist of one or more frames.
-
Click a message frame to see a detailed view of the content. For example, if you click a frame sent from the client to the server, the origin, opcode (interpretation of the payload data), duration, length of the data, key used to mask the data, and payload itself are shown.
For more information on traffic monitoring using the API Gateway Manager web console, see the API Gateway Administrator Guide.
